Chapter 1: Getting to Know Google Classroom
Google Classroom is a learning management system (often abbreviated to LMS) offered by Google to teachers. It provides a central location to communicate with students, share resources, pose questions, and create assignments. In an increasingly digital world, Google Classroom helps facilitate online learning for today's digital learners. As with many new applications, Google Classroom comes with a unique look and feel. Since your method of setting up your physical classroom is as unique as your method of teaching, Google Classroom begins as a blank canvas. Before we can add students into Google Classroom, you will need to create online Classes for your physical classes.
First, you will get comfortable with where everything is in Google Classroom. Being the teacher of the Classroom will provide access to options that are not visible to students and will allow you to change settings, such as what students can do in Google Classroom. You will be able to add students to the Classroom, create announcements and assignments, and upload course materials from this teacher view of the Classroom. But first, you will need to create and set up your first Class.
In my Classes, I tend to spend most of my time thinking about the structure of the online Class before creating it. As creatures of habit, establishing online expectations through Google Classroom, similar to what we do in person, will help us and our students know where to turn. Examples of some of the questions I ask myself when planning an online Class include: How do students ask questions? When is it appropriate for them to ask questions? Where do they find resources? How are they dismissed? By establishing this structure at the beginning, you will feel less guilty about not responding when a student contacts you at 7:30 in the evening with a question.
In this chapter, we will cover the following topics:
- Creating your first Google Class
- Navigating around Google Classroom
- Personalizing your virtual Classroom
- Managing resources in your Class
- Inviting additional teachers
- Accessing Classes from Google Classroom's home page
Note
Within this book, Class references a Google Classroom Class and class references a bricks-and-mortar classroom.
Creating your first Google Class
To begin, open Google Chrome and navigate to https://classroom.google.com/h.
Choosing the right internet browser
While Google Classroom is accessible in any web browser, the Google Chrome web browser is built to be compatible with all of Google's other apps. Therefore, some features may be incompatible or will not function correctly in other web browsers. Consider discussing with your school IT staff if Google Chrome is not installed on your computer.
If this is your first time opening Google Classroom using a Google Workspace for Education account, it will ask you to confirm your email account and then select whether to assign a teacher or student role to your account. Be sure to correctly select the teacher role, otherwise your account will be set up as a student account. You will not be able to create or manage Classes unless your role is a teacher in Google Classroom.
The following screenshot depicts the teacher role being selected:
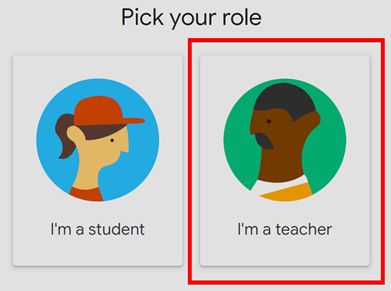
Figure 1.1 – Selecting your role
Note
If your account is set to a student account, you will need to contact your IT department so that they can change your Google Classroom role to a teacher role.
Using a personal @gmail.com account or a Google Workspace for Business account will not have the Pick your role page. Instead, all users will be able to create Classes in Google Classroom.
Another method of accessing Google Classroom is to use the app launcher. If the IT department has enabled this feature, click the waffle-shaped icon at the top-right corner of another Google app, such as Gmail, to see whether the Classroom icon is available.
This is illustrated in the following screenshot:
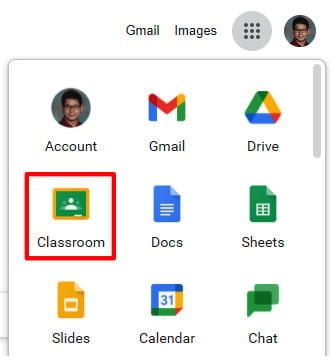
Figure 1.2 – Classroom app in App Launcher
Once you select the teacher role, the next page will point you toward a plus symbol + in the top-right corner to create your first Class, as illustrated in the following screenshot:
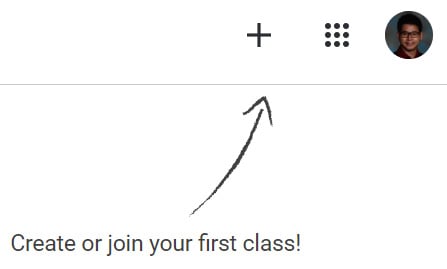
Figure 1.3 – Creating your first Class
When you click on the + symbol, a menu will appear for you to select whether to create a Class or a join a Class. Click on Create class to create your first Class.
Note
As a teacher, you can join another teacher's Class as a student by clicking on Join class and filling in the Class code. These instructions are covered in detail in Chapter 2, Inviting Students to Their Virtual Classroom.
A dialog box will appear, for you to name the Class and provide a section number. While the Class name field is mandatory, the Section number, Subject, and Room fields are optional. Depending on your school policies, specific Classes may already have section numbers that you can add here.
In Canada, many middle and high schools use section numbers for the timetable schedule, which is another option to fill in for this field. Since students will also see the section number, using the Timetable section number will be more applicable to them. While the Subject and Room fields can be helpful, these are not visible in Google Classroom by default.
The following screenshot provides an overview of the Class information:
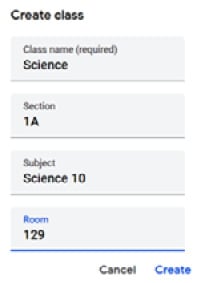
Figure 1.4 – Information for the Class in Google Classroom
Once these fields are filled in and the Create button is clicked, you will be taken to your new Class in Google Classroom, as illustrated in the following screenshot:
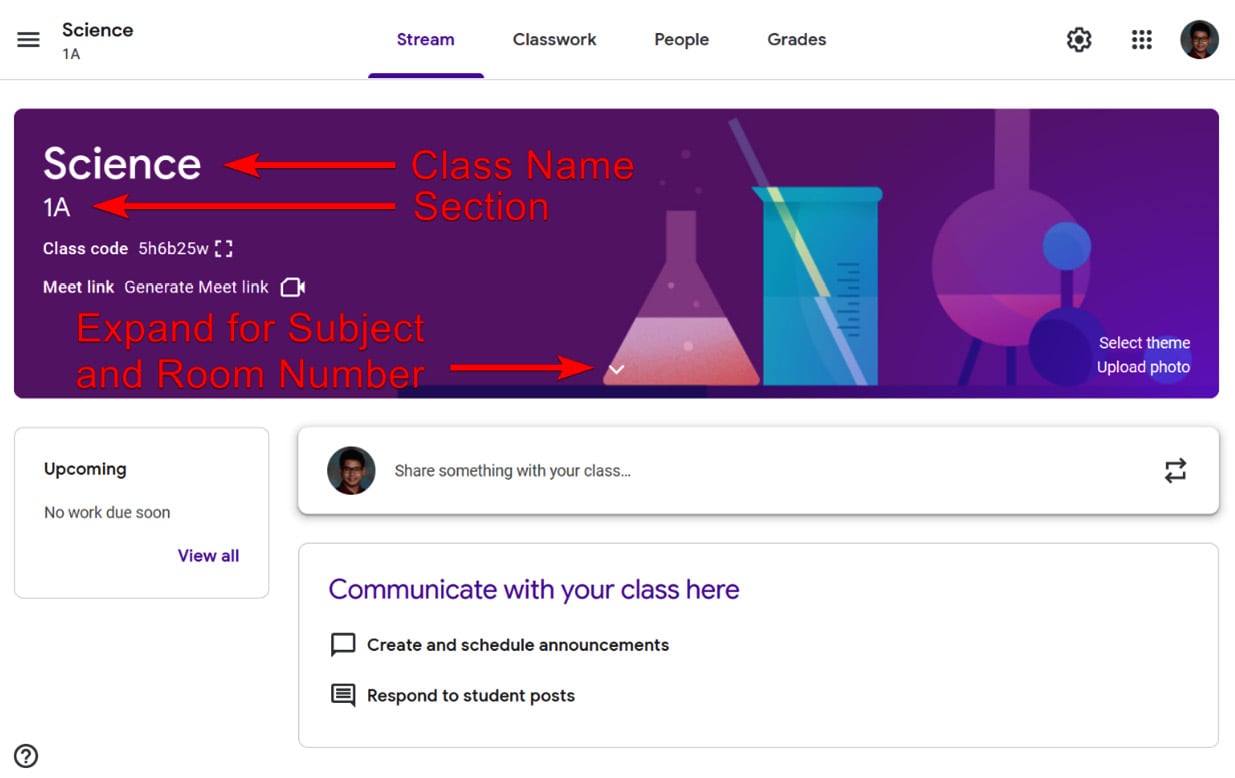
Figure 1.5 – Class information
Now that the Class is created, in the next section you will explore the different features of this online Class.
Navigating around Google Classroom
Now that your first Class is set up in Google Classroom, you can see its different parts—the banner, menu, sidebar, and content area, as illustrated in the following screenshot:
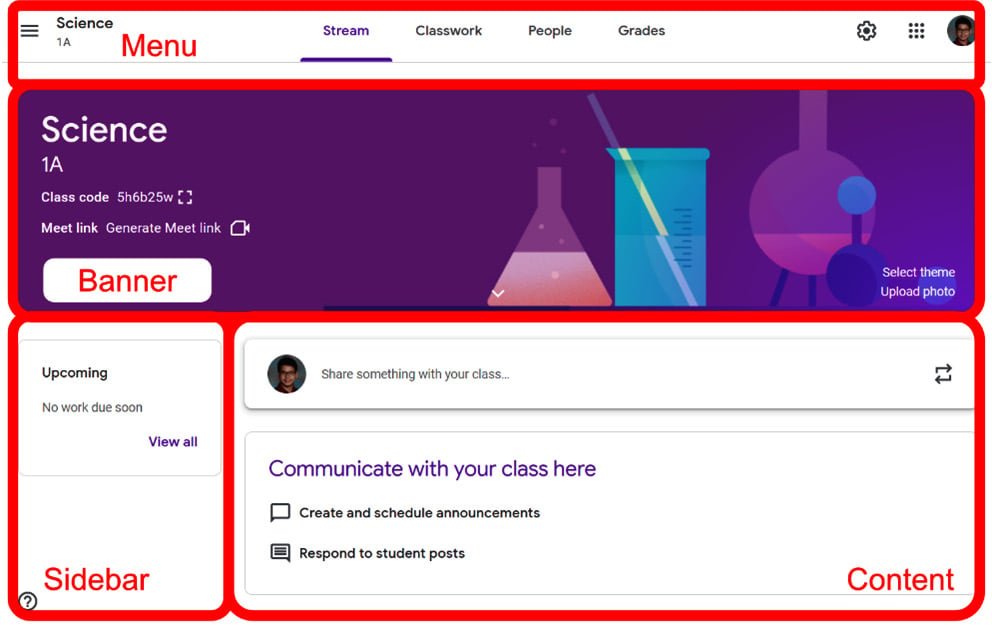
Figure 1.6 – Parts of a Google Classroom Class
Let's take a look at each of these parts, as follows:
- The banner displays a banner image, class name, section, Class code, and the Google Meet link functionality. The banner is the first thing students see when they enter the Classroom and this allows them to quickly identify which Class they are accessing in Google Classroom. The students' view is slightly different—the Class code field and the link to change the theme are missing.
- The menu allows teachers and students to switch between the different sections of Google Classroom. The menu has the following sub-sections:
The Stream section is where announcements, notifications for new assignments, discussion questions, and materials from the Classwork section appear. How to create an announcement within this section is elaborated upon in Chapter 3, Sending Your First Announcement.
The Classwork section is where resources, questions such as polls, and assignments are found. Information on organizing and implementing features within this section can be found in Chapter 4, Starting an Online Discussion with Questions, and Chapter 5, Handing out and Taking in Assignments.
The People section displays a list of all teachers managing and all students enrolled in the Class. Teachers can email students from this section and change student-related settings in Google Classroom. The features of this section are elaborated upon in Chapter 2, Inviting Students to Their Virtual Classroom.
The Grades section displays the grades for questions and assignments found in the Classwork section. This page organizes all questions and assignment grades into a table for easy viewing. The features of this section are found in Chapter 6, Grading Written Assignments in a Flash.
- The sidebar displays upcoming assignments when in the Stream section and a Topics list when in the Classwork section.
- The content area displays the current section in the Class.
Now that we are familiar with creating the main features of Google Classroom, it's now time to setup the Class and start adding content.
Personalizing your virtual Classroom
Similar to how teachers have a couple of days before students arrive at school to prepare for their classroom, you want to take some time to add information to your online Classroom before students are invited. These are the tasks you can perform in Google Classroom:
- Changing the Classroom's theme
- Uploading a banner image
Changing the Classroom's theme
The Classroom banner is the most prominent part of your Class. It creates an atmosphere for students when they arrive. Google Classroom will automatically apply a theme that is appropriate to the Class name for common subjects. This is why the theme banner has laboratory equipment for the Science class created in the previous section.
The theme also changes the colors of the headings and icons throughout the Classroom. To change your Classroom's theme, follow these steps:
Click on Select theme at the bottom-right corner of the banner image, as illustrated in the following screenshot:

Figure 1.7 – Select theme link
- Select the desired Google Classroom-provided banner image. The colors within the Classroom will change to match the banner. Click the Select class theme button, as illustrated in the following screenshot:
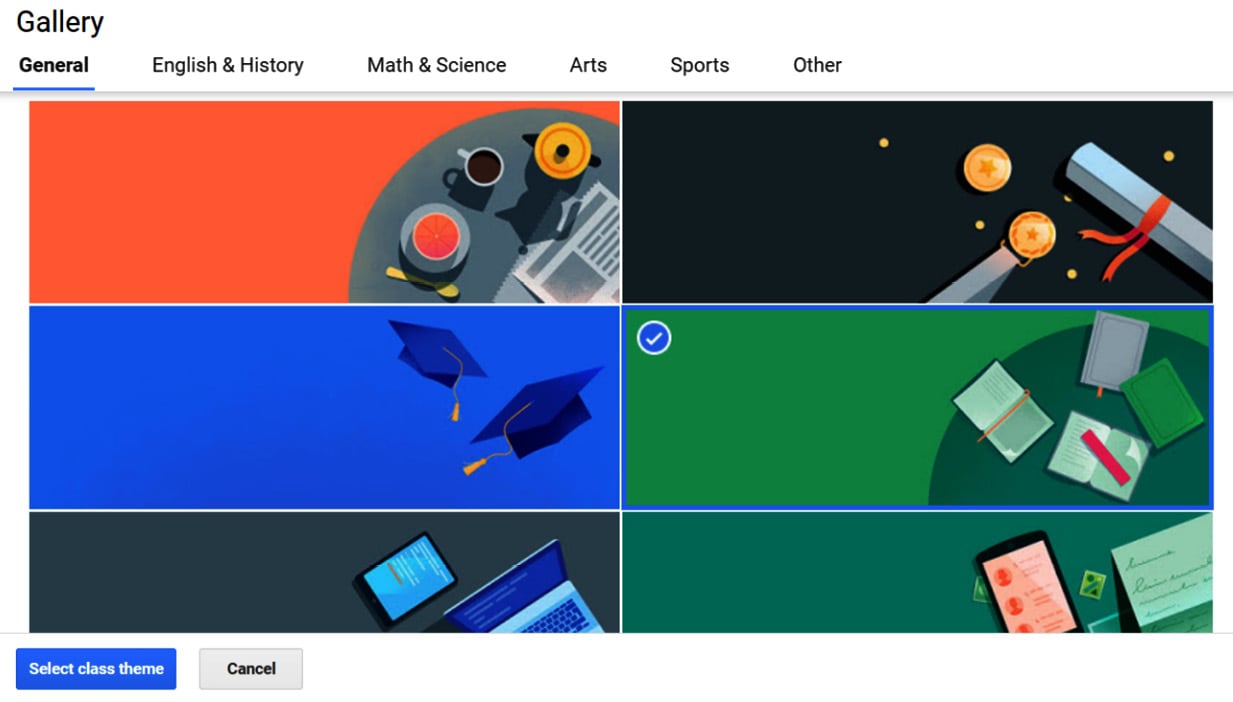
Figure 1.8 – Theme Gallery
Here is your Class with the new theme:
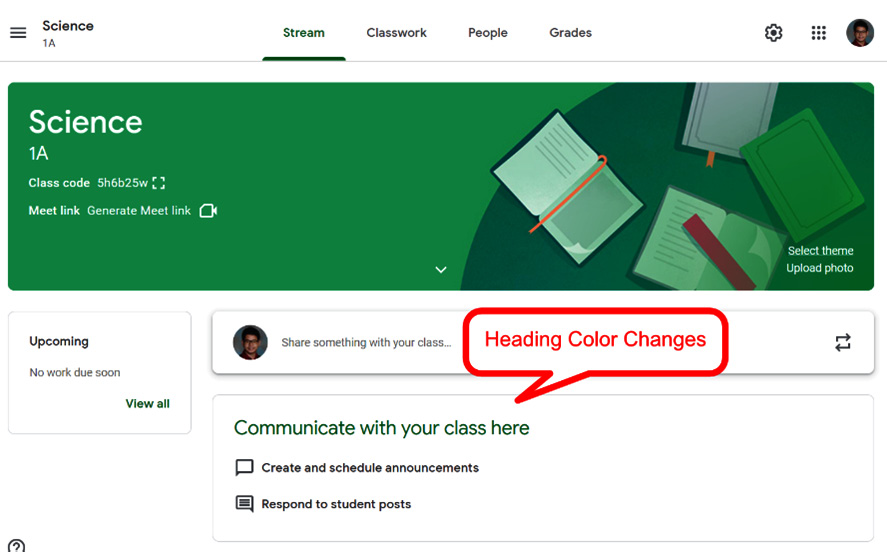
Figure 1.9 – Heading colors change to match the theme
Google Classroom also offers several categories to help find the banner appropriate for your Class. Simply select a tab in the dialog box to view available banners within each category, as illustrated in the following screenshot:
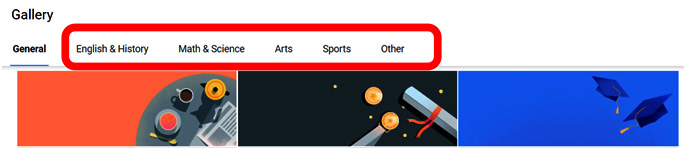
Figure 1.10 – Categories in the Theme Gallery
Try different themes
If this is your first foray into Google Classroom, try different themes before choosing one for the Class. The most prominent colors in the banner image will suggest which colors the theme will use for the background and the menu.
Uploading a banner image
Another alternative to using the images found within Google Classroom is to upload your own picture. The following steps will guide you through uploading a banner image:
- Click on Upload photo at the bottom-right corner of the banner image, as illustrated in the following screenshot:

Figure 1.11 – Upload photo link
- Click on the Select a photo from your computer button, as illustrated in the following screenshot:

Figure 1.12 – Upload photo dialog box
- In File Explorer, select the desired image and click the Open button, as illustrated in the following screenshot:

Figure 1.13 – Selecting an image in File Explorer
- If the image is too large, crop it by resizing the frame and move it to the desired location on the image. Then, click the Select class theme button, as illustrated in the following screenshot:

Figure 1.14 – Cropping an image
The following screenshot shows how the Class looks after uploading the image in the previous steps:
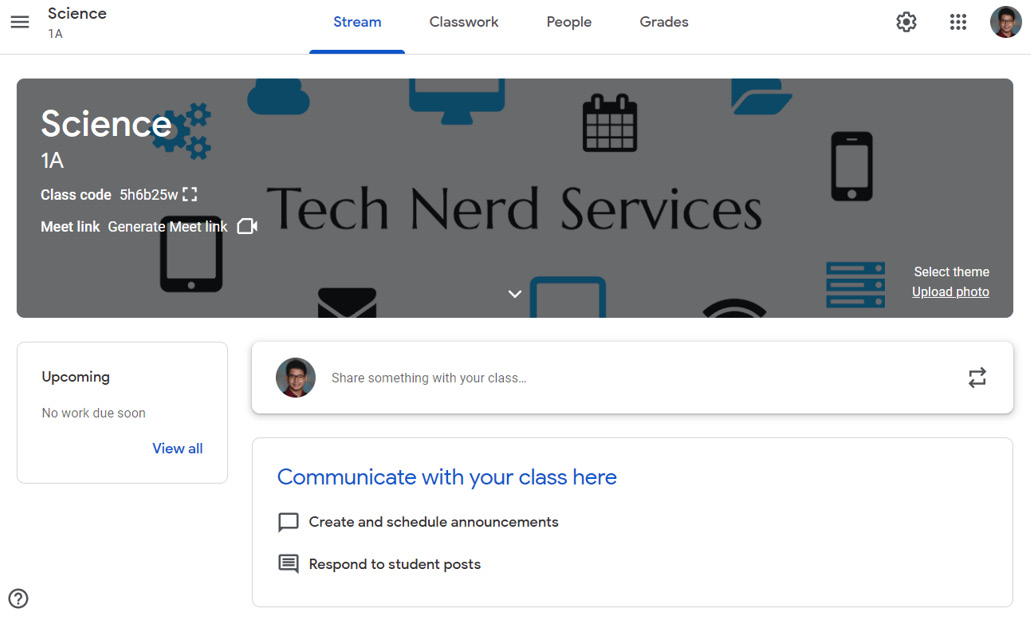
Figure 1.15 – Screenshot of a custom image theme
The accent color for the Class web page changes to match the banner color. The color is shown throughout the Class in links, headings, and icons. At the time of writing, there is no way to customize this accent color.
Choosing the right image
Size matters when it comes to your banner image. Google Classroom will only use images with a pixel dimension of at least 800 x 200. The text on the banner will always remain white. Lighter-colored images, such as the one in the previous example, will be darkened to ensure the legibility of the text.
Once you have chosen the appropriate theme to personalize your Google Class, you can now start adding resources.
Managing resources in your Class
Students and co-teachers will be able to find links to other Google apps associated with Google Classroom and resources related to the Classroom in the Classwork section of the Stream section. To navigate to this section, click on the Classwork tab in the menu, as illustrated in the following screenshot:

Figure 1.16 – Classwork tab
With your newly created site, the Classwork tab will be blank. At the top of the Classwork section, there are icons and links to other Google apps that are associated with this Class, as shown in the following screenshot:
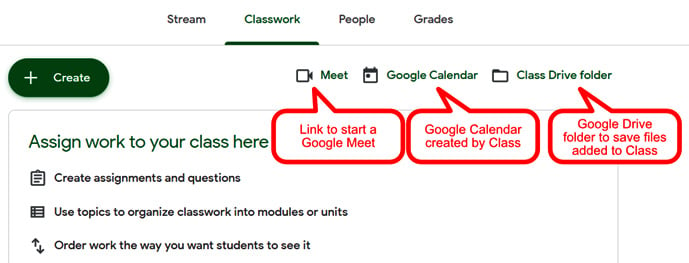
Figure 1.17 – Links to Google apps linked to the Class
This section is where you distribute files, ask questions, and assign assignments. Many of these features are explored in later chapters. In this section, you will create a topic and add files to the topic. If you already have a course syllabus and other files in a digital format, filling in this section can be made easy by adding those files to this section.
Adding files and resources to your Classroom
There are two areas where you can add files to Google Classroom—the Stream section and the Classwork section. Files uploaded to the Stream section are for short-term uses, such as announcements or worksheets, whereas files uploaded to the Classwork section are relevant for the duration of the course, such as a course syllabus. Because students will access these files for the duration of the course, adding topics in an organized fashion will help them find material more easily.
Note
While you don't have to create a topic to add files and other materials to the Classwork section, students will use the Classwork section more frequently if they can easily find the files they are looking for.
Creating a topic in Classwork
To create a topic, use the following steps:
- Click on the Create button and then select Topic, as illustrated in the following screenshot:

Figure 1.18 – The Topic option in the Create menu
- A dialog box will appear. Enter the Topic name and click the Add button, as illustrated in the following screenshot:
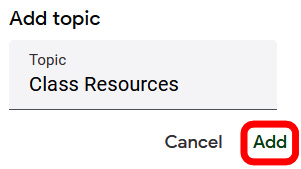
Figure 1.19 – Creating a topic
The topic will now appear in the Classwork section, as illustrated in the following screenshot:
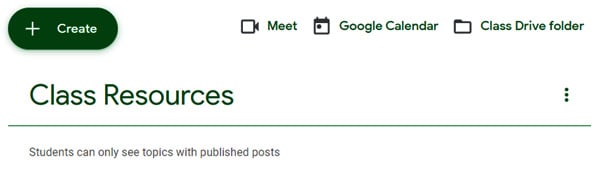
Figure 1.20 – Screenshot of a topic in Classwork
Adding a file from Google Drive
Files can be added from Google Drive or uploaded from your computer. Furthermore, you can also link videos from YouTube and link websites. In this section, you will add a file from Google Drive to the Classwork section, as follows:
- In the Classwork section, click on the Create button, then select Material, as illustrated in the following screenshot:

Figure 1.21 – The Material field in the Create menu
- A dialog box will appear. In the Title field, give the resource a title. Then, click the Add button and select Google Drive, as illustrated in the following screenshot:

Figure 1.22 – Required information in a Material field
- In the Google Drive dialog box, select your file and click the INSERT button, as illustrated in the following screenshot:

Figure 1.23 – Selecting a file in Google Drive
If you do not see the desired file, you may need to find it in the MY DRIVE tab, as illustrated in the following screenshot:

Figure 1.24 – The MY DRIVE tab in the Google Drive dialog box
- In the Topic drop-down menu, select the desired topic. Then, click the Post button, as illustrated in the following screenshot:
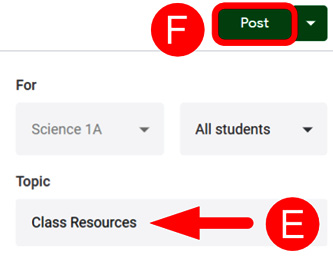
Figure 1.25 – Selecting a topic and posting the material
Adding multiple files
If you would like to add more files under the same title, simply repeat the preceding steps and select another file to add from Google Drive.
Your file will now be available to students and co-teachers. The added material will be displayed as a post in the Classwork section, as illustrated in the following screenshot:
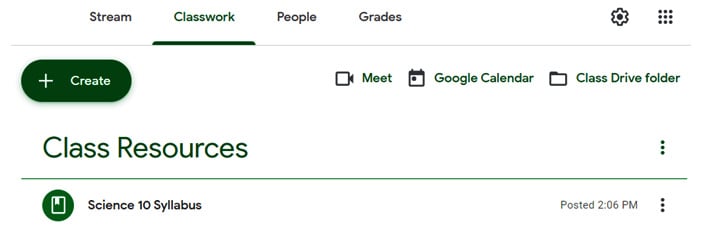
Figure 1.26 – Screenshot of material in Classwork
Adding a file from your computer
If you do not use Google Drive regularly or still have many files on your computer, the steps to upload files directly from your computer are similar to those for adding a file from Google Drive. These steps are listed here:
- Create a Material post in the Classwork section.
- Give a title to the material, and in the Add drop-down menu select File instead of Google Drive, as illustrated in the following screenshot:

Figure 1.27 – The File option in the Add menu of a Material post
- Click on the BROWSE button to open the computer's Windows File Explorer, as illustrated in the following screenshot:

Figure 1.28 – UPLOAD dialog box
- Find and open the file in the Windows File Explorer, as illustrated in the following screenshot:

Figure 1.29 – Selecting the a in Windows File Explorer
- The file will automatically be uploaded to Google Drive and will appear in the Material section, as illustrated in the following screenshot:
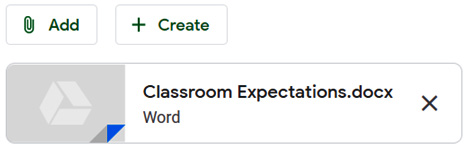
Figure 1.30 – Screenshot of how a file appears in the Material section
Adding resources from the internet
To add YouTube videos or links to websites, click on the appropriate icon for each item. You will need the Uniform Resource Locator (URL) to add them to the About page, as illustrated in the following screenshot:
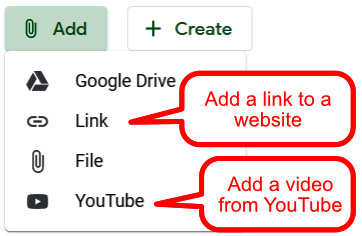
Figure 1.31 – Options in the Add menu that use a hyperlink
It is currently not possible to easily add Google Drive folders to Google Classroom. A simple workaround is to use the Get link share feature of Google Drive and add it as a link in Classroom. This feature is illustrated in the following screenshot:
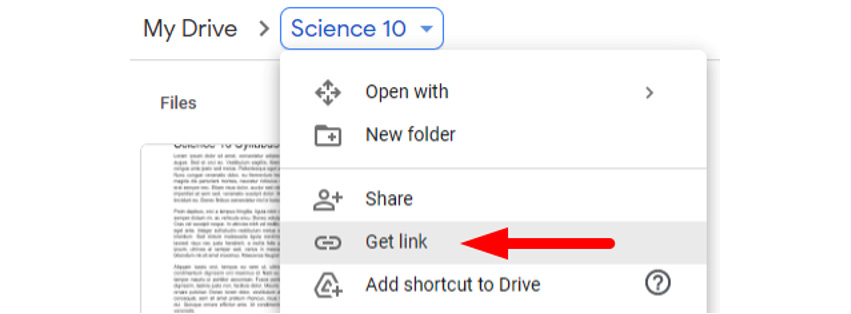
Figure 1.32 – The Get link option for a Google Drive folder
After adding materials to your Classroom, you may decide to rearrange their order.
Reordering materials in your Classroom
To change the order of materials in your Classroom, drag and drop the material (and other post types) to the desired order using the following steps:
- Hover the mouse over the material to be moved, as illustrated in the following screenshot:

Figure 1.33 – Hovering the mouse over a post
- Click and drag the material to the desired position. The material post will shrink to a small rectangle. Other posts will move to make space as you drag the post around, as illustrated in the following screenshot:

Figure 1.34 – Clicking and dragging a post
- Releasing the mouse button will expand the selected post to its original size.
Storing files in your Classroom
Whenever you upload files to Google Classroom, the files are stored in Google Drive. Files uploaded within a post, such as materials, are saved to Google Drive's default folder, My Drive. Moving or renaming a file in Google Drive will not affect Google Classroom's link to the file. When students begin submitting files for assignments, they will be accessible in the Class Drive folder functionality. An icon and link to the folder can be found in the Classwork section, as illustrated in the following screenshot:

Figure 1.35 – Class Drive folder hyperlink in the Classwork tab
Uploaded files will appear in the Google Drive app, as illustrated in the following screenshot:
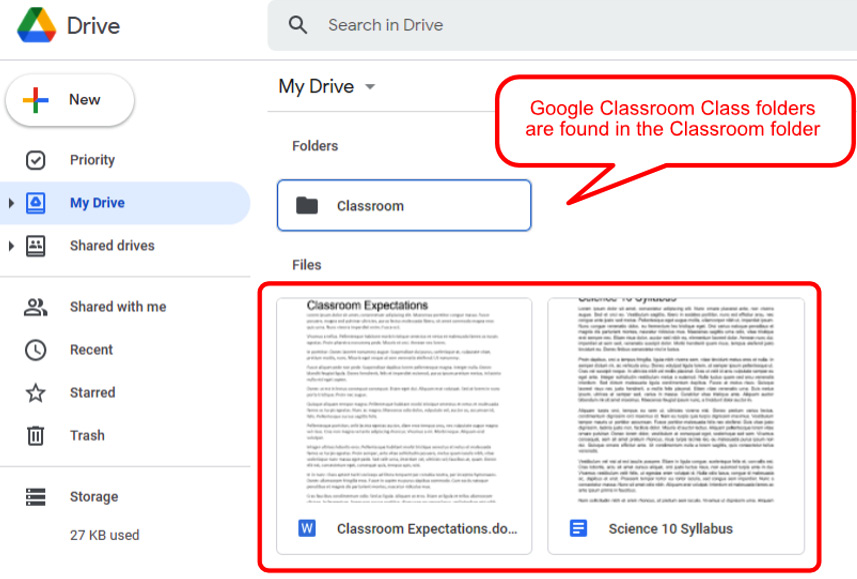
Figure 1.36 – Screenshot of files uploaded to Google Drive
These files can be further organized into folders within the Google Drive app. Then, in subsequent Classes, you can add files to your Class directly from Google Drive. Having files organized in Google Drive will also help share resources with other teachers who teach the same subject. In fact, when sharing my resources with other teachers, I often share the Google Drive folder and invite them to relevant Classes in Google Classroom.
Inviting additional teachers
You might share teaching responsibilities with colleagues who also need access to the Class on Google Classroom. By inviting other teachers, those teachers will be able to do anything that you can do, except delete the Classroom.
Note
Be sure that whoever you invite as a co-teacher is proficient with Google Classroom because they can change and delete content, and there is no recorded history of what they do.
To invite another teacher to your Classroom, proceed as follows:
- In the People section, click on the Invite teachers icon in the Teachers heading, as illustrated in the following screenshot:

Figure 1.37 – Icon to add a co-teacher
- Search for the teacher using their name or email address. Select the account and then click the Invite button, as illustrated in the following screenshot:
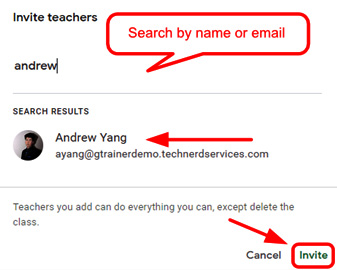
Figure 1.38 – Invite teacher dialog box
The invited teacher will appear grayed out in the Teachers section until the teacher accepts the invitation, as illustrated in the following screenshot:
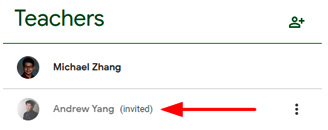
Figure 1.39 – Screenshot of an invited teacher in the People tab
Now that your first Class is ready to go, you can apply the techniques in this chapter to create additional Classes as needed. If you teach primary students, colleagues often create classes for specific subjects; if you teach secondary students, each class usually has its own Class in Google Classroom.
Often, extra-curriculars such as clubs or athletics groups will use Classes in Google Classroom to communicate with students. Therefore, viewing and managing all your Classes in Google Classroom is essential.
Accessing Classes from Google Classroom's home page
Google Classroom's home page displays all classes in which you are a teacher or a student. The classes are arranged like cards on the page. The next time you go to Google Classroom, you will first arrive at the home page where you can select the desired class, as shown in the following screenshot:
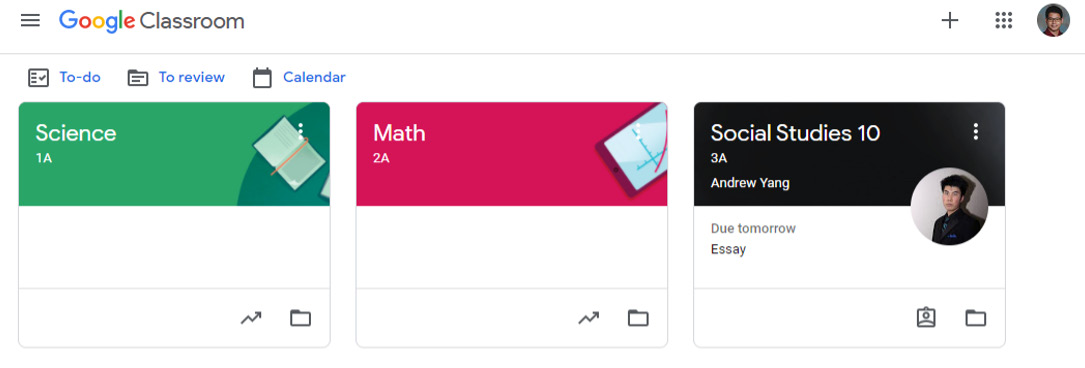
Figure 1.40 – Classroom Class dashboard
Classes in which you are enrolled as a student will have an image of the teacher on the Class card.
Note
To rearrange Classes on the home page, drag and drop the Class cards.
When you are in a Classroom, you can switch to a different Class by clicking on the hamburger menu icon at the top-left corner of the banner, as illustrated in the following screenshot:
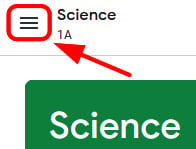
Figure 1.41 – Hamburger menu
The menu will appear and you can select the desired Class from it, as illustrated in the following screenshot:
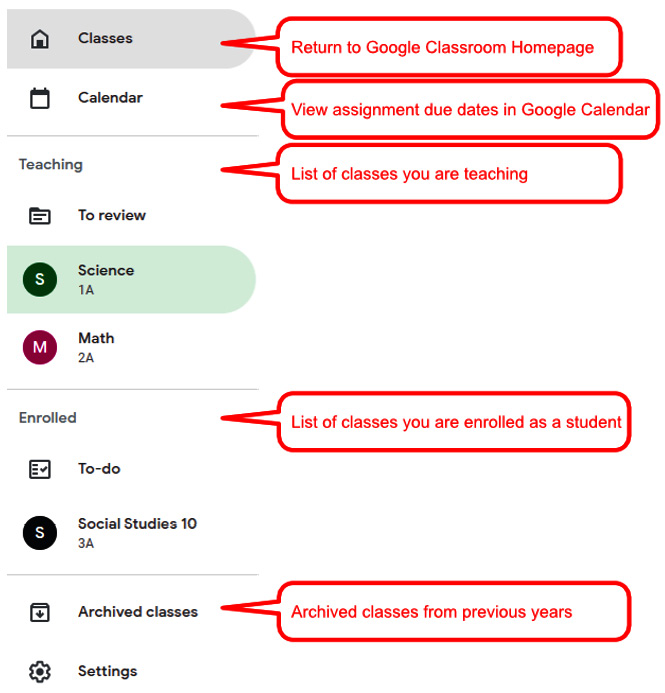
Figure 1.42 – Sections of the dashboard menu
The menu is separated into Classes that you are teaching and Classes in which you are enrolled as a student. In addition, you can return to the Google Classroom home page, view the Google Classroom calendar, access archived Classes, and change the settings from this menu.
Summary
You have now created your first Class and personalized it before adding students to the Class. You then added information and materials to the Class, as well as inviting a co-teacher.
After creating a Class, you changed the theme of the Classroom by using the various themes and patterns in Google Classroom. In addition, you uploaded a new image to use as a theme.
Then, you added the Class resources to the Classwork section, where you uploaded files from Google Drive and your computer. Finally, you invited another teacher to the Class.
Now that the Class is all set up, it's time to invite the students. In the next chapter, we will learn what it takes for students to access Google Classroom, as well as how to invite students to your Classroom.