The Structure of Trello
Before you can start using Trello, you’ll need to understand what it is and how it works. In this chapter, we’re going to walk through what you need to know to get started with Trello.
We’ll talk about the following:
- Analogies to help you understand Trello
- Where you can use Trello
- Why it’s preferred over other tools
- Creating a Trello account
- Making your first board and list
Ready? Let’s get started!
What is Trello?
I’ve talked to many people about Trello – more than I can count. I always return to one metaphor to explain Trello and a second metaphor to explain how it works: a digital whiteboard.
I bet you’ve used a whiteboard to keep your projects organized. And you likely put sticky notes on that whiteboard to help you keep track of items for that project. You use squeaky dry-erase markers to create stages or lists under which your sticky notes fall.
When a sticky note changes, you move it to another whiteboard section. You jot down extra notes on it or add a sticker to it. You use specific colors of sticky notes to differentiate between them. You might use different colors based on who is working on those tasks or what team is responsible for them.
Because of this whiteboard process, you have the big picture of your project and can see what is completed, what’s in progress, and what’s still left to do. And any time you need to zoom in, you refer to a sticky note.
The whiteboard is fantastic and a classic approach. But there are a couple of problems with it.
One – it’s not portable.
Whiteboards only work well when you and your team are all working in close physical proximity. After all, the whiteboard is only as effective as the people updating it. If no one can see it, check its status, or move items as they have changed, the whiteboard isn't functional.
If you use one at your home office, it’s only useful when you’re sitting at home, and you can’t check it on the go. You can’t reference and update it while you’re traveling, and no one on your team can edit it.
And two, sticky notes are only so powerful!
You can change colors, add stickers, and sort sticky notes differently. But there’s only so much you can do to help them stand out and keep information about their task. They won’t hold any data, such as relevant files or images. They’re small, so you can only add a little detail to them.
Enter Trello... the digital whiteboard.
Imagine a whiteboard, but better. That’s what Trello is. It’s a digital whiteboard with super-charged sticky notes.
It’s a whiteboard but without the problems. It’s more powerful for collaborating with your team and keeping track of everything.
A Trello board holds cards (sticky notes) organized by lists – no dry-erase marker is required. You move your cards around and between the lists, as you would your sticky notes. And it takes up less room than a massive physical board with sticky notes!
The cards are customizable too, but we’ll discuss those in greater detail in Chapter 2.
Now that you understand what Trello is, let’s talk about how it works.
It’s like LEGO bricks!
While Trello has much in common with a whiteboard, it also has much in common with something else we’ve all used (although, maybe it’s been a few years).
How does a project management tool have anything in common with a kid’s toy?
It’s because you can build just about anything you want with Trello. It’s a highly customizable platform that is flexible and can be more than just a whiteboard. There are a million different things you can build with it – just like LEGO.
How many different LEGO kits exist in the world? Hundreds, thousands? Maybe more? You can build a Hogwarts Castle, a Death Star, racecars, dinosaurs, villages... you can even build the Titanic!
Because LEGO bricks are versatile, you can shape and mold them to be whatever you like. You only need a creative person to plan where they need to go. Lucky for you, I just happen to be that creative person!
But why Trello?
You’re not sitting here reading this book because I’m an expert in Asana or Monday.com. There’s a reason I chose Trello over those tools, but I won’t get into bashing other tools in this book, probably. They all have their place, and in some cases, other tools do work better for some folks.
The magic of Trello is that it’s extremely versatile yet powerful.
We’re going to get technical in this book and explain all the ins and outs of how to use Trello, and as I’m writing this, I realize there’s just so much to say because you can customize it and perfect it to work just the way you want it to.
It integrates with just about any software you can think of and is one of the most well-known tools on the market. It’s owned by Atlassian, a massive company focused on producing quality tools for improving workflows.
How to tweak the experience to make it exactly what you need it to be might not be super clear from the moment you open a board, but everything you need is there. Just like a sculptor, you need to carve and work it to make it a beautiful work of art for you and your team.
Where can you use Trello?
You can use Trello in a few places. This makes it more powerful than other tools that can only be accessed in the browser.
Via the web
You can use Trello from any browser as a web-based application. Head to trello.com and log in, and you’ll have access to all features, keyboard shortcuts, and more from Chrome.
Trello desktop app
If you prefer computer apps, you can access the Trello desktop app for Windows and Mac computers. The app provides notifications, access to Power-Ups, and more keyboard shortcuts.
Trello mobile app
Trello is perfect for use on the go, and this can be done via its Android and iOS apps. It’s a great way to create and access cards while away from your computer.
What kinds of things do people use Trello for?
Many teams use Trello for more than just project management. Let’s take a look.
Work-related use cases
Here are some examples of work-related use cases:
- Customer support teams use Trello to create an organized flow for responding to customer requests
- Sales teams use Trello to keep track of leads through a pipeline as they convert them into deals and revenue
- Marketers use Trello boards to plan content calendars and track the content creation process
- Event planners use Trello to ensure nothing falls through the cracks and to create a timeline of tasks
- Engineering teams use Trello to track bugs and features throughout the development cycle
- Product teams use Trello for roadmapping, and often publicly share what new features are coming out in apps via their boards
- Small businesses use Trello for managing operations and coordinating with stakeholders.
- Agencies use Trello for collaborating with clients and keeping track of deliverables.
- Law firms use Trello for managing pleadings for clients, while keeping track of billable hours
- Non-profit teams use Trello to organize internal operations and coordinate fundraising efforts
- Churches use Trello for organizing worker schedules and tasks to be completed for Sunday services
Now, let’s look at non-work-related use cases.
Non-work-related use cases
People also use Trello outside of work for a myriad of personal uses, some of which are as follows:
- Organizing books to read
- Meal planning
- Household chores and products
- Trip planning
- Storing addresses and contact records
- Workout planning and tracking
- Saving articles
- Online shopping cart with links to products
And more!
The possibilities are endless. So, now you see why it’s like LEGO!
It’s exciting but also intimidating. When I only see a bunch of bricks and a picture of Hogwarts Castle, I have no idea how I will get there. How do these little bricks combine to make something so cool?
That’s the purpose of this book. Imagine this as your instruction manual that comes with your LEGO. I’ll help you make your Hogwarts Castle. But before we can start building, you need to understand what the bricks are.
So, let’s examine the contents of this LEGO kit we’ve opened and see what we have to work with.
Getting started
Before you can dive into the elements of Trello, you’ll need to create an account and create your first workspace.
Creating an account
Go to trello.com and click Sign up. You’ll be directed to an Atlassian login page. You can use your existing Atlassian login if you use other Atlassian products (such as Jira, Confluence, or Bitbucket). This makes it extremely easy to get started and keeps everything under one login if you use multiple tools. Otherwise, you’ll need to create a new account.
You can do that by typing an email address or choosing one of the social account options, such as Gmail:
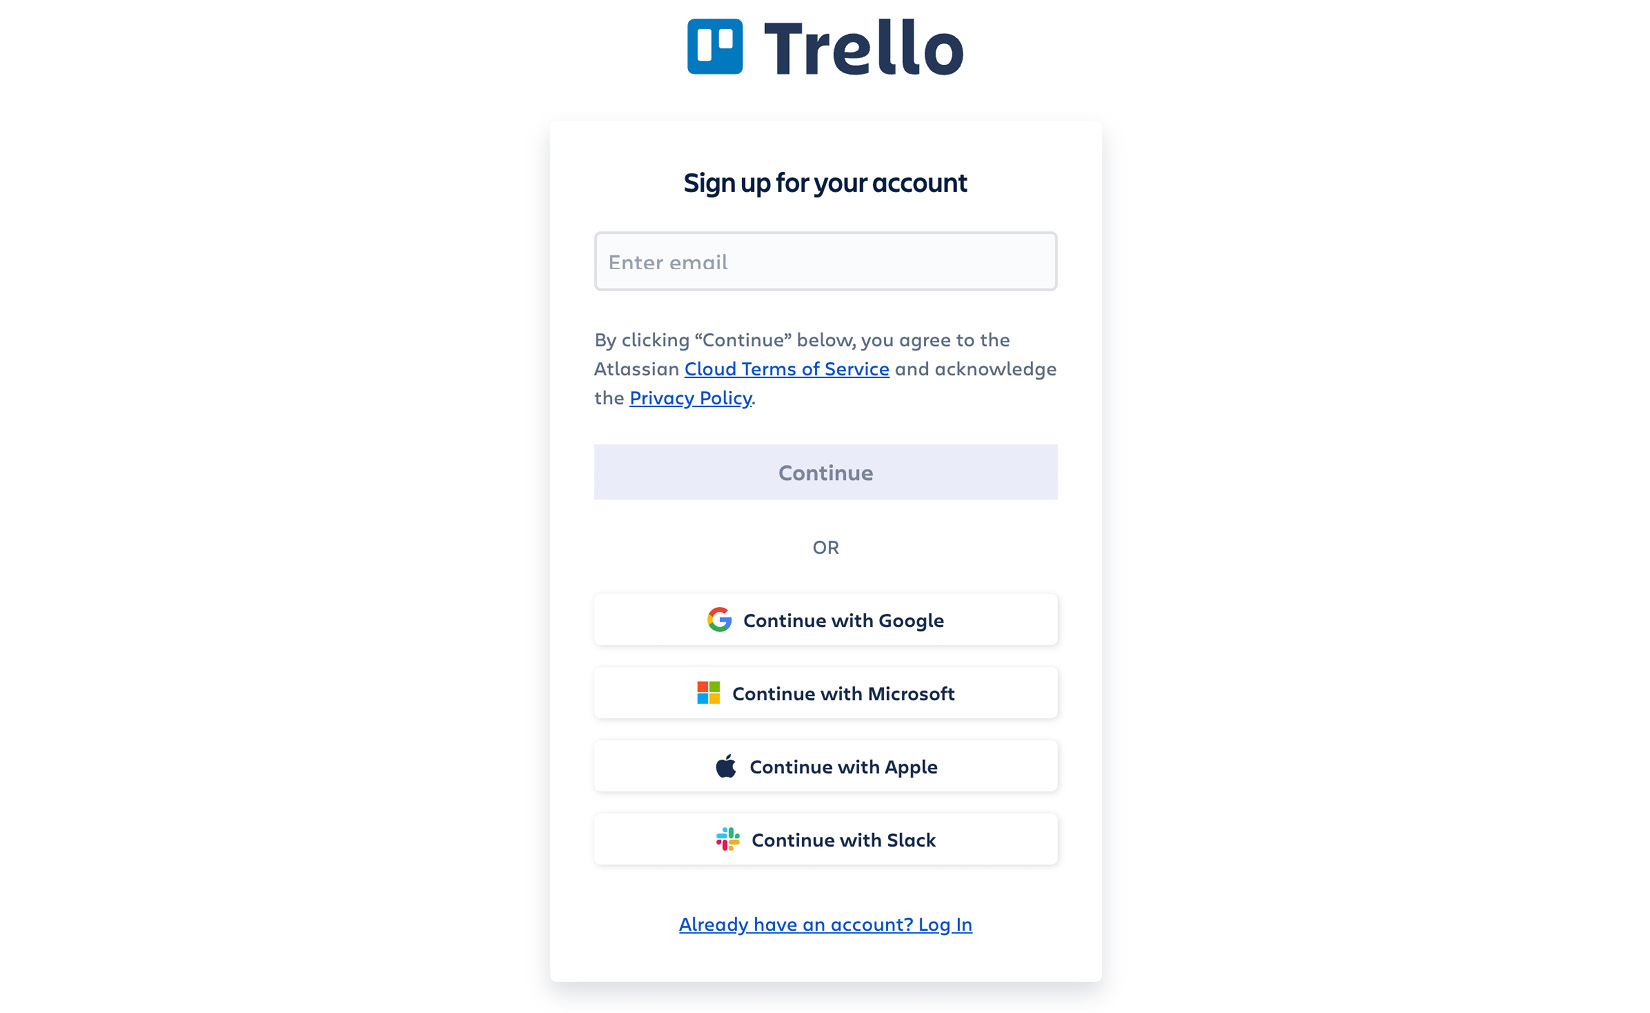
Figure 1.1 – Trello sign-up modal
Workspaces (previously called Teams)
The wizard will walk you through the sign-up flow and help you create your first workspace. Think of a workspace as your department or organization, or a type of project:
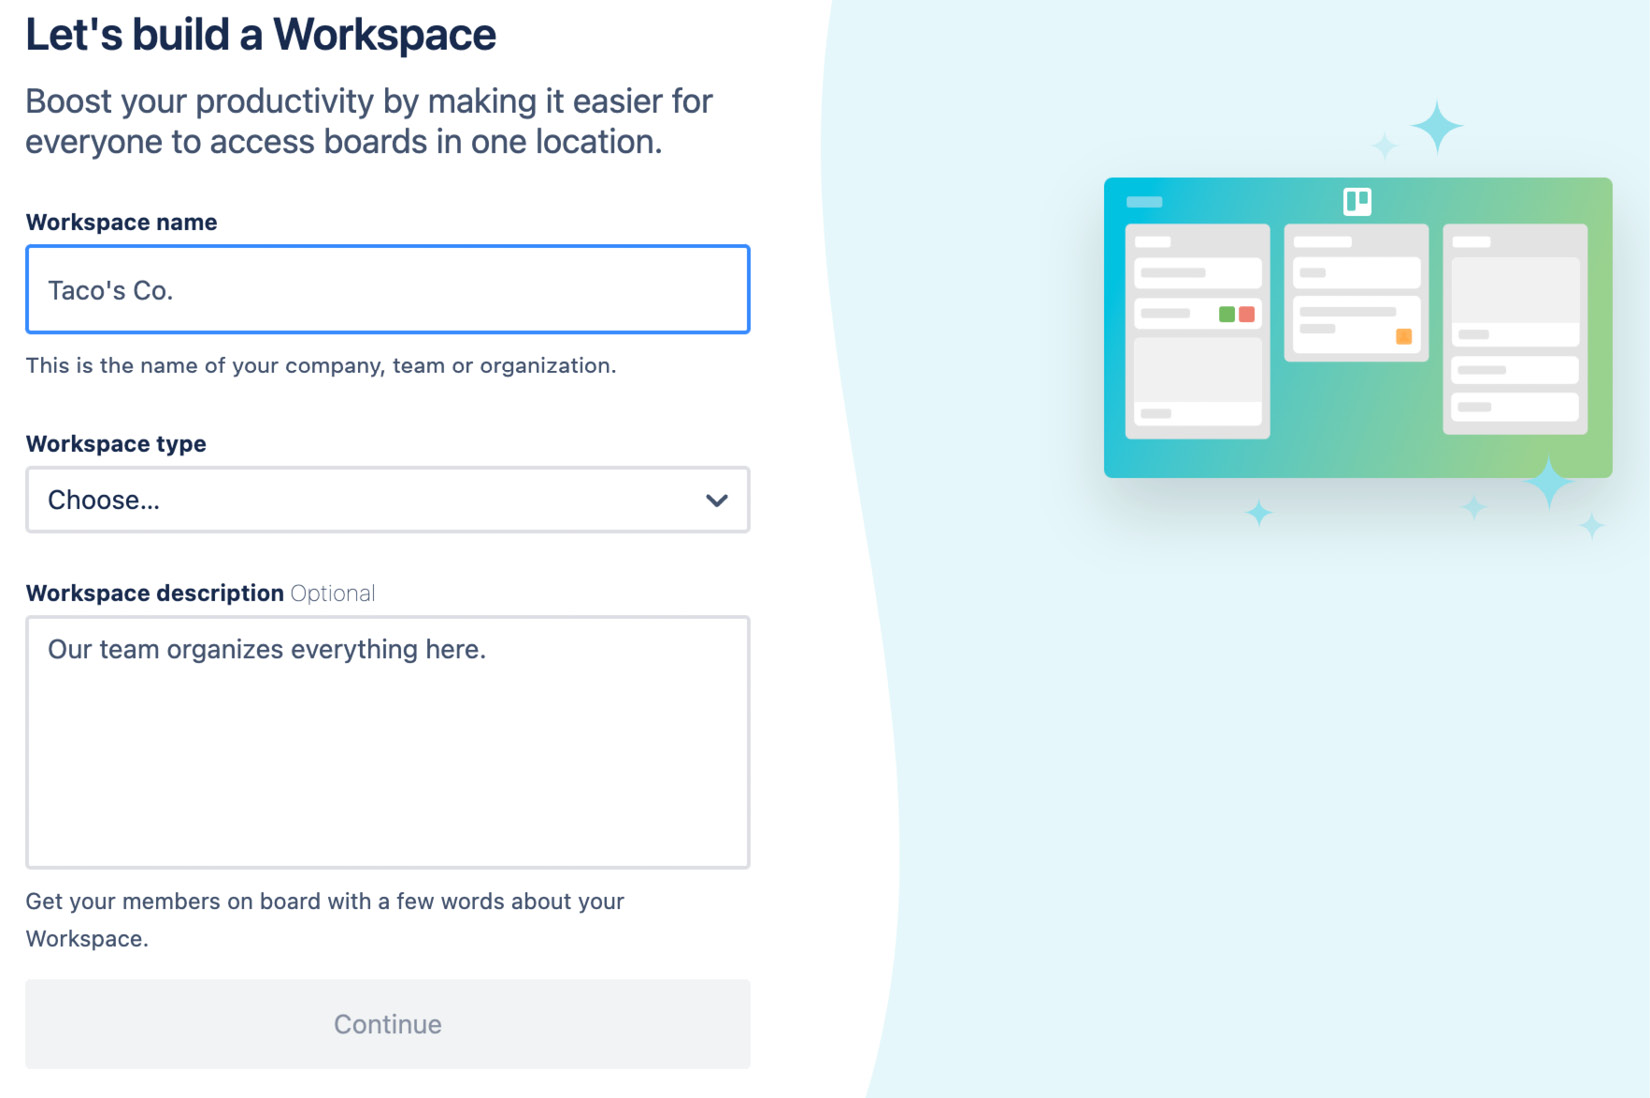
Figure 1.2 – Form to create a Trello workspace
Each workspace is charged by the number of members in that workspace. You can have free workspaces, and you can have as many workspaces as you wish. Select your team type you are to get specific template recommendations. Next, invite team members via email address, or skip this process for now and invite them later.
Now that you’ve got a Trello account squared away, you’re ready to start playing around and getting your hands dirty. It’s time for the rubber to meet the proverbial road because we’re going to start creating boards and lists and understand what those things are, as well as how to use them.
Let’s dive into what Trello is most known for... its boards!
Boards
The first principal component of Trello is the digital whiteboard – that is, “the board.” You can have several boards in Trello (up to 10 per workspace in the free plan and unlimited boards in paid plans).
A board is a collection of cards, but we’ll get to those later. Think of a board as a topic or a goal. It could be a specific project you’re working on, or it could be a team.
Don’t worry too much about what your board should be, as it will likely change over time, and you’ll find yourself operating on multiple boards. It’s easy to adjust as you go.
Are you ready to put your fingers on the keyboard? It’s time to start digging in.
Creating a board
To help you explore boards, we will create one so that you have a visual as I explain what’s going on inside the board.
From the top toolbar in Trello, click the Create button and choose the first option that appears – that is, Create board:
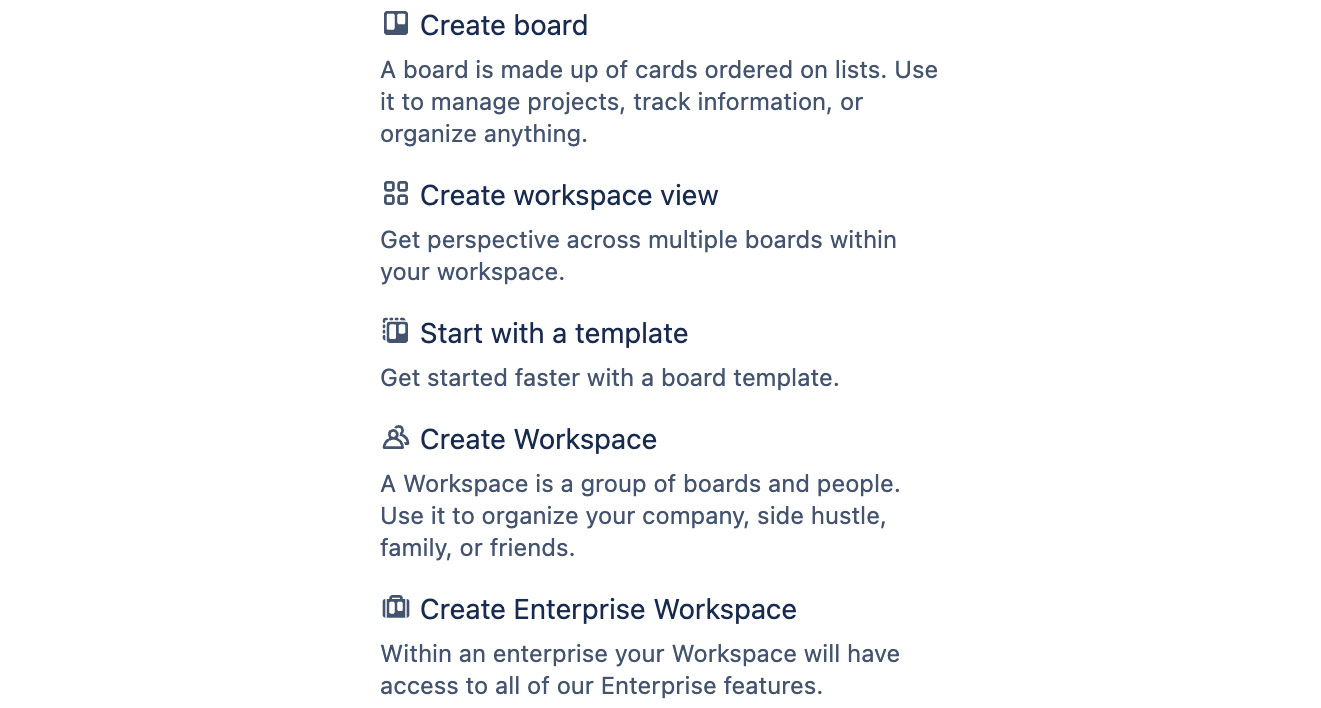
Figure 1.3 – Create options in Trello
Name your board. You can call it To Do or Team Tasks.
Next, confirm the workspace you want the board to be in. You can leave the default option or click the name of the board to select another available workspace.
Lastly, you’ll choose a level of visibility – that is, who has access to view your board. For now, stick with the default option, which is Workspace visible. If no one else is part of your workspace, this is effectively the same as private visibility. If you aren’t sure and would prefer to hide this board, you can set the visibility to Private.
Once you click Create, you’ll go straight to your new board.
Finding your boards
Go to trello.com to see the boards you have joined or created:
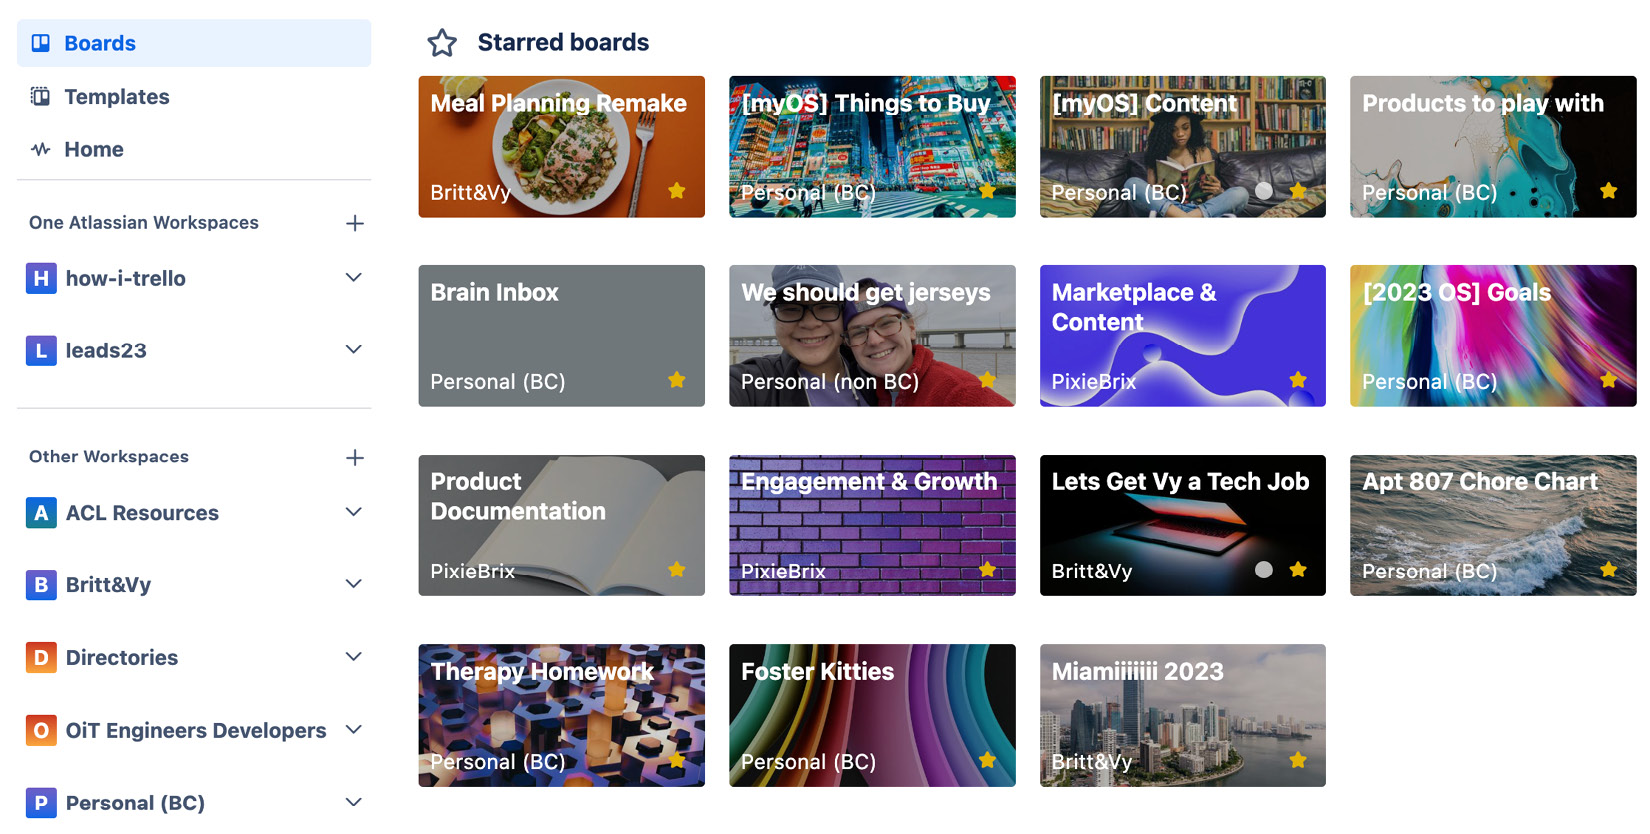
Figure 1.4 – Trello board home page
View all boards, starting with starred ones, then your recently viewed ones, and finally the remaining boards. You can view only boards from a specific workspace by selecting a workspace name on the left-hand side.
To go to a board, click on its tile.
Top toolbar options for a board
Though boards can look very different, navigating them is the same. They all have a top toolbar with items for personalizing your board.
Although other tools have the “board” concept, did you know Trello was the first to promote this type of organization? Trello also offers the best customization and set of features at a board level that I’ve seen across all other similar tools.
Starring a board
The first item you will see is the board’s name; immediately next to it will be a star. If it’s filled yellow, this means that the board is “starred” and will show up at the top of your Trello Boards page.
You can also access these boards from the Starred menu in the very top toolbar in Trello.
By default, the starred field will be unselected. Click it to star it, and click again to un-star it:
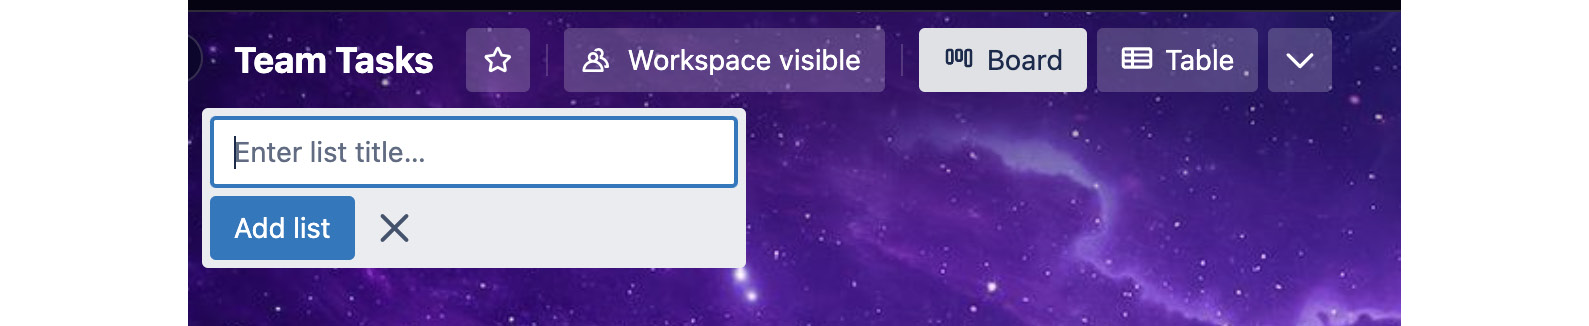
Figure 1.5 – Board title with star icon for favoriting
Setting board visibility
The next option you’ll see is your board’s visibility. When creating a board, by default, it will be set to Workspace visible. This means that anyone who is part of your workspace can view the board and join it.
To change this, select the current visibility option – a menu will appear with options to change it:
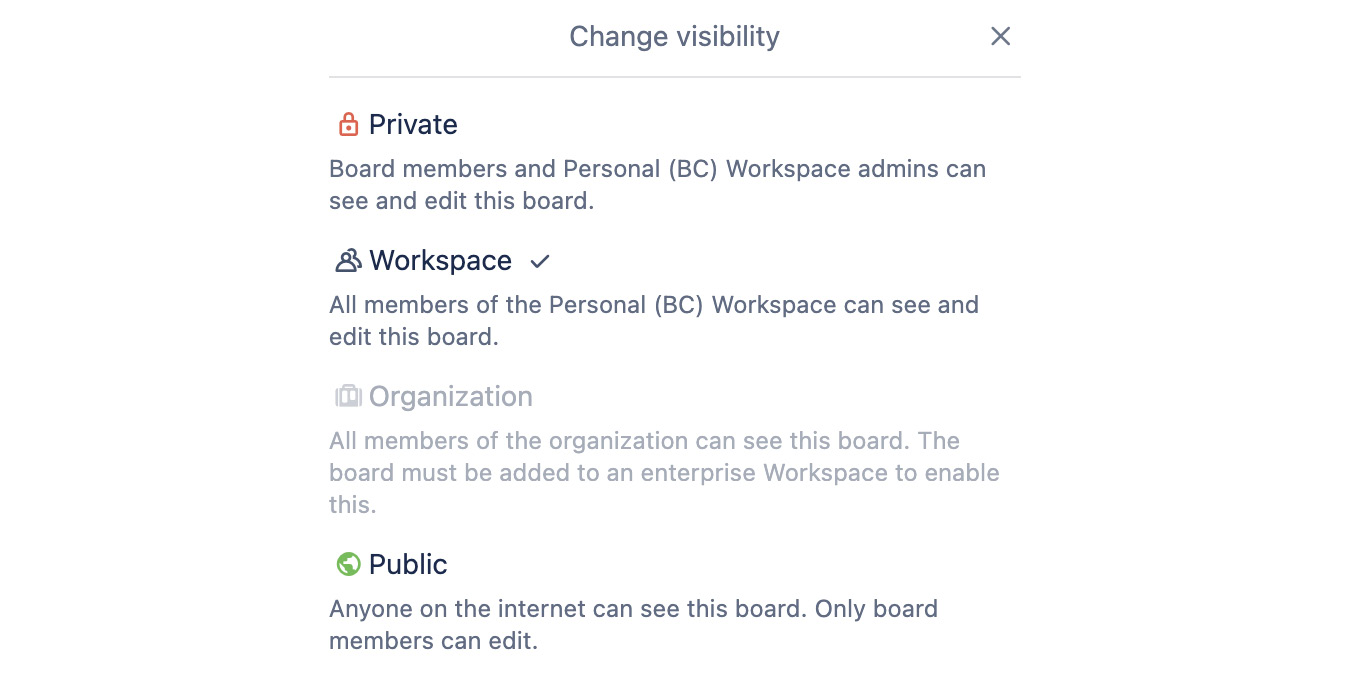
Figure 1.6 – Board visibility options
You have at least three visibility options, and a fourth one if you are on an Enterprise version of Trello.
Private means that only you and the people who you invite can see the board and its contents, with one exception – workspace admins are also able to see the contents of any board (so make sure not to say anything about your boss in your boards 😅).
You can find your workspace admins by opening the panel on the left-hand side of the board and selecting Members:
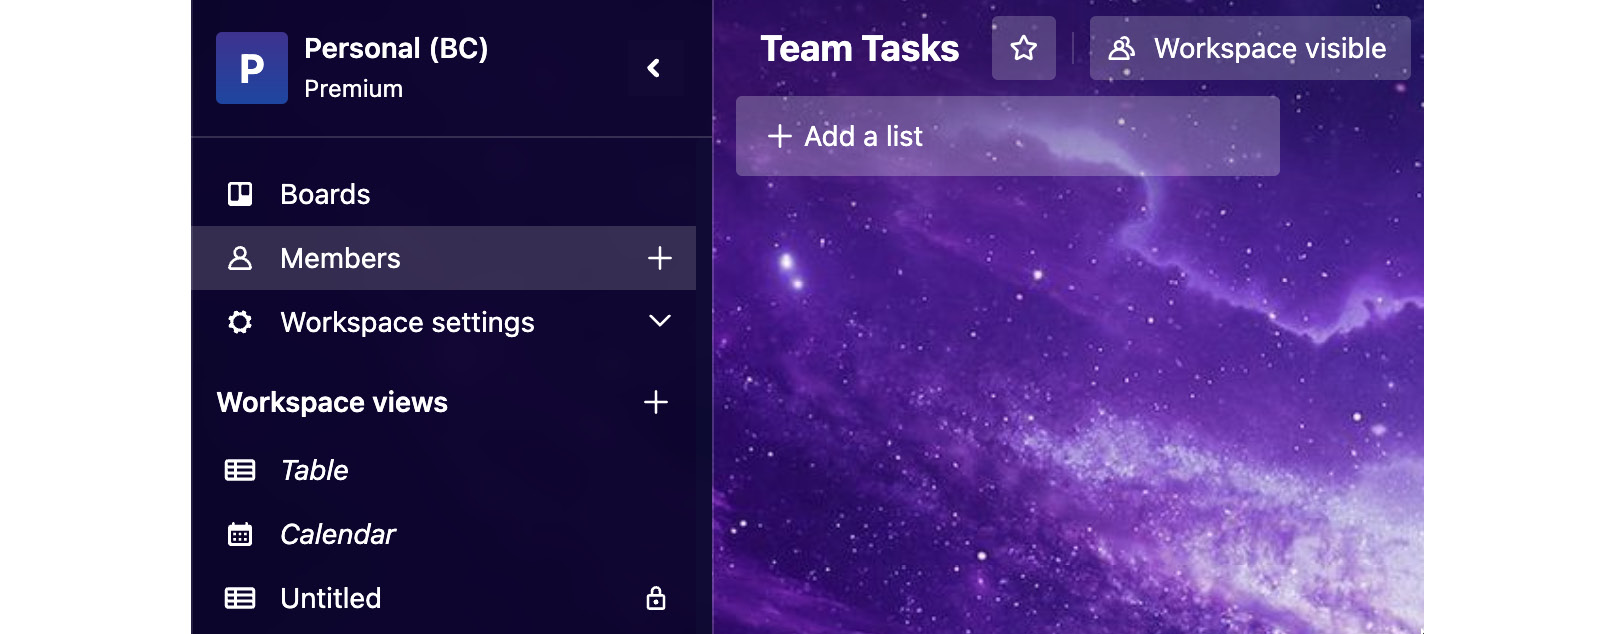
Figure 1.7 – Board member settings
If you want others to view your content and engage in a board, you can invite them to the board, even if its visibility is Private. Click the Share button in the top-right toolbar of your board to see a modal appear:
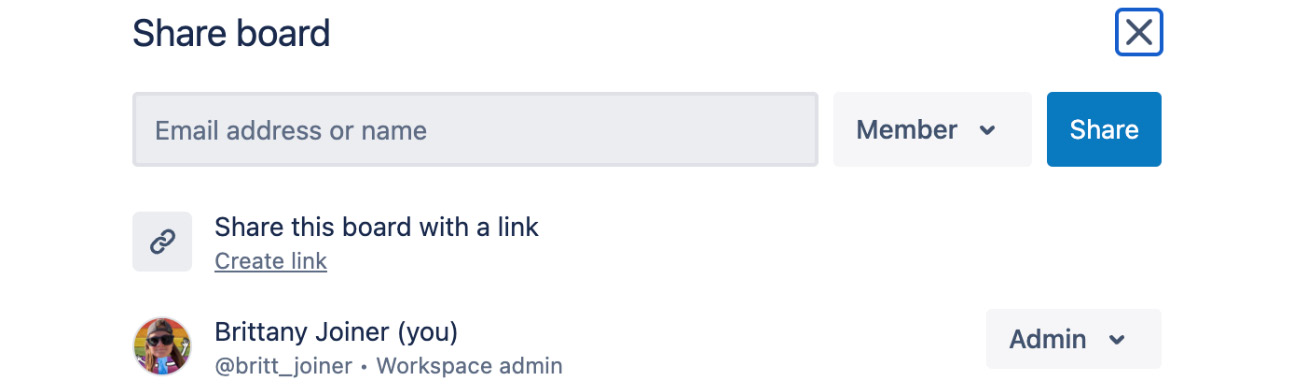
Figure 1.8 – Board sharing and invite options
Here, you can type a member’s name or email address. If they’re not on Trello, you can send an invite to their email address.
You can also click the Create link button below the text field to create a link that you can send to someone to join the board. This link is not public, but anyone you send it to will be able to join the board. You can revoke this link any time after you create it.
Workspace visible means that anyone who is part of your workspace can see the contents of your board. They’ll also be able to join it and edit. This is great for any information that is relevant to your wider group of colleagues and doesn’t contain sensitive information.
Public visibility means that anyone can see this board, even if they don’t have a Trello account. Sometimes, this is actually kind of useful! For instance, perhaps you want to distribute information, such as a roadmap or resources. Although anyone can see this board, they can’t edit it.
It’s also important to note that as of 2022, Google does not index Trello boards, so they will not appear in Google search results. Bummer for folks who had Trello boards with links that were getting tons of traffic!
Organization visibility is only available to Trello Enterprise accounts. It means anyone using Trello with the same company email domain (for example, mary@coolcompany.com and john@coolcompany.com) can view this board.
Next to the visibility settings, you’ll see options for board views. If you want to learn about them now, skip to Chapter 4.
There’s another button called Power-Ups, but once again, we won't cover these until a later chapter because we’ve got a lot of ground to cover there. These add-ons super-charge your Trello board to do even more powerful things. It’s best to start with Trello’s native features before diving into the extras. We will discuss those in Chapters 11, 12, 13, and 14.
You’ll also see a button for Automation, which allows you to customize rules for managing items in Trello. You will learn more about this in Chapter 6.
Filtering a board
One more button you’ll see in your top bar is the Filter button. If you don’t have any cards on your board, it won’t be very useful, but once you add cards, you can select which cards you want to see:
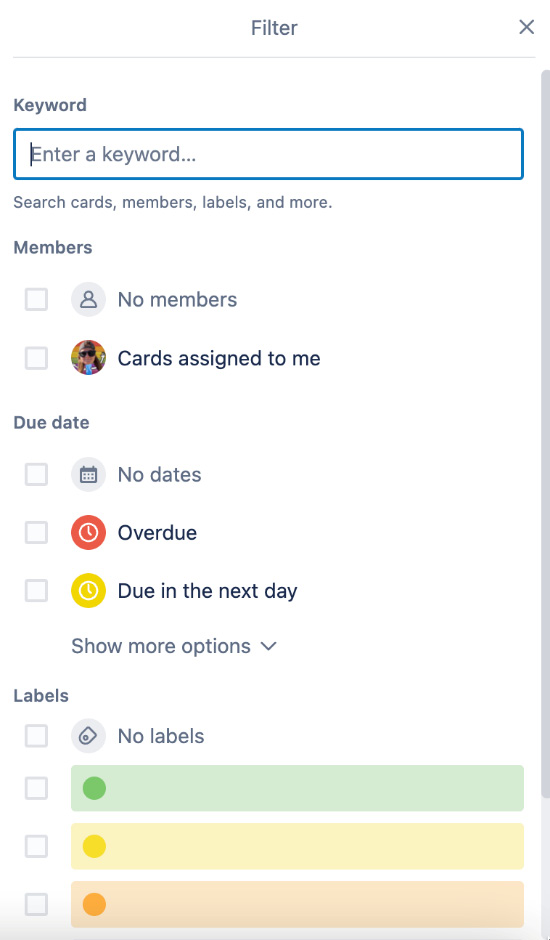
Figure 1.9 – Board filtering options
Here, you can filter to only show your cards (or another member’s) or filter by due dates. You can even filter by keywords, labels, or recency of activity. It’s a great tool for drilling down to exactly what matters, and helpful when you have a busy board.
Adding members and setting roles
You’ll also notice avatars on the top right-hand side of your board, which indicate who has joined the board. Click on an avatar to view that member’s information. If you need to change their role, click the Share button. You can also see a list of all the members and their roles here.
By default, everyone is a member, which means they can edit the content on a board, such as creating cards, lists, and more.
Admins have superpowers and can rename a board and close a board.
If you’re on a Trello Premium or higher plan, you’ll have access to another role type: Observer. These users can view content and comment on a card, but they aren’t able to edit anything on the board. This is helpful if you don't want to make a board public, but need your team to see the content without having the power to break anything.
Accessing the board menu
The last stop on the board menu is an ellipsis on the right-hand side of the top toolbar. Click it to reveal extra settings for configuring your board:
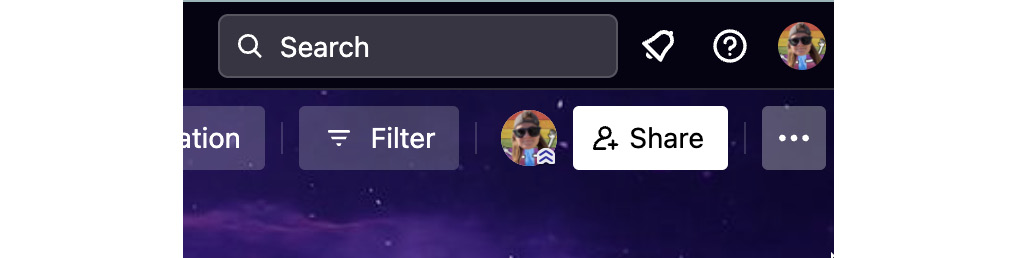
Figure 1.10 – Menu navigation on Trello boards
Description
A board description is a place where you can summarize the board. It’s helpful for others to understand the context of the board and also a great place to save related links. Let’s go ahead and set this:
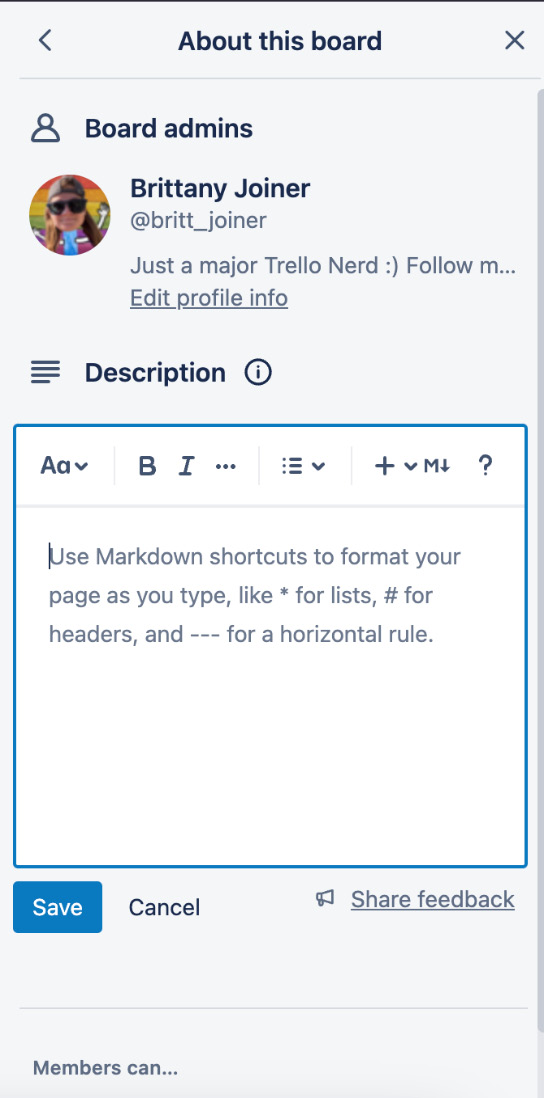
Figure 1.11 – Board description section
Use the rich text editor to style your text with headers, bullet points, and anything else you want. When you’re done, click Save.
Background
The next setting allows you to change the background to another color, a stock photo, or a custom image.
Click Custom to upload a file, or search for keywords to find photos from Unsplash:
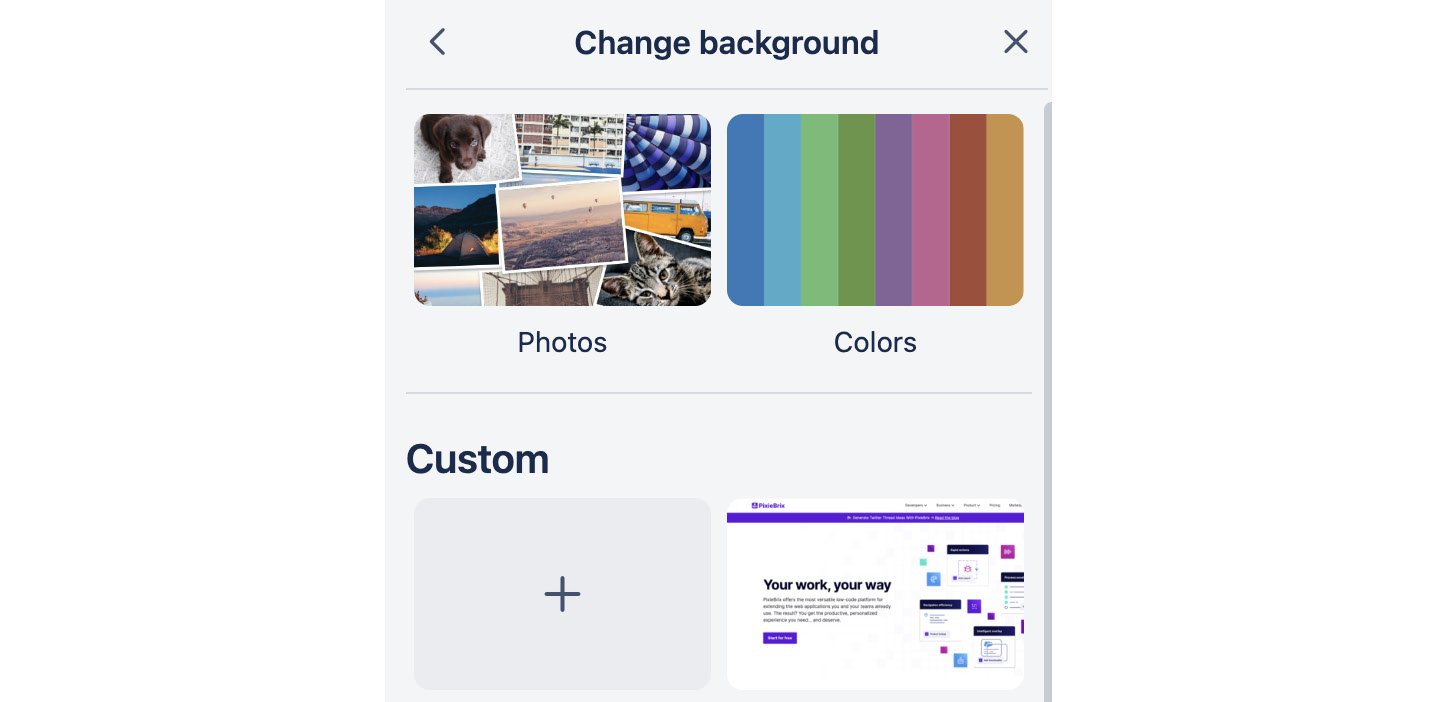
Figure 1.12 – Board background customization options
Not every tool lets you customize and style your workspace. Trello lets you make the board your own rather than being limited to using the default light or dark mode background.
Stickers
If you want to add flair to your board, you can add stickers to style cards. Open the stickers menu, search for a keyword, select the sticker, and then drag it over to a card. You can remove a sticker by hovering over it and clicking the x button:
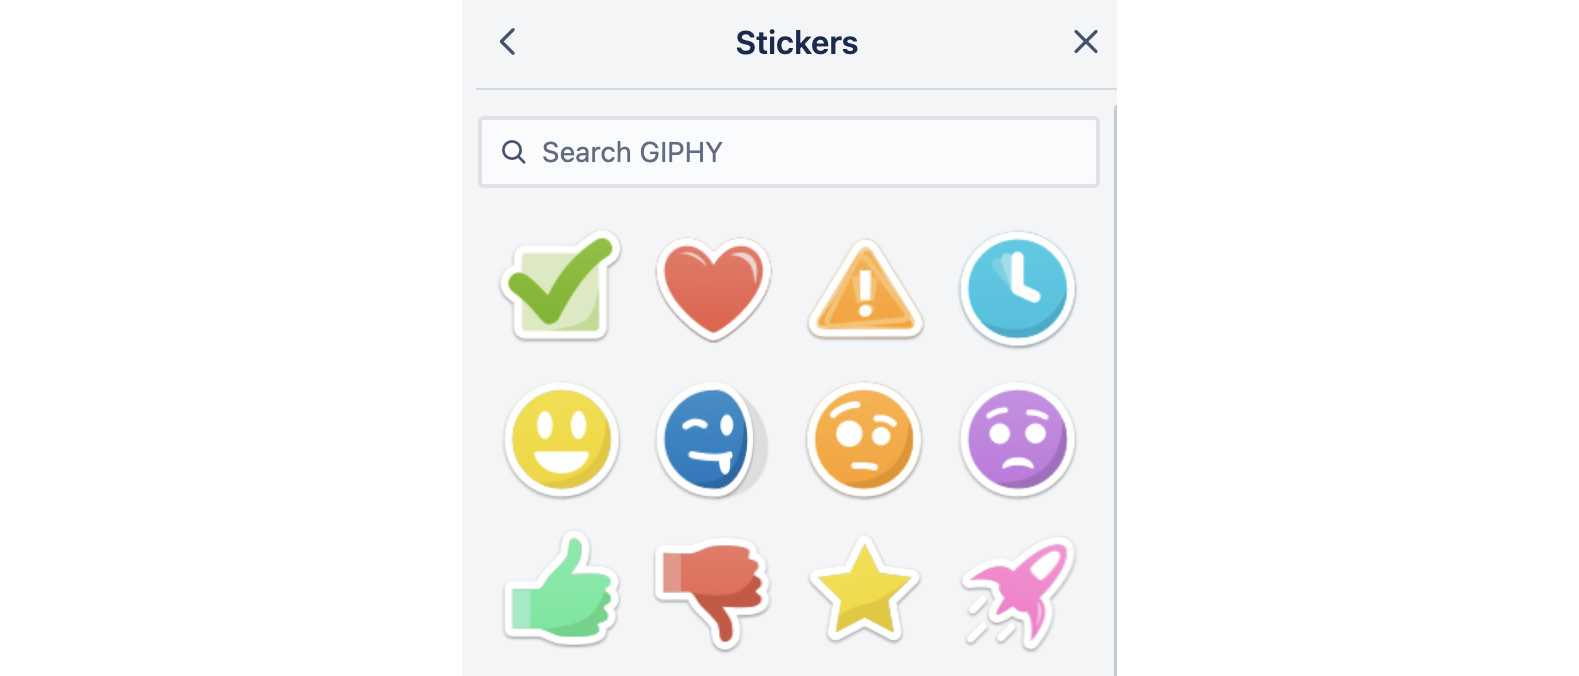
Figure 1.13 – Trello board stickers
Additional settings
Click More to view another hidden layer of settings. If you choose the first option, called Settings, you’ll see options to change the board’s workspace.
You can also enable or disable card covers (images that prepend to the top of a card).
Lastly, you can change the permissions of who is allowed to perform various actions on a board, such as commenting on cards or adding people.
You can even edit the ability for workspace members to join the board without an invite:
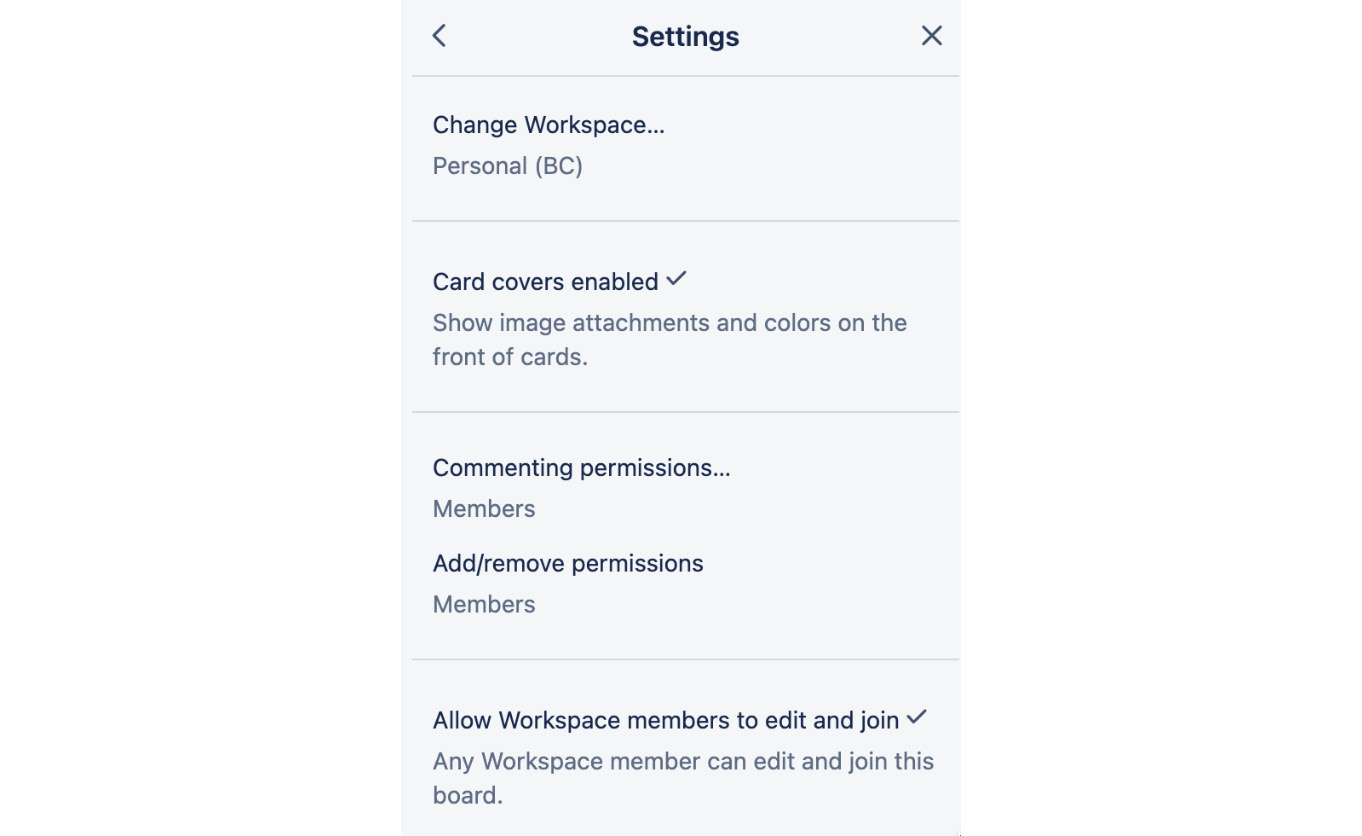
Figure 1.14 – Board advanced settings options
Collections
Collections are kind of like folders for your Trello boards. If you’d like to organize multiple boards together, you can add them to a collection. This feature is only available for Premium and higher plans.
Archived items
Trello makes it very hard to accidentally delete something. If you seem to be missing something, there’s a good chance it was just archived! You can find your archived items here. Click this option to see anything archived in this board, sorted by card or list:
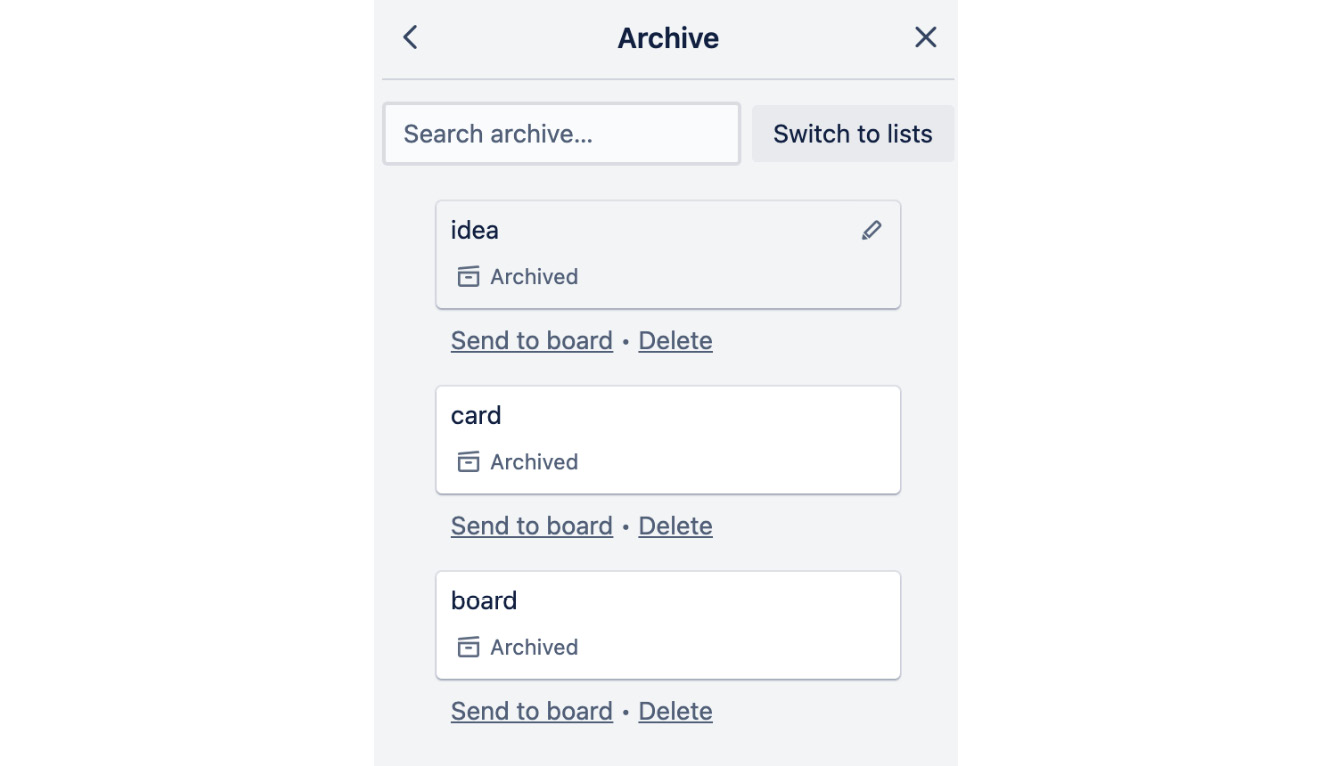
Figure 1.15 – Archived items in Trello
To bring something back, click the Send to board button.
This is one of the reasons I prefer to use Trello – because it’s hard to lose something. In other tools, you might delete something as the default action. This makes it difficult to restore if it was an accident. But when using Trello, if you find that something's missing, it’s easy to recover it.
Email address
Did you know that you can email something to a Trello board? Every board has a unique email address. You can use the Email-to-board settings area to view the board’s address, generate a new one, and configure which list to add new items to:
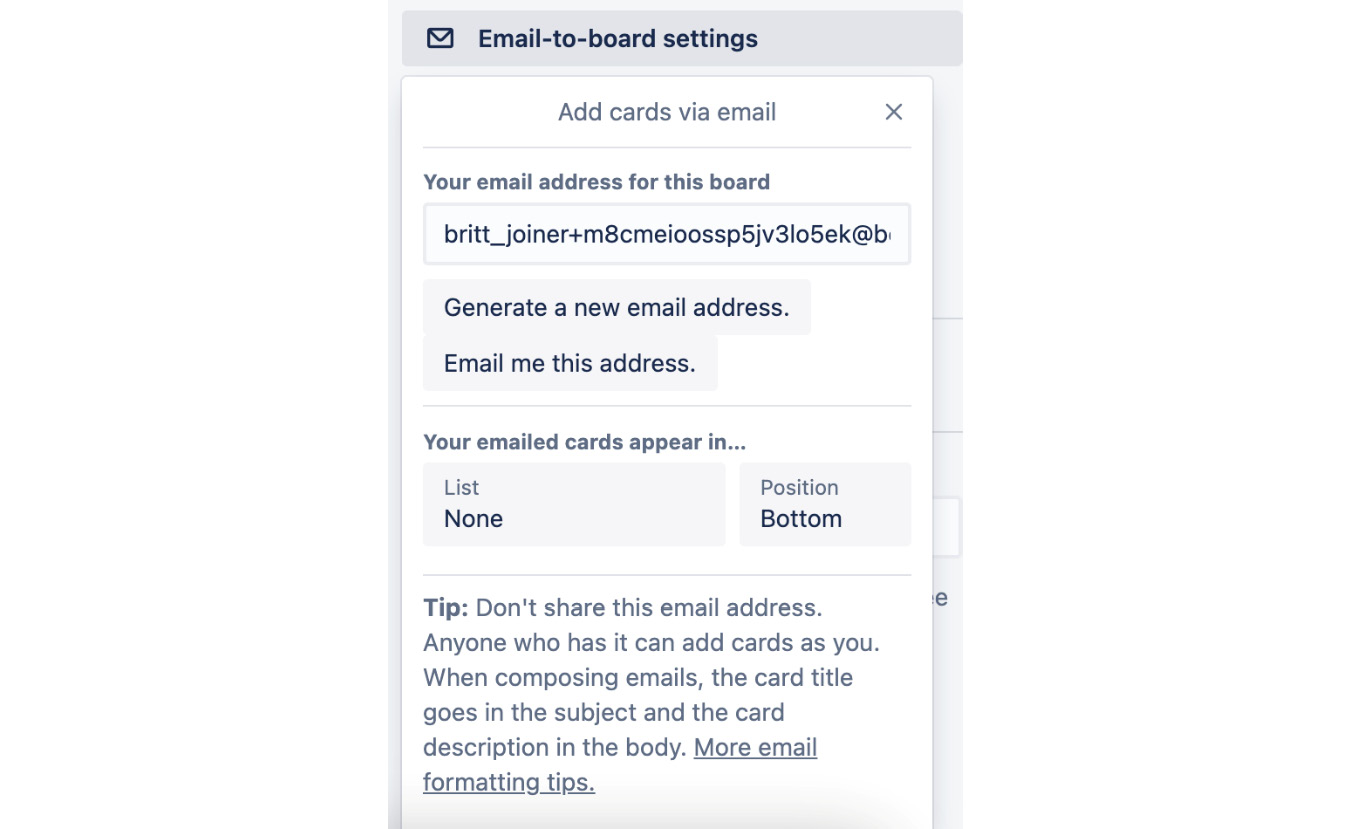
Figure 1.16 – Board email options
Go ahead and try it! Copy the email address and head to your email. Send an email with the subject Hi and something in the body. Then, head back to Trello and watch it appear on your board within seconds!
Watching
If you want notifications about everything that happens to anything on this Trello board, click the Watch button. But fair warning – that’s a lot of notifications! You’ll get a notification whenever something happens to any card on this board:

Figure 1.17 – The board’s Watch button checked
You can confirm whether you’re watching a board or not in this section, as it will show a checkmark if you are. Or, in the toolbar, you’ll see a watch button. You can toggle it off if you’re getting too many notifications.
Template
Once you have your board set up the way you like, you might want to share it as a template that you or others can use in the future. This is a great way to customize and reuse boards so that you don’t have to set them up from scratch each time:

Figure 1.18 – The Make template button
You can even publicize a template to help more people discover more uses for Trello! To view templates others have contributed to, head to trello.com/templates.
Copy
You don’t have to make a board a template to be able to copy it. Click the Copy button to duplicate the board and choose which parts you want to copy over, such as members and cards:
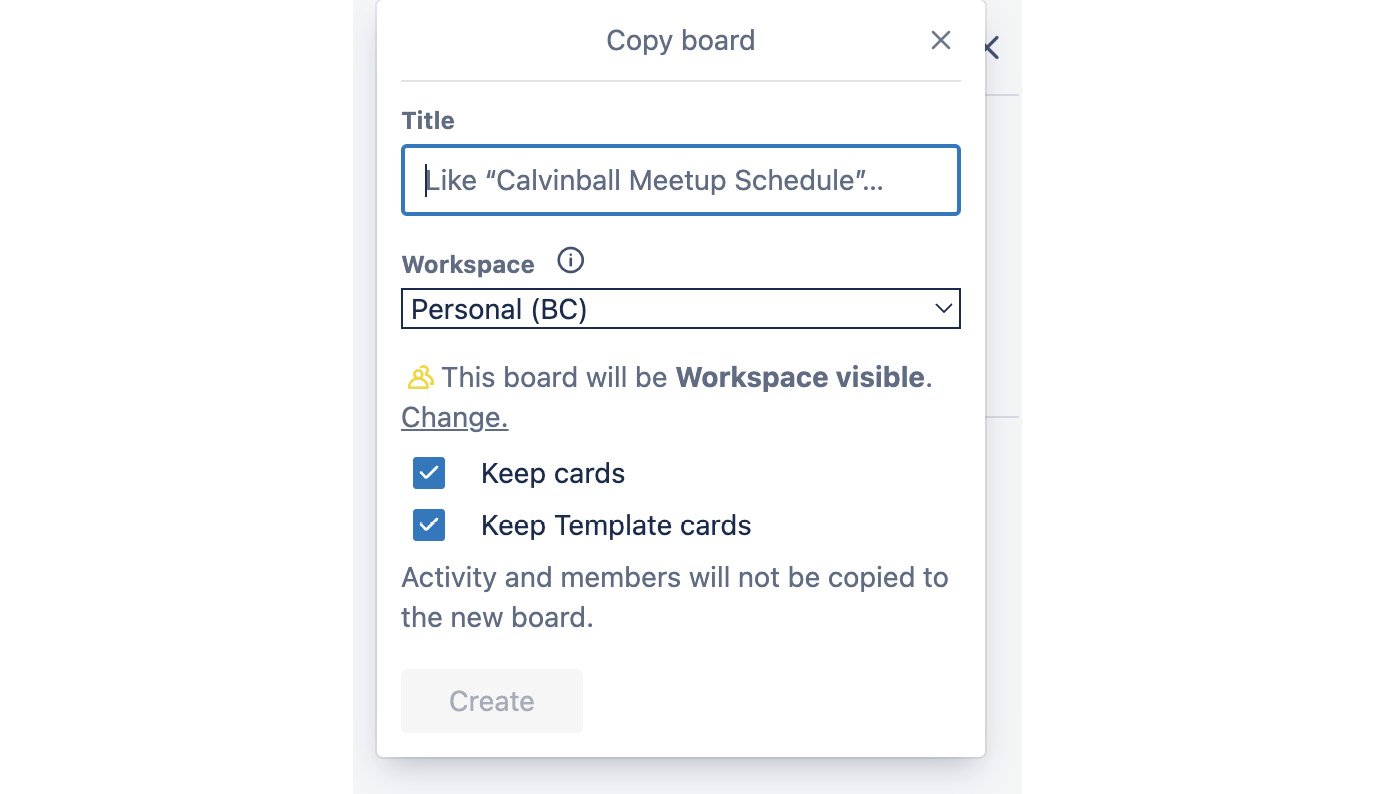
Figure 1.19 – Settings to copy a board
Try it out and make a copy of your current board. Make a duplicate board named House Projects.
Exporting
As much as you’ll enjoy working in Trello, you might find that you need to get your information out of Trello. There are multiple ways to do that – you can print your boards, export them as a CSV, or export them as a JSON object (pro tip – you can also view your board as a JSON object in your browser by appending .json to the URL):

Figure 1.20 – Board export options
At the moment, our board is pretty empty, but if you want to test it out, add a few cards and try it out!
Close board
If you ever want to delete a board, you can close it. Even after you close it, you can undo it if you change your mind! Simply click Reopen board. You can also find your closed boards from your Boards page (to get there, click the Trello logo in the top-left corner from anywhere in Trello). From there, scroll to the bottom of the page, then click the View all closed boards button.
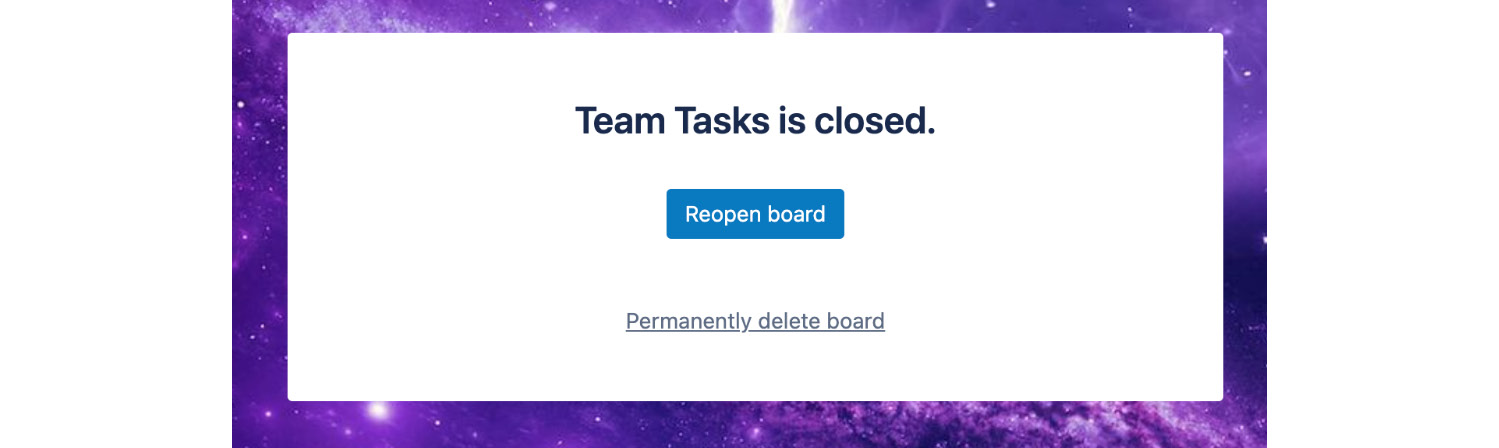
Figure 1.21 – Reopening a closed board
Go ahead and try it out! Close your board, and then bring it back.
Lists
The second major component of your Trello board is your lists. Lists are how you organize sticky notes inside the board. While there are a million strategies for how you can use lists, they’re often used as stages of your workflow.
In many cases, it’s as simple as To Do, Doing, and Done.
It’s easy to change the names of lists and drag them around, so don’t worry too much about what you call them and whether the name will change.
To create your first list, click Add a list in the box under your board’s name. Type anything you want, but if you need inspiration, call this one Ideas. Press Enter to create your first list:
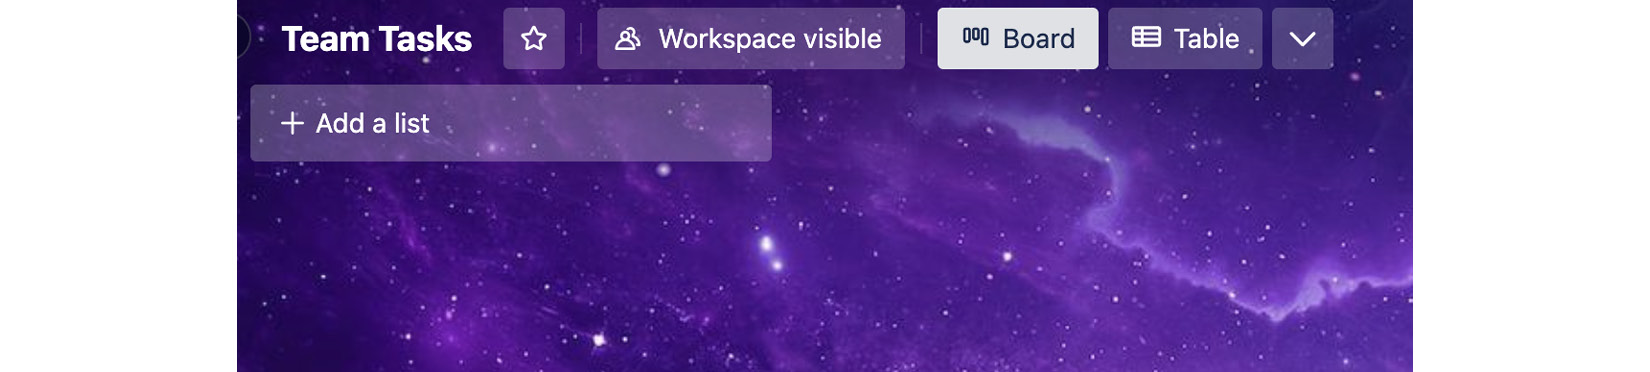
Figure 1.22 – Empty board before adding a list
Go ahead and create a few more. You’ll follow the same process – just type the name and press Enter in the box to the right of the list.
Add the To Do, Doing, and Done lists.
If you put them in the wrong order or want to move a list, drag a list to move it to a different spot.
Just like boards have actions, lists have actions for managing groups of cards. Click the three-dot menu at the top right of a list to access the list menu:
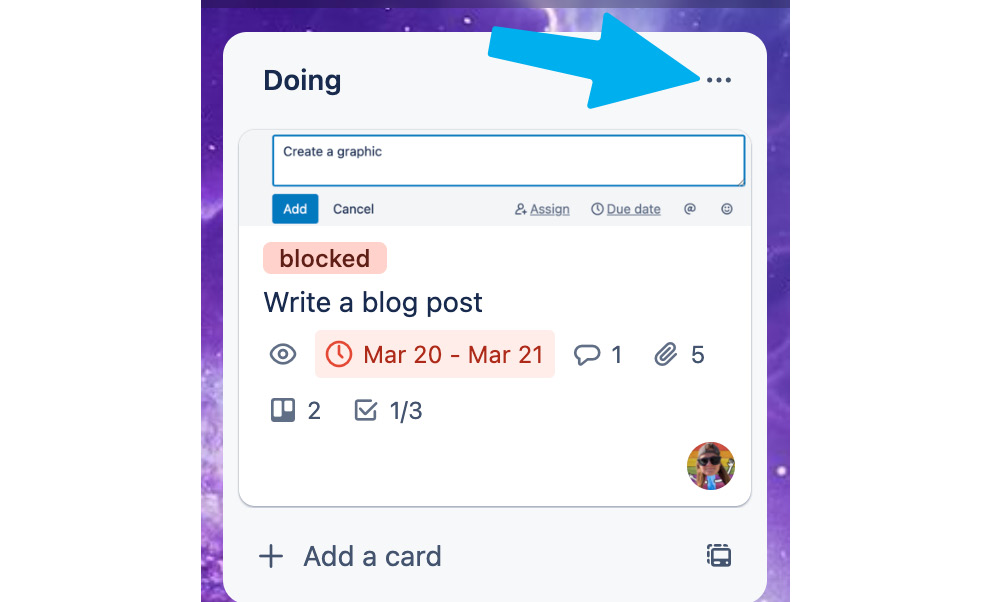
Figure 1.23 – The three-dot menu to access list actions
Add a card
The first option is to add a card to a list. This isn’t the only way to add a card, but it’s available if you like it. Click Add a card to name a card, after which it will be added to your list. Go ahead and try it!
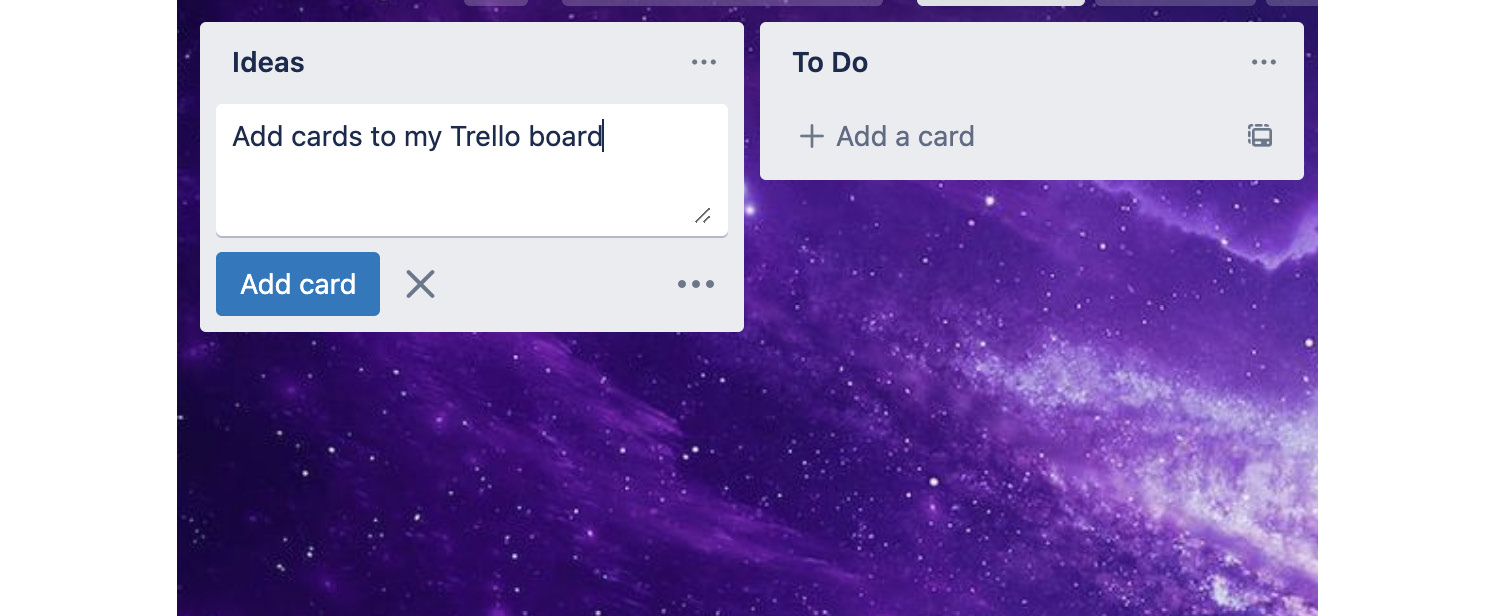
Figure 1.24 – Adding a card to a list
Make a card that says Add cards to my Trello board. Press Enter to save it. And voilà! It will appear on your list!
Copy
The next action in the list menu is to copy a list. This does just what it sounds like – it duplicates the list and adds it right next to the current list, including any cards in that list. Go ahead and try it out! Click Copy to see another list appear with the card you just created.
Move
Lists also have a Move option. You can drag a list to move it to another place within the board, or you can use this action to move it. You can even move the list to another board entirely! You might want to do this when you’re figuring out how to organize your board, or after you’ve completed a project.
Watch
You can also watch a list, similar to watching a board.
This sends notifications about anything that happens to any card in this list. It’s perfect if you’re managing a particular stage of a workflow.
For instance, if you’re in charge of reviewing content for your blog, you may want a notification about every card in the Review list:

Figure 1.25 – Available actions in a list
Select the Watch option for this To Do list so that you can get notifications whenever a new card is added to this list.
Sort by
You can use the Sort list action to sort cards in a list by certain attributes. Here, you can order cards by their name, date created, or by the due date (if you have cards with due dates in that list):

Figure 1.26 – List sorting menu
Actions for cards within a list
The following two options apply to all the cards in a list, but not the list itself. You can move all the cards to another list while leaving the list column in its current place. You might do this at the end of the week by moving all the cards in your Done This Week list to another Done list:

Figure 1.27 – Actions for cards within a list
The next action is to archive all the cards in the list while keeping the actual list itself. This is useful if you’re done with the cards in the list and want to clear them out but still plan to continue using that list.
Archive list
The last action in the List menu is to archive the list, which will archive the cards and the list itself. This is useful if you realize you no longer need the list. If you accidentally archive a list (or cards in a list), you can go to the board settings in the Archived items area and send the list back to the board.
Cards
The final element of a Trello board is the super-charged sticky note. Your board holds your lists, which contain your cards. You can easily move cards between lists (and boards), name them whatever you want, and do so much more.
That’s why Chapters 2 and 3 will dive deep into the core features of Trello that are nested inside these cards.
For now, just know that these are the sticky notes of your board and can be moved between lists. They have superpowers, allowing you to add more detail than you could ever imagine to each sticky note:

Figure 1.28 – Trello card
Summary
In this chapter, we learned how Trello is a digital whiteboard with sticky notes. You can build nearly anything you want with it because, like LEGO, it’s so versatile. Many different types of teams and people find value in Trello!
When building, you’ll use three components – boards, lists, and cards – to design your masterpiece. Boards are a collection of cards – super-charged sticky notes – and lists organize those cards across the board. There are many options for customizing your board to make it your own.
Alright you've made it through the tough set up content, now it's time to have some fun and dive into Trello cards.