


In this chapter, we are going take a look at how we can create a basic Spring MVC application. In order to develop a Spring MVC application, we need some prerequisite software and tools. First, we are going to see how to install all the prerequisites that are required to set up our development environment so that we can start developing the application.
The setup and installation steps given here are for Windows 10 operating systems, but don't worry, as the steps may change only slightly for other operating systems. You can always refer to the respective tools and software vendor's websites to install them in other operating system. In this chapter, we will learn to set up Java and configure the Maven build tool, install the Tomcat web server, install and configure the Spring Tool Suite, and create and run our first Spring MVC project.
Obviously, the first thing that we need to do is to install Java. The more technical name for Java is Java Development Kit (JDK). JDK includes a Java compiler (javac), a Java virtual machine, and a variety of other tools to compile and run Java programs.
We are going to use Java 8, which is the latest and greatest version of Java, but Java 6 or any higher version is also sufficient to complete this chapter, but I strongly recommend you use Java 8 since in later chapters of this book we may use some of the Java 8 features such as, streams and lambda expressions. Let's take a look at how we can install JDK on a Windows operating system:
Go to the Java SE download page on the Oracle website at http://www.oracle.com/technetwork/java/javase/downloads/index.html .
Click on the Java Platform (JDK) 8u91/8u92 download link; this will take you to the license agreement page. Accept the license agreement by selecting the radio button option.
Now, click on the listed download link that corresponds to your Windows operating system architecture; for instance, if your operating system is of type 32 bit, click on the download link that corresponds to Windows x86. If your operating system is of type 64 bit, click on the download link that corresponds to Windows x64.
Now it will start downloading the installer. Once the download is finished, go to the downloaded directory and double-click on the installer. This will open up a wizard window. Just click through the next buttons in the wizard, leaving the default options alone, and click on the Close button at the end of the wizard:
 JDK installation wizard
Now you can see the installed JDK directory in the default location; in our case, the default location is
C:\Program Files\Java\jdk1.8.0_60.
After installing JDK, we still need to perform some more configurations to use Java conveniently from any directory on our computer. By setting up the environment variables for Java in the Windows operating system, we can make the Java compiler and tools accessible from anywhere in the file system:
Navigate to Start Menu | Settings | System | About | System info | Advanced system settings.
A System Properties window will appear; in this window, select the Advanced tab and click on the Environment Variables button to open the Environment Variables window.
Now, click on the New button in the System variables panel and enter
JAVA_HOMEas the variable name and enter the installed JDK directory path as the variable value; in our case, this would beC:\Program Files\Java\jdk1.8.0_91. If you do not have proper rights for the operating system, you will not be able to edit System variables; in that case, you can create theJAVA_HOMEvariable under the User variables panel.Now, in the same System variables panel, double-click on the path variable entry; an Edit System Variable window will appear.
Edit Variable value of Path by clicking the new button and enter the following text
%JAVA_HOME%\binas the value.If you are using a Windows operating system prior to version 10, edit the path variable carefully; you should only append the text at the end of an existing path value. Don't delete or disturb the existing values; make sure you haven't missed the
;(semi-colon) delimited mark as the first letter in the text that you append:Now click on the OK button.

Now we have installed JDK in our computer. To verify whether our installation has been carried out correctly, open a new command window, type java -version, and press Enter; you will see the installed version of Java compiler on the screen:
C:\Users\Amuthan>java -version
java version "1.8.0_91"
Java(TM) SE Runtime Environment (build 1.8.0_91-b15)
Java HotSpot(TM) 64-Bit Server VM (build 25.91-b15, mixed mode)
Building a java software project typically includes some activities as follows:
Compiling all the source code
Packaging the compiled code into a JAR or WAR archive file
Deploying the packaged archives files on a server
Manually performing all these tasks is time-consuming and is prone to errors. Therefore, we take the help of a build tool. A build tool is a tool that automates everything related to building a software project, from compiling to deploying.
There are other build tools that are available for building Java projects such as Gradle and Ant. We are going to use Maven as our build tool. Let's take a look at how we can install Maven:
Go to Maven's download page at http://maven.apache.org/download.cgi.
Click on the apache-maven-3.3.9-bin.zip download link and start the download.
Once the download is finished, go to the downloaded directory and extract the
.zipfile into a convenient directory of your choice.Now we need to create one more environment variable called
M2_HOMEin a way that is similar to the way in which we createdJAVA_HOME. Enter the extracted Maven zip directory's path as the value for theM2_HOMEenvironment variable.Finally, append the
M2_HOMEvariable to thePATHenvironment variable as well. Double-click on the path variable and click on the New button to enter%M2_HOME%\binas the value. Setting the M2 environment variable
Now we have installed the Maven build tool in our computer. To verify whether our installation has been carried out correctly, we need to follow steps that are similar to the Java installation verification. Open a new command window, type
mvn -versionand press Enter; you will see the following details of the Maven version:C:\Users\Amuthan>mvn -version Apache Maven 3.3.9 (bb52d8502b132ec0a5a3f4c09453c07478323dc5; 2015-11-10T10:41:47-06:00) Maven home: C:\Program Files\apache-maven-3.3.9 Java version: 1.8.0_91, vendor: Oracle Corporation Java home: C:\Program Files\Java\jdk1.8.0_91\jre Default locale: en_US, platform encoding: Cp1252 OS name: "windows 10", version: "10.0", arch: "amd64", family: "dos"
So far, we have seen how to install JDK and Maven. Using these tools, we can compile the Java source code into the .class files and package these .class files into the .jar or .war archives. However, how do we run our packaged archives? For this, we take the help of a web server, which will host our packaged archives as a running application.
Apache Tomcat is a popular Java web server and servlet container. We are going to use Apache Tomcat Version 8.0, which is the latest, but you can even use version 7.0. Let's take a look at how we can install the Tomcat web server:
Go to the Apache Tomcat home page at http://tomcat.apache.org/.
Click on the Tomcat 8.0 download link; it will take you to the download page.
Click on the 32-bit/64-bit Windows Service Installer (pgp, md5, sha1) link; it will start downloading the installer.
Once the download is finished, go to the downloaded directory and double-click on the installer; this will open up a wizard window.
Just click through the Next buttons in the wizard, leaving the default options alone, and click on the Finish button at the end of the wizard. Note that before clicking on the Finish button, just ensure that you have unchecked Run Apache Tomcat checkbox.
Installing Apache Tomcat with the default option works successfully only if you have installed Java in the default location. Otherwise, you have to correctly provide the JRE path according to the location of your Java installation during the installation of Tomcat, as shown in the following screenshot:

We installed Java and Maven to compile and package our Java source code and installed Tomcat to deploy and run our application. So now we have to start write Spring MVC code so that we can compile, package, and run the code. We can use any simple text editor on our computer to write our code, but that won't help us much with features like finding syntax errors as we type, auto-suggesting important key words, syntax highlighting, easy navigation, and so on.
An integrated development environment (IDE) can help us with these features to develop the code faster and error free. We are going to use Spring Tool Suite (STS) as our IDE.
STS is the best Eclipse-powered development environment to build Spring applications. Let's take a look at how we can install STS:
Go to the STS download page at http://spring.io/tools/sts/all .
Click on the STS zip link to download the zip file that corresponds to your Windows operating system architecture type (32 bit or 62 bit); this will start the download of the zip file. The STS stable release version at the time of this writing is the STS 3.7.3.RELEASE based on Eclipse 4.6.
Once the download is finished, go to the downloaded directory and extract the
.zipfile into a convenient directory of your choice.Open the extracted
sts-bundledirectory, you will find a directory calledsts-3.7.3.RELEASE. Just open that directory and create a desktop shortcut for theSTS.exe
We have almost installed all the tools and software required to develop a Spring MVC application; so now, we can create our Spring MVC project on STS. However, before jumping into creating a project, we need to perform the following two final configurations on our STS in order to use STS effectively:
Configuring Maven on STS
Configuring Tomcat on STS
The aforementioned settings are just a one-time configuration that you need to set up on your newly installed STS; you need not perform this configuration every time you open STS
To build our projects, STS uses Maven build tool internally. But we have to tell STS where Maven has been installed so that it can use the Maven installation to build our projects. Let's take a look at how we can configure Maven on STS:
Open STS if it is not already open.
Tip
When you open STS for the very first time after installing, it will ask you to provide a workspace location. This is because when you create a project on STS, all your project files will be created under this location only. Provide a workspace directory path as you wish and click on the OK button.
Navigate to Window | Preferences | Maven | Installations.
On the right-hand side, you can see the Add button to locate Maven's installation.
Click on the Add button and choose our Maven's installed directory, and then click on the Finish button, as shown in the following screenshot:
 Selecting Maven's location during the Maven configuration on STS
Now don't forget to select the newly added Maven installation as your default Maven installation by selecting the checkbox;
Click on the OK button in the Preferences window and close it.
As mentioned previously, we can use the Tomcat web server to deploy our application, but we have to inform STS about the location of the Tomcat container so that we can easily deploy our project in to Tomcat. Let's configure Tomcat on STS:
Open STS from the desktop icon, if it is not already open.
Go to the menu bar and navigate to Window | Preferences | Server | Runtime Environments.
You can see the available servers listed on the right panel. Now click on the Add button to add our Tomcat web server.
Tip
You may also see Pivotal tc Server Developer Edition (Runtime) v3.1 listed under the available servers, which comes along with the STS installation. Although STS might come with an internal Pivotal tc Server, we chose to use the Tomcat web server as our server runtime environment because of its popularity.
A wizard window will appear; type
tomcatin the Select the type of runtime environment: text box, and a list of available Tomcat versions will be shown. Just select Tomcat v8.0 and select the Create a new local server checkbox. Finally, click on the Next button, as shown in the following screenshot: Selecting the server type during the Tomcat configuration on STS
In the next window, click on the Browse button and locate Tomcat's installed directory, and then click on the OK button. You can find Tomcat's installed directory under
C:\Program Files\Apache Software Foundation\Tomcat 8.0if you have installed Tomcat in the default location. Then, click on the Finish button, as shown in the following screenshot: Selecting the Tomcat location during the Tomcat configuration on STS
So far, we have seen how we can install all the prerequisite tools and software. Now we are going to develop our first Spring MVC application using STS. STS provides an easy-to-use project template. Using these templates, we can quickly create our project directory structures without much problem.
Let's create our first Spring MVC project in STS:
In STS, navigate to File | New | Project; a New Project wizard window will appear.
Select Maven Project from the list and click on the Next button, as shown in the following screenshot:
 Maven project's template selection
Now, a New Maven Project dialog window will appear; just select the checkbox that has the Create a simple project (skip archetype selection) caption and click on the Next button.
The wizard will ask you to specify artifact-related information for your project; just enter Group Id as
com.packtand Artifact Id aswebstore. Then, select Packaging aswarand click on the Finish button, as shown in the following screenshot: Specifying artifact-related information during the project creation
We have successfully created a basic project, but we need to perform one small configuration in our pom.xml file, that is, telling Maven to use Java Version 8 while compiling and building our project. How do we tell Maven to do this? Simply add two property entries in pom.xml. Let's do the following:
Open
pom.xml; you can findpom.xmlunder the root directory of the project itself.You will see some tabs at the bottom of the
pom.xmlfile. Select the Overview tab.Expand the Properties accordingly and click on the Create button.
Now, an Add property window will appear; enter Name as
maven.compiler.sourceand Value as1.8, as shown in the following screenshot: Adding the Java compiler version properties to POM
Similarly, create one more property with Name as
maven.compiler.targetand Value as1.8.Finally, save
pom.xml.
We just created the basic project structure. Any Java project follows a certain directory structure to organize its source code and resources. Instead of manually creating the whole directory hierarchy by ourselves, we just handed over that job to STS. By collecting some basic information about our project, such as Group Id, Artifact Id, and the Packaging style, from us, it is clear that STS is smart enough to create the whole project directory structure with the help of the Maven. Actually, what is happening behind the screen is that STS is internally using Maven to create the project structure.
We want our project to be deployable in any servlet container-based web server, such as Tomcat or Jetty, and that's why we selected the Packaging style as war. Finally, you will see the project structure in Package Explorer, as shown in the following screenshot:

The project structure of the application
Tip
If you encounter a maven error on your pom file saying web.xml is missing and <failOnMissingWebXml> is set to true, then it means it is expecting a web.xml file in your Maven project because it is a web application, as we have chosen packaging as war. However, nowadays in web applications web.xml file is optional. Add the following configuration in your pom.xml within <project> tag to fix the error:
<build>
    <plugins>
        <plugin>
            <groupId>org.apache.maven.plugins</groupId>
            <artifactId>maven-war-plugin</artifactId>
            <version>2.6</version>
            <configuration>

             <failOnMissingWebXml>false</failOnMissingWebXml>

            </configuration>
        </plugin>
    </plugins>
</build>
As we are going to use Spring MVC APIs heavily in our project, we need to add the Spring jars in our project to make use of it in our development. As mentioned previously, Maven will take care of managing dependency jars and packaging the project.
Let's take a look at how we can add the Spring-related jars via the Maven configuration:
Open
pom.xml; you can findpom.xmlunder the root directory of the project itself.You will see some tabs at the bottom of the
pom.xmlfile. Select the Dependencies tab.Click on the Add button in the Dependencies section.
A Select Dependency window will appear; enter Group Id as
org.springframework, Artifact Id asspring-webmvc, and Version as4.3.0.RELEASE. Select Scope as compile and then click on the OK button, as shown in the following screenshot: Adding the spring-webmvc dependency
Similarly, add the dependency for JavaServer Pages Standard Tag Library (JSTL) by clicking on the same Add button; this time, enter Group Id as
javax.servlet, Artifact Id asjstl, Version as1.2, and select Scope as compile.Finally, add one more dependency for servlet-api; repeat the same step with Group Id as
javax.servlet, Artifact Id asjavax.servlet-api, and Version as3.1.0, but this time, select Scope as provided and then click on the OK button.As a last step, don't forget to save the
pom.xmlfile.
In the Maven world, pom.xml (Project Object Model) is the configuration file that defines the required dependencies. While building our project, Maven will read that file and try to download the specified jars from the Maven central binary repository. You need Internet access in order to download jars from Maven's central repository. Maven uses an addressing system to locate a jar in the central repository, which consists of Group Id, Artifact Id, and Version.
Every time we add a dependency, an entry will be made within the <dependencies> </ dependencies> tags in the pom.xml file. For example, if you go to the pom.xml tab after finishing step 3, you will see an entry for spring-webmvc as follows with in <dependencies> </ dependencies> tag:
<dependency>
   <groupId>org.springframework</groupId>
   <artifactId>spring-webmvc</artifactId>
   <version>4.2.2.RELEASE</version>
</dependency>
We added the dependency for spring-mvc in step 3, and in step 4, we added the dependency for JSTL. JSTL is a collection of useful JSP (JavaServer Pages) tags that can be used to write JSP pages easily. Finally, we need a servlet-api.jar in order to use servlet-related code; this is what we added in step 5.
However, there is a little difference in the scope of the servlet-api dependency compared to the other two dependencies. We only need servlet-api while compiling our project. While packaging our project as war, we don't want to ship the servlet-api.jar as part of our project. This is because the Tomcat web server would provide the servlet-api.jar while deploying our project. This is why we selected the Scope as provided for servlet-api.
After finishing step 6, you will see all the dependent jars configured in your project, as shown in the following screenshot, under the Maven Dependencies library:

Showing Maven dependencies after configuring POM
We added only three jars as our dependencies, but if you look in our Maven dependency library list, you will see more than three jar entries. Can you guess why? What if our dependent jars have a dependency on other jars and so on?
For example, our spring-mvc.jar is dependent on the spring-core, spring-context, and spring-aop jars, but we have not specified those jars in our pom.xml file; this is called transitive dependencies in the Maven world. In other words, we can say that our project is transitively dependent on these jars. Maven will automatically download all these transitive dependent jars; this is the beauty of Maven. It will take care of all the dependency management automatically; we need to inform Maven only about the first-level dependencies.
We have created our project and added all the required jars, so we are ready to code. We are going to incrementally build an online web store throughout this book, chapter by chapter. As a first step, let's create a home page in our project to welcome our customers.
Our aim is simple; when we enter the URL http://localhost:8080/webstore/ on the browser, we would like to show a welcome page that is similar to the following screenshot:

Showing the welcome page of the web store
We are going to take a deep look at each concept in detail in the upcoming chapters. As of now, our aim is to have quick hands-on experience of developing a simple web page using Spring MVC. So don't worry if you are not able to understand some of the code here.
To create a welcome page, we need to execute the following steps:
Create a
webapp/WEB-INF/jsp/folder structure under thesrc/main/folder; create a JSP file calledwelcome.jspunder thesrc/main/webapp/WEB-INF/jsp/folder, and add the following code snippets into it and save it:<%@ taglib prefix="c" uri="http://java.sun.com/jsp/jstl/core"%> <!DOCTYPE html> <html lang="en"> <head> <meta charset="utf-8"> <meta http-equiv="X-UA-Compatible" content="IE=edge"> <meta name="viewport" content="width=device-width, initial-scale=1"> <title>Welcome</title> <link rel="stylesheet" href="https://maxcdn.bootstrapcdn.com/ bootstrap/3.3.5/css/bootstrap.min.css"> </head> <body> <div class="jumbotron"> <h1> ${greeting} </h1> <p> ${tagline} </p> </div> </body> </html>Create a class called
HomeControllerunder thecom.packt.webstore.controllerpackage in the source directorysrc/main/javaand add the following code into it:package com.packt.webstore.controller; import org.springframework.stereotype.Controller; import org.springframework.ui.Model; import org.springframework.web.bind.annotation.RequestMapping; @Controller public class HomeController { @RequestMapping("/") public String welcome(Model model) { model.addAttribute("greeting", "Welcome to Web Store!"); model.addAttribute("tagline", "The one and only amazing web store"); return "welcome"; } }
In step 1, we just created a JSP file; the important thing we need to notice here is the <h1> tag and the <p> tag. Both the tags have some expression that is surrounded by curly braces and prefixed by the $ symbol:
<h1> ${greeting} </h1>
<p> ${tagline} </p>
So, what is the meaning of ${greeting}? It means that greeting is a kind of variable; during rendering of this JSP page, the value stored in the greeting variable will be shown in the header 1 style, and similarly, the value stored in the tagline variable will be shown as a paragraph.
So now, the next question is where we will assign values to those variables arises. This is where the controller will be of help; within the welcome method of the HomeController class, take a look at the following lines of code:
model.addAttribute("greeting", "Welcome to Web Store!");
model.addAttribute("tagline", "The one and only amazing web store");
You can observe that the two variable names, greeting and tagline, are passed as a first parameter of the addAttribute method and the corresponding second parameter is the value for each variable. So what we are doing here is simply putting two strings, "Welcome to Web Store!" and "The one and only amazing web store", into the model with their corresponding keys as greeting and tagline. As of now, simply consider the fact that model is a kind of map data structure.
Tip
Folks with knowledge of servlet programming can consider the fact that model.addAttribute works exactly like request.setAttribute.
So, whatever value we put into the model can be retrieved from the view (JSP) using the corresponding key with the help of the ${} placeholder expression. In our case, greeting and tagline are keys.
We put values into the model, and we created the view that can read those values from the model. So, the Controller acts as an intermediate between the View and the Model; with this, we have finished all the coding part required to present the welcome page. So will we be able to run our project now? No. At this stage, if we run our project and enter the URL http://localhost:8080/webstore/ on the browser, we will get an HTTP Status 404 error. This is because we have not performed any servlet mapping yet.
Tip
So what is servlet mapping? Servlet mapping is a configuration of mapping a servlet to a URL or URL pattern. For example, if we map a pattern like /status/* to a servlet, all the HTTP request URLs starting with a text status such as http://example.com/status/synopsis or http://example.com/status/complete?date=today will be mapped to that particular servlet. In other words, all the HTTP requests that carry the URL pattern /status/* will be handed over to the corresponding mapped servlet class.
In a Spring MVC project, we must configure a servlet mapping to direct all the HTTP requests to a single front servlet. The front servlet mapping is a design pattern where all requests for a particular web application are directed to the same servlet. This pattern is sometimes called as Front Controller Pattern. By adapting the Front Controller design, we make front servlet have total control over the incoming HTTP request so that it can dispatch the HTTP request to the desired controller.
One such front servlet given by Spring MVC framework is the Dispatcher servlet (org.springframework.web.servlet.DispatcherServlet). We have not configured a Dispatcher servlet for our project yet; this is why we get the HTTP Status 404 error if we run our project now.
The Dispatcher servlet is what examines the incoming HTTP request and invokes the right corresponding controller method. In our case, the welcome method from the HomeController class needs to be invoked if we make an HTTP request by entering the http://localhost:8080/webstore/ URL on the browser. So let's configure the Dispatcher servlet for our project:
Create a class called
WebApplicationContextConfigunder thecom.packt.webstore.configpackage in the source directorysrc/main/javaand add the following code into it:package com.packt.webstore.config; import org.springframework.context.annotation.Bean; import org.springframework.context.annotation.ComponentScan; import org.springframework.context.annotation.Configuration; import org.springframework.web.servlet.config.annotation .DefaultServletHandlerConfigurer; import org.springframework.web.servlet.config.annotation .EnableWebMvc; import org.springframework.web.servlet.config.annotation .WebMvcConfigurerAdapter; import org.springframework.web.servlet.view .InternalResourceViewResolver; import org.springframework.web.servlet.view.JstlView; @Configuration @EnableWebMvc @ComponentScan("com.packt.webstore") public class WebApplicationContextConfig extends WebMvcConfigurerAdapter { @Override public void configureDefaultServletHandling (DefaultServletHandlerConfigurer configurer) { configurer.enable(); } @Bean public InternalResourceViewResolver getInternalResourceViewResolver() { InternalResourceViewResolver resolver = new InternalResourceViewResolver(); resolver.setViewClass(JstlView.class); resolver.setPrefix("/WEB-INF/jsp/"); resolver.setSuffix(".jsp"); return resolver; } }Create a class called
DispatcherServletInitializerunder thecom.packt.webstore.configpackage in the source directorysrc/main/javaand add the following code into it:package com.packt.webstore.config; import org.springframework.web.servlet.support .AbstractAnnotationConfigDispatcherServletInitializer; public class DispatcherServletInitializer extends AbstractAnnotationConfigDispatcherServletInitializer { @Override protected Class<?>[] getRootConfigClasses() { return null; } @Override protected Class<?>[] getServletConfigClasses() { return new Class[] { WebApplicationContextConfig.class }; } @Override protected String[] getServletMappings() { return new String[] { "/" }; } }
If you know about servlet programming, you might be quite familiar with the servlet configuration and web.xml, and in that case, you can consider the DispatcherServletInitializer class as similar to web.xml. In step 2, we configured a servlet of type DispatcherServlet by extending the AbstractAnnotationConfigDispatcherServletInitializer class, which is more or less similar to any other normal servlet configuration. The only difference is that we have not instantiated the DispatcherServlet class for that configuration. Instead, the servlet class (org.springframework.web.servlet.DispatcherServlet) is provided by the Spring MVC framework and we initialized it using the AbstractAnnotationConfigDispatcherServletInitializer class.
After this step, our configured DispatcherServlet will be ready to handle any requests that come to our application on runtime and will dispatch the request to the correct controller's method.
However, DispatcherServlet should know how to access the controller instances and view files that are located in our project, and only then can it properly dispatch the request to the correct controllers. So we have to give some hint to DispatcherServlet to locate the controller instances and view files.
This is what we configured within the getServletConfigClasses method of the DispatcherServletInitializer class. By overriding the getServletConfigClasses method, we are telling DispatcherServlet about our controller classes and view files. And in step 1, through the WebApplicationContextConfig class file, we configured the InternalResourceViewResolver and other default configurations.
Don't worry if you are not able to understand each and every configuration in the WebApplicationContextConfig and DispatcherServletInitializer classes; we will take a look deep into these configuration files in next chapter. As of now, just remember that this is a one-time configuration that is needed to run our project successfully.
We successfully created the project in the last section, so you might be curious to know what would happen if we run our project now. As our project is a web project, we need a web server to run it.
As we have already configured the Tomcat web server in our STS, let's use Tomcat to deploy and run our project:
Right-click on your project from Package Explorer and navigate to Run As | Run on Server.
A server selection window will appear with all the available servers listed; just select the server that we have configured, Tomcat v8.0.
At the bottom of the window, you can see a checkbox with the caption that says Always use this server when running this project; select this checkbox and enter the Finish button, as shown in the following screenshot:
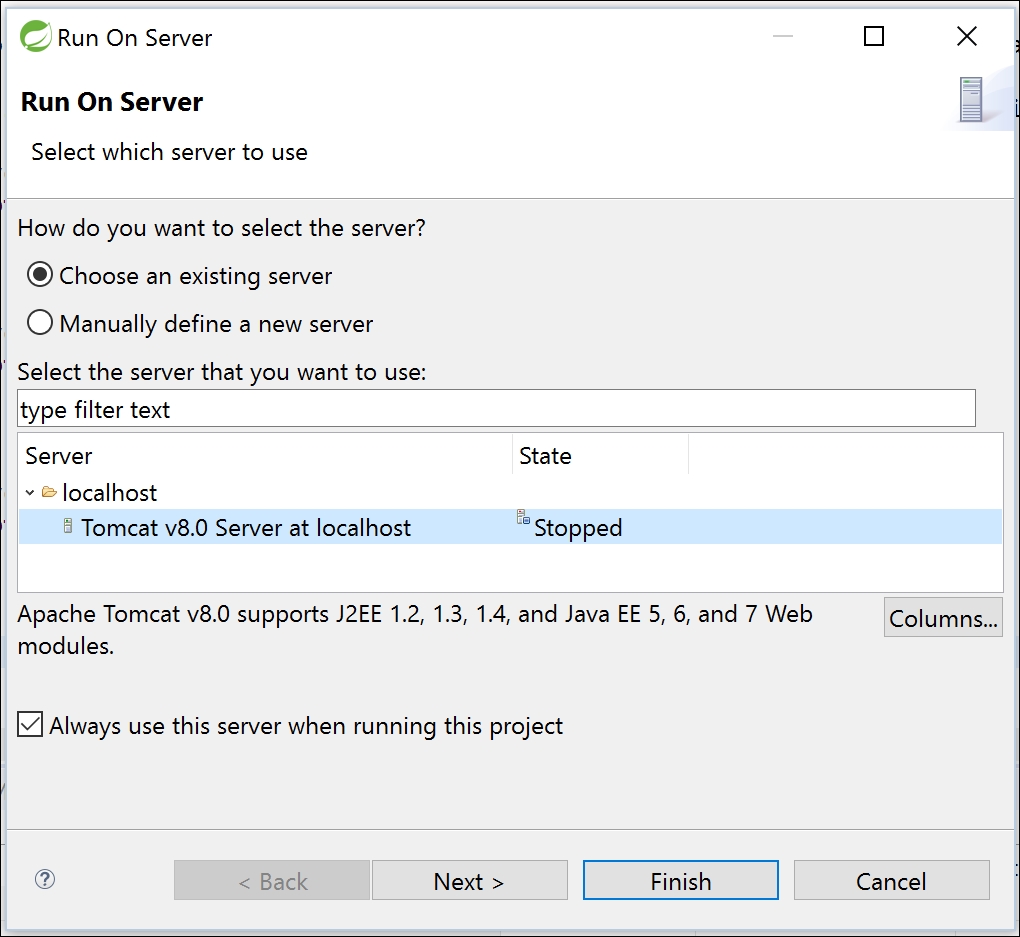 Configuring the default server for a Spring MVC project
Now you will see a web page that will show you a welcome message.
 Showing the welcome page of the web store
In this chapter, you saw how to install all the prerequisites that are needed to get started and run your first Spring MVC application, for example, installing JDK, the Maven build tool, the Tomcat servlet container, and STS IDE.
You also learned how to perform various configurations in our STS IDE for Maven and Tomcat, created your first Spring MVC project, and added all Spring-related dependent jars through the Maven configuration.
We had a quick hands-on experience of developing a welcome page for our webstore application. During that course, you learned how to put values into a model and how to retrieve these values from the model.
Whatever we have seen so far is just a glimpse of Spring MVC, but there is much more to uncover, for example, how the model, view and controllers are connected to each other and how the request flow occurs. We are going to explore these topics in the next chapter, so see you there.