


In this chapter, we will cover the basics of branding SharePoint 2013 sites using composed looks, color palettes, and font schemes. We will discuss the following recipes:
Applying a composed look
Changing the site master pages
Changing the site logo
Uploading a custom color palette
Uploading a custom font scheme
Creating a custom composed look
Using PowerShell to apply a composed look to all sites in a site collection
Using PowerShell to apply master page and logo settings to all sites in a farm
Microsoft SharePoint Server 2013 offers a variety of methods to apply styles and branding elements that range from simple configuration settings to custom code-based solutions. Before we explore the more advanced branding capabilities of SharePoint Server 2013, we will cover the basic branding offerings.
At the most basic level, branding and styling SharePoint includes applying one of the included master pages, setting the site logo, applying a color palette, and applying a font scheme. These elements, when combined, comprise a composed look.
Master pages are a feature of the ASP.NET web application framework that SharePoint leverages to provide a consistent look and feel for all pages within a SharePoint site.
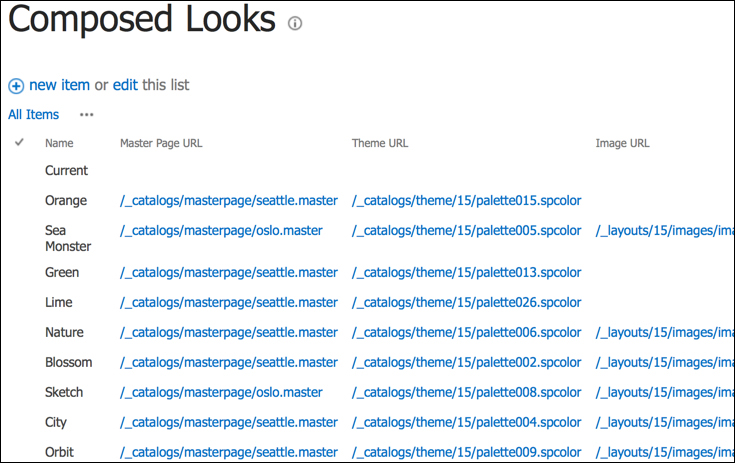
Composed looks are stored as list items in the _catalogs/design list of each SharePoint site. Each composed look item contains the master page URL, color palette URL, font scheme URL, background image URL, and display order in relation to other composed looks.
SharePoint 2007 and 2010 each included theming capabilities. However, the theming capabilities in SharePoint 2013 are completely new in how they work and the level of customization they provide.
Note
Microsoft SharePoint has a number of online forums and communities that you can join and participate in. You can use the following communities to help you with all of your SharePoint endeavors:
Twitter #SharePoint: http://twitter.com/#sharepoint
SharePoint StackExchange: http://sharepoint.stackexchange.com
MSDN SharePoint forum: http://social.msdn.microsoft.com/Forums/en-US/category/sharepoint
TechNet SharePoint forum: http://social.technet.microsoft.com/Forums/en-US/category/sharepoint
When applying an existing composed look to an existing SharePoint site, it is important to note that the only method available for applying the composed look as it exists in the _catalogs/design list is with the SharePoint web interface. To apply the components of a composed look with PowerShell or .NET code, each property must be specified individually. In this recipe, we will use the SharePoint web interface to apply a composed look as well as use PowerShell and .NET code to apply the components of a composed look.
Tip
From PowerShell or .NET code, the individual properties of the list item representing the composed look could be used when applying the individual components.
Follow these steps to apply the composed look:
Navigate to the site in your preferred web browser.

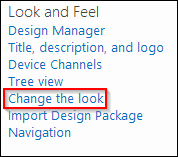
Navigate to the Change the look page. We can do this in two ways:
Select Change the look from the Settings menu.

Select Site settings from the Settings menu. Then select Change the look from the Look and Feel section.
From the available composed looks, click on the preview image to select a composed look.
Before trying out the selected composed look, we can change the background image, color palette, site layout (master page), and font scheme.

Select Try it out to preview the composed look and your configured options live on your SharePoint site.

If you are satisfied with the design changes, select Yes, keep it to apply the styling. Otherwise, select No, not quite there to return to the previous screen.

An SPWeb object represents a SharePoint site in the SharePoint database and server-side object model. When we apply a composed look, the color palette, font scheme, and background image are used to create a new SPTheme object and it is assigned to the ThemeInfo property of the SPWeb object. The site layout, which is a reference to the URL of a master page, is assigned to the MasterUrl (used for system and settings pages) and CustomMasterUrl (used for content pages) properties of the SPWeb object. The SPWeb object is then saved to the SharePoint database.
When previewing the design changes live on your SharePoint site, SharePoint appends query strings to the home page of the site to instruct the site to use the provided theme information instead of what is currently configured. This is displayed within IFRAME on the page to allow us to preview the SharePoint site, but not interact with it.
A composed look may also be applied with PowerShell or code using the server-side object model.
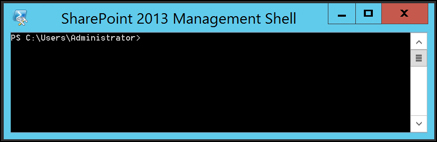
To launch PowerShell with the SharePoint snap-in loaded, you can select SharePoint 2013 Management Shell from the Start menu. You can also launch Windows PowerShell from the Start menu and manually load the SharePoint snap-in with the following command:
Add-PSSnapin Microsoft.SharePoint.PowerShell
You will see the SharePoint 2013 Management Shell command prompt as shown in the following screenshot:
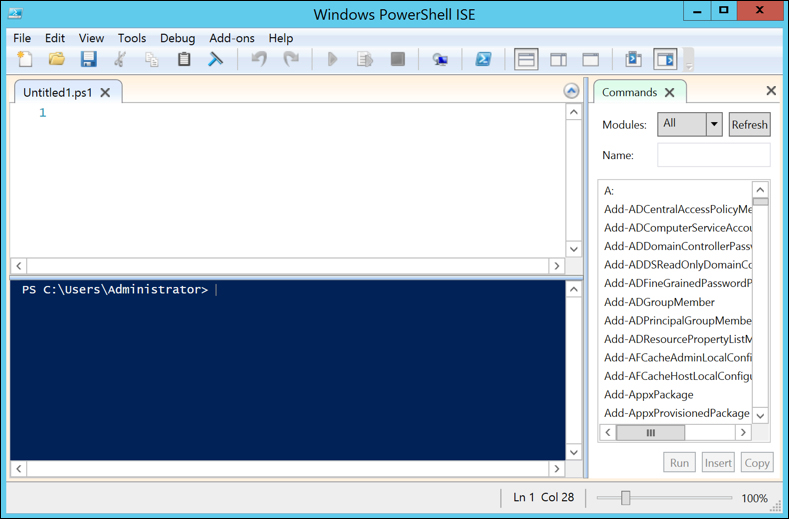
In addition, the Windows PowerShell ISE application provides the PowerShell command prompt with a user interface to simply create and execute PowerShell scripts.
Note
PowerShell scripts are plain text files with a .ps1 file extension. You can create and edit them with Notepad, however applications such as PowerShell ISE provide additional editing capabilities that assist in writing PowerShell scripts.
Follow these steps to apply a composed look with PowerShell:
Use the
Get-SPWebCmdlet to get the SharePoint site:$web = Get-SPWeb http://sharepoint/siteUse the
ApplyThememethod to apply the color palette, font scheme, and background image by their URLs. Specifyfalsefor the last parameter to instruct SharePoint to place the files generated for this theme within the current site:$web.ApplyTheme("/_catalogs/theme/15/Palette015.spcolor", "/_catalogs/theme/15/fontscheme001.spfont", "/images/background.png", $false))Use the
Updatemethod to apply the changes:$web.Update()
Use the
Disposemethod to discard theSPWebobject:$web.Dispose()
Tip
You can download the example code files for all Packt books you have purchased from your account at http://www.packtpub.com. If you purchased this book elsewhere, you can visit http://www.packtpub.com/support and register to have the files e-mailed directly to you.
Interacting with the server-side object model in C# requires a reference to the Microsoft.SharePoint.dll assembly found at C:\Program Files\Common Files\Microsoft Shared\Web Server Extensions\15\ISAPI. In addition, the code must be running in a .NET context on the SharePoint server. This includes, but is not limited to, Windows services, Windows applications, PowerShell Cmdlets, SharePoint timer jobs, SharePoint web parts, and SharePoint application pages.
Follow these steps to apply a composed look with code using the server-side object model:
Open the site collection containing the site in a
usingstatement:using (var site = new SPSite("http://sharepoint/site"))If opening the
SPSiteorSPWebobjects from code without theusingstatement, dispose of the objects when you are done with them. This ensures that the objects are removed from memory and clears up connection resources for SharePoint.Open the site in a
usingstatement:using (var web = site.OpenWeb())
In the SharePoint databases and server-side object model, the
SPSiteobject represents a site collection and theSPWebobject represents a site.Use the
ApplyThememethod to apply the color palette, font scheme, and background image by their URLs. Specifyfalsefor the last parameter to instruct SharePoint to place the files generated for this theme within the current site:web.ApplyTheme("/_catalogs/theme/15/Palette015.spcolor", "/_catalogs/theme/15/fontscheme001.spfont", "/images/background.png", false);Use the
Updatemethod to apply the changes:web.Update();
The Themes overview for SharePoint 2013 article on MSDN at http://msdn.microsoft.com/en-us/library/jj927174.aspx
The SPWeb class topic on MSDN at http://msdn.microsoft.com/en-us/library/Microsoft.SharePoint.SPWeb.aspx
The SPSite class topic on MSDN at http://msdn.microsoft.com/en-us/library/microsoft.sharepoint.spsite.aspx
The Get-SPWeb topic on TechNet at http://technet.microsoft.com/en-us/library/ff607807.aspx
Master pages are a feature of the ASP.NET web application framework that SharePoint leverages to provide a consistent look and feel for all pages within a SharePoint site. These can be used to provide various styling and branding configurations. SharePoint Server 2013 ships with two master pages that can be applied to SharePoint 2013 sites: seattle and oslo. The seattle master page is the default used when creating new SharePoint sites.
Each SharePoint site uses two configured master pages: the site master page and the system master page. The site master page is used when displaying content pages, libraries, lists, and so on, whereas the system master page is used when displaying settings and administrative pages.
SharePoint 2013 allows site collections to be configured to run in SharePoint 2010 or SharePoint 2013 compatibility modes. Master pages are only made available to the compatibility mode they are designed for. Thus, SharePoint 2010 master pages cannot be applied to a SharePoint 2013 site and vice versa.
In order to change the master page settings for a SharePoint site, the SharePoint Server Publishing Infrastructure site collection feature and SharePoint Server Publishing site feature must be activated.
Tip
Downloading the example code
You can download the example code files for all Packt books you have purchased from your account at http://www.packtpub.com. If you purchased this book elsewhere, you can visit http://www.packtpub.com/support and register to have the files e-mailed directly to you
Follow these steps to change the site master pages:
Navigate to the site in your preferred web browser. It should look like the following screenshot:
Select Master page from the Look and Feel section, as shown in the following screenshot:

Select the site master page and the system master page to use. In this example, we will use the oslo master page:

Click on OK to save the changes. Now, the site will look like the following screenshot:

The site relative URL for the selected site master page is assigned to the MasterUrl property of the SPWeb object representing the current site and the site relative URL for the system master page is set to the CustomMasterUrl property. The SPWeb object is then updated and saved to the SharePoint database.
Site master pages may also be applied with PowerShell or code using the server-side object model.
Follow these steps to change the site master pages using PowerShell:
Use the
Get-SPWebCmdlet to get the SharePoint site:$web = Get-SPWeb http://sharepoint/siteSet the
MasterUrlandCustomMasterUrlproperties to configure the master pages by their URLs:$web.MasterUrl = "/_catalogs/masterpages/seattle.master" $web.CustomMasterUrl = "/_catalogs/masterpages/seattle.master"
Use the
Updatemethod to apply the changes:$web.Update()Use the
Disposemethod to discard theSPWebobject:$web.Dispose()
Follow these steps to change the site master pages with code using the server-side object model:
Open the site collection containing the site in a
usingstatement:using (var site = new SPSite("http://sharepoint/site"))Open the site in a
usingstatement:using (var web = site.OpenWeb())
Set the
MasterUrlandCustomMasterUrlproperties to configure the master pages by their URLs:web.MasterUrl = "/_catalogs/masterpages/seattle.master"; web.CustomMasterUrl = "/_catalogs/masterpages/seattle.master";
Use the
Updatemethod to apply the changes:web.Update();
The How to: Apply a master page to a site in SharePoint 2013 article on MSDN at http://msdn.microsoft.com/en-us/library/jj862339.aspx
The SPWeb class topic on MSDN at http://msdn.microsoft.com/en-us/library/Microsoft.SharePoint.SPWeb.aspx
The SPSite class topic on MSDN at http://msdn.microsoft.com/en-us/library/microsoft.sharepoint.spsite.aspx
The Get-SPWeb topic on TechNet at http://technet.microsoft.com/en-us/library/ff607807.aspx
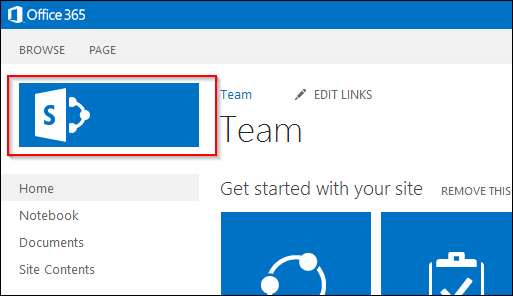
The logo is the image displayed, usually in the upper-left corner, on each page in a SharePoint site. Clicking on the logo returns the user to the root home page of the SharePoint site, as shown in the following screenshot:
To complete this recipe you will need an image uploaded or available to upload to the SharePoint site.
Follow these steps to change the site logo:
Navigate to the site in your preferred web browser.
Select Site settings from the Settings menu.
Select Title, description, and logo from the Look and Feel section.

Under Insert Logo, select the logo by clicking on FROM COMPUTER to upload a new image or by clicking on FROM SHAREPOINT to use an image already existing in the SharePoint site.
Add a simple and short description for the logo in the Enter a description textbox as shown in the following screenshot:

Click on OK to save the changes. The logo should appear as shown in the following screenshot:

The site relative URL for the logo image is assigned to the SiteLogoUrl property of the SPWeb object representing the site, and the logo description is set to the SiteLogoDescription property. The SPWeb object is then saved to the SharePoint database. The logo description will be used as the alternative text for the logo that will be displayed when hovering over the image with a mouse, as well as used by non-standard browsers such as screen readers.
The site logo and description may also be applied with PowerShell or code using the server-side object model.
Follow these steps to change the site logo using PowerShell:
Get the SharePoint site using the
Get-SPWebCmdlet:$web = Get-SPWeb http://sharepoint/siteSet the
SiteLogoUrlproperty to specify the URL of the image logo and theSiteLogoDescriptionproperty to specify the alternative text for the logo:$web.SiteLogoUrl = "/SiteAssets/logo.png" $web.SiteLogoDescription = "My PowerShell Site"
Use the
Updatemethod to apply the changes:$web.Update()Use the
Disposemethod to discard theSPWebobject:$web.Dispose()
Follow these steps to change the site logo with code using the server-side object model:
Open the site collection containing the site in a
usingstatement:using (var site = new SPSite("http://sharepoint/site"))Open the site in a
usingstatement:using (var web = site.OpenWeb())
Set the
SiteLogoUrlproperty to specify the URL of the image logo and theSiteLogoDescriptionproperty to specify the alternative text for the logo:web.SiteLogoUrl = "/SiteAssets/logo.png"; web.SiteLogoDescription = "My PowerShell Site";
Use the
Updatemethod to apply the changes:web.Update();
The SPWeb class topic on MSDN at http://msdn.microsoft.com/en-us/library/Microsoft.SharePoint.SPWeb.aspx
The SPSite class topic on MSDN at http://msdn.microsoft.com/en-us/library/microsoft.sharepoint.spsite.aspx
The Get-SPWeb topic on TechNet at http://technet.microsoft.com/en-us/library/ff607807.aspx
SharePoint 2013 comes with 32 color palettes. If you are incorporating the branding of an organization you will likely need to customize the colors to match. Color palettes are simple XML files; however, they contain over 90 configured values. Identifying the appropriate values to update manually can be tedious. To simplify the process of creating new color palettes, Microsoft has made available the SharePoint Color Palette Tool for download. This tool can be downloaded from http://www.microsoft.com/en-us/download/details.aspx?id=38182.
The SharePoint Color Palette Tool provides:
A live preview using the same layout as the live preview when configuring and applying a composed look, which we covered previously
The configuration of each color element
The configuration of which colors to use, when displaying in the color palette's drop-down list in the web interface
The option to preview with a background image
A preview utilizing various layouts in order to ensure the color palette applies well to the various page layouts and provides proper contrast between elements
We won't go into all of the details of using the tool to create color palettes. We will, however, cover how to upload the color palettes once created by the SharePoint Color Palette Tool.
To complete this recipe you will need a custom color palette created and ready to upload.
Follow these steps to upload a custom color palette:
Navigate to the site in your preferred web browser.
Select Site settings from the Settings menu.
Select Themes from the Web Designer Galleries section.

Select the folder named
15.Select New Document to upload and save the color palette file.
The SharePoint color palettes are simply stored as files in a folder in a document library found at /_catalogs/theme/15. In this recipe, we uploaded our custom color palette to this document library and made it available for use when applying composed looks. The following screenshot shows our custom color palette in the folder named 15 which is inside the Theme Gallery library:

A color palette may also be uploaded with SharePoint Designer 2013, PowerShell, or code using the server-side object model.
SharePoint Designer 2013 can be used to browse and manage document libraries in SharePoint 2013. Follow these steps to upload a custom color palette using SharePoint Designer 2013:


Follow these steps required to upload a custom color palette using PowerShell:
Get the site using the
Get-SPWebCmdlet:$web = Get-SPWeb http://sharepoint/siteAssign the path of the color palette file to a variable:
$filePath = "C:\mypalette.spcolor"Get the
/_catalogs/theme/15folder from theSPWebobject:$themeFolder = $web.Folders["_catalogs"].Subfolders["theme"].Subfolders["15"]Get the filename from the file path using the
GetFileNamemethod of theSystem.IO.Pathclass:$fileName = [System.IO.Path]::GetFileName($filePath)Get the contents of the file using the
OpenReadmethod of theSystem.IO.Fileclass:$fileStream = [System.IO.File]::OpenRead($filePath)Add the file to the
Filescollection of the folder using the name of the file and file contents. We are setting the third parameter totrueto specify that this should override an existing file if it already exists by the same name:$themeFolder.Files.Add($fileName, $fileStream, $true)Call the
Updatemethod on the folder to update theFilescollection:$themeFolder.Update()Use the
Disposemethod to discard theSPWebobject:$web.Dispose()
Follow these steps to upload a custom color palette with code using the server-side object model:
Open the site collection containing the site in a
usingstatement:using (var site = new SPSite("http://sharepoint/site"))Open the site in a
usingstatement:using (var web = site.OpenWeb())
Assign the path of the color palette file to a variable:
var filePath = "C:\mypalette.spcolor";
Get the
/_catalogs/theme/15folder from theSPWebobject:var themeFolder = web.Folders["_catalogs"].SubFolders["theme"].SubFolders["15"];
Get the filename using the
GetFileNamemethod of theSystem.IO.Pathclass:var fileName = Path.GetFileName(filePath);
Get the contents of the file using the
OpenReadmethod of theSystem.IO.Fileclass:var fileStream = File.OpenRead(filePath);
Add the file to the
Filescollection of the folder using the name of the file and file contents. We are setting the third parameter totrueto specify that this should override an existing file if it already exists by the same name:themeFolder.Files.Add(fileName, fileStream, true);
Call the
Updatemethod on the folder to update theFilescollection:themeFolder.Update();
The Color palettes and fonts in SharePoint 2013 article on MSDN at http://msdn.microsoft.com/en-us/library/jj945889.aspx
The How to: Upload a file to a SharePoint Site from a Local Folder article on MSDN at http://msdn.microsoft.com/en-us/library/ms454491(v=office.14).aspx
The SPWeb class topic on MSDN at http://msdn.microsoft.com/en-us/library/Microsoft.SharePoint.SPWeb.aspx
The SPSite class topic on MSDN at http://msdn.microsoft.com/en-us/library/microsoft.sharepoint.spsite.aspx
The Get-SPWeb topic on TechNet at http://technet.microsoft.com/en-us/library/ff607807.aspx
Similar to color palettes, font schemes are XML files that define which fonts to use for displaying various texts in the web interface. Unlike color palettes, however, Microsoft has not released any tools to simplify the font scheme creation process. Font schemes are stored in the same location as that of color palettes in the /_catalogs/theme/15 folder. SharePoint 2013 ships with eight font schemes with SharePointPersonality.spfont as the default.
When creating a new font scheme it is simplest to start with an existing one. If we download the SharePointPersonality.spfont font scheme file, we can use that as the basis for creating our own font scheme in any text editor.
There are three properties to define for our custom font scheme: name, previewSlot1, and previewSlot2. The preview slots use the fonts specified for those font slots when displaying the font scheme in the list of available font schemes to use in the web interface. There are seven font slots that can be configured:
Title
Navigation
Large-heading
Heading
Small-heading
Large-body
Body
In the default font scheme, each font slot includes the following tags:
Latin typeface (for example,
<s:latin typeface="Segoe UI Light" />) that is used by languages that use Latin scriptEast Asian typeface (for example,
<s:ea typeface="" />) that is used by languages that use East Asian scriptComplex script typeface (for example,
<s:cs typeface="Segoe UI Light" />) that is used by languages, which use complex scripts (languages whose characters require ligation or shaping)Fonts that target a specific script with a typeface (for example,
<s:font script="Arab" typeface="Segoe UI Light" />,<s:font script="Deva" typeface="Nirmala UI" />, and so on)
In order to be compatible with SharePoint, each font slot requires the Latin typeface, East Asian typeface, and complex script typeface tags. The additional fonts included for specific scripts are optional and may be removed if you do not require support for those scripts.
In addition to system fonts that will be broadly available, we can use fonts that will be downloaded by the browser if they do not exist on the local system. Using the example from fontscheme001.spfont, we can specify the source locations for the various font formats:
<s:latin typeface="Bodoni Book" eotsrc="/_layouts/15/fonts/BodoniBook.eot" woffsrc="/_layouts/15/fonts/BodoniBook.woff" ttfsrc="/_layouts/15/fonts/BodoniBook.ttf" svgsrc="/_layouts/15/fonts/BodoniBook.svg" />
When using custom fonts, it is important to include all four formats for maximum compatibility with web browsers. In addition, it is important to ensure that you have rights to use a font before distributing it via your SharePoint site. There are a number of Internet sites that can convert a font into these four formats for you. One such site is http://www.web-font-generator.com/.
To complete this recipe you will need a custom font scheme created and ready to upload.
Follow these steps to upload a custom font scheme:
Navigate to the site in your preferred web browser.
Select Site settings from the Settings menu.
Select Themes in the Web Designer Galleries section.
Select the folder named
15.Select New Document to upload and save the font scheme file.
SharePoint font schemes are simply stored as files in a folder in a document library found at /_catalogs/theme/15. In this recipe, we uploaded our custom font scheme to this document library and made it available for use when applying composed looks.
A font scheme may also be uploaded with SharePoint Designer 2013, PowerShell, or code using the server-side object model. We covered how to do this in the previous recipe, Uploading a custom color palette.
The Color palettes and fonts in SharePoint 2013 article on MSDN at http://msdn.microsoft.com/en-us/library/jj945889.aspx
The How to: Upload a File to a SharePoint Site from a Local Folder article on MSDN at http://msdn.microsoft.com/en-us/library/ms454491(v=office.14).aspx
The SPWeb class topic on MSDN at http://msdn.microsoft.com/en-us/library/Microsoft.SharePoint.SPWeb.aspx
The SPSite class topic on MSDN at http://msdn.microsoft.com/en-us/library/microsoft.sharepoint.spsite.aspx
The Get-SPWeb topic on TechNet at http://technet.microsoft.com/en- us/library/ff607807.aspx
Composed looks are stored as items in the _catalogs/design list within each SharePoint site. They can specify the master page, color palette, font scheme, background image, and display order in relation to other composed looks.
Follow these steps to create a custom composed look:
Navigate to the site in your preferred web browser.
Select Site settings from the Settings menu.
Select Composed looks in the Web Designer Galleries section.

Click on New Item to create a new composed look item in the list.
Enter the name for the composed look in both the Title and Name fields.
Enter the URLs to the master page, color palette, background image, and font scheme files in both the Web Address and Description fields for each section.
Enter the Display Order.
Click on Save.
Composed looks are simply stored as items in the _catalogs/design list. When a composed look is applied to a site the items specified in the composed look are used to create a SPTheme object that then gets applied to the SPWeb object representing the site. If no background image is specified, none will be applied when using this composed look. If no font scheme is specified, the default SharePointPersonality.spfont font scheme will be applied when using this composed look.
Lastly, the Display Order option is used to sort the available composed looks when choosing which composed look to apply to a site. Have a look at the following screenshot:
A composed look can be created with PowerShell or code using the server-side object model.
Follow these steps to create a custom composed look using PowerShell:
Get the site using the
Get-SPWebCmdlet:$web = Get-SPWeb http://sharepoint/siteGet the
SPListobject representing the_catalogs/designlist from theSPWebobject:$list = $web.Lists["Composed Looks"]Add a new
SPListItemto theItemscollection of theSPListobject:$item = $list.Items.Add()Assign the values to each of the properties of the
SPListItemobject:$item["Title"] = "PowerShell" $item["Name"] = "PowerShell" $item["Master Page URL"] = "/_catalogs/masterpages/seattle.master" $item["Theme URL"] = "/_catalogs/theme/15/palette005.spcolor" $item["Image URL"] = "/_layouts/15/images/image_bg005.jpg" $item["Font Scheme URL"] = "/_catalogs/theme/15/fontscheme003.spfont" $item["Display Order"] = "200"
Use the
Updatemethod onSPListto update theItemscollection:$item.Update()Use the
Disposemethod to discard theSPWebobject:$web.Dispose()
Follow these steps to create a custom composed look with code using the server-side object model:
Open the site collection containing the site in a
usingstatement:using (var site = new SPSite("http://sharepoint/site"))Open the site in a
usingstatement:using (var web = site.OpenWeb())
Get the
SPListobject representing the_catalogs/designlist from theSPWebobject:var list = web.Lists["Composed Looks"];
Add a new
SPListItemto theItemscollection of theSPListobject:var item = list.Items.Add();
Assign the values to each of the properties of the
SPListItemobject:item["Title"] = "PowerShell"; item["Name"] = "PowerShell"; item["Master Page URL"] = "/_catalogs/masterpages/seattle.master"; item["Theme URL"] = "/_catalogs/theme/15/palette005.spcolor"; item["Image URL"] = "/_layouts/15/images/image_bg005.jpg";
item["Font Scheme URL"] = "/_catalogs/theme/15/fontscheme003.spfont";

item["Display Order"] = "200";
Use the
Updatemethod on theSPListobject to update theItemscollection:item.Update();
The Themes overview for SharePoint 2013 article on MSDN at http://msdn.microsoft.com/en-us/library/jj927174.aspx
The How to: Add or Delete List Items article on MSDN at http://msdn.microsoft.com/en-us/library/ms467435(v=office.14).aspx
The SPWeb class topic on MSDN at http://msdn.microsoft.com/en-us/library/Microsoft.SharePoint.SPWeb.aspx
The SPSite class topic on MSDN at http://msdn.microsoft.com/en-us/library/microsoft.sharepoint.spsite.aspx
The Get-SPWeb topic on TechNet at http://technet.microsoft.com/en-us/library/ff607807.aspx
Windows PowerShell provides administrators with the ability to create complex scripts that utilize Cmdlets and .NET code. The Microsoft SharePoint PowerShell snap-in exposes many of the common administrative functions of SharePoint as Cmdlets. For the rest, we can use the server-side object model.
Since composed looks are applied at the site level, it can be cumbersome to apply them to a large number of sites. In this recipe, we are going to use PowerShell to iterate through all of the SharePoint sites in a site collection to apply a composed look.
Tip
When using complex PowerShell, it is ideal to write the commands in a text file with a .ps1 extension and then execute the script from the PowerShell session. This allows us to easily use the foreach loops and other techniques that are common to programming.
Follow these steps to apply a composed look to all sites in a site collection using PowerShell:
Open your preferred text editor to create the
.ps1script file.Get the site collection with the
Get-SPSiteCmdlet:$site = Get-SPSite http://sharepoint/siteUse a
foreachloop to iterate through eachSPWebin theAllWebsproperty of theSPSiteobject:foreach ($web in $site.AllWebs)Check if
SPWebexists:if ($web.Exists)Apply the composed look using the
ApplyThememethod:$web.ApplyTheme("/_catalogs/theme/15/Palette015.spcolor", "/_catalogs/theme/15/SharePointPersonality.spfont", "/_layouts/15/images/image_bg011.jpg", $false)Use the
Disposemethod to discard theSPWebobject:$web.Dispose()Use the
Disposemethod to discard theSPSiteobject:$site.Dispose()Save the file as a
PS1file, for example,applycomposedlook.ps1.Execute the script in the PowerShell session:
./applycomposedlook.ps1
Using PowerShell we can easily create scripts to perform tasks that would normally require a tedious amount of manual work. In this recipe, we iterated through each site in the AllWebs property of the site collection that we obtained using the Get-SPSite Cmdlet. For each SharePoint site, we used the ApplyTheme method to apply our composed look.
The steps performed in PowerShell may also be completed with code using the server-side object model. Follow these steps to apply a composed look to all sites in a site collection with code using the server-side object model:
Open the site collection in a
usingstatement:using (var site = new SPSite("http://sharepoint/site")Use a
foreachloop to iterate through eachSPWebin theAllWebsproperty of theSPSiteobject:foreach (var web in site.AllWebs)
Check if the
SPWebexists:if (web.Exists)
Apply the composed look using the
ApplyThememethod:web.ApplyTheme("/_catalogs/theme/15/Palette015.spcolor", "/_catalogs/theme/15/SharePointPersonality.spfont", "/_layouts/15/images/image_bg011.jpg", false);Use the
Disposemethod to discard theSPWebobject:web.Dispose();
The Themes overview for SharePoint 2013 article on MSDN at http://msdn.microsoft.com/en-us/library/jj927174.aspx
The SPWeb class topic on MSDN at http://msdn.microsoft.com/en-us/library/Microsoft.SharePoint.SPWeb.aspx
The SPSite class topic on MSDN at http://msdn.microsoft.com/en-us/library/microsoft.sharepoint.spsite.aspx
The Get-SPSite topic on TechNet at http://technet.microsoft.com/en-us/library/ff607950.aspx
For this recipe, we are using a PowerShell script to apply master page and logo settings to each SharePoint site in every site collection of each web application on the local SharePoint farm.
Follow these steps to apply master page and logo settings to all sites in the local SharePoint farm using PowerShell:
Open your preferred text editor to create the
.ps1script file.Use a
foreachloop to iterate through each content ofSPWebApplicationon the local SharePoint farm using theGet-SPWebApplicationCmdlet:foreach($webApp in (Get-SPWebApplication))Use a
foreachloop to iterate through eachSPSitein theSitesproperty of theSPWebApplicationobject:foreach($site in $webApp.Sites)Verify the
CompatibilityLevelproperty ofSPSiteto ensure it is in SharePoint 2013 (Version 15) mode and not in SharePoint 2010 (Version 14) mode.if ($site.CompatibilityLevel –eq 15)Use a
foreachloop to iterate through eachSPWebin theAllWebsproperty of theSPSiteobject:foreach ($web in $site.AllWebs)Check if the
SPWebobject exists:if ($web.Exists)Set the master page and logo properties for the
SPWebobject:$web.SiteLogoUrl = "/SiteAssets/logo.png" $web.SiteLogoDescription = "My PowerShell Site" $web.MasterUrl = "/_catalogs/masterpages/seattle.master" $web.CustomMasterUrl = "/_catalogs/masterpages/seattle.master"
Use the
Updatemethod on theSPWebobject to save the changes:$web.Update()Use the
Disposemethod to discard theSPWebobject:$web.Dispose()Use the
Disposemethod to discard theSPSiteobject:$site.Dispose()Save the file as a
PS1file, for example,applymasterpageandlogo.ps1.Execute the script in the PowerShell session:
./applymasterpageandlogo.ps1
In this recipe, we retrieved all of the content web applications using the Get-SPWebApplication Cmdlet. We then iterated through each site collection in the Sites property of each web application and then iterated through each site in the AllWebs property of each site collection. For each site, we updated the properties for the logo and master pages.
The steps performed in PowerShell may also be completed in code using the server-side object model. Follow these steps to apply master page and logo settings to all sites on the local SharePoint farm with code using the server-side object model:
Use a
foreachloop to iterate through each contentSPWebApplicationon the local SharePoint farm:foreach (var webApp in SPWebService.ContentService.WebApplications)
Use a
foreachloop to iterate through eachSPSitein theSitesproperty of theSPWebApplicationobject:foreach (var site in webApp.Sites)
Verify the
CompatibilityLevelproperty ofSPSiteto ensure it is in SharePoint 2013 (Version 15) mode and not in SharePoint 2010 (Version 14) mode:if (site.CompatibilityLevel == 15)
Use a
foreachloop for iterating through eachSPWebin theAllWebsproperty of theSPSiteobject:foreach (var web in site.AllWebs)
Check if the
SPWebexists:if (web.Exists)
Set the master page and logo properties on the
SPWebobject:web.SiteLogoUrl = "/SiteAssets/logo.png"; web.SiteLogoDescription = "My Code Site"; web.MasterUrl = "/_catalogs/masterpages/seattle.master"; web.CustomMasterUrl = "/_catalogs/masterpages/seattle.master";
Use the
Updatemethod on theSPWebobject to save the changes:web.Update();
Use the
Disposemethod to discard theSPSiteandSPWebobjects:web.Dispose(); site.Dispose();
The SPWebApplication class topic on MSDN at http://msdn.microsoft.com/en-us/library/microsoft.sharepoint.administration.spwebapplication.aspx
The SPWeb class topic on MSDN at http://msdn.microsoft.com/en-us/library/Microsoft.SharePoint.SPWeb.aspx
The SPSite class topic on MSDN at http://msdn.microsoft.com/en-us/library/microsoft.sharepoint.spsite.aspx
The Get-SPWebApplication topic on TechNet at http://technet.microsoft.com/en-us/library/ff607562.aspx
