Download code from GitHub
Service-Now, probably is the most spoken IT Operation / IT Service Management application/tool these days. So what exactly is Service-Now and what does it does? Service-Now is the cloud-based enterprise application which offers everything-as-a-service, Service-Now has large portfolio of services including platform as service, finance, marketing, field operation and so on. Service-Now holds vital position in the market of IT service management, IT operations management and IT business management applications. If anyone asks me what it is, then I always say that it may be an application/tool which might address most of your IT operational issues. If we go the little further on application level then we can say that Service-Now application is the collection of many small applications which are committed to different processes. Service-Now does provide the capability to application developers to develop a desired application in less time as well, which makes it more powerful and preferred to the customers. Many IT and non IT companies are moving from their legacy service management suites / help desk tools to the cloud-based Service-Now. So, the question that arises is, why is Service-Now attracting many IT and non IT customers? To answer this question, we should go to the ground zero of Service-Now, which will help to understand Service-Now from delivering business values. I will start with the ground zero of Service-Now and will gradually move toward the top with some very interesting recipes.
In this chapter, we will cover the following recipes:
Service-Now prerequisite
Service-Now and ITIL framework
Understanding Service-Now procurement
Understanding Service-Now roles and licensing
Understanding Service-Now setup
Accessing Service-Now application
Microsoft Active Directory authentication
Logging in to the Service-Now application portal or end user view
Creating service requests from the Service-Now portal
Understanding the Service-Now IT view
Understanding Service-Now self-service application
Understanding Service-Now service desk application
Understand Unique record identifier
Using the incident management application
How to use create related lists of applications
Using the problem management application
Using the change management application
Creating the change / problem task from incident task
Many customers from different industries such as banking, insurance, manufacturing, oil, and gas are using Service-Now software, but please keep in mind that every practice or customer may have its own unique operational environment. So now let's begin the Service-Now journey! You know by now that Service-Now is a service management suite but if you are thinking that it is the only one in the service management applications market then you are not correct. Names that come to my mind when I think about the other service management tools include: BMC Remedy, HP Service Manager, and VMWARE Service Manager.
Service-Now is based on the Information Technology Infrastructure Library (ITIL) framework, which is an integrated, process based, best practice framework for managing IT services. The recipes in this chapter will give you a detailed overview of the Service-Now modules and the ITIL v3.0 framework, and we will also see how Service-Now is leveraging the ITIL framework.
To start with Service-Now, you should have a basic understanding of Java scripting and SQL. Please keep in mind that as an admin or developer you are not allowed to access the database layer or application code layer but Service-Now provides its own classes, functions, and methods for development and other work. In addition, if we talk about the supporting technology behind this application, then Service-Now is Java-based and uses Oracle, MySQL, and SQL server databases and as a web server, Tomcat is being used.
Service-Now is an IT service management tool and it follows the ITIL v3.0 framework but, now Service-Now is currently expanding its footprint into many other portfolios as well, such as legal management, marketing management, and cost management and so on.
The ITIL v3.0 framework has five phases, but Service-Now has supporting modules or applications for the following ITIL phases only:
Service design
Service transition
Service operation
The following phases are not supported by Service-Now:
Service strategy
Continual service improvement

ITIL v3.0 Framework - Reference: https://en.wikipedia.org/wiki/ITIL

ITIL v3.0 Framework
To read more about the ITIL framework please follow:
Service-Now is a cloud-based tool. The entire application infrastructure is maintained by Service-Now and many customers prefer to be in the Service-Now environment because of the cost constraint, but if a customer's security standards are very high, then Service-Now also gives an option to the client to opt for hosting Service-Now in their own environment. In addition, Service-Now provides the VPN connection option from Service-Now to the customer network. After processing the sales orders, Service-Now provides three environments (one production and two non-production). If any customer wants more than three environments, such as, for example, a training instance for training new end users, then the customer can ask Service-Now to provide an extra instance, but the customer may need to pay extra to Service-Now.
Each and every company has its own license model, or to put it a better way, a method whereby a company will charge customers for using its products or services. There are various types of licenses available in the market, such as, for example, named user licenses, volume licenses, and client access licenses. Service-Now, has a role-based license model. For instance, if in your company 1,000 employees are working, then all employees will have access to Service-Now as an end user, which means they are allowed to raise requests or incidents on Service-Now, but for handling all those service tickets there are one 100 IT employees and all have Service-Now ITIL role access: According to for the Service-Now licensing model, your company would need to pay for 100 licenses only.
In an IT operational environment, a requester may be referred to as an end user who can do any of these tasks:
Create, view, or modify their own request
Search service catalog
Access knowledge base
Access public pages
Undertake surveys
Set own notification preferences
View assets assigned to a user
Initiate a chat session, or access and post to live feed.
In an IT operational environment, a fulfiller may be referred to as a support group member who can perform all the tasks of a requester, as well as the following tasks:
Create, delete, and modify any record
View, create, delete, and modify any report
Perform development and administrative activities, and approve requests routed to a user
In an IT operational environment, an approver is a manager, a lead, or a high-level management person who can perform all the tasks of requesters and can also approve or deny a routed record.
In my experience, many customers don't want to purchase an approver license for various reasons.
Approval by e-mail is counted as a license. In such special cases, you can deactivate the my approval module from the self-service application so that the module won't be visible to users and can create approval e-mails for all kinds of requests with the help of e-mail templates.
As a Service-Now application administrator, you should be always careful before giving role to any user as there may be some approvals are required from higher management. This is why it's very important to know the roles in Service-Now.
Note
In my experience, many customers don't want to purchase an approver licenses due to for various reasons. Usually Approval by e-mail is not counted as license but clients contracts varies as well. In such special cases, you can deactivate the My Approval module from Self-Service Application so that the module won't be visible for users and can create approval e-mails for all kinds of requests with the help of Email Templates module.
Service-Now is a cloud-based application; that's why your client is not required to set up any infrastructure to support Service-Now in their environment. By reading the Understanding Service-Now procurement recipe, you should know that Service-Now provides three environments (one production and two non-production). As a setup, these environments are called instances and may be classified as development, testing, and production. Consider the following examples of Service-Now instances or web addresses:
packtprod.service-now.compacktdev.service-now.compacktest.service-now.com
If the customer is Amazon and has requested more than three instances from Service-Now, then the web addresses may look similar to the following:
amazon.service-now.comamazondev.service-now.comamazonqa.service-now.comamazondev2.service-now.com
Each Service-Now instance has a unique, secured web address, but administrators are allowed to create a custom URL which can redirect to the original URL.
You don't need to install any client-side application on your local machine to access Service-Now in your environment. It is easily accessible by a standard web browser, which makes it appear as a web browser application for a customer. Here it is important to note that instance addresses or links (http://{instancename}.service-now.com) will always be company specific.
To access Service-Now, you need a standard web browser (you may use Google Chrome, Internet Explorer, or Mozilla Firefox) to access the URL with an active Service-Now instance, and valid credentials.
Open any standard web browser.
Type the Service-Now instance web address provided for your company in the address bar (
http://{instance_name}.service-now.com).If customer has given external authentication, then are you are automatically logged in. To read more about external authentication follow: http://wiki.servicenow.com/index.php?title=External_Authentication_(Single_Sign-On_-_SSO) link.
If customer has not been given external authentication, then you will see a login page as follows, where you need to enter the User name and Password in the respective fields:
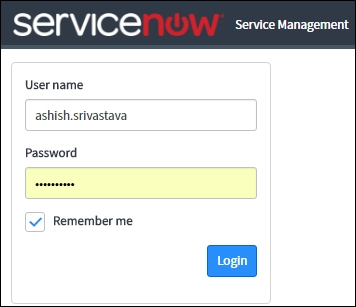
Service-Now login screen
Now click on the Login button. If your credentials match, then Service-Now will allow you to move further and show the following application screen:

Service-Now application screen
If your credentials do not match, then Service-Now denies access and shows you the following error message as follows:
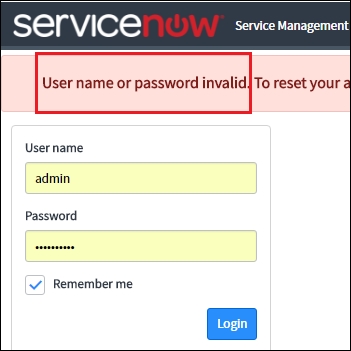
Service-Now error screen
If an external authentication is not being used, then the User name and Password authentication is done by the Service-Now user table (sys_user), which will serve only as the master source of the user's data. So, when you enter the username and password, Service-Now verifies the user's account against the user table and after successful verification, Service-Now allows you to move further. However, if Service-Now is not able to match the credentials you entered, then it does not allow you to login and show error message.
Each Service-Now instance has unique, secured web address but administrators are allowed to create a custom URL which can redirect to original URL. Here it is important to note that instances address (http ://{ instance_name}.service-now.com) will be always company specific.
To read more about external authentication follow:
It's not feasible to manually maintain a large set of users in any enterprise level application. This is why every organization maintains a master source of all users on a server. So, Service-Now should be integrated with the master source to import users for user's access.
In many organizations, the Microsoft Active Directory server is used as the master source of employee or user records. Users are allowed to log into the assigned laptop or desktop using active directory's or Windows username and password. Service-Now provides an inbuilt Lightweight Dictionary Access Protocol (LDAP) server to integrate with Microsoft Active Directory to import all users' records. To step through this recipe, all you need is an active Service-Now instance and valid credentials and an admin role.
Open a standard web browser and type the web address (
http://{instance_address}.service-now.com) of the ServiceNow instance which is provided by the organization.Now, for instance, if Service-Now is integrated with Microsoft Azure, then you will see the following login page:
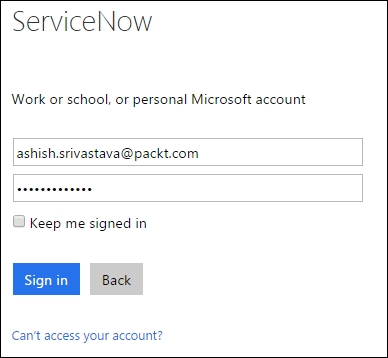
Microsoft Azure page for Service-Now login
Now, on the login page, enter active directory's username and password to log in. Please note, active directory's username and password are commonly referred to as windows credentials, as by this, you are allowed to log in on your organization's machine.
On successful authentication, Service-Now, will allow you to log in to move further but if the username and password are not matched, then Service-Now will show an error message.
Sometimes, you may observe that some fields in a user's records are not being imported in the Service-Now user table (
sys_user) properly so, in such cases, you may ask for access to Microsoft active directory where you can validate whether data is available in active directory or not. Refer to the following screenshot to see what the user record looks like in active directory:
User details in active directory server
When the user enters the network domain credentials (username and password) on the login page, the Service-Now instance passes it to the LDAP server and the LDAP server responds with an authorized or unauthorized message which Service-Now determines whether to grant access or not. It is important to note that Service-Now can allow new users to login to an instance even if the user does not have an account. When the new user tries to login in to Service-Now, it automatically issues a query to the LDAP server and if the user record is found, the integration tries to authenticate it with the password. If the password is valid, Service-Now creates an account for the user.
There are mainly two types of accounts – the network domain level account (authorized by the LDAP server – active directory integration) and the manual account (which is directly created in the Service-Now user table). So, for instance, if your customer's active directory server is not available or is down, then Service-Now will not allow any user to login on the instance because the LDAP query authentication fails. However, if as an admin, you want to access Service-Now, then you can access it via the manual account which is not authenticated by LDAP server. It is important to note that as an admin, you should have a non-AD or manual account for critical situations.
Out of the box, Service-Now provides a Content Management System (CMS) application, which is the soul of the Service-Now front-end (portal). By using the CMS application, you can create web pages and enhance the look and feel of the Service-Now platform for the end users. It is a single place from where all users can raise incidents or requests. If you are a beginner and you not aware of incidents or service requests, then read the following standard definitions:
An incident is an unplanned interruption to an IT Service or reduction in the quality of an IT service (source: https://en.wikipedia.org/wiki/Incident management_ (ITSM)).
A service request is a user request for information or advice, or for a standard change (a pre-approved change that is low risk, relatively common, and follows a procedure), or for access to an IT service. An example of a standard request is a password reset (source: https://www.sunviewsoftware.com).
In this recipe, you will learn about the Service-Now CMS site basics and navigation as an end user.
To step through this recipe, you should have an active Service-Now instance and valid credentials only.
Open any standard web browser.
Type the
service-nowinstance web address (http://{instance_name}.service-now.com) provided by your company in the address bar.By default, upon login, you will see the home page but, depending on the login rule, you may be redirected to the Service-Now portal or end user view. To read more about the login landing page click http://wiki.servicenow.com/index.php?title=Specifying_a_Login_Landing_Page#gsc.tab=0 link.
On the Service-Now platform, you are allowed to create more than one site but the URL suffix must be different for each and every site. By default, Service-Now provides the site by web address (
http://{instance_name}.service-now.com/ess). You can also create a new site by web address (http://{instance_name}.Service-Now.com/IT). It is important to note that the instance name must be same.The following screen shows the default portal of Service-Now, which the end user will see after login based on the landing page configuration:

Service-Now frontend (portal)/end user view
Now after login, you are allowed to create a service ticket (incident, task or service request). It is important to note that every organization configures Service-Now as per their business requirements so sometimes only middle-level managers, such as team leader or manager, are allowed to create service requests on your behalf. . Let's understand this by an example so if you are joining a new organization on contractor position then to start work from day one you need certain things access like laptop, printer access, VoIP access, application access and so on, then in such scenarios the only manager or lead raise service request so don’t be surprised by such kind of Service-Now configuration.
Often, a user wants to follow up on a service ticket so for fulfilling such a requirement, Service-Now provides a search facility by Zing, which is a text indexing and search engine. As an admin or end user, you can enter the ticket number in the search box as given following but it is important to note that end user has access level is less as compared to admin’s access level. For an example as an admin if you enter incident number
INC0010108in search box:
Search incident on CMS
Service-Now allows for a text search on the CMS site as well. You can type the desired text in the search box and you will see a page similar to the following screenshot. It is important to note that Service-Now search criteria are limited to Tasks, Live Feed, Policy, People & Places, Knowledge & catalog, and you can filter out any of them by unchecking the respective box:

Out of the box, Service-Now provides Content Management Application (CMS) which supports application portal or end user view. Under CMS application, Login Rules module supports landing page of portal after successful login. For better understanding let’s take an example, users without any roles should be redirected to Service-Now portal and with user ITIL, should be redirected to IT View
To read more about the login landing page click on http://wiki.servicenow.com/index.php?title=Specifying_a_Login_Landing_Page#gsc.tab=0
To read more about searching http://wiki.servicenow.com/index.php?title=Introduction_to_Searching#gsc.tab=0
As a beginner, you can co-relate the service requests with a web-based form like a movie booking, an exam form and so on, in which you need to enter your details only but depends on required information Service-Now form may be simple or complex. In this recipe, you will learn about the service requests of Service-Now. For better understanding let’s take a better example so if you want a laptop from your organization then on the service request form you might have to choose screen size, ram, hard drive and so on or many organization categories then laptop in the executive laptop, standard laptop, high configuration laptop.
To step through this recipe, you need an active Service-Now instance and valid credentials.
Open any standard web browser.
Type the Service-Now instance web address (
https://{instance_name}.service-now.com) provided by your organization in the address bar, now enter your credentials in respective fields.After login, you will be redirected to the Service-Now frontend/portal. Once you are on the main portal then in the Order Things section, click on the Hardware button:

Service-Now Portal Menu Block
After clicking on the Hardware button, you will be redirected to the catalog page where you can see all available catalogs. Now select Sales Laptop Access form the options, after that you will be redirected to the following screen:

Catalog item request form
In the catalog item Sales Laptop Access request form, enter your name, describe your request, and click on Order Now. You will now be redirected to the following screen where you can view your request number, delivery date, stage, and price:

Catalog item request order status
Out of the box, Service-Now provides Service Catalog Application to support catalog itemandunder the application, Maintain Item module is available for viewing existing catalog item (Sales Laptop) or creating new catalog item.
Service-Now portal/end user view may be classified in many ways according to organization’s business and it is important to note that here may be many catalog items for serving different purpose like for facilities, legal, IT, procurement, marketing and so on.
Similar to other enterprise applications, Service-Now also maintains two views. The first is for the end user and another is for admins or ITIL or fulfillers. In this recipe, you will learn about the IT view of the Service-Now application.
To step through this recipe, you should have an active Service-Now instance and valid login credentials.
Open any browser (Internet Explorer, Google Chrome, Safari, or Mozilla Firefox).
Type the Service-Now instance web address (
http://{instance_name}.service-now.com) provided by your organization in the address bar, now enter your credentials in respective fields and press enter button.The following screen is the IT view of Service-Now, where all the applications and modules are available:

Service-Now IT view
Section 1 in the preceding screenshot is a search box where you type the name of the desired module. If you know the table name, then you can simply type the table name, which works in two ways: If you want to open a new record of the table, then you can type table
name.doin the search box, and if you want to open it to see all the available records in the table, then you can typetablename.list:
Section 1 and Section 2
Section 2 is dedicated to applications; you can view all the applications, whether they are system or custom applications.
Section 3 is dedicated to login user details; you can do the following tasks:
You can view your Service-Now profile
You can impersonate other users to view their views
If you have the
security_adminrole, then you can elevate privilegesIf you want to log out from Service-Now, then you can click on Logout:
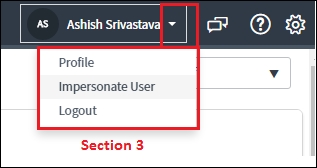
Section 3
Section 4 is a global search box, which is dedicated to finding records from multiple tables:

Section 4 and Section 5
Section 5 is a settings button from where you can customize your Service-Now view. The settings section is a combination of the following four items:
In the General section, you can customize the time zone, user interface, and so on:

Service-Now System Settings - General
In the Theme section, you can customize the look and feel of the backend. Out of the box, Service-Now provides eight themes and you are allowed to choose any one of them:

Service-Now System Settings - Theme
In the Forms section, you can customize forms layout at the IT view and the related list loading time as well. Out of the box, Service-Now provides three options. If you want to load the related list with the form, it consumes more time to load as compared to the After Form Load and On-demand options:

Service-Now System Setting - Forms
In the Developer section, Service-Now provides features to add current update sets and the current application in the backend:

Service-Now System Settings - Developer
Once you turn it on, you will able to view the current update set and application in the top banner:

Service-Now development feature
As an admin, Service-Now provides you a way to directly open the new record or view record. It is important to note that you must know the table name for applying it. If you want to open a new record of the table, then you can type table name.do in the search box like incident.do, and if you want to see all available records in the table, then you can type tablename.list like incident.list.
To read more about the navigation and user interface click on https://docs.servicenow.com/bundle/geneva-servicenow-platform/page/administer/navigation_and_ui/concept/c_NavigationAndTheUserInterface.html
To read more about the filter and breadcrumbs click https://docs.servicenow.com/bundle/geneva-servicenow-platform/page/use/using_lists/concept/c_UsingFiltersAndBreadcrumbs.html
Service-Now's Self-Service module is available for all users, whether it's an end user or any ITIL role holder. The self-service application is the best place from to manage major tasks.
To step through this recipe, all you need is a Service-Now instance address and valid credentials.
The Self-Service application module is available in the IT view for all users. To view this application module, the user doesn't need role. This self-service application has many modules but let's take a look at some key ones:
Watched Incidents: As a support group member, usually you want to denote your reporting manager or lead or any other user regards to the incident so in such a case you can add their name in watched list field. Once users are added on the incident form, they will start getting all email notification for each and every update regards to the task like incident, problem, and change and so on:

Service-Now self-service module
Homep age: Mostly, the resolver manager wants to see the overview of all calls; so, in such a case, Service-Now provides out of the box modules where any manager, lead, or team member can view the overall status of all calls, which can be customized based on the requirement:

The ITIL Homepage
To read more about the Self-Service application click on https://docs.servicenow.com/bundle/geneva-servicenow-latform/page/use/employee_self_service/reference/r_EmployeeSelfService.html
Out of the box, Service-Now provides a service desk application from which you can manage all your tasks and your group tasks. To view this application, you should have an ITIL/Fulfiller role that is licensed.
To step through this recipe, you should have an active Service-Now instance and valid login credentials and an ITIL or admin role.
Open any browser standard browser.
Type the Service-Now instance web address (
http://{instance_name}.service-now.com) provided by your organization in the address bar, now enter your credentials in respective fields and press enter buttonOn the left-hand side in the search box type Service Desk and Service-Now will search out application for you or navigate to Service Desk application. In the Service Desk application, many modules are available, but let's take a look at key ones only:

Searching the Service Desk application
As a support team member, you will receive your all your task in My work. If you want to see all the calls that are assigned to you, then you can simply click on My Work. The My Work module records all calls that are assigned to you regardless of the type of task. So, for example, if you have a problem, incident, or catalog task in your queue, then by clicking on My Work you can view all the calls that are in your bucket:

Service-Now Service Desk
Every support person belongs to some support group, but in many cases, a support group member may belong to more than one support group as well; so, to view all group's support tickets, My Groups Work is the best place to manage all calls that are assigned to your groups.
Service Level Agreements (SLAs), contracts between service providers and end users that define the level of service expected from the service provider, are critical for any resolver group or any service company, where the service company has an agreement with the clients that if any issues come to them they will resolve the issues in the agreed timeframe. So, by clicking on SLAs (My Work) you can monitor your own SLA, and by clicking on SLAs (My Groups Work) you can view your group's SLA.
Approval is one of the key functions of any service management tool. On a daily basis, we raise many requests and most of them require a manager's approval, so managers can directly go to the Service-Now instance; but if your client wants to avoid the approval license cost, then you can configure the e-mail approval functionality.
For maintaining the uniqueness of each record Service-Now generates a 32 character global unique ID which is called sys_id. You can view SysID in any standard browser address bar.
To step through this recipe, you should have an active Service-Now instance, a role, and valid login credentials.
Open any browser standard browser.
Type the Service-Now instance web address (
https://{instance_name}.service-now.com) provided by your organization in the address bar, now enter your credentials in respective fields and press enter button.In the browser you can view SysID. Let’s understand this by an example. In following screen shot you can view
sys_id=3D4301f1084f053200abb3b3728110c70e:
Record
sys_id
It is important to note that same sys_id value is never generated more than one time. If two record share same sys_id value then one was copied to other at database level outside of Service-Now application.
To read more about the sys_id click at: http://wiki.servicenow.com/index.php?title=Unique_Record_Identifier#gsc.tab=0
Incident management is one of the key applications of Service-Now. As per the ITIL definition, an unplanned interruption to an IT service or reduction in the quality of an IT service is referred to as an incident. Application login error, antivirus error, server room fan and so on can be considered as incidents examples.
To step through this recipe, all you need is an active Service-Now instance, valid credentials, and an admin/ITIL role.
Open any browser standard browser.
Type the Service-Now instance web address (
http://{instance_name}.service-now.com) provided by your organization in the address bar, now enter your credentials in respective fields and press enter button.On the left-hand side, type Incident in the search box to view the Incident application . To create a new incident record, you can directly type
incident.doin the search box. If you want to see all incident records, then you can typeincident.listin the search box directly:
Service-Now Incident Management module
If you want to create a new record by the incident application then you can click on C reate Ne w module. After clicking on Create New module the incident form is opened on screen, now enter the relevant fields on incident form and click on submit button:

Incident Form
After submission of the form, an incident number will be generated for an example INC0000055, which will serve as a reference number for the users
Once the form is submitted, an incident is assigned to the respective support group to resolve it. Any group member can check a new incident under My Group Work andassign it to them. After resolving the incident they can click on the
Resolve Incidentbutton.
The incident table extends the task table by which it gets all the properties of the task table. When you click on Create New module, an incident form appears and you fill in the details. After clicking on the Submit button, Service-Now generates an incident number with the unique number called SysID. For the assignment of the support group, a relationship is defined under System Policy Application in Assignment Lookup Rules, Assignment and Data lookup Definitions modules which store the relation of category and subcategory and when a condition is met, it assigns an incident to the support group.
End users or users without any role are not allowed to create the incident from IT view as they don’t have access to view this application but ITIL users can create the incident from the IT view. It is important to note that there is no workflow for incident application.
To read more about the incident management click at https://docs.servicenow.com/bundle/geneva-it-service-management/page/product/incident_management/concept/c_IncidentManagement.html
Related lists are highly useful when we need to build a relationship between the two tables and for reporting as well, there is always a relationship of parent and child, which can be established by a system definition application (relationship module).
To step through this recipe, you need an active Service-Now instance and a valid credential or role (admin).
Open any browser standard browser.
Type the Service-Now instance web address (
http://{instance_name}.service-now.com) provided by your organization in the address bar, now enter your credentials in respective fields and press enter button.On the left-hand side in the search box, type incident, and under the Incident Application click on Open Module:

Incident Application – Open Module
After clicking on Open Module, you will able to view all active incident in the list format as follows:

Incident Records - List View
Now, you can click on any incident record but for now, so let’s suppose you have clicked on INC0010001 record. After opening the incident record, you need Right-click on the header of the incident form. After that, select Configure and in the configure options, select Related Lists as follows:

Configuring related lists from the incident form
Out of the box, all related lists are available and you can move any related list to the Selected box from Available box as shown following:

Adding related lists to the form
The available box holds out of the box relationships and you can move as many as you want from available box to selected box but for now, let’s support you have moved Affected CIs related list from Available box to Selected box as shown following and click Save button:

Adding Affected CIs related on the incident form
After clicking on Save button, you will able to view Affected CIs related list bottom on incident form. It will show all Cis which are affected by the incident as follows:

To read more about the configuration item click on http://wiki.servicenow.com/index.php?title=ITIL_Configuration_Management#gsc.tab=0 and http://wiki.servicenow.com/index.php?title=Attaching_Configuration_Items_to_an_Incident#gsc.tab=0
Out of the box, Service-Now provides problem management application for facilitating the problem management process. If we talk about the problem as per ITIL then 'Problem' is the unknown cause of one or more incidents, often identified as a result of multiple similar incidents, In general words if your support team is receiving many incidents related to one CI (Configuration Item) then it is considered as a problem and a problem ticket must be created for permanent fix.
To step through this recipe, all you need is an active Service-Now instance, valid credential and Admin/ITIL role.
Open any browser standard browser.
Type the Service-Now instance web address (
http://{instance_name}.service-now.com) provided by your organization in the address bar, now enter your credentials in respective fields and press enter button.To search the problem application you need to type
Problemand Service-Now will search out Problem Application for you. As an option, you can directly typeproblem.doto create a new record or to view all the records in the problem management module typeproblem.listin the search box.Now, under the problem management application, click on the Create New module to create a new problem record:

Problem management application
After click on the
Create Newmodule, you will able to view blank problem form so now enter necessary details in the form and click on Submit as follows:
Problem management form
Now, a new problem ticket generated
PRB0040003for reference purpose of the user.
A dedicated problem table is available in Service-Now. When you click on Create new in the problem management module, a default problem management form appears, and after submission of the problem task, a unique sysId and number is assigned to the problem task, which serves as a parent.
To manage, problem management process Service-Now has problem table and all problem-related records are stored in problem table only which extends to the task table. In addition, a part Service-Now admins, only IT users or users with ITIL roles are allowed to create problem records. It is important to note that many organizations have dedicated problem manager positions to handle problem related task so in term of process only problem manager may have access to create problem tasks.
Disraeli, a British prime minister, said that:
"Change is inevitable. Change is constant."
So, let's see how Service-Now uses the ITIL framework in its application. Every organization goes through a transition phase to achieve new goals to improve their services, user experiences, stability, or increase their product line for internal or external customers. In the ITIL framework, change management is a process used for managing the planned deployment of alterations to all configuration items in the configuration management database that are a part of production and test UAT environments along with any other environment that a business wants to have under change management. To manage the change management process, Service-Now provides the change management application.
To step through this recipe, all you need is an active Service-Now instance, valid credentials, and a role.
Open any browser standard browser.
Type the Service-Now instance web address (
http://{instance_name}.service-now.com) provided by your organization in the address bar, now enter your credentials in respective fields and press enter button.On the left-hand side in the search box, type Change and Service-Now will search out Change management application for you. For creating new change record click on Create New module under Change application as follows:

Change management application.
As an option, you can type
change_request.doin search box to directly open change management form. If you want to see all change records, then you can typechange_request.listin the search box.After clicking on the Create New, you will able to view the change request form as follows:

Creating a new Change Request form
Change management is a very critical process and many organizations use their own customized version of change model, now in change request form, you need to enter necessary details in change management form fields with be modified through change request.
To support change management process, Service-Now provides a change_request table which extends to task table. Please note in numerous organizations, there a dedicated change manager to handle change requests. It is important to note that change management process guided by 3 workflows comprehensive change, emergency change and routine change and you can modify as per your organization requirement.
To read more about the change management: https://docs.servicenow.com/bundle/geneva-it-service-management/page/product/change_management/concept/c_ITILChangeManagement.html
Incident/problem/change may be inter-dependent. Let’s understand this by an example so if your support group has received many incidents INC0000075/ INC0000091/ INC0000059 and so on related to user account which may lead a problem ticket or an emergency change ticket to deploy the permanent fix of issue. Out of the box, Service-Now provides functions to create a change or problem task from an incident task.
To step through this recipe, all you need is an active Service-Now instance, an ITIL or Admin role, and valid credentials.
Open any browser standard browser.
Type the Service-Now instance web address (
http://{instance_name}.service-now.com) provided by your organization in the address bar, now enter your credentials in respective fields and press enter button.Go to the
Incidentapplication.Now, under incident application, click on Open module which will show all active incident records.
You can select any incident task to create a problem/change task but for now let’s suppose you have opened
INC0000044, now right click on incident form header through computer mouse as follows:
Creating a change/problem ticket from an incident
If you want to create a change task from an incident, then click on Create Change. Once you click on the Create Change button, Service-Now will redirect you to the change form with some of the basic fields auto-filled.
If you want to create a problem task form incident, then click on Create Problem. Once you click on Create Problem, Service-Now will redirect you to the change form with some of the basic fields auto-filled:

Problem task created Incident Form
Now problem task
PRB0040002is created fromINC0000044with other information as well like Priority, Opened by and so on butINC0000044will serve as a parent of problem task as follows:
Problem-related Incident