In this chapter, we will see how to set up the Selenium WebDriver test development environment. We will also see some basic settings to help get started with Selenium WebDriver. You will learn the following:
Configuring the Selenium WebDriver test development environment for Java with Eclipse and Maven
Using Ant for Selenium WebDriver test execution
Configuring Microsoft Visual Studio for Selenium WebDriver test development
Configuring Selenium WebDriver for Python and Ruby
Setting up Internet Explorer Driver Server
Setting up ChromeDriver for Google Chrome
Setting up Microsoft WebDriver for Microsoft Edge
Selenium WebDriver has been widely used for automating web browsers in combination with various tools due to its neat and clean object-oriented design. We can integrate Selenium WebDriver with other tools to develop automated tests.
The initial sections of this chapter explore Selenium WebDriver's integration with development and build tools such as Eclipse, Maven, and Microsoft Visual Studio. These tools provide an easy way to develop test automation frameworks and extend the capabilities of Selenium WebDriver API. The following recipes will explain how to set up and configure these tools with Selenium.
Lastly, we will explore how to set up various browser drivers and initial settings for WebDriver.
Selenium WebDriver is a simple API that can help with browser automation. However, much more is needed when using it for testing and building a test framework. You will need an Integrated Development Environment (IDE) or a code editor to create a new Java project and add Selenium WebDriver and other dependencies in order to build a testing framework.
In the Java world, Eclipse is a widely used IDE, as well as IntelliJ IDEA and NetBeans. Eclipse provides a feature-rich environment for Selenium WebDriver test development.
Along with Eclipse, Apache Maven provides support for managing the entire life cycle of a test project. Maven is used to define project structure, dependencies, build, and test management.
You can use Eclipse and Maven to build your Selenium WebDriver test framework from a single window. Another important benefit of using Maven is that you can get all the Selenium library files and their dependencies by configuring the pom.xml file. Maven automatically downloads the necessary files from the repository while building the project.
This recipe will explain how to configure Eclipse and Maven for the Selenium WebDriver test development. Most of the code in this book has been developed in Eclipse and Maven.
You will need Eclipse and Maven to set up the test development environment. Download and set up Maven from http://maven.apache.org/download.html. Follow the instructions on the Maven download page (see the Installation Instructions section on the page).
Download and set up Eclipse IDE for Java Developers from https://eclipse.org/downloads/.
Let's configure Eclipse with Maven to develop Selenium WebDriver tests using the following steps:
Launch the Eclipse IDE.
Create a new project by selecting File | New | Other from the Eclipse Main Menu.
On the New dialog, select Maven | Maven Project, as shown in the following screenshot, and click Next:

Next, the New Maven Project dialog will be displayed. Select the Create a simple project (skip archetype selection) checkbox and click on the Next button, as shown in the following screenshot:

On the New Maven Project dialog box, enter
com.secookbook.examplesin the Group Id: textbox andSeleniumCookbookin the Artifact Id:textbox. You can also add a name and description optionally. Click on the Finish button, as shown in the following screenshot:
Eclipse will create the SeleniumCookbook project with a structure (in Package Explorer) similar to the one shown in the following screenshot:

Select pom.xml from Package Explorer. This will open the
pom.xmlfile in the editor area with the Overview tab open. Select the pom.xml tab next to the Overview tab, as shown in the following screenshot:
Add the WebDriver and JUnit dependencies highlighted in the following code snippet to
pom.xmlin the<project>node:<project xmlns="http://maven.apache.org/POM/4.0.0" xmlns:xsi="http://www.w3.org/2001/XMLSchema-instance" xsi:schemaLocation="http://maven.apache.org/POM/4.0.0 http://maven.apache.org/xsd/maven-4.0.0.xsd"> <modelVersion>4.0.0</modelVersion> <groupId>com.secookbook.examples</groupId> <artifactId>SeleniumCookbook</artifactId> <version>0.0.1-SNAPSHOT</version> <dependencies> <dependency> <groupId>org.seleniumhq.selenium</groupId> <artifactId>selenium-java</artifactId> <version>2.47.1</version> <scope>test</scope> </dependency> <dependency> <groupId>junit</groupId> <artifactId>junit</artifactId> <version>4.12</version> <scope>test</scope> </dependency> </dependencies> </project>You can get the latest dependency information for Selenium WebDriver and JUnit from http://seleniumhq.org/download/maven.html and http://maven.apache.org/plugins/maven-surefire-plugin/examples/junit.html respectively.
Tip
TestNG is another widely used unit-testing framework in Java World. If you want to add TestNG support to the project instead of JUnit, you can get its Maven entry at http://testng.org/doc/maven.html.
Select src/test/java in Package Explorer and right-click to show the menu. Select New | Class, as shown in the following screenshot:

Tip
Downloading the example code
You can download the example code files from your account at http://www.packtpub.com for all the Packt Publishing books you have purchased. If you purchased this book elsewhere, you can visit http://www.packtpub.com/support and register to have the files e-mailed directly to you.
Enter
com.seleniumcookbook.examples.chapter01in the Package: textbox andGoogleSearchTestin the Name: textbox and click on the Finish button, as shown in the following screenshot:
This will create the
GoogleSearchTest.javaclass in thecom.secookbook.examples.chapter01package.Add the following code in the
GoogleSearchTestclass:package com.secookbook.examples.chapter01; import org.openqa.selenium.firefox.FirefoxDriver; import org.openqa.selenium.WebDriver; import org.openqa.selenium.WebElement; import org.openqa.selenium.By; import org.openqa.selenium.support.ui.ExpectedCondition; import org.openqa.selenium.support.ui.WebDriverWait; import org.junit.*; import static org.junit.Assert.*; public class GoogleSearchTest { private WebDriver driver; @Before public void setUp() { // Launch a new Firefox instance driver = new FirefoxDriver(); // Maximize the browser window driver.manage().window().maximize(); // Navigate to Google driver.get("http://www.google.com"); } @Test public void testGoogleSearch() { // Find the text input element by its name WebElement element = driver.findElement(By.name("q")); // Clear the existing text value element.clear(); // Enter something to search for element.sendKeys("Selenium testing tools cookbook"); // Now submit the form element.submit(); // Google's search is rendered dynamically with JavaScript. // wait for the page to load, timeout after 10 seconds new WebDriverWait(driver, 10).until(new ExpectedCondition<Boolean>() { public Boolean apply(WebDriver d) { return d.getTitle().toLowerCase() .startsWith("selenium testing tools cookbook"); } }); assertEquals("Selenium testing tools cookbook - Google Search", driver.getTitle()); } @After public void tearDown() throws Exception { // Close the browser driver.quit(); } }Tip
Downloading the example code:
You can download the example code files for all the Packt books you have purchased from your account at http://www.packtpub.com. If you have purchased this book elsewhere, you can visit http://www.packtpub.com/support and register to have the files e-mailed directly to you.
The example code is also hosted at https://github.com/upgundecha/secookbook.
To run the tests in the Maven life cycle, select the SeleniumCookbook project in Package Explorer. Right-click on the project name and select Run As | Maven test. Maven will execute all the tests from the project.
Eclipse provides the ability to create Selenium WebDriver test projects easily with its Maven plugin, taking away the pain of project configurations, directory structure, dependency management, and so on. It also provides a powerful code editor to write the test code.
When you set up a project using Maven in Eclipse, it creates the pom.xml file, which defines the configuration of the project and its structure. This file also contains the dependencies needed for building, testing, and running the code. For example, the following code shows the dependency information about Selenium WebDriver that we added in pom.xml:
<dependency>
    <groupId>org.seleniumhq.selenium</groupId>
    <artifactId>selenium-java</artifactId>
    <version>2.47.1</version>
</dependency>
Most open source projects publish this information on their websites. In this case, you can check http://seleniumhq.org/download/maven.html; you can also get this information from Maven Central at http://search.maven.org/#browse. Maven will automatically download libraries and support files mentioned for all the dependencies and add to the project without you needing to find, download, and install these files to the project. This saves a lot of our time and effort while managing the dependency-related tasks.
Maven also generates a standard directory structure for your code, for easier management and maintenance. In the previous example, it created the src/test/java folder for the test code and the src/test/resources folder to maintain resources needed for testing, such as test data files, utilities, and so on.
Maven provides life cycle steps such as building the test code and running the test. If you are working with the Java development team, then you might find the application code and test code together in Maven. Here, Maven supports building the application code, then firing the tests, and releasing the software to production.
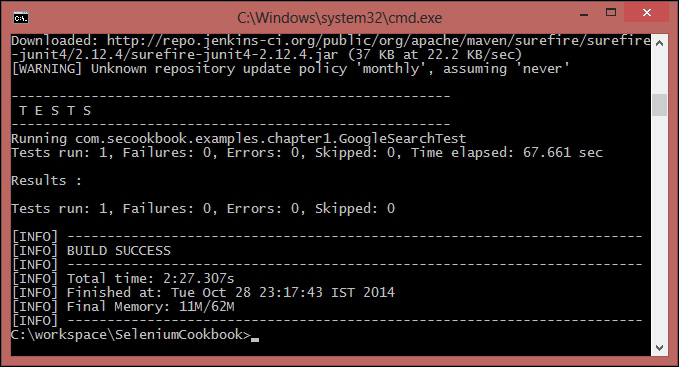
Maven can also be used to execute the test from the command line. To run tests from the command line, navigate to the SeleniumCookbook project folder through the command line and type the following command:
mvn clean test
This command will traverse through all the subdirectories and run the clean command to delete/remove earlier build files. It will then build the project and run the tests. You will see the results at the end of execution on command line, as shown in the following screenshot:
Apache Ant is a popular build tool available for Java developers. It is similar to Apache Maven, but does not support project management and dependency management features like Maven. It's a pure build tool.
You can run Selenium WebDriver tests using Ant via command line or through continuous integration (CI) tools such as Jenkins.
In this recipe, we will add Ant support to the SeleniumCookbook project created in the Configuring Selenium WebDriver test development environment for Java with Eclipse and Maven recipe.
You can also download and configure Ant from http://ant.apache.org/bindownload.cgi for other OS platforms.
Windows users can download and install WinAnt on Windows. WinAnt comes with an installer that will configure Ant through the installer. The WinAnt installer is available at http://code.google.com/p/winant/.
This recipe uses WinAnt on the Windows OS.
You will also need Selenium WebDriver and JUnit JAR files. You can download Selenium JAR file from http://selenium-release.storage.googleapis.com/ and JUnit JAR file from https://github.com/junit-team/junit/wiki/Download-and-Install.
Let's set up the SeleniumCookbook created in the previous recipe project for Ant with the following steps:
Create a
libfolder and copy the JAR files for the dependencies used for this project, that is, Selenium WebDriver and JUnit, to thelibfolder, as shown in screenshot below:
Create the
build.xmlfile in the project folder with the following XML:<?xml version="1.0" encoding="UTF-8"?> <project name="test" default="exec" basedir="."> <property name="src" value="./src" /> <property name="lib" value="./lib" /> <property name="bin" value="./bin" /> <property name="report" value="./report" /> <path id="test.classpath"> <pathelement location="${bin}" /> <fileset dir="${lib}"> <include name="**/*.jar" /> </fileset> </path> <target name="init"> <delete dir="${bin}" /> <mkdir dir="${bin}" /> </target> <target name="compile" depends="init"> <javac source="1.8" srcdir="${src}" fork="true" destdir="${bin}" > <classpath> <pathelement path="${bin}" /> <fileset dir="${lib}"> <include name="**/*.jar" /> </fileset> </classpath> </javac> </target> <target name="exec" depends="compile"> <delete dir="${report}" /> <mkdir dir="${report}" /> <mkdir dir="${report}/xml" /> <junit printsummary="yes" haltonfailure="no"> <classpath> <pathelement location="${bin}" /> <fileset dir="${lib}"> <include name="**/*.jar" /> </fileset> </classpath> <test name="com.secookbook.examples.chapter1.GoogleSearchTest" haltonfailure="no" todir="${report}/xml" outfile="TEST-result"> <formatter type="xml" /> </test> </junit> <junitreport todir="${report}"> <fileset dir="${report}/xml"> <include name="TEST*.xml" /> </fileset> <report format="frames" todir="${report}/html" /> </junitreport> </target> </project>Navigate to the project directory through the command line and type the following command:
antThis will trigger the build process. You will see the test running. At the end, Ant will create a
reportfolder in the project folder. Navigate to thehtmlsubfolder in thereportfolder and open theindex.htmlfile to view the results.
Ant needs a build.xml file with all the configurations and steps required to build the project. We can add steps for report generation, sending e-mail notification, and so on to build.xml. Ant provides a very dynamic framework for defining steps in the build process.
Ant also needs the necessary library/JAR files to be copied in the lib folder, which are needed for building the project.
Ant scans for the complete set of tests in the project and executes these tests in a way similar to Maven.
Selenium WebDriver provides .NET bindings to develop Selenium tests with the .NET platform. To use the Selenium WebDriver API along with .NET, you need to refer the Selenium WebDriver libraries to the project. Microsoft Visual Studio being the major IDE used in the .NET world, setting up the Selenium WebDriver support has become easier with NuGet Package Manager (http://nuget.org/).
This recipe explains the process of setting up Selenium WebDriver in Microsoft Visual Studio 2013 using NuGet.
NuGet comes bundled with Microsoft Visual Studio 2012 onwards. However, for Microsoft Visual Studio 2010, you will need to download and install NuGet from http://nuget.codeplex.com.
Let's configure Microsoft Visual Studio 2013 to develop Selenium WebDriver tests using the following steps:
Launch the Microsoft Visual Studio.
Create a new project by selecting File | New | Project from the main menu.
In the New Project dialog box, select Visual C# | Test | Unit Test Project. Name the project as SeleniumCookbook and click on the OK button, as shown in the following screenshot:

Next, add Selenium WebDriver packages using NuGet. Right-click on the SeleniumCookbook solution in Solution Explorer and select Manage NuGet Packages…, as shown in the following screenshot:

On the SeleniumCookbook - Manage NuGet Packages dialog box, select Online and search for the
WebDriverpackage. The search will result in the suggestions shown in the following screenshot:
Select Selenium WebDriver from the list and click on the Install button. Repeat this step for Selenium WebDriver Support Classes. Successful installation will show a green tick mark for both the packages, as shown in the following screenshot:

Close the SeleniumCookbook - Manage NuGet Packages dialog box.
Expand the References tree for the SeleniumCookbook solution in Solution Explorer. References for WebDriver are added to the project as shown in the following screenshot:

The
SeleniumCookbookproject is ready for test development. You can go on adding new tests as needed.
NuGet Package Manager adds the external dependencies to Microsoft Visual Studio projects. It lists all available packages and automatically downloads and configures packages to the project. It also installs dependencies for the selected packages automatically. This saves a lot of effort in configuring the projects initially.
Along with Java and C#, Selenium WebDriver can also be used with various other programming languages. Among these, Python and Ruby are popular choices to create Selenium WebDriver tests. In this recipe, you will see how to install Selenium WebDriver client libraries in Python and Ruby.
You will need Python or Ruby installed before installing the Selenium WebDriver client library.
You can download and install the latest Python version from https://www.python.org/. In this recipe, Python 3.4 is used.
Similarly, you can download and install the latest Ruby version from https://www.ruby-lang.org/en/installation/. In this recipe, Ruby 2.1.3 is used.
Installation and setting up Selenium WebDriver with Python or Ruby is simple using following steps.
You can install Selenium WebDriver with Python using the pip tool with the following command line:
pip install selenium
This will get the latest version of Selenium WebDriver Python client library installed. That's it.
Let's create a simple test in Python using this installation. Create a google_search.py file in your favorite editor or IDE and copy the following code:
import unittest
from selenium.webdriver.support import expected_conditions
from selenium import webdriver
from selenium.webdriver.support.ui import WebDriverWait
class GoogleSearch(unittest.TestCase):
def setUp(self):
self.driver = webdriver.Firefox()
self.driver.implicitly_wait(30)
self.base_url = "https://www.google.com/"
def test_google_search(self):
driver = self.driver
driver.get(self.base_url)
element = driver.find_element_by_idname("q")
element.clear()
element.send_keys("Selenium testing tools cookbook")
element.submit()
WebDriverWait(driver, 30)\
.until(expected_conditions.title_contains("Selenium testing tools cookbook"))
self.assertEqual(driver.title, "Selenium testing tools cookbook - Google Search")
def tearDown(self):
self.driver.quit()
if __name__ == "__main__":
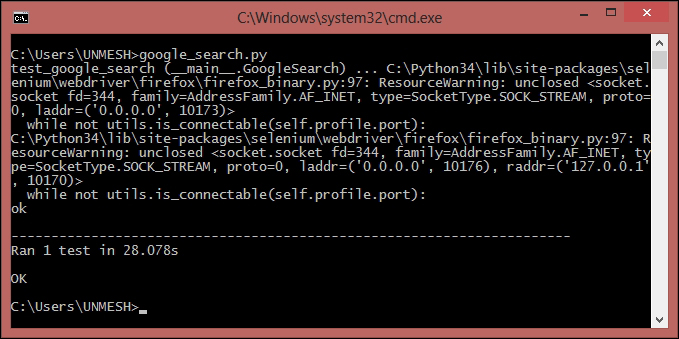
unittest.main(verbosity=2, warnings="ignore")You can run this test using the following command line:
python google_search.py
The Python interpreter will execute the test and you will see a Firefox window being opened and performing the search operation on Google.com. At the end of the execution you will see the results, as shown in the following screenshot:
You can install Selenium WebDriver with Ruby using the gem tool with following command line:
gem install selenium-webdriver
This will get the latest version of Selenium WebDriver Ruby client library installed. That's it.
Let's create a simple test in Ruby using this installation. Create a google_search.rb file in your favorite editor or IDE and copy the following code:
require "selenium-webdriver"
gem "test-unit"
require "test/unit"
class GoogleSearch < Test::Unit::TestCase
def setup
@driver = Selenium::WebDriver.for :firefox
@base_url = "https://www.google.com/"
@driver.manage.timeouts.implicit_wait = 30
end
def test_google_search
@driver.get(@base_url)
element = @driver.find_element(:name, "q")
element.clear
element.send_keys "Selenium testing tools cookbook"
element.submit()
wait = Selenium::WebDriver::Wait.new(:timeout => 10)
wait.until { @driver.title.include? "Selenium testing tools cookbook" }
assert_equal "Selenium testing tools cookbook - Google Search", @driver.title
end
def teardown
@driver.quit
end
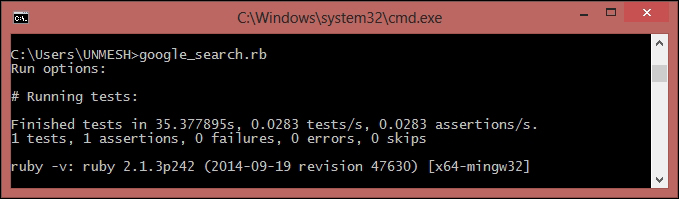
endYou can run this test using the following command line:
ruby google_search.rb
Ruby interpreter will execute the test and you will see a Firefox window being opened and performing the search operation on Google.com. At the end of the execution you will see the results, as shown in the following screenshot:
Selenium WebDriver is supported on various programming languages. For each supported language, a client library or language binding is published by the Selenium developers. These client libraries have Selenium WebDriver classes and functions that are needed to create automation scripts.
These libraries can be installed using package installers available with the respective languages. In this case, we used pip for Python, which connected to the
PyPI (Python Package Index) source using the Internet, downloaded the latest Selenium WebDriver Python client library and installed with the Python directory. Similarly, Selenium WebDriver Ruby Gem is installed using the gem utility.
We saw how to automate the Firefox browser in previous recipes. Using Firefox was straightforward. In order to execute test scripts on the Internet Explorer browser, we need to use InternetExplorerDriver and a standalone Internet Explorer Driver Server executable.
Let's setup InternetExplorerDriver and create tests for testing the search feature on Internet Explorer.
You need to download Internet Explorer Driver Server from http://docs.seleniumhq.org/download/. It is available in both 32bit and 64bit versions.
After downloading the IEDriver server, unzip and copy the file to the same directory in which the scripts are stored.
Let's create a test that uses Internet Explorer Driver Server with the following steps:
In Eclipse, create a new folder named
driversin the src/test/resources folder of the SeleniumCookbook project. Copy theIEDriverServer.exefile to this folder, as shown in the following screenshot:
Add a new test and name it as
GoogleSearchTestOnIE, and add the following code:package com.secookbook.examples.chapter01; import org.openqa.selenium.ie.InternetExplorerDriver; import org.openqa.selenium.WebDriver; import org.openqa.selenium.WebElement; import org.openqa.selenium.By; import org.openqa.selenium.remote.DesiredCapabilities; import org.openqa.selenium.support.ui.ExpectedCondition; import org.openqa.selenium.support.ui.WebDriverWait; import org.junit.*; import static org.junit.Assert.*; public class GoogleSearchTestOnIE { private WebDriver driver; @Before public void setUp() { System.setProperty("webdriver.ie.driver", "src/test/resources/drivers/IEDriverServer.exe"); DesiredCapabilities caps = DesiredCapabilities.internetExplorer(); caps.setCapability( InternetExplorerDriver.INTRODUCE_FLAKINESS_BY_IGNORING_SECURITY_DOMAINS, true); // Launch Internet Explorer driver = new InternetExplorerDriver(caps); // Maximize the browser window driver.manage().window().maximize(); // Navigate to Google driver.get("http://www.google.com"); } @Test public void testGoogleSearch() { // Find the text input element by its name WebElement element = driver.findElement(By.name("q")); // Enter something to search for element.sendKeys("Selenium testing tools cookbook"); // Now submit the form. WebDriver will find // the form for us from the element element.submit(); // Google's search is rendered dynamically with JavaScript. // Wait for the page to load, timeout after 10 seconds new WebDriverWait(driver, 10).until(new ExpectedCondition<Boolean>() { public Boolean apply(WebDriver d) { return d.getTitle().toLowerCase() .startsWith("selenium testing tools cookbook"); } }); assertEquals("Selenium testing tools cookbook - Google Search", driver.getTitle()); } @After public void tearDown() throws Exception { // Close the browser driver.quit(); } }Execute this test and you will see the Internet Explorer window being launched and all the steps executed.
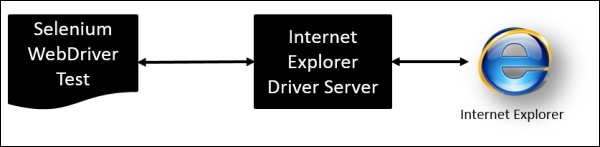
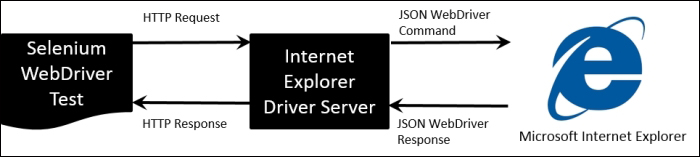
Internet Explorer Driver Server is a stand-alone server executable that implements WebDriver's JSON-wire protocol, which works as a glue between the test script and Internet Explorer, as shown in following diagram:
The tests should specify the path of the IEDriverServer executable before creating the instance of Internet Explorer. This is done by setting the webdriver.ie.driver property as shown in following code:
System.setProperty("webdriver.ie.driver",
    "src/test/resources/drivers/IEDriverServer.exe");
Tip
We can also specify a path externally through the Dwebdriver.ie.driver option using Maven command line options. In this case, we don't need to set this property in test.
Internet Explorer Driver Server supports automating major IE versions on Windows XP, Vista, Windows 7, and Windows 8 operating systems.
Note
For more information on
InternetExplorerDriver, please visit https://code.google.com/p/selenium/wiki/InternetExplorerDriver.
We need to create an instance of the InternetExplorerDriver class, which will connect to the Internet Explorer Driver Server to launch the Internet Explorer, shown as follows. It will then run the Selenium commands, which we will call by using various WebDriver and WebElement methods from the test script:
DesiredCapabilities caps = new DesiredCapabilities().internetExplorer();

caps.setCapability(
InternetExplorerDriver.INTRODUCE_FLAKINESS_BY_IGNORING_SECURITY_DOMAINS,
true);

// Launch Internet Explorer
driver = new InternetExplorerDriver(caps);
We used the DesiredCapabilities class to set the INTRODUCE_FLAKINESS_BY_IGNORING_SECURITY_DOMAINS capability, which defines to ignore the browser protected mode settings during the start by IEDriverServer.
Selenium provides the ability to run tests on remote machines by using the RemoteWebDriver class. We can configure any browser that Selenium supports for executing tests on a remote machine. To run tests on a remote machine, we need to run the Selenium Server and the Internet Explorer Driver Server on a remote machine and use RemoteWebDriverClass, as shown in the following code sample:
DesiredCapabilities caps = new DesiredCapabilities().internetExplorer();

caps.setCapability(
InternetExplorerDriver.INTRODUCE_FLAKINESS_BY_IGNORING_SECURITY_DOMAINS,
true);

// Connect with Remote Selenium Server with specified URL and capabilities
driver = new RemoteWebDriver(new URL("http://192.168.1.3:4444/hub/wd"), caps);
We can connect any browser to a remote server using the preceding method.
Similar to Internet Explorer, in order to execute test scripts on the Google Chrome browser, we need to use ChromeDriver and a standalone ChromeDriver executable.
ChromeDriver is maintained by the Google Chromium team. You can find more information at https://sites.google.com/a/chromium.org/chromedriver/.
Let's setup ChromeDriver and create a test for testing the search feature on Google Chrome.
You need to download ChromeDriver from https://sites.google.com/a/chromium.org/chromedriver/downloads.
After downloading the
ChromeDriverserver, unzip and copy the file to the driver's directory in thesrc/test/resourcesfolder, as shown in the following screenshot:
Add a new test and name it as
GoogleSearchTestOnChrome.java, and add the following code:package com.secookbook.examples.chapter01; import org.openqa.selenium.chrome.ChromeDriver; import org.openqa.selenium.WebDriver; import org.openqa.selenium.WebElement; import org.openqa.selenium.By; import org.openqa.selenium.support.ui.ExpectedCondition; import org.openqa.selenium.support.ui.WebDriverWait; import org.junit.*; import static org.junit.Assert.*; public class GoogleSearchTestOnChrome { private WebDriver driver; @Before public void setUp() { System.setProperty("webdriver.chrome.driver", "./src/test/resources/drivers/chromedriver.exe"); // Launch Chrome driver = new ChromeDriver(); // Maximize the browser window driver.manage().window().maximize(); // Navigate to Google driver.get("http://www.google.com"); } @Test public void testGoogleSearch() { // Find the text input element by its name WebElement element = driver.findElement(By.name("q")); // Enter something to search for element.sendKeys("Selenium testing tools cookbook"); // Now submit the form. WebDriver will find // the form for us from the element element.submit(); // Google's search is rendered dynamically with JavaScript. // Wait for the page to load, timeout after 10 seconds new WebDriverWait(driver, 10).until(new ExpectedCondition<Boolean>() { public Boolean apply(WebDriver d) { return d.getTitle().toLowerCase() .startsWith("selenium testing tools cookbook"); } }); assertEquals("Selenium testing tools cookbook - Google Search", driver.getTitle()); } @After public void tearDown() throws Exception { // Close the browser driver.quit(); } }Execute this test and you will see a Chrome window being launched and all the steps executed.
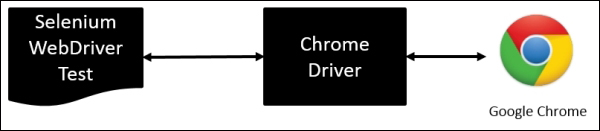
ChromeDriver is a standalone server executable that implements WebDriver's JSON-wire protocol and works as a glue between the test script and Google Chrome, as shown in the following diagram:
Note
For more information on ChromeDriver please visit https://code.google.com/p/selenium/wiki/ChromeDriver.
The tests should specify the path of the ChromeDriver executable before creating the instance of Chrome. This is done by setting the webdriver.chrome.driver property as shown in the following code:
System.setProperty("webdriver.chrome.driver","src/test/resources/drivers/chromedriver.exe");
    "src/test/resources/drivers/chromedriver.exe");
We can also specify a path externally through the –Dwebdriver.chrome.driver option using Maven command line options. In this case, we don't need to set up this property in test; we need to create an instance of ChromeDriver class that will connect to the ChromeDriver Server, as shown in the following code. It will then run the Selenium commands that we will call by using various WebDriver and WebElement methods from the test script:
driver = new ChromeDriver();
Microsoft Edge is a new web browser launched with Microsoft Windows 10. Microsoft Edge implements the W3C WebDriver standard and provides in-built support for Selenium WebDriver.
Similar to Internet Explorer, in order to execute test scripts on the Microsoft Edge browser, we need to use EdgeDriver class and a standalone Microsoft WebDriver Server executable.
Microsoft WebDriver Server is maintained by the Microsoft Edge development team. You can find more information at https://msdn.microsoft.com/en-us/library/mt188085(v=vs.85).aspx.
Let's set up Microsoft WebDriver Server and create a test for testing the search feature on Microsoft Edge.
You need to download and install Microsoft WebDriver Server on Windows 10 from https://www.microsoft.com/en-us/download/details.aspx?id=48212.
Add a new test and name it as GoogleSearchTestOnEdge.java and add the following code:
package com.secookbook.examples.chapter01;

import static org.junit.Assert.*;

import org.junit.After;
import org.junit.Before;
import org.junit.Test;
import org.openqa.selenium.By;
import org.openqa.selenium.WebDriver;
import org.openqa.selenium.WebElement;
import org.openqa.selenium.edge.EdgeDriver;
import org.openqa.selenium.edge.EdgeOptions;
import org.openqa.selenium.support.ui.ExpectedCondition;
import org.openqa.selenium.support.ui.WebDriverWait;

public class GoogleSearchTestOnEdge {

  private WebDriver driver;

  @Before
  public void setUp() {
    System.setProperty("webdriver.edge.driver",
        "C:\\Program Files (x86)\\Microsoft Web Driver\\MicrosoftWebDriver.exe");

    EdgeOptions options = new EdgeOptions();
    options.setPageLoadStrategy("eager");

    // Launch a new Edge instance
    driver = new EdgeDriver(options);

    // Navigate to Google
    driver.get("http://www.google.com");
  }

  @Test
  public void testGoogleSearch() {
    // Find the text input element by its name
    WebElement element = driver.findElement(By.name("q"));

    // Clear the existing text value
    element.clear();

    // Enter something to search for
    element.sendKeys("Selenium testing tools cookbook");

    WebElement button = driver.findElement(By.name("btnG"));
    button.click();

    // Google's search is rendered dynamically with JavaScript.
    // Wait for the page to load, timeout after 10 seconds
    new WebDriverWait(driver, 10).until(new ExpectedCondition<Boolean>() {
      public Boolean apply(WebDriver d) {
        return d.getTitle().toLowerCase()
            .startsWith("selenium testing tools cookbook");
      }
    });

    assertEquals("Selenium testing tools cookbook - Google Search",
        driver.getTitle());
  }
  @After
  public void tearDown() throws Exception {
    // Close the browser
    driver.quit();
  }
}
Execute this test and you will see a Microsoft Edge window being launched and all the steps executed.
Microsoft WebDriver Server is a standalone server executable that implements WebDriver's JSON-wire protocol, that works as a glue between the test script and the Microsoft Edge browser, as shown in the following diagram:
The tests should specify the path of Microsoft WebDriver Server executable before creating the instance of Microsoft Edge. This is done by setting the webdriver.edge.driver property as shown in the following code:
System.setProperty("webdriver.edge.driver",
        "C:\\Program Files (x86)\\Microsoft Web Driver\\MicrosoftWebDriver.exe");