


"Technology is just a tool. In terms of getting the kids working together and motivating them, the teacher is the most important."
- Bill Gates
In this first chapter, we will look at the basics of Moodle course design. You will learn how to upload resources, create web pages, how to set up groups, and we will also look at a little bit of administration for your course. We'll go through the different blocks and layout options; we'll add news events, calendar dates, and most importantly, find out how to make a backup of your hard work.
By the end of this chapter, you will be able to perform the following tasks:
Upload resources to your course
Change the course settings
Create groups of your users
Build web pages in Moodle
Back up your courses
Use some of the standard blocks
Before starting to edit your course, spend a while having a play with the software. Click on a few of the buttons to see what they do, click on some of the menu items, and generally get familiar with the look and feel of the courses. If you are fairly new to Moodle, the range of settings and options can be a little daunting; however, with time and practice anyone can learn how to use this software effectively and make a real difference to the learners studying your course.
The majority of people reading this will be high school science teachers using Moodle in an educational institution.We are assuming that you have a course setup to use that you may be new to the software, and could need a little help getting started. Any mention of the Moodle software throughout the book refers to Moodle version 2.0.
Moodle is one of the most popular learning management systems available and it is free! There is a huge community developing, improving, creating science-based resources, and supporting the software that is used all over the world. There are many reasons to use a VLE such as Moodle to enhance your teaching. These include the following:
Being able to give your students access to course materials 24/7 in a controlled environment, so learning can take place anywhere
Monitor the progress and keep records of your students learning
Extending the classroom by providing online discussion, testing, activities, and, most importantly, allowing collaboration and communication for learning
Make use of exciting multimedia, 3D interactive molecules, and web-based content, allowing pupils with different learning styles to access the curriculum
Helping science teachers collaborate, share, and store teaching resources, releasing them to students at your own pace
Moodle courses are very individual. They should do the following:
Make full use of the activities built into Moodle
Look interesting
Be built on sound pedagogic principals
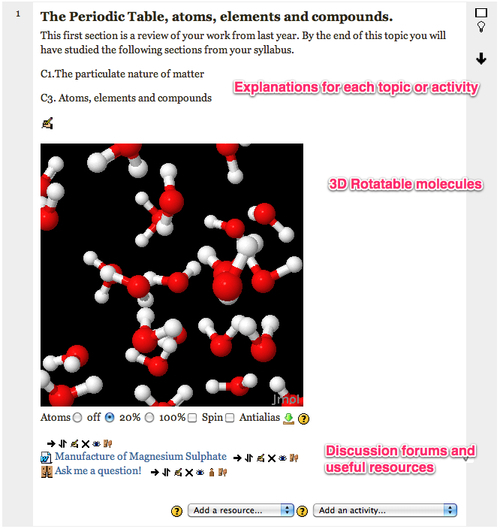
The following are examples that show parts of courses. The first one is the demo course created through the book.
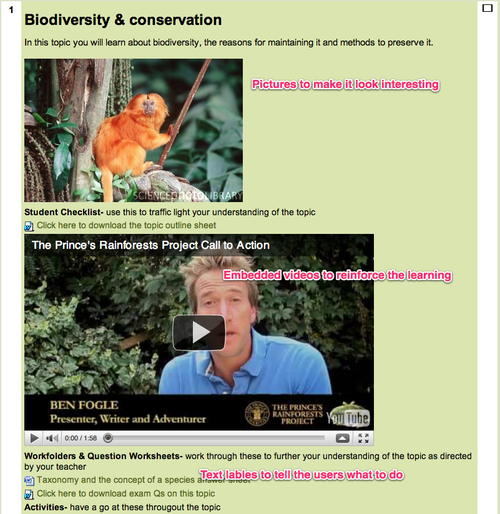
This is an example created by other teachers in my faculty, showing the first topic of a biology course.
Setting up a course is beyond the scope of this book; however, if you do need to set up a course, the instructions can be found at http://docs.moodle.org/en/Create_your_own_course.
If you are unable to perform the tasks mentioned in this chapter, you may not have been assigned the correct role by your administrator. On a Moodle site, different permission is given to different users. To fully utilize your course, you should be given the Teacher role by whomever looks after your Moodle courses.
|
Role |
What they can do |
|---|---|
|
Administrator |
Pretty much anything on the site. |
|
Manager |
Usually have full control over courses, including deleting them. They would usually not participate in a course. |
|
Course creator |
Course creators can create courses and teach in them, although teachers should be assigned the Teacher role. |
|
Teacher |
Teachers can edit their courses; add activities, resources and grade students. |
|
Non-editing teacher |
The same as the Teacher role, but they cannot change the activities. |
|
Student |
Students can carry out the activities and view resources. |
|
Guest |
Not much at all! They can view your course if you have enabled it in the course settings. |
After having a play with the software, think about your course and plan it first on paper. Consider the following:
The number of science topics (you could take them straight from the text book or syllabus)
Types of activities and materials you want to display
Whether you are going to group together similar things in each topic, for example, homework, web links, quizzes, and so on.
It can save you hours in the long run. It's worth finding out from your users what ideas they have or would like to see on a science Moodle course. This is especially true (and easy to elicit) if you meet your users face to face.
All Moodle courses follow similar layouts. Blocks around the side, Resources and Activities down the middle. Different themes can be applied to your course to change the way it looks, which can affect where you find the Blocks and alternative layouts can change the content in the middle.
There are a few layout options that can be applied to your course.
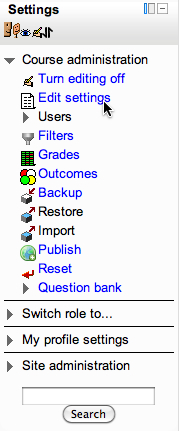
To change these settings, follow the Edit settings link in the settings block on the left-hand side of your course page:
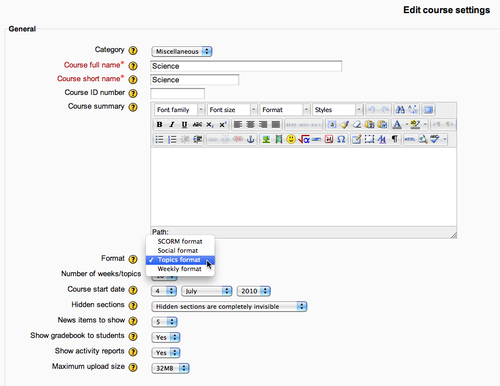
There are four standard course formats available within Moodle, which determine the layout on the course front page:
SCORM format
Social format
Topics format
Weekly format
The Topics format is the most useful for teaching science. This is because we normally teach science in discrete units or topics, and so this arranges your course into a number of sections (which you can also set here) for you to add content into. If you have a very clear, calendared structure of what you want your learners to achieve, you may wish to have a look at the Weekly format. This is a little restricting though, as it is important that learners should be able to see the big picture of the course and have an overview and progression for topics. The Social format allows you to have one big discussion forum running down the centre of the course page, which could be useful for projects and activities such as Science clubs. SCORM format is used to add SCORM compliant course content, which will be covered in the last chapter of the book. You can read about SCORM here: http://www.scorm.com/scorm-explained/.
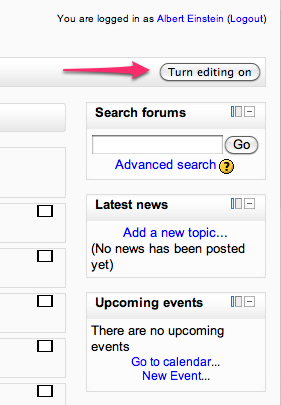
To begin any editing in your Moodle course, click the button to the top right-hand side, labeled Turn editing on:
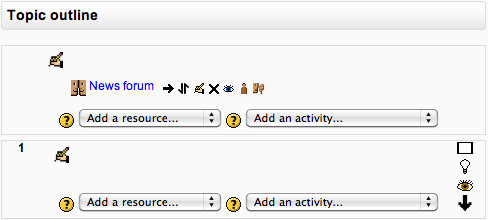
Your course will look slightly different now and you'll notice that a number of different icons appear as well as drop-down lists. In the following example, we will set up the course using topics.
The content you can add to the topics in Moodle are called either resources or activities. Resources are things that you expect students to look at, for example the files you upload, links on the Internet, videos, and so on. Activities are all the really great things you can set up in Moodle for your students to do.
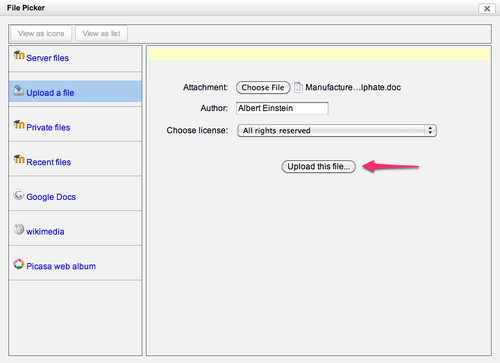
One of the easiest things to get you Moodling is to upload your teaching notes, resources, slide shows, lesson plans, and so on. So, we're going to look at how to add a file to your course. Here, the example is a Word document "The Manufacture of Magnesium Sulphate", which contains notes that have been used in class.
1. Once you have turned the editing on, choose the section you would like your resource to appear in and click on the drop-down box labeled Add a resource.
2. You will see that there are a number of different options to choose from. We're going to select File.

3. Next, give it a name and description.
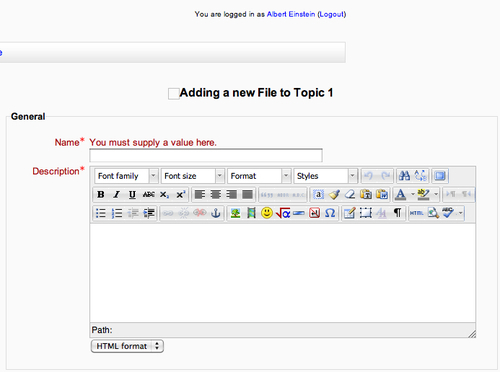
4. Then, click on Add to choose your file.

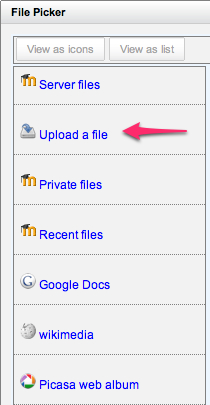
5. A pop-up will appear giving you choices of where to get the file from. Choose Upload a file. As shown here, there is also the option to pull files from other sources such as Wikimedia, Google Docs, Picasa Web album, and many more, depending on how your Moodle is set up.
6. Click on Choose File and find the file to be uploaded.
There are a number of different options you can choose to attach a copyright license to your file:
Public domain: No copyright restrictions.
Creative Commons: Use it, share it, and change it.
Creative Commons - NoDerivs: Same as Creative Commons, but you cannot make, use, or display derivatives of the work.
Creative Commons - No Commercial: You may copy, distribute, display, and make derivative works based on it, only for non-commercial reasons.
You can read about them here: http://en.wikipedia.org/wiki/Creative_Commons_licenses.
If it were something that you had created, you could use No Commercial ShareAlike, which loosely means that others can use your resources and change them, as long as they are not doing it for profit and reference your work as the original. It also means that they should give their new version the same license. If you want to retain full control over your work, choose All rights reserved. This means that people should not use your work without permission.

7. Once you are happy with the settings, click on the Upload this file button.
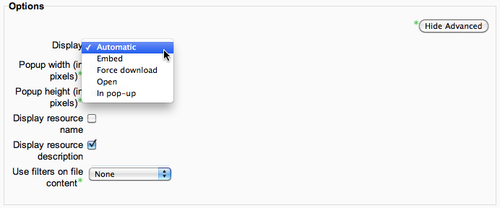
This will take you back to your first screen where there are a few more options to choose from. Some browsers block pop-ups so be careful about choosing that option. You might want to choose force download to prevent certain files, for example PDFs and Office files from opening in a browser.
If you are unsure of a setting, click on the question mark in the orange circle for a description. If in doubt, let the values be the default.

You will then be taken back to your course page, where a link to the file you uploaded will be displayed.

Any file can be uploaded, but bear it in mind that whether your course participants will have the software to view them or not. If you have some uncommon files that you want to share, first convert them to images or PDFs.
If you teach face to face, it's good to try to get into the habit of uploading your handouts and worksheets regularly. You could upload them before the lesson you teach and message your learners through Moodle (which will be covered later) to look at them before the lesson. This means that your learners can prepare for your lessons and get more out of them.
Internet connection varies massively, from snail speed dial up to lightning fast broadband. It can be annoying for the students if they have been asked to read and review a PowerPoint on Rocks that they have to wait an hour for it to download.
Note
Why is there a maximum file size that can be uploaded?
To encourage sensible file sizes you will find that's there is a limit to the file size that you can upload. This is to reduce page-loading times, and download waiting times. It can vary from school to school, usally from 8Mb to 64Mb being the average. This can be reduced in the course settings but is limited by the site settings. It is good practice to reduce your file sizes wherever possible. For instance most office type applications have an option to reduce the file size of pictures and images for display on the Web.
Reccomended file sizes depends on your (and your users') Internet connection speed.There is a good calculator at http://www.calculatorcat.com/free_calculators/download_speed_calculator.phtml to give you an idea of the time it would take to download files over different connections.
Try to think about what your users will be doing with the resources. There is little use having a 6MB photo of an experiment on your course when the same picture can be compressed to a fraction of the size (around 0.1MB is fine) without losing much of the quality. Most photo-editing software should be able to do this. Also, here are two websites that can do it for you:
The process to link to an external website is very similar to adding a file. From the Add a resource drop-down menu, choose a URL, and follow the steps.
Apart from uploading the resources, you can use Moodle to create web pages directly on your course. These can be useful for sharing information, adding images, and media for your students. So let's have a look how to add a page.
1. After turning editing on, from the resources drop-down box choose Page.

If you are not sure what the buttons do, hover over them for a bit.
2. Give your page a name and a description.

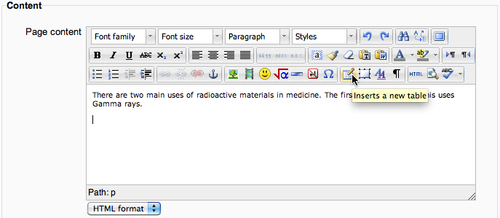
3. After this, start creating your content. To add a table (useful for arranging blocks of text and pictures), click on the button (where the tooltip is seen) shown in the next screenshot:
4. Clicking on the button with the picture of a tree will allow you to add an image.
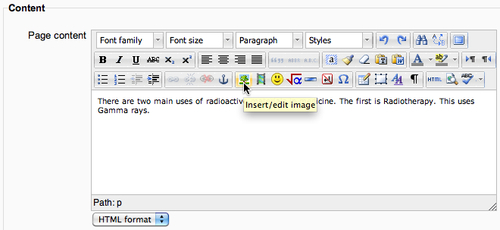
5. This will take you to a popup where you can type the URL of an image on the Internet or upload your own. When linking to external sites, remember if that image or site gets moved or deleted, you link will not work.

Have a go at uploading a few of the following or link to what you can find on the Internet:
An MP3 file of the Elements song by Tom Leher—a must for every Science course
Videos taken of you demonstrating an experiment
All of your homework sheets (although hopefully these will be redundant by the time you have finished this book!)
Pictures of your student's work to show good practice
Examples of Exemplar work
Class/revision notes (if these are from an interactive whiteboard, save them in a format you know your students can access)
Lists of key words or concept definitions
The syllabus for your course
Learning outcomes for each topic
Interactive periodic tables
Fun science activities you use such as word searches and so on
Writing frames for experiments
The website for your examination board
Past exam papers that they can download and use to practice
Topic evaluation, self review sheets, or targeting sheets
Ideas for science fair projects
Pod casts downloaded from the Internet or created by students
YouTube videos
Around the outside of your course are a number of blocks, all of which have different functions. If you are working with a standard theme, the default blocks are Search forums, Latest news, Upcoming events, and Recent activity on the right-hand side and Navigation and Settings on the left-hand side. With the course editing off, the blocks can be collapsed and expanded, and also be turned into tabs on the side of your browser.
With the editing on, they can be hidden, configured, deleted, or moved. Hover over the icons to see a description of their function.
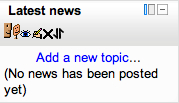
The Latest News block is for communicating with the users of your course. It is basically a way to post messages and information. Your course participants are forced to be subscribed to this and anything you post will be mailed out to them as well as appearing on your course page.
The Upcoming Events block allows you to create events for your course and will also show any deadlines for the individual activities that you set up. To manually create an event, click the New Event link then fill out the form. These events also get added to the calendar. There are four types of event—User, Course, Group, and Global. You will be able to set three of these. User (just for you), Course (everyone on your course), and Group, where you can choose and set up different events for each group on your course. The fourth type, Global, is where events for the whole site can be set up; but to do this, you would need different permissions from your administrator. You will also notice a drop-down list, where you can add other blocks to your course.
In this last section, some of the admin tasks will be covered. These are worth going through before you start using the course with your users.
Groups are brilliant. In Moodle, you can easily arrange your users into distinct groups. This allows you to get them working collaboratively and makes your job of organizing, reviewing, and marking their work easier, especially if there are lots of users on your course.
To use groups on your course, it has to be enabled in the course settings first. You will find this setting further down the page on the course settings page. You will see three different choices. This is what any activity that allows groups will have as its default value. No groups allows all learners to access the activity as one big community. They can see each other if the activity allows it, that is forums and chats. Separate groups creates different views of that activity for each group. Learners can't see each other if they are in different groups nor can they see each other's work in the case of wikis and forums, for example. The last group setting is Visible groups. Here, pupils can see what is happening in the activity for the other group, but cannot edit or contribute to it.
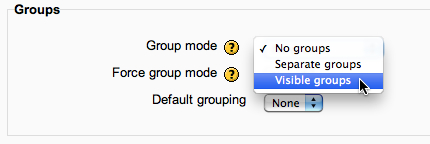
If you select Visible groups, students can see what other groups are doing, but cannot interact with them. Have a play and see what works for you. Set Force group mode to No so you can over-ride this setting if you need to for individual activities. As with everything Moodle, click the question mark icon for a description of what the options and settings are.
Note
Groupings are 'groups of groups'. You can choose to have only certain activities available for some groupings. This is an advanced feature and may not be enabled on your site.
Choose Yes from the drop-down box labeled Use group enrolment keys. Save the changes and back on your main course page you should see a link in the Settings block called Groups. Follow it and you will be able to set up your groups.
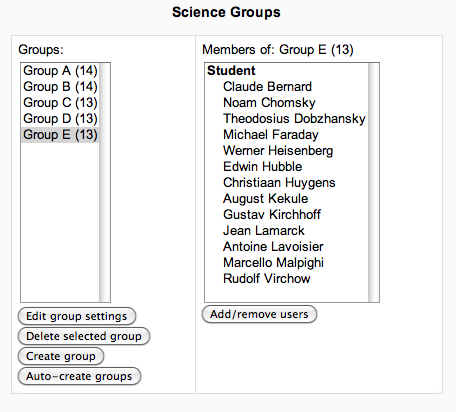
The easiest way to set up and enrol students into groups is to have Moodle do it for you automatically. You would use this for different science classes using the same course.
To manually set up a group, click the create group button, give it a name, description, and an enrolment key (password) if you wish. The clever thing to do is to create your groups before your students first use your course. If you set up the groups with enrolment keys when the students first go to use the course, they are asked for the enrolment key, and are automatically put into that group. This can save you hours of finding and selecting names from your participants and adding them into groups. If you are manually adding students to groups they must be enrolled on your course first.
The 'auto create groups' feature is very cool. You can specify the number of students in a group and Moodle will do the rest. You might want to do this to put users into smaller groups—working groups, study buddies, and so on. This is shown in the next screenshot for users on my course:
Whichever you choose, make sure that you add yourself to the groups as well! Say for instance, you have five teachers on your course, each of which is responsible for two groups. If you don't add the teachers to the groups Moodle does not know which teachers to e-mail out forum contributions to or assignment submissions to, so everyone will be sent everything! This is also why you need to be set up with the Teacher role rather than as a Course Creator.
It goes without saying how important it is to back up your courses. Your whole Moodle site is probably (hopefully?) backed up already; however, nothing is 100% fool proof. It is useful to back-up your course separately.
On the left-hand side of your course page, you should see a block called Settings.
1. To back up your course, click on the link Backup. You then have a number of options from the drop-down boxes. Some of these you may not be able to edit, as your site administrator sets them.
2. Make sure the ones you want to back up are set to Yes and then hit Next.

3. Choose the detail from each section to back up, hit the Next button and you will be taken to a new screen to check your choices.
4. Hit the Perform backup button, and it will begin to back up the course.
5. Once it has finished it should say, Backup completed successfully, then hit Continue for one last time.
6. You should then be taken to the file section for your course, where you will see a ZIP file. Click on this and you will be able to download it to our local computer for safekeeping.
This is also a neat way to copy courses form one site to another. If you ever need to restore your course, you can click the Restore button alongside the ZIP file to restore your course.
You can download and install Moodle to run on your home PC or Mac. This allows you to create your courses offline, which you can restore at a later date to your live course. This is really easy to do. If you are a Windows user, go to http://download.moodle.org/windows/ and for Mac OS X visit http://download.moodle.org/macosx/.
On both of these pages, there are links for you to download the latest Moodle distribution for your computer. Make sure that you download Moodle for Windows or Moodle for Mac OS X, as the standard Moodle downloads are designed for installation on a server. On both of these pages, there are step-by-step installation guides for either PC or Mac. Another advantage of having the software installed locally on your machine is that you can also have a look at the administration side of Moodle, should you be interested. There are also lots of help documents available and forums at moodle.org, if you get stuck.
So far we've looked at changing some of the course settings to suit you and your learners best, and organizing your learners into groups. You should be able to upload resources for your users, create web pages, and use some of the standard blocks. By now, your course should have some basic content for your users to look at. Practice these techniques—uploading resources and linking to other useful websites—and in no time you will have a great structure to build on. At the moment, these are all fairly static resources. They are not likely to change that often and your learners are passively involved in your course. In the next chapter, we'll have a look at how we can make a Moodle course look inviting, so that our students want to come back to it again and again.