


 Download code from GitHub
Getting Started with ROS
In this chapter, we will discuss the following recipes:
- Installing ROS on desktop systems
- Installing ROS on a virtual machine
- Using ROS from a Linux container
- Installing ROS on an ARM-based board
Introduction
ROS is an open source software framework for programming robots and developing complex robotics applications. In addition, ROS is sometimes called a meta-operating system or middleware software framework because it performs many of the functions of an operating system, but it requires a host operating system, such as Linux.
Moreover, like any operating system, it provides a hardware abstraction layer to build robotics applications without worrying about the underlying hardware. The core of ROS is a message-passing middleware framework—synchronous or asynchronous—where processes and threads can communicate with and transport data between each other even when they are running from different machines. In addition, ROS software is organized as packages, offering good modularity and reusability, which can be integrated with and used for any custom robotic application with minimal changes.
The Robot Operating System (ROS) is a framework that is widely accepted and used in the robotics community, which ranges from researchers to professional developers of commercial robots. ROS was originally started in 2007 by the Stanford Artificial Intelligence Laboratory (SAIL) under the name SwitchYard, in support of the Stanford AI Robot project.
Since 2008, Willow Garage has been continuing the development, and recently ROS has been actively maintained by the Open Source Robotics Foundation (OSRF):
- ROS: http://www.ros.org/
- OSRF: http://www.osrfoundation.org/
Let's start with the introductory chapter of this book, where we will learn how to install ROS on various platforms.
Installing ROS on desktop systems
We assume that you have a desktop system with Ubuntu 16.04 or Ubuntu 18.04 long-term support (LTS) installed, with an Intel Corei5 processor @3.2 GHz and 8GB of RAM, or similar. Furthermore, it is necessary to have a basic knowledge and understanding of Linux and command tools. If you need to refresh your memory or learn about these tools, you can find a lot of relevant resources on the internet, or you can find books on these topics instead.
In this section, we will discuss the ROS distribution and the corresponding supported operating system, which will guide help us in selecting the right combination, depending upon our requirements.
ROS distribution
An ROS distribution is a versioned set of ROS packages. These are very similar to Linux distributions. The purpose of the ROS distributions is to let developers work against a relatively stable code base until they are ready to set up forward. Each distribution maintains a stable set of core packages up to the end of life (EOL) of the distribution.
The latest recommended ROS distribution is Kinectic Kame, which will get support up to May 2021, however, the latest ROS distribution is Melodic Morenia, which was released on 23rd May 2018, and will be supported up to May 2023. One of the problems with this latest ROS distribution is that most of the packages will not be available on it because it will take time to migrate them from the previous distribution, so we do not recommend this.
The list of distributions to use can be found on the ROS website (http://wiki.ros.org/distributions):

Supported operating systems
ROS is fully compatible with the Ubuntu operating system by design. Moreover, the ROS distributions are planned according to Ubuntu releases. Nevertheless, they are partially supported by Ubuntu ARM, Gentoo, macOS X, Arch Linux, and OpenEmbedded. The following table shows ROS distributions and the corresponding versions of the supported operating systems:
|
ROS Distribution |
Supported OS |
Experimental OS |
|
Melodic Morenia |
Ubuntu 18.04 (LTS); Debian9 |
OS X (Homebrew), Gentoo, Ubuntu ARM, and OpenEmbedded/Yocto |
|
Kinetic Kame (LTS) |
Ubuntu 16.04 (LTS) and 15.10; Debian 8 |
OS X (Homebrew), Gentoo, Ubuntu ARM, and OpenEmbedded/Yocto |
|
Jade Turtle |
Ubuntu 15.04, 14.10, and 14.04; Debian 8 |
OS X (Homebrew), Gentoo, Arch Linux, Android NDK, Ubuntu ARM, and OpenEmbedded/Yocto |
|
Indigo Igloo (LTS) |
Ubuntu 14.04 (LTS) and 13.10; Debian 7 |
OS X (Homebrew), Gentoo, Arch Linux, Android NDK, Ubuntu ARM, and OpenEmbedded/Yocto |
As we have discussed in the previous section, there are several ROS distributions available to download and install. Therefore, we recommend you select the LTS release, which is stable and getting maximum support.
However, if the latest features of ROS are required, you could go for the latest version, but you will not get the latest complete packages immediately after release because of the migration period from one distribution to another.
In this book, we are using two LTS distributions, ROS Kinetic and ROS Melodic, for all experiments.
The following screenshot shows a choice of ROS installations:

We can get the complete installation instructions for each distribution from the ROS website (http://www.ros.org/). Afterward, navigate to Getting Started | Install. It will show a screen listing, as shown in the preceding diagram, for the latest ROS distributions.
How to do it...
In the following section, we will go through the instructions for installing the latest ROS distribution.
Configuring Ubuntu repositories
To configure the Ubuntu repository, first search for Software & Updates in the Ubuntu Search Toolbar and enable the restricted, universe, and multiverse Ubuntu repositories, as shown in the following screenshot:

Setting up the source.list file
The next step is to set up the desktop system to accept software from packages.ros.org. The details of the ROS repository server have to be added into /etc/apt/source.list:
$ sudo sh -c 'echo "deb http://packages.ros.org/ros/ubuntu $(lsb_release -sc) main" > /etc/apt/sources.list.d/ros-latest.list'
Setting up keys
Whenever a new repository is added to the Ubuntu repository manager, we have to make it trusted to validate the origin of the packages by adding the keys. The following key should be added to Ubuntu before starting the installation, which will ensure the download comes from an authorized server:
$ sudo apt-key adv --keyserver hkp://ha.pool.sks-keyservers.net:80 --recv-key 421C365BD9FF1F717815A3895523BAEEB01FA116
ROS Kinetic Installation
Now, we are prepared to install the ROS packages on Ubuntu. The first step is to update the list of packages by using the following command:
$ sudo apt-get update
There are many different libraries and tools in ROS, however, we will provide four default configurations to get you started:
- Desktop-Full install (recommended):
$ sudo apt-get install ros-kinetic-desktop-full
- Desktop install:
$ sudo apt-get install ros-kinetic-desktop
- ROS-Base:
$ sudo apt-get install ros-kinetic-ros-base
- Individual Package:
$ sudo apt-get install ros-kinetic-PACKAGE
ROS Melodic installation
Now, we are ready to install the ROS packages on Ubuntu 18.04 LTS. The first step is to update the list of packages by using the following command:
$ sudo apt-get update
There are many different libraries and tools in ROS, however, we will provide four default configurations to get you started:
- Desktop-Full Install (recommended):
$ sudo apt-get install ros-melodic-desktop-full
- Desktop Install:
$ sudo apt-get install ros-melodic-desktop
- ROS-Base:
$ sudo apt-get install ros-melodic-ros-base
- Individual Package:
$ sudo apt-get install ros-melodic-PACKAGE
Initializing rosdep
Before using ROS, you have to initialize rosdep, which enables you to easily install system dependencies for sources you want to compile, and also is required to run some core components in ROS:
$ sudo rosdep init
$ rosdep update
Setting up the environment
Good! We have completed the ROS installation. The ROS scripts and executables are mostly installed to /opt/ros/<ros_version>.
To get access to these scripts and executables, the ROS environment variables need to be added to the bash session. We have to source the following bash file for ROS Kinetic:
$ source /opt/ros/kinetic/setup.bash
ROS Melodic requires the following:
$ source /opt/ros/melodic/setup.bash
It's convenient if the ROS environment variables are automatically added to the bash session every time a new shell is launched.
For ROS Kinetic, use the following:
$ echo "source /opt/ros/kinetic/setup.bash" >> ~/.bashrc
$ source ~/.bashrc
For ROS Melodic, use the following:
echo "source /opt/ros/melodic/setup.bash" >> ~/.bashrc
source ~/.bashrc
If we have more than one ROS distribution installed, ~/.bashrc must only source setup.bash for the version we are currently using:
$ source /opt/ros/<ros_version>/setup.bash
Getting rosinstall
Moreover, rosinstall is a frequently used command-line tool in ROS that is distributed separately. It enables us to easily download several source trees for the ROS packages with the single command.
This tool is based on Python, and can be installed using the following command:
$ sudo apt-get install python-rosinstall
Build Farm Status
The ROS packages are built by the ROS build farm. We can check the status of individual packages at http://repositories.ros.org/status_page/.
Congratulations! We are done with the ROS installation. We will execute the following command to check whether the installation is correct.
Open a new terminal to run roscore:
$ roscore
This is followed by a turtlesim node in another terminal:
$ rosrun turtlesim turtlesim_node
If everything is correct, we will get the following screen:

Installing ROS on a virtual machine
As we know, complete ROS support is only available on Ubuntu and Debian distributions. If we are Windows or macOS X users and we don't want to change the operating system of our computer to Ubuntu, we can use tools such as VMware or VirtualBox to help us to virtualize a new operating system on our computers.
VMware Workstation Pro is the industry standard for running multiple operating systems as virtual machines on a single PC. It is commercial software but also has free product trials and demos (https://www.vmware.com/in.html).
Alternatively, VirtualBox is a free and open source hypervisor for x86 computers that can be installed on several host operating systems, including Linux, macOS, Windows, Solaris, and OpenSolaris (https://www.virtualbox.org/).
How to do it...
Once the virtual machine starts and is configured properly, we should see another window on the host system, as seen in the following screenshot:

There is no difference in an ROS installation on a virtual machine. Therefore, we can simply install ROS Kinetic following the same instructions described in the previous section. We can run most of the examples and stacks that we are going to work with. Unfortunately, the virtual machine may have problems when working and interfacing with external custom hardware through ROS. Moreover, performance degradation could also be observed with ROS running in a virtual machine. It is possible that the example source code discussed in Chapter 4, ROS Visualization and Debugging Tools, will not work.
The following screenshot shows ROS running on one of the virtual machines and the ROS installation:

Using ROS from a Linux container
As the industry moves beyond the virtual machine consolidation paradigm, several types of containers have come into prominence. Two flavors currently enjoy the lion's share of deployments on the Linux operating system: Docker and LXC.
Getting ready
LXC (Linux Containers) is an OS-level virtualization technology that allows the creation and running of multiple isolated Linux virtual environments (VE) on a single control host. These isolation levels or containers can be used to either sandbox specific applications or emulate an entirely new host. LXC uses the Linux cgroups functionality, which was introduced in version 2.6.24, to allow the host CPU to better partition memory allocation into isolation levels called namespaces (https://linuxcontainers.org/).
Docker, previously called dotCloud, was started as a side project and only open sourced in 2013. It is really an extension of the LXC capabilities. This it achieved using a high-level API that provides a lightweight virtualization solution to run processes in isolation. Docker is developed in the Go language and utilizes LXC, cgroups, and the Linux kernel itself. Since it's based on LXC, a Docker container does not include a separate operating system; instead it relies on the operating system's own functionality, as provided by the underlying infrastructure. So, Docker acts as a portable container engine, packaging the application and all of its dependencies in a virtual container that can run on any Linux server (https://www.docker.com/).
How to do it...
Since Docker is an open platform that helps to distribute applications and complete systems and is based on LXC, we will discuss working with ROS Docker Images and how to distribute complex applications along with complete systems as a standalone image.
Installing Docker
Before installing Docker, it will require the updated packages:
$ sudo apt-get update
Use the following command to add the GPG key for the official Docker repository to the system:
$ sudo apt-key adv --keyserver hkp://p80.pool.sks-keyservers.net:80 --recv-keys 58118E89F3A912897C070ADBF76221572C52609D
Adding the Docker repository to APT sources
For Ubuntu 16.04, add the following:
$ echo "deb https://apt.dockerproject.org/repo ubuntu-xenial main" | sudo tee /etc/apt/sources.list.d/docker.list
For Ubuntu 18.04, add the following:
$ echo "deb https://apt.dockerproject.org/repo ubuntu-xenial main" | sudo tee /etc/apt/sources.list.d/docker.list
Updating the package database with the Docker packages from the newly added repository is done as follows:
$ sudo apt-get update
Make sure that we are about to install from the Docker repository instead of the default Ubuntu repository:
$ apt-cache policy docker-engine
Notice that docker-engine is not installed yet; to install docker-engine, use the following command:
$ sudo apt-get install -y docker-engine
Check whether Docker is started or not:
$ sudo systemctl status docker
To start the Docker service, use the following command:
$ sudo service docker start
$ docker
We can search for images available on Docker Hub by using the docker command with the search subcommand:
$ sudo docker search Ubuntu
To run the Docker container, use the following command:
$ sudo docker run -it hello-world
Getting and using ROS Docker images
Docker images are akin to packages such as virtual machines or complete systems that are already set up. There are servers that provide the images, and users only have to download them. The main server is Docker Hub, which is located at https://hub.docker.com. Here, it is possible to search for Docker images for different systems and configurations.
Well! All ROS Docker images are listed in the official ROS repository on the web at https://hub.docker.com/_/ros/. We will use ROS Kinetic images, which are already available here:
$ sudo docker pull ros
$ sudo docker pull kinetic-ros-core
$ sudo docker pull kinetic-ros-base
$ sudo docker pull kinetic-robot
$ sudo docker pull kinetic-perception
Similarly, we could pull ROS Melodic images, which are also already available there:
$ sudo docker pull ros
$ sudo docker pull melodic-ros-core
$ sudo docker pull melodic-ros-base
$ sudo docker pull melodic-robot
$ sudo docker pull melodic-perception
After the container is downloaded, we can run it interactively with the following command:
$ docker run -it ros
This will be like entering a session inside the Docker container. The preceding command will create a new container from the main image wherein we have a full Ubuntu system with ROS Kinetic already installed. We will be able to work as in a regular system, install additional packages, and run the ROS nodes.
We can list all the Docker containers available and the origin of their images:
$ sudo docker ps
Congratulations! We have completed the Docker installation. To set up the ROS environment inside the container in order to start using ROS, we have to run the following command (ros_version: kinetic/melodic):
$ source /opt/ros/<ros_version>/setup.bash
However, in principle, running docker should be enough, but we could even SSH into a running Docker container as a regular machine, using name or ID.
$ sudo docker attach 665b4a1e17b6 #by ID ...OR
$ sudo docker attach loving_heisenberg #by Name
If we use attach, we can use only one instance of the shell. So, if we want to open a new terminal with a new instance of a container's shell, we just need to run the following:
$ sudo docker exec -i -t 665b4a1e17b6 /bin/bash #by ID ...OR
$ sudo docker exec -i -t loving_heisenberg /bin/bash #by Name
Moreover, Docker containers can be stopped from other terminals using docker stop, and they can also be removed with docker rm.
See also
This book comes with a working Docker Image, which is basically an extension of ROS Kinetic with the code for the examples. The instructions to download and install it will be on the GitHub repository with the rest of the code.
Installing ROS on an ARM-based board
There is high demand from industries that are working on commercial robotic products for ROS that runs on an embedded platform, mostly on the ARM platform. Finally, OSRF, which maintains the open source ROS, has announced its formal support for an ARM target.
Getting ready
There are two streams to support ROS on an ARM target:
-
Ubuntu ARM
-
OpenEmbedded (meta-ros)
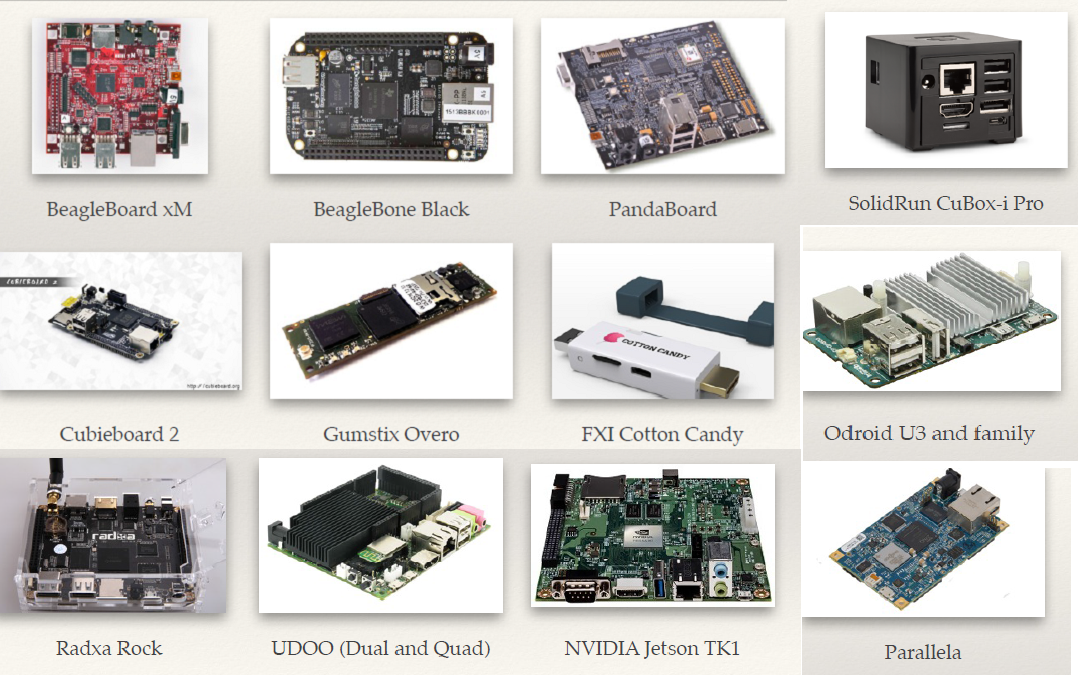
Ubuntu ARM is the most popular among researchers since it is easy to install and a lot of ARM boards are already supporting it; a few of them are shown in the following diagram. In addition, many ROS packages are already supported or could be ported with minimal changes:
Supported platforms
However, OpenEmbedded is used by professional developers for commercial products in industries. The following table shows a comparison of both:
|
Ubuntu ARM |
OpenEmbedded |
|
Binary ROS packages |
A cross-compilation tool chain for ROS packages based on catkin |
|
Is compiled for a generic ARM architecture |
Compiles all packages from their source |
|
Installation with usual Ubuntu tools (dpkg, APT, and so on) |
Supports many architectures: ARM, MIPS, PowerPC, and more |
|
Easy and quick installation |
Easy to adjust to new machines and architectures |
|
No need to compile the basic ROS packages from source |
Allows changes to the basic ROS packages |
|
Common Ubuntu feel |
Small Linux kernels and images |
|
Additional compilation is onboard |
Requires a powerful system setup to get the build machine and tool chain running |
Despite several possibilities, we have chosen to install ROS on Ubuntu ARM because these distributions are more common and can be used on other ARM-based boards such as UDOO, ODROID-U3, ODROID-X2, or Gumstix Overo. It is recommended to use an image of Ubuntu ARM 16.04 Xenial armhf on the platform to work with ROS.
Before installing ROS on the specific ARM platform, we have to complete a few prerequisites. As this book is focused on ROS, we will list them without going into detail. However, there is a lot of information about Ubuntu ARM for specific ARM platforms available on websites, forums, and books that could be reviewed.
When we have Ubuntu ARM on our selected platform, the network interfaces must be installed to provide access to the network by configuring the network settings, such as the IP, DNS, and gateway.
An Ubuntu image for most of the ARM platform will be set up for MicroSD cards with 1-4 GB size. This is not sufficient to use a large part of the ROS Kinetic packages. In order to solve this problem, we can use SD cards with more space and expand the file system to occupy all the space available with re-partitioning:
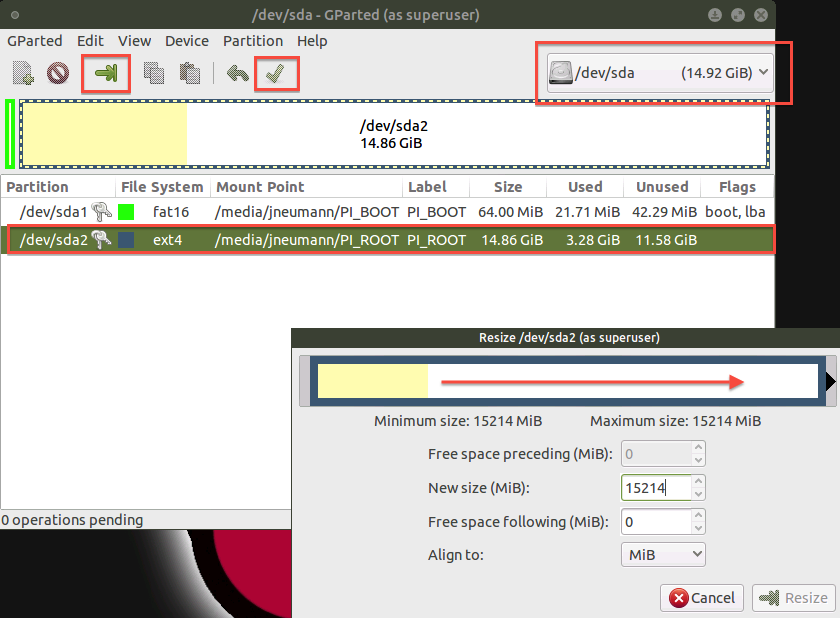
GParted
We could use the GParted utility, an open source graphical tool that is used for creating, deleting, resizing, moving, checking, and copying disk partitions and their file systems (http://gparted.org/).
How to do it...
Good! We should be ready to install ROS. After this, the process of installation is pretty similar to the desktop installation discussed in the previous section. The major difference when installing ROS on the Ubuntu ARM platform is that it will not be possible to go for the full desktop installation. We install the selected package that is required for our application. Nevertheless, it will be nice to work with source building and installation for a package not present in the ROS repository:
-
ROS Kinectic <ros_version> is compatible with Ubuntu 16.04 Xenial Xerus
-
ROS Melodic <ros_versions> is compatible with Ubuntu 18.04 Bionic Beaver
Configuring repositories
The first step consists of configuring our Ubuntu repositories to allow "restricted," "universe," and "multiverse":
$ sudo vi /etc/apt/sources.list
We have something like this for Ubuntu 16.04:
deb http://ports.ubuntu.com/ubuntu-ports/ xenial main restricted universe multiverse
#deb-src http://ports.ubuntu.com/ubuntu-ports/ xenial main restricted universe multiverse deb http://ports.ubuntu.com/ubuntu-ports/ xenial-updates main restricted universe multiverse
#deb-src http://ports.ubuntu.com/ubuntu-ports/ xenial-updates main restricted universe multiverse
#Kernel source (repos.rcn-ee.com) : https://github.com/RobertCNelson/linux-stable-rcn-ee
#
#git clone https://github.com/RobertCNelson/linux-stable-rcn-ee
#cd ./linux-stable-rcn-ee #git checkout `uname -r` -b tmp
# deb [arch=armhf] http://repos.rcn-ee.com/ubuntu/ xenial main
#deb-src [arch=armhf] http://repos.rcn-ee.com/ubuntu/ xenial main
Similarly, the following is for Ubuntu 18.04:
deb http://ports.ubuntu.com/ubuntu-ports/ bionic main restricted universe multiverse
#deb-src http://ports.ubuntu.com/ubuntu-ports/ bionic main restricted universe multiverse deb http://ports.ubuntu.com/ubuntu-ports/ bionic-updates main restricted universe multiverse
#deb-src http://ports.ubuntu.com/ubuntu-ports/ bionic-updates main restricted universe multiverse
#Kernel source (repos.rcn-ee.com) : https://github.com/RobertCNelson/linux-stable-rcn-ee
#
#git clone https://github.com/RobertCNelson/linux-stable-rcn-ee
#cd ./linux-stable-rcn-ee
#git checkout `uname -r` -b tmp
# deb [arch=armhf] http://repos.rcn-ee.com/ubuntu/ bionic main
#deb-src [arch=armhf] http://repos.rcn-ee.com/ubuntu/ bionic main
Then, use the following to update the sources:
$ sudo apt-get update
Setting system locale
Some ROS tools, such as Boost, require that the system locale be set. This can be set with the following:
$ sudo update-locale LANG=C LANGUAGE=C LC_ALL=C LC_MESSAGES=POSIX
Setting up sources.list
Next, we will configure the source lists depending on the Ubuntu version installed in our ARM platform. Run the following command to install the Ubuntu armhf repositories:
$ sudo sh -c 'echo "deb http://packages.ros.org/ros/ubuntu $(lsb_release -cs) main" > /etc/apt/sources.list.d/ros-latest.list'
Setting up keys
As discussed previously, this step is needed to confirm that the origin of the code is correct and that no one has modified the code or programs without the knowledge of the owner:
$ sudo apt-key adv --keyserver hkp://ha.pool.sks-keyservers.net --recv-key 0xB01FA116
Installing the ROS packages
Before the installation of the ROS packages, make sure our Debian package index is up-to-date:
$ sudo apt-get update
There are many different libraries and tools in ROS—not all compile fully on ARM. So, it is not possible to make a full desktop installation. We should install ROS packages individually.
We could install ros-base (Bare Bones), which includes the ROS package, build, and communication libraries, but does not include GUI tools (press ENTER (Y) when prompted):
$ sudo apt-get install ros-<ros_version>-ros-base
However, we could try to install the desktop installation, which includes the ROS, rqt, RViz, and robot-generic libraries:
$ sudo apt-get install ros-<ros_version>-desktop
Adding individual packages
We can install a specific ROS package:
$ sudo apt-get install ros-<ros_version>-PACKAGE
Find available packages with the following command:
$ apt-cache search ros-<ros_version>
Initializing rosdep
The rosdep command-line tool must be installed and initialized before we can use ROS. This allows us to easily install libraries and solve system dependencies for the source we want to compile, and is required to run some core components in ROS:
$ sudo apt-get install python-rosdep $ sudo rosdep init $ rosdep update
Environment setup
Well done! We have completed the ROS installation for the ARM platform. The ROS scripts and executables are mostly installed in /opt/ros/<ros_version>.
To get access to these scripts and executables, the ROS environment variables need to be added to the bash session. We have to source the following bash file:
$ source /opt/ros/<ros_version>/setup.bash
It's convenient if the ROS environment variables are automatically added to the bash session every time a new shell is launched:
$ echo "source /opt/ros/<ros_version>/setup.bash" >> ~/.bashrc
$ source ~/.bashrc
If we have more than one ROS distribution installed, ~/.bashrc must only source the setup.bash for the version we are currently using:
$ source /opt/ros/<ros_version>/setup.bash
Getting rosinstall
rosinstall is a frequently used command-line tool in ROS that is distributed separately. It enables us to easily download several source trees for the ROS packages with a single command.
This tool is based on Python and can be installed using the following command:
$ sudo apt-get install python-rosinstall
As a basic example, we could run an ROS core on one terminal:
$ roscore
And from another terminal, we can publish a pose message:
$ rostopic pub /dummy geometry_msgs/Pose Position: x: 3.0 y: 1.0 z: 2.0 Orientation: x: 0.0 y: 0.0 z: 0.0 w: 1.0 -r 8
Moreover, we could set ROS_MASTER_URI on our desktop system (in the same network) to point to our ARM Platform (IP 192.168.X.X).
On your laptop, add the following:
$ export ROS_MASTER_URI=http://192.168.1.6:11311
And, we will see pose published from the ARM platform to our laptop.
On your laptop, add the following:
$ rostopic echo -n2 /dummy Position: x: 1.0 y: 2.0 z: 3.0 Orientation: x: 0.0 y: 0.0 z: 0.0 w: 1.0 ---


