


 Download code from GitHub
Getting RHEL Up and Running
The first step to start working with Red Hat Enterprise Linux (RHEL) is to have it running. Whether on your own laptop as the main system, on a virtual machine, or on a physical server, its installation is necessary in order to get your hands on the system you want to learn to use. It is highly encouraged that you get yourself a physical or virtual machine to use the system while reading this book.
In this chapter, you will deploy your own RHEL 9 system to be able to follow all the examples mentioned in this book, as well as discover more about Linux.
The topics to be covered in this chapter are as follows:
- Obtaining RHEL software and a subscription
- Installing RHEL 9
Technical requirements
The best way to get started is by having an RHEL 9 virtual machine to work with. You can do it on your main computer as a virtual machine or using a physical machine. In the following section, we will review both options and you will be able to run your own RHEL 9 system.
Tip
A virtual machine is a way to emulate a complete computer. To be able to create this emulated computer on your own laptop, if you are using macOS or Windows, you will need to install virtualization software such as VirtualBox, for example. If you are running Linux, it is already prepared for virtualization, and you will only need to add the virt-manager package.
Obtaining RHEL and a subscription
To be able to deploy RHEL, you will need a Red Hat subscription to obtain the images to be used, as well as access to repositories with software and updates. You can obtain, free of charge, a developer subscription from the developers’ portal site of Red Hat using the following link: https://developers.redhat.com/. You then need to follow these steps:
- Log in or create an account at https://developers.redhat.com/.
- Click on the Log in button:

Figure 1.1 – The developers.redhat.com home page, indicating where to click to log in
- Once on the login page, use your account or, if you do not have one, create one by clicking on Register in the top-right corner or on the Register for a Red Hat account button directly in the registration box, as follows:

Figure 1.2 – Red Hat login page (common to all Red Hat resources)
You can choose to use your credentials in several services (in other words, Google, GitHub, or Twitter) if you prefer to do so.
- Once you have logged in, go to the Products section in the top bar. You can find the Red Hat Enterprise Linux section in the navigation bar before the content:

Figure 1.3 – Accessing the Linux page at developers.redhat.com
Click on Download RHEL at no-cost, which appears as a red button on the next page:

Figure 1.4 – Accessing the RHEL download page at developers.redhat.com
Then, the ISO image for the x86_64 (8 GB) architecture will start downloading:

Figure 1.5 – Download dialog for RHEL 9
The ISO image is a file that contains an exact copy of the contents of a full DVD (even when we are not using a DVD). This file will later be used to install our machines, whether dumping it to a USB drive for bare metal installations, unpacking it for network installations, or attaching it for virtual machine installations (or using out-of-band capabilities in servers such as IPMI, iLO, or iDRAC)
Tip
To verify the ISO image, and ensure that the one we have obtained is not corrupted or altered, a mechanism called checksum can be used. Checksums are a way to review a file and provide a set of letters and numbers that can be used to verify that the file is precisely the same one as in the origin. Red Hat provides a list of sha256 checksums for doing so in the downloads section of the customer portal (access.redhat.com). An article describing the process is available here: https://access.redhat.com/solutions/8367.
We have the software, in this case, the ISO image, to install RHEL 9 on any computer. These are the same bits that are used in production machines worldwide, and that you can use yourself for learning purposes with your developer subscription. Now, it is time to give them a go in the next section.
Installing RHEL 9
In this section, we will follow the typical installation process to have RHEL installed on a machine. We will follow the default steps, reviewing the options available for each one.
Preparation for a physical server installation
A physical server requires some initial setup before beginning with installation. Common steps include configuring the disks in the internal array, connecting it to the networks, preparing the switches for any interface aggregation that is expected (teaming, bonding), preparing access to external disk arrays (in other words, fiber channel arrays), setting up out-of-band capabilities, and securing the BIOS configuration.
We will not get into the details of these preparations, except for the boot sequence. The server will require to boot (start loading the system) from an external device such as a USB thumb drive or optical disk (whether physical or emulated through the out-of-band capabilities).
Creating a bootable USB thumb drive from a machine with Linux or macOS is as simple as doing a “disk dump” with the dd application. Perform the following steps:
- Find your USB device in the system, usually
/dev/sdbin Linux, or/dev/disk2in macOS (in macOS, this command requires special privileges; please run it assudo dmesg | grep removable):$ dmesg | grep removable [66931.429805] sd 0:0:0:0: [sdb] Attached SCSI removable disk
Important Note
Please verify the disk name very carefully, as the procedure for using “disk dump” will completely overwrite the disk target.
Check whether the USB is mounted and if so, dismount it (for macOS users, please use diskutil list to ascertain whether the device is mounted):
$ lsblk /dev/sdb
NAME   MAJ:MIN RM  SIZE RO TYPE MOUNTPOINT
sdb      8:0   1  3,8G  0 disk
├─sdb1   8:1    1  1,8G  0 part /run/media/miguel/USB
├─sdb2   8:2    1 10,9M  0 part
└─sdb3   8:3    1 22,9M  0 part
In this case, only partition one of the sdb disk, referred to as sdb1, is mounted. We will need to unmount all the partitions mounted. In this example, this is straightforward as there is only one. To do so, we can run the following command:
$ sudo umount /dev/sdb1
Important Note
By using super-user do (sudo) for administrative tasks such as unmounting devices, we can open an administrator shell (root in Linux and Unix-like systems) or run the command using sudo, which provides administrative privileges to the current user. When running commands with sudo, the user will be requested to enter their password (not the admin password, but the user’s own password) to proceed with the execution (this default behavior may be overridden in the sudoers configuration file).
Dump the image! (Warning, this will erase the selected disk!):
$ sudo dd if=rhel-baseos-9.0-beta-x86_64-dvd.iso of=/dev/sdb bs=512k
Tip
Alternative graphical tools are available for creating a boot device that can help select both the image and the target device. In Fedora Linux (the development branch used to create Red Hat Enterprise Linux, and a workstation for many engineers and developers), the Fedora Media Writer tool can be used. For other environments, the UNetbootin tool could also serve to create your boot media.
Now, with the USB thumb drive, we can install any physical machine, from a tiny laptop to a huge server. The next part involves making the physical machine boot from the USB thumb drive. The mechanism for doing that will depend on the server being used. However, it is becoming common to offer an option to select a boot device during bootup. The following is an example of how to select a temporary boot device for a laptop:
- Interrupt the normal startup. In this case, the boot process shows that I can do that by pressing Enter:

Figure 1.6 – Example of a BIOS message to interrupt normal startup
- Choose a temporary startup device, in this case, by pressing the F12 key:
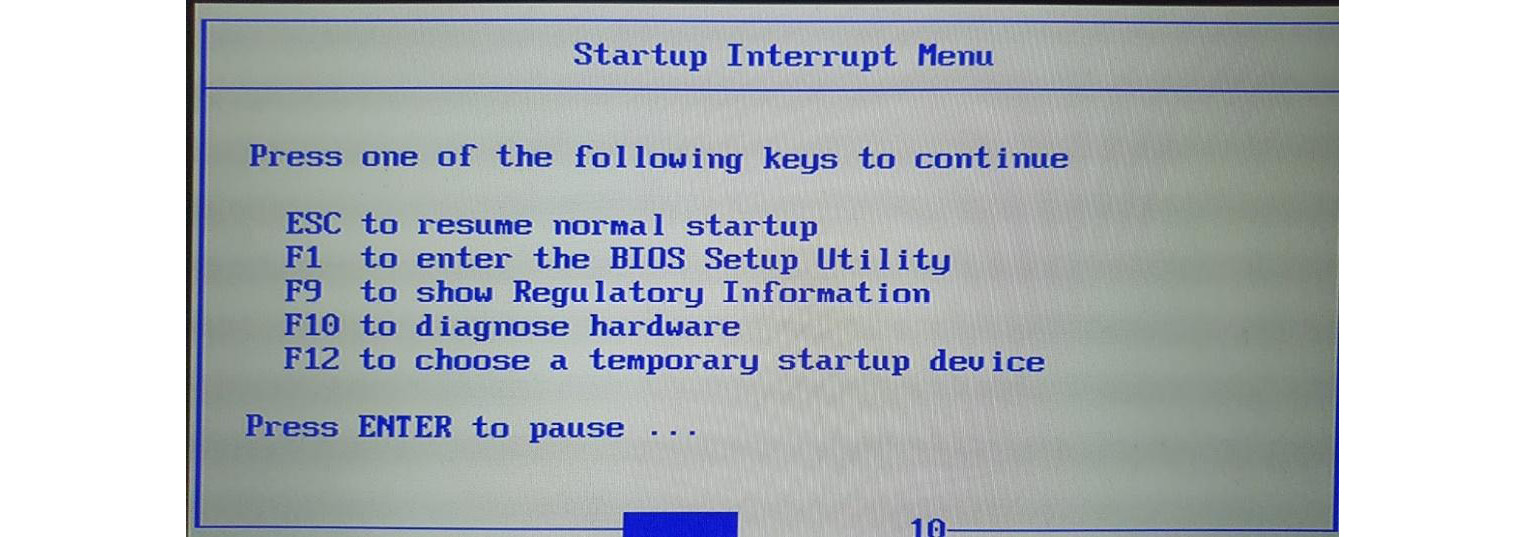
Figure 1.7 – Example of a BIOS menu for interrupted startup
- Select the device to boot from. We want to boot from our USB thumb drive, which, in this case, is USB HDD: ChipsBnk Flash Disk:
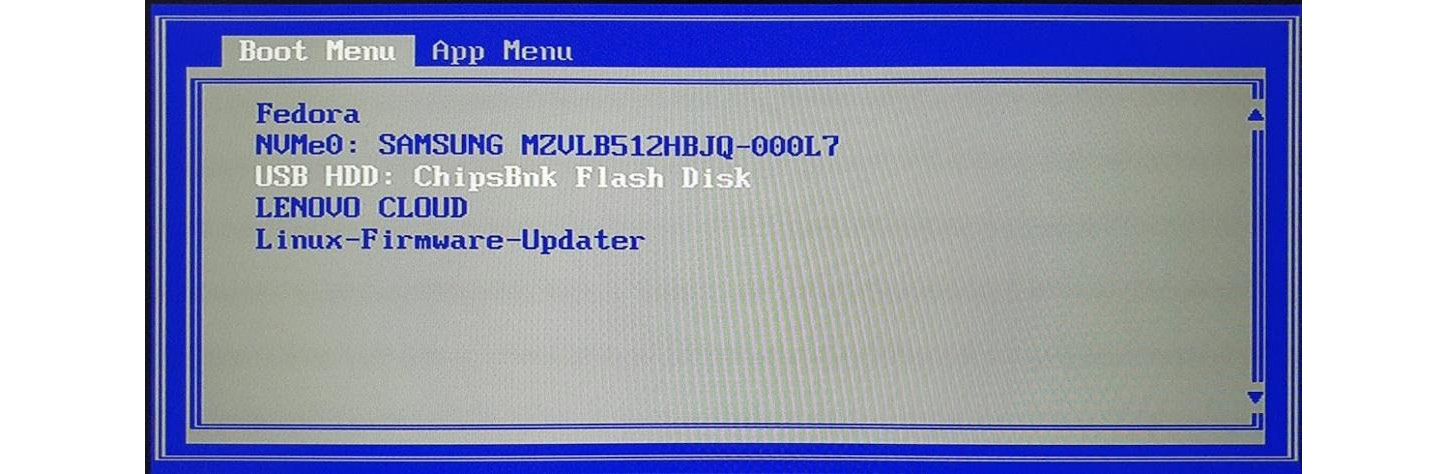
Figure 1.8 – Example of a BIOS menu to choose the USB HDD boot device
Let the system start the installer from the USB drive.
Once we know how to prepare a USB drive with an RHEL installer and how to make a physical machine boot from it, we can skip to the Running an RHEL installation section and proceed to install it. This can be pretty useful if we have a mini server (in other words, an Intel NUC), an old computer, or a laptop to be used as the machine for following along with this book.
Next, we will look at how to prepare a virtual machine in your installation, in case you are considering following this book with your current main laptop (or workstation) but you still want to keep a separate machine to work with.
Preparation for a virtual server installation
A virtual server works as if having some virtualization software that emulates a real machine in your current system. In a Linux workstation, installing virt-manager will add all the under-the-hood components required to run (for your information, these components are KVM, Libvirt, Qemu, and virsh, among others). Other no-cost virtualization software recommended for Windows or macOS systems includes Oracle VirtualBox and VMware Workstation Player.
The examples in this section will be executed using virt-manager, but are easily applicable to any other virtualization software, whether in a laptop or in the largest deployments.
The preliminary steps have been described previously and require obtaining the Red Hat Enterprise Linux ISO image, which, in this case, will be rhel-baseos-9.0-beta-0-x86_64-dvd.iso. Once downloaded and, if possible, having checked its integrity (as mentioned in the last tip of the Obtaining RHEL software and a subscription section), let’s prepare to deploy a virtual machine:
- Start your virtualization software, in this case,
virt-manager:
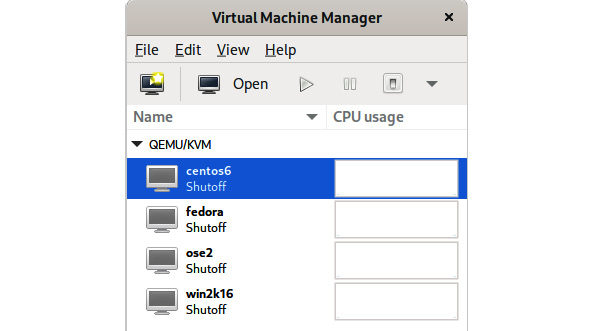
Figure 1.9 – The virtual manager main menu
- Create a new virtual machine by going to File and then clicking on New Virtual Machine. Select Local install media (ISO image or CDROM):
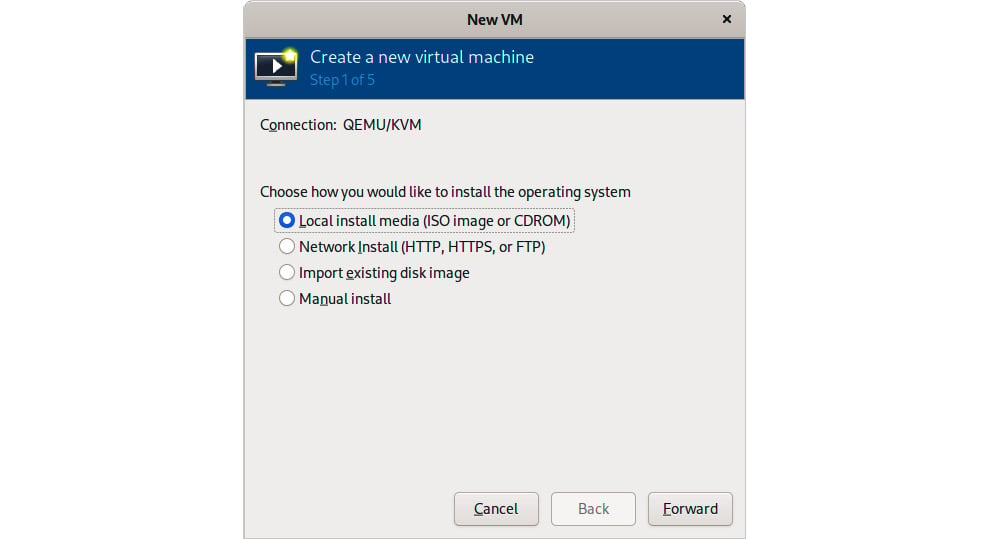
Figure 1.10 – Virtual manager – New Virtual Machine menu
- Select the ISO image. With this, the virtual machine will be configured with a virtual DVD/CDROM drive and already prepared to boot from it. This is standard behavior. However, when using different virtualization software, you may want to perform a check:
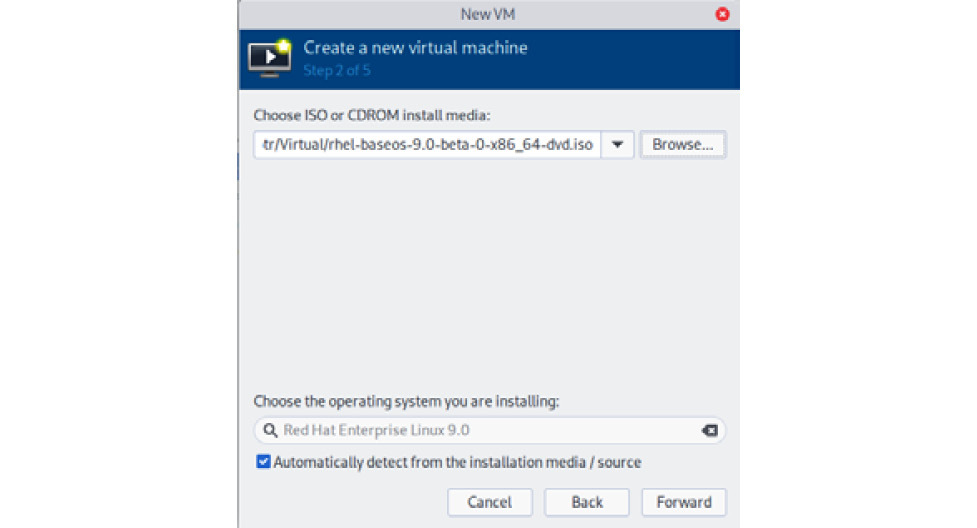
Figure 1.11 – The virtual manager menu to select an ISO image as an installation medium
- Assign memory and CPU to the virtual machine we are creating (note: a virtual machine is usually referred to as a VM). For Red Hat Enterprise Linux 9 (also referred to as RHEL 9), 1.5 GB of memory is the minimum, while 1.5 GB per logical CPU is recommended. We will use the minimum settings (1.5 GB memory, 1 CPU core):
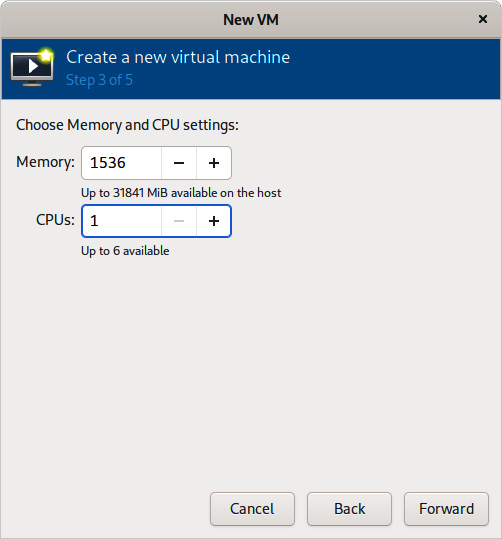
Figure 1.12 – The virtual manager menu for selecting memory and CPU
It is time to assign at least one disk to the virtual machine. In this case, we will assign a single disk with the minimum disk space, 10 GB, but in future chapters, we will be able to assign more disks to test other functionalities:
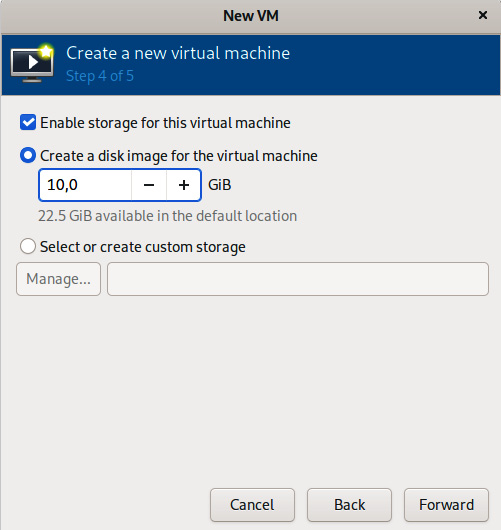
Figure 1.13 – The virtual manager menu to create a new disk and add it to the virtual machine
- Our virtual machine has all that we need to get started: a boot device, memory, CPU, and disk space. In this last step, a network interface is added, so now we even have a network. Let’s review the data and launch it:
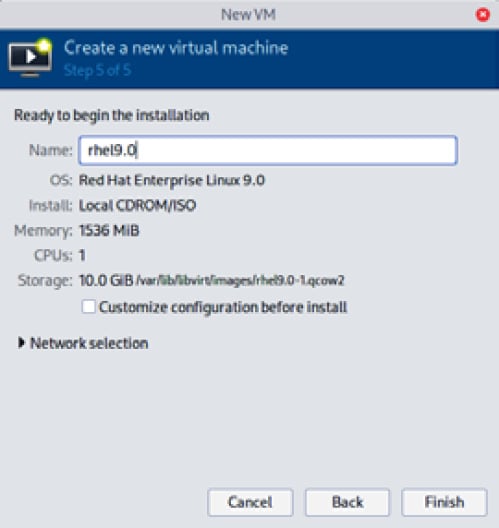
Figure 1.14 – The virtual manager menu for selecting the name of the virtual machine and the network
After taking these steps, we have a fully functional virtual machine available. Now, it is time to complete the process by installing the RHEL operating system on it. See how to do this in the next section.
Running an RHEL installation
Once we have prepared our virtual or physical server for installation, it’s time to proceed with it. We will know whether all the previous steps were performed correctly if we arrive at the following screen:
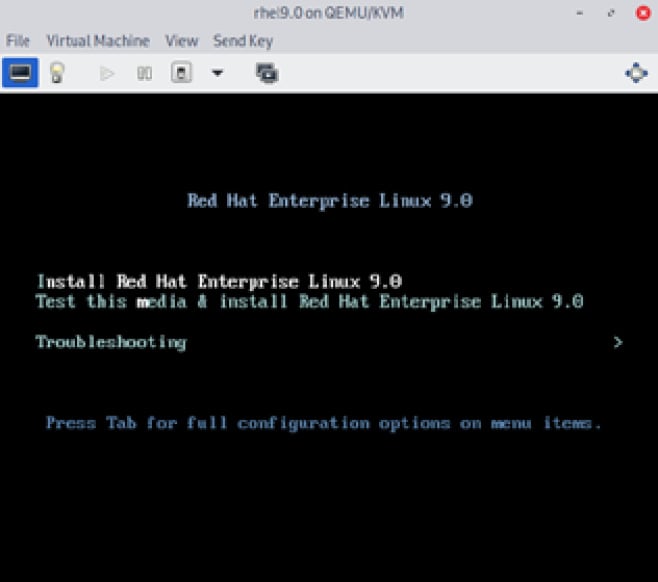
Figure 1.15 – Initial boot screen for RHEL 9 installation with Install selected
We are offered three options (the selected option is in white):
- Install Red Hat Enterprise Linux 9.0: This option will boot and run the installer.
- Test this media & install Red Hat Enterprise Linux 9.0: This option will check the image being used to ensure that it is not corrupt and that the installation can proceed with certainty. It is recommended to use this one for the first time using a just-downloaded ISO image or just-created media, such as a USB thumb drive or DVD (in a virtual machine, it takes approximately 1 minute to run the check).
- Troubleshooting: This option will help you review other options in case there are problems with installation, with a running system, or with hardware. Let’s take a quick look at the available options on this menu:
- Install Red Hat Enterprise Linux 9.0 in basic graphics mode: This option is useful for systems with an old graphics card and/or an unsupported one. It can help to get the system installed in case an issue with visualization is identified.
- Rescue a Red Hat Enterprise Linux system: This option can be used when we have a system with issues booting or when we want to access it to introspect it (in other words, review a possible compromised system). It will initiate a basic in-memory system to perform these tasks.
- Run a memory test: The system memory can be checked to prevent issues, as in the case of a brand-new server, for instance, where we want to ensure that its memory is running correctly, or a system suffering issues and panics that may indicate a memory-related issue.
- Boot from local drive: In case you booted from the install media, but you already have a system installed.
- Return to main menu: To go back to the previous menu.
Important Note
The RHEL boot menu will show several options. The one selected will show in white, with one single letter in a different color, in this case, “i” for install and “m” for test media. These are shortcuts. Pressing the key with that letter will take us directly to this menu item.
Let’s proceed with Test this media & install Red Hat Enterprise Linux 9.0 to let the installer review the ISO image we are using:

Figure 1.16 – RHEL 9 ISO image self-check
Important Note
If the media test fails, redownload the RHEL 9 ISO and try again.
Once completed, it will reach the first installation screen. The installer is called Anaconda (a joke, as it is written in a language called Python), and it follows a step-by-step approach. It is important to pay attention to the options we will select during installation. We will review them later in the Automating deployments with Anaconda section of the book.
Localization
The first step to installation is selecting the installation language. For this installation, we will select English, followed by English (United States):
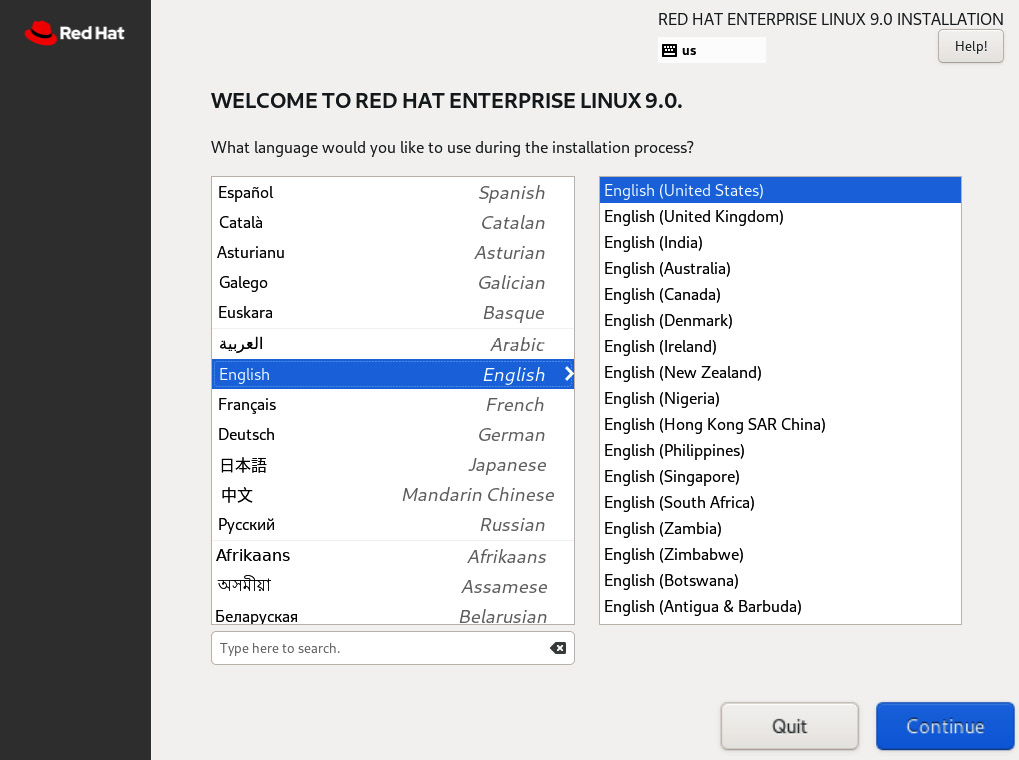
Figure 1.17 – RHEL 9 install menu – language
If you cannot easily find your language, you can type it in the box under the list to search for it. Once a language is selected, we can click the Continue button to proceed. This will take us to the INSTALLATION SUMMARY screen:
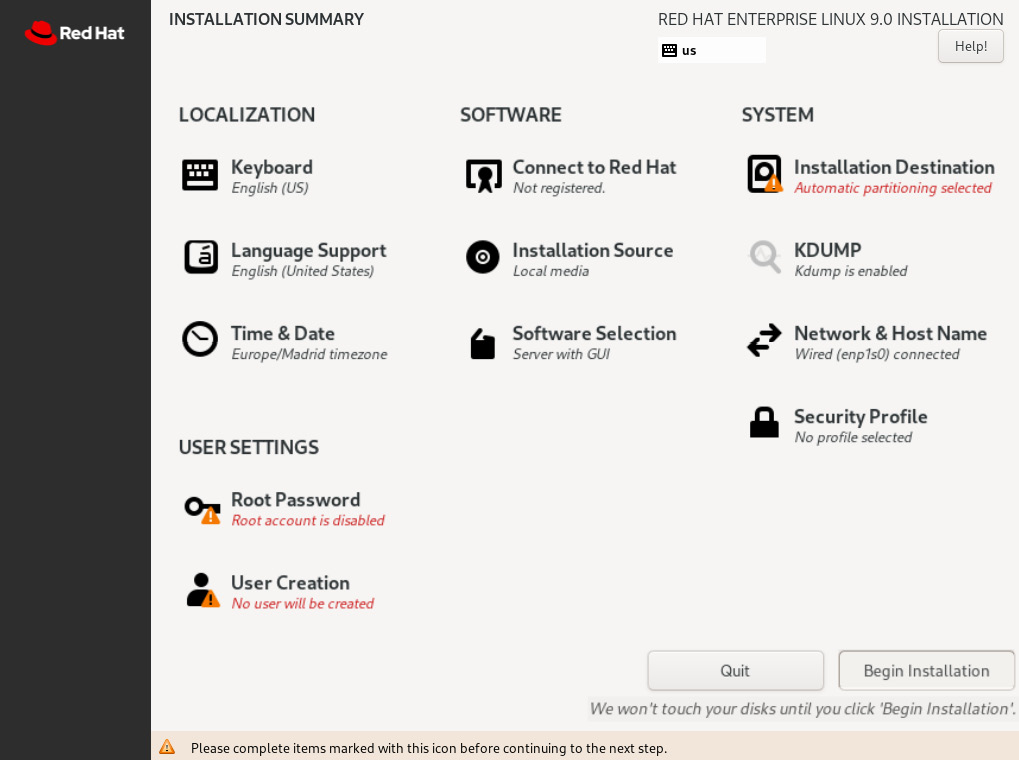
Figure 1.18 – RHEL 9 install menu – main page
On the INSTALLATION SUMMARY screen, all the configuration parts required are shown, with many of them (the ones without a warning sign and red text underneath) already preconfigured with defaults.
Let’s review the LOCALIZATION settings, starting with Keyboard:

Figure 1.19 – RHEL 9 install – The Keyboard selection icon
We can review the Keyboard settings, which can help not just in changing the keyboard, but adding extra layouts in case we want to switch between them:
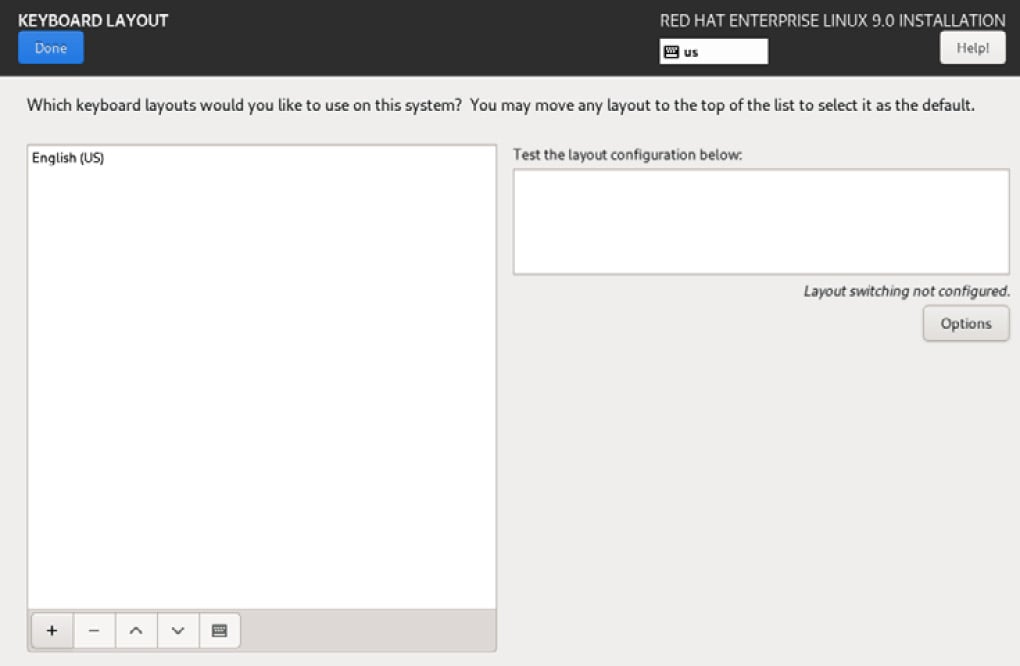
Figure 1.20 – RHEL 9 install – keyboard selection dialog
This can be done by clicking on the + button. Here is an example of adding the Spanish; Castilian (Spanish) layout. We search for spa until it appears, and then we select it, and then click Add, as follows:
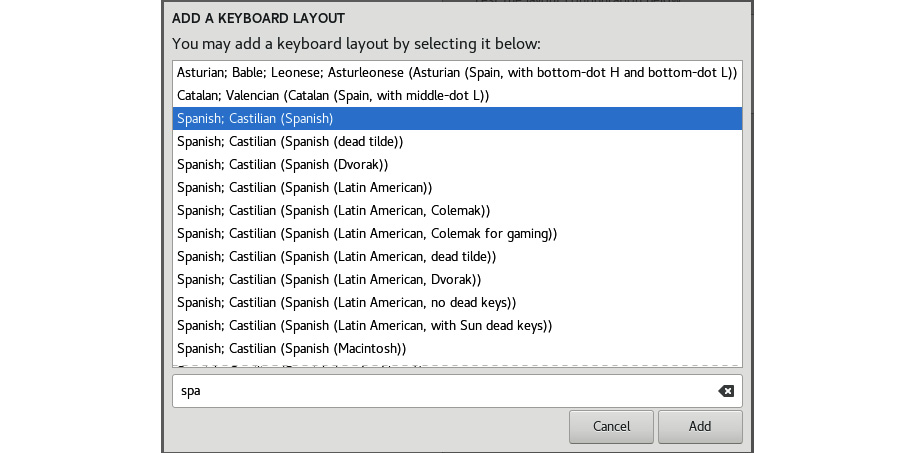
Figure 1.21 – RHEL 9 install – keyboard selection list
To make it the default option will require clicking on the ^ button underneath. In this case, we will keep it as a secondary option so that the supporting software gets installed. Once completed, click Done:
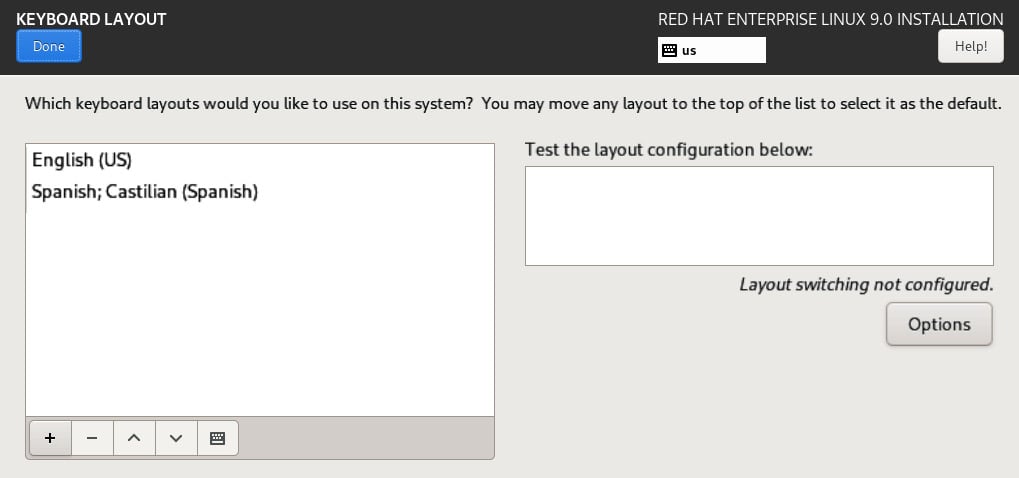
Figure 1.22 – RHEL 9 install – keyboard selection dialog with different keyboards
Now, we will move on to Language Support:

Figure 1.23 – RHEL 9 install – language selection icon
Here, we can also add our local language. In this example, I’ll use Español, and then Español (España). This will again include the software required to support the language that has been added:
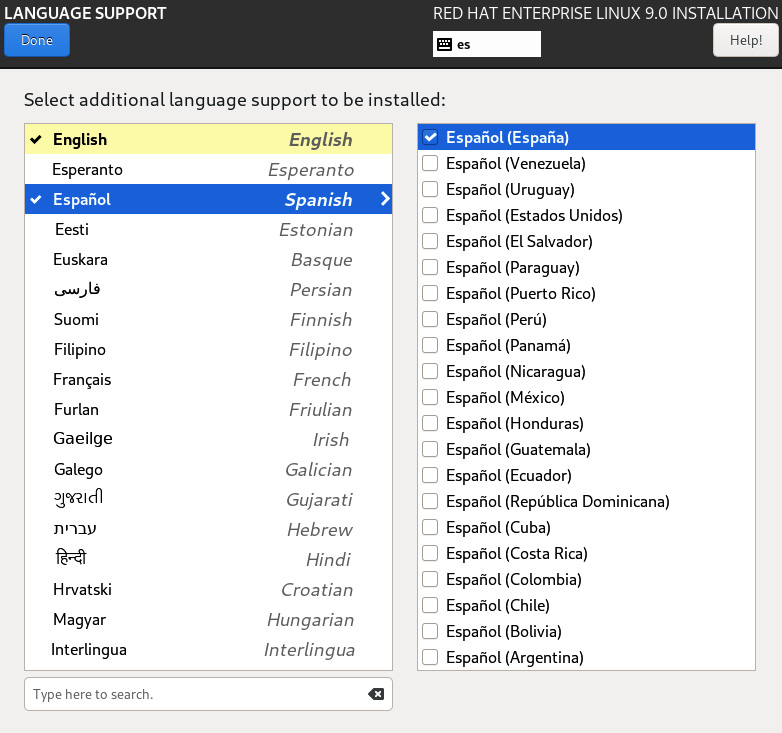
Figure 1.24 – RHEL 9 install – language selection dialog with different languages
We will proceed with both languages configured, although you may want to choose your own localized language.
Now, we will move on to Time & Date, which can be seen as follows:

Figure 1.25 – RHEL 9 install – Time and Date selection icon
The default configuration is set to the city of New York in the United States of America. You have two possibilities here:
- Use your local time zone. This is recommended when you want to have all the logs registered in that time zone (in other words, because you are only working in one time zone or because there are local teams for each time zone). In this example, we are selecting the Spain, Madrid, and Europe time zone:
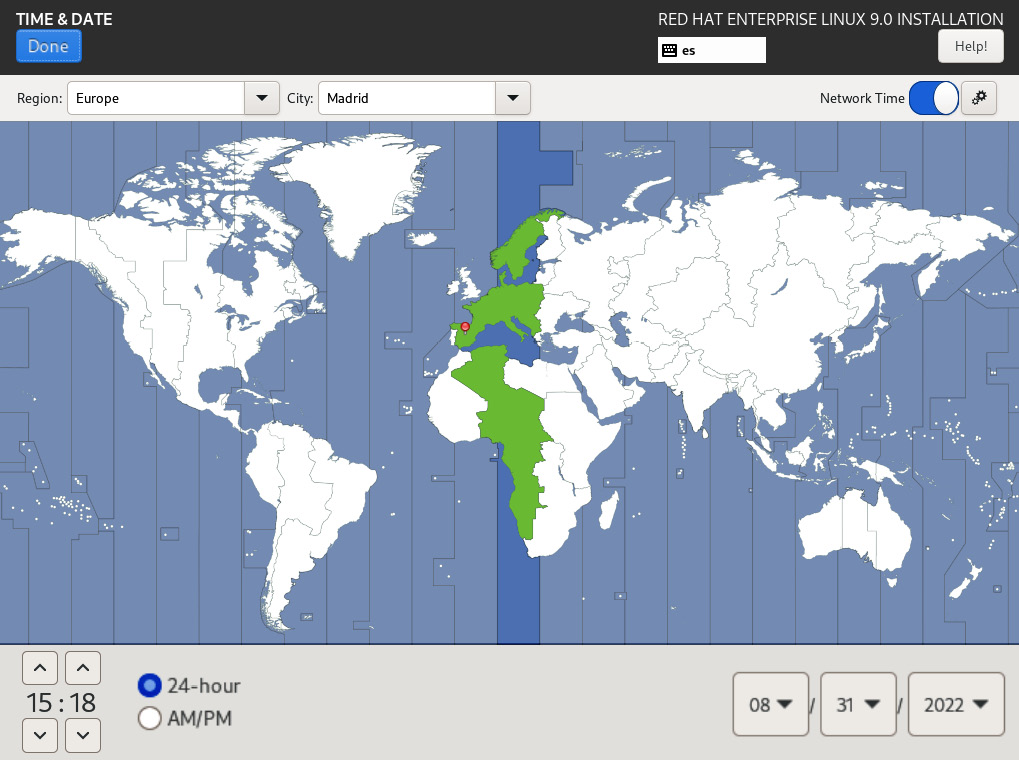
Figure 1.26 – RHEL 9 install – the Time & Date selection dialog – Madrid selected
- Use Coordinated Universal Time (UTC) to have the same time zone for all the servers around the globe. This can be selected under Region | Etc, and then City | Coordinated Universal Time:
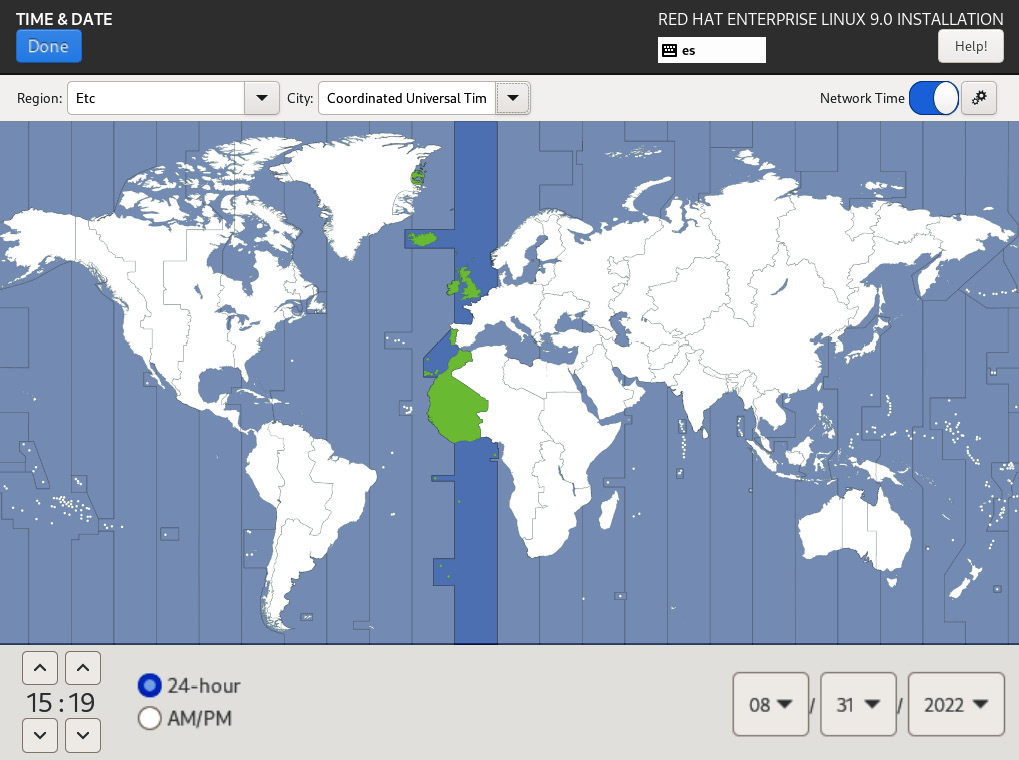
Figure 1.27 – RHEL 9 install – the Time & Date selection dialog – UTC selected
We will proceed with the localized time for Spain, Madrid, and Europe, although you may want to select your localized time zone.
Tip
As you can see on the screen, there is an option to select Network Time to have the machine’s clock synchronized with other machines. This option can only be selected once the network is configured.
Software
With the localization configuration completed (or almost completed; we may come back for the network time later), we move on to the software section, or, more precisely, to Connect to Red Hat under it:

Figure 1.28 – RHEL 9 install – the Connect to Red Hat selection icon
In this section, we can use our own Red Hat account, like the one we created previously under https://developers.redhat.com/, to access the latest updates for the system. To configure it, we will need to configure the network first.
For this deployment, we will not configure this section now. We will review how to manage subscriptions and get updates in Chapter 7, Adding, Patching, and Managing Software.
Important Note
Systems management with Red Hat Satellite: For large deployments with more than 100 virtual servers, Red Hat offers Red Hat Satellite, with advanced software management capabilities (such as versioned content views, centralized security scans with OpenSCAP, and simplified patching and updating for RHEL). To connect to a Red Hat satellite, the activation key can be used, thereby simplifying the management of systems.
Let’s now move on to Installation Source, as follows:

Figure 1.29 – RHEL 9 install – the Installation Source icon
This can be used for installation using remote sources. It is very useful when using the boot ISO image that only contains the installer. In this case, as we are using the full ISO image, it already contains all the software (also referred to as packages) needed to complete the installation.
The next step is Software Selection, as shown in the following screenshot:

Figure 1.30 – RHEL 9 install – the Software Selection icon
In this step, we can select a predefined set of packages to be installed on the system so that it can perform different tasks. While it can be very convenient to do so at this stage, we are going to adopt a more manual approach and select the Minimal Install profile to add software to the system later.
This approach also has the advantage of reducing the attack surface by installing just the minimum required packages in the system:
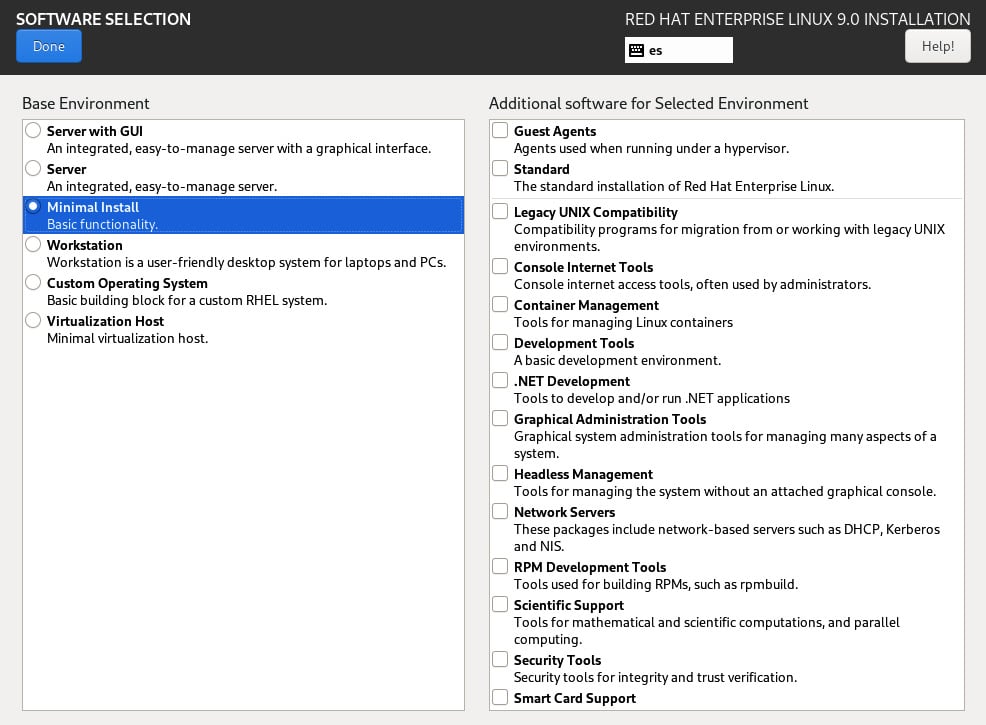
Figure 1.31 – RHEL 9 install – the Software Selection menu; Minimal Install selected
System
Once the set of packages has been selected, let’s move on to the system configuration section. We will start with the destination of the installation, where we can choose the disk or disks to be used to install and configure them:

Figure 1.32 – RHEL 9 install – the Installation Destination icon with a warning sign as this step is not complete
This task is very important as it will define not just the way the system is deployed on the disk, but also how the disk is distributed and with which tools. Even when in this section, we won’t use the advanced options. We will take some time to review the main options.
This is the default Device Selection screen, with only one local standard disk discovered, no Specialized & Network Disks options, and ready to run the Automatic partitioning. This can be seen in the following screenshot:
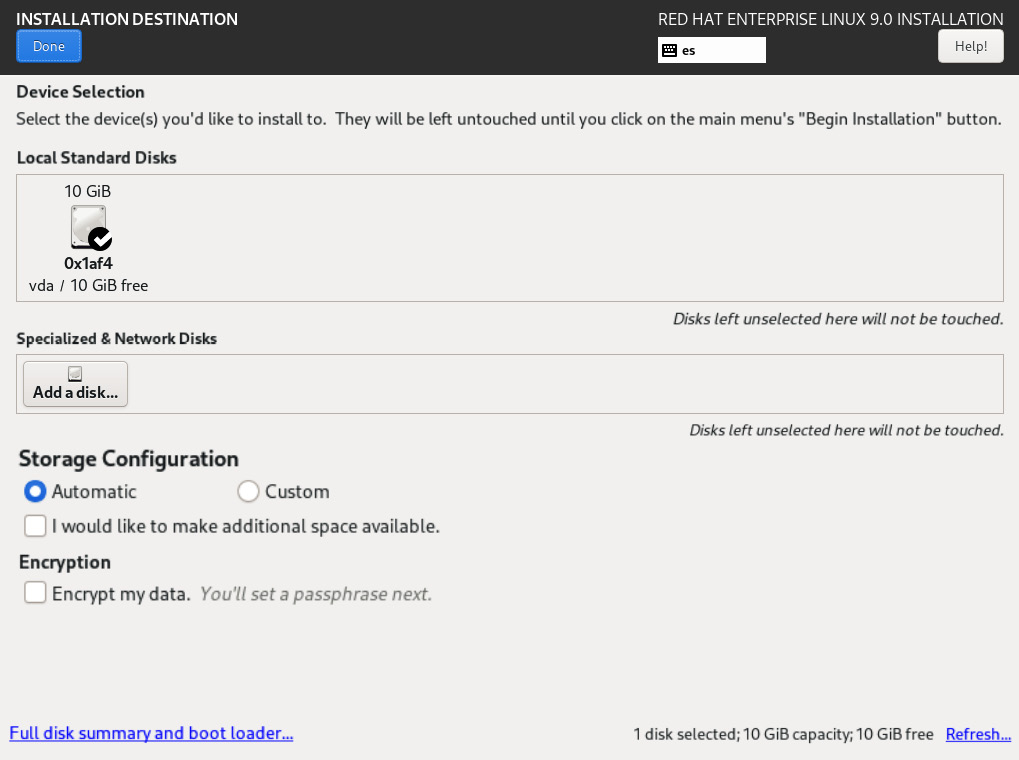
Figure 1.33 – RHEL 9 install – the INSTALLATION DESTINATION menu with automatic partitioning selected
Clicking Done in this section will complete the minimal set of data required to continue with the installation.
Let’s review the sections.
Local Standard Disks shows a set of disks to be used by the installer. It may be the case that we have several disks, and we only want to use a specific disk:
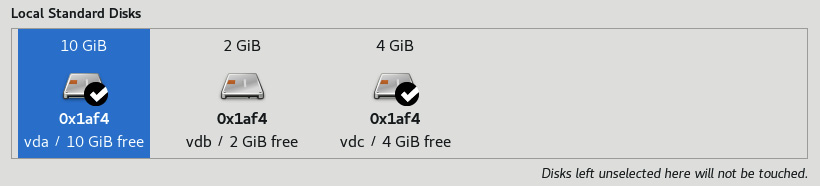
Figure 1.34 – RHEL 9 install – the INSTALLATION DESTINATION menu with several local disks selected
This is an example of having three available disks and using only the first and third ones.
In our case, we only have one disk, and it is already selected:
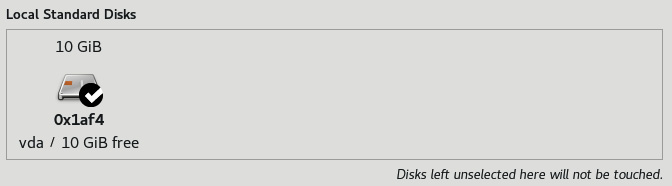
Figure 1.35 – RHEL 9 install – the INSTALLATION DESTINATION menu with a single local disk selected
It would be easy to use full-disk encryption by selecting Encrypt my data, which is highly recommended for laptop installations or for installing in environments with low levels of trust:

Figure 1.36 – RHEL 9 install – the INSTALLATION DESTINATION menu with the data encryption option (not selected)
For this example, we will not encrypt our drive.
The Automatic install option will distribute the disk space automatically:

Figure 1.37 – RHEL 9 install – the INSTALLATION DESTINATION menu; Storage Configuration (Automatic)
It will do so by creating the following resources:
/boot: Space to allocate the system core (kernel) and files to help during the boot process (such as the initial boot image,initrd)./boot/efi: Space to support the Extensible Firmware Interface (EFI) boot process./: the root filesystem. This is the main storage space where the system lives. Other disks/partitions will be assigned to folders (when doing so, they will be calledmountpoints)./home: Space where the user will store personal files.
Let’s select this option and then click Done.
Tip
System partitions and the boot process: don’t worry if you still don’t fully understand some extended concepts regarding system partitions and boot processes. To cover the filesystems, partitions, and how to manage disk space, in Chapter 12, Managing Local Storage and Filesystems, dedicated to it. To review the boot process, the Chapter 15, Understanding the Boot Process, which reviews the full system startup sequence step by step.
The next step involves reviewing Kdump, or Kernel Dump. This is a mechanism that allows the system to save the status in case a critical event happens and it crashes (it dumps the memory, hence its name):

Figure 1.38 – RHEL 9 install – the Kdump configuration icon
In order to work, it will reserve some memory for itself where it will stay, waiting to act if the system crashes. The default configuration does a good calculation of the requirements:
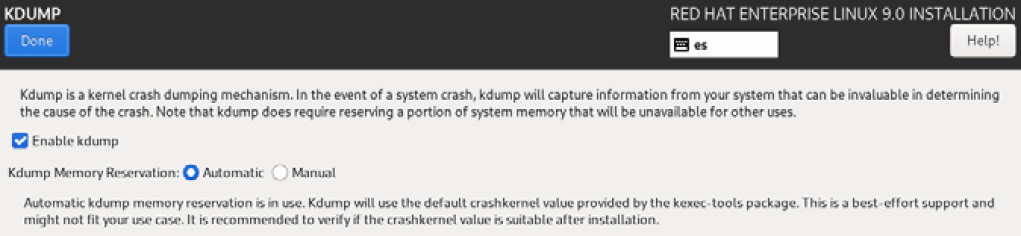
Figure 1.39 – RHEL 9 install – the Kdump configuration menu
Clicking Done will take us to the next step, Network & Host Name, which appears as follows:

Figure 1.40 – RHEL 9 install – the Network & Host Name configuration icon
This section will help to have the system connected to a network. In the case of a virtual machine, access to external networks will be handled by the virtualization software. It is very common that the default configuration uses network address translation (NAT) and the Dynamic Host Configuration Protocol (DHCP), which will provide a network configuration to the virtual machine and access to external networks.
Once on the configuration page, we can see how many network interfaces are assigned to our machine. In this case, there is only one, as follows:
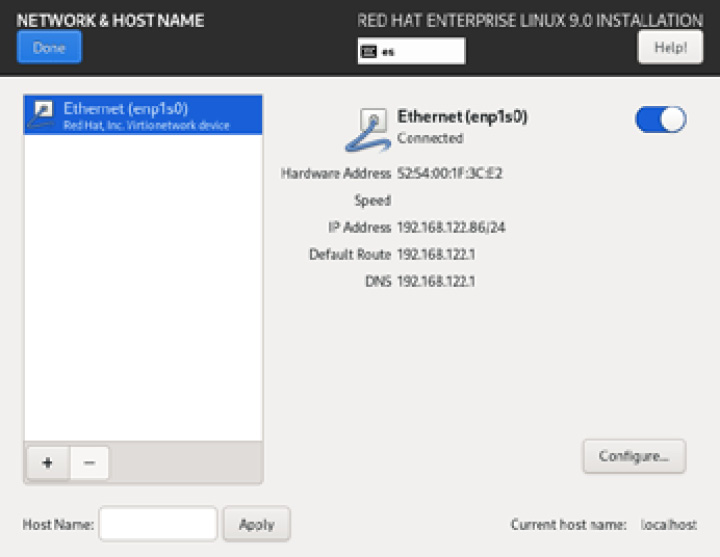
Figure 1.41 – RHEL 9 install – the NETWORK & HOST NAME configuration menu
First, we can enable the interface by clicking on the ON/OFF toggle on the right. To turn it off, it looks like this:

Figure 1.42 – RHEL 9 install – the NETWORK & HOST NAME configuration toggle (OFF)
And to turn it on, it should look like this:

Figure 1.43 – RHEL 9 install – the NETWORK & HOST NAME configuration toggle (ON)
We will see that the interface now has a configuration (IP Address, Default Route, and DNS):
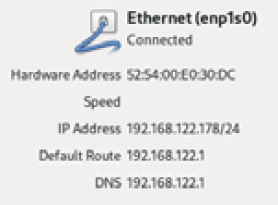
Figure 1.44 – RHEL 9 install – the NETWORK & HOST NAME configuration information details
To make this change permanent, we will click the Configure button at the bottom-right corner of the screen to edit the interface configuration:
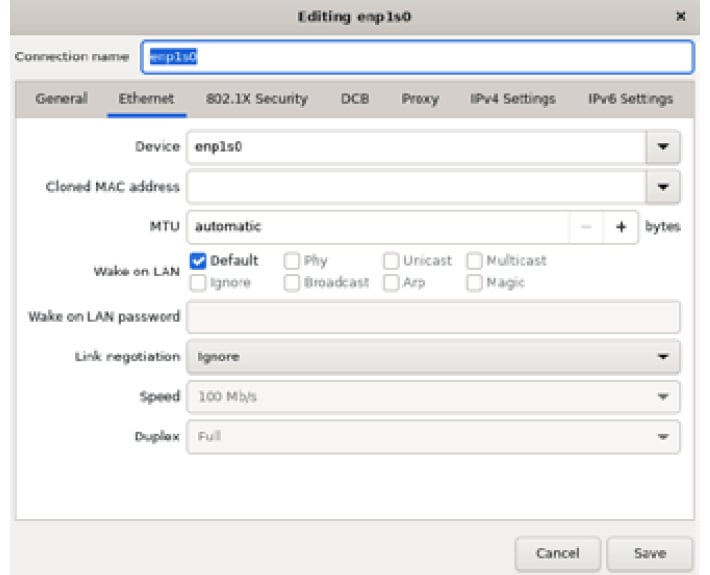
Figure 1.45 – RHEL 9 install – the NETWORK & HOST NAME configuration, interface configuration, and Ethernet tab
Clicking on the General tab will present the main options. We will select Connect automatically with priority and leave the value as -999, just like this:
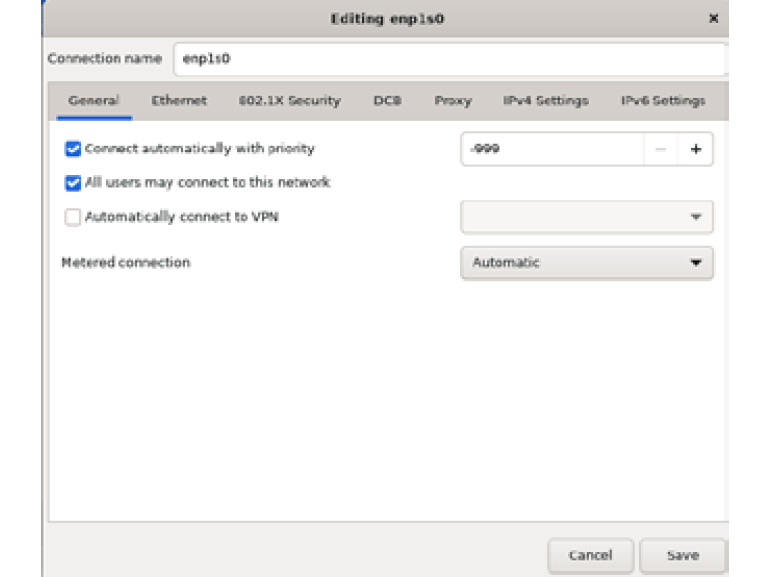
Figure 1.46 – RHEL 9 install – the NETWORK & HOST NAME configuration, interface configuration, and the General tab
Clicking Save will make the changes permanent and have this network interface enabled by default.
Now, it’s time to give a name to our virtual server. We will go to the Host Name section on the main page and type the name we want for it. We can use rhel-instance.example.com, and then click Apply:

Figure 1.47 – RHEL 9 install – the NETWORK & HOST NAME configuration with Host Name detail
Tip
The example.com domain is used for demonstration purposes and is safe to be used on any occasion, knowing that it will not collide or cause any trouble to other systems or domains.
The networking page will look like this:
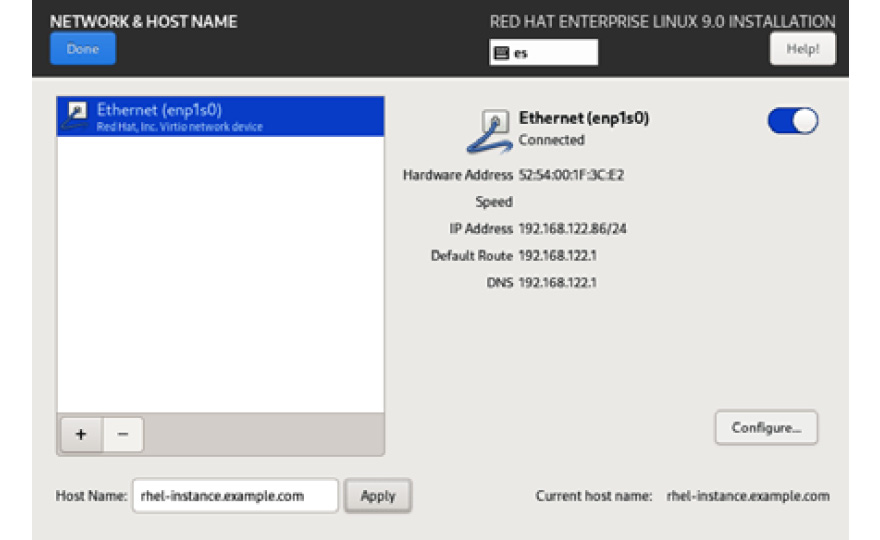
Figure 1.48 – RHEL 9 install – the NETWORK & HOST NAME configuration menu with configuration complete
Clicking Done will take us back to the main installer page with a system connected to a network and prepared to connect once the installation is complete.
In Chapter 6, Enabling Network Connectivity, will describe in more detail the options available to configure the network in an RHEL system.
Important Note
Now that the system is connected to the network, we can go back to Time & Date and enable Network Time (which is done automatically by the installer), as well as go to Connect to Red Hat to subscribe the system to Red Hat’s content distribution network (CDN). The subscription of the system to the CDN will be explained in detail in Chapter 7, Adding, Patching, and Managing Software.
It is now time to review the final system option, security profiles, by going to Security Policy as follows:

Figure 1.49 – RHEL9 install – the Security Policy configuration icon
In it, we will see a list of security profiles that can be enabled by default in our system:
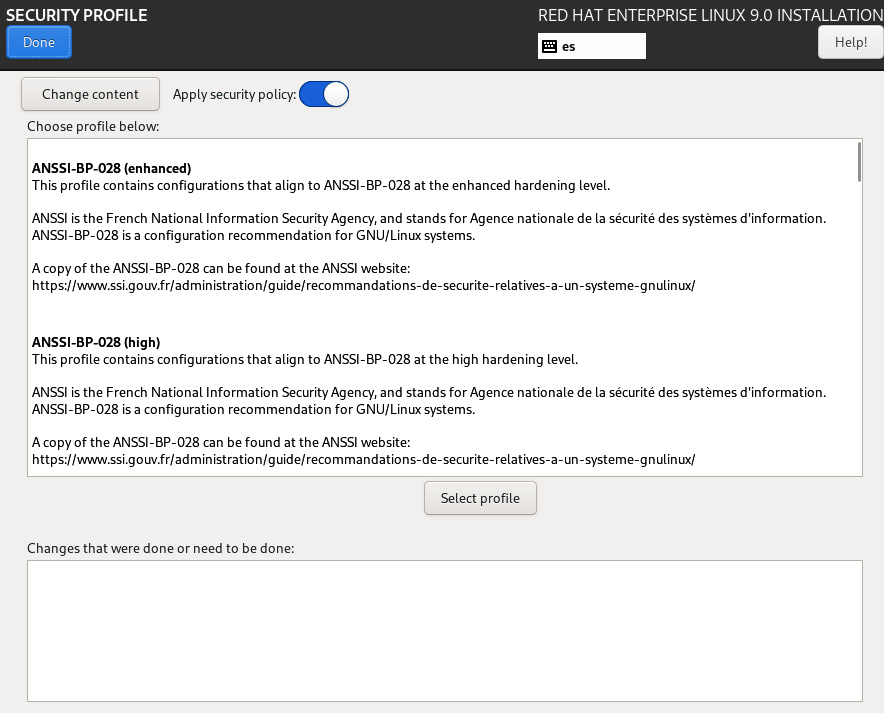
Figure 1.50 – RHEL 9 install – the SECURITY POLICY configuration menu
The security profiles have requirements that we are not covering in this installation (such as having separate /var or /tmp partitions). We can click on Apply security policy to turn it off, and then on Done:

Figure 1.51 – RHEL 9 install – Security policy configuration toggle (off)
More on this topic will be covered in Chapter 11, System Security Profiles with OpenSCAP.
User settings
The main administrator user in a Unix or Linux system is called root.
We can enable a root user by clicking in the Root Password section, although this is not necessary and, in security-restricted environments, you are advised not to do so. We will do so in this chapter in order to learn how to do it and explain the cases covered:

Figure 1.52 – RHEL 9 install – the Root Password configuration icon (warning as it is not set)
After clicking on Root Password, we are presented with a dialog to type it:
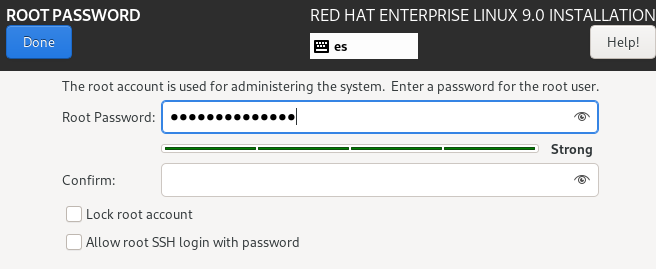
Figure 1.53 – RHEL 9 install – the Root Password configuration menu
It is recommended that the password has the following:
- More than 10 characters (and a minimum of six)
- Lowercase and uppercase letters
- Numbers
- Special characters (such as $, @, %, and &)
If the password does not meet those requirements, it will warn us and force us to click Done twice to use a weak password.
It is now time to create a user for the system by clicking on User Creation:

Figure 1.54 – RHEL 9 install – the User Creation configuration icon (with a warning as it is not complete)
This will take us to a section to input user data:
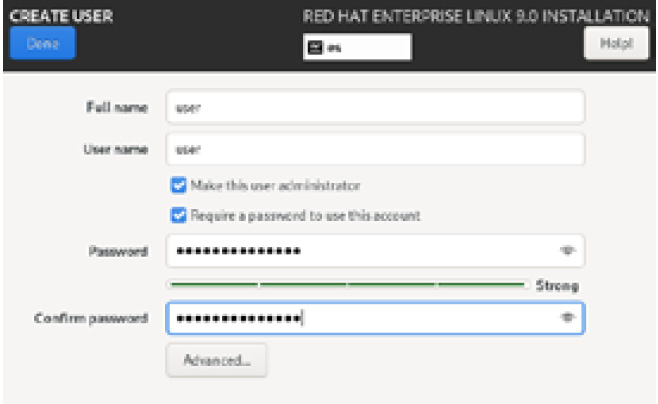
Figure 1.55 – RHEL 9 install – the User Creation configuration menu
The same password rules will apply here as in the previous section.
Clicking on Make this user administrator will enable the performance of administrative tasks (and also, no need to configure the root password).
Tip
As a good practice, do not use the same password for the root account and for the user account.
Chapter 5, Securing Systems with Users, Groups, and Permissions, includes a section on how to use and manage administrative privileges for users with the sudo tool.
Click on Done to return to the main installer screen. The installer is ready to proceed with the installation. The main page will look like this:
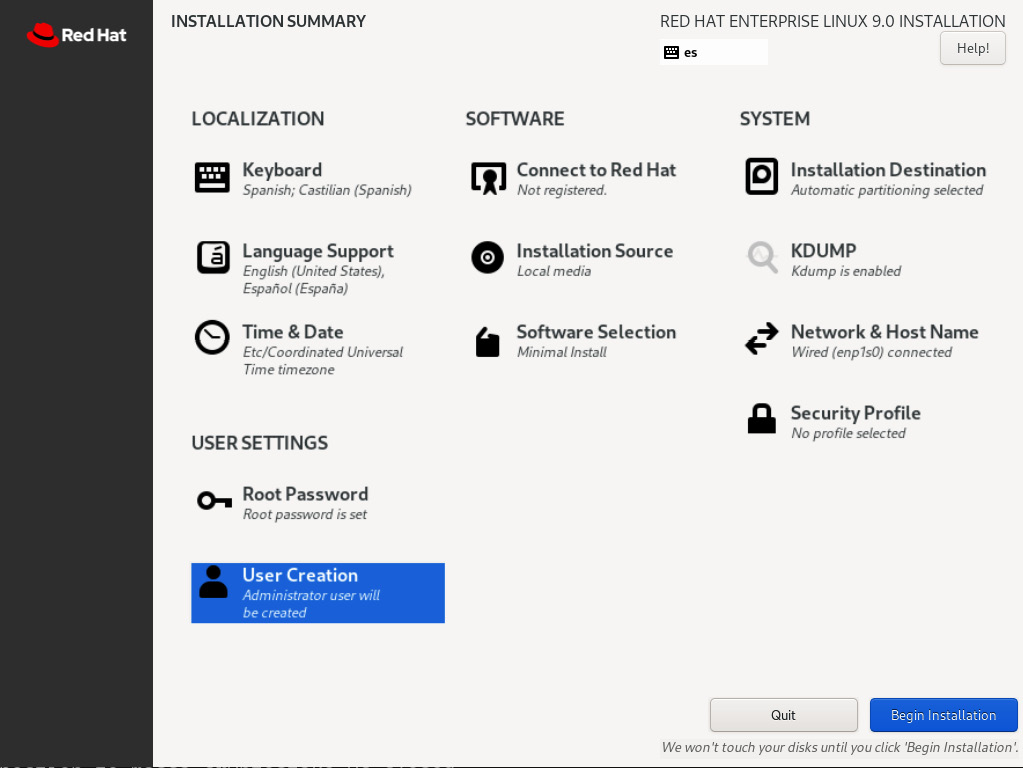
Figure 1.56 – RHEL 9 install – the main menu once completed
Clicking on Begin Installation will launch the installation process:
Important Note
If any of the steps required to start the installation are omitted, the Begin Installation button will be grayed out and, therefore, not available to be clicked.
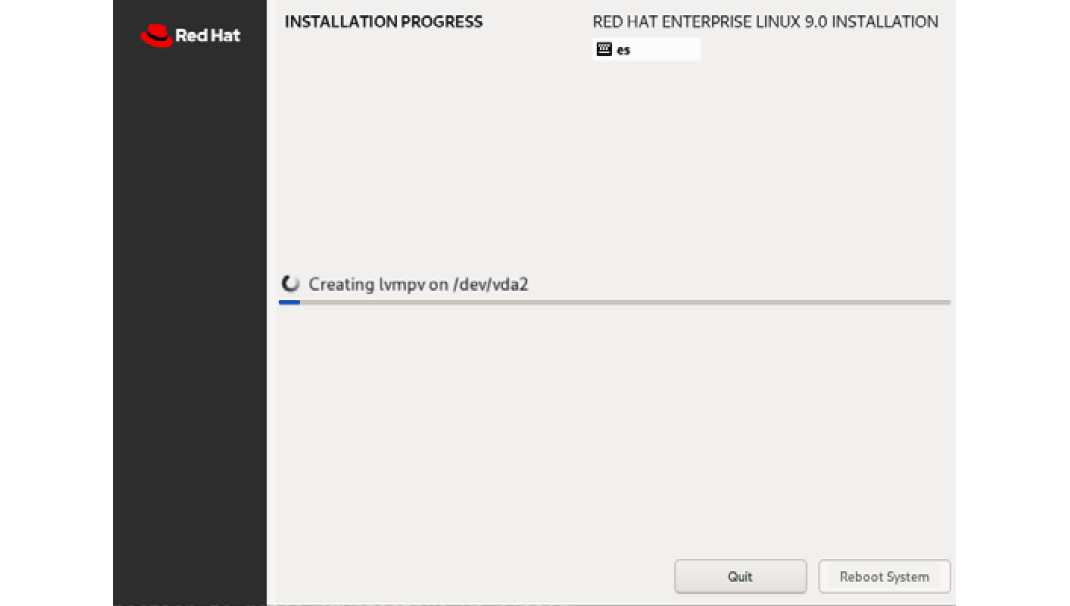
Figure 1.57 – RHEL 9 install – installation in progress
Once the installation is complete, we can click on Reboot System and it will be ready to use:
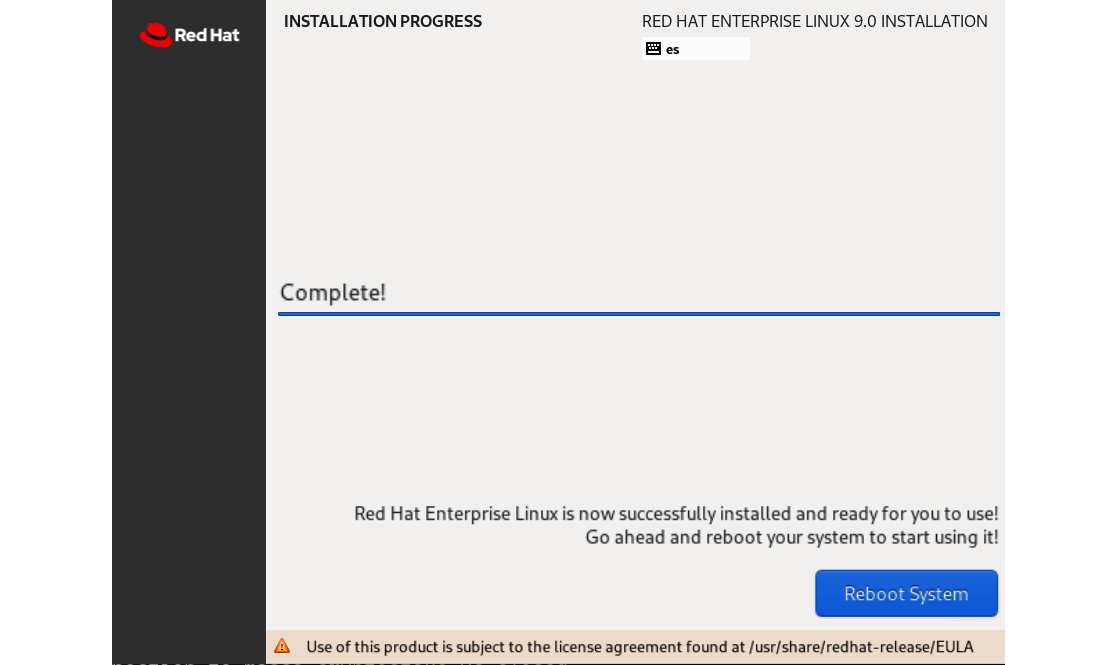
Figure 1.58 – RHEL 9 install – installation complete
It is important to remember to detach the ISO image from the virtual machine (or remove the USB thumb drive from the server) and check that the boot order is properly configured in the system.
Your first Red Hat Enterprise Linux 9 system is now ready! Congratulations.
As you can see, it is easy to install RHEL in a virtual or physical machine and have it ready to be used for any service we want to run on it. In the cloud, the process is very different, as machines are instantiated from images to run. In the next chapter, we will review how to run RHEL in a virtual machine instance in the cloud.
Summary
The Red Hat Certified System Administrator exam is entirely practical and based on real-world experience. The best way to prepare for it is by practicing as much as possible, which is why this book begins by providing access to RHEL 9 and offering alternatives on how to deploy your own virtual machine.
Different scenarios are covered regarding installation. These are the most common ones and include using a physical machine, a virtual machine, or a cloud instance. In this chapter, we focused on using a virtual machine or a physical one.
When using physical hardware, we will be focusing on the fact that many people like to reuse old hardware, buy second-hand or cheap mini servers, or even use their laptops as the primary installation for their Linux experience.
In the case of virtual machines, we are thinking about the people that want to keep all their work on the same laptop, but without messing with their current operating system (which may not even be Linux). This could also work well with the previous option by having virtual machines on your own mini server.
After this chapter, you are ready to proceed with the rest of the book, having at least an instance of RHEL 9 available to work with and practice on.
In the next chapter, we will review a number of advanced options, such as using the cloud for RHEL instances, automating the installation, and best practices.
Let’s get started!
