


Raspberry Pi, with its low cost and amazing package of functionality, has taken the robotic hobbyist community by Storm. Unfortunately, many, especially those new to embedded systems and programming, can end up so discouraged that the board can end up on the shelf, gathering dust next to the floppy disks and your old CRT.
There is nothing as exciting as ordering, and finally receiving a new piece of hardware. Yet things can go south quickly, even in the first few minutes. This chapter will, hopefully, help you avoid the pitfalls that normally accompany unpacking and configuring your Raspberry Pi. We'll walk through the process, answer many of the different questions you might have, and help you understand what is going on. If you don't go through this chapter, you'll not be successful at any of the others, and your hardware will go unused, which would be a real tragedy. So, let's get started.
One of the most challenging aspects of writing this guide is to decide the level at which I should describe each step. Some of you are beginners, some have limited experience, and others know significantly more in some of these areas. I'll try to be brief but thorough, trying to detail the steps to take in order to be successful. So, for this chapter, here are your objectives:
Unbox and connect the board to power
Connect a display, keyboard, and mouse
Load and configure the operating system
Access the board remotely
The Raspberry Pi comes in several flavors: the original A and B models, and the new and improved A+ and B+ models. The B+ flavor is the most popular. It comes with additional input/output capability, four USB connections, more memory, and will be the flavor you'll focus on in this book. That does not mean that many, if not most, of the projects here require the extra capability of the B+. As we go, I'll try and point out when you'll need the additional capability of the B+, and when the Raspberry Pi A+ might be enough. The Raspberry Pi now also comes in a B2 version. We'll not talk about that specifically here, but there is no reason why the projects shouldn't work with that version as well.
Here are the items you'll need for this chapter's projects:
A Raspberry Pi, Model B+
The USB cable to provide power to the board
A display with a proper video input
A keyboard, a mouse, and a powered USB hub
A microSD card – at least 4 GB capacity
A microSD card writer
Another computer that is connected to the Internet
An Internet connection for the board
A LAN cable (if you are using the Raspberry Pi A+ you'll need a powered USB hub, a wireless LAN connection, and a Wireless LAN device; you'll learn how to configure this later in the chapter)
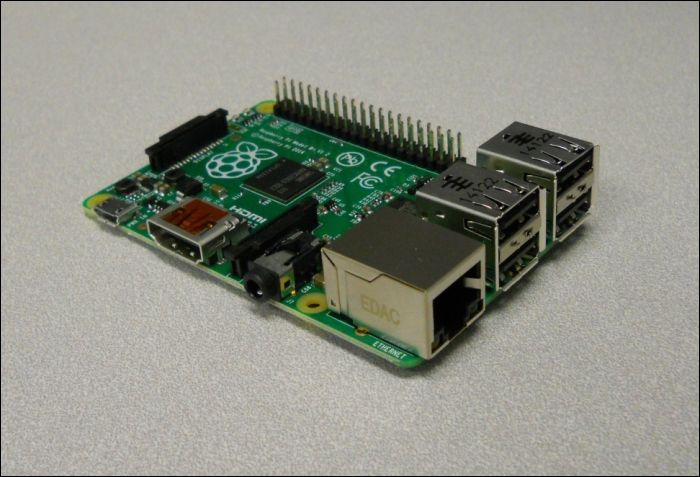
The first step to building any project with Raspberry Pi is to become familiar with Raspberry Pi itself. The Raspberry Pi comes in a box with a power cable. The following image shows what the Raspberry Pi B+ board looks like:
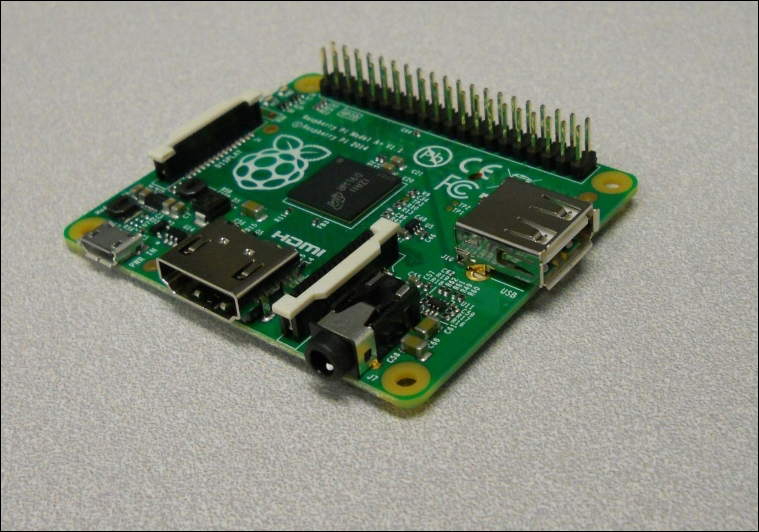
And the next image is that of the Raspberry Pi A+ board:
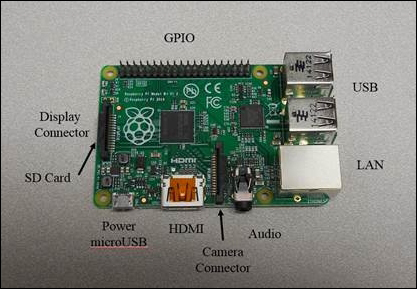
Before plugging anything in, inspect the board for any issues that might have occurred during shipping. This is normally not a problem, but it is always good to do a quick visual inspection. You should also familiarize yourself with the different connections on the board. Here is the B+ board, labeled for your information:
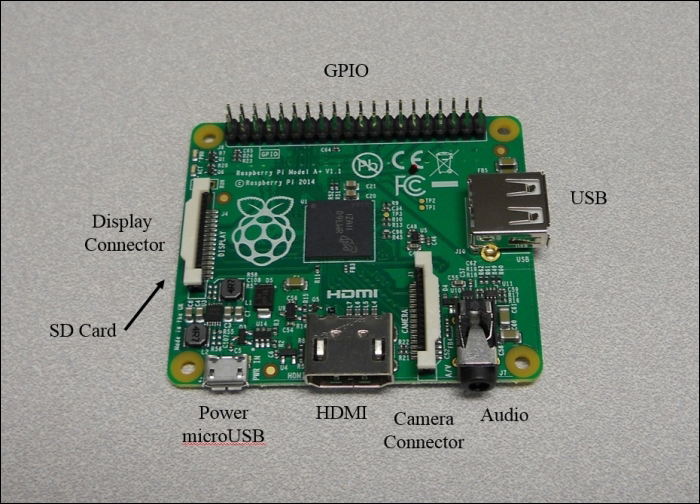
The labels for the A+ board are shown in the following image:
Let's first power the board. To do this, you'll need to go through the USB client connection. This is done by performing the following steps:
Connecting the microUSB connector end of the cable to the board.
Connecting the standard sized USB connector to either a PC, or a compatible DC power source that has a USB connection. If you are connecting it to a PC, the USB 2.0 standard requires only 500 mA be available. The USB 3.0 standard requires only 900 mA be available. This means that some computers may not supply enough current for the Raspberry Pi to work correctly.
If you are going to use a DC power source at the standard USB connector end, make sure that the unit can supply enough current. You'll need a supply that can provide at least 1000 mA at 5 volts.
When you plug the board in, the PWR LED should be red. Here is a close up of the LED locations, just so you're certain which one to look for:

If you've reached this point, congratulations! You're ready for the next step.
Now that you know your board works, you're going to add peripherals so that it can operate as a standalone computer system. This step is optional, as in the future, your projects will often be in systems where you won't connect directly to the board with a keyboard, mouse, and display. However, this can be a great learning step, and is especially useful if you need to do some debugging on the system.
You'll need the following peripherals:
A USB mouse
A USB keyboard (this can be wireless, and can contain a built-in mouse pad)
A display that accepts HDMI or DVI-Video, although using a DVI input will require an adapter
A powered USB hub (you will need this if you are going to use the Raspberry Pi A+ version for the projects)
You may have most of this stuff already, but if you don't, there are some things to consider before buying additional equipment. Let's start with the keyboard and mouse. Most mice and keyboards have separate USB connectors. This normally works fine for the Raspberry Pi model B+, as it has four USB ports. If you are going to use the Raspberry Pi A+ model, you may want to choose a keyboard that has a mouse pad built-in.
If you are using the Raspberry Pi A+ model, you will want to consider purchasing a powered USB hub. Before deciding on the hub to connect to your board, you need to understand the difference between a powered USB hub and one that gets its power from the USB port itself. Almost all USB hubs are not powered, that is, you don't plug in the USB hub separately. The reason for this is that almost all of these hubs are hooked up to computers with very large power supplies and powering USB devices from the computer is not a problem. This is not the case for your board. The USB port on your board has very limited power capabilities, so if you are going to hook up devices that require significant power—a WAN adapter or webcam for instance—you're going to need a powered USB hub, one that provides power to the devices through a separate power source. Here is an image of such a device, available at www.amazon.com and other online retailers:
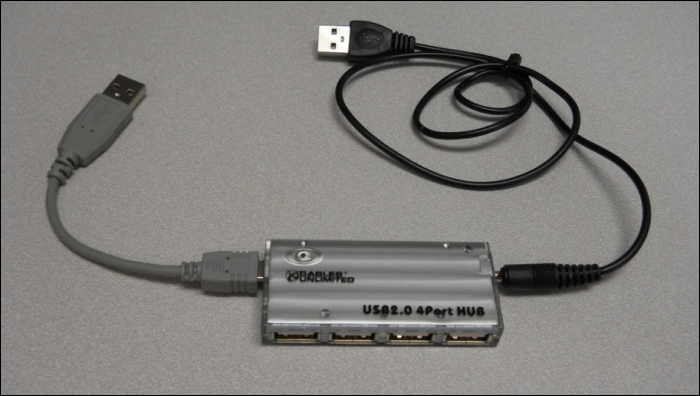
Notice that on this hub, there are two connections. The one to the far right is a power connection, and it will be plugged into a battery with a USB port. The connection to the left is the USB connection, which will be plugged into the Raspberry Pi.
Now, you'll also need a display. Fortunately, your Raspberry Pi offers lots of choices here. There are a number of different video standards; here is an image of some of the most prevalent ones, for reference:

There is an HDMI connector on the Raspberry Pi A+ and B+. To use this connector, simply connect your cable with regular HDMI connections to Raspberry Pi and your TV or monitor that has an HDMI input connector. HDMI monitors are relatively new, but if you have a monitor that has a DVI input, you can buy relatively inexpensive adapters that provide an interface between DVI and HDMI.
Don't be fooled by adapters that claim that they go from HDMI or DVI to VGA, or HDMI or DVI to S-video. These are two different kinds of signals: HDMI and DVI are digital standards, and VGA and S-video are analog standards. There are adapters that can do this, but they must contain circuitry and require power, and are significantly more expensive than any simple adapter.
You are almost ready to plug in the Raspberry Pi. Make sure you connect all your devices before you power on the unit. Most operating systems support the hot-swap of devices, which means you are able to connect a device after the system has been powered, but this is a bit shaky. You should always cycle power when you connect new hardware.
Even though your hardware configuration is complete, you'll still need to complete the next section to power on the device. So, let's figure out how to install an operating system.
Now that your hardware is ready, you need to install an operating system. You are going to install Linux, an open-source version of Unix, on your Raspberry Pi. Now Linux, unlike Windows, Android, or iOS, is not tightly controlled by a single company. It is a group effort, mostly open-source, and while it is available for free, it grows and develops a bit more chaotically.
Thus, a number of distributions have emerged, each built on a core set of similar capabilities referred to as the Linux kernel. These core capabilities are all based on the Linux specification. However, they are packaged slightly differently, and developed, supported, and packaged by different organizations. Debian, Arch, and Fedora are the names of some of the versions. There are others as well, but these are the main choices for the distribution that you might put on your card.
I choose to use the Raspbian, a Debian distribution of Linux, on my Raspberry Pi projects for a couple of reasons. First, the Debian distribution is used as the basis for another distribution, Ubuntu, and Ubuntu is arguably the most popular distribution of Linux, which makes it a good choice because of the community support that it offers. Also, I personally use Ubuntu when I need to run Linux on my personal computer. It provides a complete set of features, is well organized, and generally supports the latest sets of hardware and software. Having roughly the same version on both my personal computer and my Raspberry Pi makes it easier for me to use both as they operate, at least to a certain degree, the same way. That lets me try some things on my computer before trying them on the Raspberry Pi. I've also found that Ubuntu/Debian has excellent support for new hardware, and this can be very important for your projects.
So, you are going to install and run Raspbian, on your Raspberry Pi.
There are two approaches to getting Raspbian on your board. The board is getting popular enough for you to buy an SD card that already has Raspbian installed, or you can download it onto your personal computer and then install it on the card. I'll assume you don't need any directions if you want to purchase a card—simply do an Internet search for companies selling such a product.
If you are going to download a distribution, you need to decide if you are going to use a Windows computer to download and create an SD card, a MAC OS X, or a Linux machine. I'll give brief directions for the Windows computer and Linux machines here. For directions on the MAC OS X, go to: http://www.raspberrypi.org/documentation/installation/installing-images/mac.md.
First, you'll need to download an image. This part of the process is similar for both Windows and Linux. Open a browser window. Go to Raspberry Pi organization's website, www.raspberrypi.org and select the Downloads selection at the top of the page. This will give you a variety of download choices. Go to the Raspbian section, and select the .zip file just to the right of the image identifier. This will download an archived file that has the image for your Raspbian operating system. Note the default user name and password; you'll need that later.
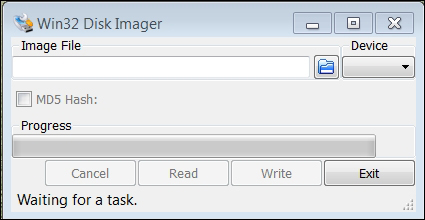
If you're using Windows, you'll need to unzip the file using an archiving program like 7-Zip. This will leave you with a file that has the .img extension, a file that can be imaged on to your card. Next, you'll need a program that can write the image to the card. I use the Image Writer for Windows program. You can find a link to this program at the top of the download section on the www.raspberrypi.org website. Plug your card into the PC, run this program, and you should see this:
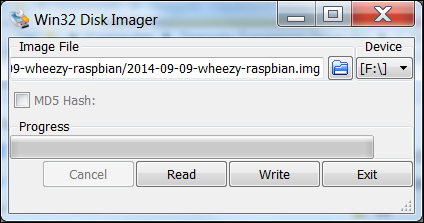
Select the correct card and image; it should look something like this:
Then click on the Write button. This will take some time, but when it is complete, eject the card from the PC.
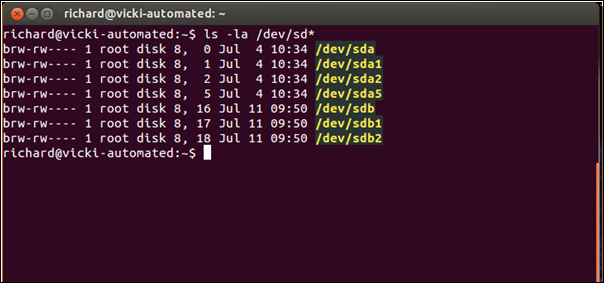
If you are using Linux, you'll need to un-archive the file and then write it to the card. You can do all of this with one command. However, you do need to find the /dev device label for your card. You can do this with the ls -la /dev/sd* command. If you run this before you plug in your card, you might see something like the following screenshot:
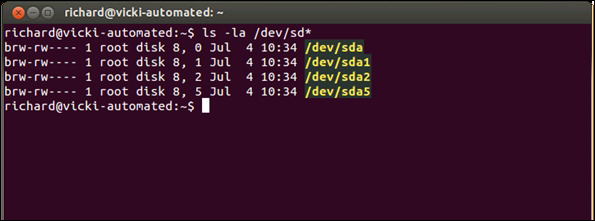
After plugging in your card, you might see something like the following screenshot:
Note that your card is at sdb. Now, go to the directory where you downloaded the archived image file, and use the following command:
sudo dd if=2014-09-09-wheezy-raspbian.img of=/dev/sdX
The 2014-09-09-wheezy-raspbian.img command will be replaced by the image file that you downloaded, and /dev/sdX will be replaced by your card ID in this example, /dev/sdb. Be careful to specify the correct device as this can overwrite the data on your hard drive. Also, this may take a few minutes. Once the file is written, eject the card and you are ready to plug it into the board and apply power.
Make sure your Raspberry Pi is unplugged and install the SD card into the slot. Then power the device. After the device boots, you should get the following screenshot:
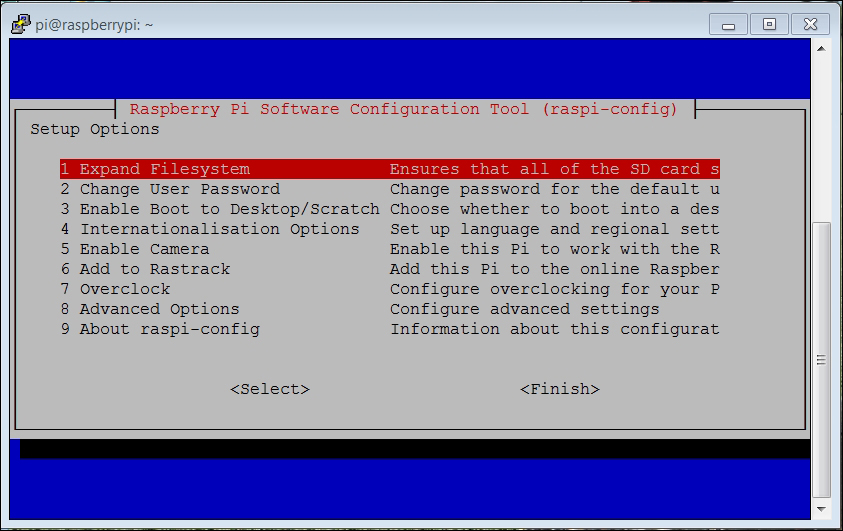
You are going to do two things, and perhaps another, based on your personal preference. First, you'll want to expand the file system to take up the entire card. So, hit the Enter key, and you'll see the following screenshot:
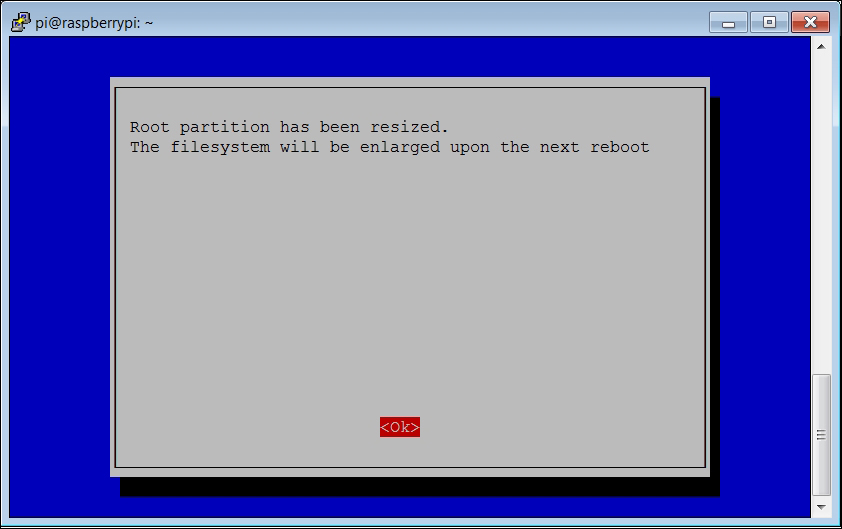
Hit Enter once again and you'll go back to the main configuration screen. Now select the Enable Boot to Desktop/Scratch option, as shown in the following screenshot:
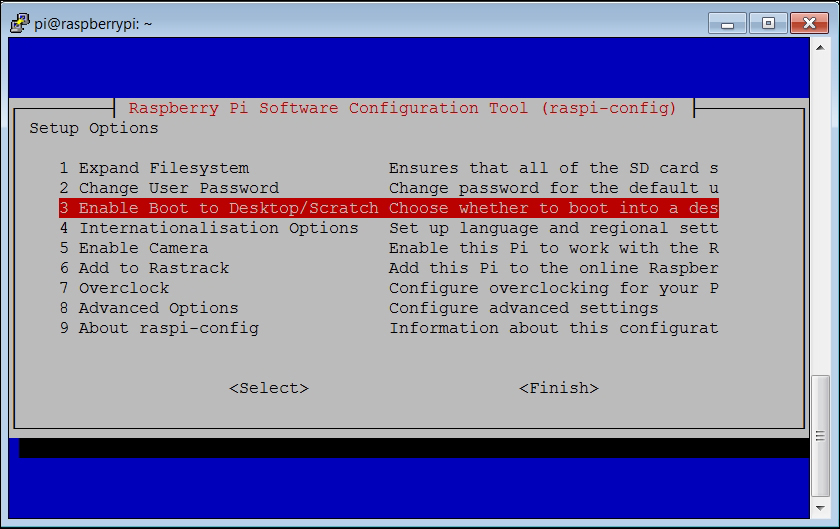
When you hit Enter you'll see the following screenshot:
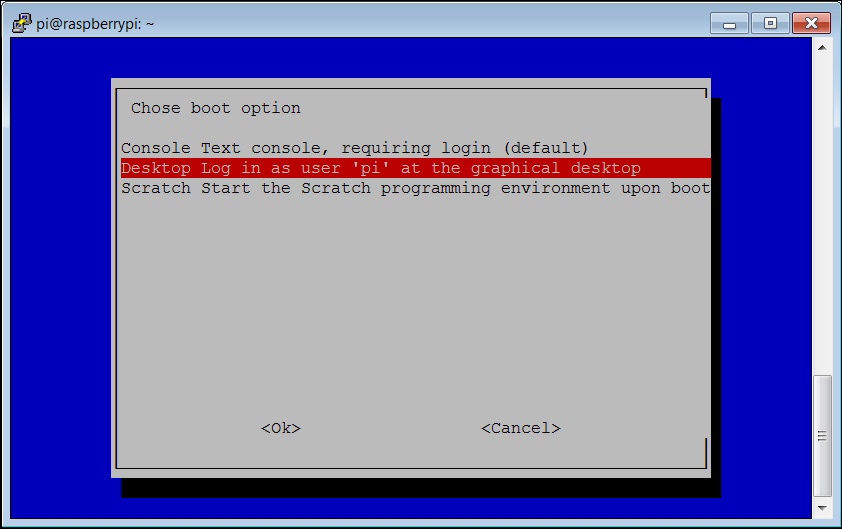
I prefer to select the middle option, Desktop Log in as user 'pi' at the graphical desktop. It normally sets up the system the way I like to have it booted up. You could also choose Console text console, require login (default). However, you will need to log in whenever you want to access the graphical environment, for example, when using the VNC server, which we will cover later.
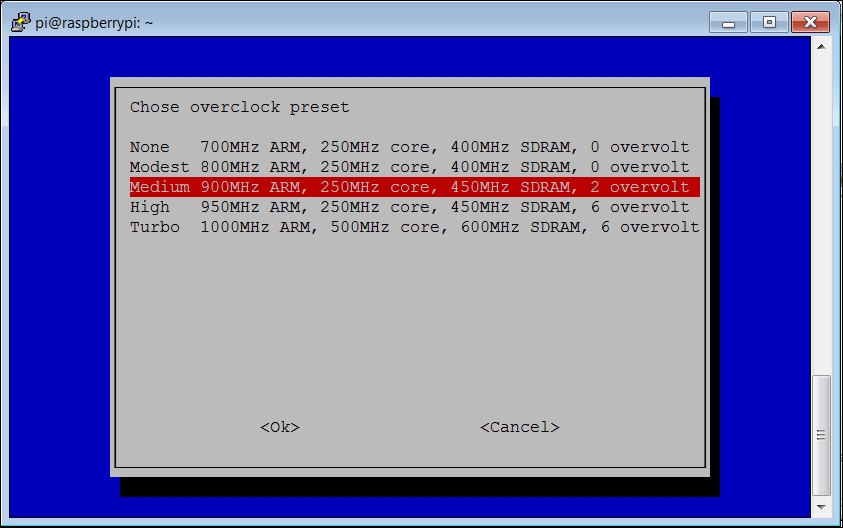
The final choice you can make is to change the over clocking on the Raspberry Pi. This is a way for you to get a higher performance from your system. However, there is a risk that you can end up with a system that has reliability problems.
I normally do a bit of over clocking, I'll select the Medium setting, as shown in the following screenshot:
Once you are done, and are back to the main configuration menu, hit the Tab key until you are positioned over the <Finish> selection, then hit Enter. Then, hit Enter again so that you can reboot your Raspberry Pi. Now when you boot, your system will take you all the way into the Windows screen.
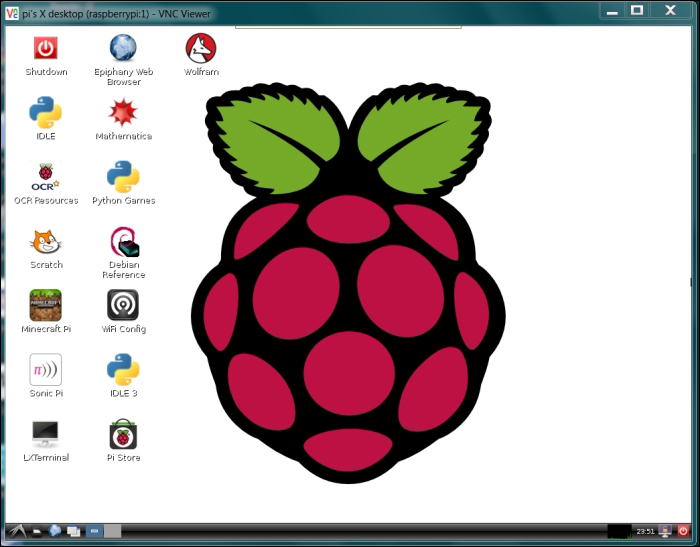
The Raspberry Pi uses the Lightweight X11 Desktop Environment (LXDE) Windows system, and should look like the following screenshot:
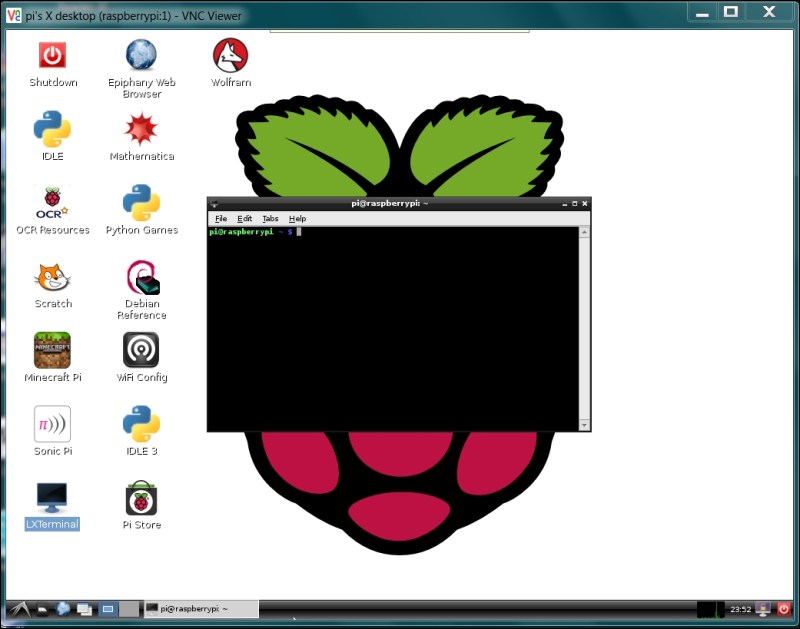
Now, when the graphical desktop system is up and running, you can bring up a terminal by double clicking on the LXTerminal icon on the screen. You should end up with a terminal window that looks like the following screenshot:
Now you are ready to start interacting with the system!
Two questions arise: do you need an external computer during the creation of your projects? and, what sort of a computer do you need? The answer to the first question is a resounding 'yes'. Most of your projects are going to be self-contained robots with very limited connections and display space; you will be using an external computer to issue commands and see what is going on inside your robotic projects. The answer to the second question is a bit more difficult. Because your Raspberry Pi is working in Linux, most notably a version of Debian that is very closely related to Ubuntu, there are some advantages to having an Ubuntu system available as your remote system. You can then try some things on your computer before trying them in your embedded system. You'll also be working with similar commands for both, which will help your learning curve. You can even use a second Raspberry Pi for this purpose.
However, the bulk of personal computers today run some sort of Windows operating system, so that is what will normally be available. Even with a Windows machine, you can issue commands and display information, so either way, it will work. I'll try to give examples for both, as long as it is practical.
You now have a very usable Debian computer system. You can use it to access the Internet, write riveting novels, balance your accounts—just about anything you could do with a standard personal computer. However, that is not your purpose; you want to use your embedded system to power your delightfully inventive projects. In most cases, you will not want to connect a keyboard, mouse, and display to your projects. However, you still need to communicate with your device, program it, and have it tell you what is going on, and when things don't work right. You'll spend some time in this section establishing remote access to your device.
This section depends on an Internet connection with the Raspberry Pi. For the B+, this is relatively easy. Simply connect the device to the LAN through the Ethernet connection. If you don't have a wired LAN connection, or would prefer to connect your device wirelessly, follow the instructions in the next section, Establishing Internet access on the Raspberry Pi A+.
The Raspberry Pi A+ does not have a LAN connection. To connect the Raspberry Pi A+ to the Internet, you'll need to establish a wireless LAN connection. First, make sure you have a wireless access point configured. You'll also need a wireless device. See http://elinux.org/RPi_USB_Wi-Fi_Adapters to identify wireless devices that have been verified to work with the Raspberry Pi. Here is one that is available at many online electronics outlets:

You'll also need to connect a powered USB hub for this process so that you can access the wireless keyboard, as well as the USB wireless LAN device. Now, connect the hub to the Raspberry Pi, and then connect your keyboard and the device to the powered hub.
Boot the system, and then edit the network file by typing sudo nano /etc/network/interfaces. You'll want to change it to look like this:
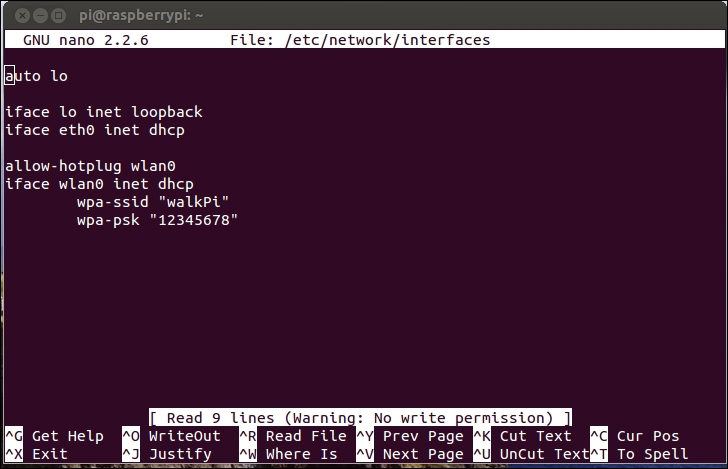
The wpa-ssid and wpa-psk values here must, of course, match what your wireless access point requires. Reboot, and your device should be connected to your wireless network.
Once you have established an Internet network connection with your device, you can access it from your host computer. There are three ways you can access your system from your remote computer:
The first is through a terminal interface called SSH.
The second way is by using a program called VNC Server. This allows you to open a graphical user interface remotely that mirrors the graphical user interface on the Raspberry Pi.
Finally, you can transfer files through a program called WinSCP, which is custom made for this purpose. From Linux, you can use a program called scp.
So, first, make sure your basic system is up and working. Open a terminal window, and check the IP address of your unit. You're going to need this no matter how you want to communicate with the system. Do this by using the ifconfig command. It should look like the following screenshot:
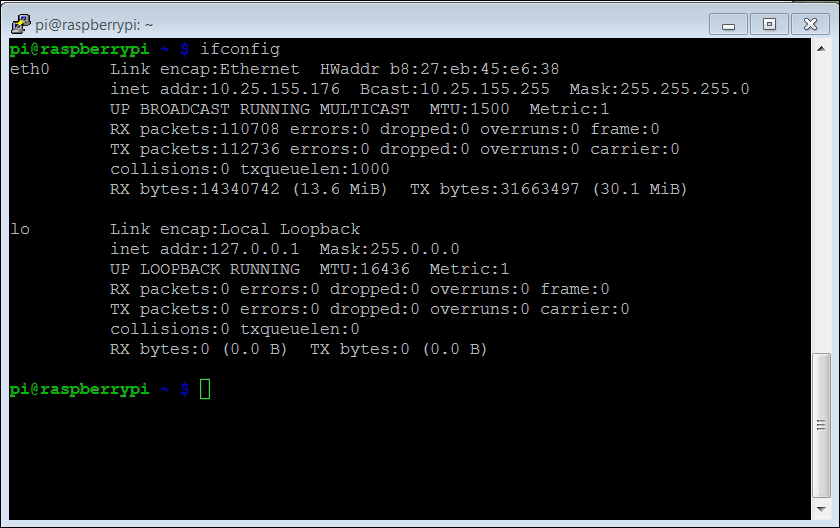
You'll need the inet addr shown in the second line of the preceding screenshot to contact your board through the Ethernet.
If you are using the wireless device to gain access to the Internet, your ifconfig will look like this:
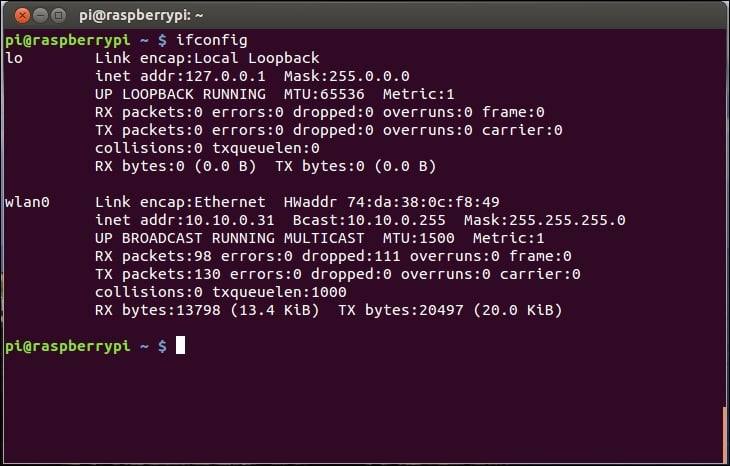
The inet addr associated with the wlan0 connection, in this case 10.10.0.31, is the address you will use to access your Raspberry Pi.
You'll also need an SSH terminal program running on your remote computer. An SSH terminal is a Secure Shell Hypterminal (SSH) connection, which simply means you'll be able to access your board and give it commands by typing them into your remote computer. The response from the Pi will appear in the remote computer terminal window. If you'd like to know more about SSH, try https://www.siteground.com/tutorials/ssh/.
If you are running Microsoft Windows, you can download such an application. My personal favorite is PuTTY. It is free and does a very good job of allowing you to save your configuration so you don't have to type it in each time. Type putty in a search window, and you'll soon come to a page that supports a download, or you can go to www.putty.org.
Download PuTTY to your Microsoft Windows machine. Then, run putty.exe. You should see a configuration window which looks something like the following screenshot:
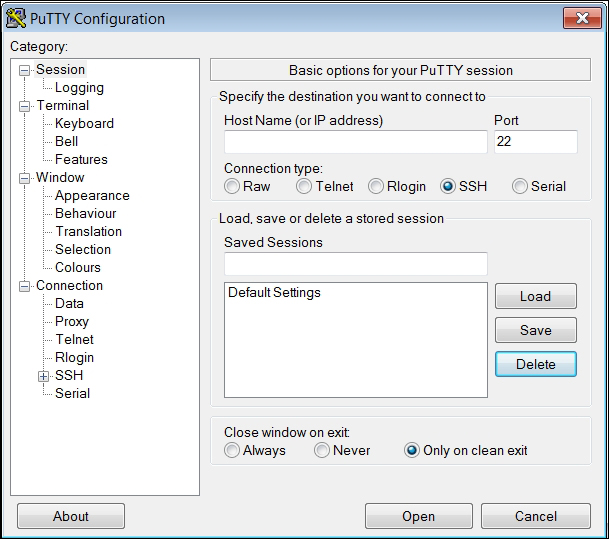
Type the inet addr from the previous page in the Host Name space, and make sure the SSH selection is selected. You may want to save this configuration under Raspberry Pi so you can reload it each time.
When you click on Open, the system will try to open a terminal window onto your Raspberry Pi through the LAN connection. The first time you do this, you will get a warning about an RSA key as the two computers don't know about each other. Windows complains that a computer it doesn't know is about to be connected in a fairly intimate way. Simply click on OK, and you should get a terminal with a login prompt, like the following screenshot:
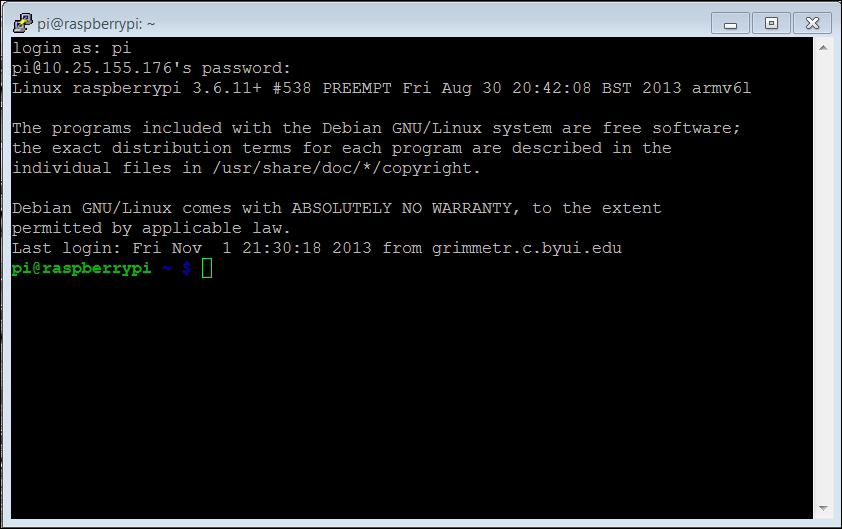
Now you can log in and issue commands to your Raspberry Pi. If you'd like to do this from a Linux machine, the process is even simpler. Bring up a terminal window and then type ssh pi@xxx.xxx.xxx.xxx where the xxx.xxx.xxx.xxx is the inet addr of your device. This will then bring you to the login screen of your Raspberry Pi, which should look similar to the preceding screenshot.
SSH is a really useful tool to communicate with your Raspberry Pi. However, sometimes you need a graphical look at your system, and you don't necessarily want to connect a display. You can get this on your remote computer using an application called vncserver. You'll need to install a version of this on your Raspberry Pi by typing sudo apt-get install tightvncserver in a terminal window on your Raspberry Pi. This is a perfect opportunity to use SSH, by the way.
Tightvncserver is an application that will allow you to remotely view your complete Windows system. Once you have it installed, you'll need to start the server by typing vncserver in a terminal window on the Raspberry Pi. You will then be prompted for a password, to verify the password, and then asked if you'd like to have a view only password. Remember the password you entered, you'll need it to remotely log in via a VNC Viewer.
You'll need a VNC Viewer application for your remote computer. On my Windows system, I use an application called RealVNC. When I start the application, it gives me the following screenshot:
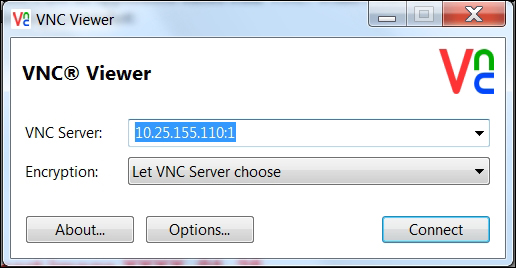
Enter the VNC Server address, which is the IP address of your Raspberry Pi, and click on Connect. You will get this pop-up window, as shown in the following screenshot:
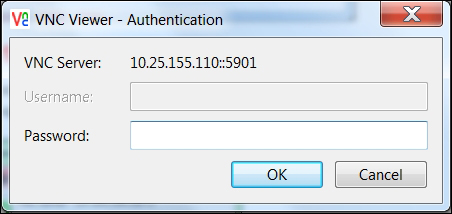
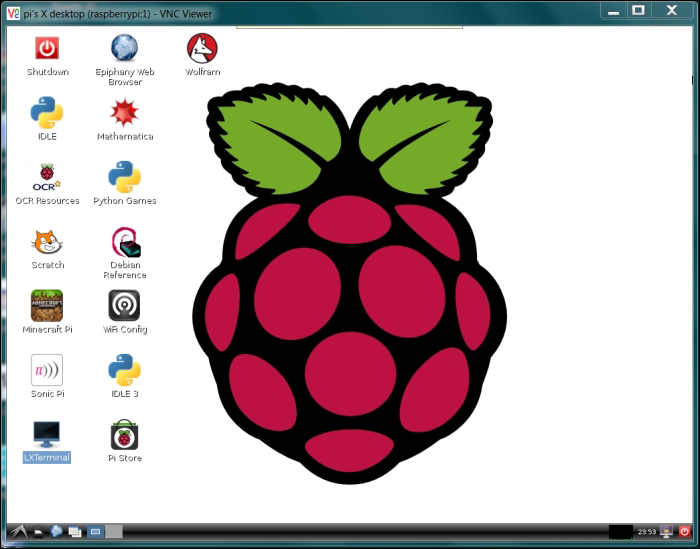
Type in the password you just entered while starting the vncserver, and you should then get a graphical view of your Raspberry Pi that looks like the following screenshot:
You can now access all the capabilities of your system, although they may be slower if you are doing graphics-intense data transfer. Just a note: there are ways to make your vncserver start automatically on boot. I have not used them; I choose to type the vncserver command from an SSH application when I want the application running. This keeps your running applications to a minimum and, more importantly, provides for fewer security risks. If you'd like to start yours each time you boot, there are several places on the Internet that will show you how to configure this. Try the following website: http://www.havetheknowhow.com/Configure-the-server/Run-VNC-on-boot.html.
To view this Raspberry Pi desktop from a remote Linux computer, running Ubuntu for example, you can type sudo apt-get install xtightvncviewer and then start it using xtightvncviewer 10.25.155.110:1 and supplying the chosen password.
Linux has viewers with graphical interfaces such as Remmina Remote Desktop Client (select VNC-Virtual Network Computing protocol), which might be used instead of xtightvncviewer. Here is a screenshot of the Remote Desktop Viewer:
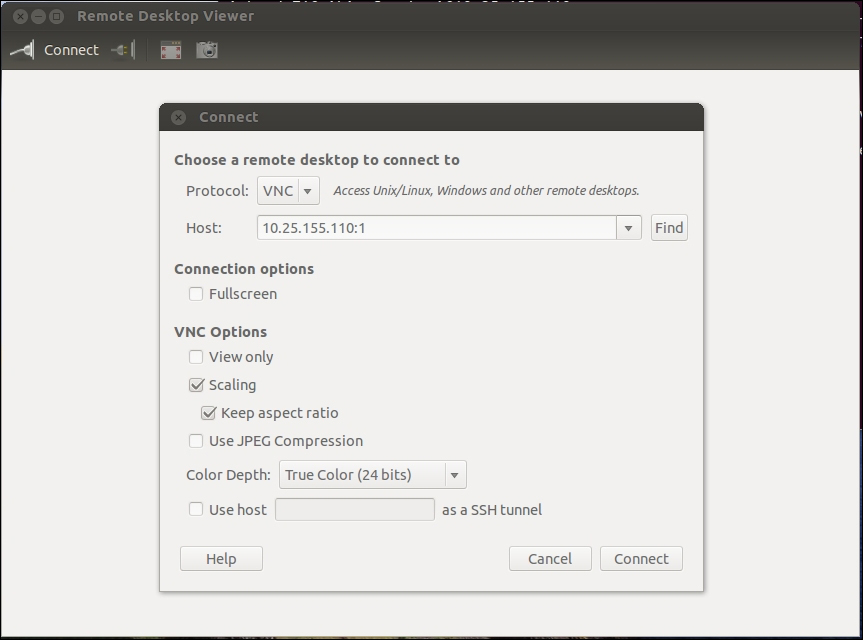
Make sure vncserver is running on the Raspberry Pi. The easiest way to do this is to log in using SSH and run vncserver at the prompt. Now, click on Connect on the Remote Desktop Viewer. Fill in the screen as follows; under the Protocol selection, choose VNC, and you should see the following screenshot:
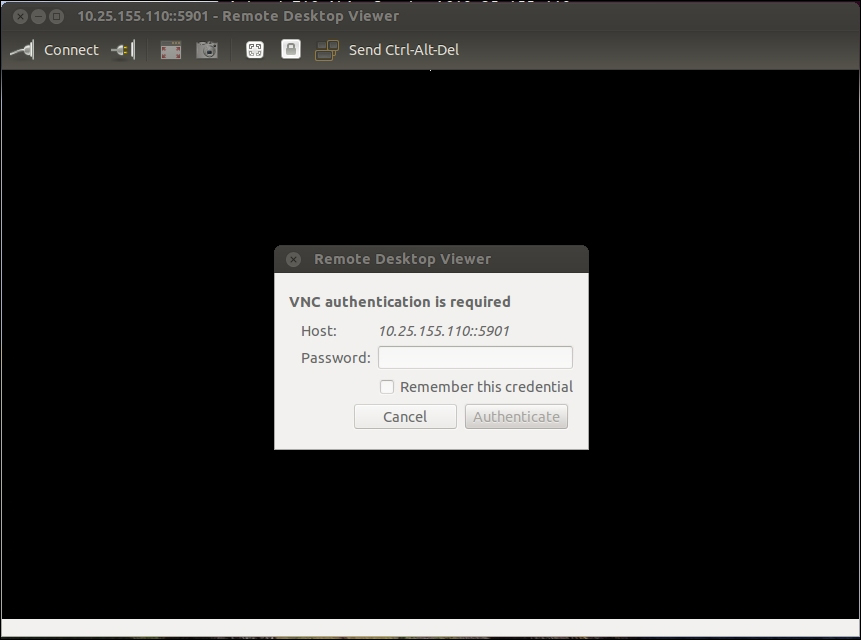
Now enter the Host inet address, making sure you include a :1 at the end, and then click on Connect. You'll need to enter the vncserver password you set up, like the following screenshot:
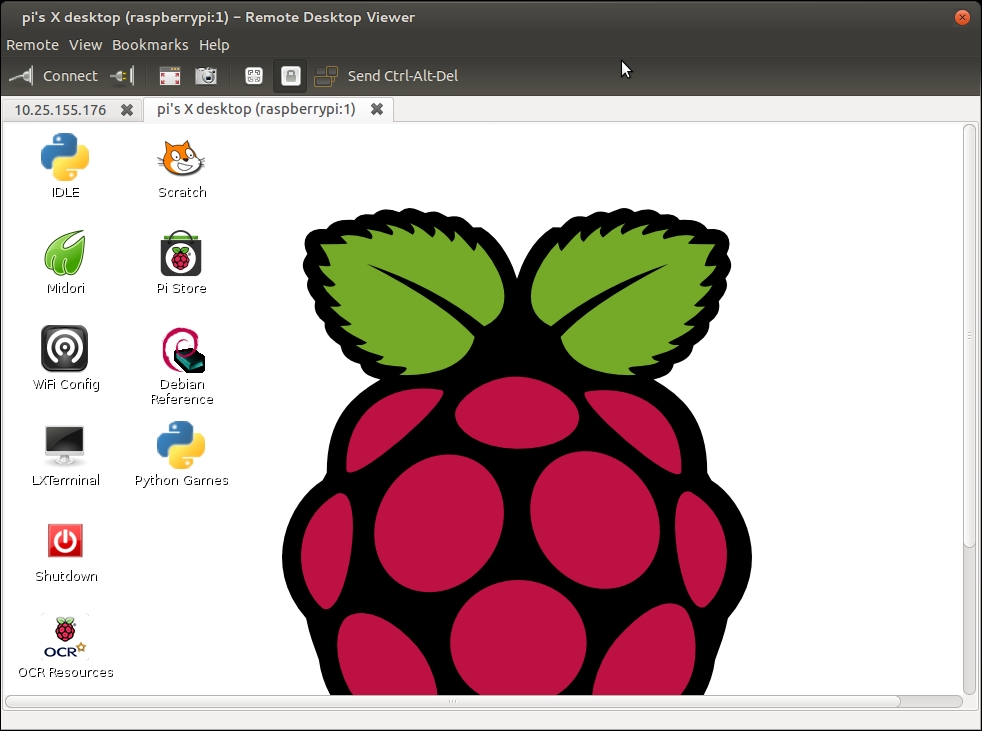
Now you should be able to see the graphical screen of the Raspberry Pi, like this:
The final piece of software that I like to use with my Windows system is a free application called WinSCP. To download and install this piece of software, simply search the web for WinSCP and follow the instructions. Once installed, run the program. It will open the following dialog box:

Click on New, and you will get the following screenshot:
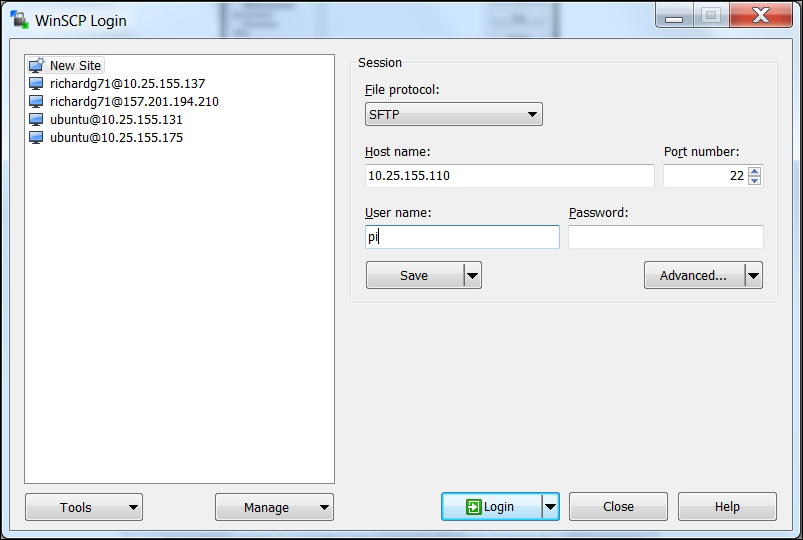
Here you fill in the IP address in the host name tab, pi in the user name tab, and the password (not the vncserver password) in the password space. Click on Login and you should see the following warning displayed, as shown in the following screenshot:
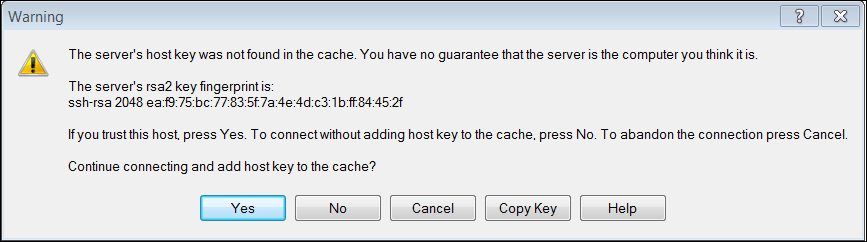
The host computer, again, doesn't know the remote computer. Click on Yes, and then the application will display the following screenshot:

Now you can drag and drop files from one system to the other. You can also do similar things on Linux using the command line. To transfer a file to the remote Raspberry Pi, you can use the scp file user@host.domain:path command, where file is the file name, and user@host.domain:path is the location you want to copy it to. For example, if you wanted to copy robot.py from your Linux system to the Raspberry Pi, you would type scp robot.py pi@10.25.155.176:/home/pi/.The system will ask you for the remote password; this is the login for the Raspberry Pi. Enter the password, and the file will be transferred.
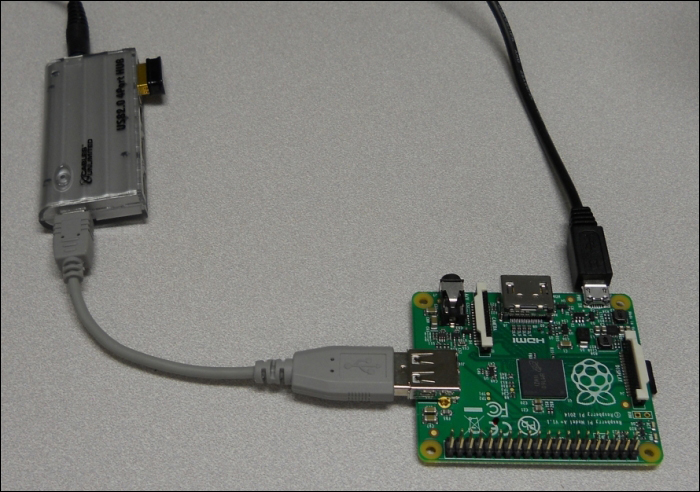
Now that you know how to use SSH, tightvncserver, and scp, you can access your Raspberry Pi remotely without having a display, keyboard, or mouse connected to it! Now your system looks like the following image (if you are using the Raspberry Pi B+):

Or this (if you are using the Raspberry Pi A+):
You only need to connect the power and the LAN, either with a cable, or through wireless LAN. If you need to issue simple commands, connect through SSH. If you need a more complete set of graphical functionality, you can access this through vncserver. Finally, if you want to transfer files back and forth, you can use WinSCP from a Windows computer or scp from a Linux computer. Now you have the toolkit to build your first capabilities.
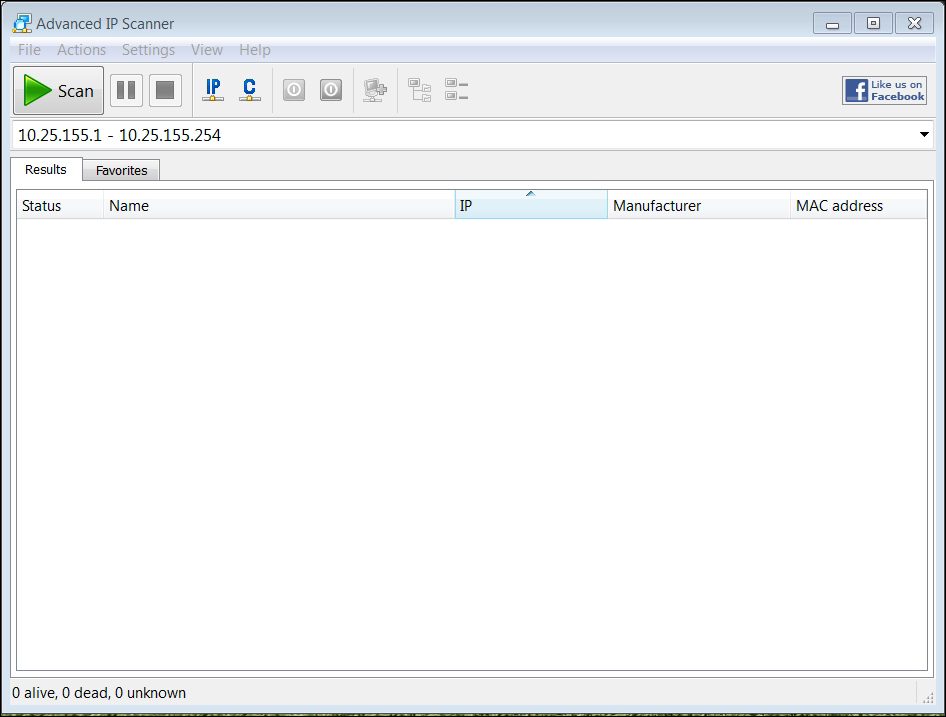
One of the challenges of accessing the system remotely is that you need to know the IP address of your board. If you have the board connected to a keyboard and display, you can always just run ifconfig command to get this info. But you're going to use the board in applications where you don't have this information. There is a way to discover this by using an IP scanner application. There are several available for free; on Windows, I use an application called Advanced IP Scanner. When I start the program, it looks like the following screenshot:
Clicking on the Scan selector, scans for all the devices connected to the network. You can also do this in Linux; one application for IP scanning in Linux is called Nmap. To install Nmap, type sudo apt-get install nmap. To run Nmap, type sudo nmap -sp 10.25.155.1/154 and the scanner will scan the addresses from 10.25.155.1 to 10.25.155.154. For more information on Nmap, see: http://www.linux.com/learn/tutorials/290879-beginners-guide-to-nmap. These scanners can let you know which addresses are being used, and this should then let you find your Raspberry Pi address without typing ipconfig.
Your system has lots of capabilities. Feel free to play with the system—try to get an understanding of what is already there, and what you'll want to add from a SW perspective. One advanced possibility is to connect the Raspberry Pi through a wireless LAN connection, so you don't have to connect a LAN connection when you want to communicate with it. There are several good tutorials on the Internet. Try http://learn.adafruit.com/adafruits-raspberry-pi-lesson-3-network-setup/setting-up-wifi-with-occidentalis or http://www.howtogeek.com/167425/how-to-setup-wi-fi-on-your-raspberry-pi-via-the-command-line/.
Remember, there is limited power on your USB port, so make sure that you are familiar with the power needs of accessories plugged into your Raspberry Pi. You may very well need to use a powered USB hub for many projects.
Congratulations! You've completed the first stage of your journey. You have your Raspberry Pi up and working. No gathering dust in the bin for this piece of hardware. It is now ready to start connecting to all sorts of interesting devices, in all sorts of interesting ways. You would have, by now, installed a Debian operating system, learned how to connect all the appropriate peripherals, and even mastered how to access the system remotely so that the only connections you need are a power supply cable and a LAN cable.
Now you are ready to start commanding your Raspberry Pi to do something. The next chapter will introduce you to the Linux operating system and the Emacs text editor. It will also show you some basic programming concepts in both the Python and C programming languages. Then you'll be ready to add open source software to inexpensive hardware and start building your robotics projects.
