


GUI programming is not as difficult as you think. At least it's not when you come to the world of Qt. This book will take you through this world and give you an insight into this incredibly amazing toolkit. It doesn't matter whether you've heard of it or not, as long as you have essential knowledge of C++ programming.
In this chapter, we will get you comfortable with the development of Qt applications. Simple applications are used as a demonstration for you to cover the following topics:
Creating a new project
Changing the layout of widgets
Understanding the mechanism of signals and slots
Connecting two signals
Creating a Qt Quick application
Connecting C++ slots to QML signals
If you haven't installed Qt 5, refer to http://www.qt.io/download to install the latest version of it. It's recommended that you install the Community version, which is totally free and compliant with GPL/LGPL. Typically, the installer will install both Qt Library and Qt Creator for you. In this book, we will use Qt 5.4.0 and Qt Creator 3.3.0. Later versions may have slight differences but the concept remains the same. It's highly recommended that you install Qt Creator if you don't have it on your computer, because all the tutorials in this book are based on it. It is also the official IDE for the development of Qt applications. Although you may be able to develop Qt applications with other IDEs, it tends to be much more complex. So if you're ready, let's go for it by performing the following steps:
Open Qt Creator.
Navigate to File | New File or Project.
Select Qt Widgets Application.
Enter the project's name and location. In this case, the project's name is
layout_demo.
You may wish to follow the wizard and keep the default values. After this process, Qt Creator will generate the skeleton of the project based on your choices. The UI files are under the Forms directory. When you double-click on a UI file, Qt Creator will redirect you to the integrated designer. The mode selector should have Design highlighted, and the main window should contain several sub-windows to let you design the user interface. This is exactly what we are going to do. For more details about Qt Creator UI, refer to http://doc.qt.io/qtcreator/creator-quick-tour.html.
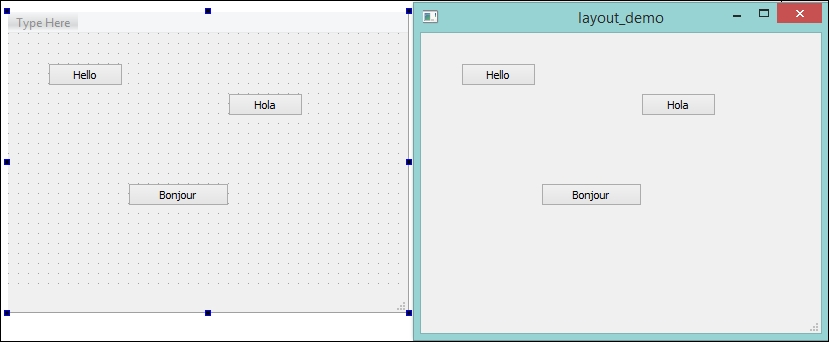
Drag three push buttons from the widget box (widget palette) into the frame of MainWindow in the center. The default text displayed on these buttons is PushButton, but you can change the text if you want by double-clicking on the button. In this case, I changed the buttons to Hello, Hola, and Bonjour, accordingly. Note that this operation won't affect the objectName property. In order to keep it neat and easy to find, we need to change the objectName property. The right-hand side of the UI contains two windows. The upper-right section includes Object Inspector and the lower-right side includes Property Editor. Just select a push button; you can easily change objectName in Property Editor. For the sake of convenience, I changed these buttons' objectName properties to helloButton, holaButton, and bonjourButton respectively.
Tip
It's a good habit to use lowercase for the first letter of objectName and an uppercase letter for Class name. This helps your code to be more readable by people who are familiar with this convention.
Okay, it's time to see what you have done to the user interface of your first Qt application. Click on Run on the left-hand side panel. It will build the project automatically and then run it. It's amazing to see that the application has the exact same interface as the design, isn't it? If everything is alright, the application should appear similar to what is shown in the following screenshot:
You may want to look at the source code and see what happened there. So, let's go back to the source code by returning to the Edit mode. Click on the Edit button in the mode selector. Then, double-click on main.cpp in the Sources folder of the Projects tree view. The code for main.cpp is shown as follows:
#include "mainwindow.h"
#include <QApplication>

int main(int argc, char *argv[])
{
    QApplication a(argc, argv);
    MainWindow w;
    w.show();

    return a.exec();
}Actually, you don't need to and you probably won't change too much in this file. The first line of the main scope just initializes the applications on a user's desktop and handles some events. Then there is also an object, w, which belongs to the MainWindow class. As for the last line, it ensures that the application won't terminate after execution but will keep in an event loop, so that it is able to respond to external events such as mouse clicks and window state changes.
Last but not least, let's see what happens during the initialization of the MainWindow object, w. It is the content of mainwindow.h, shown as follows:
#ifndef MAINWINDOW_H
#define MAINWINDOW_H

#include <QMainWindow>

namespace Ui {
    class MainWindow;
}

class MainWindow : public QMainWindow
{
    Q_OBJECT

public:
    explicit MainWindow(QWidget *parent = 0);
    ~MainWindow();

private:
    Ui::MainWindow *ui;
};

#endif // MAINWINDOW_H
You may feel a bit surprised seeing a Q_OBJECT macro if this is your first time writing a Qt application. In the QObject documentation, it says:
The
Q_OBJECTmacro must appear in the private section of a class definition that declares its own signals and slots or that uses other services provided by Qt's meta-object system.
Well, this means that QObject has to be declared if you're going to use Qt's meta-object system and (or) its signals and slots mechanism. The signals and slots, which are almost the core of Qt, will be included later in this chapter.
There is a private member named ui, which is a pointer of the MainWindow class of the Ui namespace. Do you remember the UI file we edited before? What the magic of Qt does is that it links the UI file and the parental source code. We can manipulate the UI through code lines as well as design it in Qt Creator's integrated designer. Finally, let's look into the construction function of MainWindow in mainwindow.cpp:
#include "mainwindow.h"
#include "ui_mainwindow.h"

MainWindow::MainWindow(QWidget *parent) :
    QMainWindow(parent),
    ui(new Ui::MainWindow)
{
    ui->setupUi(this);
}

MainWindow::~MainWindow()
{
    delete ui;
}
Did you see where the user interface comes from? It's the member setupUi function of Ui::MainWindow that initializes it and sets it up for us. You may want to check what happens if we change the member function to something like this:
MainWindow::MainWindow(QWidget *parent) :
    QMainWindow(parent),
    ui(new Ui::MainWindow)
{
    ui->setupUi(this);
    ui->holaButton->setEnabled(false);
}
What happened here? The Hola button can't be clicked on because we disabled it! It has the same effect if the enabled box is unchecked in the designer instead of writing a statement here. Please apply this change before heading to the next topic, because we don't need a disabled push button to do any demonstrations in this chapter.
You already know how to add and move widgets in the Design mode. Now, we need to make the UI neat and tidy. I'll show you how to do this step by step.
A quick way to delete a widget is to select it and press the Delete button. Meanwhile, some widgets, such as the menu bar, status bar, and toolbar can't be selected, so we have to right-click on them in Object Inspector and delete them. Since they are useless in this example, it's safe to remove them and we can do this for good.
Okay, let's understand what needs to be done after the removal. You may want to keep all these push buttons on the same horizontal axis. To do this, perform the following steps:
Select all the push buttons either by clicking on them one by one while keeping the Ctrl key pressed or just drawing an enclosing rectangle containing all the buttons.
Right-click and select Layout | LayOut Horizontally, The keyboard shortcut for this is Ctrl + H.
Resize the horizontal layout and adjust its
layoutSpacingby selecting it and dragging any of the points around the selection box until it fits best.
Hmm…! You may have noticed that the text of the Bonjour button is longer than the other two buttons, and it should be wider than the others. How do you do this? You can change the property of the horizontal layout object's layoutStretch property in Property Editor. This value indicates the stretch factors of the widgets inside the horizontal layout. They would be laid out in proportion. Change it to 3,3,4, and there you are. The stretched size definitely won't be smaller than the minimum size hint. This is how the zero factor works when there is a nonzero natural number, which means that you need to keep the minimum size instead of getting an error with a zero divisor.
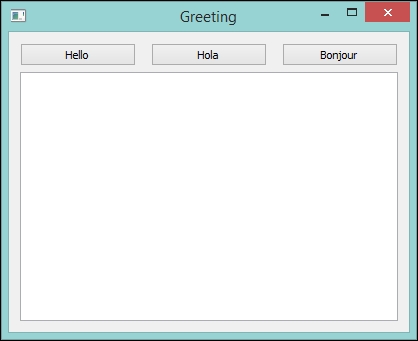
Now, drag Plain Text Edit just below, and not inside, the horizontal layout. Obviously, it would be neater if we could extend the plain text edit's width. However, we don't have to do this manually. In fact, we could change the layout of the parent, MainWindow. That's it! Right-click on MainWindow, and then navigate to Lay out | Lay Out Vertically. Wow! All the children widgets are automatically extended to the inner boundary of MainWindow; they are kept in a vertical order. You'll also find Layout settings in the centralWidget property, which is exactly the same thing as the previous horizontal layout.
The last thing to make this application halfway decent is to change the title of the window. MainWindow is not the title you want, right? Click on MainWindow in the object tree. Then, scroll down its properties to find windowTitle. Name it whatever you want. In this example, I changed it to Greeting. Now, run the application again and you will see it looks like what is shown in the following screenshot:
It is really important to keep your curiosity and to explore what on earth these properties do. However, please remember to revert the changes you made to the app, as we are about to enter the core part of Qt, that is, signals and slots.
Note
Signals and slots are used for communication between objects. The signals and slots mechanism is a central feature of Qt and probably the part that differs the most from the features provided by other frameworks.
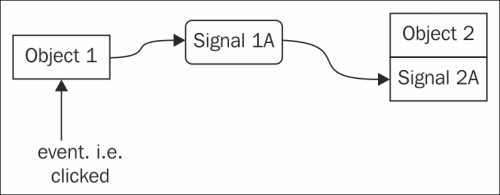
Have you ever wondered why a window closes after the Close button is clicked on? Developers who are familiar with other toolkits would say that the Close button being clicked on is an event, and this event is bound with a callback function that is responsible for closing the window. Well, it's not quite the same in the world of Qt. Since Qt uses a mechanism called signals and slots, it makes the callback function weakly coupled to the event. Also, we usually use the terms signal and slot in Qt. A signal is emitted when a particular event occurs. A slot is a function that is called in response to a particular signal. The following simple and schematic diagram helps you understand the relation between signals, events, and slots:
Qt has tons of predefined signals and slots, which cover its general purposes. However, it's indeed commonplace to add your own slots to handle the target signals. You may also be interested in subclassing widgets and writing your own signals, which will be covered later. The mechanism of signals and slots was designed to be type-safe because of its requirement of the list of the same arguments. In fact, the slot may have a shorter arguments list than the signal since it can ignore the extras. You can have as many arguments as you want. This enables you to forget about the wildcard void* type in C and other toolkits.
Since Qt 5, this mechanism is even safer because we can use a new syntax of signals and slots to deal with the connections. A conversion of a piece of code is demonstrated here. Let's see what a typical connect statement in old style is:
connect(sender, SIGNAL(textChanged(QString)), receiver, SLOT(updateText(QString)));
This can be rewritten in a new syntax style:
connect(sender, &Sender::textChanged, receiver, &Receiver::updateText);
In the traditional way of writing code, the verification of signals and slots only happens at runtime. In the new style, the compiler can detect the mismatches in the types of arguments and the existence of signals and slots at compile time.
Note
As long as it is possible, all connect statements are written in the new syntax style in this book.
Now, let's get back to our application. I'll show you how to display some words in a plain text edit when the Hello button is clicked on. First of all, we need to create a slot since Qt has already predefined the clicked signal for the QPushButton class. Edit mainwindow.h and add a slot declaration:
#ifndef MAINWINDOW_H
#define MAINWINDOW_H

#include <QMainWindow>

namespace Ui {
    class MainWindow;
}

class MainWindow : public QMainWindow
{
    Q_OBJECT

public:
    explicit MainWindow(QWidget *parent = 0);
    ~MainWindow();

private slots:
    void displayHello();

private:
    Ui::MainWindow *ui;
};

#endif // MAINWINDOW_H
As you can see, it's the slots keyword that distinguishes slots from ordinary functions. I declared it private to restrict access permission. You have to declare it a public slot if you need to invoke it in an object from other classes. After this declaration, we have to implement it in the mainwindow.cpp file. The implementation of the displayHello slot is written as follows:
void MainWindow::displayHello()
{
    ui->plainTextEdit->appendPlainText(QString("Hello"));
}
It simply calls a member function of the plain text edit in order to add a Hello QString to it. QString is a core class that Qt has introduced. It provides a Unicode character string, which efficiently solves the internationalization issue. It's also convenient to convert a QString class to std::string and vice versa. Besides, just like the other QObject classes, QString uses an implicit sharing mechanism to reduce memory usage and avoid needless copying. If you don't want to get concerned about the scenes shown in the following code, just take QString as an improved version of std::string. Now, we need to connect this slot to the signal that the Hello push button will emit:
MainWindow::MainWindow(QWidget *parent) :
    QMainWindow(parent),
    ui(new Ui::MainWindow)
{
    ui->setupUi(this);

    connect(ui->helloButton, &QPushButton::clicked, this, &MainWindow::displayHello);
}
What I did is add a connect statement to the constructor of MainWindow. In fact, we can connect signals and slots anywhere and at any time. However, the connection only exists after this line gets executed. So, it's a common practice to have lots of connect statements in the construction functions instead of spreading them out. For a better understanding, run your application and see what happens when you click on the Hello button. Every time you click, a Hello text will be appended to the plain text edit. The following screenshot is what happened after we clicked on the Hello button three times:
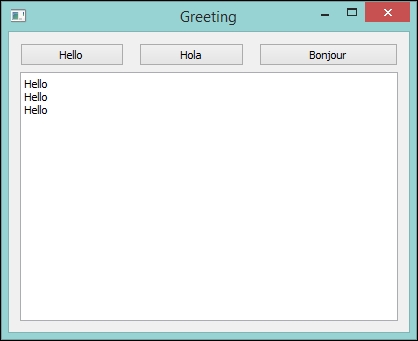
Getting confused? Let me walk you through this. When you clicked on the Hello button, it emitted a clicked signal. Then, the code inside the displayHello slot got executed, because we connected the clicked signal of the Hello button to the displayHello slot of MainWindow. What the displayHello slot did is that it simply appended Hello to the plain text edit.
It may take you some time to fully understand the mechanism of signals and slots. Just take your time. I'll show you another example of how to disconnect such a connection after we clicked on the Hola button. Similarly, add a declaration of the slot to the header file and define it in the source file. I pasted the content of the mainwindow.h header file, as follows:
#ifndef MAINWINDOW_H
#define MAINWINDOW_H

#include <QMainWindow>

namespace Ui {
    class MainWindow;
}

class MainWindow : public QMainWindow
{
    Q_OBJECT

public:
    explicit MainWindow(QWidget *parent = 0);
    ~MainWindow();

private slots:
    void displayHello();
    void onHolaClicked();

private:
    Ui::MainWindow *ui;
};

#endif // MAINWINDOW_H
It's only declaring a onHolaClicked slot that differed from the original. Here's the content of the source file:
#include "mainwindow.h"
#include "ui_mainwindow.h"

MainWindow::MainWindow(QWidget *parent) :
    QMainWindow(parent),
    ui(new Ui::MainWindow)
{
    ui->setupUi(this);

    connect(ui->helloButton, &QPushButton::clicked, this, &MainWindow::displayHello);
    connect(ui->holaButton, &QPushButton::clicked, this, &MainWindow::onHolaClicked);
}

MainWindow::~MainWindow()
{
    delete ui;
}

void MainWindow::displayHello()
{
    ui->plainTextEdit->appendPlainText(QString("Hello"));
}

void MainWindow::onHolaClicked()
{
    ui->plainTextEdit->appendPlainText(QString("Hola"));
    disconnect(ui->helloButton, &QPushButton::clicked, this, &MainWindow::displayHello);
}
You'll find that the Hello button no longer works after you clicked on the Hola button. This is because in the onHolaClicked slot, we just disconnected the binding between the clicked signal of helloButton and the displayHello slot of MainWindow. Actually, disconnect has some overloaded functions and can be used in a more destructive way. For example, you may want to disconnect all connections between a specific signal sender and a specific receiver:
disconnect(ui->helloButton, 0, this, 0);
If you want to disconnect all the slots associated with a signal, since a signal can be connected to as many slots as you wish, the code can be written like this:
disconnect(ui->helloButton, &QPushButton::clicked, 0, 0);
We can also disconnect all the signals in an object, whatever slots they might be connected to. The following code will disconnect all the signals in helloButton, which of course includes the clicked signal:
disconnect(ui->helloButton, 0, 0, 0);
Just like a signal, a slot can be connected to as many signals as you want. However, there's no such function to disconnect a specific slot from all the signals.
Apart from the new syntax for traditional connections of signals and slots, Qt 5 has offered a new way to simplify such a binding process with C++11 lambda expressions. As you may have noticed, it's kind of tedious to declare a slot in the header file, define it in the source code file, and then connect it to a signal. It's worthwhile if the slot has a lot of statements, otherwise it becomes time consuming and increases the complexity. Before we go any further, we need to turn on C++11 support on Qt. Edit the pro file (layout_demo.pro in my example) and add the following line to it:
CONFIG += c++11
Now, you need to navigate to Build | Run qmake to reconfigure the project properly. If everything is okay, we can go back to editing the mainwindow.cpp file. This way, there is no need to declare a slot and define and connect it. Just add a connect statement to the construction function of MainWindow:
connect(ui->bonjourButton, &QPushButton::clicked, [this](){
    ui->plainTextEdit->appendPlainText(QString("Bonjour"));
});
It's very straightforward, isn't it? The third argument is a lambda expression, which was added to C++ since C++11.
Note
For more details about lambda expression, visit http://en.cppreference.com/w/cpp/language/lambda.
This pair of signal and slot connection is done if you don't do need to to disconnect such a connection. However, if you need, you have to save this connection, which is a QMetaObject::Connection type. In order to disconnect this connection elsewhere, it would be better to declare it as a variable of MainWindow. So the header file becomes as follows:
#ifndef MAINWINDOW_H
#define MAINWINDOW_H

#include <QMainWindow>

namespace Ui {
    class MainWindow;
}

class MainWindow : public QMainWindow
{
    Q_OBJECT

public:
    explicit MainWindow(QWidget *parent = 0);
    ~MainWindow();

private slots:
    void displayHello();
    void onHolaClicked();

private:
    Ui::MainWindow *ui;
    QMetaObject::Connection bonjourConnection;
};

#endif // MAINWINDOW_H
Here, I declared bonjourConnection as an object of QMetaObject::Connection so that we can save the connection dealing with an unnamed slot. Similarly, the disconnection happens in onHolaClicked, so there won't be any new Bonjour text on screen after we click on the Hola button. Here is the content of mainwindow.cpp:
#include "mainwindow.h"
#include "ui_mainwindow.h"

MainWindow::MainWindow(QWidget *parent) :
    QMainWindow(parent),
    ui(new Ui::MainWindow)
{
    ui->setupUi(this);

    connect(ui->helloButton, &QPushButton::clicked, this, &MainWindow::displayHello);
    connect(ui->holaButton, &QPushButton::clicked, this, &MainWindow::onHolaClicked);
    bonjourConnection = connect(ui->bonjourButton, &QPushButton::clicked, [this](){
        ui->plainTextEdit->appendPlainText(QString("Bonjour"));
    });
}

MainWindow::~MainWindow()
{
    delete ui;
}

void MainWindow::displayHello()
{
    ui->plainTextEdit->appendPlainText(QString("Hello"));
}

void MainWindow::onHolaClicked()
{
    ui->plainTextEdit->appendPlainText(QString("Hola"));
    disconnect(ui->helloButton, &QPushButton::clicked, this, &MainWindow::displayHello);
    disconnect(bonjourConnection);
}
Tip
Downloading the example code
You can download the example code files from your account at http://www.packtpub.com for all the Packt Publishing books you have purchased. If you purchased this book elsewhere, you can visit http://www.packtpub.com/support and register to have the files e-mailed directly to you.
This is indeed another new usage of disconnect. It takes in a QMetaObject::Connection object as the only argument. You'll thank this new overloaded function if you're going to use the lambda expression as a slot.
Due to the weak couplings of the Qt signals and slot mechanisms, it is viable to bind signals to each other. It may sound confusing, so let me draw a diagram to make it clear:
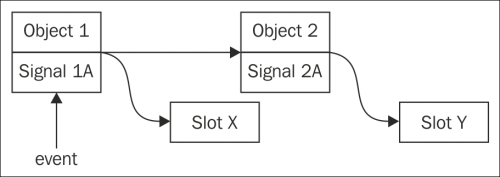
When an event triggers a specific signal, this emitted signal could be another event, which will emit another specific signal. It is not a very common practice, but it tends to be useful when you deal with some complex signals and slot connection networks, especially when tons of events lead to the emission of only a few signals. Although it definitely increases the complexity of the project, binding these signals could simplify the code a lot. Append the following statement to the construction function of MainWindow:
connect(ui->bonjourButton, &QPushButton::clicked, ui->helloButton, &QPushButton::clicked);
You'll get two lines in a plain text edit after you click on the Bonjour button. The first line is Bonjour and the second one is Hello. Apparently, this is because we coupled the clicked signal of the Bonjour button with the clicked signal of the Hello button. The clicked signal of the latter has already been coupled with a slot, which results in the new text line, Hello. In fact, it has the same effect as the following statement:
connect(ui->bonjourButton, &QPushButton::clicked, [this](){
    emit ui->helloButton->clicked();
});
Basically, connecting two signals is a simplified version of connecting a signal and a slot, while the slot is meant to emit another signal. As for priority, the slot(s) of the latter signal will be handled when the event loop is returned to the object.
However, it is impossible to connect two slots because the mechanism requires a signal while a slot is considered a receiver instead of a sender. Therefore, if you want to simplify the connection, just wrap these slots as one slot, which can be used for connections.
We already covered how to create a Qt (C++) application. How about giving the newly introduced Qt Quick application development a try? Qt Quick was introduced in Qt 4.8 and it is now becoming mature in Qt 5. Because the QML file is usually platform-independent, it enables you to develop an application for multiple targets, including mobile operating systems with the same code.
In this chapter, I'll show you how to create a simple Qt Quick application based on Qt Quick Controls 1.2, as follows:
Create a new project named
HelloQML.Select Qt Quick Application instead of Qt Widgets Application, which we chose previously.
Select Qt Quick Controls 1.2 when the wizard navigates you to Select Qt Quick Components Set.
Qt Quick Controls has been introduced since Qt 5.1 and is highly recommended because it enables you to build a complete and native user interface. You can also control the top-level window properties from QML. Getting confused by QML and Qt Quick?
Note
QML is a user interface specification and programming language. It allows developers and designers alike to create highly performant, fluidly animated, and visually appealing applications. QML offers a highly readable, declarative, JSON-like syntax with support for imperative JavaScript expressions combined with dynamic property bindings.
While Qt Quick is the standard library for QML, it sounds like the relation between STL and C++. The difference is that QML is dedicated to user interface design and Qt Quick includes a lot of visual types, animations, and so on. Before we go any further, I want to inform you that QML is different from C++ but similar to JavaScript and JSON.
Edit the main.qml file under the root of the Resources file, qml.qrc, which Qt Creator has generated for our new Qt Quick project. Let's see how the code should be:
import QtQuick 2.3
import QtQuick.Controls 1.2

ApplicationWindow {
    visible: true
    width: 640
    height: 480
    title: qsTr("Hello QML")

    menuBar: MenuBar {
        Menu {
            title: qsTr("File")
            MenuItem {
                text: qsTr("Exit")
                shortcut: "Ctrl+Q"
                onTriggered: Qt.quit()
            }
        }
    }

    Text {
        id: hw
        text: qsTr("Hello World")
        font.capitalization: Font.AllUppercase
        anchors.centerIn: parent
    }

    Label {
        anchors { bottom: hw.top; bottomMargin: 5; horizontalCenter: hw.horizontalCenter }
        text: qsTr("Hello Qt Quick")
    }
}
If you have ever touched Java or Python, the first two lines won't be too unfamiliar to you. It simply imports Qt Quick and Qt Quick Controls, and the number following is the version of the library. You may need to change the version if there is a newer library. Importing other libraries is a common practice when developing Qt Quick applications.
The body of this QML source file is actually in the JSON style, which enables you to understand the hierarchy of the user interface through the code. Here, the root item is ApplicationWindow, which is basically the same thing as MainWindow in the previous topics, and we use braces to enclose the statements just like in a JSON file. Although you could use a semicolon to mark an ending of a statement just like we do in C++, there is no need to do this. As you can see, the property definition needs a colon if it's a single-line statement and enclosing braces if it contains more than one subproperty.
The statements are kind of self explanatory and they are similar to the properties that we saw in the Qt Widgets application. A qsTr function is used for internationalization and localization. Strings marked by qsTr could be translated by Qt Linguist. In addition to this, you don't need to care about QString and std::string any more. All the strings in QML are encoded in the same coding as the QML file and the QML file is created in UTF-8 by default.
As for the signals and slots mechanism in Qt Quick, it's easy if you only use QML to write the callback function to the corresponding slot. Here, we execute Qt.quit() inside the onTriggered slot of MenuItem. It's viable to connect the signal of a QML item to a C++ object's slot, which I'll introduce later.
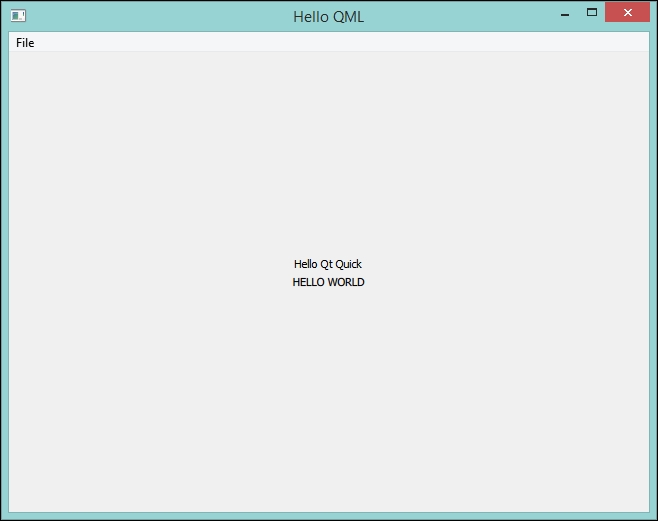
When you run this application in Windows, you can barely find the difference between the Text item and the Label item. However, on some platforms, or when you change the system font and/or its color, you'll find that Label follows the font and the color scheme of the system, while Text doesn't. Although you can use the properties of Text to customize the appearance of Label, it would be better to use the system settings to keep the looks of the application native. Well, if you run this application right now, it will appear similar to what is shown in the following screenshot:
Because there is no separate UI file for the Qt Quick applications, only a QML file, we use the anchors property to position the items, and anchors.centerIn will position the item in the center of the parent. There is an integrated Qt Quick Designer in Qt Creator, which could help you design the user interface of a Qt Quick application. If you need it, just navigate to Design mode when you're editing a QML file. However, I suggest you stay in Edit mode to understand the meaning of each statement.
The separation of the user interface and backend allows us to connect C++ slots to the QML signals. Although it's possible to write processing functions in QML and manipulate interface items in C++, it violates the principle of the separation. Therefore, you may want to know how to connect a C++ slot to a QML signal at first. As for connecting a QML slot to a C++ signal, I'll introduce that later in this book.
In order to demonstrate this, we need to create a C++ class in the first place by right-clicking on the project in the Projects panel and selecting Add New…. Then, click on C++ Class in the pop-up window. The newly created class should at least inherit from QObject by choosing QObject as its base class. This is because a plain C++ class can't include Qt's slots or signals. The header file's content is displayed as follows:
#ifndef PROCESSOR_H
#define PROCESSOR_H

#include <QObject>

class Processor : public QObject
{
    Q_OBJECT
public:
    explicit Processor(QObject *parent = 0);

public slots:
    void onMenuClicked(const QString &);
};

#endif // PROCESSOR_H
Here's the content of the source file:
#include <QDebug>
#include "processor.h"

Processor::Processor(QObject *parent) :
    QObject(parent)
{
}

void Processor::onMenuClicked(const QString &str)
{
    qDebug() << str;
}
The C++ file is the same as the one we dealt with in the previous topics. The onMenuClicked slot I defined is simply to output the string that passes through the signal. Note that you have to include QDebug if you want to use the built-in functions of qDebug, qWarning, qCritical, and so on.
The slot is prepared, so we need to add a signal to the QML file. The QML file is changed to the following code:
import QtQuick 2.3
import QtQuick.Controls 1.2

ApplicationWindow {
    id: window
    visible: true
    width: 640
    height: 480
    title: qsTr("Hello QML")
    signal menuClicked(string str)

    menuBar: MenuBar {
        Menu {
            title: qsTr("File")
            MenuItem {
                text: qsTr("Exit")
                shortcut: "Ctrl+Q"
                onTriggered: Qt.quit()
            }
            MenuItem {
                text: qsTr("Click Me")
                onTriggered: window.menuClicked(text)
            }
        }
    }

    Text {
        id: hw
        text: qsTr("Hello World")
        font.capitalization: Font.AllUppercase
        anchors.centerIn: parent
    }

    Label {
        anchors { bottom: hw.top; bottomMargin: 5; horizontalCenter: hw.horizontalCenter }
        text: qsTr("Hello Qt Quick")
    }
}
As you can see, I specified the ID of the root ApplicationWindow item to window and declared a signal named menuClicked. In addition to this, there is another MenuItem in the menu file. It emits the menuClicked signal of window, using its text as the parameter.
Now, let's connect the slot in the C++ file to this newly created QML signal. Edit the main.cpp file.
#include <QApplication>
#include <QQmlApplicationEngine>
#include "processor.h"

int main(int argc, char *argv[])
{
    QApplication app(argc, argv);

    QQmlApplicationEngine engine;
    engine.load(QUrl(QStringLiteral("qrc:///main.qml")));

    QObject *firstRootItem = engine.rootObjects().first();
    Processor myProcessor;
    QObject::connect(firstRootItem, SIGNAL(menuClicked(QString)), &myProcessor, SLOT(onMenuClicked(QString)));

    return app.exec();
}
The item in the QML file is accessed as QObject in C++ and it could be cast to QQuickItem. For now, we only need to connect its signal, so QObject will do.
You may notice that I used the old-style syntax of the connect statement. This is because QML is dynamic and the C++ compiler can't detect the existence of the signal in the QML file. Since things in QML are checked at runtime, it doesn't make sense to use the old syntax here.
When you run this application and navigate to File | Click Me in the menu bar, you'll see Application Output in Qt Creator:
"Click Me"
Let's review this process again. Triggering the Click Me menu item resulted in the emission of the window's signal menuClicked. This signal passed the text of MenuItem, which is Click Me, to the slot in C++ class Processor, and the processor myProcessor slot onMenuClicked printed the string to the Application Output panel.
In this chapter, we learned the fundamentals of Qt, which included steps for how to create a Qt application. Then, we had a walk-through of both Qt Widgets and Qt Quick, and how to change the layout. Finally, we rounded off by covering an important concept about the mechanism of signals and slots.
In the next chapter, we will have a chance to put this knowledge into practice and get started on building a real-world, and of course cross-platform, Qt application.