


As computer professionals, we deal with text data every day. Developers and programmers interact with XML and source code. System administrators have to process and understand logfiles. Managers need to understand and format financial data and reports. Web designers put in time, hand tuning and polishing up HTML content. Managing this broad range of formats can seem like a daunting task, but it's really not that difficult.
This book aims to introduce you, the programmer, to a variety of methods used to process these data formats. We'll look at approaches ranging from standard language functions through more complex third-party modules. Somewhere in there, we'll cover a utility that's just the right tool for your specific job. In the process, we hope to also cover some Python development best practices.
Where appropriate, we'll look into implementation details enough to help you understand the techniques used. Most of the time, though, we'll work as hard as we can to get you up on your feet and crunching those text files.
You'll find that Python makes tasks like this quite painless through its clean and easy-to-understand syntax, vast community, and the available collection of additional utilities and modules.
In this chapter, we shall:
Briefly introduce the data formats handled in this book
Implement a simple ROT13 translator
Introduce you to basic processing via filter programs
Learn state machine basics
Learn how to install supporting libraries and components safely and without administrative access
Look at where to find more information on introductory topics
Textual data comes in a variety of formats. For our purposes, we'll categorize text into three very broad groups. Isolating down into segments helps us to understand the problem a bit better, and subsequently choose a parsing approach. Each one of these sweeping groups can be further broken down into more detailed chunks.
One thing to remember when working your way through the book is that text content isn't limited to the Latin alphabet. This is especially true when dealing with data acquired via the Internet. We'll cover some of the techniques and tricks to handling internationalized data in Chapter 8, Understanding Encoding and i18n.
Structured text includes formats such as XML and HTML. These formats generally consist of text content surrounded by special symbols or markers that give extra meaning to a file's contents. These additional tags are usually meant to convey information to the processing application and to arrange information in a tree-like structure. Markup allows a developer to define his or her own data structure, yet rely on standardized parsers to extract elements.
For example, consider the following contrived HTML document.
<html>
    <head>
        <title>Hello, World!</title>
    </head>
    <body>
        <p>
            Hi there, all of you earthlings.
        </p>
        <p>
        Take us to your leader.
       </p>
    </body>
</html>
In this example, our document's title is clearly identified because it is surrounded by opening and closing <title> and </title> elements.
Note
Note that although the document's tags give each element a meaning, it's still up to the application developer to understand what to do with a title object or a p element.
Notice that while it still has meaning to us humans, it is also laid out in such a way as to make it computer friendly. We'll take a deeper look into these formats in Chapter 6, Structured Markup. Python provides some rich libraries for dealing with these popular formats.
One interesting aspect to these formats is that it's possible to embed references to validation rules as well as the actual document structure. This is a nice benefit in that we're able to rely on the parser to perform markup validation for us. This makes our job much easier as it's possible to trust that the input structure is valid.
Text data that falls into this category includes things such as configuration files, marker delimited data, e-mail message text, and JavaScript Object Notation web data. Content within this second category does not contain explicit markup much like XML and HTML does, but the structure and formatting is required as it conveys meaning and information about the text to the parsing application. For example, consider the format of a Windows INI file or a Linux system's /etc/hosts file. There are no tags, but the column on the left clearly means something other than the column on the right.
Python provides a collection of modules and libraries intended to help us handle popular formats from this category. We'll look at Python's built-in text services in detail when we get to Chapter 4, The Standard Library to the Rescue.
This category contains data that does not fall into the previous two groupings. This describes e-mail message content, letters, book copy, and other unstructured character-based content. However, this is where we'll largely have to look at building our own processing components. There are external packages available to us if we wish to perform common functions. Some examples include full text searching and more advanced natural language processing.
Our first order of business is to ensure that you have Python installed. You'll need it in order to complete most of the examples in this book. We'll be working with Python 2.6 and we assume that you're using that same version. If there are any drastic differences in earlier releases, we'll make a note of them as we go along. All of the examples should still function properly with Python 2.4 and later versions.
If you don't have Python installed, you can download the latest 2.X version from http://www.python.org. Most Linux distributions, as well as Mac OS, usually have a version of Python preinstalled.
At the time of this writing, Python 2.6 was the latest version available, while 2.7 was in an alpha state.
The examples in this book are written for Python 2. However, wherever possible, we will provide code that has already been ported to Python 3. You can find the Python 3 code in the Python3 directories in the code bundle available on the Packt Publishing FTP site.
Unfortunately, we can't promise that all of the third-party libraries that we'll use will support Python 3. The Python community is working hard to port popular modules to version 3.0. However, as the versions are incompatible, there is a lot of work remaining. In situations where we cannot provide example code, we'll note this.
Let's get going early here and implement our first script to get a feel for what's in store.
A Caesar Cipher is a simple form of cryptography in which each letter of the alphabet is shifted down by a number of letters. They're generally of no cryptographic use when applied alone, but they do have some valid applications when paired with more advanced techniques.
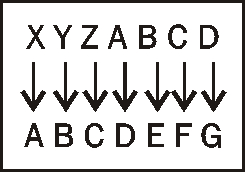
This preceding diagram depicts a cipher with an offset of three. Any X found in the source data would simply become an A in the output data. Likewise, any A found in the input data would become a D.
The most popular implementation of this system is ROT13. As its name suggests, ROT13 shifts – or rotates – each letter by 13 spaces to produce an encrypted result. As the English alphabet has 26 letters, we simply run it a second time on the encrypted text in order to get back to our original result.
Let's implement a simple version of that algorithm.
Start your favorite text editor and create a new Python source file. Save it as
rot13.py.Enter the following code exactly as you see it below and save the file.
import sys
import string

CHAR_MAP = dict(zip(
    string.ascii_lowercase,
    string.ascii_lowercase[13:26] + string.ascii_lowercase[0:13]
    )
)

def rotate13_letter(letter):
    """
    Return the 13-char rotation of a letter.
    """
    do_upper = False
    if letter.isupper():
        do_upper = True

    letter = letter.lower()
    if letter not in CHAR_MAP:
        return letter

    else:
        letter = CHAR_MAP[letter]

        if do_upper:
            letter = letter.upper()

    return letter

if __name__ == '__main__':
        for char in sys.argv[1]:
            sys.stdout.write(rotate13_letter(char))
        sys.stdout.write('\n')
Now, from a command line, execute the script as follows. If you've entered all of the code correctly, you should see the same output.
$ python rot13.py 'We are the knights who say, nee!'
Run the script a second time, using the output of the first run as the new input string. If everything was entered correctly, the original text should be printed to the console.
$ python rot13.py 'Dv ziv gsv pmrtsgh dsl hzb, mvv!'
We implemented a simple text-oriented cipher using a collection of Python's string handling features. We were able to see it put to use for both encoding and decoding source text. We saw a lot of stuff in this little example, so you should have a good feel for what can be accomplished using the standard Python string object.
Following our initial module imports, we defined a dictionary named CHAR_MAP, which gives us a nice and simple way to shift our letters by the required 13 places. The value of a dictionary key is the target letter! We also took advantage of string slicing here. We'll look at slicing a bit more in later chapters, but it's a convenient way for us to extract a substring from an existing string object.
In our translation function rotate13_letter, we checked whether our input character was uppercase or lowercase and then saved that as a Boolean attribute. We then forced our input to lowercase for the translation work. As ROT13 operates on letters alone, we only performed a rotation if our input character was a letter of the Latin alphabet. We allowed other values to simply pass through. We could have just as easily forced our string to a pure uppercased value.
The last thing we do in our function is restore the letter to its proper case, if necessary. This should familiarize you with upper- and lowercasing of Python ASCII strings.
We're able to change the case of an entire string using this same method; it's not limited to single characters.
>>> name = 'Ryan Miller'
>>> name.upper()
'RYAN MILLER'
>>> "PLEASE DO NOT SHOUT".lower()
'please do not shout'
>>>
Note
It's worth pointing out here that a single character string is still a string. There is not a char type, which you may be familiar with if you're coming from a different language such as C or C++. However, it is possible to translate between character ASCII codes and back using the ord and chr built-in methods and a string with a length of one.
Notice how we were able to loop through a string directly using the Python for syntax. A string object is a standard Python iterable, and we can walk through them detailed as follows. In practice, however, this isn't something you'll normally do. In most cases, it makes sense to rely on existing libraries.
$ python
Python 2.6.1 (r261:67515, Jul  7 2009, 23:51:51)
[GCC 4.2.1 (Apple Inc. build 5646)] on darwin
Type "help", "copyright", "credits" or "license" for more information.
>>> for char in "Foo":
...     print char
...
F
o
o
>>>
Finally, you should note that we ended our script with an if statement such as the following:
>>> if__name__ == '__main__'Python modules all contain an internal __name__ variable that corresponds to the name of the module. If a module is executed directly from the command line, as is this script, whose name value is set to __main__, this code only runs if we've executed this script directly. It will not run if we import this code from a different script. You can import the code directly from the command line and see for yourself.
$ python
Python 2.6.1 (r261:67515, Jul  7 2009, 23:51:51)
[GCC 4.2.1 (Apple Inc. build 5646)] on darwin
Type "help", "copyright", "credits" or "license" for more information.
>>> import rot13
>>>  dir(rot13)
['CHAR_MAP', '__builtins__', '__doc__', '__file__', '__name__', '__package__', 'rotate13_letter', 'string', 'sys']
>>>
Notice how we were able to import our module and see all of the methods and attributes inside of it, but the driver code did not execute. This is a convention we'll use throughout the book in order to help achieve maximum reusability.
Each Python string instance contains a collection of methods that operate on one or more characters. You can easily display all of the available methods and attributes by using the dir method. For example, enter the following command into a Python window. Python responds by printing a list of all methods on a string object.
>>> dir("content")
['__add__', '__class__', '__contains__', '__delattr__', '__doc__', '__eq__', '__format__', '__ge__', '__getattribute__', '__getitem__', '__getnewargs__', '__getslice__', '__gt__', '__hash__', '__init__', '__le__', '__len__', '__lt__', '__mod__', '__mul__', '__ne__', '__new__', '__reduce__', '__reduce_ex__', '__repr__', '__rmod__', '__rmul__', '__setattr__', '__sizeof__', '__str__', '__subclasshook__', '_formatter_field_name_split', '_formatter_parser', 'capitalize', 'center', 'count', 'decode', 'encode', 'endswith', 'expandtabs', 'find', 'format', 'index', 'isalnum', 'isalpha', 'isdigit', 'islower', 'isspace', 'istitle', 'isupper', 'join', 'ljust', 'lower', 'lstrip', 'partition', 'replace', 'rfind', 'rindex', 'rjust', 'rpartition', 'rsplit', 'rstrip', 'split', 'splitlines', 'startswith', 'strip', 'swapcase', 'title', 'translate', 'upper', 'zfill']
>>>
Much like the isupper and islower methods discussed previously, we also have an isspace method. Using this method, in combination with your newfound knowledge of Python strings, update the method we defined previously to translate spaces to underscores and underscores to spaces.
Our ROT13 application works great for simple one-line strings that we can fit on the command line. However, it wouldn't work very well if we wanted to encode an entire file, such as the HTML document we took a look at earlier. In order to support larger text documents, we'll need to change the way we accept input. We'll redesign our application to work as a filter.
A filter is an application that reads data from its standard input file descriptor and writes to its standard output file descriptor. This allows users to create command pipelines that allow multiple utilities to be strung together. If you've ever typed a command such as cat /etc/hosts | grep mydomain.com, you've set up a pipeline

In many circumstances, data is fed into the pipeline via the keyboard and completes its journey when a processed result is displayed on the screen.
Let's make the changes required to allow our simple ROT13 processor to work as a command-line filter. This will allow us to process larger files.
Create a new source file and enter the following code. When complete, save the file as
rot13-b.py.import sys import string CHAR_MAP = dict(zip( string.ascii_lowercase, string.ascii_lowercase[13:26] + string.ascii_lowercase[0:13] ) ) def rotate13_letter(letter): """ Return the 13-char rotation of a letter. """ do_upper = False if letter.isupper(): do_upper = True letter = letter.lower() if letter not in CHAR_MAP: return letter else: letter = CHAR_MAP[letter] if do_upper: letter = letter.upper() return letter if __name__ == '__main__': for line in sys.stdin: for char in line: sys.stdout.write(rotate13_letter(char))Enter the following HTML data into a new text file and save it as
sample_page.html. We'll use this as example input to our updatedrot13.py.<html> <head> <title>Hello, World!</title> </head> <body> <p> Hi there, all of you earthlings. </p> <p> Take us to your leader. </p> </body> </html>Now, run our
rot13.pyexample and provide our HTML document as standard input data. The exact method used will vary with your operating system. If you've entered the code successfully, you should simply see a new prompt.$ cat sample_page.html | python rot13-b.py > rot13.html $
The contents of
rot13.htmlshould be as follows. If that's not the case, double back and make sure everything is correct.<ugzy> <urnq> <gvgyr>Uryyb, Jbeyq!</gvgyr> </urnq> <obql> <c> Uv gurer, nyy bs lbh rneguyvatf. </c> <c> Gnxr hf gb lbhe yrnqre. </c> </obql> </ugzy>
Open the translated HTML file using your web browser.

We updated our rot13.py script to read standard input data rather than rely on a command-line option. Doing this provides optimal configurability going forward and lets us feed input of varying length from a collection of different sources. We did this by looping on each line available on the sys.stdin file stream and calling our translation function. We wrote each character returned by that function to the sys.stdout stream.
Next, we ran our updated script via the command line, using sample_page.html as input. As expected, the encoded version was printed on our terminal.
As you can see, there is a major problem with our output. We should have a proper page title and our content should be broken down into different paragraphs.
Note
Remember, structured markup text is sprinkled with tag elements that define its structure and organization.
In this example, we not only translated the text content, we also translated the markup tags, rendering them meaningless. A web browser would not be able to display this data properly. We'll need to update our processor code to ignore the tags. We'll do just that in the next section.
In order to preserve the proper, structured HTML that tags provide, we need to ensure we don't include them in our rotation. To do this, we'll keep track of whether or not our input stream is currently within a tag. If it is, we won't translate our letters.
Once again, create a new Python source file and enter the following code. When you're finished, save the file as
rot13-c.py.import sys from optparse import OptionParser import string CHAR_MAP = dict(zip( string.ascii_lowercase, string.ascii_lowercase[13:26] + string.ascii_lowercase[0:13] ) ) class RotateStream(object): """ General purpose ROT13 Translator A ROT13 translator smart enough to skip Markup tags if that's what we want. """ MARKUP_START = '<' MARKUP_END = '>' def __init__(self, skip_tags): self.skip_tags = skip_tags def rotate13_letter(self, letter): """ Return the 13-char rotation of a letter. """ do_upper = False if letter.isupper(): do_upper = True letter = letter.lower() if letter not in CHAR_MAP: return letter else: letter = CHAR_MAP[letter] if do_upper: letter = letter.upper() return letter def rotate_from_file(self, handle): """ Rotate from a file handle. Takes a file-like object and translates text from it into ROT13 text. """ state_markup = False for line in handle: for char in line: if self.skip_tags: if state_markup: # here we're looking for a closing # '>' if char == self.MARKUP_END: state_markup = False else: # Not in a markup state, rotate # unless we're starting a new # tag if char == self.MARKUP_START: state_markup = True else: char = self.rotate13_letter(char) else: char = self.rotate13_letter(char) # Make this a generator yield char if __name__ == '__main__': parser = OptionParser() parser.add_option('-t', '--tags', dest="tags", help="Ignore Markup Tags", default=False, action="store_true") options, args = parser.parse_args() rotator = RotateStream(options.tags) for letter in rotator.rotate_from_file(sys.stdin): sys.stdout.write(letter)Run the same
example.htmlfile that we created for the last example through the new processor. This time, be sure to pass a-tcommand-line option.$ cat sample_page.html | python rot13-c.py -t > rot13.html $
If everything was entered correctly, the contents of
rot13.htmlshould be exactly as follows.<html> <head> <title>Uryyb, Jbeyq!</title> </head> <body> <p> Uv gurer, nyy bs lbh rneguyvatf. </p> <p> Gnxr hf gb lbhe yrnqre. </p> </body> </html>
Open the translated file in your web browser.

That was a pretty complex example, so let's step through it. We did quite a bit. First, we moved away from a simple rotate13_letter function and wrapped almost all of our functionality in a Python class named RotateStream. Doing this helps us ensure that our code will be reusable down the road.
We define a __init__ method within the class that accepts a single parameter named skip_tags. The value of this parameter is assigned to the self parameter so we can access it later from within other methods. If this is a True value, then our parser class will know that it's not supposed to translate markup tags.
Next, you'll see our familiar rotate13_letter method (it's a method now as it's defined within a class). The only real difference here is that in addition to the letter parameter, we're also requiring the standard self parameter.
Finally, we have our rotate_from_file method. This is where the bulk of our new functionality was added. Like before, we're iterating through all of the characters available on a file stream. This time, however, the file stream is passed in as a handle parameter. This means that we could have just as easily passed in an open file handle rather than the standard in file handle.
Inside the method, we implement a simple state machine, with two possible states. Our current state is saved in the state_markup Boolean attribute. We only rely on it if the value of self.skip_tags set in the __init__ method is True.
If
state_markupisTrue, then we're currently within the context of a markup tag and we're looking for the>character. When it's found, we'll changestate_markuptoFalse. As we're inside a tag, we'll never ask our class to perform a ROT13 operation.If
state_markupisFalse, then we're parsing standard text. If we come across the<character, then we're entering a new markup tag. We set the value ofstate_markuptoTrue. Finally, if we're not in tag, we'll callrotate13_letterto perform our ROT13 operation.
You should also notice some unfamiliar code at the end of the source listing. We've taken advantage of the OptionParser class, which is part of the standard library. We've added a single option that will allow us to selectively enable our markup bypass functionality. The value of this option is passed into RotateStream's __init__ method.
The final two lines of the listing show how we pass the sys.stdin file handle to rotate_from_file and iterate over the results. The rotate_from_file method has been defined as a generator function. A generator function returns values as it processes rather than waiting until completion. This method avoids storing all of the result in memory and lowers overall application memory consumption.
A state machine is an algorithm that keeps track of an application's internal state. Each state has a set of available transitions and functionality associated with it. In this example, we were either inside or outside of a tag. Application behavior changed depending on our current state. For example, if we were inside then we could transition to outside. The opposite also holds true.
The state machine concept is advanced and won't be covered in detail. However, it is a major method used when implementing text-processing machinery. For example, regular expression engines are generally built on variations of this model. For more information on state machine implementation, see the Wikipedia article available at http://en.wikipedia.org/wiki/Finite-state_machine.
We define
MARKUP_STARTandMARKUP_ENDclass constants within ourRotateStreamclass. How might our state machine be affected if these values were swapped?Is it possible to use ROT13 on a string containing characters found outside of the English alphabet?
What would happen if we embedded
>or<signs within our text content or tag values?In our example, we read our input a line at a time. Can you think of a way to make this more efficient?
We've briefly covered reading data via standard in as well as processing simple command-line options. Your job is to integrate the two so that your application will simply translate a command-line value if one is present before defaulting to standard input.
If you're able to implement this, try extending the option handling code so that your input string can be passed in to the rotation application using a command-line option.
$python rot13-c.py –s 'myinputstring'
zlvachgfgevat
$
Now that we've got our first example out of the way, we're going to take a little bit of a detour and learn how to obtain and install third-party modules. This is important, as we'll install a few throughout the remainder of the book.
The Python community maintains a centralized package repository, termed the Python Package Index (or PyPI). It is available on the web at http://pypi.python.org. From there, it is possible to download packages as compressed source distributions, or in some cases, pre-packaged Python components. PyPI is also a rich source of information. It's a great place to learn about available third-party applications. Links are provided to individual package documentation if it's not included directly into the package's PyPI page.
There are at least two different popular methods of packaging and deploying Python packages. The distutils package is part of the standard distribution and provides a mechanism for building and installing Python software. Packages that take advantage of the distutils system are downloaded as a source distribution and built and installed by a local user. They are installed by simply creating an additional directory structure within the system Python directory that matches the package name.
In an effort to make packages more accessible and self-contained, the concept of the Python Egg was introduced. An egg file is simply a ZIP archive of a package. When an egg is installed, the ZIP file itself is placed on the Python path, rather than a subdirectory.
Egg files have largely become the de facto standard in Python packaging. In order to install, develop, and build egg files, it is necessary to install a third-party tool kit. The most popular is SetupTools
, and this is what we'll be working with throughout this book. The installation process is fairly easy to complete and is rather self-contained. Installing SetupTools gives us access to the easy_install command, which automates the download and installation of packages that have been registered with PyPI.
Download the installation script, which is available at http://peak.telecommunity.com/dist/ez_setup.py. This same script will be used for all versions of Python.
As an administrative user, run the
ez_setup.pyscript from the command line. The SetupTools installation process will complete. If you've executed the script with the proper rights, you should see output similar as follows:# python ez_setup.py Downloading http://pypi.python.org/packages/2.6/s/setuptools/setuptools-0.6c11-py2.6.egg Processing setuptools-0.6c11-py2.6.egg creating /usr/lib/python2.6/site-packages/setuptools-0.6c11-py2.6.egg Extracting setuptools-0.6c11-py2.6.egg to /usr/lib/python2.6/site-packages Adding setuptools 0.6c11 to easy-install.pth file Installing easy_install script to /usr/bin Installing easy_install-2.6 script to /usr/bin Installed /usr/lib/python2.6/site-packages/setuptools-0.6c11-py2.6.egg Processing dependencies for setuptools==0.6c11 Finished processing dependencies for setuptools==0.6c11 #
We downloaded the SetupTools installation script and executed it as an administrative user. By doing so, our system Python environment was configured so that we can install egg files in the future via the SetupTools easy_install system.
Note
SetupTools does not currently work with Python 3.0. There is, however, an alternative available via the Distribute project. Distribute is intended to be a drop-in replacement for SetupTools and will work with either major Python version. For more information, or to download the installer, visit http://pypi.python.org/pypi/distribute.
Now that we have SetupTools installed, we can install third-party packages by simply running the easy_install command. This is nice because package dependencies will automatically be downloaded and installed so we no longer have to do this manually. However, there's still one piece missing. Even though we can install these packages easily, we still need to retain administrative privileges to do so. Additionally, all of the packages that we chose to install will be placed in the system's Python library directory, which has the potential to cause inconsistencies and problems down the road.. As you've probably guessed, there's a utility to address that.
Note
Python 2.6 introduces the concept of a local user package directory. This is simply an additional location found within your user home directory that Python searches for installed packages. It is possible to install eggs into this location via easy_install with a –user command-line switch. For more information, see http://www.python.org/dev/peps/pep-0370/.
The virtualenv package, distributed as a Python egg, allows us to create an isolated Python environment anywhere we wish. The environment comes complete with a bin directory containing a Python binary, its own installation of SetupTools, and an instance-specific library directory. In short, it creates a location for us to install and configure Python without interfering with the system installation.
Here, we'll enable the virtualenv package, which will illustrate how to install packages from the PyPI site. We'll also configure our first environment, which we'll use throughout the book for the rest of our examples and code illustrations.
As a user with administrative privileges, install
virtualenvfrom the system command line by runningeasy_install virtualenv. If you have the correct permissions, your output should be similar to the following.Searching for virtualenv Reading http://pypi.python.org/simple/virtualenv/ Reading http://virtualenv.openplans.org Best match: virtualenv 1.4.5 Downloading http://pypi.python.org/packages/source/v/virtualenv/virtualenv-1.4.5.tar.gz#md5=d3c621dd9797789fef78442e336df63e Processing virtualenv-1.4.5.tar.gz Running virtualenv-1.4.5/setup.py -q bdist_egg --dist-dir /tmp/easy_install-rJXhVC/virtualenv-1.4.5/egg-dist-tmp-AvWcd1 warning: no previously-included files matching '*.*' found under directory 'docs/_templates' Adding virtualenv 1.4.5 to easy-install.pth file Installing virtualenv script to /usr/bin Installed /usr/lib/python2.6/site-packages/virtualenv-1.4.5-py2.6.egg Processing dependencies for virtualenv Finished processing dependencies for virtualenv
Drop administrative privileges as we won't need them any longer. Ensure that you're within your home directory and create a new virtual instance by running:
$ virtualenv --no-site-packages text_processingStep into the newly created
text_processingdirectory and activate the virtual environment. Windows users will do this by simply running theScripts\activateapplication, while Linux users must instead source the script using the shell's dot operator.$ . bin/activateIf you've done this correctly, you should now see your command-line prompt change to include the string (
text_processing). This serves as a visual cue to remind you that you're operating within a specific virtual environment.(text_processing)$ pwd /home/jmcneil/text_processing (text_processing)$ which python /home/jmcneil/text_processing/bin/python (text_processing)$
Finally, deactivate the environment by running the deactivate command. This will return your shell environment to default. Note that once you've done this, you're once again working with the system's Python install.
(text_processing)$ deactivate
$ which python
/usr/bin/python
$
Note
If you're running Windows, by default python.exe and easy_install.exe are not placed on your system %PATH%. You'll need to manually configure your %PATH% variable to include C:\Python2.6\ and C:\Python2.6\Scripts. Additional scripts added by easy_install will also be placed in this directory, so it's worth setting up your %PATH% variable.
We installed the virtualenv package using the easy_install command directly off of the Python Package index. This is the method we'll use for installing any third-party packages going forward. You should now be familiar with the easy_install process. Also, note that for the remainder of the book, we'll operate from within this text_processing virtual environment. Additional packages are installed using this same technique from within the confines of our environment.
After the install process was completed, we configured and activated our first virtual environment. You saw how to create a new instance via the virtualenv command and you also learned how to subsequently activate it using the bin/activate script. Finally, we showed you how to deactivate your environment and return to your system's default state.
Now that you know how to set up your own isolated Python environment, you're encouraged to create a second one and install a collection of third-party utilities in order to get the hang of the installation process.
Create a new environment and name it as of your own choice.
Point your browser to http://pypi.python.org and select one or more packages that you find interesting. Install them via the
easy_installcommand within your new virtual environment.
Note that you should not require administrative privileges to do this. If you receive an error about permissions, make certain you've remembered to activate your new environment. Deactivate when complete. Some of the packages available for install may require a correctly configured C-language compiler.
The Python community is a friendly bunch of people. There is a wide range of online resources you can take advantage of if you find yourself stuck. Let's take a quick look at what's out there.
Home site: The Python website, available at http://www.python.org. Specifically, the documentation section. The standard library reference is a wonderful asset and should be something you keep at your fingertips. This site also contains a wonderful tutorial as well as a complete language specification.
Member groups: The
comp.lang.pythonnewsgroup. Available via Google groups as well as an e-mail gateway, this provides a general-purpose location to ask Python-related questions. A very smart bunch of developers patrol this group; you're certain to get a quality answer.Forums: Stack Overflow, available at http://www.stackoverflow.com. Stack overflow is a website dedicated to developers. You're welcome to ask your questions, as well as answer others' inquires, if you're up to it!
Mailing list: If you have a beginner-level question, there is a Python tutor mailing list available off of the Python.org site. This is a great place to ask your beginner questions no matter how basic they might be!
Centralized package repository: The Python Package Index at http://pypi.python.org. Chances are someone has already had to do exactly what it is you're doing.
If all else fails, you're more than welcome to contact the author via e-mail to <questions@packtpub.com>. Every effort will be made to answer your question, or point you to a freely available resource where you can find your resolution.
This chapter introduced you to the different categories of text that we'll cover in greater detail throughout the book and provided you with a little bit of information as to how we'll manage our packaging going forward.
We performed a few low-level text translations by implementing a ROT13 encoder and highlighted the differences between freeform and structured markup. We'll examine these categories in much greater detail as we move on. The goal of that exercise was to learn some byte-level transformation techniques.
Finally, we touched on a couple of different ways to read data into our applications. In our next chapter, we'll spend a great deal of time getting to know the IO system and learning how you can extract text from a collection of sources.
