


In this chapter, we are going to cover the following Proxmox basics:
Hardware requirements
Preparing for installation
Installing Proxmox on a bare metal node
Installing Proxmox on a Debian system
A Proxmox subscription
Disabling a Proxmox subscription
Applying a Proxmox subscription
Setting up a Proxmox package repository
Seeking support
The Proxmox Virtual Environment (VE) is an open source multinode clustered hypervisor built on Debian Linux, and is able to run on commodity hardware, thus eliminating any vendor lock ins. Proxmox is freely available without any features locked. However, a subscription type license is available to enable a enterprise repository to receive well-tested patches and updates. Subscriptions are recommended for a production-level Proxmox environment.
Note
A hypervisor is a software or firmware that creates a layer between native hardware and an operating system to form a virtual environment to create and run virtual machines. A hypervisor emulates the functions of physical hardware to enable virtual machines to see them as physical resources.
Proxmox can be configured to run a virtual environment of just a few nodes with virtual machines or an environment with thousands of nodes. Supporting both KVM and OpenVZ container-based virtual machines, Proxmox VE is a leading hypervisor today. Proxmox has an extremely vibrant community ready to provide help to any free Proxmox users. Also, the expert technical support team of Proxmox is equally capable of handling all corporate users with their mission critical virtual environment.
As mentioned earlier, Proxmox is a multinode environment, meaning that many nodes can form a single cluster where a virtual machine can be moved around to any node within the cluster, thereby allowing a redundant virtual environment. Through a robust Graphical User Interface (GUI), the entire Proxmox cluster can be managed. As of Proxmox VE 3.4, only one cluster is manageable through the GUI.
Here are some of the notable features of the Proxmox VE:
It provides a multinode cluster environment for virtualization. No single node acts as a master, thus eliminating single points of failure.
It gives centralized web-based management and a single interface to manage an entire cluster.
A console can be accessed through secured VNC, SPICE, and HTML5-based noVNC.
It provides support for multiple authentication sources, such as local using Pluggable Authentication Module (PAM), Microsoft ADS, and LDAP.
A Proxmox cluster file system (pmxcfs) can be used to store configuration files for real-time replication on all nodes using corosync (http://en.wikipedia.org/wiki/Corosync_%28project%29).
It provides role-based permission management for objects VMs, storages, nodes, pools, and so on.
Unlike SOAP, REST is not a protocol but combination of various standards such as HTTP, JSON, URI and XML. Visit http://www.restapitutorial.com for information on REST based APIs.
It provides a built-in powerful firewall for host nodes and virtual machines.
It provides migration of VMs between physical hosts with or without shared storage.
It supports mainstream storage types, such as Ceph, NFS, ZFS, Gluster, and iSCSI.
It provides cluster-wide logging.
Proxmox can be installed on just about any commodity hardware, but in order to have a stable platform, some attention is required when selecting nodes. A setup selected for Proxmox learning can be underpowered and less expansive. While this setup is acceptable for very small environments and home usage, it will not be adequate for production-level setups where stability and redundancy is the minimum requirement.
Here are the minimum requirements to install Proxmox on a hardware node:
Processor: Intel or AMD 64-bit
Motherboard: Intel VT or AMD-V capable (not required for OpenVZ)
Memory: 1 GB RAM
Network Interface Card (NIC): 1
Based on the minimum requirement of Proxmox, here are examples of Intel and AMD-based hardware configurations that are suitable for learning:
|
Processor → Requirement ↓ |
Intel |
AMD |
|---|---|---|
|
Processor/CPU |
i3-4160 3.0 GHz |
FX-4300 3.8 GHz |
|
Motherboard |
Asus B85M-D Plus 6 x SATA |
Asus M5A78L-M/USB3 6 x SATA |
|
Memory |
Corsair 1 x 4 GB DDR3 |
Corsair 1 x 4 GB DDR3 |
To have a stable performing Proxmox cluster, here are the hardware configurations that are recommended:
An Intel or AMD 64-bit processor
An Intel VT or AMD-V capable Dual or Quad CPU motherboard
16 GB RAM memory
Two Network Interface Card (NIC)
RAID controller with Battery Backup Unit (BBU)
Solid State Drives (SSD) for operating system or SSD for shared storage node
Fencing hardware only if HA is needed
Note
For more details on fencing and HA visit https://pve.proxmox.com/wiki/Fencing.
The following table lists the configurations of a server node that can be used in a production environment:
|
Requirement |
Hardware |
|---|---|
|
Processor/CPU |
Intel Xeon E5-2630 v3 2.4 GHz |
|
Motherboard |
Intel S2600CP2 Dual LGA2011 |
|
Memory |
Kingston 16 GB DDR3 Registered ECC |
|
Power supply |
Redundant |
Note that the example configurations are for reference only. Your requirement will vary depending on the work load and expected performance. Adjust the hardware requirements accordingly by keeping in mind that in a hypervisor more core counts will increase performance of virtual machines rather than higher clock counts of a processor that is used. With a higher core count, more threads can be distributed among processors.
Tip
It is worth mentioning here that it is better to select a CPU with a higher cache amount for a node with large amount of memory to minimize the main memory access and maximize the performance for each CPU cores.
Proxmox is a clustered hypervisor. In order to set up a cluster, a minimum of two nodes are required. For the purpose of following through this book, when selecting hardware, be sure to have enough components to set up two nodes.
Note
For more details on Proxmox, please visit http://www.proxmox.com/.
Although a Proxmox cluster can be set up with just two nodes, a minimum of three nodes are recommended for a production environment.
Note
In a cluster, a quorum is established with a minimum of three votes. Each node is counted as single vote. The cluster health depends on this democratic system where the majority vote wins. So, in a two node cluster, when one node fails the other node can only cast one vote, creating an unresolved situation. With a three node cluster, when one node fails, the total vote from the remaining nodes is two out of possible three votes. Thus, the cluster operation continues. By any means, a two node cluster is not recommended for a production cluster. However, it is still possible to create using instructions by visiting https://pve.proxmox.com/wiki/Two-Node_High_Availability_Cluster.
Once the necessary hardware is assembled, in this recipe, we are going to see how to prepare ourselves before installing Proxmox.
We are going to use the Proxmox VE installation disk to install Proxmox. First, we need to prepare a disk with the Proxmox installation ISO image.
Here are the steps to install Proxmox:
Download the Proxmox ISO image by visiting http://proxmox.com/downloads/category/iso-images-pve.
Use a burning software to copy the ISO image on to a DVD disk.
Boot the physical node from the disk prepared from ISO to start the installation process.
Some nodes may not have a ROM drive available to install from a disk. In such cases, it is possible to install Proxmox by transferring an ISO image onto a USB flash drive. Note that in order to boot from USB media, your motherboard must support the USB boot option. Check from the motherboard BIOS before proceeding to the following steps. If the motherboard does not support USB boot option, it may not also support an external USB ROM Drive. In this case, the best way to proceed is to install an ROM drive in the computer or use a newer motherboard if possible. Here are the instructions to transfer an ISO image to a USB and use it as bootable drive:
Use the following steps to do this on Windows:
Download the Proxmox ISO installation image from http://proxmox.com/downloads/category/iso-images-pve.
Rename the file extension of the downloaded ISO from
.isoto.raw.Download and install the USB image writing application from https://github.com/downloads/openSUSE/kiwi/ImageWriter.exe.
Note
In some Windows 7 versions, the preceding writer may not work. In such scenarios, download and install the ImageUSB from http://www.osforensics.com/tools/write-usb-images.html.
Using the preceding applications, copy the ISO image onto a USB drive.
Insert the USB media into the USB port of the physical node and boot from the USB media.
Use the following steps to do this on Linux:
Download the Proxmox ISO installation image from http://proxmox.com/downloads/category/iso-images-pve.
Insert the USB media into the USB port of the node and find out the device name of the drive using
#fdisk. The name should be in the/dev/XXXformat.Use the following command to copy the ISO onto USB media. Use extra caution when using a device name in the following command. The wrong device name will destroy all the data on the device:
#dd if=<Proxmox ISO file> of=/dev/XXX bs=1MReboot the node from the USB media to start the installation.
The Proxmox installation process is guided by a fully graphical interface through various prompts. In this recipe, we are going to follow through creating our first Proxmox node.
Power up and boot the physical node using the installation disk or the USB media we created in the preceding recipe. The following screenshot is how the screen looks after the boot:

At the main installation window after the booting process press Enter to start the installation.
On the End User License Agreement (EULA) screen click on Agree.
In this step, we have chosen the drive to install the hypervisor on. From Proxmox VE 3.4, a new feature to change the filesystem has been added. After selecting Target Harddisk from the drop-down menu, select Options to open the Filesystem selection dialog box. The following screenshot shows the drive selection screen with the Filesystem dialog box open:

From the Filesystem drop-down menu, select the desired filesystem. Select the desired filesystem size in hdsize. In version 3.3, support for the ext3, ext4, and ZFS filesystems have been added. Add additional information, such as the swapsize, maxroot, minfree, and maxvz values as required or leave them blank to continue with default, then click on Next. The following table shows the functions of these four options. These values are usually alternatives to each other, meaning if values are entered for one of these options, values for other options are automatically calculated:
Option
Function
swapsize
This defines the size of a swap partition. There are complex formulas to calculate this value. However, it is generally left as the default value.
maxroot
This refers to the maximum size the root partition should be.
minfree
This refers to the minimum free space to allocate for a pve partition.
maxvz
This refers to the maximum space to allocate to locally store VMs. The default path for local VM storage is
/var/lib/vz.The following screenshot shows the filesystem that is supported after clicking on the drop-down menu:

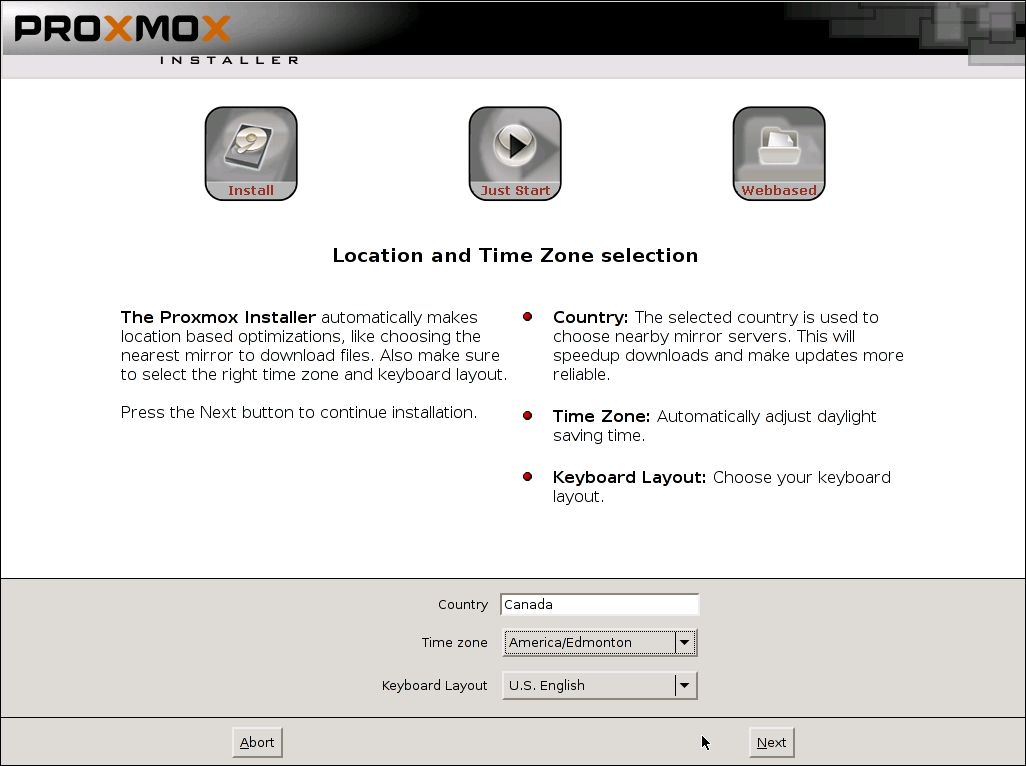
After selecting the drive for installation, we now have to select localization information, such as Country, Time Zone, and Keyboard Layout based on the desired language. Then, click on Next. The following screenshot displays the localization screen:
Type in and confirm the password for the root login. Then, enter an e-mail address where all the Proxmox cluster notifications will go to. Click on Next.
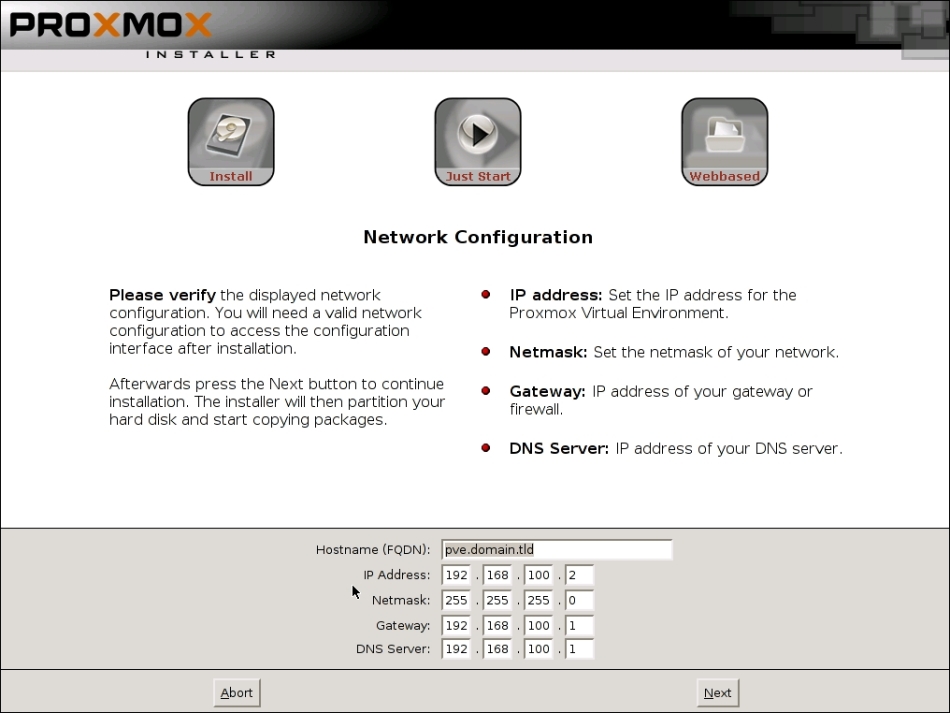
In this step, we need to enter the hostname and network information, such as IP Address, Gateway, DNS Server, and so on. Enter the necessary information for your environment, then click on Next. The following screenshot shows the network information screen:
At this point, all the necessary information has been collected and the main installation has been started. After the installation is completed, eject the installation disk or the USB media, then click on Reboot.
Follow steps 1 to 7 to set up the second node. A minimum of two nodes are required to form a Proxmox cluster. More information on cluster configurations is available in Chapter 3, Cluster and VM Management.
Although installation of Proxmox on a native bare metal node is recommended, at times, it may be necessary to install Proxmox on an existing Debian node. In this recipe, we will see how to install the Proxmox VE on Debian. Note that Proxmox can only be installed on 64-bit hardware and a 64-bit operating system.
Install Debian from instructions from the official Debian site at http://www.debian.org. Prior to installing Proxmox on the Debian node, ensure that the hostname can be resolved. Check the hostname using the following command:
#nano /etc/hosts
It should have these entries:
127.0.0.1 localhost.localdomain localhost
172.16.0.71 pmx1.domain.com pmx1 pvelocalhost
If the entries are missing, type in the proper IP address associated with the hostname of the node. The pvelocalhost entry must be present at the end of the line.
Use the following steps to install Proxmox on a Debian system:
Add the Proxmox VE repository in the source list as follows:
#nano /etc/apt/sources.list
deb http://ftp.ca.debian.org/debian wheezy main contrib

#PVE repository for installation
deb http://download.proxmox.com/debian wheezy pve

#PVE security updates
deb http://security.debian.org/ wheezy/updates main contrib
Tip
Due to a bug in the Debian OS,
apt-getmay display an error of not finding/binary-i386with aUnable to find expected entry 'pve/binary-i386/packages'error message. The error may occur even though it is a 64-bit Debian installed operating system. In such cases, change the PVE repository entry to the following:deb [arch=amd64] http://download.proxmox.com/debian wheezy pveAdd the Proxmox VE repository key using the following command:
#wget –O-http://download.proxmox.com/debian/key.asc | apt-key add –Update the repository using the following command:
#apt-get updateUpdate the operating system using the following command:
#apt-get dist-upgradeInstall the Proxmox VE Kernel:
#apt-get install pve-firmware pve-kernel-2.6.32-37-pveInstall Kernel headers:
#apt-get install pve-header-2.6.32-37-pveBe sure to select the Proxmox VE Kernel on the boot loader grub2.
Reboot the node to activate the new Proxmox VE Kernel.
Verify the running kernel to ensure that the proper Proxmox VE Kernel is loaded:
#uname –aCheck the grub2 config using following command:
#update-grubInstall the Proxmox VE packages:
#apt-get install Proxmox-ve-2.6.32 ntp ssh lvm2 postfix ksm- control-daemon vzprocps open-iscsi bootlogdDuring installation, accept suggestions to remove Exim and set up Postfix. Exim can be installed later if required.
Reboot the node after the Proxmox VE installation is done.
Follow steps 1 to 13 to set up a second node. A minimum of two nodes are required to form a Proxmox cluster. We will take a good look at the Proxmox GUI in Chapter 2, Getting to know the Proxmox GUI.
The Proxmox VE itself is free. There are absolutely no costs involved in simply downloading the ISO image and installing a fully-functional Proxmox cluster without paying for a license or subscription. However, there is a Proxmox subscription option available to support the project, which enables enterprise repository. There are no feature differences between the Free and Subscription versions of Proxmox. Both are exactly the same. The difference is between the type of releases, updates, and patches they receive.
Tip
Packages from the enterprise repository go through an extra layer of scrutiny and testing. Thus, a subscription is recommended for a production-level Proxmox VE.
This not to be confused with the fact that a Proxmox cluster is built with no subscription and is not stable enough to use. New packages are usually released through a no-subscription repository first. Same packages are pushed through the Enterprise repository at a later time. This delay allows the Proxmox team to pin point and fix any lingering bugs or defects in the package. In a cluster running mission critical virtual machines may face unacceptable downtime due to the bug, which will not affect a smaller environment that is able to sustain downtime.
There are four levels of subscription at various price points, such as COMMUNITY, BASIC, STANDARD, and PREMIUM. For more information on the Proxmox subscription, visit https://www.proxmox.com/proxmox-ve/pricing.
A fresh installation of the Proxmox VE without subscriptions will display a message upon login to Proxmox GUI, as shown in the following screenshot:

This is because an enterprise repository is enabled by default. If you decide not to get any Proxmox subscriptions and continue using the fully Free version, you will have to disable the enterprise repository.
Login to the Proxmox node through a console or SSH. An enterprise repository can only be disabled through CLI.
The enterprise repository is listed in /etc/apt/sources.list.d/pve-enterprise.list. We have to comment out the line to disable the repository:
# nano /etc/apt/sources.list.d/pve-enterprise.list
#deb https://enterprise.proxmox.com/debian wheezy pve-enterprise
Add the Proxmox No-Subscription repository as follows:
# nano /etc/apt/sources.list
deb http://download.proxmox.com/debian wheezy pve-no-subscription
No restart of services or reboot is required to apply the changes. Log out from the Proxmox GUI and log back in to see if the changes were applied correctly. The "no subscription" message box should not pop-up after login. Subscriptions can be managed from the Proxmox GUI under the Subscription tab. Here is a screenshot of a nonsubscribed Proxmox node:

If you choose to get a Proxmox subscription of any type, a subscription key must be uploaded into the Proxmox node to activate it. The subscription key is sent by e-mail after successful payment. The key can be uploaded through the Proxmox GUI.
Login to the Proxmox GUI by accessing the link through a browser and enter the admin login credentials. The default username is root and the password is the same as was entered during installation: https://<pmx_node_IP>:8006.
After logging into the Proxmox GUI, click on the node that the subscription is going to be applied to.
Click on the Subscription tab.
Click on the Upload Subscription Key button to open the key dialog box, as shown in the following screenshot:

Copy/paste the subscription key from the e-mail received from Proxmox in the key box, then click on Ok.
Click on Check. At this moment, the key will be verified with Proxmox to check the validity. After the activation is completed, it should look like the following screenshot:

If a wrong subscription key has been entered, then the display should resemble the following screenshot:
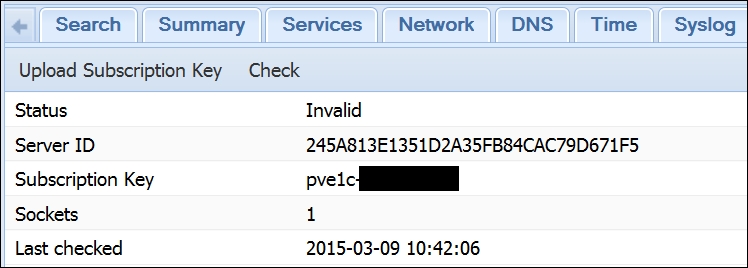
In such cases, simply upload the correct key to activate again. You may also see the key invalid notice when the key has already been activated for another node, which is no longer in service. In such cases, contact Proxmox or other third-party license providers that the license was purchased from to request reissuing of the same license. Then, simply click on the Check button to reactivate the key. Each key is hard coded to each server ID. The key needs to be reissued by Proxmox in order to use it.
The Proxmox VE offers three main repositories:
|
Repository |
Subscription |
Usage |
|---|---|---|
|
Enterprise |
Required |
This is primarily used in the production of the Proxmox node. Packages in this repository go through additional scrutiny, bug fixes, and testing. |
|
No-Subscription |
Not required |
This is used in learning, training, and home Proxmox cluster nodes. Packages in this repository go through initial bug fixes and are stable enough to be referred as the final release. |
|
Test |
Not required |
This is used for the testing and development of Proxmox only. Packages in this repository are usually the very latest and are still going through final phases of the release cycle, such as beta testing and release candidate. Packages in this repository may contain a number of bugs and issues. Users of this repository are encouraged to share bug reports with developers. |
The location and content of the Enterprise Repository source file is as follows:
#cat /etc/apt/sources.list.d/pve-enterprise.list
deb https://enterprise.proxmox.com/debian wheezy pve-enterprise
The location and content of the No-Subscription Repository source file is as follows:
#cat /etc/apt/sources.list
deb http://ftp.ca.debian.org/debian wheezy main contrib
deb http://download.proxmox.com/debian wheezy pve-no-subscription
deb http://security.debian.org / wheezy/updates main contrib
Proxmox offers a Test Repository to allow users to try out new features or packages. As the name implies, the Test Repository should only be used for testing. All the new features of Proxmox are released in the Test Repository before they are available for the No-Subscription and Enterprise repositories. Packages in the Test Repository are not well-tested and may contain bugs. For this reason, the repository should never be used in a production-level cluster. The Test Repository is not enabled by default.
Log in to the Proxmox node through a console or SSH. The repository source file needs to be edited through CLI to enable the Test Repository.
Use the following steps to set up the Proxmox package repository:
Open the repository source file using any favorite text editor:
#nano /etc/apt/sources.listMake the necessary changes to make the entries look similar to the following:
deb http://ftp.debian.org/debian wheezy main contrib
deb http://download.proxmox.com/debian wheezy pvetest
deb http://security .debian.org/ wheezy/updates main contrib
Save the file and exit the editor.
Run the following command to update the repositories:
#apt-get update
Usually, the announcement of the availability of a new package is made on the official Proxmox forum (http://forum.proxmox.com). The name of the package or the version information is included in the announcement. If you want to find information on a package, simply ask for it on the forum. Once you have the information, simply run the apt-get command to install it through CLI:
#apt-get install <package_name>
Besides Enterprise, No-Subscription, and Test repositories there are two repositories that are outdated and are no longer supported or updated:
Outdated stable repository (pve): This repository has stopped receiving updates after the initial release of Proxmox VE 3.1:
/etc/apt/sources.list
deb http://ftp.debian.org/debian wheezy main contrib
deb http://download.proxmox.com/debian wheezy pve
deb http://security .debian.org/ wheezy/updates main contrib
If you're upgrading from Proxmox VE 2.x to 3.x, the second entry in
/etc/apt/sources.listneeds to be changed fromwheezy pvetowheezy pve-no-subscription.Outdated Proxmox VE 2.x stable repository (squeeze pve): In order to have a stable Proxmox node, it is highly recommended to upgrade and update to the latest stable release of the Proxmox VE.
/etc/apt/sources.list
deb http://ftp.debian.org/debian squeeze main contrib
deb http://download.proxmox.com/debian squeeze pve
deb http://security.debian.org/ squeeze/updates main contrib
As mentioned in the beginning of this chapter, Proxmox has a vibrant community of users ready to provide help to anybody in need. There are several ways that a new Proxmox user can seek help and support to learn and extend knowledge of the Proxmox VE:
|
Help and support |
Free/subscription |
|---|---|
|
Forum |
Free |
|
Wiki/Documentation |
Free |
|
Customer portal and tickets |
Requires subscription |
|
Proxmox Mailing list |
Free |
|
Proxmox Bug tracker |
Free |
The official forum of Proxmox is a gathering place for newbies or experts alike to receive or provide help from the Proxmox community. It is also a vast information resource of past issues and solutions to many problems. A few of the Proxmox staff also spend a significant amount of time in this forum to offer help outside their job responsibilities. There is an array of Proxmox experts willing to help out without expecting anything in return. This is the only place for Free and Community-level subscriptions for Proxmox users to seek support. Visit http://forum.proxmox.com to access the official Proxmox forum.
The Proxmox Wiki site contains a wealth of information on installation, configuration, and the management of Proxmox clusters. All documentation is written in a very easy to understand form with as many illustrations as possible. The use of the Proxmox Wiki page is completely free and requires no registration. Visit https://pve.proxmox.com/wiki/Main_Page for the official Proxmox documentation.
A customer portal is only available for basic, standard, and premium subscription-level users. Supports tickets must be opened through a customer portal by visiting https://my.proxmox.com/ to receive technical support directly from the Proxmox staff.
Depending on the subscription level, a number of tickets that can be opened varies. Responses are guaranteed within one business day. See the different support levels for subscriptions by visiting https://www.proxmox.com/proxmox-ve/pricing.
There are two different mailing lists available from Proxmox:
User mailing list: This mailing list is targeted at general Proxmox users to ask technical questions (http://pve.proxmox.com/cgi-bin/mailman/listinfo/pve-user).
Developer mailing list: This mailing list is for developers who are interested in participating in code-related commits and developmental related questions (http://pve.proxmox.com/cgi-bin/mailman/listinfo/pve-devel).
The Proxmox bug tracker is available to submit and review any bugs found in Proxmox during day-to day-use (https://bugzilla.proxmox.com/). It can also be used to submit new feature requests. Not all features get added to Proxmox, but developers of Proxmox are very forward thinking and apply time appropriate and main stream features to make the Proxmox VE even better.
