In this chapter, we will cover:
Setting up and configuring the PrimeFaces library
AJAX basics with process and update
PrimeFaces selectors
Partial process and update with fragments
Partial view submit
Internationalization (i18n) and Localization (L10n)
Right-to-left language support
Improved resource ordering
This chapter will provide details on the setup and configuration of PrimeFaces, along with the basics of the PrimeFaces AJAX mechanism. The goal of this chapter is to provide a sneak preview of some of the features of PrimeFaces, such as the AJAX processing mechanism, Internationalization, and Localization, along with support for right-to-left languages.
PrimeFaces is a lightweight JSF component library with one JAR file, which needs no configuration and does not contain any required external dependencies. To start with the development of the library, all we need is the artifact for the library.
You can download the PrimeFaces library from http://primefaces.org/downloads.html, and you need to add the primefaces-{version}.jar file to your classpath. After that, all you need to do is import the namespace of the library that is necessary to add the PrimeFaces components to your pages to get started.
If you are using Maven (for more information on installing Maven, please visit http://maven.apache.org/guides/getting-started/maven-in-five-minutes.html), you can retrieve the PrimeFaces library by defining the Maven repository in your Project Object Model XML file, pom.xml, as follows:
<repository>
  <id>prime-repo</id>
  <name>PrimeFaces Maven Repository</name>
  <url>http://repository.primefaces.org</url>
</repository>
Tip
Downloading the example code
You can download the example code files for all Packt books you have purchased from your account at http://www.packtpub.com. If you purchased this book elsewhere, you can visit http://www.packtpub.com/support and register to have the files e-mailed directly to you.
Add the dependency configuration as follows:
<dependency>
  <groupId>org.primefaces</groupId>
  <artifactId>primefaces</artifactId>
  <version>5.2</version>
</dependency>
At the time of writing this book, the latest and most stable version of PrimeFaces was 5.2. To check whether this is the latest available version or not, please visit http://primefaces.org/downloads.html. The code in this book will work properly with PrimeFaces 5.2. In prior versions or the future versions, some methods, attributes, or components' behaviors may change.
In order to use PrimeFaces components, first we need to add the namespace declaration to our pages. The namespace for PrimeFaces components is as follows:
xmlns:p="http://primefaces.org/ui"
That is all there is to it. Note that the p prefix is just a symbolic link, and any other character can be used to define the PrimeFaces components. Now you can create your first XHTML page with a PrimeFaces component, as shown in the following code snippet:
<html xmlns="http://www.w3.org/1999/xhtml"
  xmlns:h="http://java.sun.com/jsf/html"
  xmlns:f="http://java.sun.com/jsf/core"
  xmlns:p="http://primefaces.org/ui">
  <f:view contentType="text/html">
    <h:head />
    <h:body>
      <h:form>
        <p:spinner />
      </h:form>
    </h:body>
  </f:view>
</html>
This will render a spinner component with an empty value, as shown in the following screenshot:
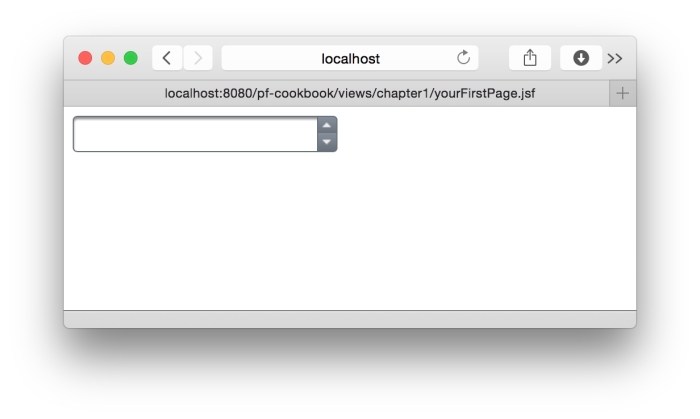
A link to the working example for the given page is given at the end of this recipe.
When the page is requested, the p:spinner component is rendered with the SpinnerRenderer class implemented by the PrimeFaces library. Since the spinner component is an input component, the request-processing life cycle will get executed when the user inputs data and performs a post back on the page.
PrimeFaces only requires a Java 5+ runtime and a JSF 2.x implementation as mandatory dependencies. There are some optional libraries for certain features. All of these are listed in this table:
|
Dependency |
Version |
Type |
Description |
|---|---|---|---|
|
JSF runtime |
2.0, 2.1, or 2.2 |
Required |
Apache MyFaces or Oracle Mojarra |
|
itext |
2.1.7 |
Optional |
|
|
apache-poi |
3.7 |
Optional |
|
|
rome |
1.0 |
Optional |
|
|
commons-fileupload |
1.3 |
Optional |
|
|
commons-io |
2.2 |
Optional |
|
|
atmosphere |
2.2.2 |
Optional |
PrimeFaces Push |
|
barcode4j-light |
2.1 |
Optional |
Barcode Generation |
|
qrgen |
1.4 |
Optional |
QR code support for barcode |
|
hazelcast |
2.6.5+ |
Optional |
Integration of the |
|
ehcache |
2.7.4+ |
Optional |
Integration of the |
Note
Please ensure that you have only one JAR file of PrimeFaces or a specific PrimeFaces theme in your classpath in order to avoid any issues regarding resource rendering.
Currently, PrimeFaces fully supports nonlegacy web browsers with Internet Explorer 10, Safari, Firefox, Chrome, and Opera.
This recipe is available in the demo web application on GitHub (https://github.com/ova2/primefaces-cookbook/tree/second-edition). Clone the project if you have not done it yet, explore the project structure, and build and deploy the WAR file on application servers compatible with Servlet 3.x, such as JBoss WildFly and Apache TomEE.
The showcase for the recipe is available under http://localhost:8080/pf-cookbook/views/chapter1/yourFirstPage.jsf.
PrimeFaces provides Partial Page Rendering (PPR) and the view-processing feature based on standard JSF 2 APIs to enable choosing what to process in the JSF life cycle and what to render in the end with AJAX. PrimeFaces AJAX Framework is based on standard server-side APIs of JSF 2. On the client side, rather than using the client-side API implementations of JSF, such as Mojarra or MyFaces, PrimeFaces scripts are based on the jQuery JavaScript library, which is well tested and widely adopted.
We can create a simple page with a command button to update a string property with the current time in milliseconds that is created on the server side and output text to show the value of that string property, as follows:
<p:commandButton update="display" action="#{basicPPRBean.updateValue}" value="Update" />
<h:outputText id="display" value="#{basicPPRBean.value}"/>
If we want to update multiple components with the same trigger mechanism, we can provide the ID's of the components to the update attribute by providing them with a space, comma, or both, as follows:
<p:commandButton update="display1,display2" />
<p:commandButton update="display1 display2" />
<p:commandButton update="display1,display2 display3" />
In addition, there are reserved keywords that are used for a partial update. We can also make use of these keywords along with the ID's of the components, as described in the following table. Some of them come with the JSF standard, and PrimeFaces extends this list with custom keywords. Here's the table we talked about:
The keywords are a server-side part of the PrimeFaces Search Expression Framework (SEF), which provides both server-side and client-side extensions to make it easier to reference components. We can also update a component that resides in a different naming container from the component that triggers the update. In order to achieve this, we need to specify the absolute component identifier of the component that needs to be updated. An example of this could be the following:
<h:form id="form1">
  <p:commandButton update=":form2:display"
    action="#{basicPPRBean.updateValue}" value="Update"/>
</h:form>

<h:form id="form2">
  <h:outputText id="display" value="#{basicPPRBean.value}"/>
</h:form>

@Named
@ViewScoped
public class BasicPPRBean implements Serializable {

  private String value;

  public String updateValue() {
    value = String.valueOf(System.currentTimeMillis());
    return null;
  }

  // getter / setter

}
PrimeFaces also provides partial processing, which executes the JSF life cycle phases—apply request values, process validations, update model, and invoke application—for determined components with the process attribute. This provides the ability to do group validation on the JSF pages easily. Mostly group validation needs arise in situations where different values need to be validated in the same form, depending on an action that gets executed. By grouping components for validation, errors that would arise from other components when the page has been submitted can be overcome easily. Components such as commandButton, commandLink, autoComplete, fileUpload, and many others provide this attribute to process partially instead of processing the whole view.
Partial processing could become very handy in cases where a drop-down list needs to be populated upon a selection on another dropdown and where there is an input field on the page with the required attribute set to true. This approach also makes immediate subforms and regions obsolete. It will also prevent submission of the whole page; thus, this will result in lightweight requests. Without partially processing the view for the dropdowns, a selection on one of the dropdowns will result in a validation error on the required field. A working example for this is shown in the following code snippet:
<h:outputText value="Country: " />
<h:selectOneMenu id="countries" value="#{partialProcessingBean.country}">
<f:selectItems value="#{partialProcessingBean.countries}" />
  <p:ajax listener= "#{partialProcessingBean.handleCountryChange}"
    event="change" update="cities" process="@this"/>
</h:selectOneMenu>

<h:outputText value="City: " />
<h:selectOneMenu id="cities" value="#{partialProcessingBean.city}">
  <f:selectItems value="#{partialProcessingBean.cities}" />
</h:selectOneMenu>

<h:outputText value="Email: " />
<h:inputText value="#{partialProcessingBean.email}" required="true" />
With this partial processing mechanism, when a user changes the country, the cities of that country will be populated in the dropdown regardless of whether any input exists for the email field or not.
As illustrated in the partial processing example to update a component in a different naming container, <p:commandButton> is updating the <h:outputText> component that has the display ID and the :form2:display absolute client ID, which is the search expression for the findComponent method. An absolute client ID starts with the separator character of the naming container, which is : by default.
The <h:form>, <h:dataTable>, and composite JSF components, along with <p:tabView>, <p:accordionPanel>, <p:dataTable>, <p:dataGrid>, <p:dataList>, <p:carousel>, <p:galleria>, <p:ring>, <p:sheet>, and <p:subTable> are the components that implement the NamingContainer interface. The findComponent method, which is described at http://docs.oracle.com/javaee/7/api/javax/faces/component/UIComponent.html, is used by both JSF core implementation and PrimeFaces.
JSF uses : (colon) as the separator for the NamingContainer interface. The client IDs that will be rendered in the source page will be of the kind id1:id2:id3. If needed, the configuration of the separator can be changed for the web application to something other than the colon with a context parameter in the web.xml file of the web application, as follows:
<context-param>
  <param-name>javax.faces.SEPARATOR_CHAR</param-name>
  <param-value>_</param-value>
</context-param>
It's also possible to escape the : character, if needed, in the CSS files with the \ character, as \:. The problem that might occur with the colon is that it's a reserved keyword for the CSS and JavaScript frameworks, like jQuery, so it might need to be escaped.
This recipe is available in the demo web application on GitHub (https://github.com/ova2/primefaces-cookbook/tree/second-edition). Clone the project if you have not done it yet, explore the project structure, and build and deploy the WAR file on application servers compatible with Servlet 3.x, such as JBoss WildFly and Apache TomEE.
For the demos of this recipe, refer to the following:
Basic Partial Page Rendering is available at
http://localhost:8080/pf-cookbook/views/chapter1/basicPPR.jsfUpdating Component in a Different Naming Container is available at
http://localhost:8080/pf-cookbook/views/chapter1/componentInDifferentNamingContainer.jsfAn example of Partial Processing is available at
http://localhost:8080/pf-cookbook/views/chapter1/partialProcessing.jsf
PrimeFaces integrates the jQuery Selector API (http://api.jquery.com/category/selectors) with the JSF component-referencing model. Partial processing and updating of the JSF components can be done using the jQuery Selector API instead of a regular server-side approach with findComponent(). This feature is called the PrimeFaces Selector (PFS) API. PFS provides an alternative, flexible approach to reference components to be processed or updated partially. PFS is a client-side part of the PrimeFaces SEF, which provides both server-side and client-side extensions to make it easier to reference components.
In comparison with regular referencing, there is less CPU server load because the JSF component tree is not traversed on the server side in order to find client IDs. PFS is implemented on the client side by looking at the DOM tree. Another advantage is avoiding container limitations, and thus the cannot find component exception—since the component we were looking for was in a different naming container.
The essential advantage of this feature, however, is speed. If we reference a component by an ID, jQuery uses document.getElementById(), a native browser call behind the scene. This is a very fast call, much faster than that on the server side with findComponent(). The second use case, where selectors are faster, is when we have a lot of components with the rendered attributes set to true or false. The JSF component tree is very big in this case, and the findComponent() call is time consuming. On the client side, only the visible part of the component tree is rendered as markup. The DOM is smaller than the component tree and its selectors work faster.
In this recipe, we will learn PFS in detail. PFS is recognized when we use @(...) in the process or update attribute of AJAX-ified components. We will use this syntax in four command buttons to reference the parts of the page we are interested in.
The following code snippet contains two p:panel tags with the input, select, and checkbox components respectively. The first p:commandButton component processes/updates all components in the form(s). The second one processes / updates all panels. The third one processes input, but not select components, and updates all panels. The last button only processes the checkbox components in the second panel and updates the entire panel.
<p:messages id="messages" autoUpdate="true"/>

<p:panel id="panel1" header="First panel">
  <h:panelGrid columns="2">
    <p:outputLabel for="name" value="Name"/>
      <p:inputText id="name" required="true"/>

    <p:outputLabel for="food" value="Favorite food"/>
    <h:selectOneMenu id="food" required="true">
    ...
    </h:selectOneMenu>

    <p:outputLabel for="married" value="Married?"/>
    <p:selectBooleanCheckbox id="married" required="true"
      label="Married?">
      <f:validator validatorId="org.primefaces.cookbook.
        validator.RequiredCheckboxValidator"/>
    </p:selectBooleanCheckbox>
  </h:panelGrid>
</p:panel>

<p:panel id="panel2" header="Second panel">
  <h:panelGrid columns="2">
    <p:outputLabel for="address" value="Address"/>
    <p:inputText id="address" required="true"/>

    <p:outputLabel for="pet" value="Favorite pet"/>
    <h:selectOneMenu id="pet" required="true">
    ...
    </h:selectOneMenu>

    <p:outputLabel for="gender" value="Male?"/>
    <p:selectBooleanCheckbox id="gender" required="true"
    label="Male?">
    <f:validator validatorId="org.primefaces.cookbook.
    validator.RequiredCheckboxValidator"/>
    </p:selectBooleanCheckbox>
  </h:panelGrid>
</p:panel>

<h:panelGrid columns="5" style="margin-top:20px;">
  <p:commandButton process="@(form)" update="@(form)"
    value="Process and update all in form"/>

  <p:commandButton process="@(.ui-panel)" update="@(.ui-panel)"
    value="Process and update all panels"/>

  <p:commandButton process="@(.ui-panel :input:not(select))"
    update="@(.ui-panel)"
     value="Process inputs except selects in all panels"/>

  <p:commandButton process="@(#panel2 :checkbox)"
    update="@(#panel2)"
    value="Process checkboxes in second panel"/>
</h:panelGrid>
Note
In terms of jQuery selectors, regular input field, selection, and checkbox controls are all inputs. They can be selected by the :input selector.
The following screenshot shows what happens when the third button is pushed. The p:inputText and p:selectBooleanCheckbox components are marked as invalid. The h:selectOneMenu component is not marked as invalid although no value was selected by the user.
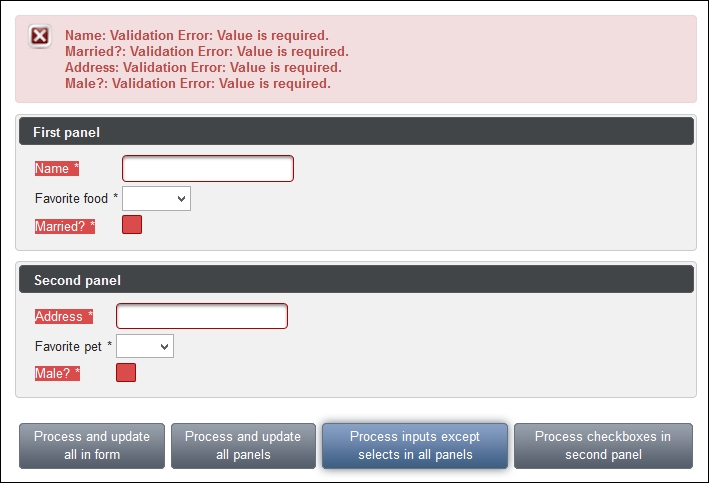
The first selector from the @(form) first button selects all forms on the page. The second selector, @(.ui-panel), selects all panels on the page as every main container of PrimeFaces' p:panel component has this style class. Component style classes are usually documented in the Skinning section in PrimeFaces User's Guide (http://www.primefaces.org/documentation.html). The third selector, @(.ui-panel :input:not(select)), only selects p:inputText and p:selectBooleanCheckbox within p:panel. This is why h:selectOneMenu was not marked as invalid in the preceding screenshot. The validation of this component was skipped because it renders itself as an HTML select element. The last selector variant, @(#panel2 :checkbox), intends to select p:selectBooleanCheckbox in the second panel only.
Tip
In general, it is recommended that you use Firebug (https://getfirebug.com) or a similar browser add-on to explore the generated HTML structure when using jQuery selectors.
A common use case is skipping validation for the hidden fields. Developers often hide some form components dynamically with JavaScript. Hidden components get validated anyway, and the form validation can fail if the fields are required or have other validation constraints. The first solution would be to disable the components (in addition to hiding them). The values of disabled fields are not sent to the server. The second solution would be to use jQuery's :visible selector in the process attribute of a command component that submits the form.
PFS can be combined with regular component referencing as well, for example, update="compId1 :form:compId2 @(.ui-tabs :input)".
This recipe is available in the demo web application on GitHub (https://github.com/ova2/primefaces-cookbook/tree/second-edition). Clone the project if you have not done it yet, explore the project structure, and build and deploy the WAR file on application servers compatible with Servlet 3.x, such as JBoss WildFly and Apache TomEE.
The showcase for the recipe is available at http://localhost:8080/pf-cookbook/views/chapter1/pfs.jsf.
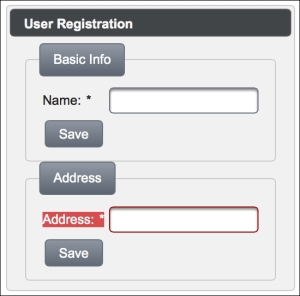
For enhanced AJAX capabilities, PrimeFaces offers the <p:fragment> component, which offers partial processing and updating with the AJAX request triggered by a component that resides inside the fragment itself. This component is useful and easy to use when multiple sections exist for a form with a different action for each section since there'll be no need to specify ID's for component processing and updating.
Let's define two fragments to retrieve data for registering a user into a system, one for user name input and the other for user address input. The definition of these two fragments would be as follows with the respective input fields marked with the required attribute:
<p:fragment autoUpdate="true">
  <p:fieldset legend="Basic Info">
    <p:outputLabel for="name" value="Name:" />
    <p:inputText id="name"
      value="#{fragmentBean.userName}" required="true" />
    <p:commandButton value="Save"
      actionListener="#{fragmentBean.saveUserInfo}" />
  </p:fieldset>
</p:fragment>
<p:fragment autoUpdate="true">
  <p:fieldset legend="Address">
    <p:outputLabel for="address" value="Address:" />
    <p:inputText id="address"
      value="#{fragmentBean.address}" required="true" />
    <p:commandButton value="Save"
      actionListener="#{fragmentBean.saveAddressInfo}" />
  </p:fieldset>
</p:fragment>When we click on the Save button of the Address section, only the Address input text will be processed and the Name input will be left intact. Since the Address input is a required field, we will get that field drawn in red for the error in the following image, but only that one since a descendant command button of the second fragment invokes the action.
This recipe is available in the demo web application on GitHub (https://github.com/ova2/primefaces-cookbook/tree/second-edition). Clone the project if you have not done it yet, explore the project structure, and build and deploy the WAR file on application servers compatible with Servlet 3.x compatible application server, such as JBoss WildFly and Apache TomEE.
The showcase for the recipe is available at http://localhost:8080/pf-cookbook/views/chapter1/fragment.jsf.
One other cool feature of the enhanced AJAX provided by PrimeFaces is the partialSubmit attribute that can be applied to action components and <p:ajax>, where only partially processed components are added to the AJAX requests with their ID's. By default, the JSF and PrimeFaces implementation serializes the whole form to send it via AJAX requests, and eventually, with large views, this will increase the size of the network data traffic that will be posted to the server. To overcome this problem, partial submit can be used to reduce the size of the post data when actions take place on views that have quite a lot of input fields. With this approach, only the ID's of the partially processed fields will be sent to the server.
Partial submit is disabled by default; it can be enabled globally with a context parameter in web.xml, as follows:
<context-param>
  <param-name>primefaces.SUBMIT</param-name>
  <param-value>partial</param-value>
</context-param>
Or, it can be declared with the partialSubmit attribute explicitly on the command action, as follows:
<h:outputLabel for="name" value="Name:"
  style="font-weight:bold" />
<p:inputText id="name" />
<p:commandButton value="Partial Submit (False)"
  partialSubmit="false" process="name" />
<p:commandButton value="Partial Submit (True)"
  partialSubmit="true" process="name" />
<p:inputText /> <p:inputText /> <p:inputText /><br\>
<p:inputText /> <p:inputText /> <p:inputText /><br\>
<p:inputText /> <p:inputText /> <p:inputText /><br\>
The visual output of the given code snippet will be as follows. So, here we have two buttons, one with the partialSubmit attribute set to false and another one set to true:
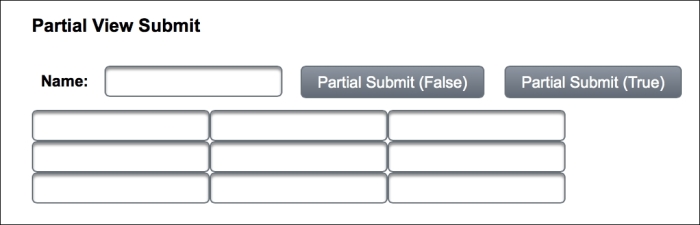
When the button with the Partial Submit (False) label is clicked, the AJAX request that will be sent to the server will contain all the ID's of the input text fields that exist on the page. An example output for the AJAX request is extracted from the <p:log> component (a visual console to display internal logs of PrimeFaces) and given here:
Data:javax.faces.partial.ajax=true&javax.faces.source=j_idt19&jav
ax.faces.partial.execute=name&j_idt19=j_idt19&mainForm=mainForm&bo
okTree_selection=0_6&name=mert&j_idt21=&j_idt22=&j_idt23=&j_id
t24=&j_idt25=&j_idt26=&j_idt27=&j_idt28=&j_idt29=&javax.fac
es.ViewState=-6151865609302284540%3A502720797990996178
The ID's that are highlighted belong to the input text fields that exist in the page. If we click on the button with the Partial Submit (True) label, we should get an AJAX request with no chained ID list in the data list:
Data:javax.faces.partial.ajax=true&javax.faces.source=j_idt20&jav
ax.faces.partial.execute=name&j_idt20=j_idt20&name=&javax.faces.Vi
ewState=-6151865609302284540%3A502720797990996178
With version 5.2, PrimeFaces introduced partial submit filtering, which allows customization on the AJAX data sent to the server. This comes in handy when you have multiple input fields within a data table, for instance, and try to prevent sending the ID list of those input fields to the server while doing paging, sorting, or row selection. The filter can be defined as a selector and its default value is :input. The example AJAX component in the following code will filter on all the input fields and will not send any data to the server:
<p:ajax event="page" partialSubmit="true"
  partialSubmitFilter=":not(:input)" />
This recipe is available in the demo web application on GitHub (https://github.com/ova2/primefaces-cookbook/tree/second-edition). Clone the project if you have not done it yet, explore the project structure, and build and deploy the WAR file on application servers compatible with Servlet 3.x, such as JBoss WildFly and Apache TomEE.
The showcase for the recipe is available at http://localhost:8080/pf-cookbook/views/chapter1/partialSubmit.jsf.
Internationalization (i18n) and Localization (L10n) are two important features that should be provided in the web application's world to make it accessible globally.
With Internationalization, we are emphasizing that the web application should support multiple languages, and with Localization, we are stating that the text, date, or other fields should be presented in a form specific to a region.
Note
PrimeFaces only provides English translations. Translations for other languages should be provided explicitly. In the following sections, you will find details on how to achieve this.
For internationalization, first we need to specify the resource bundle definition under the application tag in faces-config.xml, as follows:
<application>
<locale-config>
<default-locale>en</default-locale>
<supported-locale>tr_TR</supported-locale>
</locale-config>
<resource-bundle>
<base-name>messages</base-name>
<var>msg</var>
</resource-bundle>
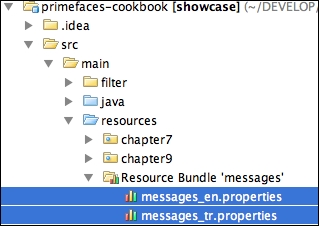
</application>A resource bundle is a text file with the .properties suffix that would contain locale-specific messages. So, the preceding definition states that the resource bundle messages_{localekey}.properties file will reside under classpath, and the default value of localekey is en, which stands for English, and the supported locale is tr_TR, which stands for Turkish. For projects structured by Maven, the messages_{localekey}.properties file can be created under the src/main/resources project path. The following image was made in the IntelliJ IDEA:
To showcase Internationalization, we will broadcast an information message via the FacesMessage mechanism that will be displayed in PrimeFaces' growl component. We need two components—growl itself and a command button—to broadcast the message:
<p:growl id="growl" />
<p:commandButton action="#{localizationBean.addMessage}" value="Display Message" update="growl" />
The addMessage method of localizationBean is as follows:
public String addMessage() {
  addInfoMessage("broadcast.message");
  return null;
}
The preceding code uses the addInfoMessage method, which is defined in the static MessageUtil class as follows:
public static void addInfoMessage(String str) {
  FacesContext context = FacesContext.getCurrentInstance();
  ResourceBundle bundle =
    context.getApplication().getResourceBundle(context, "msg");
  String message = bundle.getString(str);
  FacesContext.getCurrentInstance().addMessage(null,
    new FacesMessage(FacesMessage.SEVERITY_INFO, message, ""));
}
Localization of components, such as calendar and schedule, can be achieved by providing the locale attribute. By default, locale information is retrieved from the view's locale, and it can be overridden by a string locale key or with a java.util.Locale instance.
Components such as calendar and schedule use a shared PrimeFaces.locales property to display labels. As stated before, PrimeFaces only provides English translations, so in order to localize the calendar, we need to put the corresponding locales into a JavaScript file and include the scripting file to the page.
The content for the German locale of the Primefaces.locales property for calendar would be as shown in the following code snippet. For the sake of the recipe, only the German locale definition is given and the Turkish locale definition is omitted; you can find it in the showcase application Here's the code snippet we talked about:
PrimeFaces.locales['de'] = {
  closeText: 'Schließen',
  prevText: 'Zurück',
  nextText: 'Weiter',
  monthNames: ['Januar', 'Februar', 'März', 'April', 'Mai',
  'Juni', 'Juli', 'August', 'September', 'Oktober', 'November',
  'Dezember'],
  monthNamesShort: ['Jan', 'Feb', 'Mär', 'Apr', 'Mai', 'Jun',
  'Jul', 'Aug', 'Sep', 'Okt', 'Nov', 'Dez'],
  dayNames: ['Sonntag', 'Montag', 'Dienstag', 'Mittwoch',
  'Donnerstag', 'Freitag', 'Samstag'],
  dayNamesShort: ['Son', 'Mon', 'Die', 'Mit', 'Don', 'Fre',
  'Sam'],
  dayNamesMin: ['S', 'M', 'D', 'M ', 'D', 'F ', 'S'],
  weekHeader: 'Woche',
  FirstDay: 1,
  isRTL: false,
  showMonthAfterYear: false,
  yearSuffix: '',
  timeOnlyTitle: 'Nur Zeit',
  timeText: 'Zeit',
  hourText: 'Stunde',
  minuteText: 'Minute',
  secondText: 'Sekunde',
  currentText: 'Aktuelles Datum',
  ampm: false,
  month: 'Monat',
  week: 'Woche',
  day: 'Tag',
  allDayText: 'Ganzer Tag'
};
The definition of the calendar components both with and without the locale attribute would be as follows:
<p:calendar showButtonPanel="true" navigator="true" mode="inline" id="enCal"/>

<p:calendar locale="tr" showButtonPanel="true" navigator="true" mode="inline" id="trCal"/>

<p:calendar locale="de" showButtonPanel="true" navigator="true" mode="inline" id="deCal"/>
They will be rendered as follows:

For Internationalization of the PrimeFaces message, the addInfoMessage method retrieves the message bundle via the defined msg variable. It then gets the string from the bundle with the given key by invoking the bundle.getString(str) method. Finally, the message is added by creating a new PrimeFaces message with the FacesMessage.SEVERITY_INFO severity level.
For some components, localization could be accomplished by providing labels to the components via attributes, such as with p:selectBooleanButton:
<p:selectBooleanButton
  value="#{localizationBean.selectedValue}"
  onLabel="#{msg['booleanButton.onLabel']}"
  offLabel="#{msg['booleanButton.offLabel']}" />
The msg variable is the resource bundle variable that is defined in the resource bundle definition in the PrimeFaces configuration file. The English version of the bundle key definitions in the messages_en.properties file that resides under the classpath would be as follows:
booleanButton.onLabel=Yes
booleanButton.offLabel=No
This recipe is available in the demo web application on GitHub (https://github.com/ova2/primefaces-cookbook/tree/second-edition). Clone the project if you have not done it yet, explore the project structure, and build and deploy the WAR file on application servers compatible with Servlet 3.x, such as JBoss WildFly and Apache TomEE.
For the demos of this recipe, refer to the following:
Internationalization is available at
http://localhost:8080/pf-cookbook/views/chapter1/internationalization.jsfLocalization of the calendar component is available at
http://localhost:8080/pf-cookbook/views/chapter1/localization.jsfLocalization with resources is available at
http://localhost:8080/pf-cookbook/views/chapter1/localizationWithResources.jsf
For already translated locales of the calendar, see http://code.google.com/p/primefaces/wiki/PrimeFacesLocales.
In PrimeFaces, components such as accordionpanel, datatable, dialog, fileupload, schedule, tabview, and tree offer right-to-left text direction support for languages such as Arabic, Hebrew, and so on. These components possess the dir attribute that can either get the value ltr (which is the default behavior with left-to-right text direction) or rtl.
We are going to create a dialog box that contains Arabic characters, as given here:
<p:commandButton value="Show Dialog" onclick="PF('arabicDlg').show();" type="button" />
<p:dialog widgetVar="arabicDlg" dir="rtl">
  <h:outputText value="PrimeFaces هو مصدر للمساهمة في المشروع المكون جناح مفتوح مع الملحقات المختلفة." />
</p:dialog>
When you click on the Show Dialog button, you will get the following output:
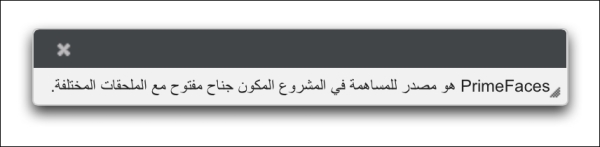
Within the example, we're setting the dir attribute of the <p:dialog> component to rtl, stating that the text direction will be right to left.
The direction of text can also be changed globally by setting primefaces.DIR in the web.xml file:
<context-param>
  <param-name>primefaces.DIR</param-name>
  <param-value>rtl</param-value>
</context-param>
A parameter value can either be ltr or rtl. It can also be an EL expression to provide dynamic values.
This recipe is available in the demo web application on GitHub (https://github.com/ova2/primefaces-cookbook/tree/second-edition). Clone the project if you have not done it yet, explore the project structure, and build and deploy the WAR file on application servers compatible with Servlet 3.x, such as JBoss WildFly and Apache TomEE.
The showcase for the recipe is available at http://localhost:8080/pf-cookbook/views/chapter1/rightToLeft.jsf.
PrimeFaces provides improved resource ordering to support customization of content. This ability could be used when Internet Explorer demands special meta tags to be placed first or for scenarios where the styling for PrimeFaces components needs to be overridden by custom styling.
Define <h:head> using facet definitions where necessary:
<h:head title="PrimeFaces Cookbook - ShowCase">
<f:facet name="first">
</f:facet>
...
<f:facet name="middle">
</f:facet>
...
<f:facet name="last">
</f:facet>
...
</h:head>
Note
The <h:head> tag is used by JSF components to add their resources to pages; thus, it's a must-have tag throughout your JSF-based applications. One of the commonly made mistakes among developers is forgetting to put in the head tag.
For instance, if a stylesheet gets declared in multiple CSS files, which would be linked in the middle and last facets respectively, the stylesheet definition referred to in the middle facet will be overridden by the one defined in the last facet.
With PrimeFaces' own HeadRenderer implementation, the resources are handled in the following order:
If defined, first facet.
PF-JSF registered CSS.
Theme CSS.
If defined, middle facet.
PF-JSF registered JS.
Head content.
If defined, last facet.
Internet Explorer introduced a special tag named meta, which can be used as <meta http-equiv="X-UA-Compatible" content="..." />. The <meta> tag is X-UA-Compatible and its content helps to control document compatibility, such as specifying the rendering engine to render the related pages in the browser. For example, inserting the following statement into the head of a document would force IE 8 to render the page using the new standards mode:
<meta http-equiv="X-UA-Compatible" content="IE=8" />
X-UA-Compatible must be the first child of the head component. Internet Explorer won't accept this <meta> tag if it's placed after the <link> or <script> tag. Therefore, it needs to be placed within the first facet. This is a good demonstration of resource ordering with the use of the first facet.
This recipe is available in the demo web application on GitHub (https://github.com/ova2/primefaces-cookbook/tree/second-edition). Clone the project if you have not done it yet, explore the project structure, and build and deploy the WAR file on application servers compatible with Servlet 3.x, such as JBoss WildFly and Apache TomEE.
The showcase for the recipe is available at http://localhost:8080/pf-cookbook/views/chapter1/resourceOrdering.jsf.