


 Download code from GitHub
Understanding H2O AutoML Basics
Machine Learning (ML) is the process of building analytical or statistical models using computer systems that learn from historical data and identify patterns in them. These systems then use these patterns and try to make predictive decisions that can provide value to businesses and research alike. However, the sophisticated mathematical knowledge required to implement an ML system that can provide any concrete value has discouraged several people from experimenting with it, leaving tons of undiscovered potential that they could have benefited from.
Automated Machine Learning (AutoML) is one of the latest ML technologies that has accelerated the adoption of ML by organizations of all sizes. It is the process of automating all these complex tasks involved in the ML life cycle. AutoML hides away all these complexities and automates them behind the scenes. This allows anyone to easily implement ML without any hassle and focus more on the results.
In this chapter, we will learn about one such AutoML technology by H2O.ai (https://www.h2o.ai/), which is simply named H2O AutoML. We will provide a brief history of AutoML in general and what problems it solves, as well as a bit about H2O.ai and its H2O AutoML technology. Then, we will code a simple ML implementation using H2O’s AutoML technology and build our first ML model.
By the end of this chapter, you will understand what exactly AutoML is, the company H2O.ai, and its technology H2O AutoML. You will also understand what minimum requirements are needed to use H2O AutoML, as well as how easy it is to train your very first ML model using H2O AutoML without having to understand any complex mathematical rocket science.
In this chapter, we are going to cover the following topics:
- Understanding AutoML and H2O AutoML
- Minimum system requirements to use H2O AutoML
- Installing Java
- Basic implementation of H2O using Python
- Basic implementation of H2O using R
- Training your first ML model using H2O AutoML
Technical requirements
For this chapter, you will need the following:
- A decent web browser (Chrome, Firefox, or Edge), the latest version of your preferred web browser.
- An Integrated Development Environment (IDE) of your choice
- Jupyter Notebook by Project Jupyter (https://jupyter.org/) (optional)
All the code examples for this chapter can be found on GitHub at https://github.com/PacktPublishing/Practical-Automated-Machine-Learning-on-H2O/tree/main/Chapter%201.
Understanding AutoML and H2O AutoML
Before we begin our journey with H2O AutoML, it is important to understand what exactly AutoML is and what part it plays in the entire ML pipeline. In this section, we will try to understand the various steps involved in the ML pipeline and where AutoML fits into it. Then, we will explore what makes H2O’s AutoML so unique among the various AutoML technologies.
Let’s start by learning a bit about AutoML in general.
AutoML
AutoML is the process of automating the various steps that are performed while developing a viable ML system for predictions. A typical ML pipeline consists of the following steps:
- Data Collection: This is the very first step in an ML pipeline. Data is collected from various sources. The sources can generate different types of data, such as categorical, numeric, textual, time series, or even visual and auditory data. All these types of data are aggregated together based on the requirements and are merged into a common structure. This could be a comma-separated value file, a parquet file, or even a table from a database.
- Data Exploration: Once data has been collected, it is explored using basic analytical techniques to identify what it contains, the completeness and correctness of the data, and if the data shows potential patterns that can build a model.
- Data Preparation: Missing values, duplicates, and noisy data can all affect the quality of the model as they introduce incorrect learning. Hence, the raw data that is collected and explored needs to be pre-processed to remove all anomalies using specific data processing methods.
- Data Transformation: A lot of ML models work with different types of data. Some can work with categorical data, while some can only work with numeric data. That is why you may need to convert certain types of data from one form into the other. This allows the dataset to be fed properly during model training.
- Model Selection: Once the dataset is ready, an ML model is selected to be trained. The model is chosen based on what type of data the dataset contains, what information is to be extracted from the dataset, as well as which model suits the data.
- Model Training: This is where the model is trained. The ML system will learn from the processed dataset and create a model. This training can be influenced by several factors, such as data attribute weighting, learning rate, and other hyperparameters.
- Hyperparameter Tuning: Apart from model training, another factor that needs to be considered is the model’s architecture. The model’s architecture depends on the type of algorithm used, such as the number of trees in a random forest or neurons in a neural network. We don’t immediately know which architecture is optimal for a given model, so experimentation is needed. The parameters that define the architecture of a model are called hyperparameters; finding the best combination of hyperparameter values is known as hyperparameter tuning.
- Prediction: The final step of the ML pipeline is prediction. Based on the patterns in the dataset that were learned by the model during training, the model can now make a generalized prediction on unseen data.
For non-experts, all these steps and their complexities can be overwhelming. Every step in the ML pipeline process has been developed over years of research and there are vast topics within themselves. AutoML is the process that automates the majority of these steps, from data exploration to hyperparameter tuning, and provides the best possible models to make predictions on. This helps companies focus on solving real-world problems with results rather than ML processes and workflows.
Now that you understand the different steps in an ML pipeline and how the steps are automated by AutoML, let’s see why H2O’s AutoML technology is one of the leading technologies in the industry.
H2O AutoML
H2O AutoML is an AutoML software technology developed by H2O.ai that simplifies how ML systems are developed by providing user-friendly interfaces that help non-experts experiment with ML. It is an in-memory, distributed, fast, and scalable ML and analytics platform that works on big data and can be used for enterprise needs.
It is written in Java and uses key-value storage to access data, models, and other ML objects that are involved. It runs on a cluster system and uses the multi-threaded MapReduce framework to parallelize data operations. It is also easy to communicate with it as it uses simple REST APIs. Finally, it has a web interface that provides a detailed graphical view of data and model details.
Not only does H2O AutoML automate the majority of the sophisticated steps involved in the ML life cycle, but it also provides a lot of flexibility for even expert data scientists to implement specialized model training processes. H2O AutoML provides a simple wrapper function that encapsulates several of the model training tasks that would otherwise be complicated to orchestrate. It also has extensive explainability functions that can describe the various details of the model training life cycle. This provides easy-to-export details of the models that users can use to explain the performance and justifications of the models that have been trained.
The best part about H2O AutoML is that it is entirely open source. You can find H2O’s source code at https://github.com/h2oai. It is actively maintained by a community of developers serving in both open as well as closed sources companies. At the time of writing, it is on its third major version, which indicates that it is quite a mature technology and is feature-intensive – that is, it supports several major companies in the world. It also supports several programming languages, including R, Scala, Python, and Java, that can run on several operating systems and provides support for a wide variety of data sources that are involved in the ML life cycle, such as Hadoop Distributed File System, Hive, Amazon S3, and even Java Database Connectivity (JDBC).
Now that you understand the basics of AutoML and how powerful H2O AutoML is, let’s see what the minimum requirements are for a system to run H2O AutoML without any performance issues.
Minimum system requirements to use H2O AutoML
H2O is very easy to install, but certain minimum standard requirements need to be met for it to run smoothly and efficiently. The following are some of the minimum requirements needed by H2O in terms of hardware capabilities, along with other software support:
- The minimum hardware required by H2O is as follows:
- Memory: H2O runs on an in-memory architecture, so it is limited by the physical memory of the system that uses it. Thus, to be able to process huge chunks of data, the more memory the system, has the better.
- Central Processing Unit (CPU): By default, H2O will use the maximum available CPUs of the system. However, at a minimum, it will need 4 CPUs.
- Graphical Processing Unit (GPU): GPU support is only available for XGBoost models in AutoML if the GPUs are NVIDIA GPUs (GPU Cloud, DGX Station, DGX-1, or DGX-2) or if it is a CUDA 8 GPU.
- The operating systems that support H2O are as follows:
- Ubuntu 12.04
- OS X 10.9 or later
- Windows 7 or later
- CentOS 6 or later
- The programming languages that support H2O are as follows:
- Java: Java is mandatory for H2O. H2O requires a 64-bit JDK to build H2O and a 64-bit JRE to run its binary:
- Java versions supported: Java SE 15, 14, 13, 12, 11, 10, 9, and 8
- Other Languages: The following languages are only required if H2O is being run in those environments:
- Python 2.7.x, 3.5.x, or 3.6.x
- Scala 2.10 or later
- R version 3 or later
- Java: Java is mandatory for H2O. H2O requires a 64-bit JDK to build H2O and a 64-bit JRE to run its binary:
- Additional requirements: The following requirements are only needed if H2O is being run in these environments:
- Hadoop: Cloudera CDH 5.4 or later, Hortonworks HDP 2.2 or later, MapR 4.0 or later, or IBM Open Platform 4.2
- Conda: 2.7, 3.5, or 3.6
- Spark: Version 2.1, 2.2, or 2.3
Once we have a system that meets the minimum requirements, we need to focus on H2O’s functional dependencies on other software. H2O has only one dependency and that is Java. Let’s see why Java is important for H2O and how we can download and install the correct supported Java version.
Installing Java
H2O’s core code is written in Java. It needs Java Runtime Environment (JRE) installed in your system to spin up an H2O server cluster. H2O also trains all the ML algorithms in a multi-threaded manner, which uses the Java Fork/Join framework on top of its MapReduce framework. Hence, having the latest Java version that is compatible with H2O to run H2O smoothly is highly recommended.
You can install the latest stable version of Java from https://www.oracle.com/java/technologies/downloads/.
When installing Java, it is important to be aware of which bit version your system runs on. If it is a 64-bit version, then make sure you are installing the 64-bit Java version for your operating system. If it is 32-bit, then go for the 32-bit version.
Now that we have installed the correct Java version, we can download and install H2O. Let’s look at a simple example of how we can do that using Python.
Basic implementation of H2O using Python
Python is one of the most popular languages in the ML field of computer programming. It is widely used in all industries and has tons of actively maintained ML libraries that provide a lot of support in creating ML pipelines.
We will start by installing the Python programming language and then installing H2O using Python.
Installing Python
Installing Python is very straightforward. It does not matter whether it is Python 2.7 or Python 3 and above as H2O works completely fine with both versions of the language. However, if you are using anything older than Python 2.7, then you will need to upgrade your version.
It is best to go with Python 3 as it is the current standard and Python 2.7 is outdated. Along with Python, you will also need pip, Python’s package manager. Now, let’s learn how to install Python on various operating systems:
- On Linux (Ubuntu, Mint, Debian):
- For Python 2.7, run the following command in the system Terminal:
sudo apt-get python-pip
- For Python 3, run the following command in the system Terminal:
sudo apt-get python3-pip
- For Python 2.7, run the following command in the system Terminal:
- On macOS: macOS version 10.8 comes with Python 2.7 pre-installed. If you want to install Python 3, then go to https://python.org, go to the Downloads section, and download the latest version of Python 3 for macOS.
- On Windows: Unlike macOS, Windows does not come with any pre-installed Python language support. You will need to download a Python installer for Windows from https://python.org. The installer will depend on your Windows operating system – that is, if it is 64-bit or 32-bit.
Now that you know how to install the correct version of Python, let’s download and install the H2O Python module using Python.
Installing H2O using Python
H2O has a Python module available in the Python package index. To install the h2o Python module, all you need to do is to execute the following command in your Terminal:
pip install h2o
And that’s pretty much it.
To test if it has been successfully downloaded and installed, follow these steps:
- Open your Python Terminal.
- Import the
h2omodule by running the following command:import h2o
- Initialize H2O to spin up a local
h2oserver by running the following command:h2o.init()
The following screenshot shows the results you should get after initializing h2o:
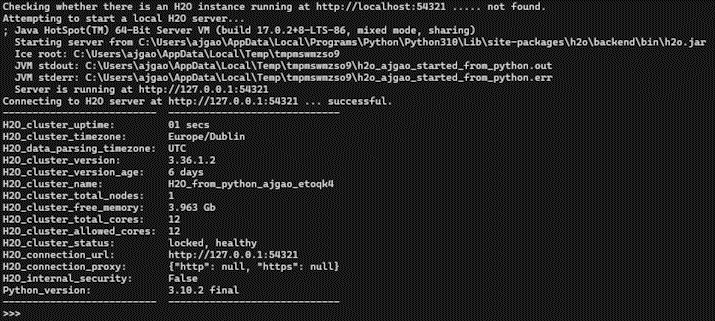
Figure 1.1 – H2O execution using Python
Let’s have a quick look at the output we got. First, it ran successfully, so mission accomplished.
After executing h2o.init() by reading the output logs, you will see that H2O checked if there is already an H2O server instance running on localhost with port 54321. In this scenario, there wasn’t any H2O server instance running previously, so H2O attempted to start a local server on the same port. If it had found an already existing local H2O instance on the port, then it would have reused the same instance for any further H2O command executions.
Then, it used Java version 16 to start the H2O instance. You may see a different Java version, depending on which version you have installed in your system.
Next, you will see the location of the h2o jar file that the server was started from, followed by the location of the Java Virtual Machine (JVM) logs.
Once the server is up and running, it shows the URL of the H2O server locally hosted on your system and the status of the H2O Python library’s connection to the server.
Lastly, you will see some basic metadata regarding the server’s configuration. This metadata may be slightly different from what you see in your execution as it depends a lot on the specifications of your system. For example, by default, H2O will use all the cores available on your system for processing. So, if you have an 8-core system, then the H2O_cluster_allowed_cores property value will be 8. Alternatively, if you decide to use only four cores, then you can execute h2o.init(nthreads=4) to use only four cores, reflecting the same in the server configuration output.
Now that you know how to implement H2O using Python, let’s learn how to do the same in the R programming language.
Basic implementation of H2O using R
The R programming language is a very popular language in the field of ML and data science because of its extensive support for statistical and data manipulation operations. It is widely used by data scientists and data miners for developing analytical software.
We will start by installing the R programming language and then installing H2O using R.
Installing R
An international team of developers maintains the R programming language. They have a dedicated web page for the R programming language called The Comprehensive R Archive Network (CRAN): https://cran.r-project.org/. There are different ways of installing R, depending on what operating system you use:
- On Linux (Ubuntu, Mint, Debian):
Execute the following command in the system Terminal:
sudo apt-get install r-base
- On macOS: To install R, go to https://cran.r-project.org/, go to the Download R for macOS hyperlink, and download the latest release of R for macOS.
- On Windows: Similar to how you install R on macOS, you can download the
.exefile from https://cran.r-project.org/, go to the Download R for Windows hyperlink, and download the latest release of R for Windows.
Another great way of installing R on macOS and Windows is through RStudio. RStudio simplifies the installation of R-supported software and is also a very good IDE for R programming in general. You can download R studio from https://www.rstudio.com/.
Now that you know how to install the correct version of R, let’s download and install the H2O R package using the R programming language.
Installing H2O using R
Similar to Python, H2O provide support for the R programming language as well.
To install the R packages, follow these steps:
- First, we need to download the H2O R package dependencies. For this, execute the following command in your R Terminal:
install.packages(c("RCurl", "jsonlite")) - Then, to install the actual
h2opackage, execute the following command in your R Terminal:install.packages("h2o")
And you are done.
- To test if it has been successfully downloaded and installed, open your R Terminal, import the
h2olibrary, and execute theh2o.init()command. This will spin up a local H2O server.
The results can be seen in the following screenshot:
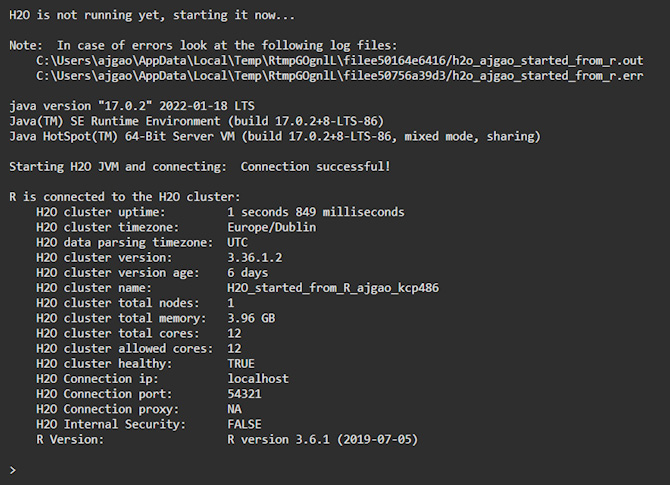
Figure 1.2 – H2O execution using R
Let’s have a quick look at the output we got.
After executing h2o.init(), the H2O client will check if there is an H2O server instance already running on the system. The H2O server is usually run locally on port 54321 by default. If it had found an already existing local H2O instance on the port, then it would have reused the same instance. However, in this scenario, there wasn’t any H2O server instance running on port 54321, which is why H2O attempted to start a local server on the same port.
Next, you will see the location of the JVM logs. Once the server is up and running, the H2O client tries to connect to it and the status of the connection to the server is displayed. Lastly, you will see some basic metadata regarding the server’s configuration. This metadata may be slightly different from what you see in your execution as it depends a lot on the specifications of your system. For example, by default, H2O will use all the cores available on your system for processing. So, if you have an 8-core system, then the H2O_cluster_allowed_cores property value will be 8. Alternatively, if you decide to use only four cores, then you can execute the h2o.init(nthreads=4) command to use only four cores, thus reflecting the same in the server configuration output.
Now that you know how to implement H2O using Python and R, let’s create our very first ML model and make predictions on it using H2O AutoML.
Training your first ML model using H2O AutoML
All ML pipelines, whether they’re automated or not, eventually follow the same steps that were discussed in the Understanding AutoML and H2O AutoML section in this chapter.
For this implementation, we will be using the Iris flower dataset. This dataset can be found at https://archive.ics.uci.edu/ml/datasets/iris.
Understanding the Iris flower dataset
The Iris flower dataset, also known as Fisher’s Iris dataset, is one of the most popular multivariate datasets – that is, a dataset in which there are two or more variables that are analyzed per observation during model training. The dataset consists of 50 samples of three different varieties of the Iris flower. The features in the dataset include the length and width of the petals and sepals in centimeters. The dataset is often used for studying various classification techniques in ML because of its simplicity. The classification is performed by using the length and width of the petals and sepals as features that determine the class of the Iris flower.
The following screenshot shows a small sample of the dataset:
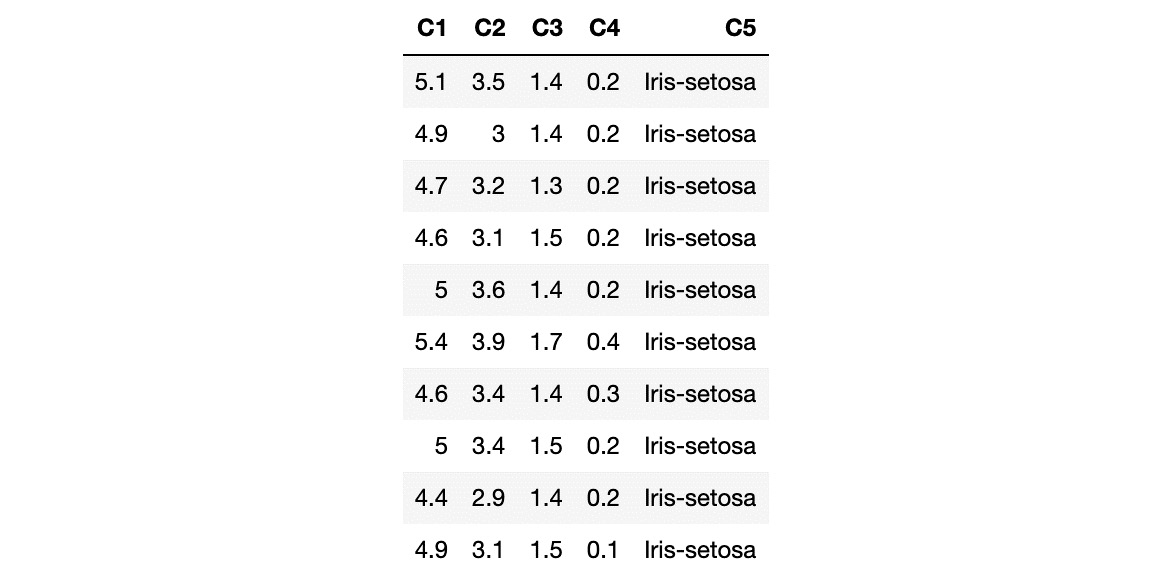
Figure 1.3 – Iris dataset
The columns in the dataset represent the following:
- C1: Sepal length in cm
- C2: Sepal width in cm
- C3: Petal length in cm
- C4: Petal width in cm
- C5: Class:
- Iris-setosa
- Iris-versicolour
- Iris-virginica
In this scenario, C1, C2, C3, and C4 represent the features that are used to determine C5, the class of the Iris flower.
Now that you understand the contents of the dataset that we are going to be working with, let’s implement our model training code.
Model training
Model training is the process of finding the best combination of biases and weights for a given ML algorithm so that it minimizes a loss function. A loss function is a way of measuring how far the predicted value is from the actual value. So, minimizing it indicates that the model is getting closer to making accurate predictions – in other words, it’s learning. The ML algorithm builds a mathematical representation of the relationship between the various features in the dataset and the target label. Then, we use this mathematical representation to predict the potential value of the target label for certain feature values. The accuracy of the predicted values depends a lot on the quality of the dataset, as well as the combination of weights and biases against features used during model training. However, all of this is entirely automated by AutoML and, as such, is not a concern for us.
With that in mind, let’s learn how to quickly and easily create an ML model using H2O in Python.
Model training and prediction in Python
The H2O Python module makes it easy to use H2O in a Python program. The inbuilt functions in the H2O Python module are straightforward to use and hide away a lot of the complexities of using H2O.
Follow these steps to train your very first model in Python using H2O AutoML:
- Import the H2O module:
import h2o
- Initialize H2O to spin up a local H2O server:
h2o.init()
The h2o.init() command starts up or reuses an H2O server instance running locally on port 54321.
- Now, you can import the dataset by using the
h2o.import_file()command while passing the location of the dataset into your system. - Next, import the dataset by passing the location where you downloaded the dataset:
data = h2o.import_file("Dataset/iris.data") - Now, you need to identify which columns of the DataFrame are the features and which are the labels. A label is something that we want to predict, while features are attributes of the label that help identify the label. We train models on these features and then predict the value of the label, given a specific set of feature values. Referring to the dataset in the Understanding the Iris flower dataset section, let’s set all the column names –
C1,C2,C3,C4, andC5– as a list of features:features = data.columns
- Based on our DataFrame, the
C5column, which denotes the class of the Iris flower, is the column that we want to eventually predict once the model has been trained. Hence, we denoteC5as the label and remove it from the remaining set of column names, which we will note as features. Set the target label and remove it from the list of features:label = "C5" features.remove(label)
- Split the DataFrame into training and testing DataFrames:
train_dataframe, test_dataframe = data.split_frame([0.8])
The data.split_frame([0.8]) command splits the DataFrame into two – a training DataFrame and another for testing. The training DataFrame contains 80% of the data, while the testing DataFrame contains the remaining 20%. We will use the training DataFrame to train the model and the testing DataFrame to run predictions on the model once it has been trained to test how the model performs.
Tip
If you are curious as to how H2O splits the dataset based on ratios and how it randomizes the data between different splits, feel free to explore and experiment with the split_frame function. You can find more details at https://docs.h2o.ai/h2o/latest-stable/h2o-py/docs/_modules/h2o/frame.html#H2OFrame.split_frame.
- Initialize the H2O AutoML object. Here, we have set the
max_modelparameter to10to limit the number of models that will be trained by H2O, set AutoML to10, and set the randomseedgenerator to1:aml=h2o.automl.H2OAutoML(max_models=10, seed = 1)
- Now, trigger the AutoML training by passing in the feature columns – that is
C1,C2,C3, andC4– in (x), the label columnC5in (y), and thetrain_dataframeDataFrame using theaml.train()command. This is when H2O starts its automated model training. - Train the model using the H2O AutoML object:
aml.train(x = features, y = label, training_frame = train_dataframe)
During the training, H2O will analyze the type of the label column. For numerical labels, H2O treats the ML problem as a regression problem. If the label is categorical, then it treats the problem as a classification problem. For the Iris flower dataset, the C5 column is a categorical value containing class values. H2O will analyze this column and correctly identify that it is a classification problem and train classification models.
H2O AutoML trains several models behind the scenes using different types of ML algorithms. All the models that have been trained are evaluated on the test dataset and their performance is measured. H2O also provides detailed information about all the models, which users can use to further experiment on the data or compare different ML algorithms and understand which ones are more suitable to solve their ML problem. H2O can end up training 20-30 models, which can take a while. However, since we have passed the max_models parameter as 10, we are limiting the number of models that will be trained so that we can see the output of the training process quickly. More on ensemble learning will be discussed in Chapter 5, Understanding AutoML Algorithms.
- Once the training has finished, AutoML creates a Leaderboard of all the models it has trained, ranking them from the best performing to the worst. This ranking is achieved by comparing all the models’ error metrics. Error metrics are values that measure how many errors the model makes when making predictions on a sample test dataset with the actual label values. Lower error metrics indicate that the model makes fewer errors during prediction, which indicates that it is a better model compared to one with a higher error metric. Extract the AutoML Leaderboard:
model_leaderboard = aml.leaderboard
- Display the AutoML Leaderboard:
model_leaderboard.head(rows=model_leaderboard.nrows)
The Leaderboard will look as follows:
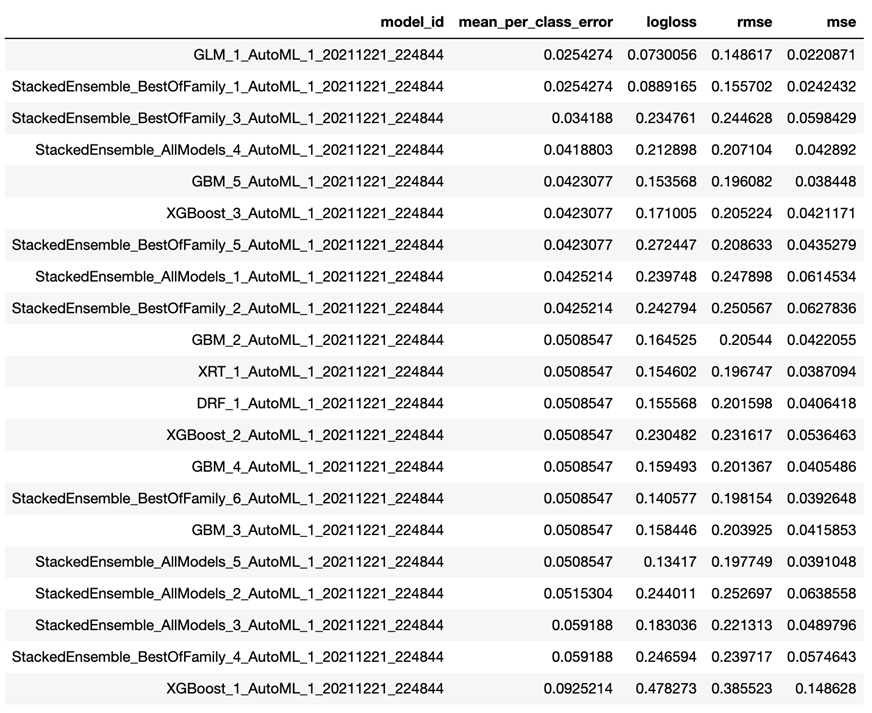
Figure 1.4 – H2O AutoML Leaderboard (Python)
The Leaderboard includes the following details:
model_id: This represents the ID of the model.mean_per_class_error: This metric is used to measure the average of the errors of each class in your multi-class dataset.logloss: This metric is used to measure the negative average of the log of corrected predicted probabilities for each instance.- Root Mean Squared Error (RMSE): This metric is used to measure the standard deviation of prediction errors.
- Mean Squared Error (MSE): This metric is used to measure the average of the squares of the errors.
The Leaderboard sorts the models based on certain default metrics, depending on the type of ML problem, unless specifically mentioned during AutoML training. The Leaderboard sorts the models based on the AUC metric for binary classification, mean_per_class_error for multinomial classification, and deviance for regression.
The metrics are different measures of error in the model’s performance. So, the smaller the error value, the better the model is for making accurate predictions. We will explore the different model performance metrics in Chapter 6, Understanding H2O AutoML Leaderboard and Other Performance Metrics.
In this case, GLM_1_AutoML_1_20211221_224844 is the best model according to H2O AutoML since it is a multinomial classification problem and this model has the lowest mean_per_class_error.
You may notice that despite passing the max_model value as 10, when triggering AutoML for training, we see more than 10 models in the Leaderboard. This is because only 10 models have been trained; the remaining models are Stacked Ensemble models. Stacked Ensemble models are models that are created from what other models have learned and are not technically trained in the normal sense. We will learn more about Stacked Ensemble models in Chapter 5, Understanding AutoML Algorithms, and more about the Leaderboard in Chapter 6, Understanding H2O AutoML Leaderboard and Other Performance Metrics.
Congratulations! You have officially trained your very first ML model using H2O AutoML and it is now ready to be used to make predictions.
Making predictions is very straightforward: we will use the test_dataframe DataFrame that was created from the data.split_frame([0.8]) command.
Execute the following command in Python:
aml.predict(test_dataframe)
That’s it – everything is wrapped inside the predict function of the model object.
After executing the prediction, you will see the following results:
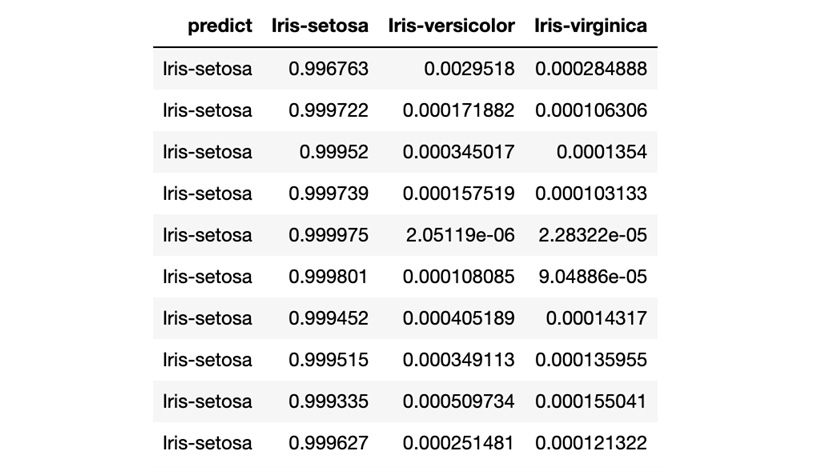
Figure 1.5 – H2O AutoML model prediction (Python)
The prediction result shows a table where every row is a representation of predictions for the rows present in the test DataFrame. The predict column indicates what Iris class it is for that row, while the remaining columns are the calculated probabilities of the Iris classes, as denoted in the column’s name, by the model after reading the feature values of that row. In short, the model predicts that for row 1, there is a 99.6763% chance that it is Iris-setosa.
Congratulations! You have now made an accurate prediction using your newly trained model using AutoML.
Now that we’ve seen how easy it is to use H2O AutoML in Python, let’s learn how to do the same in the R programming language.
Model training and prediction in R
Similar to Python, training and making predictions using H2O AutoML in the R programming language is also very easy. H2O has a lot of support for the R programming language and, as such, has encapsulated much of the sophistication of ML behind ready-to-use functions.
Let’s look at a model training example that uses H2O AutoML in the R programming language on the Iris flower dataset.
You will notice that training models in R is similar to how we do it in Python, with the only difference being the slight change in syntax.
Follow these steps:
- Import the
H2Olibrary:library(h2o)
- Initialize H2O to spin up a local H2O server:
h2o.init()
h2o.init() will start up an H2O server instance that’s running locally on port 54321 and connect to it. If an H2O server already exists on the same port, then it will reuse it.
- Import the dataset using
h2o.importFile(“Dataset/iris.data”)while passing the location of the dataset in your system as a parameter. Import the dataset:data <- h2o.importFile("Dataset/iris.data") - Now, you need to set which columns of the dataframe are the features and which column is the label. Set the
C5column as the target label and the remaining column names as the list of features:label <- "C5" features <- setdiff(names(data), label)
- Split the DataFrame into two parts:
parts <- h2o.splitFrame(data, 0.8)
One DataFrame will be used for training, while the other will be used for testing/validating the model being trained. parts <- h2o.splitFrame(data, 0.8) splits the DataFrame into two parts. One DataFrame contains 80% of the data, while the other contains the remaining 20%. Now, assign the DataFrame that contains 80% of the data as the training DataFrame and the other as the testing or validation DataFrame.
- Assign the first part as the training DataFrame:
train_dataframe <- parts[[1]]
- Assign the second part as the testing DataFrame:
test_dataframe <- parts[[2]]
- Now that the dataset has been imported and its features and labels have been identified, let’s pass them to H2O’s AutoML to train models. This means that you can implement the AutoML model training function in R using
h2o.automl(). Train the model using H2O AutoML:aml <- h2o.automl(x = features, y = label, training_frame = train_dataframe, max_models=10, seed = 1)
- Extract the AutoML Leaderboard:
model_leaderboard <- aml@leaderboard
- Display the AutoML Leaderboard:
print(model_leaderboard, n = nrow(model_leaderboard))
Once the training has finished, AutoML will create a Leaderboard of all the models it has trained, ranking them from the best performing to the worst.
The Leaderboard will display the results as follows:
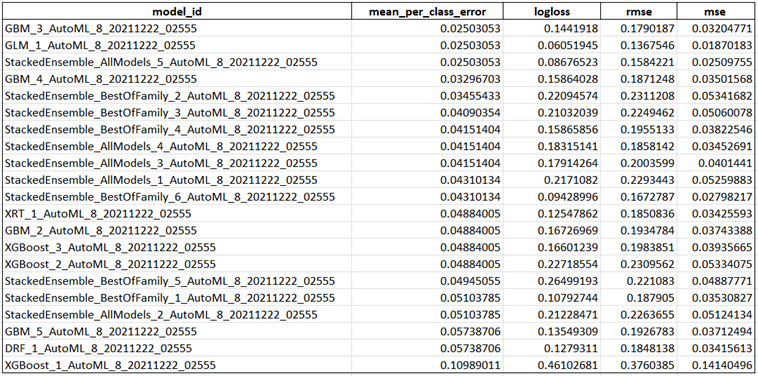
Figure 1.6 – H2O AutoML Leaderboard (R)
The Leaderboard includes the same details as we saw in the Leaderboard we got when training models in Python.
However, you may notice that the best model that’s suggested in this Leaderboard is different from the one we got in our previous experiment.
In this case, GBM_3_AutoML_8_20211222_02555 is the best model according to H2O AutoML, while in the previous experiment, it was GLM_1_AutoML_1_20211221_224844. This may be due to several factors, such as a different random number being generated for the seed value during model training or different data values being split across the training and testing DataFrames between the two experiments. This is what makes ML tricky – every step that you perform in a model training pipeline can greatly affect the overall performance of your trained model. At the end of the day, ML is a best-effort approach to making the most accurate predictions.
Congratulations – you have officially trained your ML model using H2O AutoML in R. Now, let’s learn how to make predictions on it. We will use the testing DataFrame we created after the split function to make predictions on the model we trained.
Execute the following command in R to make predictions:
predictions <- h2o.predict(aml, test_dataframe)
The predict function of the h2o object accepts two parameters. One is the model object, which in our case is the aml object, while the other is the DataFrame to make predictions on. By default, the aml object will use the best model in the Leaderboard to make predictions.
After executing the prediction, you will see the following results:
Figure 1.7 – H2O AutoML model prediction (R)
The results show a table with similar details that we saw in our previous experiment with Python. Every row is a representation of predictions for the rows present in the test DataFrame. The predict column indicates what Iris class it is for that row, while the remaining columns are the calculated probabilities of the Iris classes.
Congratulations – you have made an accurate prediction using your newly trained model using AutoML in R. Now, let’s summarize this chapter.
Summary
In this chapter, we understood the various steps in an ML pipeline and how AutoML plays a part in automating some of those steps. Then, we prepared our system to use H2O AutoML by installing the basic requirements. Once our system was ready, we implemented a simple application in Python and R that uses H2O AutoML to train a model on the Iris flower dataset. Finally, we understood the Leaderboard results and made successful predictions on the ML model that we just trained. All of this helped us test the waters of H2O AutoML, thus opening doors to more advanced concepts of H2O AutoML.
In the next chapter, we will explore H2O’s web User Interface (UI) so that we can understand and observe various ML details using an interactive visual interface.
