Download code from GitHub
PowerShell is a command-line environment that is designed for system administrators. It helps you manage and automate administrative tasks on the Windows operating system. With the trend of DevOps, developers are also getting on board with PowerShell.
Microsoft first introduced PowerShell in 2006. 10 years later, in 2016, Microsoft announced that they have made PowerShell open source and cross-platform with support for Windows, macOS X, CentOS, and Ubuntu. The source code is available on GitHub.
Office 365 is a subscription-based SAS offering from Microsoft. To manage Office 365, we have the following options:
- Office 365 admin center: We can use this web-based administration center provided by Microsoft to manage users, licenses, support tickets, billing and subscription, and other services such as Exchange, SharePoint, and Skype for Business that are part of our Office 365 subscription. To sign up for Office 365, we need to use Office 365 admin center. During this signing up process, we select the unique name for our tenant and the global admin account:
- Office 365 Admin app: This app allows us to manage Office 365 with limited functionality. We can reset user passwords, manage support tickets, and so on. It is not a full management tool. However, it helps you to be connected to your subscription when you are away from your computer:
- Office 365 management API: The APIs are designed for developers to create custom apps to manage Office 365: https://msdn.microsoft.com/en-us/office-365/office-365-managment-apis-overview. ISVs use these APIs to create products to manage Office 365. These APIs are out of the scope of this book.
- PowerShell for Office 365: This is the management tool that complements Office 365 admin center. We can use Office 365 PowerShell automation to quickly manage Office 365 users and licenses, Skype for Business Online, SharePoint Online, and Microsoft Exchange Online, and create reports:
In this chapter, we will discuss the following topics:
- Why do we need to learn PowerShell for Office 365?
- PowerShell is a cmdlet-based language with verb-noun syntax
- How to pass parameters to cmdlets and storing results as a variable
- How to get help with PowerShell?
- How PowerShell is an object-oriented language and how to work with objects?
- Using the if and where statements
- Using the for and while loops
- Creating your first script
Office 365 admin center is an out-of-the-box solution that is designed to handle the most common administrative tasks, such as creating new users and assigning licenses. There are situations where PowerShell for Office 365 helps us save time and effort. If you are a systems administrator, PowerShell is now a must-have skill. PowerShell for Office 365 helps you automate a lot of repetitive tasks and also work with advanced functions that are not available in Office 365 admin center:
- Office 365 PowerShell can reveal additional information that you cannot see with Office 365 admin center
- Office 365 has features that you can only configure using Office 365 PowerShell
- Office 365 PowerShell is great at performing bulk operations
- Office 365 PowerShell is great for filtering data
- Office 365 PowerShell allows us to automate repetitive tasks
- Office 365 PowerShell makes it easy to print or save data
- Office 365 PowerShell lets you manage operations across server products
I think using the Office 365 admin center is like using public transportation. We have to live with the options provided by Microsoft. If we need something custom, like in the case of transportation when we use taxis or personal vehicles, in Office 365, we can use PowerShell. We still have to write scripts in accordance with Microsoft's guidelines. However, we get far more flexibility and options as compared to Office 365 admin center.
Before we dive deep into PowerShell for Office 365, let's cover the basics of PowerShell in the next few sections.
The building blocks of PowerShell are called cmdlets (pronounced command-lets). Cmdlets allow us to get things done in PowerShell. A cmdlet is a lightweight command that is used in the Windows PowerShell environment. The Windows PowerShell runtime evokes these cmdlets within the context of automation scripts that are provided at the command line. We can put multiple cmdlets together into a set of commands to run all at once, or we can place them in a file with the extension .ps1 to create a PowerShell script that we can run manually or using a scheduler. In Office 365, the following cmdlets are commonly used:
Get-MsolUserNew-MsolUser
In PowerShell, cmdlets follow a pattern with verb-noun syntax. For example, to manage users, the syntax is <Verb>-MSOL<Noun>.
Here, MSOL stands for Microsoft Online.
To manage SharePoint Online, the syntax is <Verb>-SPO<Noun>.
SPO is SharePoint Online.
The following is the list of the most commonly used verbs in PowerShell:
GetSetAddNewRemoveConnectDisconnectTestEnableDisableInvokeStartStop
A cmdlet is a lightweight command that is used in the Windows PowerShell environment. The Windows PowerShell runtime invokes these cmdlets within the context of automation scripts that are provided at the command line. The Windows PowerShell runtime also invokes them programmatically through Windows PowerShell APIs.
They basically accept input via parameters, perform the operation, and then output the results.
Cmdlets differ from commands in a command-shell environment in the following ways:
- Cmdlets are instances of .NET Framework classes; they are not standalone executables.
- Cmdlets can be created from as few as a dozen lines of code.
- Cmdlets do not generally do their own parsing, error presentation, or output formatting and these operations are normally handled by the Windows PowerShell runtime.
- Cmdlets process input objects from the pipeline rather than from streams of text, and typically deliver objects as output to the pipeline.
- Cmdlets are record-oriented because they process a single object at a time.
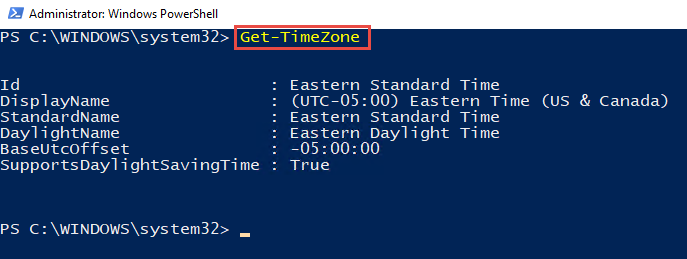
Parameters are the input values that we pass to a cmdlet. For example, if we have to get the time zone, we can use the following cmdlet:
Get-TimeZoneThis cmdlet gets the current time zone or a list of available time zones.
These are the parameters:
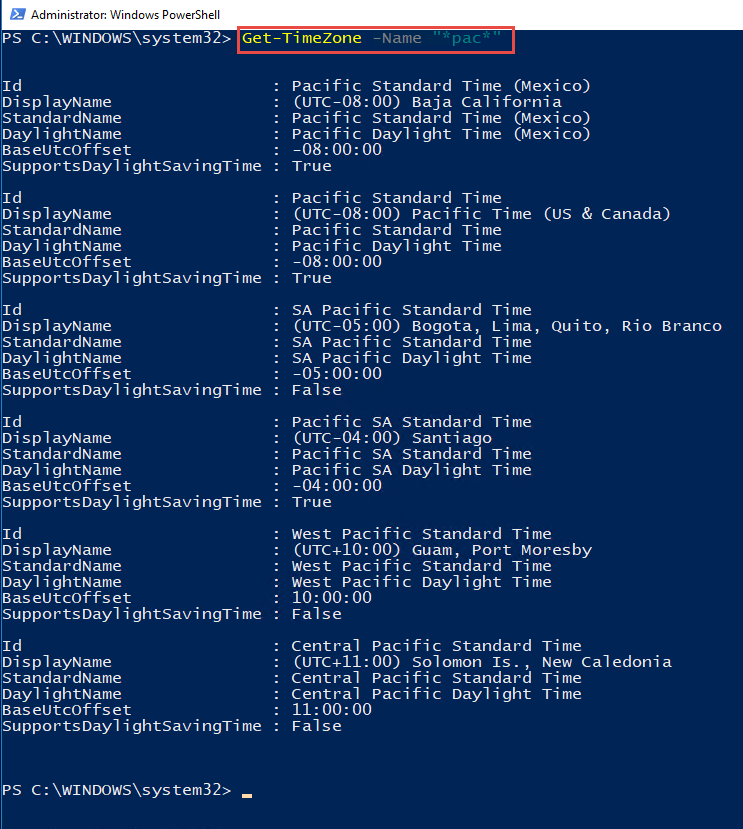
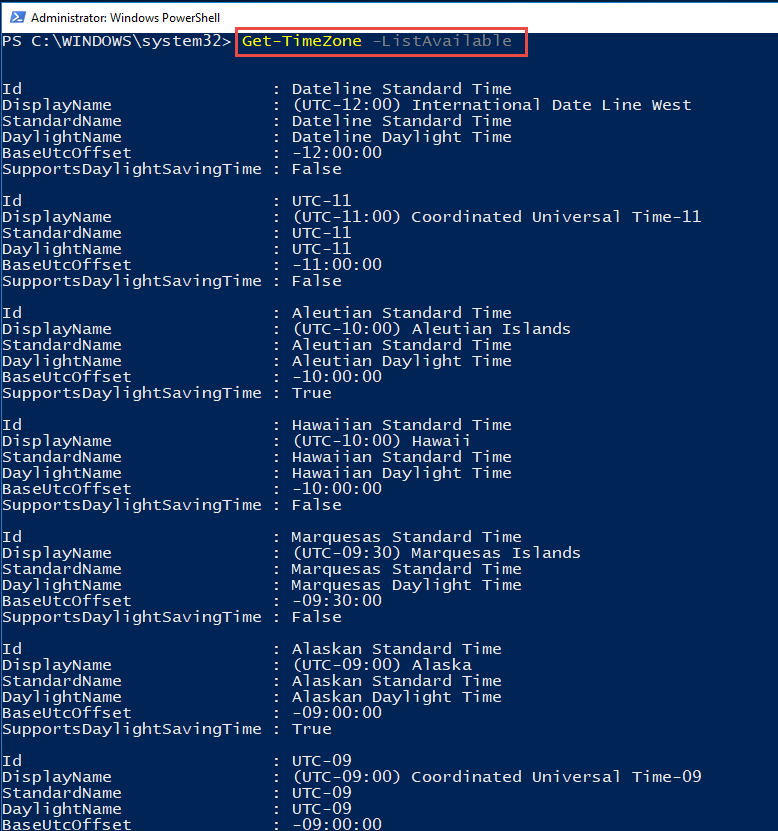
[-Id]: Specifies, as a string array, the ID or IDs of the time zones that this cmdlet gets[-ListAvailable]: Indicates that this cmdlet gets all available time zones[-Name]: Specifies, as a string array, the name or names of the time zones that this cmdlet gets
We can use this command with or without these parameters:
Get-TimeZone
The following screenshot shows the output for the preceding command:
We can use this command with the Name parameter:
Get-TimeZone -Name "*pac*"
The following screenshot shows the output for the preceding command:
We can use this command with the ListAvailable parameter:
Get-TimeZone -ListAvailable
The following screenshot shows the output for the preceding command:
In PowerShell, variables are always prefixed by the character $ and can include any alphanumeric character or underscore in their names. We can store the output from a cmdlet in a variable and use it later on in other cmdlets or for other purposes in the script, such as writing to the host, using it for comparison, or creating another variable, such as this, for example:
$timeZone = Get-TimeZone
Write-Host "The current time zone is " $timeZone
The following screenshot shows the output for the preceding command:

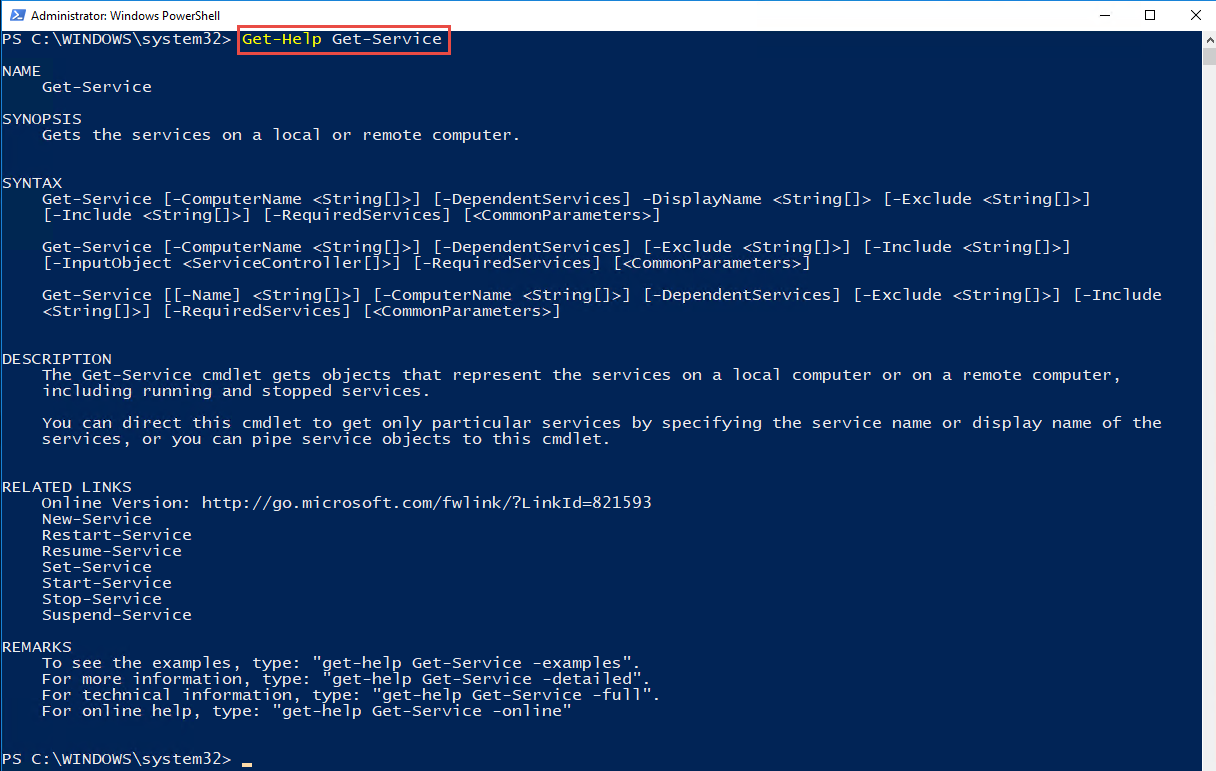
PowerShell comes with a lot of in-built cmdlets, and with the addition of every new module, the list of available cmdlets increases. You can use your favorite search engine to get more information on a cmdlet. You can do this from the PowerShell window as well. The cmdlet to get the help is this:
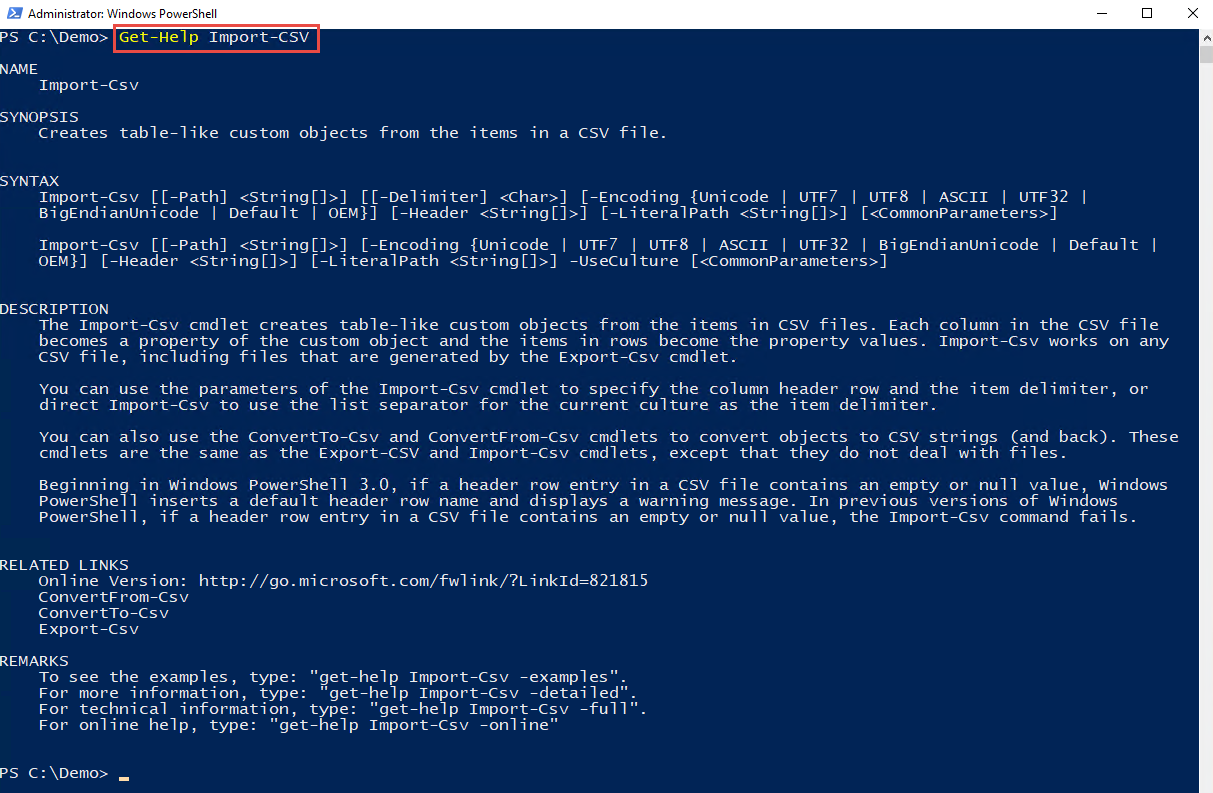
Get-Help nameofcmdletHere's an, for example:
Get-Help Get-ServiceThe following screenshot shows the output for the preceding command:
This is useful if we would like to get help but don't want to leave the Command Prompt.
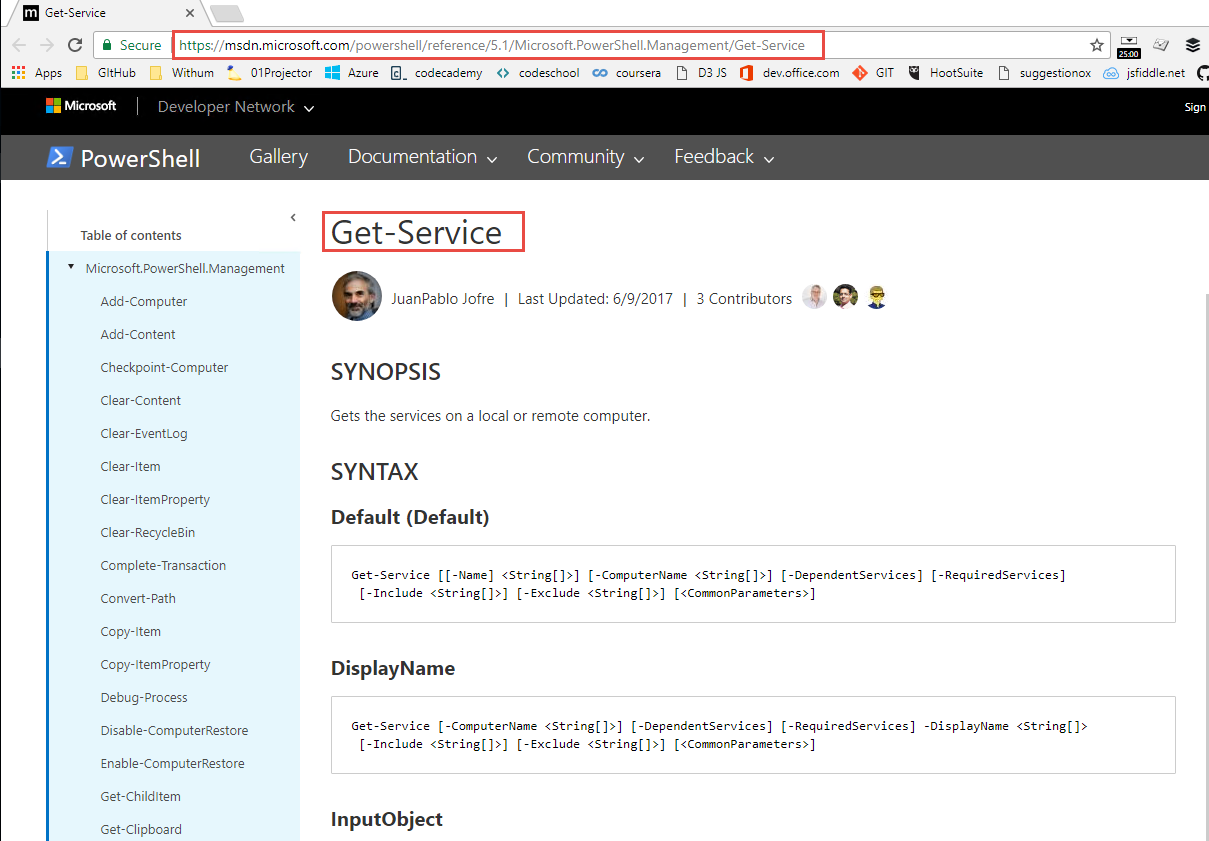
If you would like to get help from the official online documentation, you can use the following cmdlet:
Get-Help Get-Service -onlineThis will open the online help manual of the cmdlet with your default browser:
If you would like to quickly check whether there are any commands available for a particular service, you can use the following cmdlet:
Get-Command *Service*This will give all the commands that contain the Service service in all the modules that are loaded:
A module is a combination of multiple PowerShell functionalities like scripts, cmdlets that are built to solve a common purpose. For example, to work with the users and licensing, we have to use the Module MSOnline provided by the Microsoft. You can find more information about the Windows PowerShell module here https://msdn.microsoft.com/en-us/library/dd878324(v=vs.85).aspx.
To find out the members of a cmdlet, we can pipe the Get-Member cmdlet with another cmdlet:
Get-Service | Get-Member
The following screenshot shows the output for the preceding command:
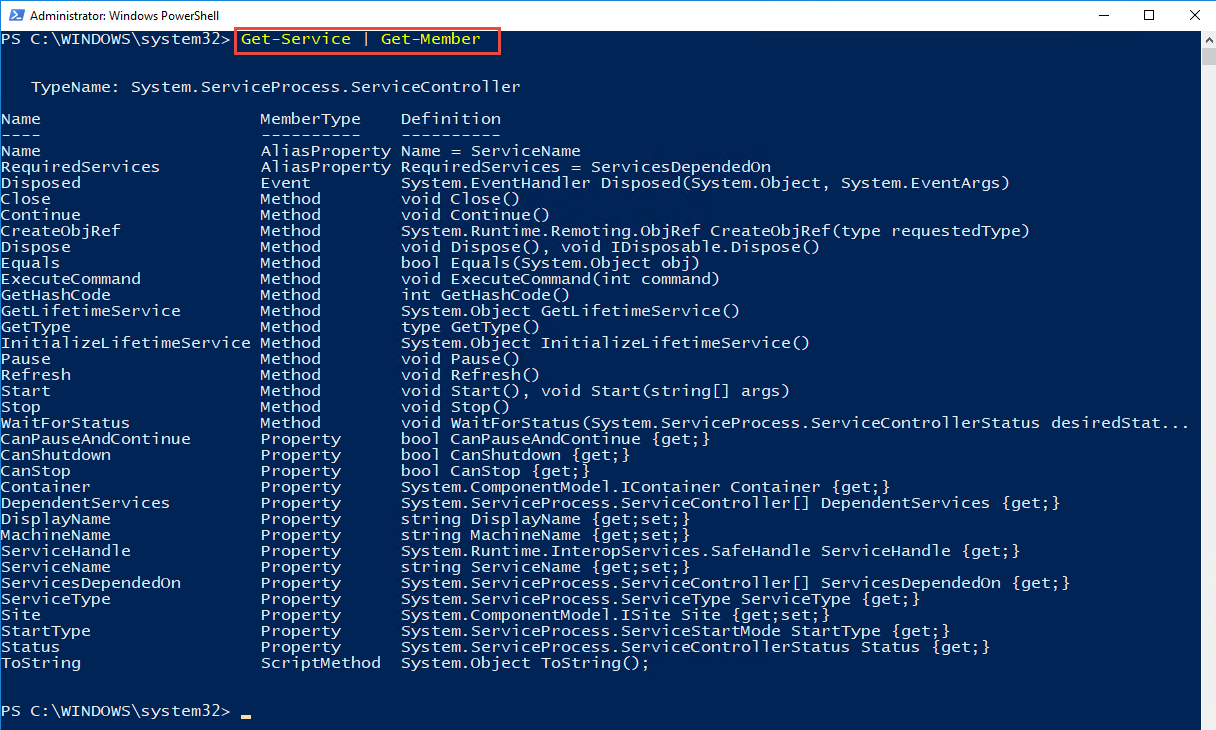
Using the pipe character (|), we can select the objects and then perform an action on them.
These three cmdlets--Get-Command, Get-Help, and Get-Member--are important to understand and use, especially when you are new to PowerShell. If you take a closer look, you will find the highlighted letters spell Microsoft compiled HTML help (.chm) files, which were the old-school help files available in Windows. We will use them throughout the book to get additional information on the commands we will use.
PowerShell works with objects, and these objects can have attributes and methods. An attribute is a property or a description. PowerShell is an object-oriented scripting language; however, moderately complex scripts are often written using a procedural/functional approach.
To get the members of any cmdlet, we can pipe the Get-Member cmdlet with any given cmdlet:
Get-TimeZone | Get-MemberThe output of the preceding command is shown in the following screenshot:
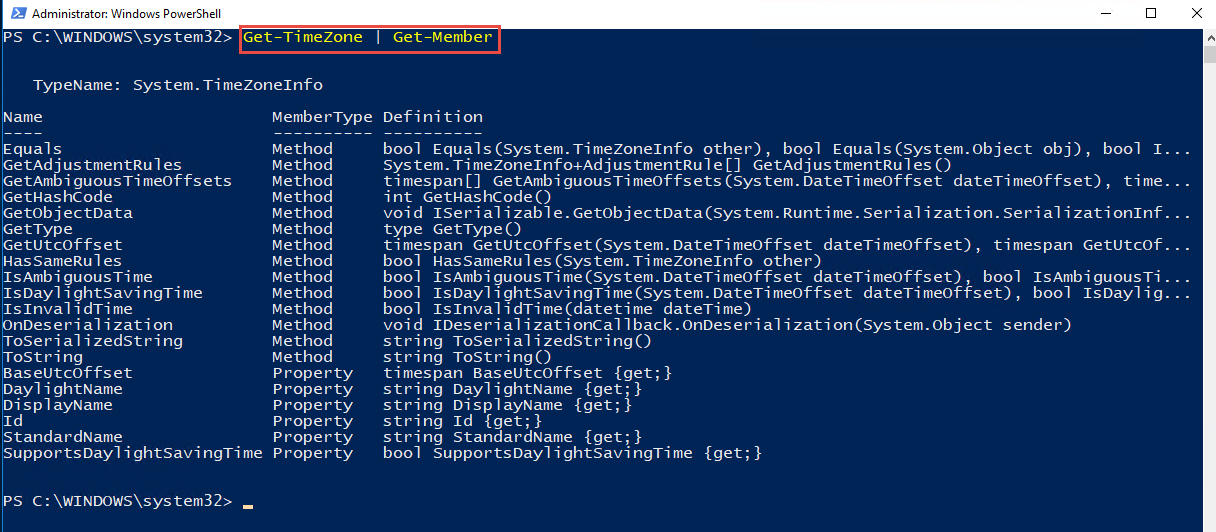
The type of the input is System.String[] and the type of the output is System.TimeZoneInfo[].
When writing scripts, we have to implement business logic that will shape the process. The if and where statements allow us to define logical conditions. For example, if you would like to compare two numbers, you can use the if and else statements and, based on the comparison, take appropriate action.
Conditional statements are the building blocks of any programming and scripting language.
If a certain condition is true, we can run a block of code. The syntax of an if...else is as follows:
if (<test1>)
  {<statement list 1>}
elseif (<test2>)
  {<statement list 2>}
else
  {<statement list 3>}
Here's an example:
$a = 6;
 if( $a -eq 5){
   Write-Host "Variable a is equal to 5"
 }
 elseif( $a -eq 4){
   Write-Host "Variable a is equal to 4"
 }
 else
 {
   Write-host "Variable a is not equal to 5 and 4"
 }
The output of this script will be Variable a is not equal to 5 and 4.
We can use a combination of the if...else statements where in the if block we check for a condition: if that condition is true, then we execute a block of code, and if the condition is not true, then we execute another block of code. Sometimes, we can have more than one expected outcome and we can use multiple elseif conditions. The comparison operator -eq returns Boolean values (true or false). If the outcome of the comparison is true, then the associated block of code is executed. Since it is a Boolean value, we can use the reverse logic as well.
We have a lot of comparison operators available in PowerShell:
-eq: Equal to-ne: Not equal to-gt: Greater than-ge: Greater than or equal to-lt: Less than-le: Less than or equal to-like: Wildcard match-notlike: Does not match wildcard-match: Regular expression matching-notmatch: Does not match regular expression pattern-contains: Collection contains item-notcontains: Collection does not contain item-in: Item is in a collection
We can use multiple comparison operators in a single if statement. This helps you implement complex scenarios.
You can have multiple if statements or even use nested if statements.
We can Where-Object cmdlet to filter data return by other cmdlets. For example, if we would like to find out the processes running on a computer with the name svcHost we can use the Where-Object cmdlet with the Get-Process cmdlets as shown below.
Get-Process | Where-Object {$_.name -contains "svcHost"}Loops in PowerShell execute a series of commands or cmdlets as long as the condition to run them is true. Loops are helpful for running repetitive tasks inside a PowerShell script. For example, if we need to create five new users, we can use a loop, and inside the loop, we can add the logic to create a new user and execute the loop five times. Loops allow us to write business logic once and then run it repetitively as long as a certain condition is met. To implement loops in PowerShell, we can use the for, foreach, while, do...while, and do...until loops.
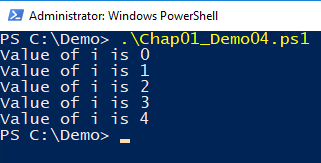
In a for loop, we run the command block based on a conditional test. In the following for loop, we are running Write-Host until the value of variable $i is less than 5. In the beginning, the value of variable $i is 0, and every time the loop is executed, we are incrementing the value of $i by 1. During the execution of the loop, when the value of variable $i becomes 5, the loop stops executing:
for ( $i=0; $i -lt 5; $i++)
{
   Write-Host "Value of i is" $i
}
The output of this for loop is as follows:
Using the while, do...while, and do...until loops, we can run loops as long as a condition is true (it is met).
The while loops only use the while keyword, followed by the condition and then the script block, as shown here:
$i=1
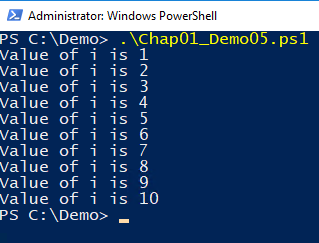
while ($i -le 10)
{
Write-Host "Value of i is" $i
$i++
}In this script, the script block inside the while loop will run till the value of the variable $i is less than 10. The output of this while loop is as follows:
The do...while and do...until loops begin with the do keyword, followed by the script block and then by the conditional keyword and the condition.
Here's an example of the do...while loop:
$i=1
do
{
Write-Host "Value of i is" $i
$i++
}
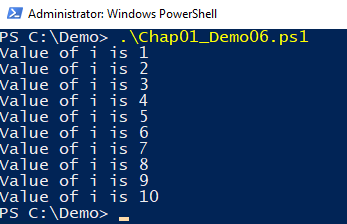
while ($i -le 10)Here's an example of the do...until loop:
$i=1
 do
 {
   Write-Host "Value of i is" $i
   $i++
 }
 until ($i -gt 10)
Both the examples mentioned here basically implement the same business logic using loops, with slightly different comparison methods. In the do...while loop, the script block will run until the value of the variable $i is less than 10, and in the do...until loop, the script block will run until the value of the variable $i becomes greater than 10. The output of both the loops will be the same as, shown here:
To automate tasks, we need to create and run PowerShell scripts. To run a script, we need to follow these steps:
- Configure PowerShell to run scripts: Running a malicious script can harm the computer/server; the default setting for PowerShell is not to run them. We need to change the execution policy of the computer/server to be less restrictive. These steps need to be implemented once.
- Store the script: We need to store the script files with the
.ps1extension on the file system. - Edit the script: Add the business logic using commands, cmdlets, variables, and so on.
- Run the script: Run the PowerShell script within the PowerShell Command Prompt or ISE.
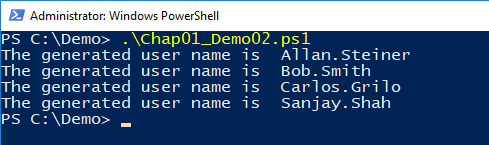
Let's create our first PowerShell script. We will be creating a script to read the information from a CSV file and then process the information using the for loops and then print it on the screen.
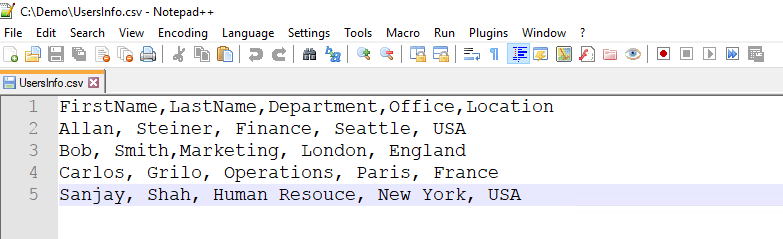
A comma-separated file has information in the form of tables, as shown in the following screenshot. The file has the user's information: their first name, last name, location, and department. We will use this information and create the login names for the users using the format $firstName + "." + $lastName.
The CSV file is as follows:
The script is as follows:
Function generateUserName($firstName, $lastName){
  $userName = $firstName + "." + $lastName
  Return $userName;
}

$userInformation = import-csv 'C:\Demo\UsersInfo.csv'

foreach($user in $userInformation){
  $firstName = $user.FirstName
  $lastName=$user.LastName
  $department =$user.Department
  $office=$user.Office
  $Location=$user.Location
  $userName = generateUserName $firstName $lastName
  Write-Host "The generated user name is " $userName
}
The following screenshot shows the preceding script:
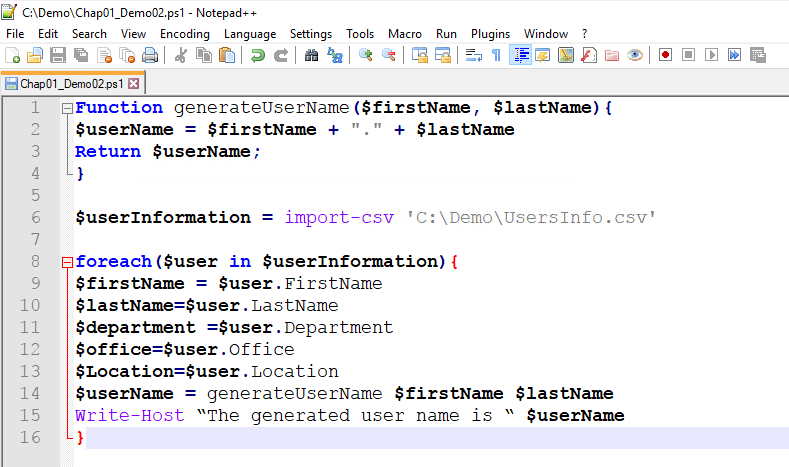
Now let's review this script line by line. As mentioned before, if you are using functions inside a script, it is recommended that you write them at the top of the script. The reason is that when the script is executed, the functions are already loaded.
On line 1 we have declared the function with the name generateUserName, and it accepts two parameters of type string. We can pass complex datatypes as parameters as well.
On line 2, we are creating the value for the username using the following logic:
$firstname + "." + $lastName
On line 3, we are returning that value.
On line 6, we are reading the contents of the CSV file. The Import-CSV cmdlet is a cmdlet to read the contents of a file.
We will be covering this cmdlet in detail because to automate bulk user creation, we can use $userInformation stored in CSV files. We can also use information from other sources, such as plain text files or SharePoint lists. But as of now, CSV files are more common.
The Import-CSV cmdlet reads the information from the .csv file and stores them in the table-like custom objects. Each column header becomes the property and the subsequent rows become the values of the properties. You can find more information about this cmdlet here https://msdn.microsoft.com/en-us/powershell/reference/5.0/microsoft.powershell.utility/import-csv.
Here is the Import-CSV command:
This cmdlet accepts the following parameters.
[-Delimiter]: Specifies the delimiter that separates the property values in the CSV file. The default is a comma (,). Enter a character, such as a colon (:). To specify a semicolon (;), enclose it in quotation marks. If you specify a character other than the actual string delimiter in the file,Import-CSVcannot create objects from the CSV strings. Instead, it returns the strings.
[-Encoding]: Specifies the type of character encoding that was used in the CSV file. Acceptable values for this parameter are as follows:UnicodeUTF7UTF8ASCIIUTF32BigEndianUnicodeDefaultOEM
The default is ASCII.
This parameter was introduced in Windows PowerShell 3.0.
[ -Header]: Specifies an alternate column header row for the imported file. The column header determines the names of the properties of the object thatImport-CSVcreates. Enter a comma-separated list of the column headers. Enclose each item in quotation marks (single or double). Do not enclose the header string in quotation marks. If you enter fewer column headers than there are columns, the remaining columns will have no header. If you enter more headers than there are columns, the extra headers are ignored. When using theHeaderparameter, delete the original header row from the CSV file. Otherwise,Import-CSVcreates an extra object from the items in the header row.[-LiteralPath]: Specifies the path to the CSV file to import. UnlikePath, the value of theLiteralPathparameter is used exactly as it is typed. No characters are interpreted as wildcards. If the path includes escape characters, enclose it in single quotation marks. Single quotation marks tell Windows PowerShell not to interpret any characters as escape sequences.[-Path]: Specifies the path to the CSV file to import. You can also pipe a path toImport-CSV.[-UseCulture]: Indicates that this cmdlet uses the list separator for the current culture as the item delimiter. The default is a comma (,).[CommonParameters]: This cmdlet supports the common parameters:-Debug,-ErrorAction,-ErrorVariable,-InformationAction,-InformationVariable,-OutVariable,-OutBuffer,-PipelineVariable,-Verbose,-WarningAction, and-WarningVariable.
Inputs:
[System.String]: You can pipe a string that contains a path to Import-CSV.
Outputs:
[Object]: This cmdlet returns the objects described by the content in the CSV file.
Let's come back to the script. Once we get the contents of the CSV file in the $userInformation object, we process each row and assign the first name, last name, department, and office to the variables. On line 14, we call the generateUserName function and capture the return value in the variable and display the username on the script:
Note
Using a similar script, we will cover how to create bulk users and assign them licenses in Chapter 3, Azure AD and Licensing Management.
In this chapter, we discussed how PowerShell is a cmdlet-based language with verb-noun syntax. We covered how to pass parameters to cmdlets and store results as variables. We covered how to get help with PowerShell. We covered object-oriented concepts with PowerShell and the concept of objects. We covered how to use the if and where statements. We covered how to use the for and while loops. Finally, we created our first script and used the concepts we covered in the earlier sections to read the contents from a CSV file. In the next chapter, we will cover how can manage Office 365 using PowerShell.