


PowerShell runs existing commands and scripts seamlessly. You can make use of PowerShell's integration with COM, WMI, and ADSI technologies along with its tight integration with .NET. Indeed, PowerShell is the only technology that enables you to create and work with objects from these various technologies in one environment.
In this chapter we will cover:
Windows PowerShell syntax and grammar
How to write PowerShell scripts and functions
What is new in Windows PowerShell 3.0
In order to enable the readers to get familiar with the language environment quickly, this chapter will briefly introduce the PowerShell grammar. A key concept to grasp when starting to work in PowerShell is that everything is an object. An "object", in PowerShell, consists of properties (information we can gather) and methods (actions we can perform).
An object is something we can gather information from and/or perform an action upon. In simple terms, an object is a black box that has attributes or properties that describe it. Some of these properties are read-only. You can change or set the others. For example, consider a service that has properties such as name, display name, status, and services that it depends on.
Often, objects can also be made to do something. These actions are referred to as methods. Sometimes, the method is used to modify the object and sometimes to make an external change. A service can be stopped and started. You can also modify the service object by changing its start mode to either automatic, manual, or disabled. First of all, we will introduce the most important object in PowerShell—pipeline.
In a traditional command-line environment, you would have to manipulate the text to convert output from one format to another and to remove titles and column headings. A major advantage of using objects is that it is much easier to pipeline commands, that is, to pass the output of one command to another command as the input.
Windows PowerShell provides a new architecture that is based on objects rather than text. The cmdlet that receives an object can act directly on its properties and methods without any conversion or manipulation. Users can refer to properties and methods of the object by their names, rather than calculating the position of the data in the output. You do not need to manipulate strings or calculate data offsets. Pipelines act like a series of connected segments of pipe. Items moving along the pipeline pass through each segment. To create a pipeline in Windows PowerShell, you connect commands together with the pipe operator "|". The output of each command is used as an input to the next command. A related useful characteristic of pipelines is that they operate on each item separately; thus you do not have to modify them based on each single item. Furthermore, each command in a pipeline usually passes its output to the next command in the pipeline item-by-item. This usually reduces the resource demand of complex commands and allows you to get the output immediately.
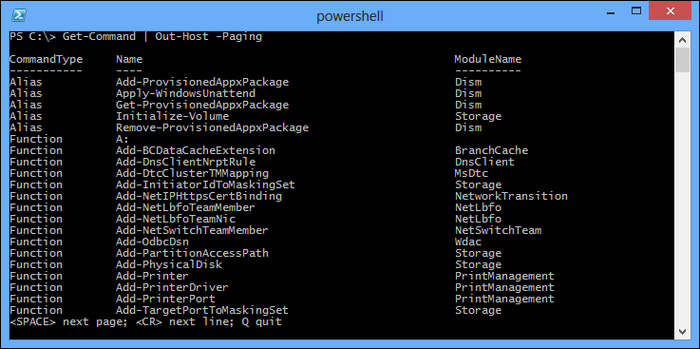
The notation used for pipelines is similar to the one used in other shells, so at first glance, it may not be apparent that Windows PowerShell introduces something new. For example, if you use the
Out-Host cmdlet to force a page-by-page display of the output from another command, the output looks just like the normal text displayed on the following screen, broken up into pages:
Tip
Downloading the example code
You can download the example code files for all Packt books you have purchased from your account at http://www.packtpub.com. If you purchased this book elsewhere, you can visit http://www.packtpub.com/support and register to have the files e-mailed directly to you.
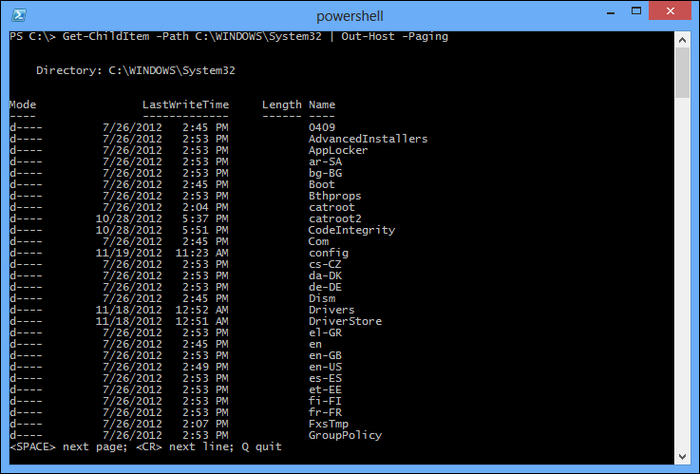
The Out-Host -Paging command is a useful pipeline element whenever you want to display a lengthy output slowly. It is especially useful if the operation is very CPU-intensive because processing is transferred to the Out-Host cmdlet when it has a complete page ready to display, and the cmdlets that precede it in the pipeline halt their operation until the next page of output is available. You can see this if you use the Windows Task Manager to monitor the CPU and memory consumed by Windows PowerShell. For example, run the following command:
Get-ChildItem C:\Windows -recurse
and command:
Get-ChildItem C:\Windows -recurse | Out-Host -Paging
compared the CPU and memory utilization rate..
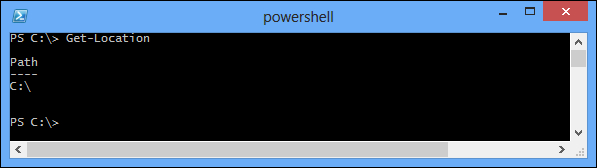
What you see on the screen is text, but that is because it is necessary to represent objects as text in a console window. This is just a representation of what is really going on inside Windows PowerShell. For example, consider the
Get-Location cmdlet. If you type Get-Location while your current location is the root of the C drive, you would see the following output:
Instead of using text to insert commands into a pipeline communication, Windows PowerShell uses objects. From the users' perspective, objects package related information into a form that makes it easier to manipulate the information as a unit, and extract specific items that you need.
The Get-Location command will not return the text that contains the current path, but returns an object called the
PathInfo object, including the current path and some other information packet. Then the Out-Host cmdlet will send the
PathInfo object to the screen, after which Windows PowerShell will decide what information is to be displayed and how to show it based on its format rules.
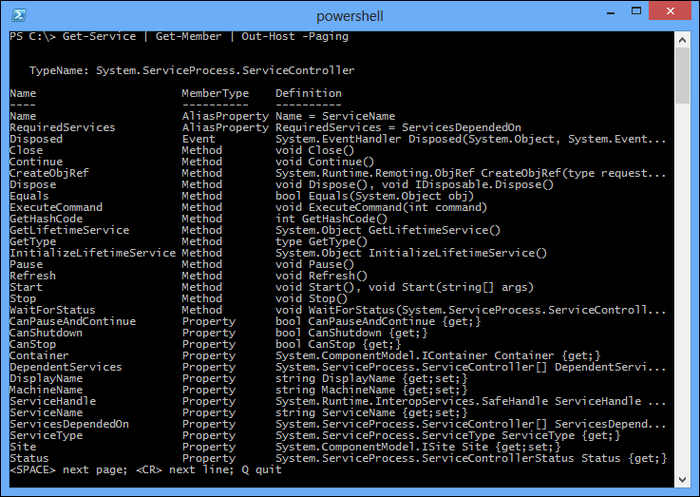
Because objects play such an important role in Windows PowerShell, there are several native commands designed to work with arbitrary object types. The most important one is the Get-Member command.
The simplest technique for analyzing the objects that a command returns is to pipe the output of the command to the Get-Member cmdlet. The Get-Member cmdlet shows the formal name of the object type and a complete listing of its members. Sometimes the number of returned elements can be overwhelming. For example, a service object can have over 100 members.
To see all the members of a service object and page the output, please type the following:
PS > Get-Service | Get-Member | Out-Host -Paging
The output from this command will look something like this:
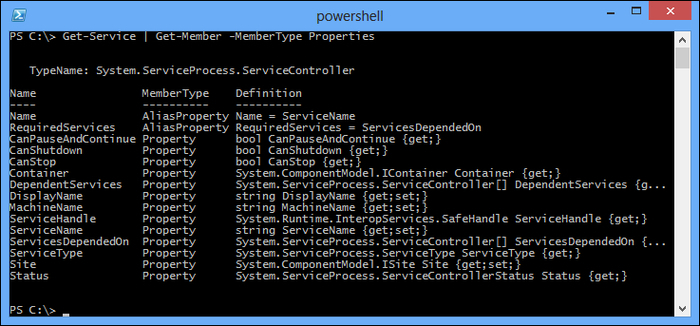
The Get-Member command lets you list only members that are properties. There are several forms of properties. The resulting list is still very long, but a bit more methodical, as shown in the following screenshot:
If you need to look at the content outside of Windows PowerShell's default display format, you can do so through the use of the format cmdlets, which can format the output data.
Windows PowerShell's set of cmdlets allows users to control which attributes are displayed for a specific object. All cmdlet names begin with a verb form. The format cmdlets are Format-Wide, Format-List, Format-Table, and Format-Custom.
Each format cmdlet has default properties. These properties will be used if you do not specify a particular attribute to display. Each cmdlet also uses the same parameter name and attribute, but you need to specify which attribute has to appear. As the Format-Wide cmdlet reveals a single attribute display only, its property parameters require only a single value, but the characteristic parameters of Format-List and Format-Table will accept an attribute name list.
With the Format-Wide cmdlet, you can format the output as a table listing one property only. This makes it useful for displaying simple lists that show only one element per line.
The Format-List cmdlet is used for formatting the output as a list of properties, each on a new line. The Format-Table cmdlet is used for tabular output.
Windows PowerShell provides several cmdlets that let you control the data's output directly. These cmdlets share two important characteristics that we will discuss in this section.
By default, Windows PowerShell sends data to the host window, which is just what the Out-Host cmdlet does. The Out-Host cmdlet is primarily used for paging data. For example, the following command uses Out-Host to page the output:
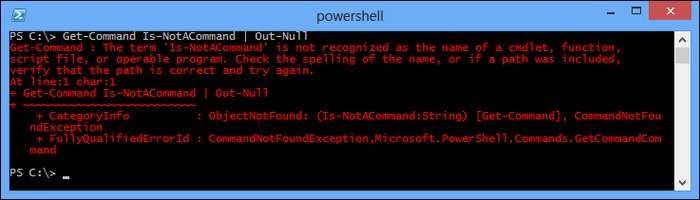
The Out-Null cmdlet is designed to immediately discard any input it receives. This is useful for discarding unnecessary data that you get as a side effect of running a command. When typing the following command, you will not get anything back from the command:
Get-Command | Out-Null
The Out-Null cmdlet does not discard an error output. For example, if you enter Get-Command Is-NotACommand | Out-Null, a message is displayed informing you that Windows PowerShell does not recognize Is-NotACommand. This is shown in the following screenshot:
You can send the output to a file instead of the console window by using the Out-File cmdlet. The following command line sends a list of processes to the C:\tmp\processlist.txt file:
PS > Get-Process | Out-File -FilePath C:\tmp\processlist.txt
When you manipulate in Windows PowerShell, you are operating the .NET Framework objects. Technically, a .NET Framework object is an instance of a .NET Framework class that consists of data and the operations associated with that data. An object is a data entity that has properties.
For example, when you get a service in PowerShell, you are really getting an object that stands for the service. When you view information in it, you are viewing the properties of the service object. And, on starting a service, when you change the Status property of the service to started, you are using the start() method of the service object.
All objects of the same type have the same properties and methods, but each instance of an object can have different values for the properties. For example, every service object has a Name and Status property. However, each service can have a different name and a different status.
You can store the output of a pipeline or a command in a variable for later use, or to work with it in more detail. Variables in PowerShell allow users to store the output of something that may be used later. A variable's name starts with a dollar sign ($) and can be followed by any alphanumeric character or the underscore in its name. You can create a variable and assign it a value in the same step. Windows PowerShell only creates the variable if it does not exist, otherwise it assigns the specified value to the existing variable, as shown in the following screenshot:
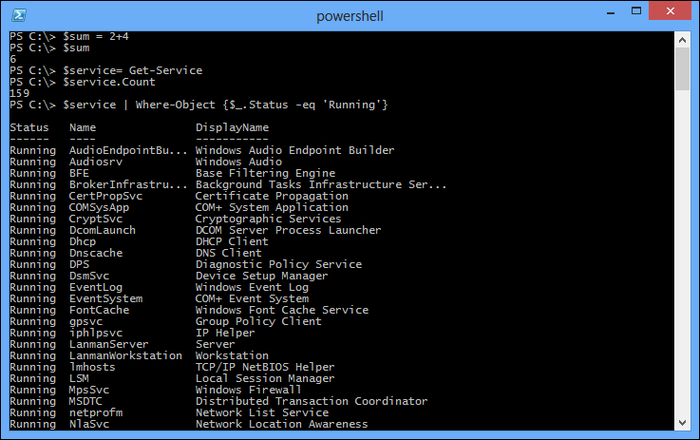
You can store any pipeline or command result in a variable to use it later. If that result is simple data, such as a number or a string, then the variable contains simple data. If the command generates rich text data, such as the objects that stand for system services from the Get-Service cmdlet, then the variable contains the list of rich data. If the command, such as a former executable, generates plain text, then the variable contains plain text.
Variables are stored in the memory; if you no longer need the variables that store a large amount of data, you should assign the $null value to those variables, and then PowerShell can release the memory for you.
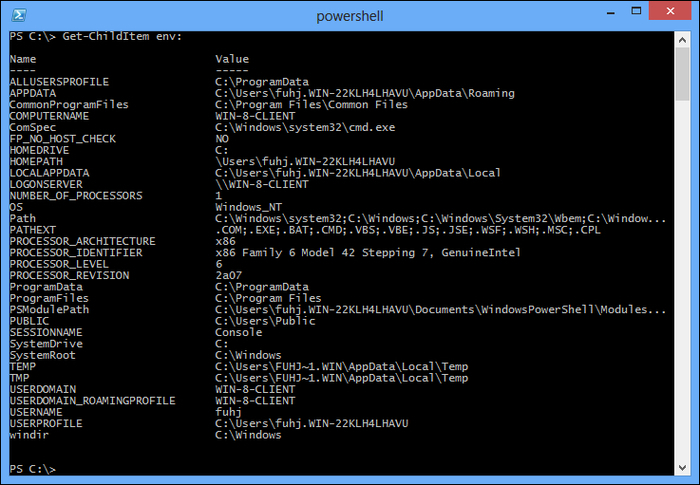
PowerShell offers several ways to access environment variables. To list all the environment variables you can list the children of the env drive, as shown in the following screenshot:
To get an environment variable, prefix its name with $env
(such as $env: variablename). An example is shown in the following screenshot:

PowerShell provides access to the environment variable through its environment provider. The provider lets you work with data storage, such as registration, environment variables, alias, and certificate, as you will visit the filesystem. Get environment variables to use their provider path; supply env: or environment:: by using the Get-ChildItem cmdlet.
Windows Management Instrumentation (WMI) is a core technology for Windows system administration because it exposes a wide range of information in a uniform manner. As we all know, WMI is an infrastructure that supports the CIM model and Microsoft-specific extensions of CIM.
The WMI infrastructure ships in Windows 2000, which was difficult to write and use. In PowerShell 3.0, Microsoft introduced several new cmdlets, which are used for operating CIM. With these cmdlets, not only can we manage servers, but we can also manipulate all the heterogeneous devices necessary to make these servers together into a comprehensive and coherent computing platform. In today's world, cloud computing is a very important technology. Generalized cloud computing requires standard-based management. This is the reason why Microsoft paid so much attention to standard-based management in Windows Server 2012, which is expected to be a Cloud OS. We are going to discuss how to use Get-CimClass to access CIM objects and then how to use CIM objects to do specific things.
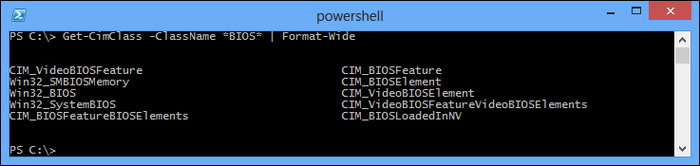
The first problem of using CIM is trying to find out what can be done with CIM. CIM classes describe the resources that can be managed. There are dozens of CIM classes, some of which contain several properties.
Get-CimClass resolves this problem by making CIM discoverable. You can get a list of the CIM classes available on the local computer using the –ClassName parameter with a keyword and a wildcard character. An example is shown in the following screenshot:
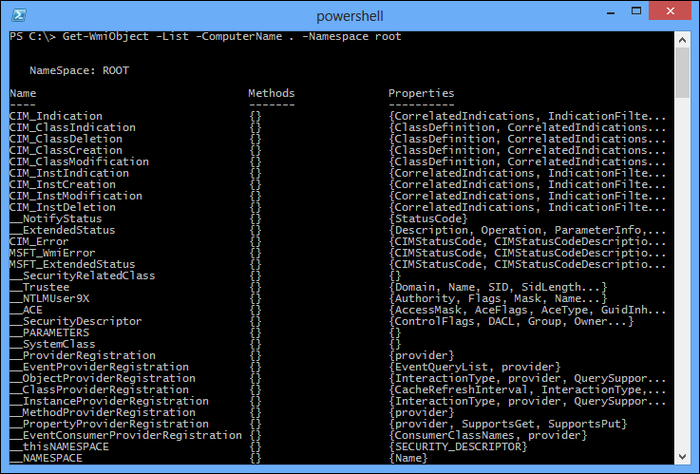
Get-CimClass uses the root/cimv2 namespace by default. If you want to specify another WMI namespace, use the Namespace parameter and specify the namespace's path, as shown in the following screenshot:
If you are familiar with WMI cmdlets from PowerShell 2.0, you will find learning new CIM cmdlets easy. If you already know the ClassName value of a WMI class, you can use it to get information. For example, one of the WMI classes commonly used for searching for information about a process is Win32_Process. The WMI cmdlet needs to work with ClassName and NameSpace, and the CIM cmdlet follows the same pattern. Refer to the following screenshot:
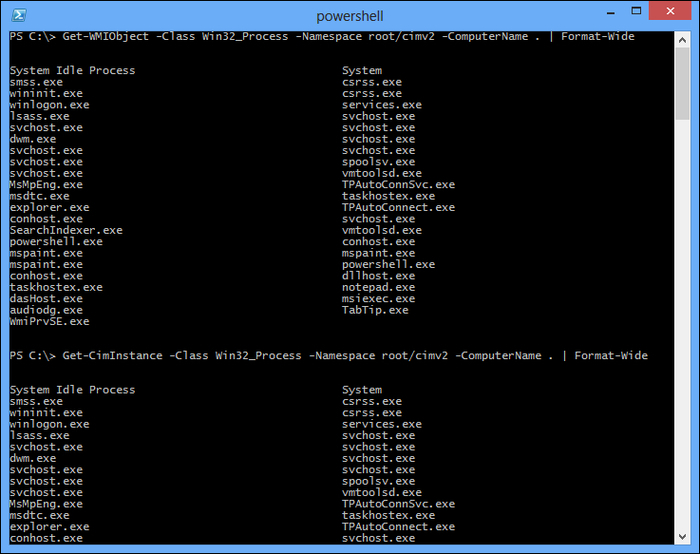
Although we are showing all of the parameters, the command can be expressed in a more succinct way. The ComputerName parameter is not necessary when connecting to the local system. We display it to demonstrate the most general case and remind you about the parameter. The Namespace parameter defaults to root/cimv2, and can be ignored as well. Finally, most cmdlets allow you to ignore the name of common parameters. With Get-WmiObject, if no name is specified for the first parameter, Windows PowerShell treats it as the Class parameter.
You will also notice that in some places, the script using the WMI cmdlet can't be simply changed to the CIM cmdlet by changing the cmdlet name. This is shown in the following example:
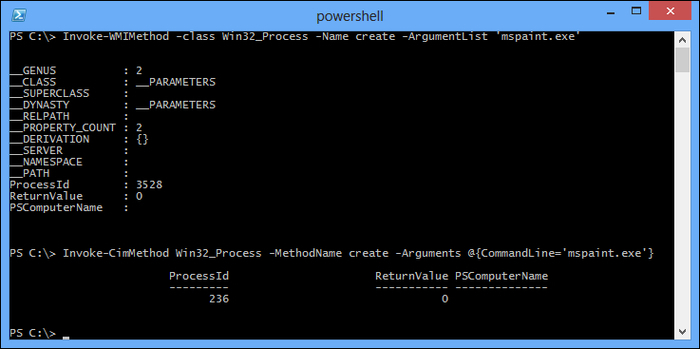
We can see that the parameters of the two cmdlets are completely different, and the result displayed is not the same.
There are software components with .NET Framework and COM interfaces that enable users to perform many system administration tasks. Windows PowerShell lets you use these components, so you are not limited to the tasks that can be performed by using cmdlets.
We can create an instance of an object using its default constructor. This can be done using the New-Object cmdlet with the classname as its only parameter:

Many cmdlets (such as Get-Process and Get-ChildItem) generate live .NET objects that represent tangible processes, files, and directories. However, PowerShell supports much more of the .NET Framework than just the objects that its cmdlets produce.
The PowerShell loop statement allows the user to execute operations without the need to execute the command repeatedly, for example, repeating operations several times, processing a set of items, or cycling a condition till it becomes true.
The PowerShell flow control and comparative statements let the user script adapt to different data. They let you do this based on the value of the data by carrying out orders, skipping some operations, and so on.
PowerShell allows the user to contrast data, and then make decisions with the comparison operators. It allows making decisions based on the result of logical operators to contrast data blocks.
Examples for comparison operators are -eq, -ne, -ge, -gt, -lt, -le, -like, -notlike, -match, -notmatch, -contains, -notcontains, -is, -isnot, -in, -notin, and so on.
Examples for logical operators are -and, -or, -xor, -not, -shl, -shr, and so on.
By default, the PowerShell comparison operator is not case sensitive. For all operators that are case sensitive, the -i prefix makes the comparison case insensitive, and the -c prefix executes case-sensitive comparisons.
In PowerShell you can change the flow of execution of the script by using the conditional statements. The following code snippet shows us an example:
if (condition)
{
statement block
}
elseif (condition)
{
statement block
}
else
{
statement block
}
If the condition calculates to $true, PowerShell implements the block you supply. Then, it continues with the rest of the if/else statement list. PowerShell needs matching parentheses in the block even if the block contains only one statement.
If the condition calculates to $false, PowerShell implements the statements under elseif until a condition matches. If there is a match, PowerShell executes the block-related conditions, and then continues to implement the rest of the if/else statement list. For example:
$textForMatch = Read-Host "Input some text"
$matchType = Read-Host "Supply Simple or Regex matching?"
$pattern = Read-Host "Match pattern"
if ($matchType -eq "Simple")
{
$textForMatch -like $pattern
}
elseif($matchType -eq "Regex")
{
$textForMatch -match $pattern
}
else
{
Write-Host "Match type must be Simple or Regex"
}
If none of the conditions calculate to $true, PowerShell executes the statement block related to the else clauses, and then continues to implement till the end of the if/else statement list.
A switch statement is usually
used to control several conditions that have a clear value. It requires the value of the conditions to be an integer or a character. The conditions used in a switch statement are called cases. Using the value of case, the control program will jump to the matching case, and will keep running till the statement exits or meets the break statement. Usually, we can use the default clause to include other exceptions. If the conditions of the switch statement are all false, the control program will jump to execute the default clause. If the default clause is omitted, it will execute the next statement directly.
The following code snippet shows a switch statement:
switch options expression
{
comparison value { statement block }
-or
{ comparison expression } { statement block }
(…)
default { statement block }
}
When PowerShell evaluates a switch statement, it calculates the expression for the statement in the switch body. If the expression is a list of values, PowerShell calculates each entry against the statement in the switch body.
The {comparison expression} statement for you deals with the current input items, which are stored in the $_ variable, in any one of the script blocks. When it is dealing with a {comparison expression} statement, PowerShell executes a related statement block only when the {comparison expression} value is $true.
When dealing with a switch
statement, PowerShell tries matching the current input object for each statement in the switch body even if there are already one or more matches. PowerShell exits a switch statement after it finds a match or if it encounters a break statement, which is the final statement of the block of statements.
A PowerShell loop statement lets you execute a group of statements several times.
Consider the following code block:
:loop_label for(initialization; condition; increment)
{
statement block
}
A PowerShell for statement first executes the expressions given during initialization. It next assesses the condition; if the condition of the evaluation results to $true, PowerShell executes the given statement block. Then, it will execute the expressions given in increment. PowerShell continues to execute the statement block and the incremental statement as long as the condition calculates to $true.
For example:
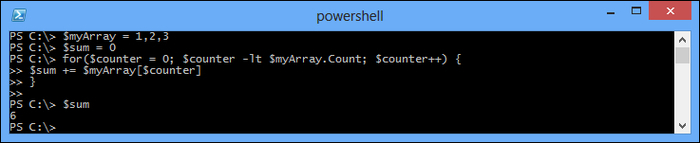
for($counter = 0; $counter -lt 10; $counter++)
{
Write-Host "Processing item $counter"
}Consider the following code block:
:loop_label foreach(variable in expression)
{
statement block
}
When PowerShell executes a foreach statement, it implements a pipeline of the given expression. For each entry produced by
the expression, it assigns an entry variable, and then executes a given statement block.
For example:
$handleSum = 0;
foreach($process in Get-Process |
Where-Object {$_.Handles -gt 600})
{
$handleSum += $process.Handles
}
$handleSumSometimes, loops may be nested within each other. However, if you are working with nested loops, how do you break and continue to work? They will always affect the inner loop, which is the loop that they were called from. However, you can also label loops and then submit the label to continue or break if you want to exit or skip the outer loops.
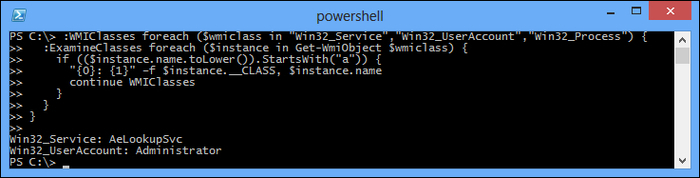
The next example nests two foreach loops. The first (outer) loop cycles through a field with three WMI classnames. The second (inner) loop runs through all instances of the respective WMI classes. This allows you to output all instances of all the three WMI classes. The inner loop checks whether the name of the current instance begins with "a"; if not, the inner loop will then invoke continue to skip all instances not beginning with "a". The result is a list of all services, user accounts, and running processes that begin with "a":
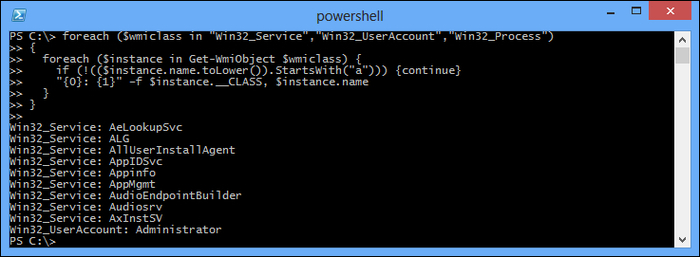
As expected, the continue statement in the inner loop has had an effect on the inner loop where the statement was contained. But how would you change the code if you'd like to see only the first element of all services, user accounts, and processes that begin with "a"? Actually, you would do
almost the exact same thing, except that now continue would need to have an effect on the outer loop. Once an element was found that begins with "a", the outer loop would continue with the next WMI class:
PowerShell makes dealing with arrays and lists similar to working with other data types: you can expediently create an array or a list, and then add or remove elements from it. You can also expediently execute sort, search, or put it in another array. When you want to store the mapping between one block of data and another, a hash table supplies a perfect solution.
For example, you can create an array and save a given set of items in it; these items should be separated by a comma, as shown in the following screenshot:

You can also create an array with a specific size using the New-Object cmdlet. We can access a specific element of the array by using PowerShell's array access principle, as shown in the following screenshot:

PowerShell's array access principle provides an easy way to visit two specific elements of an array or more combinations of the elements in the array. In PowerShell, the first item of the array is assigned index 0.
To store a command, generate a list of outputs using variable assignment, as shown in the following screenshot:
To access every item in an array, use the
Foreach-Object cmdlet, as shown in the following screenshot:

To access each item in an array, use the
foreach keyword, as shown in the following screenshot:

To access items in an array by position, use a
for loop, as shown in the following screenshot:
PowerShell thus provides three main alternatives to deal with the elements in an array. In the Foreach-Object cmdlet and the foreach script's keywords, technology visits an element of the array and lets you use the cycle items in the array in a less structured approach.
You can use the Sort-Object cmdlet to sort a list of items, as shown in the following screenshot:
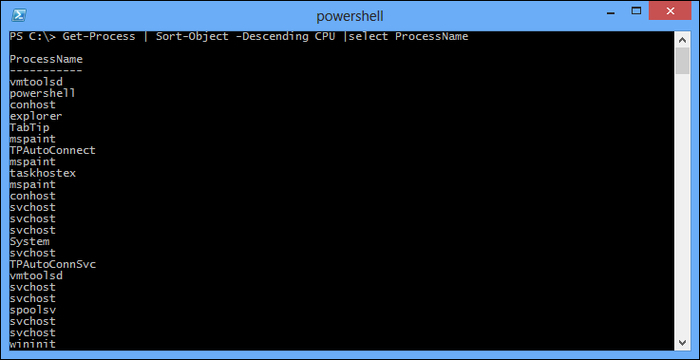
The Sort-Object cmdlet provides you with a convenient way to sort objects by a property that you specify. If you don't specify an attribute, the Sort-Object cmdlet follows the ordering rule of the objects, if they define any. In addition to sorting by a property in the ascending or descending order, the Sort-Object cmdlet's -unique switch operator also allows you to delete duplicates from the sorted collection.
The -contains operator is a useful method to determine quickly if a list contains a specific element. To search for a list item instead of matching a pattern, use the -match or -like operators. The -eq, -like, and -match operators are useful methods to find a matching element set for your specific condition. The -eq operator returns all the elements that are equal to your terms, the -like operator returns all the elements matched elements in the wildcard given in your pattern, and the -match operator returns all elements that match the regular expression given in your pattern. To delete all the elements of the array, match them to a given mode, and then you can keep all the elements that do not match the pattern.
We can use the
System.Collections.ArrayList class to set a processing array and define it, as shown in the following screenshot:
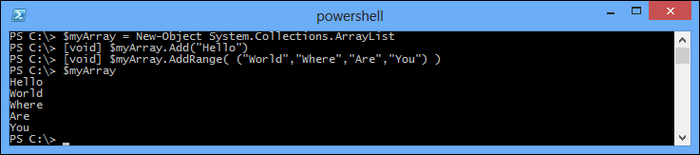
As in most languages, an array in PowerShell keeps the same length once you create them. PowerShell allows you to add an entry, delete an entry, and search for an entry in an array, but these operations may be time consuming when you are working on a large amount of data. For example, to combine two arrays, PowerShell creates a new array that is big enough to hold the contents of the two arrays, and then copies the two arrays to the destination array.
For example, if you have a collection of items, and you need to visit each item by the label that you provided, you can define a map between the label and the entry using a hash table. This is shown in the following screenshot:
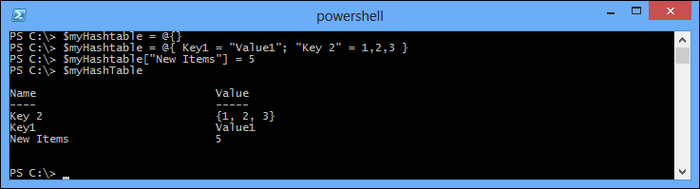
Hash tables are very similar to arrays that allow you to access items by whatever label you want—not just through their index in the array. They form the keystone of a large number of scripting techniques. Since they allow you to map names to values, they form the effective basis for lookup tables such as the International Telephone Country Codes and area codes. Since they allow you to map names to fully-featured objects and script blocks, they can often take the place of custom objects. This key and value mapping also proves to be helpful in interacting with cmdlets that support advanced configuration parameters, such as the calculated property parameters available on the Format-Table and Select-Object cmdlets.
For example, consider that you have hash table keys and values, and you want column value results from the sorted key sequence. To sort a hash table, we can make use of the GetEnumerator() method in the hash table to obtain personal elements. Then, we can use the
Sort-Object cmdlet, and sort by name or value, as shown in the following screenshot:
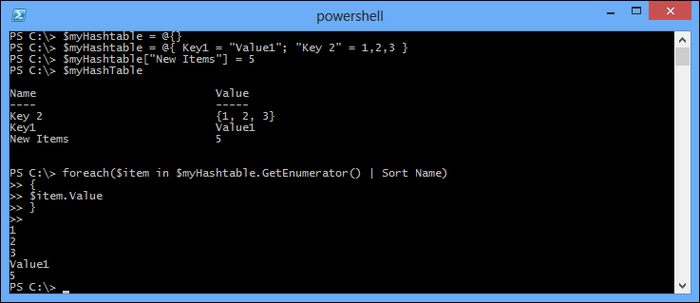
However, the hashtable object supports the GetEnumerator() method and allows you to deal with single hash table entries that have name and value attributes. Once you have these, we can sort them easily as we can sort any other PowerShell data.
An elegant code block helps the process not only when controlling the collection of objects, but also in many other conditions. The most important thing is that the script block allows us to package a block of code and delay its execution. A script block holds the code snippets, and so you do not need to specify a formal name. We can dynamically create any script operation and of course, we can also perform the transfer of different parameters many times.
Defining a script piece for writing is very simple; it is just surrounding several program statements within curly brackets. This statement will not be executed immediately; on the contrary, a new script block object will be created and returned. In order to facilitate calling the script block after that, we may allocate a script block to a variable. The following screenshot shows a sample script block:

We can call a script block using the invoke operator (&). The following screenshot shows how we can use this operator with a variable when this variable contains a block:

Block compile objects can be passed in and executed multiple times. They are reference objects and we can assign a variable to a block just to make the variable point to the block quoted in memory.
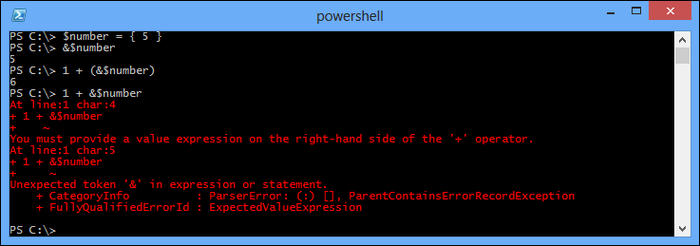
As we have seen so far, none of the blocks have executed an action or an interaction with the outside world in complex ways. Now that I have already mentioned the expression, we can see the operation from the point of view of the block, which can be used in an expression. The operation parameters evaluate the return value. This return value from the script block simply asks you to output an object that will neither be a cmdlet nor another expression. The following is an example of a return value:

As you can see from the last command in the previous example, the return number cannot be used directly in a conditional expression; you must make use of parentheses. If you don't, the plus (+) operator will be mistaken as the right-hand operand and an error, as shown in the following screenshot, will be raised:
Note that the output of an object does not terminate the execution of the block, and the rest of the statement outputs after the object are still implemented. For example, you can print a string to the console window to return a value, and the retuning value does not contain other output statements, as shown in the following screenshot:
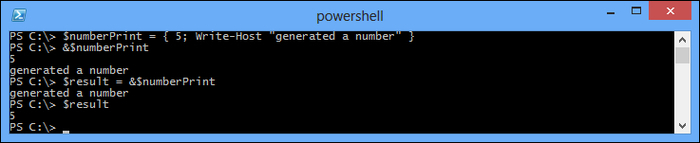
The $numberPrint block returns a value and writes a string to the console. Looking at the anonymous block invocation, you may think that the block returns or prints two variables, but this in fact is not the case. Look at the assignment operation in the following screenshot. The
$result variable is assigned number 5; this will return the real value and the string will be printed to the console.
We can use a return statement to end the execution and exit the script block. It terminates the execution and gives the return value. Changing the block before using return will prevent the Write-Host command from executing:

You can use the return statement to simply quit a block and stop execution. It doesn't ask you to provide a value. If you omit the value, the script block will only exit and not return a value. In this case, the block returns a value to the caller only if there is an output before the return statement.
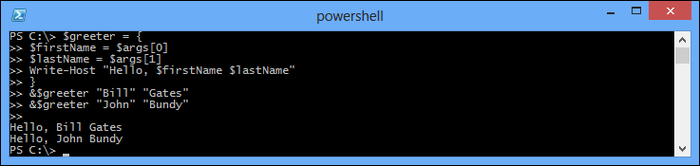
A useful scripting block will need a way to get parameters from the outside world so that it can be executed with different data. The parameters can be passed and retrieved according to their position. A piece of scripting block will always have a predefined $args variable through automatic settings, and it will contain a group of provided parameters. We can use it to create and output a custom message to the user giving a first name and a family name as shown in the following screenshot:
Though the indexed access to parameters is a good technology, which can be used in many programming languages, unfortunately, it's too easy to make a mistake once the parameters grow in quantity. It is best to be used in a very simple scene where you cannot go wrong. In an advanced scenario, when you don't know the number of parameters while defining your script block, a mistake is likely to occur. We did not talk much about simple and advanced scenarios and in most cases we make use of named parameters. These are announced in the script block using the param keyword. Here is how the previous example switches to named parameters:

Note that usually the first letter of a parameter name will suffice. In cases where multiple parameter names start with the same character sequence, you will have to provide the initial characters that uniquely identify the parameter.
We can set default parameter values, which can contain any expression. We can exploit this fact to implement mandatory parameters. Mandatory parameters are parameters that absolutely have to be provided when calling the script block. To do that, we add an expression that throws an exception when evaluated. In that way, the exception will be thrown if the caller fails to provide the parameter. Based on this consideration in the $greeting block, the $firstName parameter is essential:
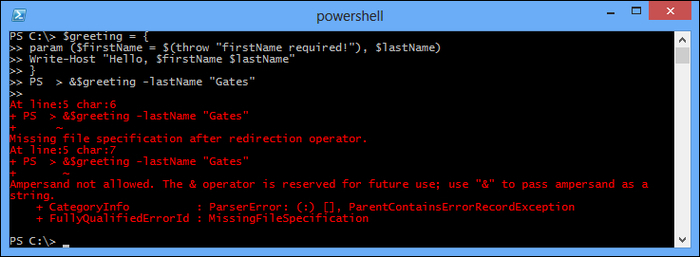
Now, you can follow the $(throw "wrong information") model to realize forced parameters.
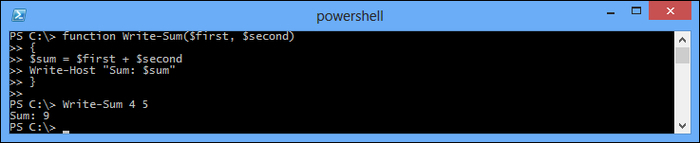
A function in PowerShell is just a subroutine having another name or a piece of code that can accept parameters, operations, and return values. A subroutine is probably the most important invention in the field of computer science programming. Subroutines allow writing code snippets that are independent of the main program, and can be called when you need them. A function is the main mechanism to construct abstraction, and produce reusable code snippets in PowerShell. By learning to structure the code and the function, you can make them more manipulative and readable.
A function is very similar to a script block in the sense that it contains executable code. The main difference is that it is a script with two anonymous parameters and it must be assigned to a variable so that it is assessed. For functions to get their name in their creation, their name must be immediately assessed. For defining a function, we must use the function keyword as shown in the following code snippet:
function <name>(<parameter list>)
{
<function body>
}
The function name should start with a letter and may contain any alphanumeric character sequence and an underscore character. This is how we define a simple function to output some text:

Having a function to accept parameters, we can provide a list of function definitions. The following is a sample function; it accepts two numbers and writes the sum to the console:
A PowerShell command sequence can be saved as a script file and can be executed later. We need to use a script file when we want to create small scripting tools, which we can run on a regular basis. We also need to use script files in cases where we create a complex modular script to keep their code in a different file. This will facilitate function development and maintenance.
The typical PowerShell script is a text file, which can be created using all kinds of tools. By default, these documents carry the .ps1 file extension. You can create them using Notepad, but it is best if you use a more powerful tool such as a programmer's text editor with syntax highlighting and intelligent word completion, for example Notepad++, ISE, and PowerGUI.
Notepad++ is a free source code editor and is a Notepad replacement that supports several languages. With a plugin that supports PowerShell, it gives you full syntax highlighting for PowerShell.
The Windows PowerShell Integrated Scripting Environment (ISE) is a host application for Windows PowerShell. Powershell v3 comes with a pretty good ISE built-in. In Windows PowerShell ISE, you can run commands and write, test, and debug scripts in a single Windows-based graphic user interface with multiline editing, tab completion, syntax coloring, selective execution, context-sensitive help, and support for right-to-left languages.
PowerGUI is a graphical user interface and script editor for Microsoft Windows PowerShell. You can find it at www.PowerGUI.org. It is the freeware tool that the administrators need for speeding up PowerShell adoption, and harnessing the power of PowerShell to efficiently manage their entire Windows environment. PowerGUI simplifies management with an intuitive user console.
You can even create scripts from the PowerShell console using the string and the
Set-Content cmdlet. The following screenshot shows how you can create your first script:

As you can see, the hello-world.ps1 file is a pure text file; we can check its contents using the
Get-Content cmdlet.
PowerShell finds a file to invoke just by looking at the path environment variable. It is interesting to note that the current folder is not in the system path. This means that invoking a script in the current folder will require you to prefix it with a path. Thus the command in our case becomes .\hello-world ps1. This will look familiar if you come from a Unix background as shell will not include the current folder path variable.
When in action, PowerShell's default security construction principle only allows interactive commands and will be implemented in the console input. Shell has several executive policies, configuration levels of security, and user privileges to run the script. By default, the shell will run in the restricted policy level; this means that is not allowed to run a script. We can check the executive policy by calling the Get-ExecutionPolicy cmdlet.
The PowerShell script files also allow users to pass parameters for initialization. Script files have the $args variable set up with the parameters passed at the time of their invocation. The following is example code for using $args to get parameters:
$firstName = $args[0]
$lastName = $args[1]
Write-Host "Hello, $firstName $lastName"
We can save the code as Get-HelloArgs.ps1, and then execute it as follows:

Of course, we also can use the param keyword for accepting a parameter. The following is the example code:
param ($firstName, $lastName)
Write-Host "Hello, $firstName $lastName"
We can save the code as Get-HelloParam.ps1 and execute it as follows:

A parameter is, most of the time, a one-way communication mechanism, and will only transfer data from the environment of the script. We need to be able to return values from our script. PowerShell provides a good way to output the return value from a script and we should make use of this method.
An object can be bound to a variable or outputted to a pipeline for the next command. We can use it to generate a pile of objects from our script and output them. The following screenshot gives us a script that gives an output of three temporary filenames:
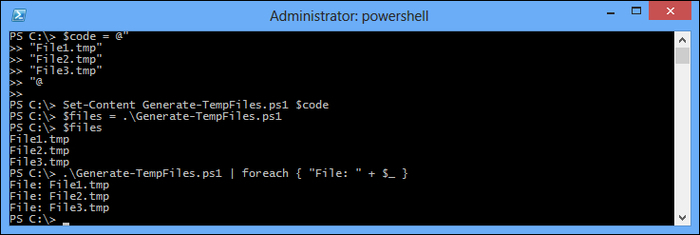
As you can see, this value can be assigned to a variable or can be passed down the line as a foreach command. A return statement will output an object and terminate execution.
Sooner or later, you will be responsible for creating a bigger, more complex solution using PowerShell as its implementation language. Earlier when you wrote your own code, there were cases where each piece of code was stuck in a separate file and you could not find a way through the code. This was not a pleasant situation as you must be aware that your options are separated from the script code into several files to make things easier to manage. In addition to this, fast navigation to the correct location of the correct file with less code makes it more reusable. This is a very common and useful function that lets you move out of the first client code to another file, and is then included in many documents. In practice, I usually use a folder in my system path that contains useful scripts so that I can easily include useful features in any of the scripts and start working on the production code in no time.
Script libraries are normal files that contain useful functions. They are ordinary PowerShell scripts that do not execute an action—they just define several functions and let the library client code call them to do the real job.
Including or importing a script library in a script file is similar to executing it. It is a good programming practice to ensure that the scripting library should contain any executable code function definition.
A few months ago, Windows PowerShell 3.0 was launched as part of the Windows Server 2012 and Windows 8 RTM release. PowerShell 3.0 introduced a lot of new features, and improved some existing features in order to allow system administrators to control and manage their systems more easily and efficiently. In this section, the focus will be on the unique features of Windows PowerShell 3.0 to make sure that you gain the knowledge and the edge of using it.
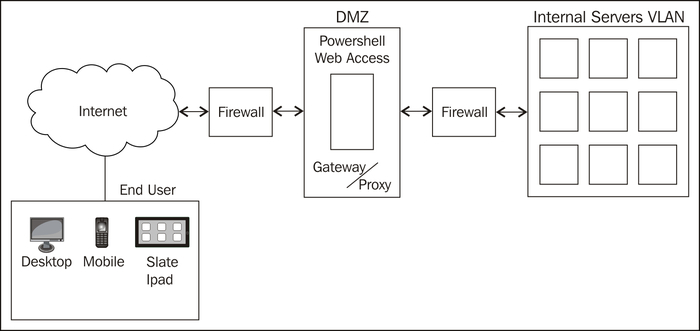
Windows PowerShell Web Access (PSWA) is one of the new features in Windows PowerShell 3.0 that has been introduced in Windows Server 2012. Yes, it is what you are guessing right now. PowerShell Web Access is a web-based version of the PowerShell console where you can run and execute PowerShell cmdlets from any web browser that is not only available on desktops but also on any mobile or tablet devices. PowerShell Web Access allows you to do your administration tasks smoothly anywhere and anytime using any device running a web browser regardless of it being a Microsoft or a non-Microsoft one.
The Windows PowerShell Web Access gateway is the name of the server where PowerShell Web Access is installed and configured. This gateway is the bridge between the end user and the managed servers, so once you connect to the web interface of the PowerShell Web Access for writing your cmdlets and scripts, the gateway will be responsible for executing them on the right server. In the real world, the PSWA gateway is placed in the DMZ (demilitarized zone) and the web interface is published to the Internet so that you can easily connect to your server anytime and anywhere.
This part will show how to install and configure Windows PowerShell Web Access easily in a few steps.
In this step we will add the Windows PowerShell Web Access Windows feature. There are two ways to accomplish this task; either we can use the Server Manager Wizard or Windows PowerShell. Since PowerShell is our hero in this book, let's do it in the PowerShell way, using the following steps:
Run the Windows PowerShell console with administrative privileges.
Install the Windows PowerShell Web Access feature using the
Install-WindowsFeaturecmdlets. The purpose of this is to install PowerShell Web Access and the pre-requisites, if not installed.PS > Install-WindowsFeature WindowsPowerShellWebAccess –IncludeAllSubFeature –IncludeManagementToolsThe following screenshot shows the execution results that you should get after using this command, and also warns you that you still need to do some configuration in order to complete the PSWA installation:

The gateway is the server where Windows PowerShell Web Access is installed and running. It is called a gateway because it is the gateway/proxy between the end user and the managed servers/nodes in your network. Now, after installing the PowerShell Web Access feature we will configure the gateway. In this step, we will create an IIS web application that runs PowerShell Web Access and configures the SSL certificate. There are two ways to accomplish this task; we can either do it manually or use PowerShell, and again here we are using PowerShell:
Run the Windows PowerShell console with administrative privileges.
Use the
Install-PswaWebApplicationcmdlet to install and configurePswaWebApplication:Install-PswaWebApplication –WebSiteName "Default Web Site" –WebApplicationName "PSWA" –UseTestCertificateThe following screenshot shows the execution results that you should get after installing the PSWA application, and it also shows a warning because you have to choose a
UseTestCertificateswitch:
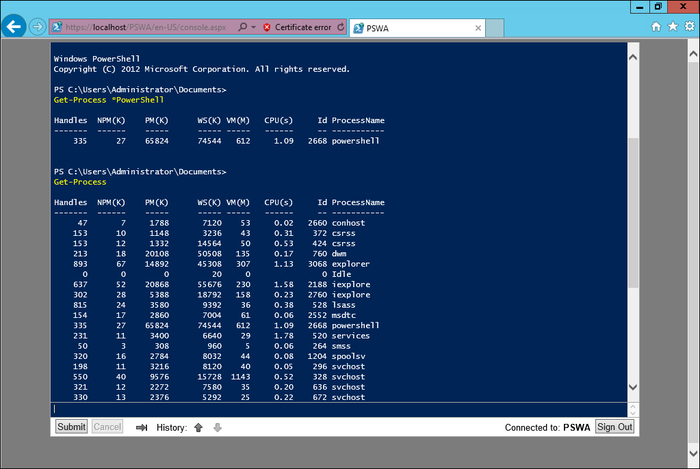
Open PSWA using
https://<server_name>/PSWAto verify your installation. We should see a screen similar to the following:
Now, we have PSWA up and running; however, no one will be able to sign in and use it until we create the appropriate authorization rule. The reason behind this is that it is a good practice to secure your environment by restricting the access to your network until you create the right access for the right person. The authorization rule is the access control for your PSWA that adds an additional security layer to your PSWA. It is similar to the access list on your firewall and network devices. We can configure the PSWA authorization rule using the following steps:
Run the Windows PowerShell console with administrative privileges.
Use the
Add-PswaAuthorizationRulecmdlet to create the authorization rule with the–UserName,–ComputerName, and–ConfigurationNameswitches.The following screenshot shows the execution results that you should get after configuring the PSWA authorization rule:


In the previous version of PowerShell, we used the
Get-Help cmdlet to show the Help information that comes embedded by default with the cmdlets. In PowerShell 3.0, the inline help has been replaced with a Help file hosted on the Internet. By default, the Get-Help cmdlet will not show you any Help information until you use the Update-Help cmdlet to download the help files from the Internet. If you are running the Get-Help cmdlet for the first time without using the Update-Help cmdlet, it will automatically prompt you to download the latest Help files from the Internet. The reason behind this is that in the previous versions of PowerShell, the Help information was static and sometimes there were mistakes as well as updates in the Help information. There was no available way to update the Help information even while using a Windows update. Thus Microsoft introduced a new update method using the Update-Help cmdlet, which gets the latest Help information from the Help files hosted on the Internet. Also, you can use the SAVE-HELP cmdlet to save the Help files locally or on shared folders so that every computer in your network can get them directly. Moreover, if you do not want to download the help files locally, you can use the Get-Help cmdlets with the –Online switch for redirecting you to the web pages that contain the Help information for the cmdlets, but you have to consider the Internet connectivity each time you use this parameter. The following screenshot shows the use of the Get-Help cmdlet:

Scheduled jobs are similar to background jobs introduced in PowerShell 2.0. Both jobs run asynchronously in the background without interrupting the user interface, but the difference is that the background jobs must be started manually using the Start-Job cmdlet, and in some cases, if you want to automate this job you can use a scheduled task to create a scheduled job that triggers your script. In PowerShell 3.0, scheduled jobs are introduced to reduce the hassle of scheduling the background jobs in multiple steps. Simply, scheduled jobs can create background job and schedule it for a later execution using a set of cmdlets instead of using the Task
Scheduler wizard. You can also get the results of running scheduled jobs and resume interrupted jobs.
In the following example, we will create a simple scheduled job that clears the event log for application, security, and system log stores every day at 02:00 am. The first thing we need to define is when the scheduled job will be executed using the New-JobTrigger cmdlet, then create and register the job using the Register-ScheduleJob cmdlet. The code snippet is as follows:
$trigger = New-JobTrigger -Daily -At 2am
Register-ScheduledJob -Name ClearEventLogDaily -Trigger $trigger -ScriptBlock {Clear-EventLog -LogName Application,Security,System
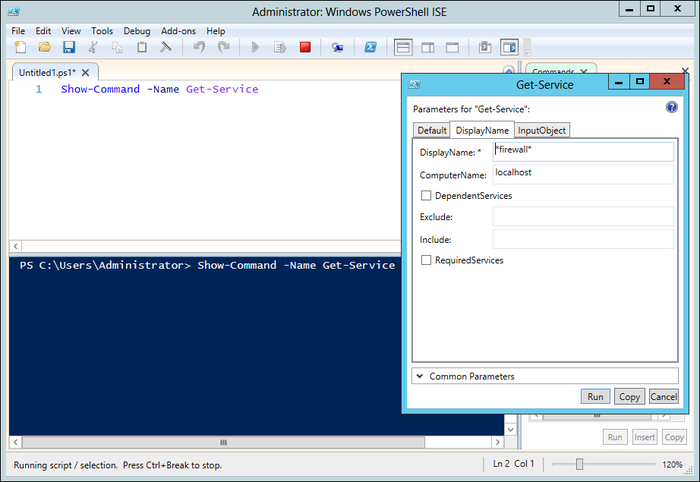
The Show-Command cmdlet allows you to display the command in a Graphical User
Interface (GUI) as if you are browsing a web form or a normal Windows program. You can use Show-Command to compose a command in a GUI form, select the required variables and write the values, then click on Run to execute the command with the parameters you entered. You can also click on the Copy button to copy the command with the parameters and values to the clipboard so that you can paste it to the PowerShell console and save it to a script. Refer to the following screenshot:
PowerShell ISE is the GUI editor for PowerShell. It is similar to the Blue PowerShell console but with more advanced features. In the previous version of PowerShell, ISE was just a graphical editor that allowed you to write and execute the PowerShell commands and scripts in a nice user interface that highlights the syntax and with the ability to add/remove breakpoints for debugging capabilities. In PowerShell 3.0, new features have been added to ISE to give the administrator a different experience while using it. In this section we will highlight these features.
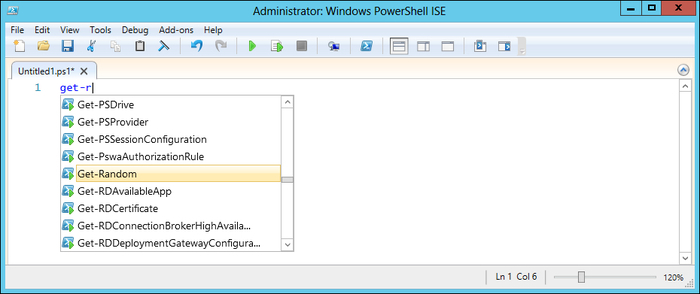
IntelliSense is the name of Microsoft's implementation for the autocomplete technique. Autocomplete is one of the most famous features in today's applications, and everyone using a computer is using autocomplete. Simply, autocomplete is a feature embedded in most of the search engines that gives you a list of suggestions once you start typing on your keyboard. IntelliSense in PowerShell not only shows you a suggestion for words but also for commands, parameters, variables, and even UNC paths on your computer. The following screenshot shows us an example:
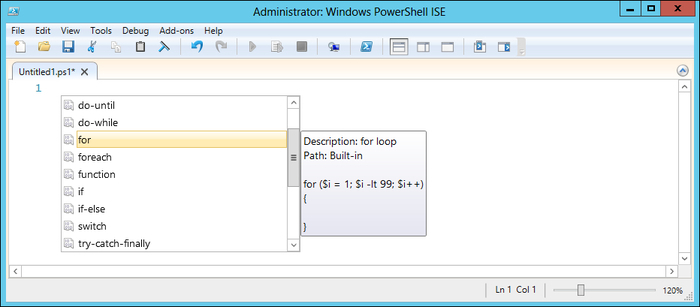
Code snippet is the name used to describe a piece of reusable code, and it is usually used to speed up the process of writing code especially when using a repetitive code and syntax. PowerShell 3.0 ISE introduced the snippets feature to make the script-writing process easier. By using snippets you do not have to know the syntax for each command and function. For example, the ForEach code snippet inserts the syntax of the ForEach loop and you just have to modify your variables. The following screenshot shows us a similar example:
In order to create a new code
snippet we use the New-IseSnippet cmdlet. In the following example we will create a new snippet to restart all SQL Server Services:
New-IseSnippet -Title RestartSQLServerServices -Description "Restart all SQL Server Services" -Text "Restart-Service -Name *SQL*"
In PowerShell, snippets are saved in the form of an XML file with the snippet.ps1xml file's extension under User Profile | Windows PowerShell | Snippets.
Note
You can get the path of the snippets' folder using the following command:
Join-Path (Split-Path $profile.CurrentUserCurrentHost) "Snippets"
To display all user-defined snippets we use the Get-IseSnippet cmdlet. This command will show the name of each snippet and where it is located. To remove a snippet, open the folder that contains all the user-defined snippets and delete the snippet file. By default, PowerShell loads all the snippets
located in the default folder automatically during startup; however, if you have saved your snippet's files in a separate folder, use Import-IseSnippet –Path <Snippets_Folder_Path> to load it.
Add-on tools are Windows Presentation Foundation (WPF) controls that can be added to PowerShell ISE to add extra features and functionalities to the ISE, such as spelling checker and script-printing features. One of the most popular add-ons is Microsoft Script Explorer. The Microsoft Script Explorer enables you to find scripts, snippets, and modules in the script repositories such as TechNet Script Center and other community repositories such as PoshCode, and also it can search for scripts in local and network filesystems.
PowerShell ISE 3.0 automatically saves any runspace and script file that is open , so in case a failure happens in your ISE or your operating system restarts suddenly, ISE will restore all your runspaces once you open it again. It is similar to "restore session" in Internet Explorer.
PowerShell remoting is one of the most impressive features that make PowerShell unique and give it a different flavor over other shells. PowerShell remoting allows IT administrators to control and execute PowerShell scripts on multiple remote computers from a local PowerShell console without moving to any place. We will talk more in depth about PowerShell remoting in the coming chapters, but let's take a sneak peak at what is new in PowerShell 3.0 from the remoting perspective.
PowerShell remoting is now similar to a remote desktop session; you can disconnect your session without interrupting any running process, application, or script, and you can connect later to this session again from the same or a different computer to continue your work.
Remoting in PowerShell 3.0 can be enabled on public networks on the client operating systems such as Windows 7 and Windows 8. In simple terms, we use the SkipNetworkProfileCheck switch with the Enable-PSRemoting or Set-WSMANQuickConfig cmdlets.
The custom session configuration file is a predefined session configuration that includes information about which cmdlets, snippets, modules, and other PowerShell components should be loaded in this session and the configuration that can be used by the user, which gives another edge of security for PowerShell in general and PowerShell remoting specifically.
The word "workflow" represents a set of objects, tasks, and activities that are connected together and running concurrently or sequentially or both. In IT, the word workflow always links to another word automatically. For example, in Microsoft SharePoint Server we use a workflow to automate an approval process such as vacation request approval, or we can use Microsoft System Center Orchestrator to automate a process such as provisioning new users and applications.
Workflow capabilities have been introduced in Windows PowerShell 3.0, and it is designed specifically to help you perform time and effort-consuming complex tasks across multiple and different devices in different locations.
You might wonder what the real value of Windows PowerShell Workflow is, as you already use PowerShell to write different scripts and modules that allow you to perform long-running tasks, and this is the aim of scripting in general. Well, before I tell you the answer let's think about these questions together: can you write a script that restarts an operation on a device and waits for this device to boot-up to resume the rest of the commands again? Can you write a single script that runs on multiple devices concurrently? PowerShell Workflows is designed to be interruptible, stoppable, restartable, and also parallelizable, which is why it is more efficient for long-running tasks than scripts.
The script consists of a set of commands; however, workflow consists of a set of activities. Commands normally represent an action that you want to execute; however, the activities represent a task you want to perform. Moreover, commands execute sequentially and activities run sequentially and concurrently.
There are two methods to define a workflow; we can either use the PowerShell syntax or, since it is built on top of Windows Workflow Foundation (WF), you can use an XAML file designed by Visual Studio Workflow Designer.
Writing a PowerShell Workflow is
similar to writing a PowerShell function with a little difference. The first difference is using the word "workflow" instead of "function". Also, as in functions, the same definition of parameters using param() can be used with CmdletBinding to add some advanced workflow features. CmdletBinding allows you to add advanced capabilities to your function and workflows, such as adding the –Verbose, –Debug, –whatif, and –confirm parameters to your workflow without implementing them manually. It also defines HelpUri that will be used by the Get-Help cmdlets to get the online help for the workflow or function. The following code snippet shows how we write a PowerShell Workflow:
Workflow Test-Workflow
{
 [CmdletBinding(ConfirmImpact=<String>,DefaultParameterSetName=<String>,
   HelpURI=<URI>,PositionalBinding=<Boolean>)]
  Param([string] <Parameter_Name>)
}
As mentioned earlier, PowerShell Workflows use activities that are similar to cmdlets; the PowerShell team has already implemented all PowerShell core cmdlets as activities, which makes it easier for PowerShell users to use activities and not get confused, except for a set of cmdlets that are excluded from this implementation. Does it mean that the excluded cmdlets cannot be used in a workflow?
No, PowerShell automatically executes them using a special activity called inlineScript. The purpose of this activity is to execute any PowerShell command that is valid in PowerShell but not supported by workflows, such as executing a .ps1 file or calling a dynamic parameter inside a workflow.
Note
For the list of excluded cmdlets you can visit http://technet.microsoft.com/en-us/library/jj574194.aspx.
PowerShell Workflows can be executed concurrently and sequentially by using the reserved keywords such as Parallel and Sequence. The activities inside the Parallel block will be running concurrently, and activities inside the Sequence block will be running sequentially. ForEach –parallel is a combination of the Sequence and Parallel executions. ForEach –parallel will execute the activities sequentially on the items in the collection concurrently. In other words, if there is a collection of computers where a set of activities such as rename and restart computer are being executed, the activities will be executed in sequence on all computers
at the same time. The following script block shows the syntax of using the Parallel and Sequence execution capabilities inside a workflow:
Workflow Test-Workflow
{
  Parallel
{
  <Activity_1>
  <Activity_2>
  <Activity_3>
}

Sequence
{
  <Activity_1>
  <Activity_2>
  <Activity_3>
}

ForEach -parallel ($item in $collection)
{
<Activity_1>
  <Activity_2>
  <Activity_3>
}
}
Parallel execution is useful for running independent activities concurrently, such as starting a process and restarting a service at the same time where each activity is running independently from the other one.
Sequence execution is useful for defining a set of activities to run sequentially inside a Parallel or ForEach –parallel execution.
Note
For more information on the different ways of creating a PowerShell Workflow refer to http://msdn.microsoft.com/en-us/library/windows/desktop/hh852738(v=vs.85).aspx.
One of the most interesting features in PowerShell Workflow, and what makes it unique compared to a normal script is the flexibility of controlling the execution; at any point you can interrupt, suspend, or resume the workflow's execution. You can even restart the computer while running the workflow and complete the execution upon startup.
You can suspend the workflow's execution using the Suspend-Workflow activity that will save the execution state, variables, and values in a checkpoint and return the job ID for the suspended workflow, so you can use the job ID as a parameter for the Resume-Job cmdlet to resume the workflow execution again.
In the following example, we will learn how to suspend and resume the workflow execution:
Workflow Test-Workflow
{
  <Activity_1>
  <Activity_2>
Suspend-Workflow
  <Activity_3>
}
You can execute this workflow using the following command:
PS C:\>Test-Workflow
The first two activities will be executed and the workflow will be suspended, and the result of suspend-workflow will be information about the workflow-executed job.
Id  Name  PSJobTypeName  State      HasMoreData  Location  Command
--  ----  -------------  -----      -----------  --------  -------
2   Job2  PSWorkflowJob  Suspended  True         localhost  Test-Workflow
In order to resume the workflow again, we will use the Resume-Job cmdlet:
S C:\>Resume-Job –Name Job2
In order to get the results of the activities executed after resuming, in our case Activity 3, we will use the Get-Job and Receive-Job cmdlets:
PS C:\>Get-Job –Name Job2 | Receive-Job
Since PowerShell Workflow is recoverable, you can restart the target computer and smoothly resume the workflow again using the Restart-Computer activity. Simply use the –wait switch with Restart-Computer so that the workflow will wait for the computer to restart and reconnect again before proceeding with the workflow execution.
In the following example, the workflow will restart the targeted computer after executing Activity 1 and Activity 2, and then wait for the computer to boot up again to resume and execute Activity 3. You can also use the -PSConnectionRetryCount and -PSConnectionRetryInterval parameters to specify the connection retries and the interval between each connection retry.
Workflow Test-Workflow
{
  <Activity_1>
  <Activity_2>
  Restart-Computer –Wait –PSConnectionRetryInterval 4 –PSConnectionRetryCount 8
  <Activity_3>
}
In order to maintain these features of PowerShell Workflow, it is a must to implement another feature in workflows, which is "CheckPoint". Checkpoints in PowerShell Workflow take a snapshot of the current state and data, and then save it in the profile of the user who executes this workflow on the hard disk, so on resuming, the workflow will start from the last checkpoint instead of starting from the beginning. PowerShell by default adds checkpoints in the beggining and ending of the workflow. In addition, you can use the -PSPersist switch with any activity to take a checkpoint after completing its execution. Also, you can use the Checkpoint-Workflow activity at any point in your flow to take a checkpoint.
Note
Workflows are used to execute tasks faster, so using checkpoints without any need or optimization will slow the execution and make the usage futile.
In case of using pipelines and parallel execution, checkpoints will not be taken until the completion of the pipeline or the parallel activities; however, you can use checkpoints in sequence activities to take a checkpoint after completion of every single activity.
In this chapter, we studied variables and data structures such as objects, lists, arrays, and hash tables, which are used frequently in the examples in later chapters. This chapter facilitated the explanation for the later examples.
If arithmetic is the soul of the program, then the control flow is the skeleton of PowerShell. Control flows directly determine the program operation's path. Pipelines, script blocks, functions, and script files are major program-organization tools of PowerShell.
PowerShell 3.0 introduced a lot of new features, such as PowerShell Web Access and PowerShell Workflow. PowerShell 3.0 improves some existing features such as PowerShell ISE. Since the later chapters will be based on this chapter content, readers are encouraged to review characteristics of the PowerShell language at this step.
In the next chapter we will introduce a snap-in for protecting your PowerShell code. The user can encrypt based on the .NET code obfuscator to protect the source code from getting cracked.