


In this chapter, we will cover:
Downloading and installing the Play framework
Creating a new application
Defining routes as the entry point to your application
Configuring your application via
application.confDefining your own controllers
Defining your own models
Using Fixtures to provide initial data
Defining your own views
Writing your own tags
Using Java Extensions to format data in your views
Adding modules to extend your application
Using Oracle or other databases with Play
Understanding suspendable requests
Understanding session management
Let's begin with Play framework. There is no need for XML configuration, no need to create a war file, just start off with a commandline tool. Play is a full stack. Everything is bundled. All you need to do is download the Play framework, unzip it, and use it.
Once you install it, this chapter will give you a head start about the first steps to carry out after you create you first application. It will provide you the basic knowledge needed for any advanced topic, which is described in the later chapters. After this chapter you know where to look for certain files and how to change them.
Some features presented here are also shown in the only example application for the first chapter, which you can find at examples/chapter1/basic-example.
This recipe will help you to install the Play framework as quickly and unobtrusively as possible in your current system.
All you need is a browser and some basic knowledge about unzipping and copying files in your operating system. Also be aware that you can install Play on Microsoft Windows, Linux as well as Mac OS X or even BSD.
Open up a browser and go to http://www.playframework.org/download and download the most up-to-date stable version http://download.playframework.org/releases/play-1.2.zip (at the time of writing this recpe play 1.2 was the latest stable version).
After downloading it, unzip it, either with a GUI tool or via command line zip:
unzip play-1.1.zip
If you are using Linux or MacOS you might want to put the unzipped directory in /usr/local/ in order to make Play available to all the users on your system; however, this is optional and requires the root access on the particular system:
mv play-1.1 /usr/local/
As a last step adding the Play binary inside the play-1.1 directory to the PATH environment variale is encouraged. This is easily possible with a symlink:
ln -s /usr/local/play-1.1/play /usr/local/bin/play
If you enter play on your commandline, you should get an ASCII art output along with some help and, most importantly, the version of Play you just called. If you do not want to create a symlink, you can also copy the Play binary to a path, which is already included in the PATH variable. In the preceding example you could have copied it to /usr/local/bin.
As just mentioned, Play would also work by just unzipping the Play framework archive and always using the absolute path of your installation. However, as this is not very convenient, you should put your installation at the defined location. This also makes it quite easy for you to replace old Play framework versions against newer ones, without having to change anything else than the created symlink.
If you are on a Linux system and you do not see the ASCII art output as mentioned some time back, it might very well be possible that you already have a Play binary on your system, installed. For example, the sox package, which includes several tools for audio processing, also includes a Play binary, which surprisingly plays an audio file. If you do not want to have this hassle, the simplest way is just to create the symlink with another name such as:
ln -s /usr/local/play-1.1/play /usr/local/bin/play-webNow calling play-web instead of play will for sure always call the Play framework specific script.
After installing the necessary parts to start with Play, the next step is to create a new application. If you are a Java developer you would most likely start with creating a Maven project, or alternatively create some custom directory structure and use Ant or scripts to compile your sources. Furthermore, you would likely create a WAR file which you could test in your web application server. All this is not the case with the Play framework, because you use a command line utility for many tasks dealing with your web application.
Change into a directory where you want to create a new application and execute the following command:
play new myApp
This command will create a new directory named myApp and copy all needed resources for any project into it. After this is done, it should be finished in almost no time. The following file system layout exists inside the myApp directory:
./conf
./conf/dependencies.yml
./conf/routes
./conf/application.conf
./conf/messages
./test
./lib
./public
./app
./app/models
./app/controllers
./app/views
If you are familiar with a rails application, you might be able to orientate very quickly. Basically, the conf directory contains configuration and internationalization files, where as the app folder has a subdirectory for its model definitions. Its controllers contain the business logic and its views, being a mix of HTML and the Play template language. The lib directory contains jar libraries needed to run your application. The public folder contains static content like JavaScript, CSS, and images; and finally the test folder contains all types of tests.
Generally speaking, you can add arbitrary content in the form of directories and files in the application directory; for example, the files needed to support Eclipse, or NetBeans will be put here as well. However, you should never remove data which has been copied during the creation of the application unless you really know what you are doing.
If you analyze a HTTP based application, every execution of logic consists of three things. First there is a HTTP method called as well as a specific URL. Optionally, the request may include a payload like request parameters or a request body. No matter what you look at: a news or a blog article, your favorite social network, you are bidding for some item during an online auction, or delete e-mails in your web mail account, you always use an URL an a HTTP method. Any unbelievably complex application such as Google Mail basically boils down to this contract. So what would be easier for a web application than to resemble this contract by mapping the tuple of HTTP method and HTTP URL to certain actions. This is what the routes file is for in Play.
As seen some time back in the filesystem layout, after creating a new application, there is a conf/routes file. This file can be seen as the central point of your application. In order to have a truly REST based architecture, the combination of the HTTP method and URL define an implicit action. Using HTTP GET on any URL should never ever change any resource because such calls are seen as idempotent calls and should always return the same result.
In order to fully understand the importance of the routes file, this graphic illustrates that it is the starting point for every incoming HTTP request:
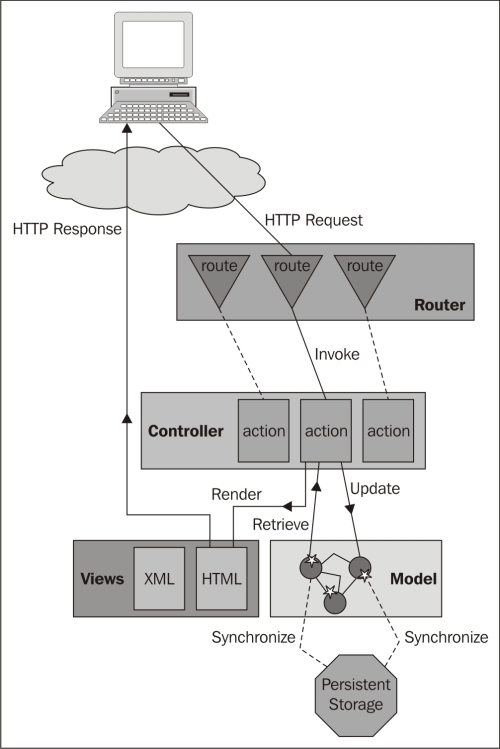
The image is also available at http://www.playframework.org/documentation/1.2/images/diagrams_path.
Basically the router component parses the routes file on startup and does the mapping to the Controller.
Always be aware that no logic can be executed from an external source if not triggered by the router component, which in turn is configured by default in the conf/routes file.
Edit your routes file as shown in the following code snippet:
GET      /              Application.index
POST     /users         Application.createUser
GET      /user/{id}     Application.showUser
DELETE   /user/{id}     Application.deleteUser

# Map static resources from the /app/public folder to the /public path

GET /public staticDir:publicThe preceding example features a basic application for user management. It utilizes HTTP methods and URIs appropriately. For the sake of simplicity, updating a user is not intended in this example. Every URI (alternatively called a resource) maps to a Java method in a controller, which is also called an action. This method is the last part of the line, with the exception to the HTTP resource /public, where the public directory is mapped to the public URI. You might have already noticed the usage of some sort of expression language in the URI. The ID variable can be used in the controller and will contain that part of the URI. So /user/alex will map alex to the ID variable in the showUser and deleteUser methods of the controller.
Please be aware that some browsers currently only support GET and POST methods. However, you can freely use PUT and DELETE as well, because Play has a built-in workaround for this which uses POST and setting the X-HTTP-Method-Override header telling the framework to execute the code as needed. Be aware to set this request header when writing applications yourself, that connect to a play-based application.
As seen in the preceding screenshot, the router component can do more than parsing the routes file. It is possible to have more complex rules such as using regular expressions.
Using regular expressions in the URL is actually pretty simple, as you can just include them:
GET /user/{<[0-9]+>id} Application.showUserThis ensures that only numbers are a valid user ID. Requesting a resource like /user/alex now would not work anymore, but /user/1234 instead would work. You can even create a List from the arguments in the URL with the following line of code:
GET /showUsers/{<[\0-9]+>ids}/? Application.showUsersIn your application code you know you could use a List<Integer> IDs and show several users at once, when the URL /showUsers/1234/1/2 is called. Your controller code would start like this:
public static void showUsers(@As("/") List<Integer> ids) {This introduces some new complexity in your application logic, so always be aware if you really want to do this. One of the usecases where this is useful is when you want to use some sort of hierarchical trees in your URLs, like when displaying a mailbox with folders and arbitrary subfolders.
You can also use annotations to create routing, which offers you some more flexibility. See the first recipe in Chapter 2. Furthermore, routing can also be done for virtual host, and this will also be presented later on.
Though Play does not require a lot of configuration to run, there has to be one file where basic information such as database connection strings, log levels, modules to enable additional functionality, supported application languages, or the setting of the application mode is configured. This file is conf/application.conf
, though it looks like a properties file, it really is not because of its UTF-8 encoding.
Just open conf/application.conf with your any editor supporting UTF-8, be it Eclipse, Vim, textmate, or even notepad.
Now every configuration option follows the scheme:
# Some comment
key = value
Notable for application start is the http.port option, which runs your Play application per default on port 9000; this can be changed to any port above 1024 if you are a non-root user, which is highly recommended anyway.
By definition Java property files are ISO-8859-1 and nothing else. Play, however, is thought of as an everything-UTF-8 framework; hence, the application configuration filename does not have a .properties suffix. For more info about standard Java properties, please refer to:
http://download.oracle.com/javase/6/docs/api/java/util/Properties.html
As the documentation covers most of the possible parameters in the configuration file pretty well, this file will only be mentioned if the default configuration has to be changed.
Most importantly, adding and configuring modules in order to enhance the basic functionality of Play is part of the application.conf, and each module requires enabling it via defining its path:
module.foo=${play.path}/modules/foo
After starting your Play application, the console output should include information about which of your configured modules have been loaded successfully.
Note
Please be aware that from play 1.2 modules are not configured via this mechanism, but via the new dependencies.yml file. You can still configure modules this way, but this is deprecated from then on.
Another important setup is the log level of your application when using log4j, which is used by Play framework all over the place. When in production mode, it should be set to INFO or ERROR; however, in testing mode the following line might help you to discover problems:
application.log=DEBUG
We will refer to the application.conf file when setting up special databases later on in this chapter. Also there is an own Configuring log4j for log rotation recipe in the Chapter 7, Running in Production.
Controllers represent the thin layer between HTTP and business logic. They are called by the router, once the requested resource is mapped successfully to a controller method specified in the conf/routes file.
In order to follow this recipe, you should use the conf/routes file defined in the recipe Defining routes as the entry point to your application in this chapter.
Fire up your favorite editor, open app/controllers/Application.java, and put the following into the file:
package controllers;

import play.*;
import play.mvc.*;
public class Application extends Controller {

    public static void index() {
        render();
    }

    public static void showUser(String id) {
         render();
    }

    public static void deleteUser(String id) {
        render();
    }

    public static void createUser(User user) {
        render();
    }
}Absolutely no business logic happens here. All that is done here is to create a possibility to execute business logic. When looking back at the conf/routes file you see the use of the id parameter, which is again used here as a parameter for the static method inside the Application class. Due to the name of the parameter it is automatically filled with the corresponding part of the URL in the request; for example, calling GET /user/1234 will result in putting "1234" in the ID parameter of the showUser method. The most important fact to make a Java class work as controller is to have it extend from play.mvc.Controller. Furthermore, all your actions have to be static in order to be executed as controller methods.
As no business logic is executed here (such as creating or deleting a user from some database) the render() method is called. This method is again defined in the controller class and tells the controller to start the rendering phase. A template is looked up and rendered. As Play also follows the convention over configuration pattern, a default template location is assumed, which follows an easy naming scheme:
./app/views/${controller}/{method}.htmlIn the case of showing a user it would be:
./app/views/Application/showUser.html
This not only looks pretty simple, it actually is. As Play framework follows the MVC principle, you should be aware that the controller layer should be as thin as possible. This means that this layer is not for business logic but merely for validation in order to ensure the model layer will only get valid data.
As it is not convenient for any web developer to construct the objects by hand from the HTTP parameters, Play can easily do this task for you like this:
    public static void createUser(User user) {

        // Do something with the user object
        // ...
        render();
    }
This requires a certain naming convention of your form elements in the HTML source, which will be shown later.
Instead of just rendering HTML pages there is another great feature. You can trigger a HTTP redirect by just calling the Java method. Imagine the following code for creating a new user:
   public static void createUser(User user) {

        // store user here..., then call showUser()showUser(user.id);
    }
Tip
Downloading the example code
You can download the example code files for all Packt books you have purchased from your account at http://www.PacktPub.com. If you purchased this book elsewhere, you can visit http://www.PacktPub.com/support and register to have the files e-mailed directly to you.
Now the last line of code will not call the static showUser method directly, but instead issue a HTTP 304 redirect response to the client, which includes a Location: /show/1234 response header. This allows easy implementation of the common redirect-after-post pattern, without cluttering your application logic. You only need to be aware that it is not possible to directly call methods marked as public in your controller classes, as the framework intercepts them.
Some Java developers might want to scream in pain and agony now that "Static methods in a controller are not threadsafe!". However, the Controller is bytecode enhanced in order to make certain calls threadsafe, so the developer has not to worry about such issues. If you are interested in knowing more, you might want to check the class play.classloading.enhancers.ControllerEnhancer.
As soon as you have to implement business logic or objects which should be persisted, the implementation should be done in the model. Note that the default implementation of this layer is implemented in Play with the use of JPA, Hibernate, and an SQL database in the background. However, you can of course implement an arbitrary persistence layer if you want.
Any model you define should go into the models package, which resides in the app/models directory.
As in the recipes before, this was already a reference to a user entity. It is the right time to create one now. Store this in the file app/models/User.java:
package models;

import javax.persistence.Entity;
import play.data.validation.Email;
import play.data.validation.Required;
import play.db.jpa.Model;

@Entity
public class User extends Model {

        public String login;

        @Required @Email
        public String email;
}Although there are not many lines of code, lots of things are included here. First, there are JPA annotations marking this class to be stored in a database. Second, there are validation annotations, which can be used to ensure which data should be in the object from an application point of view and not dependent on any database.
Tip
Remember: If you do as many tasks as possible such as validation in the application instead of the database it is always easier to scale. Annotations can be mixed up without problems.
The next crucially important point is the fact that the User class inherits from Model. This is absolutely essential, because it allows you to use the so-called ActiveRecord pattern for querying of data.
Also, by inheriting from the Model class you can use the save() method to persist the object to the database. However, you should always make sure you are importing the correct Model class, as there exists another Model class in the Play framework, which is an interface.
The last important thing which again will be mainly noticed by the Java developers is the fact, that all fields in the example code are public. Though the preceding code does not explicitly define getters and setters, they are injected at runtime into the class. This has two advantages. First, you as a developer do not have to write them, which means that your entity classes are very short and concise and not filled with setters and getters irrelevant to your logic. Second, if you really want to put logic into setters such as adding some complex check or changing the result before really storing it to the database, then it is possible without any problem. If you want you can also reuse your existing JPA entities, which are likely to have getters and setters. It is all a matter of choice. But the shorter your models are the more concise and easy to understand they will be.
Now let's talk about some other options, or possibly some pieces of general information that are relevant to this task.
Finders are used to query for existing data. They are a wonderful syntactic sugar on top of the Model entity. You can easily query for an attribute and get back a single object or a list of objects. For example:
User user = User.find("byName", name).).).first();Or you can get a list of users with an e-mail beginning with a certain string:
List<User> users = User.find("byEmailLike", "alexander@%").fetch();You can easily add pagination:
List<User> users = User.find("byEmailLike", "alexander@%")
                                        .from(20).fetch(10);
Or just add counting:
long results = User.count("byEmailLike", "alexander@%");Play has a generic infrastructure to support as many databases as possible. If you implement other persistence solutions, for example, JPA, GAE, or MongoDB, then always try to use the ActiveRecord pattern, because most of the Play developers will be used to it and it is very easy to grasp and understand. If you cannot do this for whatever reasons, like some completely different query language, then still do not use something like the DAO pattern in Play, as this is not natural for the framework and would pretty much break its flow. The anemic domain model—pulling logic from the object into data access objects—should be an absolute no-go when developing with Play.
Please check the Play examples and the Play documentation at http://www.playframework.org/documentation/1.2/jpa for an extensive introduction about models before reading further as this will be essential as well before going on with more complex topics. You will also find much more info about finders.
This is a short excursion into the JPA world but well worth it. Whenever you deal with databases you will be forced to implement some sort of commit/rollback transaction mechanism. As the standard Play persistence is based on JPA and Hibernate, the problem of course exists as well.
However, in order to simplify things, the HTTP request has been chosen as the transaction boundary. You should keep that in mind when having problems with data you thought should have been committed but is not persisted, because the request is not yet finished. A minor solution to this problem is to call JPA.em().flush(), which synchronizes changes to the database. If you want to make sure that you do not change data which has just been created in another request, you should read a Hibernate documentation about optimistic and pessimistic locking found at http://docs.jboss.org/hibernate/core/3.6/reference/en-US/html/transactions.html.
For more information on the active record pattern you might want to check the Wikipedia entry http://en.wikipedia.org/wiki/Active_record or the more Ruby on Rails specific active record API at http://ar.rubyonrails.org/. There is also an active record implementation in pure Java at http://code.google.com/p/activejdbc.
There is a recipe for encrypting passwords before storing them on the database which makes use of creating an own setter.
Fixtures are the Swiss Army knife of database independent seed data. By defining and describing your data entities in a text file it is pretty simple to load it into an arbitrary database.
This serves two purposes. First, you can make sure in your tests, that certain data exists when running the tests. Second, you can ensure that the must-have data like a first administrative account in your application exists, when deploying and starting your application in production.
Define a fixtures file and store it under conf/initial-data.yml:
User(alr):
        login: alr
        password: test
        email: alr@spinscale.de

Tweet(t1):
        content: Lets get ready to tweet
        postedAt: 2010-11-22T08:23:15
login: alrAs you can see in the preceding snippet, there are two entities defined. The first one only consists of strings, whereas the second one consists of a date and a reference to the first one, which uses the name in parentheses after the type as a reference.
Fixtures are helpful in two cases. For one you can ensure the same test data in your unit, functional, and selenium tests. Also you can make sure, that your application is initialized with a certain set of data, when the application is loaded for the first time.
If you need to initialize your application with some data, you can execute a job loading this data at application startup with the following code snippet:
@OnApplicationStart
public class Bootstrap extends Job {

    public void doJob() {
        // Check if the database is empty
        if(User.count() == 0) {
          Fixtures.load("initial-data.yml");
        }
    }
You should put the referenced initial-data.yml file into the./conf directory of your application. If you reference it with its filename only in any class like in the doJob() method that we saw some time back, it will be found and loaded in your current database by using the count() method of the User entity. Also by extending this class from Job and putting the @OnApplicationStart annotation at the top, the doJob() method is executed right at the start of the application.
Play uses SnakeYAML as an internal YAML parser. You can find out more about the integration at either http://www.playframework.org/documentation/1.2/yaml or http://code.google.com/p/snakeyaml/.
After getting a closer look at controllers and models, the missing piece is views. Views can essentially be anything: plain text, HTML, XML, JSON, vCard, binary data such as images, whatever you can imagine. Generally speaking, the templating component in Play is kept very simple. This has several advantages. First, you are not confronted with a new tag library, like you are in JSF with every new component. Second, every web developer will dig his way through this templating language quite fast. Third, the templating language is very nice and also very easy to extend. Even though the template language is based on Groovy and uses some Groovy expressions, there is absolutely no need to have any deep knowledge in Groovy. Even though you can use Groovy expressions, there is absolutely no need for it.
In this example, we will put together a small view showing our user entity.
The first step is to get the user inside the controller and allow it in the view to be used. Edit app/controllers/Application.java and change the showUser() method to this:
public static void showUser(Long id) {
        User user = User.findById(id);
        notFoundIfNull(user);
        render(user);
}
After that create an HTML template file in ./app/views/Application/showUser.html:
#{extends 'main.html' /}
#{set title:'User info' /}

<h1>${user.login}</}</}</h1>

Send <a href="mailto:${user.email}">}">}">mail</a>Though again only a couple of lines have been written, a lot of things have happened. Beginning with the name and path of the template location, it is just the name of the class (including the package, which the controller does not have in this case) and its method name appended with a file format. Of course, you can change it, but this way it is pretty easy to understand which view code belongs to which controller action.
Regarding the controller logic all that has been done is to query the database for the user with a specific ID (the one specified in the URL) and to return a HTTP 404 error, if the returned object is null. This eliminates the nasty null checks from your code to keep it as clean as possible. The last part triggers the rendering. The argument handed over (you can choose an arbitrary amount of arguments) can be referenced in the HTML template under the name you put in the render() method. If you used render(userObj) you could reference it as userObj in the template.
The template contains lots of information in the four lines of code. First, Play template specific tags always use a #{} notation. Second, Play templates support some sort of inheritance with the #{extends} tag, as the main.html has been chosen here as a template into which the rest of the code is embedded. Third, you can set variables in this template, which are parsed in the main.html template, like the variable title, which is set in line two. Lastly you can easily output fields from the user object by writing the name of the object inside the template and its field name. As already done before, the field is not accessed directly, but the getter is called.
Templating is covered fairly well in the documentation and in the example, so be sure to check it out.
There are more than two dozen predefined tags which can be used. Most of them are pretty simple, but still powerful. There is a special #{a} tag for creating links, which inserts real URLs from a controller action. There are of course #{if} structures and #{list} tags, form helper tags, i18n and JavaScripts helpers, as well as template inheriting tags and some more:
There are some variables which are always defined inside a template, which help you to access data that are always needed without putting it explicitly into the render call. For example, request, session, params, errors, out, messages, flash, and lang. You can have a look at the documentation for more details:
http://www.playframework.org/documentation/1.2/templates#implicits
There are also more predefined render() methods with different output formats than HTML defined. Most known are renderText(), renderXML(), renderJSON(), and renderBinary() for images. Be aware that all of these methods do not use templates, but write out the result directly to the client without invoking any template specific code.
It is very easy to write your own tags, so be sure to follow the next recipe as well as get some information about mixins, which allows you to define some more logic for displaying data without changing it in the model; for example, replacing the last digits with XXX for privacy issues.
Furthermore, a recipe with an own renderRSS() is shown as last recipe in Chapter 2, which is about controllers.
In order to keep repetitive tasks in your template short, you can easily define your own tags. As all you need to know is HTML and the built-in templating language, even pure web developers without backend knowledge can do this.
In this example, we will write a small tag called #{loginStatus /}, which will print the username or write a small note, that the user is not logged in. This is a standard snippet, which you might include in all of your pages, but do not want to write over again.
The following logic is assumed in the controller, here in Application.java:
public static void login(String login, String password) {
   User user = User.find("byLoginAndPassword", login, password).first();
   notFoundIfNull(user);
   session.put("login", user.login);
}
A new tag needs to be created in app/views/tags/loginStatus.html:
<div class="loginStatus">
#{if session.login}
Logged in as ${session.login}
#{/if}
#{else}
Not logged in
#{/else}
</div>
Using it in your own templates is now easy, just put the following in your templates:
#{loginStatus /}The controller introduces the concept of state in the web application by putting something in the session. The parameters of the login method have been (if not specified in routes file) constructed from the request parameters. In this case, from a request, which has most likely been a form submit. Upon calling the controller, the user is looked up in the database and the user's login name is stored in the session, which in turn is stored on the client side in an encrypted cookie.
Every HTML file in the app/views/tags directory is automatically used as a tag, which makes creating tags pretty simple. The tag itself is quite self explanatory, as it just checks whether the login property is set inside the session.
As a last word about sessions, please be aware that the session referenced in the code is actually not a HttpSession as in almost all other Java based frameworks. It is not an object stored on the server side, but rather its contents are stored as an encrypted cookie on the client side. This means you cannot store an arbitrary amount of data in it.
You should use tags whenever possible instead of repeating template code. If you need more performance you can even write them in Java instead of using the templating language.
The preceding discussion was the absolute basic usage of tag. It can get somewhat more complex by using parameters or the same sort of inheritance, which is also possible with templates.
Check out http://www.playframework.org/documentation/1.2/templates#tags for more about this topic.
If you need more performance, there is a mechanism called FastTags inside of Play. These tags are actually compiled, as they are written in pure Java. This speeds up execution time. Most of the native supported tags are FastTags in order to keep performance high. For example, take a look at your Play installation inside samples-and-tests/just-test-cases/app/utils/MyTags.java and you will see that these tags are also very simple to implement.
Java Extensions are a very nice helper inside your templates, which will help you to keep your template code as well as your model code clean from issues such as data formatting. Reformatting values such as dates is a standard problem at the view layer for most web developers. For example, the problem of having a date with millisecond exactness, though only the year should be printed. This is where these extensions start. Many web developers also do this by using JavaScript, but this often results in code duplication on frontend and backend.
This recipe shows a pretty common example, where a date needs to be formatted to show some relative date measured from the current time. This is very common in the Twitter timeline, where every Tweet in the web interface has no correct date, but merely a "n hours ago" or "n days ago" flag.
Just create a tiny application. You will need to create a new application and add a database to the application configuration, so entities can be specified.
You need a route to show your tweets in conf/routes:
GET /{username}/timeline Application.showTweetAfter that we can model a tweet model class:
package models;


import java.util.Date;
import javax.persistence.Entity;
import play.data.validation.Max;
import play.db.jpa.Model;

@Entity
public class Tweet extends Model {

        @Max(140) public String content;
        public Date postedAt;
        public User user;
}
As well as a simple user entity:
@Entity
public class User extends Model {

        @Column(unique=true)
        public String login;
}
The controller is quite short. It uses an alternative query for the 20 newest tweets, which is more JPA like:
public static void showTweets(String username) {
        User user = User.find("byLogin", username).first();
        notFoundIfNull(user);
        List<Tweet> tweets = Tweet.find("user = ? order by postedAt DESC", user).fetch(20);
        render(tweets, user);
}
The rendering code will look like this:
#{extends 'main.html' /}
#{set 'title'}${user.login} tweets#{/set}

#{list tweets, as:'tweet'}
<div><h3>${tweet.content}</h3> by ${tweet.user.login} at <i>${tweet.postedAt.since()}</i></h3></div>
#{/list}
Now this code works. However, the since() Java Extension, which is built in with Play only works when you hand over a date in the past as it calculates the difference from now. What if you want to add a feature of a future tweet which is blurred, but will show a time when it is shown? You need to hack up your own extensions to do this. Create a new class called CustomExtensions in the extensions package inside your application directory (so the file is ./app/extensions/CustomExtension.java)
public class CustomExtensions extends JavaExtensions {

        private static final long MIN   = 60;
        private static final long HOUR  = MIN * 60;
        private static final long DAY   = HOUR * 24;
        private static final long MONTH = DAY * 30;
        private static final long YEAR  = DAY * 365;

        public static String pretty(Date date) {
                Date now = new Date();
                if (date.after(now)) {
	                long delta = (date.getTime() - now.getTime()) / 1000;

                if (delta < 60) {
                    return Messages.get("in.seconds", delta,
 pluralize(delta));
                }

                if (delta < HOUR) {
                    long minutes = delta / MIN;
                    return Messages.get("in.minutes", minutes, pluralize(minutes));
                }

                if (delta < DAY) {
                    long hours = delta / HOUR;
                    return Messages.get("in.hours", hours,
 pluralize(hours));
                }

                if (delta < MONTH) {
                    long days = delta / DAY;
                    return Messages.get("in.days", days, pluralize(days));
                }

                if (delta < YEAR) {
                    long months = delta / MONTH;
                    return Messages.get("in.months", months,
 pluralize(months));
                }

                long years = delta / YEAR;
                return Messages.get("in.years", years, pluralize(years));

                } else {
                        return JavaExtensions.since(date);
                }

        }
}
Update your ./app/conf/messages file for successful internationalization by appending to it:
in.seconds = in %s second%s
in.minutes = in %s minute%s
in.hours   = in %s hour%s
in.days    = in %s day%s
in.months  = in %s month%s
in.years   = in %s year%s
The last change is to replace the template code to:
#{list tweets, as:'tweet'}
<div><h3>${tweet.content}</h3> by ${tweet.user.login} at <i>${tweet.postedAt.pretty()}</i></h3></div>
#{/list}A lot of code has been written for an allegedly short example. The entity definitions, routes configuration, and controller code should by now be familiar to you. The only new thing is the call of ${tweet.postedAt.since()} in the template, which does call a standard Java Extension already shipped with Play. When calling the since() method, you must make sure that you called it on an object from the java.util.Date class. Otherwise, this extension will not be found, as they are dependent on the type called on. What the since() method does, is to reformat the boring date to a pretty printed and internationalized string, how long ago this date is from the current time. However this functionality only works for dates in the past and not for future dates.
Therefore the CustomExtensions class has been created with the pretty() method in it. Every class which inherits from JavaExtensions automatically exposes its methods as extension in your templates. The most important part of the pretty() method is actually its signature. By marking the first parameter as type java.util.Date you define for which data type this method applies. The logic inside the method is pretty straightforward as it also reuses the code from the since() extension. The only unknown thing is the call to Messages.get(), which just returns the string in the correct language, such as"3 days ago" in English and "vor 3 Tagen" in German.
Last but not least, the template code is changed to use the new extension instead of since().
Java Extensions can be incredibly handy if used right. You should also make sure that this area of your application is properly documented, so frontend developers know what to search for, before trying to implement it somehow in the view layer.
It is pretty simple to use parameters as well, by extending the method with an arbitrary amount of parameters like this:
public static void pretty(Date date, String name) {Using it in the template is as simple as ${tweet.postedAt.pretty("someStr")}
There are tons of useful helpers already built-in. Not only for dates, but also for currency formatting, numbers, strings, or list. Check it out at http://www.playframework.org/documentation/1.2/javaextensions.
Modules are the way to implement reusability in your application. Code whic does not belong to your core functionality can be combined into a single module and also reused in other applications, or maybe even made open source. Furthermore, there are already quite a lot of modules in Play, and since the release of play 1.1, there is quite a rise of new modules every week. Using other modules is actually pretty easy and requires only one command and one configuration change to get it working.
Basically modules are Play applications themselves, so you are embedding another Play application into your own.
In this example the "search" module is going to be installed. It is a great module which allows you to integrate with Apache Lucene by just adding two annotations to your JPA models. From then on you can do lightning fast queries instead of using your database for full tex search ueries. However, if you want to install any module, you need to have an Internet connection for the first installation. Furthermore, this search module is used as an example in this case; there will be no implementation hits on using it. Please refer to the documentation for this.
Check whether the module is already installed. This should be executed in the directory of a Play application in order to return useful data:
play modules
Check whether the module you want to install is available:
play list-modules
Put this in your conf/dependencies.yml file:
require:
    - play
    - play -> search head
Then run play deps. After you have run and downloaded the module, you will have a ./modules/search-head directory in your application, which gets automatically loaded on application startup.
When starting your application the next time you should see the following startup message:
10:58:48,825 INFO ~ Module search is available (/path/to/app/modules/search-head)
In case you are using an older version of Play than version 1.2, there is another mechanism to install a module, which needs further configuration. Make sure you are inside of the Play application where you want to install the module:
play install search
You are asked whether you are sure you want to install the module, because you need to check whether this module is compatible with the version of Play you are using. The installation tries to install the latest version of the module, but you can choose the module version in case you need an older one.
Follow the hint in the last line and put it into the conf/application.conf file:
module.search=${play.path}/modules/search-headWhen starting your application the next time you should see the following startup message:
10:58:48,825 INFO ~ Module search is available (/home/alex/devel/play/play-1.1/modules/search-head)
From now on you can use the module and its functionality in your code.
The steps are pretty straightforward as it is automated as much as possible. When calling Play install, everything is downloaded as a big package from the Web, unpacked in your Play installation (not your application) and from then on, ready to run in any Play web, once enabled in the configuration. The main difference between the old and new way of adding modules is the fact that the old mechanism stored the modules not in the application but in the framework directory, where as the new mechanism only stores modules inside of the application directory.
Many modules require additional configuration in the conf/application.conf file. For example, if you install a module which persists your models in a MongoDB database, you will need to configure the database connection additionally. However, such cases are always documented, so just check the module documentation in case.
Also if modules do not work, first check whether they work in your version of Play. If this is the case, you should also file a bug report or inform the module maintainer. Many modules are not maintained by the core developers of Play, but instead by users of the Play framework.
As soon as you have added a new module and it includes documentation (most modules do), it will always be available in development mode under http://localhost:9000/@documentation.
There is currently no functionality to update your modules automatically. This is something you have to do manually. In order to keep it up-to-date you can either read the mailing list or alternatively just check the source repository of the module. This should always be listed in the module description page.
Go to http://www.playframework.org/modules/search-head/home for more information about this module.
If you are interested in modules, check out the Chapter 5, Introduction to Writing Modules in this book. It also includes a recipe Using Solr for indexing, which takes up the search topic again.
This is just a quick recipe to show that any database with a JDBC driver can be used as persistence storage in Play, though it has been mainly developed with MySQL in mind. The most simple configuration of a database is to use the in memory H2 database by specifying db=mem in the application.conf file. You can ensure persistence by specifying db=fs, which also uses the H2 database. Both of these options are suitable for development mode as well as automated test running. However, in other cases you might want to use a real SQL database like MySQL or PostgreSQL.
Just add driver-specific configuration in your configuration file. In order to support PostgreSQL, this is the way:
db.url=jdbc:postgresql:accounting_db
db.driver=org.postgresql.Driver

db.user=acct
db.pass=Bdgc54S
Oracle can also be configured without problems:
db.url=jdbc:oracle:thin:@db01.your.host:1521:tst-db01

db.driver=oracle.jdbc.driver.OracleDriver
As the JDBC mechanism already provides a generic way to unify the access to arbitrary databases, the complexity to configure different database is generally pretty low in Java. Play supports this by only needing to configure the db.url and db.driver configuration variables to have support for most databases, which provide a JDBC driver.
You can even go further and configure your connection pool (if the JDBC driver has support for that), reusing application server resources, or check whether changing your JPA dialect is also needed when changing your default database.
It is also possible to use datasources provided by the underlying application server, just put the following line in your config file:
db=java:/comp/env/jdbc/myDatasource
Connection pools are a very important feature to ensure a performant and resource saving link to the database from your application. This means saving resources by not creating a new TCP connection every time you issue a query. Most JDBC drivers come with this out of the box, but you can also tweak the settings in your config file:
# db.pool.timeout=1000
# db.pool.maxSize=30
# db.pool.minSize=10
It might also be necessary to configure your JPA dialect for certain databases. As Play uses hibernate, you need to specify a hibernate dialect:
jpa.dialect=org.hibernate.dialect.Oracle10gDialect
For more information about dialects, check out http://docs.jboss.org/hibernate/core/3.3/reference/en/html/session-configuration.html#configuration-optional-dialects.
Most web frameworks bind an incoming HTTP request via the servlet to a thread. However, this means that each connection requires a thread, resulting in 300 concurrent connections needing 300 threads. Often, having that many threads does not scale when switching threads. This means that the computation time to manage threads and grant resources to them in a synchronized and fair mode increases with the amount of threads. Especially, when you consider the fact that most web connections are blocking and are waiting for something to happen in the background, like persisting an entity or executing another web request. This means that you can keep a small thread pool for accepting HTTP requests and have a bigger thread pool for executing business logic. Here comes the feature of continuations and suspendable requests into Play.
In order to have a simple test, you could create a small application which creates a big PDF report. Then access the URL mapped to the PDF report creation more often simultaneous than you have CPU cores. So you would have to request this resource three times at once on a duo core machine. You will see that a maximum two HTTP connections are executed simultaneously; in development mode it will be only one, regardless of your CPU count.
Play 1.2 introduces a new feature called continuations, which allows transparent suspension of threads including recovery without writing any additional code to do this:
public static void generateInvoice(Long orderId) {
    Order order = Order.findById(orderId);
    InputStream is = await(new OrderAsPdfJob(order).now());
    renderBinary(is);
}
Of course, the OrderAsPdfJob needs a signature like this:
public void OrderAsPdfJob extends Job<InputStream> {

    public InputStreamdoJobWithResult() {
        // logic goes here
    }
}
Note
There is an alternative approach in play before version 1.2, which needed a little bit more core but still allowed asynchronous and non thread bound code execution.
You can suspend your logic for a certain amount of time like this:
public static void stockChanges() {
   List<Stock> stocks = Stock.find("date > ?", request.date).fetch();
   if (stocks.isEmpty()) {
       suspend("1s");
   }
renderJSON(stocks);
}
Alternatively, you can wait until a certain job has finished its business logic:
public static void generateInvoice(Long orderId) {
    if(request.isNew) {
        Order order = Order.findById(orderId);
        Future<InputStream> task = new OrderAsPdfJob(order).now();
        request.args.put("task", task);
        waitFor(task);
    }
    renderBinary((Future<InputStream>)request.args.get("task").get());
}Following the three lines of code in the first example, you see that there is actually no invocation telling the framework to suspend the thread. The await() method takes a so-called Promise as argument, which is returned by the now() method of the job. A Promise is basically a standard Java Future with added functionality for invocation inside of the framework, when the task is finished.
The stockChanges() example is pretty self explanatory as it waits the defined amount of time before it is called again. This means that the operation is only called again if there was no updated stock available and it is very important it is called again from the beginning. Otherwise it will happily render the JSON output and has to be triggered by the client again. As you can see, this would be a pretty interesting starting point for implementing SLAs for your customers in a stock rate application, as you could allow your premium customers quicker updates.
The second example takes another approach. The controller logic is actually run twice. In the first run, the isNew parameter is true and starts a Play job to create the PDF of an invoice. This parameter is automatically set by the framework depending on the status of the request and gives the developer the possibility to decide what should happen next. The waitFor()
tells the framework to suspend here. Again, after the task is finished, the whole controller method will be called again, but this time only the renderBinary() method is called as isNew is false, which returns the result by calling get() on the Future type.
Always think whether introducing such a suspended response is really what you want or whether this just shows certain problems in your application design. Most of the time such a mechanism is not needed.
Promises are documented in the javadoc at http://www.playframework.org/documentation/api/1.2/index.html?play/libs/F.Promise.html as well as in the play 1.2 release notes at http://www.playframework.org/documentation/1.2/releasenotes-1.2#Promises. There are even better features like waiting for the end of a list of promises or even waiting for only one result of a list of promises.
The job mechanism inside a Play is used to execute any business logic either on application startup or on regular intervals and has not been covered yet. It is however pretty well documented in the public documentation at http://www.playframework.org/documentation/1.2/jobs.
The recipe Integration with Munin in Chapter 7 shows how to monitor your controller execution times in order to make sure you are suspending the right requests.
Whenever you read about Play, one of the first advantages you will hear is that it is stateless. But what does this mean actually? Does it mean you do not have a session object, which can be used to store data while a visitor is on your website? No, but you have to rethink the way sessions are used.
Usually a session in a servlet-based web application is stored on a server side. This means, every new web request is either matched to a session or a new one is created. This used to happen in memory, but can also be configured to be written on disk in order to be able to restart the servlet container without losing session data. In any scenario there will be resources used on the server side to store data which belongs to a client.
Imagine a server environment with two servers receiving all HTTP connections. After the session has been created on server A, some logic has to redirect the user with this session always to server A, because otherwise a new session would have to be created on server B without taking over the session data from server A. Alternatively, the sessions have to be shared somehow. Both solutions require additional logic somewhere.
Play goes the way of sharing the session, but in a slightly different way. First, the real session used to identify the client is stored as a Cookie on the client. This cookie is encrypted and cannot be tampered with. You can store data in this cookie; however, the maximum cookie size is only 4KB. Imagine you want to store big data in this session, like a very large shopping cart or a rendered graphic. This would not work.
Play has another mechanism to store big data, basically a dumb cache. Caches are good at storing temporary data as efficient and fast accessible as possible. Furthermore, this allows you to have a scaling caching server, as your application scales. The maximum session size is 4KB. If you need to store more data, just use a cache.
Use the session object inside the controller to write something into it. This is a standard task during a login:
public static void login(String login, String password) {
    User user = User.find("byLoginAndPassword", login, password).first();
    notFoundIfNull(user);
    session.put("login", user.login);
    index();
}
The session variable can now be accessed from any other controller method as long as it is not deleted. This works for small content, like a login:
String login = session.get("login");Now, you can also use the built-in cache functionality instead of the session to store data on the server side. The cache allows you to put more data than the session maximum of 4 kilobytes into the cache (for the sake of having a lot of data assume that you are a subcontractor of Santa Claus, responsible for the EMEA region and constantly filling your shopping cart without checking out):
Cache.set(login, shoppingCart, "20mn");
Querying is as easy as calling:
Cache.get(login)
Adding data to the session is as easy as using a regular session object. However, there is no warning if there is data put into the session, which is bigger than the maximum allowed cookie size. Unfortunately, the application will just break when getting the data out of the cookie, as it is not stored in the cookie, and the session.get() call will always fail.
In order to avoid this problem, just use the Cache class for storing such data. You can also add a date when the data should expire out of the cache.
Caching is a very powerful weapon in the fight for performance. However, you always gain performance at the cost of reducing the actuality of your data. Always decide what is more important. If you can keep your data up-to-date by scaling out and adding more machines, this might be more useful in some cases, than caching it. As easy as caching is, it should always be the last resort.
If you have a setup with several Play nodes, there is a problem if every instance uses its own cache, as this can lead to data inconsistency among the nodes. Therefore, Play comes with support to offload cache data to memcached instead of using the built-in Java-based EhCache. You will not have to change any of your application code to change to memcached. The only thing to change is the configuration file:
memcached=enabled
memcached.host=127.0.0.1:11211
You can store arbitrary data in your cache (as long as it is serializable). This offers you the possibility to store queries to your persistence engine in the cache. If 80 percent of your website visits only hit the first page of your application, where the 10 most recent articles are listed, it makes absolute sense to cache them for a minute or 30 seconds. However, you should check whether it is really necessary as many databases are optimizing for this case already; please check your implementation for that.