


 Download code from GitHub
In this chapter, we will cover the following recipes:
Installing Play Framework
Creating a Play application using Typesafe Activator
Using the Play console
Working with modules
Working with controllers and routes
Using Action parameters in controllers
Using reverse routing and redirects
Working with View templates
Using helper tags
Using View layouts and Includes
Working with XML and text files
Using Ebean (Java) with MySQL
Using Anorm (Scala) and database evolutions with MYSQL
Using a form template and web actions
Using a form validation
Securing form submission
Testing with JUnit (Java) and specs2 (Scala)
Testing models
Testing controllers
Play is a developer-friendly and modern web application framework for both Java and Scala. This first chapter will take you through the steps in installing Play Framework for local development. This chapter will describe the Play application project directory structure, its various members and its function in a Play application.
This chapter will also introduce you to the Activator command, which replaces the old Play command. Activator is used for various stages during development, including compilation, downloading library dependencies, testing, and building. It is really quite similar to other build tools such as Ant or Maven.
This first chapter will also go about implementing Model-View-Controller (MVC) components available in Play Framework. This will be followed by source code to create controllers and routing actions using View templates and model components used to interface with an RDBMS (such as MySQL). This chapter will tackle basic HTTP forms, recognizing the importance of modern web applications being able to deal with user interactivity and data and how Play Framework provides various APIs to make life easier for developers.
By the end of the chapter, you should have a good grasp of how to implement basic web application functionalities such as form submissions and data access with MySQL, create URL routes to web actions, and create views composed of smaller, modular, and reusable view components.
Most of the recipes in this chapter assume that you have a level of familiarity with Java development, web application development, command-line interfaces, Structured Query Language (SQL), development build tools, third-party library usage, dependency management, and unit testing.
This recipe will guide you through installing Play Framework 2.3 for local development. This section will guide you on the prerequisite installations for Play Framework, such as the Java Development Kit (JDK), and the necessary steps to ensure that Play Framework has access to the JDK's binaries.
Play Framework requires a JDK version of 6 or above. Head over to the Oracle website and download the appropriate JDK for your development machine at http://www.oracle.com/technetwork/java/javase/downloads/index.html.
Once you have downloaded a suitable JDK, ensure that the binary folder is added to the system path:
    $ export JAVA_PATH=/YOUR/INSTALLATION/PATH
    $ export PATH=$PATH:$JAVA_HOME/bin
You can also refer to Oracle's online documentation for more information regarding setting environment variables at http://docs.oracle.com/cd/E19182-01/820-7851/inst_cli_jdk_javahome_t/index.html.
Here's how you can verify that the JDK is now accessible in the system path:
    $ javac -version
    javac 1.7.0_71

    $ java -version
    java version "1.7.0_71"
    Java(TM) SE Runtime Environment (build 1.7.0_71-b14)
    Java HotSpot(TM) 64-Bit Server VM (build 24.71-b01, mixed mode)
As of Play 2.3.x, Play is now distributed using a tool called Typesafe Activator (http://typesafe.com/activator), install it using following steps:
Download the Typesafe Reactive Platform distribution at https://typesafe.com/platform/getstarted and unzip it at your desired location that has write access.
After downloading and unzipping the distribution, add the
Activatorinstallation directory to your system path:$ export ACTIVATOR_HOME=</YOUR/INSTALLATION/PATH> $ export PATH=$PATH:$ACTIVATOR_HOME
Now, verify that Activator is now accessible in the system path:
    $ activator --version
    sbt launcher version 0.13.5
You should now be able to create a Play application using the
activatorcommand:$ activator new <YOUR_APP_NAME>
Once you have a JDK and Activator installed and properly configured, you should be ready to create Play 2.3.x applications. Beginning with Play 2.0, developers are now able to create Java- or Scala-based Play applications. Activator provides many Play project templates for both Java and Scala. For the first project, let us use the basic project templates. We will also be using the command-line interface of Activator across all recipes in this cookbook.
You need to perform the following for creating the templates for both Java and Scala:
For Java, let's use the
play-javatemplate and call our first applicationfoo_javaby using the following command:$ activator new foo_java play-javaFor Scala, let's use the
play-scalatemplate and call our first applicationfoo_scalaby using the following command:$ activator new foo_scala play-scala
This Activator command creates the project's root directory (foo_java or foo_scala) and creates all the relevant subdirectories, config files, and class files:
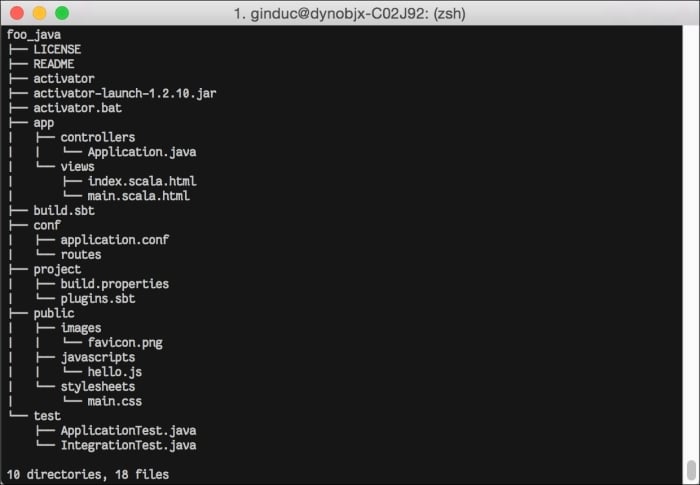
The following screenshot shows the root directory for foo_java:
The following screenshot shows the root directory for foo_scala:
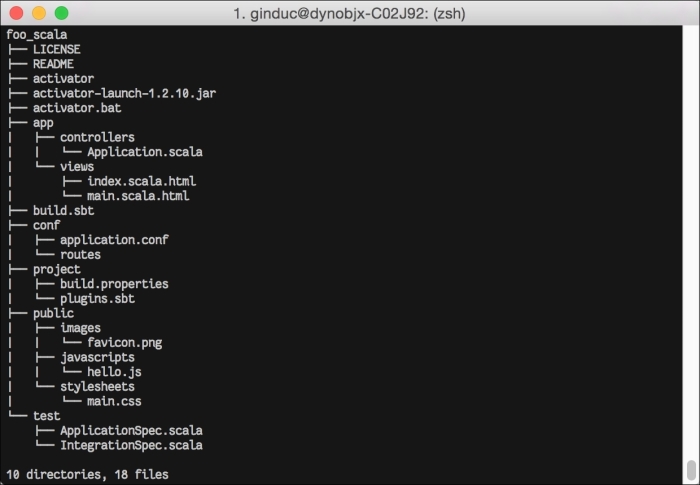
As you notice, both the Java and Scala project template generated an almost identical list of files, except for class files that are generated as .java files for the play_java template and as.scala files for the play_scala template.
For the project's directory structure, one of the more important aspects of Play Framework is its adherence to the concept of convention over configuration. This is best reflected by the standard project directory structure of every Play application it follows:
|
1st Level |
2nd Level |
3rd Level |
Description |
|---|---|---|---|
|
|
Application source files | ||
|
|
Compiled JavaScript or style sheets | ||
|
|
Compiled style sheet (such as LESS or SASS) | ||
|
|
Compiled JavaScript (such as CoffeeScript) | ||
|
|
Application request-response controllers | ||
|
|
Application domain objects | ||
|
|
Application presentation views | ||
|
|
Application configuration files | ||
|
|
Publicly available assets | ||
|
|
Publicly available style sheet files | ||
|
|
Publicly available JavaScript files | ||
|
|
Build configuration files (such as | ||
|
|
Unmanaged libraries and packages | ||
|
|
Log files | ||
|
|
Test source files |
Source code, configuration files, and web assets are organized in a predefined directory structure, making it easy for the developer to navigate through the project directory tree and find relevant files in logical placements.
Go to http://typesafe.com/activator/templates for a comprehensive list of available project templates.
The Play console is a command-line interface tool used to build and run Play applications. It is important for every developer to be familiar with the available commands, such as clean, compile, dependencies, and run, to fully utilize the power of the Play console.
You need to perform the following to use the Play console for both Java and Scala:
After Activator finishes setting up the Play project, you can enter the Play console of your Play application.
Use the following command for Java:
    $ cd foo_java
    $ activator
Use the following command for Scala:
    $ cd foo_scala
    $ activator
Once you have entered the Play console, you can run your application in the development mode:
Use the following command for Java:
[foo_java] $ runUse the following command for Scala:
[foo_scala] $ run
Now, open a web browser and head over to
http://localhost:9000:
Use the following command line to start your Play application with Hot-Reloading enabled:
$ activator "~run"Use the following command line to start your Play application on a different port:
$ activator "run 9001"
Note
Running your application in development mode configures your application to run in auto-reload, where Play will attempt to recompile any recent changes to the project files, removing the need to manually restart your application for every code edit. You are now ready to view your application using your web browser.
You can also use the Play console to manually compile class files using the compile command in the activator console (use the activator command):
Use the following command for Java:
[foo_java] $ compileUse the following command for Scala:
[foo_scala] $ compile
You can also run Play commands directly instead of using the Play console:
Use the following command for Java:
    $ cd foo_java
    $ activator compile
    $ activator run
Use the following command for Scala:
    $ cd foo_scala
    $ activator compile
    $ activator run
Use the following command to generate an eclipse project file for your existing Play application using Activator:
    $ activator eclipse
    [info] Loading project definition from /private/tmp/foo_scala/project
    [info] Set current project to foo_scala (in build file:/private/tmp/foo_scala/)
    [info] About to create Eclipse project files for your project(s).
    [info] Compiling 5 Scala sources and 1 Java source to /private/tmp/foo_scala/target/scala-2.11/classes...
    [info] Successfully created Eclipse project files for project(s):
    [info] foo_scala
Use the following command to generate an IntelliJ IDEA project file for your existing Play application using Activator:
    $ activator idea
    [info] Loading project definition from /private/tmp/foo_java/project
    [info] Set current project to foo_java (in build file:/private/tmp/foo_java/)
    [info] Creating IDEA module for project 'foo_java' ...
    [info] Running compile:managedSources ...
    [info] Running test:managedSources ...
    [info] Excluding folder target
    [info] Created /private/tmp/foo_java/.idea/IdeaProject.iml
    [info] Created /private/tmp/foo_java/.idea
    [info] Excluding folder /private/tmp/foo_java/target/scala-2.11/cache
    [info] Excluding folder /private/tmp/foo_java/target/scala-2.11/classes
    [info] Excluding folder /private/tmp/foo_java/target/scala-2.11/classes_managed
    [info] Excluding folder /private/tmp/foo_java/target/native_libraries
    [info] Excluding folder /private/tmp/foo_java/target/resolution-cache
    [info] Excluding folder /private/tmp/foo_java/target/streams
    [info] Excluding folder /private/tmp/foo_java/target/web
    [info] Created /private/tmp/foo_java/.idea_modules/foo_java.iml
    [info] Created /private/tmp/foo_java/.idea_modules/foo_java-build.iml
You can utilize other Play Framework or third-party modules in your Play application. This is easily done by editing the build file (build.sbt) and declaring library dependencies in the style of sbt dependency declaration.
You need to perform the following steps to declare a module:
Open the
build.sbtfile and add the following lines, using the notation of the group ID%module name%version while declaring library dependencies:libraryDependencies ++= Seq( jdbc, "mysql" % "mysql-connector-java" % "5.1.28" )Once the changes to
build.sbthave been saved, head over to the command line and have Activator download the newly declared dependencies:$ activator clean dependencies
In this recipe, we declare what our Play application will need and reference the Java Database Connectivity (JDBC) module provided by Play Framework and the MySQL Java Connector module provided by MySQL. Once we have our modules declared, we can run the activator dependencies command to make Activator download all declared dependencies from the public Maven repositories and store them in the local development machine.
Please refer to the Play Framework website for a complete list of official Play modules (https://www.playframework.com/documentation/2.3.x/Modules). You can also refer to the Typesafe official release repository for other useful plugins and modules at your disposal (http://repo.typesafe.com/typesafe/releases/).
Play applications use controllers to handle HTTP requests and responses. Play controllers are composed of actions that have specific functionality. Play applications use a router to map HTTP requests to controller actions.
To create a new page, which prints out "Hello World" for a Play Java project, we need to take the following steps:
Run the
foo_javaapplication with Hot-Reloading enabled:$ activator "~run"Edit
foo_java/app/controllers/Application.javaby adding the following action:public static Result hello() { return ok("Hello World"); }Edit
foo_java/conf/routesby adding the following line:GET /hello controllers.Application.hello()
View your new hello page using a web browser:
http://localhost:9000/hello
For Scala, we need to take the following steps:
Run the
foo_scalaapplication with Hot-Reloading enabled:$ activator "~run"Edit
foo_scala/app/controllers/Application.scalaby adding the following action:def hello = Action { Ok("Hello World") }Edit
foo_scala/conf/routesby adding the following line:GET /hello controllers.Application.hello
View your new hello page using a web browser:
http://localhost:9000/hello
In this recipe, we enumerated the steps necessary to create a new accessible page by creating a new web action in a controller and defined this new page's URL route by adding a new entry to the conf/routes file. We should now have a "Hello World" page, and all without having to reload the application server.
Web applications should be able to accept dynamic data as part of their canonical URL. An example of this is GET operations of RESTful API web services. Play makes it easy for developers to implement this.
For Java, we need to take the following steps:
Run the
foo_javaapplication with Hot-Reloading enabled.Edit
foo_java/app/controllers/Application.javaby adding the following action:public static Result echo(String msg) { return ok("Echoing " + msg); }Edit
foo_java/conf/routesby adding the following line:GET /echo/:msg controllers.Application.echo(msg)
View your new echo page using a web browser:
http://localhost:9000/echo/fooYou should be able to see the text Echoing foo.
For Scala, we need to take the following steps:
Run the
foo_scalaapplication with Hot-Reloading enabled.Edit
foo_scala/app/controllers/Application.scalaby adding the following action:def echo(msg: String) = Action { Ok("Echoing " + msg) }Edit
foo_scala/conf/routesby adding the following line:GET /echo/:msg controllers.Application.echo(msg)
View your new echo page using a web browser:
http://localhost:9000/echo/barYou should be able to see the text Echoing bar.
In this recipe, we made edits to just two files, the application controller, Application.java and Application.scala, and routes. We added a new web action, which takes in a String argument msg in Application.scala and returns the contents of the message to the HTTP response. We then add a new entry in the routes file that declares a new URL route and declares the :msg route parameter as part of the canonical URL.
One of the more essential tasks for a web application is to be able to redirect HTTP requests, and redirecting HTTP with Play Framework is quite straightforward. This recipe shows how developers can use reverse routing to refer to defined routes.
For Java, we need to take the following steps:
Run the
foo_javaapplication with Hot-Reloading enabled.Edit
foo_java/app/controllers/Application.javaby adding the following action:public static Result helloRedirect() { return redirect(controllers.routes.Application.echo("HelloWorldv2")); }Edit
foo_java/conf/routesby adding the following line:GET /v2/hello controllers.Application.helloRedirect()
View your new echo page using a web browser:
http://localhost:9000/v2/helloNotice that the URL in the web browser has also redirected to
http://localhost:9000/echo/HelloWorldv2
For Scala, we need to take the following steps:
Run the
foo_scalaapplication with Hot-Reloading enabled.Edit
foo_scala/app/controllers/Application.scalaby adding the following action:def helloRedirect() = Action { Redirect(routes.Application.echo("HelloWorldv2")) }Edit
foo_scala/conf/routesby adding the following line:GET /v2/hello controllers.Application.helloRedirect
View your new echo page using a web browser:
http://localhost:9000/v2/helloYou should be able to see the text Echoing HelloWorldv2.
Notice that the URL in the web browser has also redirected to
http://localhost:9000/echo/HelloWorldv2
In this recipe, we utilized reverse routes while referring to existing routes inside other action methods. This is handy, as we will not need to hard code rendered URL routes from within other action methods. We also utilized our first HTTP redirect, a very common web application function, by which we were able to issue a 302 HTTP redirect, a standard HTTP status code handled by all standard web servers.
You expect to be able to send some data back to the View itself in web applications; this is quite straightforward with Play Framework. A Play View template is simply a text file that contains directives, web markup tags, and template tags. The View Template files also follow standard naming conventions and they are placed in predefined directories within the Play project directory, which makes it easier to manage template files.
For Java, we need to take the following steps:
Run the
foo_javaapplication with Hot-Reloading enabled.Create the view file
products.scala.htmlinfoo_java/app/views/. Add the contents of the view file:@(products: Collection[String]) <h3>@products.mkString(",")</h3>Edit
foo_java/app/controllers/Application.javaby adding the following action:private static final java.util.Map<Integer, String> productMap = new java.util.HashMap<Integer, String>(); static { productMap.put(1, "Keyboard"); productMap.put(2, "Mouse"); productMap.put(3, "Monitor"); } public static Result listProducts() { return ok(products.render(productMap.values())); }Edit
foo_java/conf/routesby adding the following line:GET /products controllers.Application.listProducts
View the products page using a web browser:
http://localhost:9000/products
For Scala, we need to take the following steps:
Run the
foo_scalaapplication with Hot-Reloading enabled.Create the view file
products.scala.htmlinfoo_scala/app/views/. Add the contents of the view file:@(products: Seq[String]) <h3>@products.mkString(",")</h3>Edit
foo_scala/app/controllers/Application.scalaby adding the following action:private val productMap = Map(1 -> "Keyboard", 2 -> "Mouse", 3 -> "Monitor") def listProducts() = Action { Ok(views.html.products(productMap.values.toSeq)) }Edit
foo_scala/conf/routesby adding the following line:GET /products controllers.Application.listProducts
View the products page using a web browser:
http://localhost:9000/products
In this recipe, we were able to retrieve a collection of data from the server side and display the contents of the collection in our View template. For now, we use a static collection of String objects to display in the View template instead of retrieving some data set from a database, which we will tackle in the upcoming recipes.
We introduced declaring parameters in View templates by declaring them in the first line of code in our view template and passing data into our View templates from the controller.
View tags allow developers to create reusable view functions and components and make the management of views a lot simpler and easier.
For Java, we need to take the following steps:
Run the
foo_javaapplication with Hot-Reloading enabled.Create the tag file
productsIterator.scala.htmlinfoo_java/app/views/tagsAdd the contents of the tag file:
    @(products: Collection[String])

    <ul>
      @for(product <- products) {
        <li>@product</li>
      }
    </ul>
Edit
foo_java/app/views/products.scala.htmlby adding the following block:@import tags._ @productsIterator(products)Reload the products page using a web browser to see the new product listing, using an unordered list HTML tag:
http://localhost:9000/products
For Scala, we need to take the following steps:
Run the
foo_scalaapplication with Hot-Reloading enabled.Create the tag file
productsIterator.scala.htmlinfoo_scala/app/views/tagsAdd contents of the tag file:
    @(products: Seq[String])

    <ul>
      @for(product <- products) {
        <li>@product</li>
  }
    </ul>
Edit
foo_scala/app/views/products.scala.htmlby adding the following block:@import tags._ @productsIterator(products)Reload the products page using a web browser to see the new products listing, using an unordered list HTML tag:
http://localhost:9000/products
In this recipe, we were able to create a new view tag in app/views/tags. We proceeded to use this tag in our View template.
First, we created a new tag that receives a collection of product titles, from which it is then displayed in the template as an unordered list. We then imported the tag in our products View template and invoked the helper function by calling it using its filename (@productsIterator(products)).
For this recipe, we will create a main layout View template that will include a defined header and footer view. This will allow our View template to inherit a consistent look and feel by including this main View template and manage all UI changes in a single file. Our Products view will utilize the main layout view in this example.
For Java, we need to take the following steps:
Run the
foo_javaapplication with Hot-Reloading enabled.Create the main layout view file
mainLayout.scala.htmlinfoo_java/app/views/commonAdd the contents of the main layout view file:
  @(title: String)(content: Html)
  <!DOCTYPE html>
  <html lang="en">
    <head>
      <title>@title</title>
    </head>
    <body>
      <header>@header()</header>
      <section class="content">@content</section>
      <footer>@footer()</footer>
    </body>
  </html>
Create the header view file
header.scala.htmlinfoo_java/app/views/commonand add the following code:<div> <h1>Acme Products Inc</h1> </div>Create the footer view file
footer.scala.htmlinfoo_java/app/views/commonand add the following code:<div> Copyright 2014 </div>Edit the products view file
foo_java/app/views/products.scala.htmlto use the main layout View template by replacing all the file contents with the following code:@(products: Collection[String]) @import tags._ @import common._ @mainLayout(title = "Acme Products") { @productsIterator(products) }Reload the updated products page using a web browser:
http://localhost:9000/products
For Scala, we need to take the following steps:
Run the
foo_scalaapplication with Hot-Reloading enabled.Create the main layout view file
mainLayout.scala.htmlinfoo_scala/app/views/commonAdd the contents of the main layout view file:
  @(title: String)(content: Html)
  <!DOCTYPE html>
  <html lang="en">
    <head>
      <title>@title</title>
    </head>
    <body>
      <header>@header()</header>
      <section class="content">@content</section>
      <footer>@footer()</footer>
    </body>
  </html>
Create the header view file
header.scala.htmlinfoo_scala/app/views/commonand add the following code:<div> <h1>Acme Products Inc</h1> </div>Create the footer view file
footer.scala.htmlinfoo_scala/app/views/commonand add the following code:<div> Copyright 2014 </div>Edit the products view file
foo_scala/app/views/products.scala.htmlto use the main layout view template by replacing all the file contents with following code:@(products: Seq[String]) @import tags._ @import common._ @mainLayout(title = "Acme Products") { @productsIterator(products) }Reload the updated products page using a web browser:
http://localhost:9000/products
Using View templates, we are also able to respond to HTTP requests in other content types such as text files and XML data formats. Play Framework has native handlers for XML and text file content type responses.
For Java, we need to take the following steps:
Run the
foo_javaapplication with Hot-Reloading enabled:$ activator "~run"Create the text-based view template file
products.scala.txtinapp/views/and add the following content:@(productMap: Map[Integer, String]) @for((id, name) <- productMap) { The Product '@name' has an ID of @id }Create the XML-based view template file
products.scala.xmlinapp/views/and add the following content:@(productMap: Map[Integer, String]) <products> @for((id, name) <- productMap) { <product id="@id">@name</product> } </products>Edit
foo_java/app/controllers/Application.javaby adding the following actions:public static Result listProductsAsXML() { return ok(views.xml.products.render(productMap)); } public static Result listProductsAsTXT() { return ok(views.txt.products.render(productMap)); }Edit
foo_java/conf/routesby adding the following lines:GET /products.txt controllers.Application.listProductsAsTXT() GET /products.xml controllers.Application.listProductsAsXML()View the new routes and actions using a web browser:
http://localhost:9000/products.txtand,http://localhost:9000/products.xml
For Scala, we need to take the following steps:
Run the
foo_scalaapplication with Hot-Reloading enabled:$ activator "~run"
Create the text-based view template file
products.scala.txtinapp/views/and add the following content:@(productMap: Map[Int, String]) @for((id, name) <- productMap) { The Product '@name' has an ID of @id }Create the XML-based view template file
products.scala.xmlinapp/views/and add the following content:@(productMap: Map[Int, String]) <products> @for((id, name) <- productMap) { <product id="@id">@name</product> } </products>Edit
foo_scala/app/controllers/Application.scalaby adding the following actions:def listProductsAsTXT = Action { Ok(views.txt.products(productMap)) } def listProductsAsXML = Action { Ok(views.xml.products(productMap)) }Edit
foo_scala/conf/routesby adding the following lines:GET /products.txt controllers.Application.listProductsAsTXT GET /products.xml controllers.Application.listProductsAsXMLView the new routes and actions using a web browser:
http://localhost:9000/products.txtandhttp://localhost:9000/products.xml
In this recipe, we utilized build-in support for other content types in Play Framework. We created new URL routes and web actions to be able to respond to requests for data in XML or text file formats. By following file naming standards and convention for views, we were able to create view templates in HTML, XML, and text file formats, which Play automatically handles, and then adds the appropriate content type headers in the HTTP response.
Play Framework 2.x includes an object-relational mapping tool called Ebean for Java-based Play applications. To be able to use Ebean, ensure that Ebean and a suitable MySQL driver are declared as project dependencies in foo_java/build.sbt.
For this recipe, we will be utilizing Ebean with database evolutions. Play Framework 2.x gives developers a way to manage database migrations. Database migrations are useful for tracking schema changes during the course of application development. Database evolutions are enabled by default but can be disabled in conf/application.conf with the following settings:
evolutionplugin=disabled
Evolution scripts are stored in the conf/evolutions/default/ directory. For more information regarding database evolutions, please refer to Play's online documentation at
https://www.playframework.com/documentation/2.3.x/Evolutions.
You need to perform the following steps to utilize Ebean:
Add the Ebean dependency in
build.sbt:libraryDependencies ++= Seq( javaJdbc, javaEbean, "mysql" % "mysql-connector-java" % "5.1.28" )Ensure that Ebean and MySQL are configured properly in
conf/application.conf:db.default.driver=com.mysql.jdbc.Driver db.default.url="jdbc:mysql://<YOUR_MYSQL_HOST>/<YOUR_DB>" db.default.user=<YOUR_USER> db.default.password=<YOUR_PASSWORD> ebean.default="models.*"For the next recipes, we need to create our product table in our MySQL database. Create our first database evolution file
1.sqlinconf/evolutions/defaultand add the following SQL statements:# --- !Ups CREATE TABLE Products ( id INT NOT NULL AUTO_INCREMENT, name VARCHAR(100) NOT NULL, PRIMARY KEY (id) ); # --- !Downs DROP TABLE Products;The next step is to create the Ebean model for our entity
Product:package models; import java.util.*; import javax.persistence.*; import play.db.ebean.*; import play.data.format.*; import play.data.validation.*; @Entity @Table(name = "Products") public class Product extends Model { @Id public Long id; @Column @Constraints.Required public String name; public static Finder<Long, Product> find = new Finder<Long, Product>( Long.class, Product.class ); public Long getId() { return id; } public void setId(Long id) { this.id = id; } public String getName() { return name; } public void setName(String name) { this.name = name; } }
The following displays various database-oriented operations using Ebean.
Tip
Downloading the example code
You can download the example code files for all Packt books you have purchased from your account at http://www.packtpub.com. If you purchased this book elsewhere, you can visit http://www.packtpub.com/support and register to have the files e-mailed directly to you.
The following code snippet will create a new record:
Product product = new Product();
      product.name = "Apple iPhone";
product.save();Play Framework 2.x includes Anorm, a useful data access library for Scala-based Play applications. To be able to use Anorm, ensure that Anorm and a suitable MySQL driver are declared as project dependencies in foo_scala/build.sbt.
For this recipe, we will be utilizing Anorm with database evolutions. Play Framework 2.x gives developers a way to manage database migrations. Database migrations are useful for tracking schema changes during the course of application development. Database evolutions are enabled by default but can be disabled in conf/application.conf using the following settings:
evolutionplugin=disabled
Evolution scripts are stored in the conf/evolutions/default/ directory. For more information regarding database evolutions, please refer to Play's online documentation at https://www.playframework.com/documentation/2.3.x/Evolutions.
You need to perform the following steps to utilize Anorm:
Add the Anorm dependency to
build.sbt:libraryDependencies ++= Seq( jdbc, anorm, "mysql" % "mysql-connector-java" % "5.1.28" )Ensure that Anorm and MySQL are configured properly in
conf/application.conf:db.default.driver= com.mysql.jdbc.Driver db.default.url="jdbc:mysql://localhost/YOUR_DB" db.default.user=YOUR_USER db.default.password=YOUR_PASSWORDFor the next recipes, we need to create our products table in our MySQL database. Create our first database evolution file
1.sqlinconf/evolutions/defaultand add the following SQL statements:# --- !Ups CREATE TABLE Products ( id INT NOT NULL AUTO_INCREMENT, name VARCHAR(100) NOT NULL, PRIMARY KEY (id) ); # --- !Downs DROP TABLE Products;
The following sections display various database-oriented operations using Anorm.
The following code snippet will create a new record:
   DB.withConnection { implicit c =>
     SQL("INSERT INTO Products(id, name) VALUES ({id}, {name});")
        .on('id -> product.id, 'name -> product.name).executeInsert()
}The following code snippet will update a record:
   DB.withConnection { implicit c =>
      SQL("UPDATE Products SET name = {name} WHERE id = {id}")
       .on('name -> product.name, 'id -> product.id).executeUpdate()
}The following code snippet will delete a record:
   DB.withConnection { implicit c =>
      SQL("DELETE FROM Products WHERE id={id};")
       .on('id -> id).executeUpdate()
   }Querying a record
The following code snippet will query a record:
    DB.withConnection { implicit c =>
      SQL("SELECT * FROM Products WHERE id={id};")
       .on('id -> id).executeQuery().singleOpt(defaultParser)
    }
The following code snippet will retrieve a record:
    DB.withConnection { implicit c =>
     SQL("SELECT * FROM Products;").executeQuery().list(defaultParser)
   }
Finally, we can combine all of these functions in a companion object called Product:
    package models

    import play.api.db.DB
    import play.api.Play.current
    import anorm._
    import anorm.SqlParser.{str, int}

    case class Product(id: Long, name: String)

    object Product {
      val defaultParser = int("id") ~ str("name") map {
          case id ~ name  => Product(id, name)
         }

      def save(product: Product) = {
        DB.withConnection { implicit c =>
      SQL("INSERT INTO Products(id, name) VALUES ({id}, {name});")
                  .on('id -> product.id, 'name -> product.name).executeInsert()
        }
          }


      def update(product: Product) = {
        DB.withConnection { implicit c =>
               SQL("UPDATE Products SET name = {name} WHERE id = {id}")
                .on('name -> product.name, 'id -> product.id).executeUpdate()
            }
          }


      def delete(id: Long) = {
        DB.withConnection { implicit c =>
               SQL("DELETE FROM Products WHERE id={id};")
           .on('id -> id).executeUpdate()
        }
          }


      def get(id: Long) = {
        DB.withConnection { implicit c =>
      SQL("SELECT * FROM Products WHERE id={id};")
        .on('id -> id).executeQuery().singleOpt(defaultParser)
        }
          }

      def all = {
        DB.withConnection { implicit c =>
      SQL("SELECT * FROM Products;").executeQuery().list(defaultParser)
        }
          }
}As with the majority of web applications, there will always be a need to accept an HTTP form, be it a registration form or a login form. Play Framework provides helper classes to manage and process HTTP form submissions. In this recipe, we will go over the steps to create a simple form and map the web action assigned to handle this form submission. We will also utilize the flash scope, which allows us to use the flash object to send messages from the controller to the view template on a per-request basis.
For Java, we need to take the following steps:
Run the
foo_javaapplication with Hot-Reloading enabled.Create the form view template file
app/views/product/form.scala.htmland add the following contents:@(productForm: Form[models.Product]) @import common._ @mainLayout(title = "New Product") { @if(flash.get("success") != null) { <p>@flash.get("success")</p> } @if(productForm.hasGlobalErrors) { <ul> @for(error <- productForm.globalErrors) { <li>@error.message</li> } </ul> } @helper.form(action = routes.Products.postForm()) { @helper.inputText(productForm("id")) @helper.inputText(productForm("name")) <input type="submit"> } }Create the products controller
foo_java/app/controllers/Products.javaand add the following import, action, and Play form blocks:package controllers; import play.*; import play.mvc.*; import play.data.*; import views.html.*; import models.*; public class Products extends Controller { public static Result create() { Form<Product> form = Form.form(Product.class); return ok(views.html.product.form.render(form)); } public static Result postForm() { Form<Product> productForm = Form.form(Product.class).bindFromRequest(); if (productForm.hasErrors()) { return badRequest(views.html.product.form.render(productForm)); } else { Product product = productForm.get(); product.save(); flash("success", "Product saved!"); return redirect(controllers.routes.Products.create()); } } }Edit
foo_java/conf/routesby adding the following line:GET /products/new controllers.Products.create() POST /products controllers.Products.postForm()View your new product form using a web browser:
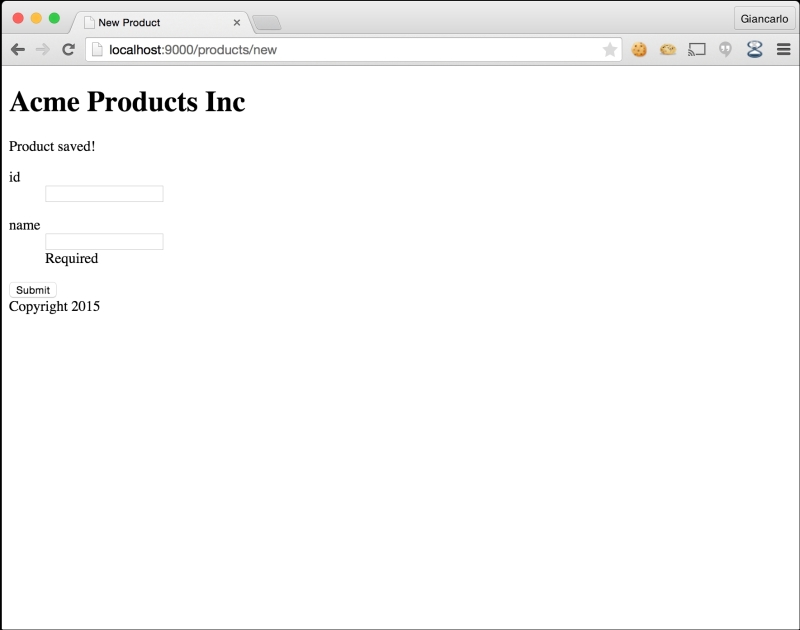
http://localhost:9000/product/newFill in a name for your new product and hit submit. You should now receive the success message:
For Scala, we need to take the following steps:
Create the form view template file
app/views/product/form.scala.htmland add the following contents:@(productForm: Form[models.Product])(implicit flash: Flash) @import common._ @mainLayout(title = "New Product") { @flash.get("success").map { message => <p>@message</p> } @if(productForm.hasGlobalErrors) { <ul> @for(error <- productForm.globalErrors) { <li>@error.message</li> } </ul> } @helper.form(action = routes.Products.postForm()) { @helper.inputText(productForm("id")) @helper.inputText(productForm("name")) <input type="submit"> } }Create the products controller
foo_scala/app/controllers/Products.scalaand add the following import, action, and Play form blocks:import play.api._ import play.api.mvc._ import models._ import play.api.data._ import play.api.data.Forms._ val form = Form( mapping( "id" -> longNumber, "name" -> text )(Product.apply)(Product.unapply) ) def create = Action { implicit request => Ok(views.html.product.form(form)) } def postForm = Action { implicit request => form.bindFromRequest.fold( formWithErrors => { BadRequest(views.html.product.form(formWithErrors)) }, product => {Product.save(product) Redirect(routes.Products.create).flashing("success" -> "Product saved!") } ) }Edit
foo_scala/conf/routesby adding the following lines:GET /products/new controllers.Products.create POST /products controllers.Products.postFormView your new Product form using a web browser:
http://localhost:9000/product/newFill in a name for your new product and click on submit. You should now receive the following success message:

In this recipe, we were able to create our first HTTP form using Play Framework. This recipe included steps in creating an HTML form view template and our Products controller. We declared two web actions and two URL routes and created the Play form object, which we used to bind request parameters to our model, Fruit. We were able to load the web form by accessing http://localhost:9000/Products/new on a web browser. After filling out our form details, we submitted the form itself and received a notification from the Products controller.
Play Framework provides an easy way to validate form submissions. For Play Java, we will add the validation to the model, which will check for a submitted field's length and return an error message if the validate condition is not satisfied. For Play Scala, we will add the form validation to the form object itself and define the validation parameters for each form field there.
For Java, we need to take the following steps:
Edit the Product model,
foo_java/app/models/Product.javaand add thevalidate()method:public String validate() { if (name.length() < 3 || name.length() > 100) { return "Name must be at least 3 characters or a maximum of 100 characters"; } return null; }Reload the Product form using a web browser:
http://localhost:9000/products/newThe product form should now accept only product names with a minimum of three characters and a maximum of 100, as shown in the following screenshot:

For Scala, we need to take the following steps:
Edit the products controller
foo_scala/app/controllers/Products.scalaand modify how the form is declared:val form = Form( mapping( "id" -> longNumber, "name" -> nonEmptyText(minLength = 3, maxLength = 100) )(Product.apply)(Product.unapply) )Reload the Products form using a web browser:
http://localhost:9000/products/newThe product form should now accept only fruit names with a minimum of three characters and a maximum of 100, as shown in the following screenshot:

In this recipe, we added data validations for product name and the acceptable length submitted by users. For Java, we added a validate() method in the product model.
Our Java model can be validated by using JSR-303 JavaBean validation annotations and by defining a validate() method that Play invokes if it is present in the model class.
For Scala, we added data validation directives to the Form object in the controller. We used Play form helpers to define the minimum and maximum character count for the name property of the product.
Play Framework has a CSRF filter module that developers can use to validate CSRF tokens during HTTP form submissions. This allows developers to be sure that the form was submitted with a valid session token and not tampered with in any way.
For Java, we need to take the following steps:
Add the Play filters module as a project dependency to
build.sbt:libraryDependencies += filters
Create a
Global.javaobject file in theapp/directory:import play.GlobalSettings; import play.api.mvc.EssentialFilter; import play.filters.csrf.CSRFFilter; public class Global extends GlobalSettings { @Override public <T extends EssentialFilter> Class<T>[] filters() { return new Class[]{CSRFFilter.class}; } }Declare the
Global.javaobject inconf/application.conf:application.global=Global
Update the template declaration by adding an implicit request object for the product form file
app/views/product/form.scala.html:@(productForm: Form[models.Product])
Add the CSRF token helper tag to the product form file
app/views/product/form.scala.html:@helper.form(action = routes.Products.postForm()) { @helper.CSRF.formField @* -Add the CSRF Token Helper Tag- *@ }Reload the product form using a web browser:
http://localhost:9000/products/newThe product form should now contain a Play-generated CSRF token and should use this to validate form submissions, as shown in the following screenshot:

For Scala, we need to take the following steps:
Add the Play filters module as a project dependency to
build.sbt:libraryDependencies += filters
Create a
Global.scalaobject file in theapp/:import play.api._ object Global extends GlobalSettings { }Declare the
Global.scalaobject inconf/application.conf:application.global=Global
Add the Play global CSRF filter by modifying the object declaration in
app/Global.scala:import play.api.mvc._ import play.filters.csrf._ object Global extends WithFilters(CSRFFilter()) with GlobalSettingsUpdate the template declaration by adding an implicit request object for the Product form file
app/views/product/form.scala.html:@(productForm: Form[models.Product])(implicit flash: Flash, request: play.api.mvc.Request[Any])
Add the CSRF token helper tag to the product form file
app/views/product/form.scala.html:@helper.form(action = routes.Products.postForm()) { @helper.CSRF.formField @* -Add the CSRF Token Helper Tag- *@ }Reload the product form using a web browser:
http://localhost:9000/products/newThe product form should now contain a Play-generated CSRF token and should use this to validate form submissions.
In this recipe, we added the Play Framework filters module, which includes CSRF helpers. We added global CSRF support by declaring the CSRFFilter in the Play application global settings class, app/Global.java and app/Global.scala. The last step was to insert a CSRF token helper tag in our tag that the filter uses to validate form submissions.
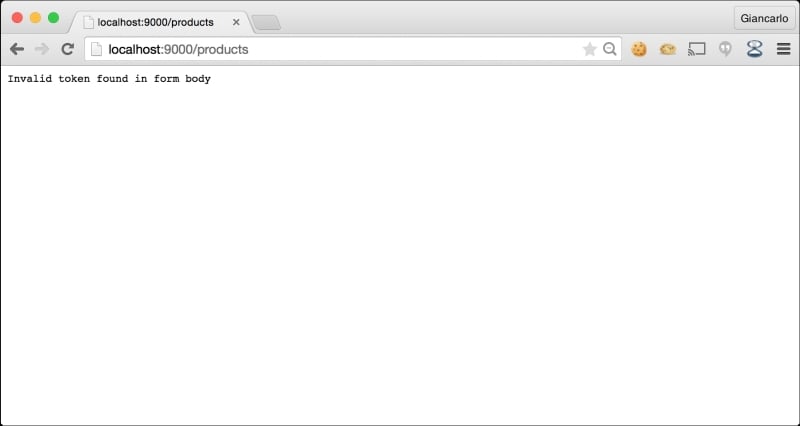
Modifying or tampering with a valid CSRF token will now result in an error and will be rejected by Play, as shown in the following screenshot:
It is quite important for a web framework to integrate testing as seamlessly as possible with the web framework itself. This minimizes the friction developers encounter when coding functional specs and writing tests to validate their work. For Play Java projects, we will be utilizing the popular test framework JUnit. We will be using it to do a simple unit test and to test our model and controller action. For Play Scala projects, we will be using specs2 to do a simple unit test and to test our model, a controller action, and a route mapping.
For Java, we need to take the following steps:
Create a new spec class,
ProductTest.java, intest/and add the following content:import static org.junit.Assert.*; import org.junit.Test; public class ProductTest { @Test public void testString() { String str = "product"; assertEquals(7, str.length()); } }Run the first spec using Activator by running the command
test-only ProductTest:$ activator [info] Loading project definition from /private/tmp/foo_java/project [info] Set current project to foo_java (in build file:/private/tmp/foo_java/) [foo_java] $ test-only ProductTest [info] Compiling 3 Java sources to /private/tmp/foo_java/target/scala-2.11/test-classes... [info] Passed: Total 1, Failed 0, Errors 0, Passed 1 [success] Total time: 3 s, completed 09 29, 14 8:44:31 PM
For Scala, we need to take the following steps:
Create a new Spec class,
ProductSpec.scala, intest/and add the following content:import org.specs2.mutable._ class ProductSpec extends Specification { "The 'product' string" should { "contain seven characters" in { "product" must have size(7) } } }Run the first spec using Activator by running the command
test-only ProductSpec:$ activator [info] Loading project definition from /private/tmp/foo_scala/project [info] Set current project to foo_scala (in build file:/private/tmp/foo_scala/) [foo_scala] $ test-only ProductSpec [info] ProductSpec [info] [info] The 'product' string should [info] + contain seven characters [info] [info] Total for specification ProductSpec [info] Finished in 24 ms [info] 1 example, 0 failure, 0 error [info] Passed: Total 1, Failed 0, Errors 0, Passed 1 [success] Total time: 2 s, completed 09 29, 14 12:22:57 PM
The following recipe focuses on writing a test for our model objects. We will create a new record and add assertions to validate the object's creation. We will then use the Activator command to run our test.
For Java, we need to take the following steps:
Edit the
ProductTest.javafile and add the following content:// add new imports import static play.test.Helpers.*; import models.*; import play.test.*; // add new test @Test public void testSavingAProduct() { running(fakeApplication(), new Runnable() { public void run() { Product product = new Product(); product.name = "Apple"; product.save(); assertNotNull(product.getId()); } }); }Execute the new spec by running the command
test-only ProductTest:[foo_java] $ test-only ProductTest [info] Passed: Total 2, Failed 0, Errors 0, Passed 2 [success] Total time: 2 s, completed 09 29, 14 9:33:43 PM
For Scala, we need to take the following steps:
Edit the
ProductSpec.scalafile and add the following content:import models._ import play.api.test.WithApplication "models.Product" should { "create a product with save()" in new WithApplication { val product = Product(1, "Apple") val productId = Product.save(product) productId must not be None } }Execute the new spec by running the command
test-only ProductSpec:[foo_scala] $ test-only ProductSpec [info] Compiling 1 Scala source to /private/tmp/foo_scala/target/scala-2.11/test-classes... [info] ProductSpec [info] [info] The 'product' string should [info] + contain seven characters [info] [info] models.Product should [info] + create a product with save() [info] [info] Total for specification ProductSpec [info] Finished in 1 second, 90 ms [info] 2 examples, 0 failure, 0 error [info] Passed: Total 2, Failed 0, Errors 0, Passed 2 [success] Total time: 4 s, completed 09 29, 14 4:28:51 PM
In this recipe, we added a new spec, where we created a new product and invoked the save() method. We then added assertion statements to validate that the value returned by the save() method is not equal to none. The test command is used to run the test and displays the results of the test.
The following recipe focuses on writing a test for our controller objects. We will use a FakeApplication to create a mock HTTP request to the Product XML listing page and add assertions to validate that the response we receive is indeed an XML representing all of the products in our database. We will then use the Activator command to run our test.
For Java, we need to take the following steps:
Edit the
ProductTest.javafile and add the following content:// add new imports import play.mvc.*; import static org.fest.assertions.Assertions.*; //add new test @Test public void testProductListAsXml() { Result result = callAction(controllers.routes.ref.Application.listProductsAsXML()); assertThat(status(result)).isEqualTo(OK); assertThat(contentType(result)).isEqualTo("application/xml"); assertThat(contentAsString(result)).contains("products"); }Execute the new spec by running the command
test-only ProductTest:[foo_java] $ test-only ProductTest [info] Compiling 1 Java source to /private/tmp/foo_java/target/scala-2.11/test-classes... [info] Passed: Total 3, Failed 0, Errors 0, Passed 3 [success] Total time: 3 s, completed 09 29, 14 9:37:03 PM
For Scala, we need to take the following steps:
Edit the Product
Spec.scalafile and add the following spec code:import controllers._ import play.api.test.FakeRequest import play.api.test.Helpers._ "controllers.Application" should { "respond with XML for /products.xml requests" in new WithApplication { val result = controllers.Application.listProductsAsXML()(FakeRequest()) status(result) must equalTo(OK) contentType(result) must beSome("application/xml") contentAsString(result) must contain("products") } }Execute the new spec by running the
test-only ProductSpeccommand:$ test-only ProductSpec [info] Compiling 1 Scala source to /private/tmp/foo_scala/target/scala-2.11/test-classes... [info] ProductSpec [info] [info] The 'product' string should [info] + contain seven characters [info] [info] models.Product should [info] + create a product with save() [info] [info] controllers.Application should [info] + respond with XML for /products.xml requests [info] [info] Total for specification ProductSpec [info] Finished in 1 second, 333 ms [info] 3 examples, 0 failure, 0 error [info] Passed: Total 3, Failed 0, Errors 0, Passed 3 success] Total time: 4 s, completed 09 29, 14 5:23:41 PM
In this recipe, we created a new spec to test a URL route we created earlier. Then, we validated the /products.xml URL route by making sure that the response content type is application/xml and that it contains our root element products. The test command is used to run the test and it displays the results of the test.

