


This chapter will guide you through the setup and installation of Piwik Open Source Web Analytics on a web server or on your local computer in a test server environment. This is not a complicated procedure, but there are a few ways to set up your Piwik installation, and a couple of choices you will have to make during the installation procedure.
Piwik can be downloaded easily from its website at http://piwik.org/. It is a free and open source application, and is released under the GNU General Public License. This means you can download Piwik, modify it, and release new software using its code base as long as you agree to pass on the same rights to others who use your modified code.
In this chapter, we will cover the following topics:
Meeting system requirements
Uploading to your hosting account
Creating a database for your installation
Installing Piwik
Retrieving and using the default JavaScript tracking code
Securing your installation
Setting up Piwik for high-traffic situations
Updating your installation
Backing up Piwik
At the time of writing this book, the latest version of Piwik was 1.8; the following are the requirements for this version. A newer version of Piwik may have more or less the same requirements as those covered below.
Firstly, you need to make sure that your server and/or development environment is set up and ready for the install. Fortunately, the requirements of Piwik are not very hard to meet. Most hosting companies' standard PHP and MySQL packages will meet these requirements.
First, you need a web server. The most common, Apache, is the standard for most Piwik installations. Piwik also runs well on light web servers like Nginx or lighttpd. In fact, for high traffic websites, a light web server is the recommended option. But if you are a beginner with Piwik or Nginx, it is best to stick with Apache.
Piwik requires MySQL version 4.1 or greater to store its analytics data.
Piwik also needs PHP version 5.1.3 or higher installed on your web server; version 5.3 or higher is recommended for less memory usage.
You will also need to have either the
pdoandpdo_mysqlextension installed, or themysqliextension installed. These MySQL extensions can use some of the more advanced features of MySQL 4.1 necessary for Piwik to run.You will also need the PHP
GDextension to create the images for some of the graphs in Piwik.
Chances are that a web hosting company will have the required PHP extensions enabled on your account. They are standard on most modern servers. If they do not have it enabled, you can put in a support ticket to have the above requirements met. Editing the php.ini file to enable the correct PHP extensions yourself will be covered in the installation process.
Once you have the environment for Piwik ready and you are waiting for a brand new Piwik installation, it is time to go to the Piwik website http://piwik.org and download the Piwik archive file. Just like the screenshot below, you should be able to see a big orange button containing the download link to the current version of Piwik. The current version, during the writing of this book, is 1.8.

This button links to the zip file version of the download—something you might prefer on a Windows or Mac computer. If you are looking for other archive formats, like tar.gz, you can find a list at http://builds.piwik.org. The most current version of Piwik will be named either latest.tar.gz or latest.zip.
Download the zip file to a place you want to store it temporarily. If you are going to upload with FTP, use a tool like 7zip, Peazip, or the archive tool built into your operating system, to open up the zip file. You should be able to see a piwik folder in there, as well as a How to install Piwik.html file. If you are going to use cPanel's File Manager or some other web server administration tool, you don't have to unzip this file. You will be uploading it whole and extracting the files from the server.
You can now drag or extract this piwik folder to the location you want it in. This will be a temporary location if you plan on uploading the files via FTP. If you are only running a test server on your local machine, you can drag the folder to the document root of your local server. The document root is the directory on your web server where the files for your web site are held. The name of this folder varies depending upon your server configuration. Some common document root folder names are:
HTTPDocs
HTDocs
HTML
Public_HTML
Web
You can skip the steps of downloading, unzipping, and even the next step of uploading, if you are familiar with SSH. Just use the following steps and you don't have to worry about opening your FTP client. SSH is a network protocol that allows secure command execution between two networked computers. Using SSH can be quicker and easier once you get used to typing commands in a terminal window.
You will need an SSH client to do this. If you have an Apple computer, it will come with a program called Terminal. If you are using Windows, you will have to download Putty, which is available at http://www.chiark.greenend.org.uk/~sgtatham/putty/. These tools allow you to interact with your remote web server and execute commands via your server's command line interface.
1. Log in to your web server using Putty or Terminal. If you are logging in as
root, this will put you in the/root directory. If you are logged in under a user account, you will most likely be at/home/YOURUSERNAME, whereYOURUSERNAMEis the same username you just logged in with.2. Navigate from your home directory to the directory that Apache will be serving the documents from. On many servers, this will be
/var/www/or/var/www/vhosts/your-domain.com. If you need to find the document root, you can run this command on the command line:grep -i 'DocumentRoot' httpd.conf3. Once you know where your document root is, just use the
cdcommand to get there:cd /var/www4. Use
wgetorcurlto grab thetar.gzfrom http://www.Piwik.org.wgetis the more common of the two, but both will work similarly (if you are usingcurl, just replacewgetwithcurl, in the following command):wget http://builds.piwik.org/latest.tar.gz5. Now you will want to extract Piwik's files from the archive:
tar -xvwzf latest.tar.gz6. You can delete the archive file, as you will no longer be needing it:
rm latest.tar.gz7. You can stop right here if you want your Piwik installation in a folder called
piwik. If you are running Piwik alongside an active site, putting your Piwik installation in a subfolder is the best choice.8. If you want to move the location of your Piwik folder before you install, instead of browsing to the
piwiksubfolder of your domain or localhost, you can (from your current location at the document root):Rename it or move it to another folder:
mv piwik NEW_FOLDERMove it to the document root:
mv -r ./piwik/* ./
If you have put Piwik on a local web server or used wget to download Piwik to your Linux web host, you can skip this section. For those of you who still need to get Piwik to its home on a web server, it's time to decide how you are going to do that. If your web hosting company is running a web-based server administration software like cPanel, Plesk, or Webmin/Virtualmin, then you can probably upload through your browser and never have to use your FTP software.
Many modern web hosts provide their users with administration tools that allow the users to do just about anything they can imagine with their servers. It's good to become familiar with the tools your hosting company provides you. There may be a few things hiding in there that you don't know about, like creating new e-mail addresses, new databases, and new name server records, and uploading files. cPanel is one of the most common and commercial web-based web server administration tools. If you plan on using one of these tools, you don't even need to unzip the file and upload each file one by one. You can unzip the zip file on the server after it's uploaded. Follow these steps to upload the file:
1. Browse to the File Manager utility in your cPanel installation.

2. This should bring up a pop-up window with your Web Root already selected. Click on the Go button.

3. Click on the Upload link in the File Manager and you will be at the upload page. Click on the Choose File button and choose the latest.zip file you downloaded from http://piwik.org. Don't worry about any of the other checkboxes on the page. They can be left as is.

4. After the upload is done, return to the File Manager screen, right-click on the latest.zip file and choose Extract. This will put your Piwik installation inside a folder called
piwikin your web root. If you want, you can rename this folder with some other name by right-clicking on the file and choosing Rename. Naming this folder something likestatsmay help you remember what type of software is in this folder.
If you are using a web-based administration tool other than cPanel, you will use a process similar to this to upload the Piwik zip file to your web server. Look out for a help or knowledge base link or search Google if you have trouble finding your web-based FTP tool. Most web admin systems will name the tool you are looking for, as File Manager or Web FTP. Some may use the right-click method to bring up a menu and some may use a menu across the top of the page. It shouldn't be too hard to figure out.
If you are running a barebones host without cPanel software, it's time to open your FTP software. If you don't have an FTP client installed on your computer—no problem. I can recommend two great free FTP tools that run on either Windows or Mac, and one that will run from a browser:
Filezilla: Filezilla is a lightweight, free FTP software that has been around for years. It is open source and is in constant development. There is a client version and a server version. You will only need the client version. You can get Filezilla at http://filezilla-project.org.
CyberDuck: This free FTP software has lots of features, but earlier versions of CyberDuck were only for Macs. It's very easy to use, and has recently become available to Windows users. You can find CyberDuck at http://cyberduck.ch.
Net2ftp: This free service will run from a browser, so even if you have to upload the Piwik files with a Chrome notebook, you can get it done. Net2ftp has both a Java and a Flash web interface to choose from.
There are dozens of free FTP clients. A Google search will turn up a lot more than the three I have listed. Just choose one you feel comfortable with and let's get to work.
Using your FTP software, connect to your FTP server with the Host, Username and Password your hosting company has provided for you. For security reasons, it is better to use sFTP—a secure FTP connection. Browse to the folder you want to install Piwik in, with your FTP tool. Most FTP software, such as Filezilla, will show your local files on the left-hand side of the software window and your remote files on the right side of the software window, as shown in the following screenshot. But those like Cyberduck may show only the remote files by default, and all uploads and downloads are done by dragging from and dropping to the Cyberduck window.
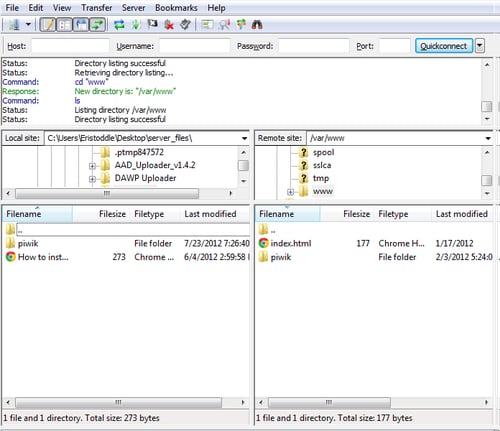
Now select all of your local Piwik files from inside the piwik folder in either the left pane of your FTP software or from an Explorer or Finder window to the remote folder you want them to reside in on the server in your FTP tool. It may take a minute or so to upload all the files, but once that is done, you are ready to create a database and then start the installation wizard.
Now it's time to create the MySQL database and admin user that your Piwik installation will be using. It is recommended that you create a user and database specifically for Piwik to use to keep your MySQL users and databases segregated.
Create a user and database for your installation, using the following steps:
1. Open your browser, browse to the location of your cPanel installation, and click on the MySQL Databases link in cPanel.

2. Enter a name for the database you will be using for Piwik, and click on the Create Database button. If you are on shared hosting, cPanel will add your username as a prefix. For example, if you chose
piwikas the name of your database and your username isusername, the actual name of the database created will beusername_piwik. You will need to remember this database name for the web-based Piwik installation.
3. Now it's time to create a user and assign the user to our new database. Jump down to the MySQL Users section. Enter your desired username and password twice, and click on Create User. You will need to remember the username and password for the Piwik installation. With cPanel on a shared host, you will get a new MySQL username with your username as a prefix, like this:
username_mysqluser.
4. Now add the user to the database, by clicking on the Add button.

5. Next, check the ALL PRIVILEGES checkbox for the user and click on the Make Changes button, so that the new user gets full control of the new database.

Some web hosts provide you with an installation of phpMyAdmin with your hosting account, and other hosts may give you a way to install phpMyAdmin with a one-click installation process. In either case, here is how we create a user and database in Piwik using phpMyAdmin:
1. Navigate to the folder where phpMyAdmin is installed. The location of this installation depends upon your hosting provider or the directory you choose in the phpMyAdmin one-click installation process.
2. Click on the Databases link.
3. There, you should see a textbox with the words Create new database. Enter the name of your database in the box and click on the Create button.

4. Now that your database exists, it is time to create a user. Click on the More link on the far right-hand side of the upper menu. This will bring up another menu. One of the items in that menu will be Privileges. Click on that link.

5. When the page loads, click on Add a new User.

6. Enter a username, a password, and the same password again, in their designated boxes. Below that, in the Database for user section, make sure Grant all privileges on database "Your_Database_Name" is checked, where Your_Database_Name is the database you just created.

7. Click on the Go button at the end of the page. Once the page loads, you are done with the creation of a database section.
For those of you who would rather use SSH to create your database for Piwik, you can use the following steps:
1. Log in to your web server via SSH, using Putty or Terminal.
2. Connect to the MySQL server, using the following command:
mysql -u root –pIn this command,
rootis a MySQL user with full permission.3. You will be prompted for this user's password. Enter it.
4. Run the following command:
CREATE DATABASE piwik;In this command,
piwikis the name of the database you are creating.5. Run this command:
GRANT ALL ON piwik.* TO piwik_user@'localhost' IDENTIFIED BY 'password';In this command,
piwik_useris the MySQL username you choose andpasswordis the password you choose for that user.
Your database will be ready, but you may have to run the last command for all the possible host names you will be using. You will also need to run the last command for localhosts such as 127.0.0.1, and the domain your Piwik installation will be running under, if any.
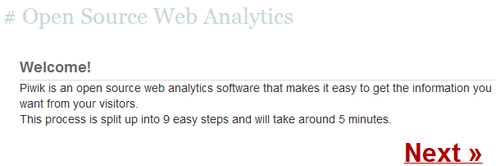
Now that we are done making everything ready for the installation process, it's time to start the Piwik 5-minute installation. Browse to the location of your Piwik installation on your server. If you installed Piwik to a local server, this may be http://localhost/piwik. If you installed Piwik into a folder called piwik, you would browse to http://your_domain_here.com/piwik. You will be greeted by a page that looks like the one below. There will also be a handy little progress bar at the bottom of the page, which is cut out of these screenshots.
There is not much else to do here except click on Next. This will take you to the Systems Check portion of our installation. The following screenshot shows what this page will look like if you don't have the correct extensions for MySQL installed. This should not happen with most servers, but it could happen.
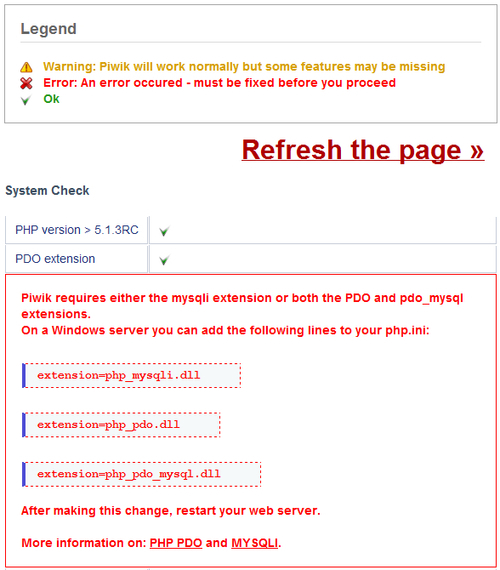
In order to activate these extensions, you need to locate and edit your php.ini file. If you do not know where this file is located, you can upload a PHP file to your Piwik folder or to a location you can browse to on your server. In this file, which you can name something like info.php, you need to have the following PHP code:
<?php phpinfo(); ?>
Browse to the location of that file on the server, using your web browser. The page that loads will tell you just about everything you need to know about your PHP installation. You need to find the location of your php.ini file. It is usually located near the top of the page and will look something like the following screenshot:

Once you have your php.ini file loaded in your text editor, it may be hard to find exactly where the extensions listing is, as the file could have thousands of lines. When you search the file for the term Dynamic Extensions, you should find a list like this:
;extension=php_bz2.dll
;extension=php_curl.dll
;extension=php_fileinfo.dll
;extension=php_gd2.dll
;extension=php_gettext.dll
;extension=php_gmp.dll
;extension=php_intl.dll
;extension=php_imap.dll
;extension=php_interbase.dll
;extension=php_ldap.dll
;extension=php_mbstring.dll
;extension=php_exif.dll
;extension=php_mysql.dll
;extension=php_mysqli.dll
;extension=php_oci8.dll
;extension=php_oci8_11g.dll
;extension=php_openssl.dll
;extension=php_pdo_firebird.dll
;extension=php_pdo_mssql.dll
;extension=php_pdo_mysql.dll
On a Linux server, these extension names will end in .so instead of .dll. To activate a PHP extension, all you need to do is remove the semicolon in front of the extension name. So, remove the semicolon from the front of either extension=php_pdo_mysql.dll or extension=php_mysqli.dll. Also, remove the semicolon in front of extension=php_gd2.dll on Windows or extension=php_gd2.so on Linux, or you will see the error pictured below and will be unable to see some of the graphs that Piwik provides.

Another error you might run into with Piwik installations and/or updates is a file permission error. To fix this, you need to know the user your Apache or Nginx web server runs under. With Apache on an Ubuntu server, it is commonly www-data, but the specific username of your server depends on your installation. You can fix the issues with the automated install by doing the following in an SSH connection with your server, where www-data is replaced with the username of your running server:
1. Browse to the folder above your Piwik folder.
2. Use the full path to your Piwik folder, in the following commands:
Run the following command:
chown -R www-data:www-data piwikRun the following command:
chmod -R 0755 piwik
What you are doing here is giving your web server the ownership of the Piwik files, and the ability to execute and write to them. FTP software may let you set these file permissions to 0755, but may not have the ability to change the ownership of the files.
If you have fixed these issues or had no issues in the first place, you should see a long line of green check marks going down the page. Now that every requirement is satisfied, click on Next and move on to the next page, the Database Setup step.

This is where you will enter the name of the MySQL database you created for Piwik, as well as the username and password that you created for the Piwik database. You may want to leave the table prefix alone. It doesn't hurt anything and will be necessary if you want to add plugins to Piwik or when you are installing Piwik in a database that is already in use by another software. You can leave the adapter drop down as is. Once you have filled out all the information, click on Next, and the installer will create all the necessary tables for your Piwik installation. You should see a page like the one below:

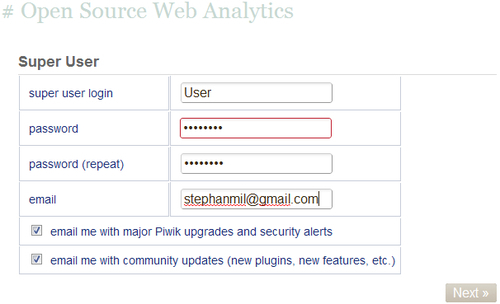
Click on Next again and you will be taken to the page to create your super user login. You can create almost unlimited users in one Piwik installation, but there will only be one super user who controls everything. Pick a login name and a secure password, and enter your e-mail address in the correct box. If you want to receive notifications of Piwik upgrades and security alerts, you can check the box, and they will be delivered to your e-mail address. And if you want news about community updates, you can check that box too.
When you are done entering your login details, click on the Next button. You will be taken to the page where you will set up your first website to track.
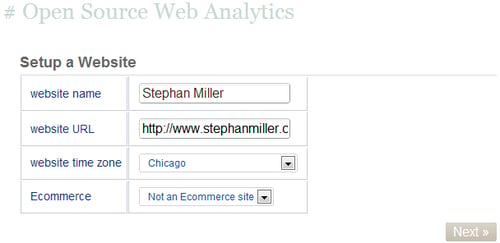
Enter the name of your website in the correct textbox. This is nothing more than a label to identify the website you are tracking. In the next box, enter the URL of your website. If you are testing Piwik tracking on a website that runs on a local server like XAMPP, then this URL will start with http://localhost and end with the folder you have installed your test site into, like http://localhost/wordpress/. On a live website, this URL can be the WWW version or the non-WWW version. Either one will do, because Piwik will track both versions when you enter one. Next, to select the time zone, select a major city nearest to your location. If the website you are tracking is a shopping-cart website that takes payments, you will want to select the Ecommerce option. This option adds goal tracking features specifically geared to shopping-cart websites. When you are done with everything, click on the Next button.
This will take you to the page where you will find the JavaScript code that has to be included in the website you are tracking. The best place to paste this code in your web pages is right before the closing </body> tag. If you are using a PHP-based CMS, chances are that there will be a PHP file which generates the footer of all the pages in the website you will be tracking. In a Wordpress installation, this would most likely be the footer.php file in the theme you are using. So, you would find that file and paste this JavaScript before the </body> tag. In osCommerce, you would also look for the footer.php file, find the </body> tag, and place your JavaScript right before it. In a phpBB installation, you would find the overall_footer.html file and add this JavaScript before the </body> tag. It is pretty simple to add tracking to any site, if you know where to look for the closing HTML body tag.
There may also be a plugin or extension available for your CMS. We will cover all the other options you have for adding tracking code to your site in later chapters. For now, you have to start tracking. So get that JavaScript on your website.
Click on Next again and you are greeted with the Congratulations page. You can click on Continue to Piwik to view the Dashboard of your new Piwik installation.
The data that Piwik collects from visitors comes with responsibility. You are now responsible for the privacy of your visitors. While this responsibility may not be as big as storing encrypted credit card numbers, still, it shouldn't be taken lightly. The developers that work on Piwik are dedicated to providing users with a secure and bug-free application. But there are a few things you can do to make your Piwik installation more secure. Most of these would apply to any PHP and MySQL application.
Use a separate MySQL database for Piwik: It is a good practice to do this with all of your databases. That way, if an attacker happens to be able to access one database, this database will not be linked to multiple applications.
Give your Piwik database its own username and password: The first thing a hacker might try is to use one set of credentials that work on all of your databases. Giving each database a separate username and password limits the damage an attacker can do. To learn more about MySQL best practices, please visit: http://dev.mysql.com/tech-resources/articles/mysql-administrator-best-practices.html.
Always access Piwik over SSL: With a standard HTTP connection, information is sent in plain text. This includes usernames and passwords. Choosing to always use the HTTPS connection guarantees that this data will be encrypted. This is a pretty simple process that gives a lot of added security.
Make sure your web server is configured to accept SSL requests. You can use a self-signed certificate, but a valid SSL certificate is recommended for a production installation of Piwik.
Find the section marked
Generalin theconfig/config.ini.phpfile in your Piwik install folder and addforce_ssl=1underneath theGeneralheading, as follows:[General] force_ssl=1
Restrict access to Piwik files: Only the
piwik.jsand thepiwik.phpfiles are required by external websites for tracking. You can use .htaccessto restrict the access of every other file in the Piwik installation to only those IP addresses you will be using to check your stats.Keep backups: Regular backups will protect your data in case of a disaster. First make sure that your Piwik MySQL database is backed up. There are plenty of free scripts or downloadable software to back up MySQL databases. Any one that works, should do. The only file you have to worry about backing up is
config.ini.phpin theconfigfolder of your Piwik installation. Back it up to your computer or another location, regularly. This is all you need to restore a Piwik installation if your current installation is ever damaged. To learn more about backing up your MySQL databases, please visit: http://dev.mysql.com/doc/refman/5.1/en/backup-methods.html.Keep your system up-to-date: Your system is only as strong as its weakest link, and there are many links in its chain. Sometimes, software updates add features, but often these updates fix bugs and plug security holes. So, keeping Piwik, Apache, Linux, PHP, and MySQL up-to-date is an important part of the security of your Piwik installation.
Use the Piwik security plugin: Piwik comes with a SecurityInfo plugin that will test your installation for any security issues and return a recommendation report. This plugin is not activated by default. First, you must activate the plugin in the Piwik's Settings | Plugins menu. You can then view the SecurityInfo plugin by going to Settings | Security in the Piwik admin interface. Anything marked green in the report is in good condition. Anything red should be checked out and fixed, if possible. Yellow is somewhere between both extremes, but not a dire threat.
Use strong passwords: This is always a good practice. Another good practice is changing your passwords regularly. You can generate a strong password online at http://www.pctools.com/guides/password/.
Use SSH and secure FTP: This is another general good practice. This will encrypt your connection to your web server—so no one snooping on your connection can capture data in any readable form.
It is a good practice to regularly back up your Piwik installation, and you should definitely back up Piwik before you plan on doing an update. You can never be sure that everything will go as planned on your server. So, it is better to be safe than sorry. Fortunately, this is a simple process involving only two steps.
Firstly, you need to back up the config.ini.php file located in the config folder of your Piwik installation. This file contains your Super User credentials, your database connection details, and the list of plugins you have installed. All you need to do is open your FTP software, connect to the FTP server of your website, download the file, and store it in a safe place. This will ensure that you can get a new Piwik installation up and running using your old data, if anything bad should happen to your old installation.
The second thing you need to do to back up your Piwik installation is to back up the MySQL database that Piwik uses. This involves dumping the contents of the database to a SQL file. This is not as hard as it sounds either. You don't need to know any special database queries to do it. You can use the same tool, which you used to create the database, for creating backups.
In phpMyAdmin, just browse to your Piwik database, click on Export in the top menu, and when the page loads, click on the Go button.
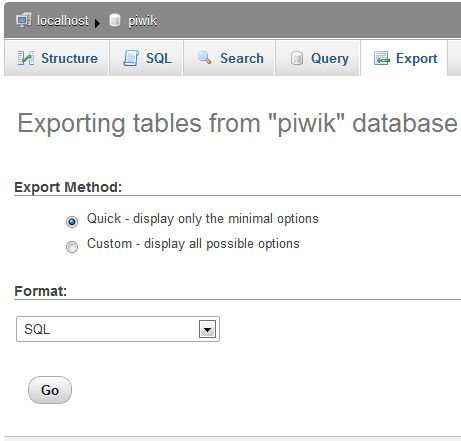
When your browser asks you to save the SQL file, just choose a suitable location on your hard drive and wait for the download to finish. If you use cPanel, phpMyAdmin comes installed already, so you just browse to where your cPanel is located, find the Databases section, click on phpMyAdmin, and follow the instructions above. There are many other ways you can run a MySQL backup using various GUI-based MySQL tools. You can explore these other ways at http://codex.wordpress.org/Backing_Up_Your_Database. This page details how to back up a Wordpress database, but the same instructions will work for Piwik.
Once you have these two files some place safe, you have everything you need to rebuild your current Piwik installation from scratch. Now it is safe to update Piwik.
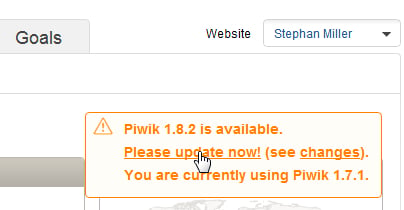
Every once in while, Piwik will notify you of an update—which is a good thing. Piwik updates always bring new features, bug fixes, and security fixes. During the writing of this book, I actually had to update from version 1.6 to version 1.7 and then from version 1.7 to 1.8. Piwik updates are a three-click process, if your file permissions are correct. Everything can be done in the browser.
If your Piwik installation requires an update, you will see the notification in the top right corner of the Piwik dashboard, as long as you are an Admin or a Super User of your Piwik installation. If you hover over the notification with your mouse cursor, you will see a link to the update page and to the changes page. The changes page will tell what is new in the update. Click on the Please update now! link to get started.
If the permissions on the directories in your Piwik installation are not correct, you will see a notification that your only option is to download Piwik and manually install the update.
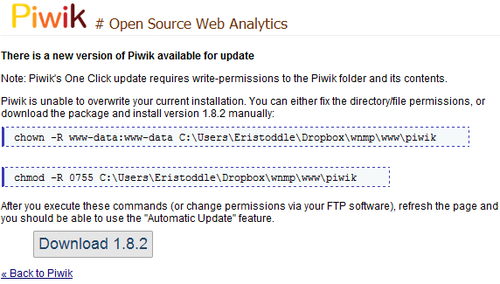
To fix this issue, you need to correct the file permission errors in your Piwik installation folder. Setting permissions for your Piwik installation was covered in the install process a few pages back. Follow those instructions; restart the update in your browser and you should now see a page like this:
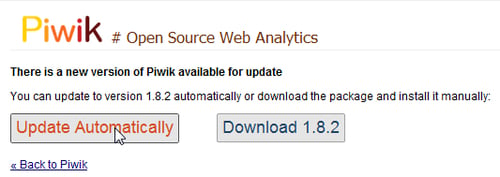
Click on the Update Automatically button. That should take you to a page similar to this:

It may seem like the update is done now, but that is not necessarily so. Continuing to Piwik may involve a detour to a page that looks a lot like the following page:
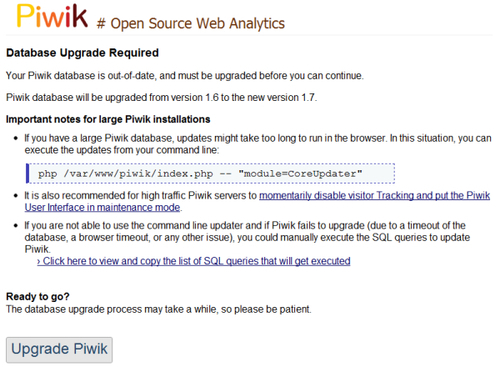
This means that the files are currently up-to-date, but the database needs to be upgraded to support those new features that Piwik is bringing you. Click on the Upgrade Piwik button and you should be done and ready to check out any new Piwik goodies.
If you are running Piwik on a high traffic website, it can take a lot longer for a database upgrade to finish. It is recommended to update these types of installations through SSH or the command line prompt using this command:
$ php /path/to/piwik/index.php -- "module=CoreUpdater"
Here, /path/to/Piwik/index.php is the path to the index.php file in your Piwik installation.
It is every webmaster's dream to have a website that receives a million page views a month. But, if you do have a site that has this much traffic, can Piwik keep up? Or, what if you have to provide analytics data to thousands of clients? Or, if you own a multitude of sites that you would like to track with one Piwik installation. Will Piwik stand up to a beating like this? The answer is "Yes"—if you set up your installation correctly.
Using Piwik out of the box will be fine when you are tracking several hundred visits a day, but when that traffic moves up into the thousands, you are going to have to tweak a few things to help Piwik handle the stress. But that is the case with any software. It is just not going to perform the same under ten times the load, unless you prepare for it. Fortunately, there are a few quick and easy ways to help you on your way to scaling Piwik up to that million-page-views-a-month goal.
One of the quickest fixes to execute in a traffic "problem" is to move your Piwik installation to a better server. If you are on a shared host, then move your installation to a Virtual Private Server. If you are already on a VPS, move Piwik to a dedicated host. There is really no such thing as unlimited in the server world. The only thing that counts here is real numbers. If you are maxing out a one core dedicated server, you might want to upgrade to a server with a four core processor. But don't just brute force your performance problem by throwing bigger servers at it. Make sure you use some of the other optimizations below, before you start waiting for the 64 core processor to come out.
Every server benefits from more RAM, and every server enters critical territory when its RAM is maxed out. It is recommended that you have at least 4 GB of memory on a server running Piwik if you are tracking multiple websites or one website with a lot of visits. Piwik can use a lot of memory to archive data and process reports. Every extra bit of memory can help. Modern VPS hosts and cloud services like Amazon will even allow you to adjust your memory on the fly if you need more or less.
It could be necessary to run a PHP cache like APC or XCache to get better performance out of your high traffic Piwik installation. A PHP cache will optimize and cache intermediate PHP code. What this means to you is better performance out of your Piwik code.
As I previously mentioned in the Meeting system requirements section of this chapter, once you start tracking sites with a lot of traffic, your standard Apache server may not be able to handle the load as well as a lighter web server like Nginx or lighttpd can.
If you plan on running Piwik on Nginx, you can find the configuration for it at https://github.com/perusio/piwik-nginx or at http://wiki.nginx.org/Piwik. Nginx does not use .htaccess files, and all of the data in these must be applied to the Nginx configuration file instead. It is not that hard to do once you become familiar with the Nginx configuration file syntax, but it does help to have step-by-step instructions or a prebuilt configuration file.
Nginx can be installed on a Linux server using the apt-get or yum commands. You can find download links for a Windows version of Nginx at http://nginx.org.
By default, Piwik triggers its report archiving process when the reports are viewed from the browser. You can disable this in the Settings | General Settings menu of Piwik and set up a cron job to automatically run the archiving process for you.
The cron shell script
is located at /misc/cron/archive.php, in the Piwik folder. This is a Linux shell file. It is just a text file that contains a shell script, which will use a background process to archive your reports instead of your Piwik installation. It can be executed with this command: /usr/bin/php5 /path/to/piwik/misc/cron/archive.php. Make sure its permissions are set to 755, and set up a cron job that points at the file. Setting it to run every hour or half hour is a good choice for medium and high traffic websites.
Reports will load instantly when you log into your Piwik installation, because the reports will have already been archived by the cron job instead of by your page load. This will provide a better user experience.
With its default configuration, a Piwik installation works in real-time. This is not really real time, but every 10 seconds. Processing the reports for a high-traffic website six times a minute can put a lot of extra stress on a server. And if you do not need your analytics data to update this frequently, you will see a performance increase by setting the report processing interval to something higher, like 3600 seconds. This can be done in the Settings | General Settings menu of Piwik.
If you don't need your old analytics data, you shouldn't keep it around. Deleting your old logs will free up a lot of space in your database and give you a slight increase in performance. You can configure Piwik to automatically delete old logs. Just log in to Piwik as the Super User, browse to Settings | Privacy, and click on the Delete old visitor logs from database link. You will be asked to enter the duration, in days, that you want to keep logs around. You can set the deletion process to run every day, every week, or every month, as well as specify the maximum number of rows to delete on each run.
Piwik can be used behind a load balancer . A load balancer distributes the workload of one application across multiple servers. Here are the steps you need to follow:
1. Synchronize the
config/config.ini.phpon all servers. You can use rsync to do this.2. Delete the contents of the
tmp/*folder every time you upgrade Piwik or one of its plugins.3. Enable database session storage by setting the
session_save_handlervariable, in theconfig/config.ini.phpfile, todbtable. If the variable is not currently in the file, you can add it under the[General]section, using this command:session_save_handler = dbtable.4. Enabling SSL is recommended, but not required. This can be done in the
config/config.ini.phpfile too. Addforce_ssl=1under the[General]section.
By excluding URL query parameters from the URLs being tracked, you increase Piwik's performance. The fewer URLs tracked, the better. If the website you are tracking with Piwik uses session ID parameters in its URLs, then these can be ignored and not tracked as new, separate pages. The Super User can edit the global list of query parameters that are being excluded from tracking, by navigating to Settings | Manage Websites. Every Piwik admin user can edit their own list of query parameters excluded from tracking by navigating to Settings | Websites.
In this chapter, you learned how to install Piwik and get it running on an Apache web server. You also learned that there is more than one way to install Piwik, depending on your preferences or server features. Later, you learned how to insert Piwik's JavaScript tracking code into your web pages, so that you could start analysing your traffic. You should now know how to make your Piwik installation as secure as possible, and have an idea of how you can set up Piwik to handle high traffic websites or many websites simultaneously. If an update for Piwik is required, you will have enough knowledge to run the update and fix any permission issues.
In the next chapter, you will learn the ins and outs of using the Piwik interface and generating reports with Piwik.