


NetBeans is a free and open source Integrated Development Environment (IDE), which complies with multiple programming languages. For a long time it has been the editor of choice to major developer communities. Along with the growing market demand, NetBeans has integrated the PHP development features since NetBeans 6.5 (November 2008), and these days, it has become one of the most popular IDEs for the PHP community.
In this chapter we will discuss:
Why NetBeans for PHP application development?
Downloading the NetBeans IDE
Step-by-step NetBeans installation
Setting up your PHP development environment
Creating a NetBeans project
So let's get on with it...
NetBeans IDE facilitates our daily PHP application development activities with the following:
Creating and managing projects: The IDE for PHP enables us to create PHP projects, and helps to grow the project. It can perform project-related settings and operations; that is, creating documentation for the project, testing the project, and so on.
Editing features for the source code: The code editor comes with an exciting collection of source-editing capabilities within the PHP project scope. It empowers faster code writing with the following features:
Syntax highlighting enables highlighting PHP syntax in project files.
Code folding enables the folding and unfolding of selected classes and method codes within the current file.
Navigation helps to explore classes and methods in the current PHP file.
Code templates help in using predefined code snippets.
Parameter hints give information about the formal parameters of a method where the method is called.
Formatting provides auto code formatting in the current file.
Bracket completion adds/removes paired quotes, parentheses, and braces during code writing.
Mark occurrences marks all the occurrences of a code string within the opened project files.
Error detection shows the PHP parsing error immediately after typing is finished.
Pair matching highlights matched pair of quotes, braces, parentheses, and so on.
Semantic highlighting identifies the keywords, method names, call, unused variables, and so on.
Go to declaration sends the cursor to where the chosen type is declared.
Instant rename renames all occurrences of a variable within its scope.
Code documentation helps with an automatic documentation structure.
Deploying the project: Provides synchronization within the PHP project content, with remote server content.
Database and services: Provides support for database management and web services.
SCM tools: Provides source code management tools, such as Git, Subversion, CVS, and Mercurial, built-in for source code versioning, tracking changes, and so on.
Running PHP scripts: Enables the parsing of PHP scripts, and yields output within the IDE without going to the browser.
Debugging the source code: You can inspect local variables, set watches, set breakpoints, and evaluate the code, live. You can also perform command-line debugging, and check the PHP output in the IDE without going to the browser, which provides competence for remote debugging.
Supporting PHP frameworks: It also offers the support for popular PHP frameworks, such as the Zend Framework and Symfony.
Note
Comparison of integrated development environments for PHP can be found at http://en.wikipedia.org/wiki/Comparison_of_integrated_development_environments#PHP.
Before we proceed with downloading the latest version, let's have a look into the recommended system requirements of various platforms for installing and running the NetBeans IDE:
Microsoft Windows XP Professional SP3/Vista SP1/Windows 7 Professional:
Processor: 2.6 GHz Intel Pentium IV or equivalent
Memory: 2 GB
Disk space: 1 GB of free disk space
Processor: 2.6 GHz Intel Pentium IV or equivalent
Memory: 2 GB
Disk space: 850 MB of free disk space
Processor: Dual-Core Intel (32 or 64-bit)
Memory: 2 GB
Disk space: 850 MB of free disk space
NetBeans can be your daily IDE for development that will assist you in increasing your coding productivity. It is a free-of-cost, open source IDE, which can be downloadable for different technologies, including Java, C/C++, PHP, and so on, and platforms such as Windows, Linux, Mac OS X, or even OS-independent bundles. Moreover, you may download the IDE only for PHP technology, or for all technologies in an installer package.
Again, if you are already using the IDE for the development of Java, C/C++, and so on, then you may skip this download, and the installation section, and jump directly to the section named Adding PHP as a plugin to an already existing NetBeans installation.
Go through the following steps to download the NetBeans IDE:
1. Visit http://netbeans.org/downloads/ in order to download the latest NetBeans release. The download page will automatically detect your computer's operating system, and will let you download the operating, system-specific installer.
Note that you can add or remove packs or plugins later, using the IDE's plugin manager. Also, you can select "OS-independent ZIP" if you want to avoid installation. Again, NetBeans is a must-have IDE for those programmers who work with multiple programming language platforms. Currently, NetBeans IDE supports various development platforms—J2SE, J2EE, J2ME, PHP, C/C++, and so on.

Next, we are going to download the PHP bundle, as shown in the screenshot above..
2. After clicking on the Download button, the page will be redirected to an auto download, along with a direct download link, as shown in the following screenshot:
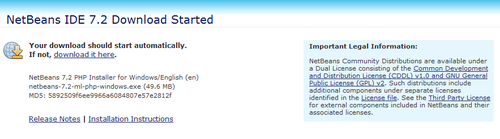
As you can see, your download starts automatically; Firefox users should see a window to save the file, which will appear as follows:
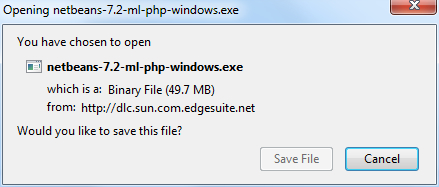
3. Save the file onto your disk space.
We just downloaded the installation file for the NetBeans PHP bundle. The PHP bundle provides tools for PHP 5.x development, and Zend and Symfony framework support. If you click on the All download option, you'll have the installation file for all mentioned technologies and during installation you will be able to choose exactly what tools and runtimes to install. So, now we are ready launch the installation wizard.
Installing NetBeans is pretty much easier with the installation wizard, which guides the user with the required steps or configurations. Those who are already using NetBeans for other technologies, such as Java or C/C++, can skip this section and jump directly to the section named Adding PHP as a plugin to an already existing NetBeans installation.
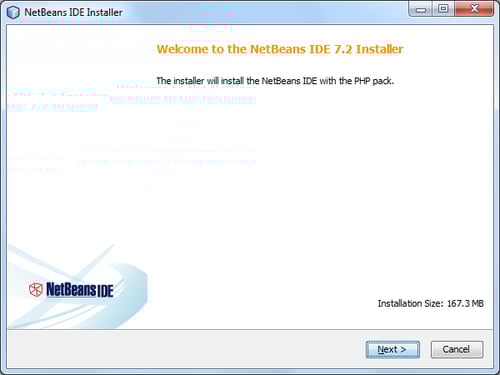
In this section, we will install the NetBeans IDE step by step, for Windows OS—that is, Windows 7. In order to install the software, you need to run the installer and proceed with the followings steps:
1. Run or execute the installer. The first step will look similar to the following screenshot:
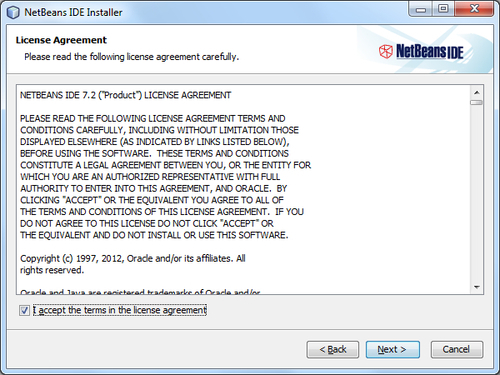
2. By clicking on the Next button, you will be asked to accept the license agreement:
3. The next step will ask you for the installation location for NetBeans and the JRE, with some default program file path:
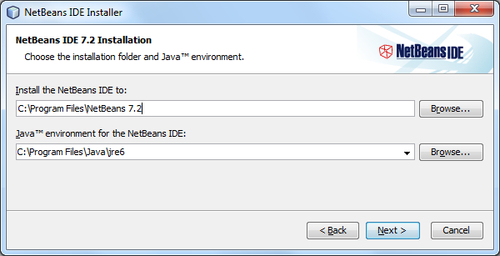
Note that JRE is the Java software for your computer, or the Java Runtime Environment, which is also referred to as the Java Virtual Machine (JVM). JRE will be installed as well.
4. Set the
installationfolder using the file browser, and click on the Next button. The next screenshot shows the total installation size:
5. If everything is set, start the installation by clicking on the Install button, which will start the installation process.

6. After everything is installed correctly, you will see the finish wizard, as shown in the following screenshot:

7. You may check or uncheck the Contribute to the NetBeans project by providing anonymous usage data checkbox, as per your wish to participate or not. Note that it will send project-specific usage data to
netbeans.org, so read the on-screen instructions carefully before checking it. Complete the installation by clicking on the Finish button. Now, go to your OS's Program menu or into the directory where you have installed the IDE to be run. The IDE initializes with a splash screen, as shown below:
8. Finally, the running IDE looks similar to the following screenshot:
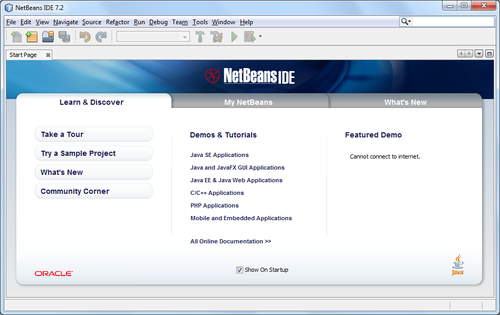
Now that we have the IDE up and running, we can go on to explore setting up the development environment with various operating systems.
In the next section, we will configure our PHP development environment on various operating systems. We will use the latest Apache-MySQL-PHP package installer, that is LAMP, XAMPP, and MAMP, for corresponding operating systems.
If you want to add functionality to your NetBeans IDE configuration, use the NetBeans Plugin Manager. For example, assume that you have already been running the NetBeans IDE for the Java or C/C++ pack. You then decide that you want to try out the PHP functionality. To do this, go to the NetBeans Plugin Manager from the IDE (choose Tools | Plugins), and add the PHP pack to your existing installation.
Multiple installations of NetBeans IDE 5.x, 6.x, and 7.x can coexist with the latest version on the same system. You do not have to uninstall the earlier versions in order to install or run the latest one.
If you have an earlier installation of the NetBeans IDE, you can choose whether or not to import the user settings from the existing user directory when you run the latest IDE for the first time.
Instead of installing and configuring Apache, MySQL, and PHP individually, we will use the XAMPP package to have all of them installed and configured automatically. We will download and install the latest XAMPP package (v. 1.7.7), which includes the following:
Apache 2.2.21
MySQL 5.5.16
PHP 5.3.8
phpMyAdmin 3.4.5
FileZilla FTP Server 0.9.39
The following steps will download and install the XAMPP package:
1. We will download the installer for the latest XAMPP package from: http://www.apachefriends.org/en/xampp-windows.html.
2. After completing the download, run the
.exefile to proceed with the installation. More installation details can be found at: http://www.apachefriends.org/en/xampp-windows.html.3. You will be given a choice to install the Apache server and the MySQL database server as services, so you don't need to start them manually from the XAMPP Control Panel. Again, you will have the option to configure those services, such as start/stop, run as service, and uninstall from the XAMPP control panel later.
4. After completing the installation process successfully, you will be able to proceed with further steps. Open the XAMPP control panel from your operating system's Start | Programs | XAMPP.
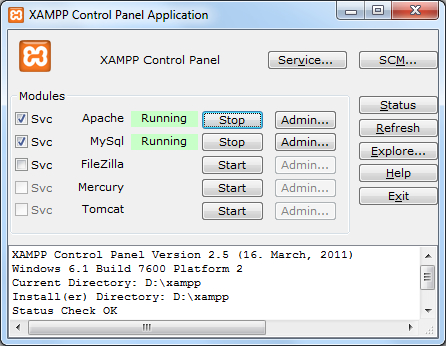
Svc checkboxes indicate that the module was installed as a Windows service, and hence will start with the Windows startup, or you can check them to be running as a service. If you ever need to restart your Apache web server, use the Stop/Start button besides Status of Apache.
5. Now, check your XAMPP installation. Visit the URL
http://localhostfrom your web browser; the XAMPP welcome page looks similar to the following screenshot:
6. From the left, click
phpinfo()to check the PHP release and the installed components that you have configured: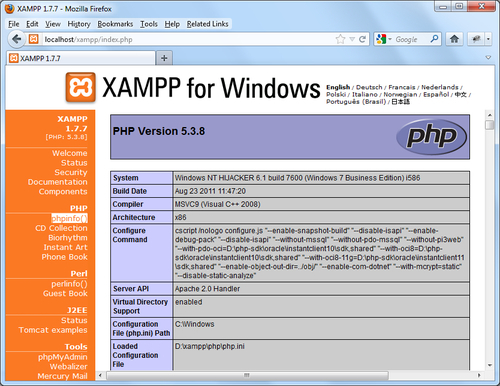
7. Click on the Status menu under the Welcome menu to check the installed tools status; the activated green status beside corresponding columns means that you are running Apache, MySQL, and PHP successfully:

We have successfully installed and run the XAMPP package on our system. We have the XAMPP control panel in order to control the installed services and we also have a web interface to manage MySQL databases.
XAMPP is not meant for production use, but only for developers in a development environment. XAMPP is configured to be as open as possible, and it allows the web developers to fetch anything they want. For development environments, this is great. But, in a production environment, it could be fatal. So, you need to secure your XAMPP installation with the help of the A matter of security section, at http://www.apachefriends.org/en/xampp-windows.html.
Follow the steps listed here in order to install the LAMP package in Ubuntu:
1. Instead of installing each item separately, we will go with installing the LAMP server in a package in Ubuntu, which is fairly simple, along with a single terminal command:
sudo apt-get install lamp-server^The
apt-getcommand is a powerful command-line tool, which is used to work with Ubuntu's Advanced Packaging Tool (APT) performing functions such as the installation of new software packages, upgrading the existing software packages, updating of the package list index, and even upgrading the entire Ubuntu system.2. This command will cause the LAMP package to start installing immediately along with the latest PHP5, Apache 2, MySQL and PHP5-MySQL software. By default, Apache 2 and MySQL install as a service, and your document root will be at
/var/www/, and anindex.htmlfile will be at/var/www/.3. Both Apache and MySQL should be running. However, if required, you may start Apache by using the
service startcommand as follows:sudo service apache2 startYou can stop Apache by using the following command:
sudo service apache2 stop4. Now, let's check the LAMP installation. Point your browser to
http://localhost/, and you will see the default, Apache 2 landing page, as shown in the following screenshot: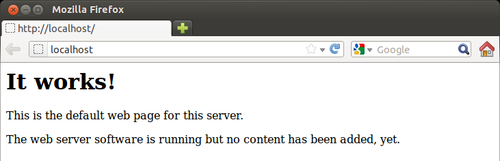
This means that your Apache 2 web server is running. You can still check these service statuses as follows:
sudo service apache2 statusThe previous command will give you the following output:
Apache is running. Process #5. Again, to check the MySQL status, simply run the following command:
sudo service mysql statusThe following output will be displayed:
mysql start/running. Process #6. To check the PHP installation, simply create a file named
test.phpin/var/www/, with the following line:<?php phpinfo(); ?>
Note
You can create a new file from the terminal by using
touch test.phpor using gedit application, then editing the file, and saving it.7. Now, point your browser to
http://localhost/test.php, and you will see the installed PHP and the component's configuration details: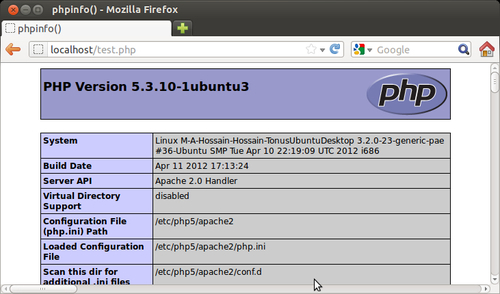
Steps 8 to 12 are optional, as we install
phpMyAdminin these steps.8. Though we can maintain our databases using NetBeans, we still need to maintain the MySQL database functionalities using a web-based interface. To do this, we may use
phpMyAdmin.sudo apt-get install phpmyadminphpMyAdminwill be installed with this command, and during the installation, you will receive a blue window asking which server you want to use—apache2orlighttpd. Chooseapache2, and click on OK to continue with the installation. Note that during the installation, you may be asked to configurephpMyAdminfor database-config, passwords, and so on.9. After the installation point, open your browser with
http://localhost/phpmyadmin/, and you will be able to view aphpMyAdminlanding page, as shown in the following screenshot:
10. If you receive a
404error athttp://localhost/phpmyadmin/, then you need to manually set upphpMyAdminunder Apache, by modifying/etc/apache2/apache2.confusinggedit(the official text editor for the GNOME desktop):sudo gedit /etc/apache2/apache2.conf11.
geditwill open the file in a graphical mode, and will add the following line insideapache2.confat the bottom:Include /etc/phpmyadmin/apache.conf12. Now, restart the Apache server to make the changes effective:
sudo service apache2 restartRefresh your browser, and you will now have the same
phpMyAdminlogin screen as shown in the previous screenshot.
The PHP development environment in the Ubuntu desktop has been set up successfully. The installation of the LAMP server was really a charm with a single command. We learned how to stop or restart services such as Apache and MySQL, along with checking their status.
Also, we have optionally installed phpMyAdmin for managing databases via the web interface. Note that phpMyAdmin is not meant for production use, but only for developers, in a development environment.
As we have crafted our environment for development, PHP error messages will be very helpful for us to resolve them. By default, PHP error messages are turned off in your LAMP installation. You can enable the error messages displaying from the loaded php.ini file (see phpinfo) by modifying the line that contains display_errors. Note that any changes to php.ini requires the Apache 2 server to restart.
Follow the steps below to download and install MAMP in your Mac OS X:
1. Download the latest MAMP release from http://www.mamp.info/en/; download MAMP by clicking on the Download now button under MAMP package downloader:

2. As shown in the preceding screenshot, choose the MAMP download on the left-hand side of the screen.
3. Extract the downloaded file, and run the
.dmgfile. After accepting the "terms of use", you will see a screen similar to the following: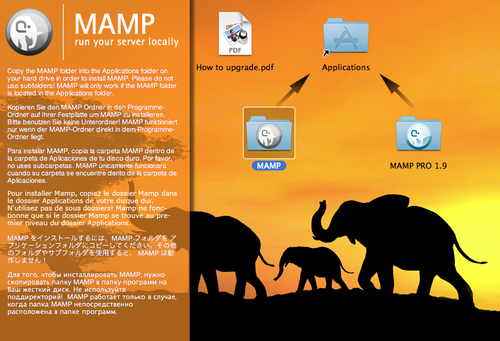
4. Drag the
MAMPfolder into theApplicationsfolder; the MAMP installation is now complete on your Mac OS X.5. Now, let's check our MAMP installation. Point your browser to
http://localhost/MAMP/, and you will see the default MAMP landing page, as shown in the following screenshot:
You can check phpinfo, phpMyAdmin, and so on, on the top bar at the Start page of MAMP.
6. From
/Applications/MAMP/, double-click onMAMP.appto run the Apache, MySQL, PHP, and MAMP control panel. The MAMP control panel shows the server status, and lets you start/stop servers, as shown in the following screenshot:
7. Switch to PHP version 5.3 from the MAMP control panel at Preferences... | PHP Tab (it requires a server restart).
We have successfully downloaded and installed MAMP for our Mac OS X development environment. Also, we have tested the installation, and found that it is up and running perfectly. The MAMP landing page comes with a tabbed interface, with phpinfo, phpMyAdmin, SQLiteManager, and so on. You have the following program and libraries installed with your MAMP bundle:
So far, we have installed the latest NetBeans IDE, and set up our platform-precise development environment with up-to-date Apache, MySQL, and PHP. Now, our recently completed development environment is well-crafted enough to start building projects. We will head for PHP project creation and maintenance with the help of IDE. Such a synergetic approach between the developer and the IDE can really improve productivity.
As we have learned, MAMP is not meant for production use, but only for developers in a development environment. Secure your MAMP installation with the help of the MAMP forum at http://forum.mamp.info/viewtopic.php?t=365. You may need to set the MySQL password, phpMyAdmin password, secure the MAMP landing page, and so on.
NetBeans groups all of the necessary files for developing an application into a project. Project files consist of your original code along with any imported code that your project may be dependent on. NetBeans project management makes it easier to work on large projects by instantly showing you how a change in one part of the program will affect the rest of the program. So, the IDE provides features to facilitate the development growing through the project.
Finally, we are going to create a NetBeans PHP project to have the PHP content organized, and get more control over the created project.
In order to create a NetBeans PHP project, follow the steps below:
1. In order to start the project creation, go to File | New Project from the IDE menu bar.

2. From this window, choose PHP for the project category, and select PHP Application that is selected by default, which means we are going to create a PHP project from scratch. If you already have source PHP code, then go for PHP Application with Existing Sources, and you will have to browse to your existing sources to set your source directory.
3. Click on the Next button, which will take you to the following screen, as shown below:

4. Define the project name and IDE, which automatically suggests the source folder for the given name. However, we can explicitly define the source folder path by browsing the folder path. Also, choose the appropriate PHP Version, according to which the project will behave at the IDE, and select Default Encoding. We will go for the selected items, by default, to have the latest PHP version behavior, and
UTF-8as Default Encoding.5. Remember that the project metadata is the data that is used only at the local stage; optionally, you may put the project metadata created by NetBeans into a separate directory. To do that, check the box Put NetBeans metadata into a separate directory.
6. So, we name our project as
chapter1, and click on Next, as shown in the following screenshot:
7. Define where the project will run (remote server, and so on), as well as the project URL. The default project URL is a formation of
http://localhost/concatenated with a trailing project name. Click on Next to get to the following screenshot:
Optional checkboxes are used to add the PHP framework support into your project, if required. The IDE supports the two popular PHP frameworks—the Symfony and Zend frameworks.
8. Finally, click on Finish to complete the project wizard, and NetBeans will open the PHP project. It should look similar to the following screenshot:

An index page,
index.php, is created inside the project source automatically.9. To test the project, we will put some code between PHP tags. So, let's put a simple
echoas follows:<?php echo "Hello World"; ?>
10. Save the file and point your browser to a project URL,
http://localhost/chapter1/. The page should give an output similar to the following screenshot:
So, we can see that our PHP project is performing fine.
11. To add more files and classes into our project, you may right-click on the project name, which will show the Project menu:

With this project context menu, we can add more PHP files, classes, and so on from New, whenever required. As we can see in this screenshot, a project can be modified as well. For example, you can rename, copy, or alter the project configuration, should you so wish.
Creating a new PHP project in NetBeans has worked like a charm. While creating it, we have observed that we can easily set several configurations of a project with the help of the step-by-step project creation wizard. Also, we have seen that after the creation of a new project, the IDE supports new PHP files, classes, interfaces, and so on from the project context menu. Note that, from the project context menu, you can manage the project operations, such as running and versioning tasks. To change the settings of an existing project, position the cursor on the project node, and choose Properties from the pop-up menu.
So, from now on, these will be our steps to create a new PHP project in NetBeans.
We have practiced setting up the development environment for a particular operating system. We have the IDE, web server, database server, scripting language, and database management web interface installed and running successfully.
Specifically, we covered:
NetBeans IDE installation
PHP development environment setup on various platforms
Creating a PHP project in NetBeans IDE
We also discussed the importance of using such IDEs, and how we could benefit from the IDE. Now that we've all the necessary kits to start PHP development, in the next chapter we will learn about the editor features to do fast and productive PHP development.
