


In this chapter, we will cover:
Designing simple navigation using jQuery
Creating tab navigation
Designing components using Ext JS
Event handling in MochiKit
Building tab navigation using Dojo
Building a chart application using YUI library
Loading dynamic content using jQuery slider
Creating an Ajax shopping cart using MooTools
Building an Ajax login form using prototype.js
In this chapter, we will learn how to work with the most famous JavaScript libraries and frameworks with capabilities of Ajax functionality. These libraries were selected by our subjective opinion and we are not trying to say which library/framework is better or worse. Each of them has its advantages and disadvantages.
jQuery is a development framework that allows us to use JavaScript in our HTML document. Now we will build a simple navigation using the basic jQuery features.
Before we can begin, we need to include the latest jQuery library. We can download it from the download section at www.jquery.com. We will save it in our JavaScript folder named js, in the root of our HTML document, for example, cookbook.
All libraries mentioned in this book are also available in an online cache such as http://code.google.com/apis/libraries/.
Note
You can download the example code fles for all Packt books you have purchased from your account at http://www.PacktPub.com. If you purchased this book elsewhere, you can visit http://www.PacktPub.com/support and register to have the fles e-mailed directly to you.
Now, we can start coding our task1.html page. We'll place it in the cookbook folder.
<!doctype html>
<html>
<head>
  <title>Example 1</title>
</head>

<body>
  <ul id="navigation">
    <li id="home"><a href="#">Home</a></li>
    <li class="active"><a href="#">Our Books</a></li>
    <li><a href="#">Shop</a></li>
    <li><a href="#">Blog</a></li>
  </ul>
  <div id="placeHolder">
    <!-- our content goes here -->
  </div>

  <script src=js/jquery.min.js></"></script>

  <script>
    $(document).ready(function(){
      $('#navigation li a').each(function(){
      var $item = $(this);
        $item.bind('click',function(event){
        event.preventDefault();
          var title = $item.html();
          var html = title + ' was selected.';
          $('#placeHolder').html(html);
        });
      });
      $.get('ajax/test.html', function(data) {
        $('.result').html(data);
          alert('Load was performed.');
      });
    });
  </script>
</body>
</html>Now, let's explain what we have done in the preceding code snippet. The main idea of our script is to find each hyperlink <a> in the document, prevent its default functionality, and display the hyperlink content in our placeHolder. From the beginning, we started with doctype and the main HTML layout. The body of the page contains a navigation and a placeholder element for the dynamic content.
The most important part for jQuery functionality is to include our jQuery library. Let's place it before the closing <body> tag. This will allow the HTML of a page to load first:
<script src="js/jquery.min.js"></script>
After loading our HTML page and when the document is ready, we can define our JavaScripts scripts in the $(document).ready() function:
<script>
  $(document).ready(function(){
    alert("Hello jQuery!");
  });
</script>
This can be also shortened to $():
<script>
  $(function(){
    alert("Hello jQuery!");
  });
</script>
The dollar sign $()
represents an alias to the jQuery() factory
function. Within this function we can use all the CSS selectors like ID, class, or exact tag names. For example:
$('a'): Selects all hyperlinks in our document$('#myID'): Selects the element with this ID$('.myID'): Selects all elements with this class
In our case, we are selecting all hyperlinks in the navigation <div> and defining their own functionality with an event handler for click events:
$item.bind('click',function(event){
  // prevent default functionality
  event.preventDefault();
  // here goes the rest
});
And the last step of our example is creating the title VAR and HTML string, which goes to the placeHolder:
var title = $(this).html();
var html = title + ' was selected.';
$('#placeHolder').html(html);The preceding example was really simple. But there is a lot more that jQuery can offer to us. This includes special selectors, effects, DOM manipulation, or AJAX functionality.
We can specify our selectors more precisely. For example, we can specify which hyperlinks should be affected based on their href attributes:
$('a[href^=mailto:]').addClass('mailto);
$('a[href$=.pdf]').addClass('pdf');
$('a[href^=http] [href*=milan]').addClass('milan');
jQuery also covers all possible events (click, blur, focus, dblclick, and so on), visual effects (hide, show, toggle, fadeIn, fadeOut, and so on), or DOM manipulations (appendTo, prependTo, and so on). It has a full suite of AJAX capabilities, which are really easy to use, such as:
$.get('test.html', function(data) {
  $('.result').html(data);
});
But we will have a better look at more jQuery features in further tasks and chapters.
jQuery UI is built from the core interaction plugins of jQuery. As a high-level framework, it makes creating effects and animation easy for every developer. Now we will build a tab navigation using jQuery UI.
First of all, we need to include the jQuery library from www.jquery.com, if we haven't done it in the preceding recipe. Then, we can download jQuery UI library from www.jqueryui.com/download. On this page, we can download specific modules or the whole library. We can select the theme we like or create our own one with advanced theme settings. For now, we will select the whole library with the ui-lightness theme.
Now we are ready for coding. Let's start with the HTML part. This part will define a
navigationelement with three tabs and one accordion.<body> <div id="navigation"> <ul> <li><a href="#tabs-1">Home</a></li> <li><a href="#tabs-2">Our Books</a></li> <li><a href="ajax/shop.html">Shop</a></li> </ul> <div id="tabs-1"> <p>Lorem ipsum dolor 1</p> </div> <div id="tabs-2"> <p>Lorem ipsum dolor 2</p> </div> </div> </body>When the HTML is ready, we can continue with CSS and JavaScript CSS styles in the
<head>tag, as shown in the following code:<head> <link href="css/ui-lightness/jquery-ui.custom.css" rel="stylesheet" /> </head>
We will add JavaScript before closing the
<body>tag:<script src="js/jquery.min.js"></script> <script src="js/jquery-ui.custom.min.js"></script> <script> $(document).ready(function(){ $('#navigation').tabs(); }); </script> </body>Our result looks like the following:

The downloaded jQuery UI contains the whole CSS content of the selected theme (jquery-ui.custom.css). All we need to do is to include it in the <head> tag:
...
  <link href="css/ui-lightness/jquery-ui.custom.css"
  rel="stylesheet" />
After CSS, we include jQuery and the jQuery UI library:
  <script src="js/jquery.min.js"></script>
  <script src="js/jquery-ui.custom.min.js"></script>
The JavaScript part is really simple:
$('#navigation').tabs();It is important to fit the required HTML structure. Each hyperlink is targeting the HTML content in selected <div> tags. To create a relation between them we will use #id in each hyperlink and the ID of the selected <div> tag (for example, tabs-1).
There is an exception in the third tab, which loads the requested data via Ajax. In this case, we do not define any target area, as it will be created automatically. As you can see, using the Ajax in jQuery UI is really easy and comfortable.
jQuery UI offers us a lot of options. We can use just a default functionality as was presented in the preceding code snippet or some additional functionality:
|
Content via Ajax: |
|
|
Open on mouseover: |
|
|
Collapse content: |
|
|
Sortable: |
|
|
Cookie persistence: |
|
Chapter 3, Useful tools using jQuery
Ext JS is a JavaScript framework that offers a lot of cross-browser user interface widgets. The core of Ext JS is build-on component design, which can be easily extended to meet our needs.
We can download the latest version of Ext JS framework from www.sencha.com, Ext JS section. Now, we are ready to build a classic Ext JS layout with two columns and one accordion. We can also prepare a simple HTML file ajax/center-content.html to test
the Ajax functionality:
…
<body>
<p>Center content</p>
</body>
…
First of all, we will include mandatory files like CSS and Ext JS library files.
<link rel="stylesheet" href="css/ext-all.css" />

<script src="js/ext-base.js"></script>
<script src="js/ext-all.js"></script>
We will continue with the
onReadyfunction, which will run our script:<script type="text/javascript"> Ext.onReady(function(){ var viewport = new Ext.Viewport({ layout:'border', items:[{ region:'west', id:'west-panel', title:'West', split:true, width: 200, layout:'accordion', items: [{ html: 'Navigation content', title:'Navigation' },{ title:'Settings', html: 'Settings content' }] },{ region:'center', layout:'column', autoLoad:{ url: 'ajax/center-content.html', method:'GET' } }] }); }); </script>Our layout with an accordion navigation is ready:

Ext JS is built for developers, to make their lives easier. As you can see in the source, we have built a layout with a simple JavaScript object. We have a "Viewport" with two items. One is positioned to the left (region: West) and the second to the right (region: East). We don't have to take care of the CSS in this case. Everything is handled directly by Ext JS through our variables like width, margins, cmargins, and so on. The layout property is really powerful. The inner layout on the West side is an accordion with the items Navigation and Settings. In the center column, we can see content loaded via Ajax, using the autoLoad method.
The next lightweight library in this chapter is MochiKit. In this task we will build a script for listing the
onkeydown and onkeypress events. After each event we will display which key was pressed with its key code and key string.
All mandatory files, documents, and demos are available on www.mochikit.com. We need to download the whole MochiKit library and save it in our js folder. Be careful, MochiKit.js is just the main file that includes all necessary sub-modules from MochiKit (such as, base.js, signal.js, DOM.js, and so on). The landing page for Ajax requests will be ajax/actions.php:
<?php
  if($_GET["action"] && $_GET["key"]) {
    // our logic for processing given data
  } else {
    echo "No params provided";
  }
?>Let's start with HTML code:
<table>
  <tr>
      <th>Event</th>
       <th>Key Code</th>
       <th>Key String</th>
  </tr>
  <tr>
      <td>onkeydown</td>
    <td id="onkeydown_code">-</td>
    <td id="onkeydown_string">-</td>
  </tr>
  <tr>
    <td>onkeypress</td>
    <td id="onkeypress_code">-</td>
      <td id="onkeypress_string">-</td>
  </tr>
</table>
Include the MochiKit framework:
<script type="text/javascript" src="js/MochiKit/MochiKit.js"> </script>
Define the JavaScript functionality:
<script>
connect(document, 'onkeydown',
    function(e) {
        var key = e.key();
        replaceChildNodes('onkeydown_code', key.code);
        replaceChildNodes('onkeydown_string', key.string);
      doSimpleXMLHttpRequest("ajax/actions.php",
        { action: "keydown", key: key.code});
    });

connect(document, 'onkeypress',
    function(e) {
        var key = e.key();
        replaceChildNodes('onkeypress_code', key.code);
        replaceChildNodes('onkeypress_string', key.string);
      doSimpleXMLHttpRequest("ajax/actions.php",
        { action: "keypress",  key: key.code});
    });
</script>
Our result is:

The connect() function connects a signal (Mochikit.Signal API Reference) to a slot. In our case, we are connecting our document to the onkeydown and onkeypress handlers to call a function(e). Parameter e represents our event object, when the key() object reference returns key code and string.
replaceChildNodes(node[, childNode[,...]])
is a function of Mochikit.DOM API Reference, which removes all children from the given DOM element and then appends the given childNode to it.
After each onkeydown and onkeypress event we are sending an Ajax call using the doSimpleXMLHttpRequest() function. In our example, the request from our page looks
like ajax/actions.php?action=onkeydown&key=87.
Any object with connected slots can be disconnected by the disconnect() or disconnectAll() functions. In the case that we want to use connect() just once, we can use the connectOnce() function and this will disconnect the signal handler automatically once it has fired.
MochiKit allows us to make the most of existing browser-generated events, but some of them are not natively supported by all browsers. MochiKit is able to synthesize these events, which include onmouseenter, onmouseleave, and onmousewheel.
Now we will have a look at Dojo JavaScript Library. We will build a simple tab navigation using the basic functionality of the Dojo Toolkit (dojoToolKit).
We need to include the Dojo Toolkit from websites such as Google CDN (http://ajax.googleapis.com/ajax/libs/dojo/1.5/dojo/dojo.xd.js) or AOL CDN (http://o.aolcdn.com/dojo/1.5/dojo/dojo.xd.js).
If you want to download the whole Dojo SDK you can find it at www.dojotoolkit.org/download.
The landing page for Ajax requests will be ajax/content1.html:
<body>
  <h1>Operation completed.</h1>
</body>
We will include styles from the
clarotheme (included indojoToolKit) in the<head>tag of our document:<link rel="stylesheet" type="text/css" href="js/dojoToolKit/dijit/themes/claro/claro.css" />
We will define our HTML code in the body of our document:
<body class="claro">
<div>
  <div dojoType="dijit.layout.TabContainer">
    <div dojoType="dijit.layout.ContentPane"
      title="Our first tab" selected="true">
        <div id="showMe">
          click here to see how it works
        </div>
    </div>
    <div dojoType="dijit.layout.ContentPane"
        title="Our second tab">
      Lorem ipsum - the second
    </div>
    <div dojoType="dijit.layout.ContentPane"
  title="Our last tab" closable="true">
    Lorem ipsum - the last...
    </div>
  </div>
</div>
</body>
When the HTML and CSS is ready, we will include
DojoToolkitwith required modules:<script type="text/javascript" src="js/dojoToolKit/dojo/dojo.js" djConfig="parseOnLoad: true"></script> <script type="text/javascript"> dojo.require("dijit.layout.TabContainer"); dojo.require("dijit.layout.ContentPane"); </script>Adding JavaScript functionality gives us the following:
<script type="text/javascript">
  dojo.addOnLoad(function() {
    if (document.pub) { document.pub(); }
    dojo.query("#showMe").onclick(function(e) {
      dojo.xhrGet({
        url: "ajax/content1.html",
        load: function(result) {
          alert("The loaded content is: " + result);
        }
      });
      var node = e.target;
      node.innerHTML = "wow, that was easy!";
    });
  });
</script>
When the preceding code snippet is ready and saved, our result will be a simple tab navigation with three tabs.

As you can see in the source, we are using the Dijit-Dojo UI component system. Dijit is included in Dojo SDK and includes UI components with four supported themes (nihilo, soria, tundra,and claro). We can set which theme we want to use by selecting a class within our <body> tag. In the preceding example we have class="claro".
We need to provide the djConfig attribute with parseOnLoad:true when we include the dojoToolKit script. Without this, Dojo won't be able to find the page elements that should be converted to Dijit widgets.
When we want to use a specific widget, we need to call the required class for the widget (dojo.require("dijit.layout.TabContainer")) and provide its dojoType attribute (dojoType="dijit.layout.TabContainer"). As an example of using Ajax in Dojo, we use the dojo.xhrGet() function to get the content of ajax/content1.html each time we click on showMe div.
In this task we will use a UI library developed by Yahoo! to build a chart.
The YUI library is available for download on Yahoo!'s developer website (http://developer.yahoo.com/yui/3). After we save it in our js folder, we are ready to start programming.
We have to start by including the YUI library in the
<head>tag of our document along with styles for the placeholder of our chart:<script type="text/javascript" src="js/yui-min.js"></script> <style> #mychart { margin:10px; width:90%; max-width: 800px; height:400px; } </style>We will place our HTML in the
<body>tag to mark where our chart will be placed:<div id="mychart"></div>
Our JavaScript is as follows:
<script type="text/javascript">
(function() {
    YUI().use('charts', function (Y){
        //dataProvider source
        var myDataValues = [
        {date:"January"	, windows:2000, mac:800, linux:200},
        {date:"February", windows:3000, mac:1200, linux:300},
        {date:"March"  , windows:3500, mac:1900, linux:1400},
        {date:"April"  , windows:3000, mac:2800, linux:200},
        {date:"May"    , windows:1500, mac:3500, linux:700},
        {date:"June"    , windows:2000, mac:3000, linux:250}
        ];

        //Define our axes for the chart.
        var myAxes = {
            financials:{
                keys:["windows", "mac", "linux"],
                position:"right", type:"numeric"
            },
            dateRange:{
                keys:["date"],
                position:"bottom",type:"category"
            }
        };

        //instantiate the chart
        var myChart = new Y.Chart({
            type:"column", categoryKey:"date",
            dataProvider:myDataValues, axes:myAxes,
            horizontalGridlines: true,
            verticalGridlines: true,
            render:"#mychart"
        });
    });
})();</script>
The results after saving and opening our HTML document are as follows:

YUI Charts are defined in the Chart object. For the "document ready" function we will use the (function(){...})() syntax. We need to specify that we want to use YUI() 'charts'.
The main part is creating a Y.Chart object. We can define how this chart will be rendered, how our gridlines will look, where to display our chart, and which data to display. We will define axes with the myAxes object, which handles the legend on the sides. Our data are stored in the myDataValues object.
There are many possibilities and ways to style our charts. We can split the chart to the smallest parts and set each property. For example, rotation of the label or margin:
styles:{
  label: {rotation:-45, margin:{top:5}}
}
YUI also covers an AJAX functionality. This is how a simple AJAX call will look:
<div id="content">
  <p>Place for a replacing text</p>
</div>

<p><a href="ajax/content.html" onclick="return callAjax();">Call Ajax</a></p>

<script type="text/javascript">
//<![CDATA[

function callAjax(){
  var sUrl = "ajax/content.html";
  var callback = {
    success: function(o) {
      document.getElementById('content')
        .innerHTML =  o.responseText;
    },
    failure: function(o) {
      alert("Request failed.");
    }
  }

  var transaction = YAHOO.util.Connect
    .asyncRequest('GET', sUrl, callback, null);
  return false;
}
//]]>
</script>
We created the callAjax() function, which is triggered by clicking on the Call Ajax hyperlink. The Ajax call is provided by YAHOO.util.Connect.asyngRequest(). We defined the HTTP method (GET), requested URL ajax/content.html, and callback functionality with the success method, which displays response text in the 'content' <div>.
In this task, we will learn how to load the content of the page dynamically using jQuery slider.
In this task, we will use the jQuery UI library as well. We can either include the jQuery UI library from http://jqueryui.com/download or from some CDN. Then we will create a folder for our little project, let's say packt1. There will be more folders in our packt1 folder; these are ajax folders for our HTML files loaded via AJAX, CSS for our styles, and js for our JavaScript libraries.
The folder structure will look like the following:
Packt1/
  ajax/
    content1.html
    content2.html
    content3-broken.php
    items.html
  css/ - all stylesheets
  js/
    ui/ - all jQuery UI resources
    jquery-1.4.4.js
index.htmlSince everything is set, we are ready to start.
We will start with basic HTML layout and content. This part already includes a link to our CSS given from the jQuery UI library. We can save it as
index.html:<!DOCTYPE html> <html lang="en"> <head> <title>Ajax using jQuery</title> <link href="css/ui-lightness/jquery-ui.custom.css" rel="stylesheet" /> </head> <body> <div class="demo"> <div id="tabs"> <ul> <li><a href="#tabs-1">Home</a></li> <li><a href="ajax/content1.html">Books</a></li> <li><a href="ajax/content2.html">FAQ</a></li> <li><a href="ajax/content3-broken.php"> Contact(broken) </a> </li> </ul> <div id="tabs-1"> This content is preloaded. </div> </div> </div> </body> </html>Now we will add JavaScript libraries and their functionality:
<script src="js/jquery-1.4.4.js"></script>
<script src="js/ui/jquery-ui.min.js"></script>
<script>
$(function() {
  $("#tabs").tabs({
    ajaxOptions: {
      success: function(){
        $("#slider").slider({
          range: true,
          min: 1,
          max: 10,
            values: [1,10],
          slide: function( event, ui ) {
            $("#amount").val(ui.values[0] + " to " +
              ui.values[1]);
            },
          change: function(event, ui) {
          var start = ui.values[0];
          var end 	= ui.values[1];
            $('#result').html('');
            for(var i = start; i <= end; i++){
              var $item = $('<h3></h3>');
              $item
                .load('ajax/items.html #item-'+i);
                 .appendTo($('#result'));
            }          }
        });
      },
      error: function(xhr, status, index, anchor) {
        $(anchor.hash).html(
          "Couldn't load this tab. We'll try to fix
            this as soon as possible. " +
          "If this wouldn't be a demo." );
      }
    }
  });
});
</script>
Our
index.htmlpage is ready and we can create files that are going be loaded in our page via AJAX.The first page will be
ajax/content1.html. This page will contain a slider with extra functionality, which will be described later.<h2>Slider</h2> <p> <label for="amount">Displaying items:</label> <input type="text" id="amount" style="border:0; color:#f6931f; font-weight:bold;" value="none" /> </p> <div id="slider"></div> <div id="result"></div>
The second page will be
ajax/content2.html:<p><strong>This tab was loaded using ajax.</strong></p> <p>Lorem ipsum dolor sit amet, consectetur adipiscing elit. Aenean nec turpis justo, et facilisis ligula.</p>
And the last file in our AJAX folder will be
items.html:<div id="item-1">Item 1</div> <div id="item-2">Item 2</div> <div id="item-3">Item 3</div> <div id="item-4">Item 4</div> <div id="item-5">Item 5</div> <div id="item-6">Item 6</div> <div id="item-7">Item 7</div> <div id="item-8">Item 8</div> <div id="item-9">Item 9</div> <div id="item-10">Item 10</div>
Now, as shown in the following screenshot, we have a multi-functional page with four tabs. Three of them are loaded via Ajax and one of them contains a slider. This slider has an extra functionality and every change loads a selected number of items.

From the beginning, we started with a simple tab layout with four tabs, using the jQuery UI library. One of them (#tabs-1) was included directly in the index.html file. The jQuery UI library allows us to define ajaxOptions, so that we can load our content via AJAX. The navigation where we find the required content is preceeded by the href attribute of each hyperlink. If this target does not exist, the error method is triggered.
We wanted to have a functional slider on our second tab (named Books). To make it work, we can't initialize it in the $(document).ready() function, because its HTML content hasn't been created yet. We will add slider initialization only when we need it in the success method.
After each change of slider the load() function is triggered. This function loads the content of the given target via AJAX. In our case, we use a more specific selector with the exact ID of the object, which is displayed in our result box.
In this task we were using only the basic function load(), but jQuery offers more AJAX methods, as shown in the following table:
|
Performs an Ajax request | |
|
Loads data from the server using HTTP POST request | |
|
Loads data from the server using HTTP GET request | |
|
Loads JSON data from the server using HTTP GET request | |
|
Loads and executes a JavaScript file from the server using HTTP GET request |
Chapter 3, Useful tools using jQuery
This task will show us how to use Ajax with MooTools JavaScript framework. We will build a shopping cart with a drag-and-drop functionality. After each UI interpretation to add a new item to the shopping cart, we will send an HTTP POST request to the server.
MooTools is available for download at https://mootools.net/download or in Google's CDN. For communication between the server and client we will create a new file in our ajax folder, for example, addItem.php:
<?php
if($_POST['type']=='Item'){
	echo 'New Item was added successfuly.';
}
?>
After creating this dummy PHP file, we are ready to proceed to the programming part of this task.
We will begin, as we usually do, with HTML layout to include MooTools library:
<!doctype html>
<html>
<head>
  <title>Ajax Using MooTools</title>
</head>
<body>
  <div id="items">
    <div class="item">
    <span>Shirt 1</span>
    </div>
    <div class="item">
    <span>Shirt 2</span>
    </div>
    <div class="item">
    <span>Shirt 3</span>
    </div>
    <div class="item">
    <span>Shirt 4</span>
    </div>
    <div class="item">
    <span>Shirt 5</span>
    </div>
    <div class="item">
    <span>Shirt 6</span>
    </div>
  </div>

  <div id="cart">
    <div class="info">Drag Items Here</div>
  </div>

  <h3 id="result"></h3>

  <script src="js/mootools-core-1.3-full.js"></script>
  <script src="js/mootools-more-1.3-full.js"></script>
  <script src="js/mootools-art-0.87.js"></script>
</body>
</html>
In this task we have to provide our own CSS styles:
<style>
#items  {
  float: left; border: 1px solid #F9F9F9; width: 525px;
}
  item {
    background-color: #DDD;
    float: left;
    height: 100px;
  margin: 10px;
    width: 100px;
    position: relative;
  }
  item span {
    bottom: 0;
    left: 0;
    position: absolute;
    width: 100%;
  }
#cart {
  border: 1px solid #F9F9F9;
  float: right;
  padding-bottom: 50px;
  width: 195px;
}
#cart .info {
    text-align: center;
}
#cart .item {
  background-color: green;
    border-width: 1px;
    cursor: default;
  height: 85px;
    margin: 5px;
    width: 85px;
}
</style>
When the look of our UI fits our expectations, we can start JavaScript:
<script>
window.addEvent('domready', function(){
    $('.item').addEvent('mousedown', function(event){
        event.stop();
        var shirt = this;
        var clone = shirt.clone()
      .setStyles(shirt.getCoordinates())
      .setStyles({
            opacity: 0.6,
            position: 'absolute'
         })
      .inject(document.body);

        var drag = new Drag.Move(clone, {
            droppables: $('cart'),
            onDrop: function(dragging, cart){
                dragging.destroy();

        new Request.HTML({
          url: 'ajax/addItem.php',
          onRequest: function(){
          $('result').set('text', 'loading...');
            console.log('loading...');
          },
          onComplete: function(response){
            $('result').empty().adopt(response);
            console.log(response);
          }a
        }).post('type=shirt');

               if (cart != null){
                    shirt.clone().inject(cart);
                    cart.highlight('#7389AE', '#FFF');
                }
            },
            onCancel: function(dragging){
                dragging.destroy();
            }
        });
        drag.start(event);
    });
});
</script>
Once we save our code, our shopping cart is ready. The result is as follows:
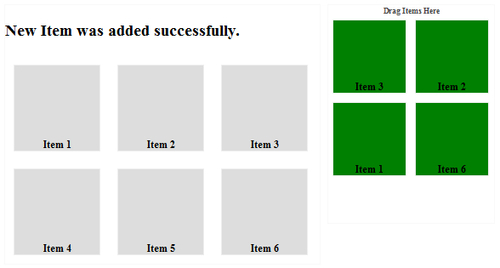
The $(document).ready function is performed by binding a domready event to the window object. For each item, we are add a mousedown event, which contains the whole procedure of adding each item in the cart, using the Drag object and clone() function.
To communicate with the server we use the Request.HTML method and send it with the HTTP post method with post variable type. If the variable type is equal to the string shirt, it means a new item was added to the cart and the information box result was updated to 'New Item was added successfully'.
Class Request represents the main class, which deals with an XMLHttpRequest:
var myRequest = new Request([options]);
An example of the preceding template is as follows:
var  request = new Request({
  url: 'sample.php', data: { sample: 'sample1'},
    onComplete: function(text, xml){
      $('result').set('text ', text);
}
In the core of the MooTools library, the Request class was extended to Request.HTML and Request.JSON.
Request.HTML is an extended Request class specially made for receiving HTML data:
new Request.HTML({
  url: 'sample.php',
  onRequest: function(){
    console.log('loading...');
  },
  onComplete: function(response){
    $('result').empty().adopt(response);
  }
}).post('id=242');
We can use the post or get
method:
new Request.HTML([options]).get({'id': 242});As the most effective practice of communication between client and server, we can use Request.JSON to receive and transmit JavaScript objects in JSON format.
var jsonRequest = new Request.JSON({
url: 'sample.php', onSuccess: function(author){
  alert(author.firstname);   // "Milan".
  alert(author.lastname);   // "Sedliak"
    alert(author.company);     // "Skype"
}}).get({bookTitle: 'PHP Ajax CookBook', 'bookID': 654});The last JavaScript framework in this chapter is prototype.js. In this task, we will make a simple login form with AJAX functionality. We will have a look at the most frequently used practices for prototype.js with AJAX.
We can download prototype.js from http://www.prototypejs.org/download. Then, just save it in the js folder. To finish this task we will need to have the Apache Server running.
First, let's create our dummy
.phpfile,login.php:<?php if($_POST['username']==$_POST['password']){ echo 'proceed'; } ?>Then, we can continue with our HTML layout.
<!DOCTYPE html>
<html>
<head>
</head>
<body>
  <form id="loginForm">
    <label for="username">Username: </label>
    <input type="text" id="username" name="username" />
    <br />
    <label for="password">Password:</label>
    <input type="password" id="password"  name="password"/>
    <br /><br />
    <input type="submit" value="Sign In" id="submit" />
  </form>
</body>
</html>
When the HTML is set, we will define our JavaScript:
<script src="js/prototype.js"></script>

<script>

$('submit').observe('click', login);

function login(e) {
  Event.stop(e);

  var url = "ajax/login.php";

  new Ajax.Request(url, {
    method: 'post',
    parameters: {
      username: document.getElementById('username').value,
      password: document.getElementById('password').value
    },
    onSuccess: process,
    onFailure: function() {
      alert("There was an error with the connection");
    }
  });
}

function process(transport) {
  var response = transport.responseText;
  if(response == 'proceed'){
    $('loginForm').hide();
    var my_div = document.createElement('div');
    my_div.appendChild(document.createTextNode("You are logged in!"));
    document.body.appendChild(my_div);
  }
  else
    alert("Sorry, your username and password don't match.");
}
</script>
As you can see in the source, we observe a new click event on the button element with ID submit, which is the submit button in our login form. The login() function is triggered by the click event. The default behavior of the submit button was replaced by Event.stop(event), and so triggering the HTTP request was disabled. An AJAX request was created instead. Ajax.Request is the basic class for using AJAX in prototype.js. We are using the post method with two parameters (username and password). If the request was successful and the response text from login.php was proceed we were successfully logged in.
prototype.js extends the Ajax.Request object to a few more, as discussed:
Ajax.Updater is an extension of the
Ajax.Requestobject, which performs an AJAX request and updates the container, based on response text:In the case that we need to update our content at regular intervals, we can use periodical updater:
new Ajax.PeriodicalUpdater('items', '/items', {
  method: 'get', frequency: 3, decay: 2
});
Frequency represents the periodicity (in number of seconds) of updating the content. In the preceding code snippet, our content will be updated every 3 seconds.
Ajax.Respondersrepresents a repository of global listeners that monitor all AJAX activity on the page:Ajax.Responders.register(responder) Ajax.Responders.unregister(responder)
With responders we can easily track how many AJAX requests are active on our page.
Ajax.Responders.register({
  onCreate: function() {
    Ajax.activeRequestCount++;
  },
  onComplete: function() {
    Ajax.activeRequestCount--;
  }
});