


What should the first chapter of a book looking at photographic rendering in V-Ray 2.0 for SketchUp be all about? That was the question I had to ponder as I started developing the material that would be included in this book.
Should we spend time looking at the current state of the art regarding photographic and photoreal rendering in the CG industry? Should we delve into a technical explanation of exactly what it is that people are referring to when they make use of the terms photographic and photoreal rendering?
Well, after quite a bit of deliberation, much of which was shaped and brought into focus by the hands-on approach to learning that Packt Publishing themselves advocate, I decided to follow the advice of a well-worn axiom: dive right in at the deep end. In other words, develop an introductory exercise chapter that might typically be found at the end of a publication such as this one, often in the form of a "putting it all together" type exercise.
My reasons for opting to take this somewhat turned-around approach were three fold:
Firstly, as already noted, this approach suits the philosophy promoted by the publishers themselves, which is that learning ought to be as much of a hands-on experience as possible; one that engages and involves the student rather than one that is passive and possibly even tedious.
Secondly, it gives users, who are brand new to photographic rendering of any kind, the opportunity to see just how easy it can be once they have figured out how to work with the tools of the trade—in this case, SketchUp and V-Ray Version 2.0. My hope is that this chapter can help strip away the mysticism, the trepidation, and maybe even some of the frustration that can result from not understanding how something works.
And finally, for users who may already be familiar with the general principles of photographic rendering but who are new to V-Ray in SketchUp, this book will give them an opportunity to very quickly get an overview of the process, tools, and options that can be used in a V-Ray-specific pipeline.
So, with the general idea of what this particular chapter is all about made reasonably clear, let's go ahead and dive right in.
Once the geometry populating a scene has been lovingly prepared, the thing that we as the render artist will be charged with is the task of turning plain scene models into a finalized, photo-realistic render. We can give ourselves a solid foundation on which to build by, first of all, giving consideration to the compositional quality of the shot (or render) that we have been tasked with creating.
In fact, when you start to give some serious thought to the subject, doesn't it stand to reason that in order to look like a photograph, a rendered image would need to be constructed in at least a similar manner as the photograph that it is seeking to mimic?
This is why compositional rules such as those listed in the following bullets need to be thought of as the foundation or starting point from which a photographic render can be constructed.
Thirds
Positive and negative space
Balance
Leading lines
Focal point
Symmetry and patterns
Point of view
Subject and background
Depth
Framing
As a computer artist, if we are not already familiar with the total accuracy of the statement Put garbage in and you will get garbage out, we will be very soon, because it is one of the most often citied and indeed accurate pieces of advice that you are likely to hear.
In other words, what we get out as the end result of a piece of work or project can only be as good as the materials, the time, and the effort that we put into it. If we start our rendering project with a weak or unstable foundation (such as poor composition), then it stands to reason that we are really going to struggle to produce any kind of high quality end result from it when all is said and done.
Of course, not all of the compositional rules listed can be applied to every single image that we will ever shoot or render. Still, it should be our aim to make good use of the ones that can be applied, so as to help create a composition that presents our work in the best possible manner.
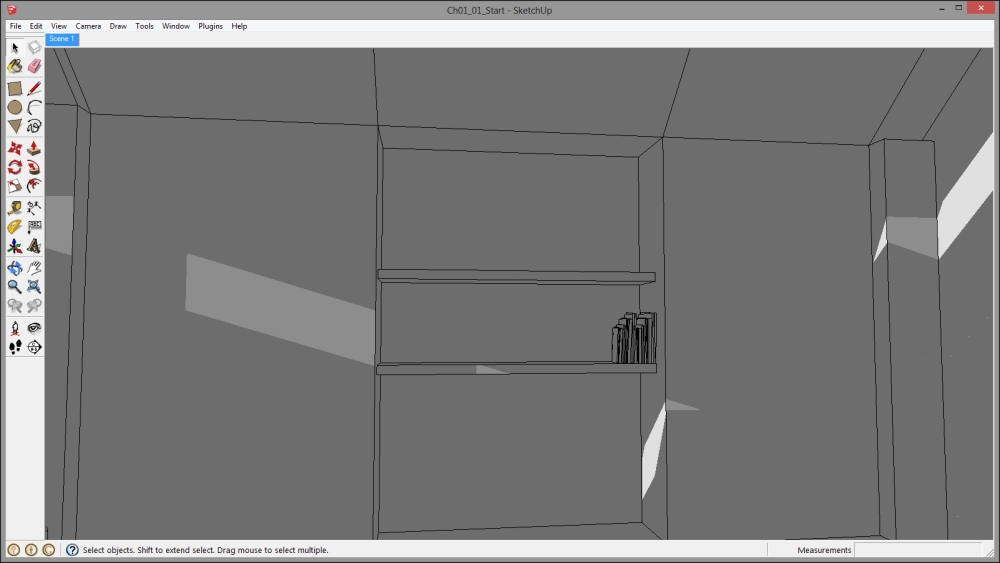
Let's jump into our quick start lesson by loading the Ch01_01_Start.skp file from the downloadable Exercise_Files folder into the SketchUp application. As you can see, what we have at this moment is a very uninteresting view of a simple interior scene, as shown in the following screenshot:
Tip
Downloading the example code
You can download the example code files for all Packt books you have purchased from your account at http://www.packtpub.com. If you purchased this book elsewhere, you can visit http://www.packtpub.com/support and register to have the files e-mailed directly to you.
Our first task is to immediately improve the visual engagement of our scene by finding some interesting Points Of View (POV) from which to take our renders. While setting these up, we will need to look for ways to apply as many of our rules of composition to the camera view as necessary in order to obtain a visually stronger and more engaging final shot.
One extremely important thing to bear in mind at this stage of the process, and something that I will be repeating throughout the pages of this book, is the fact that experimentation is really one of the keys to success! The more views or camera angles we try, the more likely we are to find something that not only evokes the feel or mood we want to convey, but also presents the scene in the manner we need.
As a skill-building exercise, let's use the start scene that we have already opened and find as many interesting POV as possible from which the environment can be rendered.
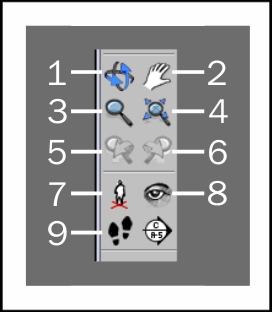
To help with this, we will need to make use of some key SketchUp tools. The major view finding options that are typically used are shown in the following figure:
Note
This figure shows the tools as they appear on the SketchUp Large Toolset toolbar rather than on the default Getting Started toolbar.
The following tools are represented by the numbers shown in the preceding figure:
Orbit (1)
Pan (2)
Zoom (3)
Zoom Extents (4)
Previous View (5)
Next View (6)
Position Camera (7)
Look Around (8)
Walk (9)
As we look around the scene using these tools, we will hopefully find a number of views that we like. As we do so, we will want to use the following steps to save each of those scene views so that we can return to them at any time we like and take renders from them:
To see where my own view-finding experiments led me, open up the Ch01_02_Views.skp file from the Exercise_Files folder, where the views that are available should match the screenshots that follow.
Note
You can of course continue to work through this chapter, adding your own scene views if you prefer. Just be sure to save your work to a differently named scene file to avoid overwriting the provided one.
I eventually decided on six different views to produce my renders. Each one of them focuses on a different element or elements in the room, and each one of them employs one or more of the compositional rules listed earlier.
Another exercise you might want to try before going any further at this point would be to take down some notes regarding which of the previously listed compositional elements are visibly at work in each of the scene views that I have chosen here. The goal will be to develop your ability to observe and break down the compositional elements being used in any of the given images. Take your time to do this and then compare your own notes with the brief description that accompanies each of the scene view images.
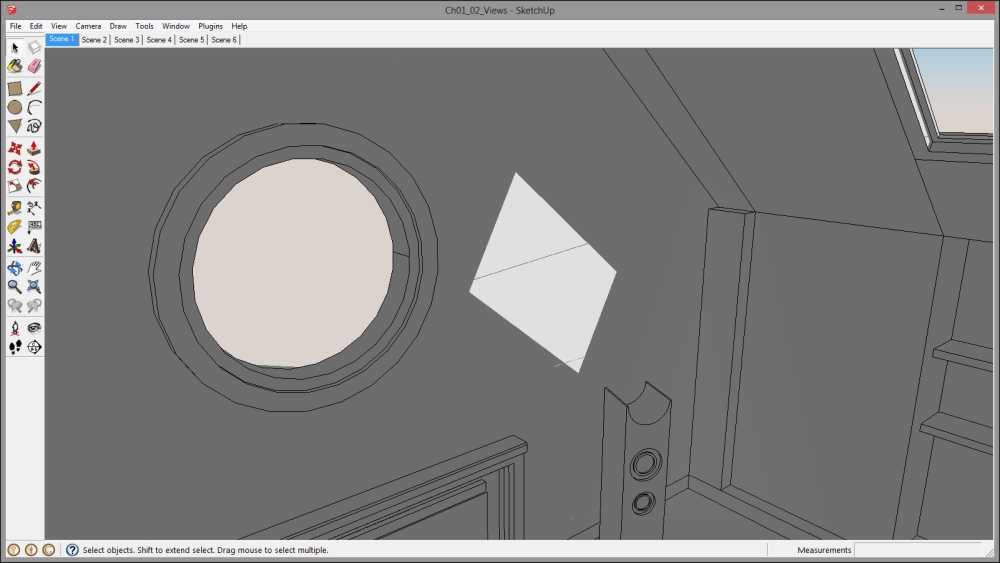
Scene 1 makes use of a very specific focal point in the form of the circular window, using a somewhat unusual POV. The scene is given a sense of balance by placing both the window and corner of the room roughly on the vertical third lines, which of course helps us add to the figure's balance.
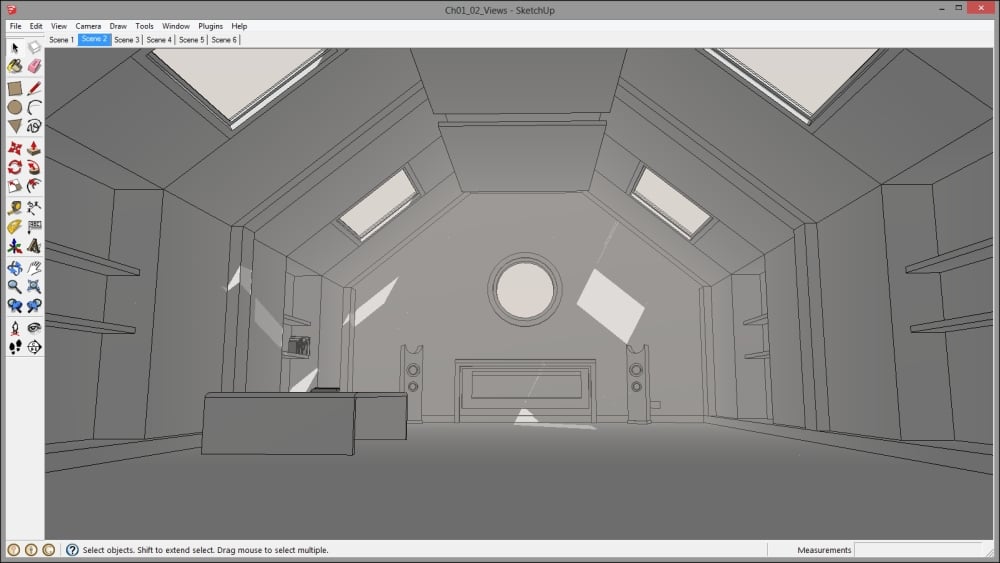
In Scene 2, the first deliberate choice made for the view was to use a wide shot for the POV. This lets us show everything in the room in one go, essentially making the environment itself a general focal point in the render.
We can also see both symmetry and balance at work. Both of these elements come about as a consequence of the initial choice for the POV. Looking straight down the center of the room gives us a natural sense of both symmetry and balance that hopefully feels unforced.
The fireplace and speakers both sit roughly on the lower horizontal third line, which helps draw our eyes to them naturally, creating a kind of secondary focal point that is a little more specific in nature. At the same time, having these elements placed around the lower third also adds to the sense of balance in the scene.
Note
As the table is the only fly in the ointment for both symmetry and balance in this view, it would be perfectly acceptable for us to do a little furniture rearranging here and place the table in a more central location. This relocation of elements in a view is typically referred to as Staging.
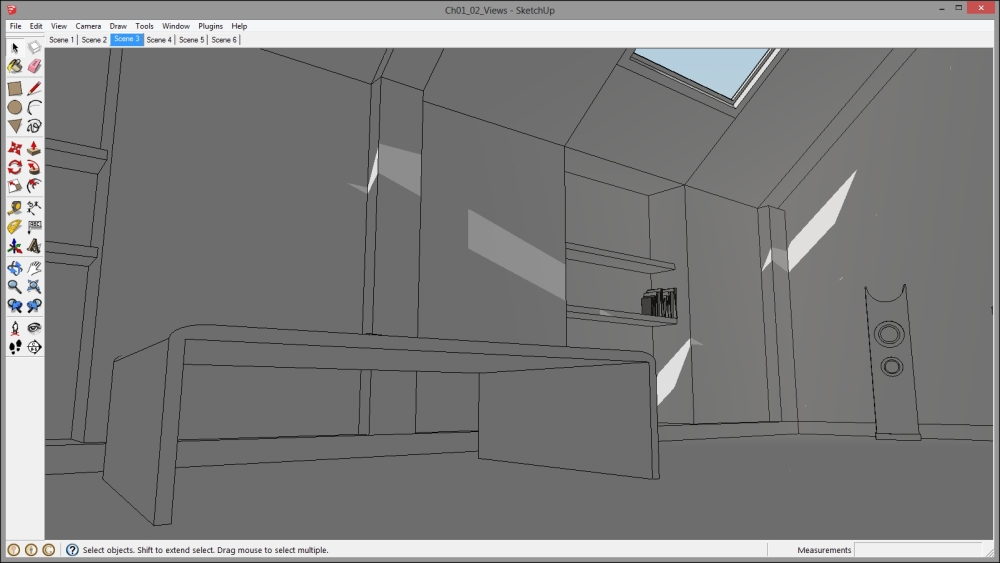
Our Scene 3 view makes use of a very specific focal point in the table, with the POV being deliberately chosen so as to give us the ability to create depth in the scene by means of foreground and background objects. The fact that this keeps the table placed on both the vertical and horizontal third lines reinforces its role as the main focal point.
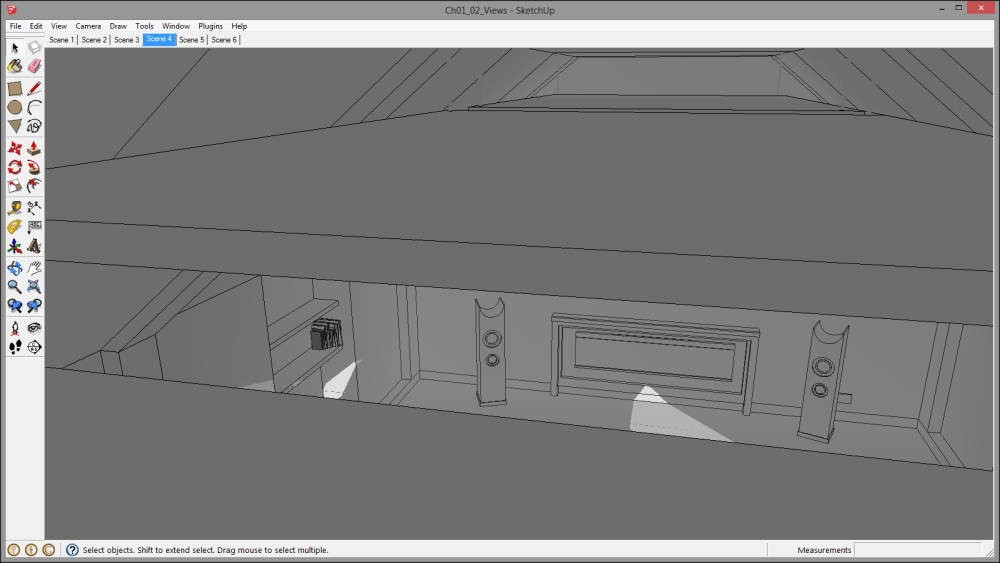
Scene 4 gives us an unusual POV on the environment that, although a little gimmicky, is a device that can give an image a very unique feel when used well. In this instance, the choice of POV directly influences what we can use as a focal point in the scene, which becomes the fireplace and speakers in this case. We also, by default, get to make a good use of framing and depth as both are created automatically by the ceiling panels that we are sitting above.
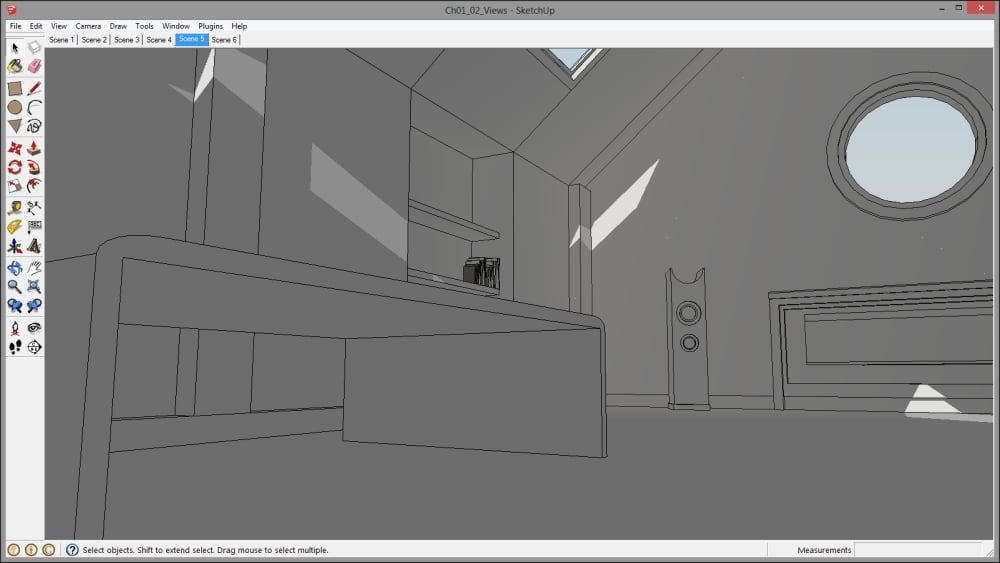
Scene 5 is a deliberate attempt to make use of balance by forcing a diagonal line of visual interest through the image, starting at the table on the left, then travelling left to right through the speaker in the center, and on to the window in the upper right. The line you will notice travels through the vertical and horizontal thirds, creating visual connectivity. We also get a measure of depth in the shot as this POV gives us some natural foreground and background object separation.
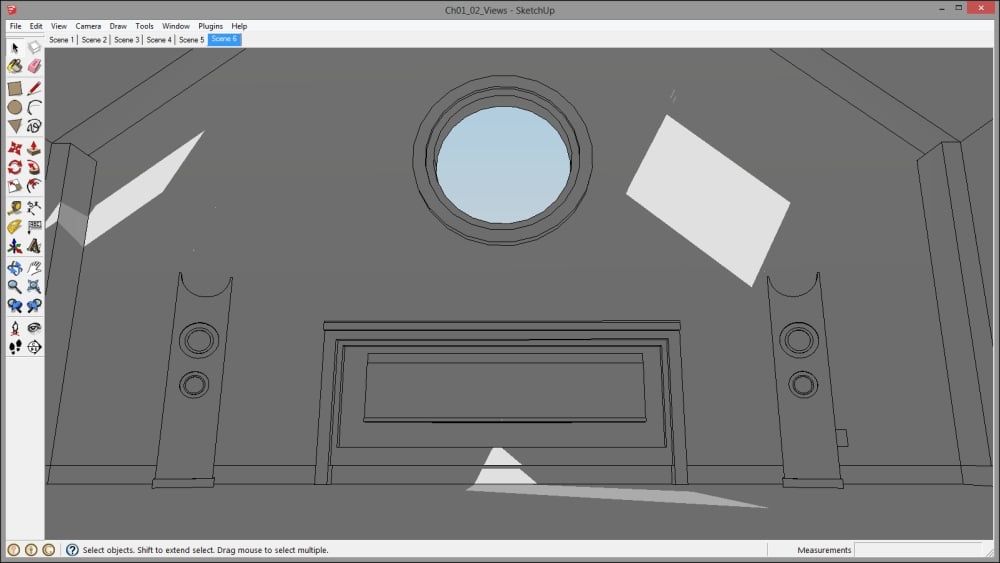
Our sixth and final scene, Scene 6, is something I enjoy referring to as the cathedral shot. An extremely low POV causes everything in the scene to take on a presence that can make the viewer feel somewhat small and insignificant. By placing everything symmetrically in the view, we make use of framing to create a sense of balance that itself seems to add to the grandness of our view.
One final thing that we need to do before we leave composition behind is to make certain that our actual V-Ray renders match more closely with what we are currently seeing in the SketchUp viewport. It would be a shame to have worked hard to create a good composition in our camera view only to find that our render doesn't frame up in the same way. In fact, to show that currently our viewport and the V-Ray frame buffer renders are out of sync, let's take our first render.
If you don't already have the V-Ray toolbars present in the interface, now would be a good time to bring those up. To do that, let's perform the given steps:
On the main menu, navigate to View | Toolbars… and select the VfS: Main Toolbar and VfS: Lights options from the flyout menu.
I would also suggest that you dock these at the top of the SketchUp user interface as I have. This will keep us on the same wavelength when I talk about going up to the V-Ray toolbars throughout the rest of this book!

To initiate a render in V-Ray, all that we need to do is hit the big R (for render) button on the main toolbar and V-Ray will begin to process the scene for us.
Note
If this takes a while, don't be alarmed. Depending on the complexity of your scene and the power available in your computer, this process can take anything from a few seconds to a few hours before our scene begins to render.
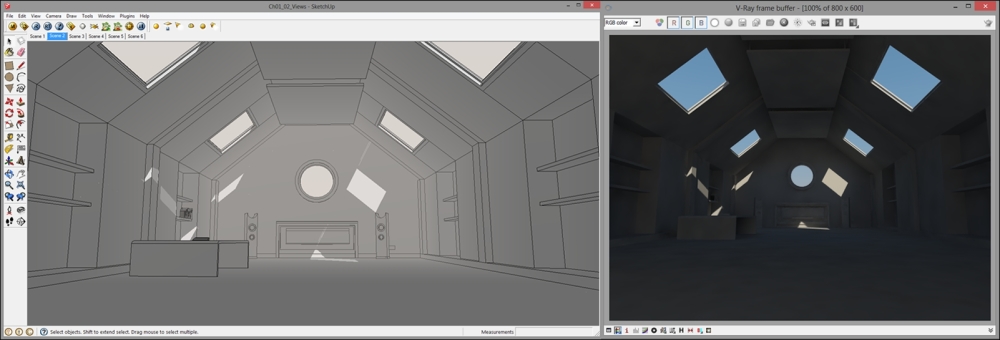
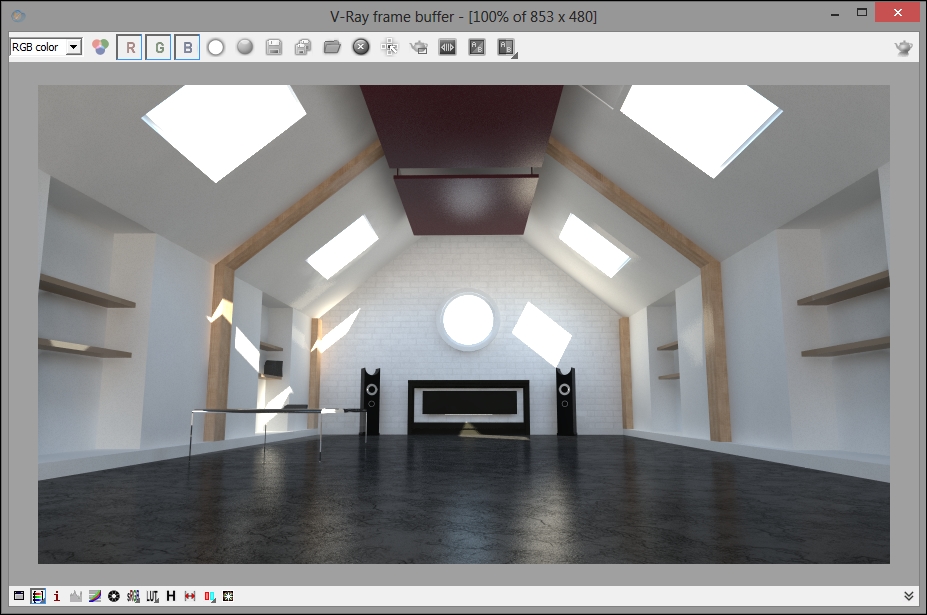
Once the render is complete, as you can see in the following screenshot, the framing we have in the V-Ray frame buffer window does not match that seen in the SketchUp viewport at all. This is because my SketchUp interface is currently set 1600 x 900 (currently giving us a viewport aspect ratio of 2.01:1), whereas V-Ray by default is rendering at 800 x 600 (which is a 1.333:1 ratio).
This obviously requires a bit of correction. To do that, we need to open up our V-Ray option editor by clicking on the O (for Option) button on the toolbar. Don't be intimidated by the sight of all the rollouts and parameters that confront us; we will become quite comfortable with these as we move through the various chapters in this book.

To align the framing of our renders a little more closely, let's perform the following steps:
Click on the Output rollout to open it.
Change the Width and Height settings to a resolution that uses something closer to a 2.01:1 ratio, such as 853 x 480, 1280 x 720, or 1920 x 1080.
Note
These standard HD resolutions use an aspect ratio of 1.777:1, which is close enough to help us. If the talk of aspect ratios here leaves you a little confused, don't worry. All you need to do for now is keep the preceding steps in mind and we will discuss the subject in more depth in Chapter 8, Composition and Cameras.
To keep things moving along quickly, I am going to employ a good workflow practice and render at a reduced, low-end HD resolution of 853 x 480. This approach to the testing phase means that we can make broad revisions without having to wait for full quality renders to finish. On average, an image rendered at half resolution will be completed four times faster than a full resolution render, which is logical since only one-fourth of the overall rendered content is being produced.
While a good composition gives us a solid foundation on which to build a photographic render, if we try to render a scene that has no lighting, well let's just say the end results will fall quite a way short of those desired.
The brilliant thing about lighting a scene with V-Ray in SketchUp is that a complete day-lighting system that consists of both the Sun and Sky elements is, by default, set up and ready to render with as soon as we start creating geometry in the scene. For newer users, this can obviously help tremendously when it comes to getting up and running with the software.
Controlling the placement of the Sun is extremely easy as we simply need to make use of SketchUp's built-in shadow controls, wherein we set the month of the year along with the time of day and time zone, and then we can render. What we instantly get is natural-looking daylight without having to do anything at all!
Better still is the fact that V-Ray also sets up a basic indirect (or global) illumination system for us automatically. This means we can even render interior Arch Viz shots right out of the box without having to do any extra set up work beyond, of course, getting our geometry created and then positioned in the scene.
Note
Global illumination is a general name for a group of algorithms used in 3D computer graphics that are meant to add more realistic lighting to 3D scenes. Such algorithms take into account not only the light which comes directly from a light source (direct illumination), but also subsequent cases in which light rays from the same source are reflected by other surfaces in the scene, reflective as well as non-reflective (indirect illumination). The source of this content is Wikipedia.
To look at the kind of renders we can get from V-Ray without doing any real lighting setup at all, either continue to work with your current scene or open up the Ch01_03_Lighting.skp file from your Exercise_Files folder, if you prefer to work with the same scene as I will be using.
The scene or camera angle we are using here (Scene 2) has been deliberately chosen to help us properly evaluate the quality and level of lighting that we are getting in our scene. It can do this because it affords us a full view of the environment.
With our camera view set to Scene 2, let's take a render by clicking the render button on the V-Ray toolbar. Once the initial translation phase is complete, V-Ray opens up its own frame buffer window and starts the rendering phase.
Note
One of the very nice features of V-Ray Version 2.0 is the fact that translation times in scenes are now significantly faster (in the vast majority of cases) than rendering the same scene in V-Ray Version 1.49.
The first activity we see in the frame buffer window will be V-Ray's indirect illumination calculations. First of all, the light cache and then the irradiance mapping engines calculate the level of illumination and light bounce requirements for the scene. This is based on the parameters set up in the V-Ray option editor and the materials applied through the materials editor.
Note
Irradiance mapping and light cache are the two indirect illumination engines set up by default in V-Ray Version 2.0 for SketchUp.
The final part of this process is the rendering of the image itself. In this instance, what we get, as we no doubt could discern from the GI calculations, is way too dark for the type of bright and airy feel in the interior that we are looking for. This brings us to a critical aspect of lighting in V-Ray, exposure!
Another default aspect of the V-Ray setup in SketchUp is that it makes use of a physical camera model for rendering. This means that real-world parameters such as shutter speed, F numbers (or F stops), and ISO (or film speed) values are used to control various aspects of the render, such as exposure, motion blur, and depth of field.
Basically, if we understand how to control these elements on a real-world camera, be it film or digital, then we already have a big head start when it comes to rendering using the V-Ray physical camera model. To access the physical camera controls, we need to revisit the V-Ray toolbar and click on the option editor button once more.
Then, if we open the Camera rollout, you can see in the following screenshot that we now have access to a wealth of camera controls and parameters. As we have already noted that our render is quite a bit darker than desired, the controls we are interested in would be those capable of affecting the exposure levels, which would be as follows:
Shutter Speed
F Number
Film Speed (ISO)

As a general rule, I prefer to handle exposure levels using only the film speed value as much as I possibly can. This is due to the fact that it is the only one of the three controls in what is often referred to as the exposure triangle that isn't used to control some other aspect of the physical camera model. Shutter speed is also used to control motion blur while the F number (or F stop) value will typically be the control mechanism for any Depth of Field (DOF) effects in our render.
To get some nice brightness levels in this instance, let's adjust the film speed or ISO value and set it to 1200. Taking another render by hitting the render button on the far right of the V-Ray frame buffer's top toolbar will show us that our illumination levels are now much more appropriate for the bright, airy feel we want to create.
Tip
The higher the ISO number we use in a render, the more sensitive V-Ray becomes to light, thereby producing a brighter final image. Unlike the ISO setting on a digital camera, we can increase this value as much as we like in V-Ray without the fear of introducing artifacts or noise into our rendered images.
The next aspect of our lighting setup that needs a little attention is the quality of the indirect illumination solution. At this moment, we can see quite a bit of dark splotching on our nice clean geometry. This often happens when we work with scenes that present a little bit of a challenge to the indirect illumination engines, which, of course, interiors nearly always do. Couple this with the reasonably low-quality default settings that V-Ray sets up, and we get splotches or noise patches in our render.
To clean this up a little, let's perform the following steps:
Jump into the Irradiance map rollout in the option editor, and in the Basic Parameters section, set the minimum and maximum rate values to
-2and-1respectively.We can also increase the HSph. subdivs value to
125and the Interp. samples value to35.Next, we can jump into the Light cache rollout and increase the Subdivs (or subdivisions) value to
1200.
If we take another render by hitting the button on the toolbar, we should see a marked improvement in the level of splotchiness present in the image; not that every trace of it will be gone, mind you. When working with interior scenes, creating completely noise-free Global Illumination (GI) renders can prove to be quite costly in terms of the time it takes to render the final image.
What we often have to aim for then is a situation that would generally be considered free enough of noise to be called an acceptable final solution. One reason why we can often get away with this is the fact that once materials get applied to the geometry, any slight levels of splotchiness still found in the scene tend to oftentimes just blend into the materials themselves.
Tip
We do need to bear in mind that every increase in quality settings inside a render engine, such as those we have just applied to the indirect illumination controls, will result in a corresponding increase in the time it takes for the render to complete! This is typically referred to as the speed verses quality conundrum.
This, of course, leads us nicely onto the subject of creating believable materials for our models. Because this is just a quick start exercise and we will be devoting an entire chapter to the development of some very specific materials in V-Ray, we will deal with just two things here. First, we will demonstrate how to apply existing materials to various geometry elements in the scene. And second, we will walk through the creation of a new floor material just to get a feel of how the V-Ray standard material works.
To get started, we can either continue with our current file or open up the Ch01_04_Materials.skp file from the downloadable Exercise_Files folder. This file essentially picks up where our lighting tweaks have left off. Let's introduce ourselves straight away to the V-Ray material editor by going back to the V-Ray toolbar and clicking on the M (for material editor) button. This, of course, will open up the editor window for us.
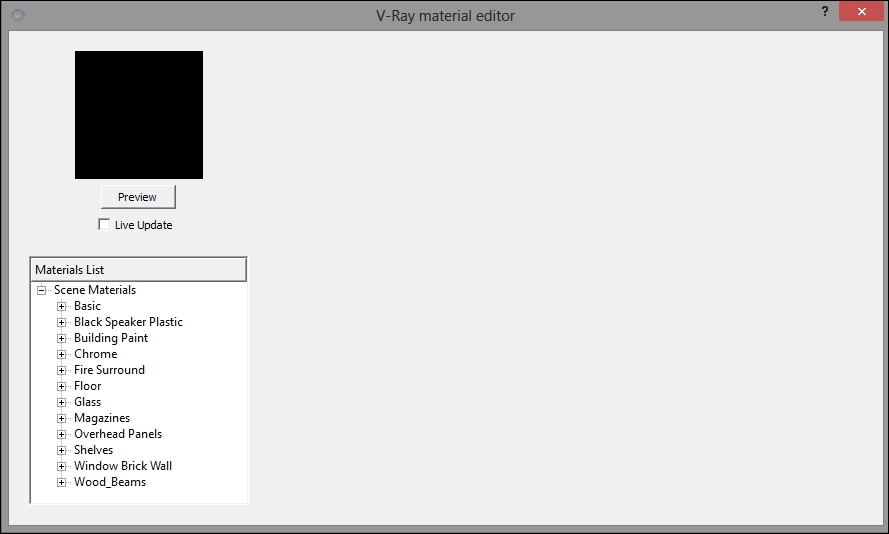
Looking in the Materials List section, you can see that we have a material named Basic. This is the plain grey material currently assigned to all the geometry in the scene. As we want to alter this arrangement, we need to briefly cover the setup or current state of geometry in the scene.
What I am referring to is the fact that everything in our scene at this moment in time has been turned into either a group or a nested group. This, for those who may be unfamiliar with SketchUp, will affect how we go about applying materials to the geometry. For instance, with one of the shelf objects selected, I can right-click on Shelves material in the Materials List section and choose the Apply Material to Selection option.
The selected material is then applied to that geometry. However, if I select a geometry group such as the main building itself, those same steps will no longer work and the material application would fail.
To apply a material to this type of geometry, we need to perform the following steps:
Double-click on the main building geometry to open up the group.
In the Edit menu, use the Select All command.
Right-click on a material in Materials List, such as Building Paint, and then choose the Apply Material to Selection option.
We need to follow a similar process when working with nested groups. Applying a material directly to a nested group such as our table won't work. However, we can perform the following steps to attain the desired result:
Double-click to open the nested hierarchy.
Left-click to select one of the groups.
Select a material from the Materials List section.
Right-click and choose Apply Material to Selection.
The material should then apply just fine. If it doesn't, we will need to perform the following extra steps inside the nested group:
Double-click on one of the nested groups.
Use the Select All command from the Edit menu.
Select a material from the Materials List section.
Right-click and choose Apply Material to Selection.
This may seem like a clunky way to get things done, especially if we are coming to SketchUp from other 3D applications. However, once the process becomes familiar to us, it really does become second nature and flows quite freely.
Now that we understand the process of applying materials, go ahead and see if you can get the named textures in Materials List applied to their related scene objects. This is a good way to get some practice at working with the preceding outlined steps.
To keep ourselves moving forward, let's run through the creation of a material of our own. This is what we will use to texture the floor in our scene.
Tip
Do keep in mind that we already have a Floor Material in our Materials List that can be used as a reference at any point if you should get a little stuck.
To move forward, we can either continue with our current file or open the Ch01_05_FloorMat.skp file from our Exercise_Files folder.
The first thing we want to do here is create a new V-Ray standard material for ourselves. So, let's perform the following steps in Materials List:
Right-click on either the Scene Materials label itself, or with the Scene Materials label selected, right-click on an empty area of the Material List panel.
In the pop-up menu, hover over the Create Material option and select the Standard material from the flyout.
Then, we need to locate the newly created label named DefaultMaterial in the Materials List.
Right-click on it and choose the Rename Material option from the pop up.
In the Rename Material window that opens up, call the new material My Floor and click on OK.
Of course, we will want to assign this material to the floor geometry straight away. Our new material is currently using grey for its diffuse color, making it the same as the already assigned basic material; we will avoid any potential confusion by changing our new material's diffuse color to something that will enable us to tell them apart.
To change this to something more recognizable, let us perform the following steps:
In the Diffuse rollout of our My Floor material, click on the diffuse color swatch.
In the Select Color dialog box, choose a color that would be very noticeable in the scene, such as the burnt orange I will create here. Let's use the HSV settings of HSV 12, 240, and 218.
Then, enable the select tool from the Large Toolset toolbar.
Triple-click on the floor geometry in the scene to ensure that it is all selected, or we could double-click and then use the Select All command from the Edit menu.
Right-click on the My Floor material name in the editor and choose Apply Material to Selection from the pop up.
If our burnt orange color appears in the viewport, we know that we have successfully applied this new material to the geometry; not that we will leave it set at burnt orange of course. In fact, we won't actually use the diffuse color swatch at all. Instead, we will make use of a number of bitmap or image files to help give our floor material a little more visual interest. To do this, perform the following steps:
Click on the map button (m) to the right of the diffuse color swatch.
From the drop-down list that appears under the Preview button, select the TexBitmap option.
In the Open Bitmap File dialogue box that appears, navigate to your downloaded
Exercise_Filesfolder, and from theTexturessubfolder, click to open theFloor.bmpfile.
Then, click on OK to close the texture editor window.
And finally, let's lower the diffuse map's overall level of contribution by setting the spinner value to 0.25.
We should now see our bitmap texture appear in the SketchUp viewport. At this moment, however, the default UV mapping coordinates are causing the bitmap to tile way too much for my liking. To rectify this, we need to use the controls found in SketchUp's own Materials editor.
To access that, let's perform the following steps:
Click on the Paint Bucket tool over on the SketchUp toolbar.
In the SketchUp Materials editor window, click on the Edit tab.
In the Edit tab, we have width and height controls that appear just below the image naming field. Click on the Lock/Unlock aspect ratio button that appears next to these fields.
Enter values of
3.00meters for the width and2.30meters for the height.Close the SketchUp Materials editor.

We should be able to see the difference this has made straight away in the viewport.
Next, we need to apply some parameter changes that will help us add some realism to our floor material. The first thing that we need are some reflections. To do this, we need to specifically add reflection controls to our V-Ray standard material.
Note
Although V-Ray Version 2.0 in SketchUp, just like other applications such as 3ds Max and Maya, now has a V-Ray Material that has all of the relevant parameter sections such as reflection and refraction set up and ready to work, there are some drawbacks to it that we will discuss in later chapters that preclude our use of it in this instance.
In the V-Ray material editor, let's perform the following steps:
Right-click on the My Floor material.
In the pop-up menu, hover over the Create Layer option, and from that flyout, choose the Reflection option.
Next, in the General area of the Reflection rollout, set the spinner next to the reflection color swatch to a value of 0.25. (We can double-click and type the values in any of these fields if we want.)
Then, we need to click on the map button (m) next to the reflection color swatch. In the texture editor parameters window that appears, click on the map button (m) for the Perpendicular controls.

In the drop-down list below the Preview button, choose the TextBitmap option.
And, in the Open Bitmap File dialog box that appears, navigate to
Exercise_Files|Texturesand once more choose theFloor.bmpfile.Finally, click on OK in the two open dialogs to go back to the materials editor window.
Placing the bitmap in the perpendicular channel here will give us some nice variation in the reflection intensity, which will automatically make things feel a little more natural. Next, we need to add some breakup to those reflections. So, in the Reflection rollout of the My Floor material, go to the Glossiness section and set the Hilight and Reflect values to 0.85.
Then, as a finishing touch, we can add a bit of a textured feel to the floor along with extra breakup by adding a subtle bump map to the material. To do that, let's perform the following steps:
Open up the Maps rollout at the bottom of the material controls.
Put a check in the Bump option, and at the same time, set its spinner value to 0.1.
To add a map for the bump effect, click on the map button and select the TextBitmap option from the drop-down list beneath the Preview button.
In the Open Bitmap File window that appears, navigate to
Exercise_Files|Texturesand choose theWall_Stucco_Bump.bmpfile.In the UVW section at the bottom of the texture editor controls, set u and v Repeat values to 4 and then click on Ok to exit the editor.
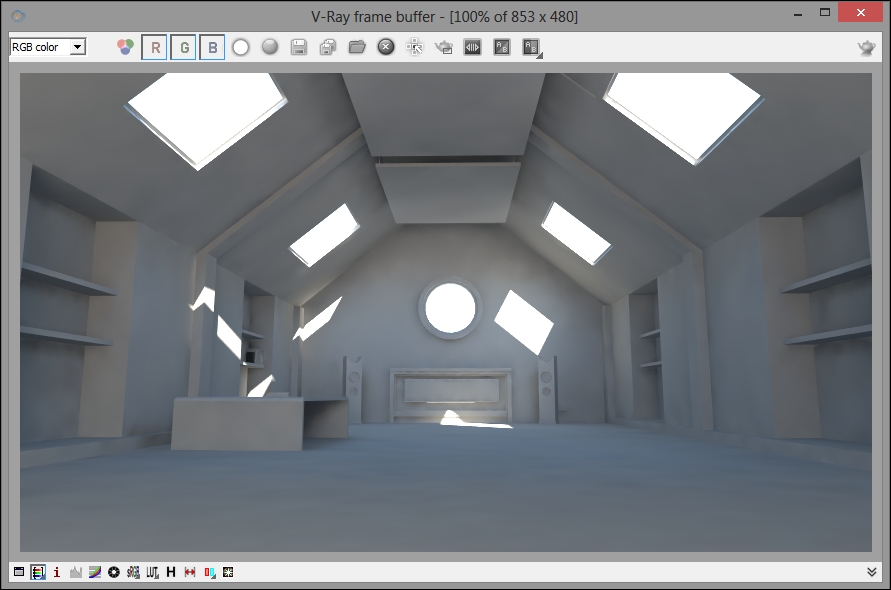
We can now take a render and see how things are looking by coming up to the V-Ray toolbar and clicking on the render button. Hopefully, what you have should look just like the following render:
We are closing in on a decent quick start image here. However, before we go ahead and create our final output render settings, let's just see how we can tweak things a little, now that all of our materials are fixed in place.
One area that I will want to address are the super bright whites that we are currently getting inside the render. You can find these by right-clicking on the image inside the V-Ray frame buffer, which should pop up a Pixel information dialog that contains RGB data readouts for varying image bit depths.
Note
V-Ray can do this because, by default, renders inside the frame buffer are stored at the highest bit depth possible using floating point values.
The one we are specifically interested in would be the Color (float) option. Whenever all three numbers in this readout go above the value of 1, which is pure white in floating point terms, then we know that what we are looking at is one or more super bright pixels in the image.
Sometimes, we can use these to good effect in our renders, especially when it comes to using the new Lens Effects feature of V-Ray Version 2.0. At other times, however, the burnout these super bright pixels cause, particularly in areas where direct light falls on an already bright texture such as our white walls, can be extremely undesirable. This means that it will always be useful to know which V-Ray tools can be used to help deal with this. One set of such tools would be the color mapping controls.
However, before we go ahead and make any changes, I am going to open up the Ch01_06_Tweaks.skp file from the Exercise_Files folder, which again picks up from where we currently have the scene. (Again, feel free to continue on using the current file, if you prefer.)
To deal with our super brights, let's perform the following steps:
Reopen the option editor by using the button on the V-Ray Main toolbar.
Inside the dialog, we want to open up the Color Mapping rollout and select the Exponential option from the Type drop down.
We also need to set Bright Multiplier here to a value of 1.0 instead of the default 0.8.
This simple change in the color mapping type will prevent any of the RGB values in our image from climbing above a value of 1. Another effect of this color mapping change is that our rendered image will become a little less bright and the RGB values of our extremely blown-out sky will drop to levels below 1, meaning that we can now see a little bit of blue in there!
Another lighting tweak we might want to make at this point is in connection with the current positioning of the direct sunlight in our view. At this moment in time, the sunlight coming through the skylights is creating one or two bright spots on the left side wall, which are looking a little messy and may need cleaning. We can do that by basically shifting the Sun a little in our scene. To do that, we need to perform the following steps:
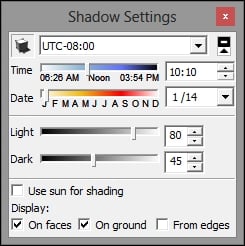
Open up SketchUp's Shadows control dialog from the Window menu.
Then, set the time of day to 11.10 a.m. by using either the spinner or clicking in the text field and typing.
With that done, we will not only eliminate those distracting highlights, but we will actually create another element of symmetry in the shot in which the spots of light now fall on either side of the window opening.
One element that seems to be a little bit lacking in the scene would be occlusion or contact shadows. We may particularly expect to see these in corner areas of the room, especially the shelving recesses. At this point, we ideally want to add them without creating an extra image element that would need to be composited in another application. In this instance, we will choose the easiest route available to accomplish this and enable V-Ray's ambient occlusion option by following the given steps:
With the V-Ray Options dialog open, go to the Indirect Illumination rollout.
In the Ambient Occlusion section, check the On box.
Set the radius amount to 8.5.
As we want the effect to be fairly subtle, let's set Amount to 0.35.
With our lighting tweaks in place, a final, slightly distracting element that we may want to tackle could be the material we have applied to the shelves in the scene. I am not entirely convinced that what we have created sits well in the scene. So, I would like to experiment a little and try applying the same material that we are using for our overhead panels.
To do that, follow the given steps:
Select all of the shelf objects in the scene.
Open up V-Ray material Editor.
Right-click on the Overhead Panel material.
From the pop up, choose the Apply Material to Selection option.
Now, it's time to set up our final render output settings. These should ideally be dealt with as the very last step in the production process because once these are in place, the time required to complete each of the renders will increase quite dramatically.
Note
Bear in mind that we are referring to image sampling and final resolution settings here. Important composition elements such as the final aspect ratio for our images would need to be set up much earlier in the process.
At this point, we could increase the quality of our indirect illumination solution by upping the parameter values that we worked with earlier. In this instance though, I am going to stick with what we have as they seem to be doing a fairly decent job for us.
Tip
It is, generally speaking, a bad idea to increase values just because we can. Unless there will be a visible improvement to the finished render, we will simply be increasing our render time for no apparent reason.
Let's go ahead and tackle our output image resolution first of all. In this instance, I am going to render out at full HD resolution, which means (at the time of writing) rendering is done at 1920 x 1080.
To set this up, we can perform the following steps:
Open up the option editor by clicking on the button on the toolbar.
Go into the Output rollout and set the width and height values to 1920 x 1080.
In the Render Output section, put a check in the Save Output box. Then, using the output file button next to the naming field, browse to the location where you want to save your image, such as the
Exercise_Filesfolder that we have been working with.Once there, set an appropriate file name such as
Ch01_Final, which is what I will use.Set the save-as type drop down to OpenEXR image file and then click on Save.
The final step here would be to improve the overall quality of the render by adjusting the image sampling settings. To do this, let's perform the following steps:
Open the Image sampler rollout in the option editor.
Make sure that Adaptive DMC is set as the Image Sampling type.
Set the Min Subdivs value to 1 and the Max Subdivs value to 16.
Set the Antialiasing filter in the drop down to Triangle.
And finally, in the DMC sampler rollout, set the noise threshold value to 0.005.
Note
Although we are moving very quickly over these important controls, rest assured that we will be returning to discuss them in Chapter 9, Quality Control.
With that, I think we are just about ready to take our final render for the chapter. So, let's visit the V-Ray toolbar one last time and click on the render button.
It is worth bearing in mind that the final settings that we have used here have the following functions:
They represent a good, high quality starting point for renders given that they balance both quality and speed in a fairly equal manner
They will need to be tweaked in order to suit the peculiarities of each scene on which we work

Once our image is rendered, what we end up with should hopefully look just like the render we have in the preceding screenshot, only much larger of course. Not too bad for a quick start exercise. Also, keep in mind that we haven't applied any post-production touches at all up to the final image.
Note
Please note that your downloadable Exercise_Files folder contains a Final Renders subfolder that houses finished 1280 x 720 HD renders for this chapter, one from each of the six scenes or camera views found in the file.
Be sure to cast a critical eye over them and look for the things that do and the things that do not work in your opinion. Better still, have a go at fixing any problems you spot and then rerender the scene so that you can do a side-by-side comparison and evaluation.
Let's summarize the elements of photographic rendering that we have very quickly touched in this chapter.
As with any construction project, the crafting of a photographic render requires that we start with a solid foundation. In this instance, that means getting our basic composition in the scene right before we move on to using the tools found in the render engine itself. Solid compositional principles such as thirds, leading lines, and points of view should be considered and possibly even tried out at this phase of the project.
Once we have that in place, we can then move onto using V-Ray tools to craft a lighting setup in the scene that creates an appropriate mood for us; then, build and apply materials to scene geometry that have believable physical properties associated with them.
Add to this mix global illumination, exposure control, and then finally our finished render and output quality control settings. Now, we have a recipe for successfully creating photographic renders with V-Ray.
Of course, in this introductory chapter, we have moved incredibly quickly through the basic process of rendering an image in V-Ray. What we need to do now is break down the key processes and tools in a little more depth so that we can fully understand both the power of the tools available as well as learn how to control them. Next up is lighting; specifically, a look at how we can go about lighting an interior daytime scene from the ground up.


