PhoneGap is an open source cross-platform framework used to build hybrid mobile applications. By hybrid, we mean HTML5, JavaScript, and CSS applications wrapped by a native shell. PhoneGap provides APIs to access the native function with JavaScript: accelerometer, camera, and so on.
All applications in this book have been developed on the Mac. However, you can easily carry out development on both Windows and Linux systems. The only small issue with PhoneGap development is building applications for Apple devices. If you want to test the application in an iOS emulator on your machine, you need a Mac operating system. If it is enough for you to build iOS applications with PhoneGap Build, then you could do it without Mac. However, you will need Mac in the initial stage to set up properly provisioning profiles and certificates for the iOS build with PhoneGap. You can use a friend's Mac terminal and then use Adobe PhoneGap Build to create an iOS rollout.
In this chapter, we will set up and configure everything on your computer so that you can develop and run all the applications in this book. This includes information about downloading, installation, and analysis of the basic PhoneGap application.
Also, this chapter is about a variety of mobile frameworks, comparison of them, how they fit with PhoneGap, and what framework or tool is better to choose. We will stick with a few mobile frameworks, but it is not compulsory for you to use this stack of approaches in your future projects. It is only a proposal for quick start. However, if you select some of my approaches in your real-world application, I will be more than happy.
This chapter will cover the following topics:
How to install PhoneGap
Understanding PhoneGap
How to create a basic application
How to configure an environment for iOS and Android development
PhoneGap best practices
What UI framework to select
When working with older versions of PhoneGap, we have to make a lot of detailed settings of the environment in order to run the application. However, with the newer versions, starting from 5.0.0, this procedure becomes easier. Before installing PhoneGap, we need to install Node.js, because it is easier to install PhoneGap CLI as a ready-to-use NPM package without compiling it from source codes. And NPM is a utility of Node.js.
Tip
Node.js is a platform built on Chrome's JavaScript runtime. It was built as a tool for fast and scalable network applications. The main feature of the framework is an event-driven, non-blocking I/O model. For now, it is mainly used on server side in the same way as PHP, Ruby, or others. However, it is very popular and spreading fast nowadays.
There are several ways to install Node.js, but I will describe only two of them.
We will see how to install Node.js from the official website and with Homebrew.
To install Node.js, you can download a pre-compiled binary package, which makes for a nice and easy installation. Follow these steps:
Head over to http://nodejs.org/ and click on the INSTALL button to download the latest package:

Install the package by following along. You will then be directed to install Node.js and NPM (Node Package Manager), which facilitates installs of additional packages for Node.js:

At the end of the install, you will be prompted to make sure that
/usr/local/binis in your path. Double-check that you have it by running in the terminal using this command:$ echo $PATH
If not, add it in either
.bash_profileor.bashrcin your home directory.After the installation, check whether it is OK by entering the following command in the command line node, which will open a Node.js JavaScript session:
$ node
> console.log('PhoneGap by Example');
PhoneGap by Example
undefined
To exit the Node.js session, just hit control + c twice. And we are done with the first method of Node.js installation.
Another good way to install Node.js is using Homebrew.
Homebrew (http://github.com/mxcl/homebrew) is the package manager that Apple forgot. Written in Ruby, it allows you to quickly and easily compile software on your Mac.
To install Homebrew (http://brew.sh/), follow these steps:
Run the following command on the console:
ruby -e "$(curl -fsSL https://raw.githubusercontent.com/Homebrew/install/master/install)"Once the installation is complete, you will receive a Successful Installation message:
==> Installation successful!
==> Next steps
Run `brew doctor` before you install anything
Run `brew help` to get started
Once Homebrew is installed, you can go ahead and install Node.js:
brew install node
It might require root access from you as well. And that is it. Node.js is installed now. It is pretty easy, right?
Download the installer from https://nodejs.org/download/.
Follow the steps in the installer. One default option is to install NPM and another is to add Node.js to our path:

Test Node.js. Just open the Windows command prompt and type
node –v. This should print a version number.Test NPM. Type
npm -vin the terminal. This should print NPM's version number.
To install Node.js on Linux, we should be familiar with the terminal as well. First of all, we need to install dependencies. Follow these steps:
Installing Ruby and GCC:
For Ubuntu or Debian:
sudo apt-get install build-essential curl git m4 ruby texinfo libbz2-dev libcurl4-openssl-dev libexpat-dev libncurses-dev zlib1g-devFor Fedora:
sudo yum groupinstall 'Development Tools' && sudo yum install curl git m4 ruby texinfo bzip2-devel curl-devel expat-devel ncurses-devel zlib-devel
Installing Homebrew:
ruby -e "$(curl -fsSL https://raw.githubusercontent.com/Homebrew/linuxbrew/go/install)"
After that, we need to add the following three lines to .bashrc or .zshrc:
export PATH="$HOME/.linuxbrew/bin:$PATH"
export MANPATH="$HOME/.linuxbrew/share/man:$MANPATH"
export INFOPATH="$HOME/.linuxbrew/share/info:$INFOPATH"
So, all the prerequisites are done, and we can install Node.js now. There are only two steps left to follow:
Open the terminal and type
brew install node.Wait until Homebrew finishes installation.
Now, we can test Node.js and NPM by running node -v and npm -v in the terminal accordingly.
Tip
Downloading the example code
You can download the example code files from your account at http://www.packtpub.com for all the Packt Publishing books you have purchased. If you purchased this book elsewhere, you can visit http://www.packtpub.com/support and register to have the files e-mailed directly to you.
We will use NPM (Node Package Manager) for all the future steps. NPM is part of Node.js, so we should already have installed it. Once you've installed Node.js, you can make sure you've got the most recent version of NPM using npm itself:
$ sudo npm install npm -g
(On Windows, you can drop sudo, but you should run it as administrator). Running this update will give you the most recent stable version of npm, also supported by NPM Inc.
So, we got Node.js and NPM installed. Let's install PhoneGap now. Open your command line and run the following command:
$ sudo npm install -g phonegap
Once the installation completes, you can invoke phonegap on the command line for further help. However, before that, let's understand how PhoneGap is organized.
Further in this chapter, I will often mention Apache Cordova instead of PhoneGap, and we will use the Cordova command-line interface. This is considered to be more appropriate in the context of the mission of the library.
Let's add some clarity to the difference between these two technologies: Cordova and PhoneGap.
In a few words, PhoneGap is a distribution of Apache Cordova. PhoneGap can be considered as a shell for Cordova technology and provides great infrastructure for maintenance and distribution.
Cordova/PhoneGap includes native implementation for different mobile platforms. For example, on Android it is implemented with Java, and on iOS it is implemented with Objective-C.
In order to set up the PhoneGap project well, we should examine the basic concepts and principles of the application structure in detail.
The app itself is an index.html web page by default, which connects a necessary CSS, JavaScript, images, media files, and other resources needed to run the application. The application runs in the native WebView wrapper, which can be spread through app stores.
The web view used by PhoneGap is the same web view used by the native operating system. On iOS, this is the Objective-C UIWebView class; on Android, this is android.webkit.WebView. There are differences in the web view rendering engines between operating systems, so we should account for this in our UI implementation.
The application can be fully or partially wrapped by WebView. For example, only some parts of the application may be made with HTML, and the remaining elements will be implemented with native components. In this book, we will consider that the applications are fully wrapped with WebView.
For interaction between our web page and the native components in Cordova, there is implemented plugins interface. This allows the JavaScript function to call the native components, and the native components transfer data in JavaScript. It might access the camera with JavaScript, accelerometer, or other device feature. Third-party plugins provide access to native features that are not necessarily present on every mobile platform. You can view all available plugins in the plugins repository (http://plugins.cordova.io/). You can also develop your own plugins. We will discuss this later.
PhoneGap offers two approaches in the development of PhoneGap applications. These are cross-platform workflow and platform-centered workflow.
Cross-platform workflow: I recommend you to use this workflow if you intend to develop a mobile application under several platforms and you have no differences in the programs for various platforms. With this approach, Cordova CLI (The command-line interface) is primarily used. The Cordova CLI allows you to compile applications for different platforms, manage plugins, and so on.
Platform-centered workflow: I recommend you to use this workflow if you plan to focus on developing applications for a single platform and plan to quite deeply integrate with native components. This approach implies a certain development for a specific platform. For example, for iOS native development, you will use the Objective-C language, and for Android development, you will use the Java language.
PhoneGap allows you to move from a cross-platform workflow to a platform-centered workflow, but you cannot do it in the reverse order. The folder's structure is different and includes a different set of shell tools. Therefore, we start with the use of cross-platform workflow.
In this book, we will mostly use cross-platform workflow, but there will be times when you have to switch to platform-centered workflow. The difference will be in using platform-specific shell tools. For example, for iOS, we will run iOS-specific SDK shell commands. For example, for release, we will run this command:
$ /path/to/my_new_project/cordova/build –release
In this section, we will discuss how to create an application and install it on different mobile platforms using the Apache Cordova command-line interface.
You will likely be surprised and ask about the difference between the PhoneGap command line and the Cordova command line, because we have already established PhoneGap. PhoneGap is a command-line utility that encapsulates Cordova. PhoneGap is built on Apache Cordova, and nothing else. You can think of Apache Cordova as the engine that powers PhoneGap. Over time, the PhoneGap distribution may contain additional tools, and that's why they differ in command, but they do the same thing. For the local build, PhoneGap uses the local library Cordova, but on the PhoneGap Build service, it uses it's own infrastructure. The official documentation for PhoneGap uses Cordova CLI.
Tip
PhoneGap Build is an online service where we can build PhoneGap/Cordova application for distribution. In this case, we do not need to set up a build process locally. We will review this service in detail in Chapter 10, Releasing and Maintaining the Application.
We will also adhere to the official documentation necessary to carry out commands using Cordova CLI. Further, if necessary, we will use the PhoneGap CLI as well.
Before using the command-line tools, we needed to install the SDKs for each mobile platform we are targeting.
Cordova CLI supports the following combinations of platforms and operating systems:
|
Mobile OS |
Windows terminal |
Mac terminal |
Linux terminal |
|---|---|---|---|
|
iOS |
- |
+ |
- |
|
Amazon Fire OS |
+ |
+ |
+ |
|
Android |
+ |
+ |
+ |
|
BlackBerry 10 |
+ |
+ |
+ |
|
Windows Phone 8 |
+ |
- |
- |
|
Windows |
+ |
- |
- |
|
Firefox OS |
+ |
+ |
+ |
On Mac, the command line is available via Terminal Application. On Windows PC, it's available as Command Prompt under Accessories.
We have already installed a PhoneGap library, but Cordova CLI also requires the installation.
For proper working of Cordova CLI, you must install a Git client, as the Cordova CLI refers to Git repositories to retrieve the necessary information. For more information on installing a Git client, you can refer to http://git-scm.com/. We should be able to run the Git command from the console. Once we have verified that the Git client is installed and running, let's install the Cordova CLI using NPM:
$ sudo npm install -g cordova
The preceding -g flag tells npm to install Cordova globally. Otherwise, it will be installed in the node_modules subfolder in the current folder.
Now, let's create our first application. Let's name it Travelly. It will be just a PhoneGap application scaffolding, and we will continue to develop it in the next chapter. So, to create an application, let's run the following command:
$ cordova create travelly com.cybind.travelly Travelly
We need to wait until this command is executed. The Cordova CLI refers to the external storage to extract all the files needed for the project:
The first argument,
travelly, is the folder where our project was generated.The second argument,
com.cybind.travelly, provides our project with a reverse domain-style identifier. It is an optional argument, if we omit the third argument as well. We can edit this value later inconfig.xml. However, let's make it right from the beginning so that it is properly configured in the generated code as well. If we do not specify the identifier, it will be defaulted toio.cordova.hellocordova, which we do not want.The third argument,
Travelly, provides the application's display title. It is an optional parameter, and the default value isHelloCordova.
Once the command execution is completed, a folder will appear with the following content:
$ ls
config.xml  hooks/     platforms/  plugins/    www/
Where:
config.xml: This is the configuration file that contains important metadata needed to generate and distribute the application.hooks/: This is the folder for hooks and pieces of code that Cordova CLI executes at certain points in our Cordova application build.platforms/: This directory is for native code for each of the supported platforms. By default, this is empty, and we need to add the required platforms, which we will see later.plugins/: In this directory, we will place the plugins that provide extra support to the interface with each of the native platforms.www/: This directory houses our application's home page, along with various resources undercss,js, andimg, which follow common web development file-naming conventions. This gets copied into each of the platform-specific projects in platforms' folder whenever a build is performed. So, this is where our core development will happen and all our cross-platform code will live in.
You can see that all these folders are empty or contain just a basic set of files. The config.xml file contains minimum information. The folder will get full, and config.xml will grow as we continue our development. So, get ready.
Before proceeding to consider the specific settings for each mobile platform, let's look at the common configuration file config.xml. This file contains very important information on setting up our future applications.
By default, our config.xml file has the following contents:
<?xml version='1.0' encoding='utf-8'?>
<widget id="com.cybind.travelly" version="0.0.1" xmlns="http://www.w3.org/ns/widgets" xmlns:cdv="http://cordova.apache.org/ns/1.0">
    <name>Travelly</name>
    <description>
      A sample Apache Cordova application that responds to the deviceready event.
    </description>
    <author email="dev@cordova.apache.org"
    href="http://cordova.io">
      Apache Cordova Team
    </author>
    <content src="index.html" />
    <access origin="*" />
</widget>
Where:
Widget: It's ID attribute provides the app's reverse-domain identifier, and the version provides its full version number.
Name: This specifies the app's formal name as it appears on the device's home screen and within app-store interfaces.
Description and author: This specifies metadata and contact information that may appear within app-store listings.
Content: This optional element defines the app's starting page in the top-level web assets directory.
Access: This defines the set of external domains the app is allowed to communicate with. In our case, we allow it to access any server.
Furthermore, there can be other options presented. Usually, they are added under the tag access. These elements are preference and feature.
Preference items can be global and multiplatform.
For example, the following two settings are global and apply to all supported platforms:
<preference name="Fullscreen" value="true" />
<preference name="Orientation" value="landscape" />
Where:
Fullscreenallows you to hide the status bar at the top of the screenOrientationallows you to lock orientation and prevent the interface from rotating in response to changes in orientation
The following two settings apply to multiple platforms, but not all:
<preference name="TopActivityIndicator" value="gray" />
<preference name="AutoHideSplashScreen" value="false" />
Where:
TopActivityIndicatorsets the color of the Activity IndicatorAutoHideSplashScreenspecifies whether to hide the splash screen automatically or allow the programmer to do it in code
In this case, it is not necessary to add feature elements manually, because in the initial stage, we will use the cross-platform workflow, where we will use the command CLI plugin to add the device API. However, when we move to fine-tuning of each platform, we will add the feature elements, as shown in this example:
  <feature name="Device">
    <param name="ios-package" value="CDVDevice" />
  </feature>

  <feature name="Device">
    <param name="android-package" value="org.apache.cordova.device.Device" />
</feature>In order to be able to run the application being developed in an iOS simulator or on an iOS device connected to our computer, we need the following components:
OS: Mac OS X
IDE: Xcode (6.0 and newer)
iOS SDK
Tip
You can download Xcode from https://developer.apple.com/xcode/downloads/ and iOS SDK from https://developer.apple.com/ios/download/.
The only disappointment when developing for iOS with the ability to debug on your computer is a limitation of the operating system by Apple. Unfortunately, it must only be Mac OS X operating system that does this. If you do not want the ability to run applications on your computer, you can simply use the service PhoneGap Build. However, as we try to better understand the features of PhoneGap, we should look deeper into platform-specific aspects.
We can test many of the Cordova features using the iOS emulator installed with the iOS SDK and Xcode, but we need an actual device to fully test all of the app's device features before submitting it to the App Store. To install apps onto a device, we should be a member of Apple's iOS Developer Program, which costs $ 99 per year. Next, we will describe how to run our application in an iOS emulator, which does not require the acquisition of the program.
So, let's say, we already have Mac OS X installed. The next thing we need to do is install Xcode. It is very simple. Follow these steps:
By keyword "Xcode", find the application in the App Store and press the Install App button. Once Xcode is installed, several command-line tools need to be enabled for Cordova to run.
From the Xcode menu, select Preferences.
Then, click on the Downloads tab.
From the Components panel, press the Install button next to the command-line tools listing.
On the same window, you can install other components, such as several versions of an iOS simulator.
Now, with the help of the Cordova CLI, we can add our future version of iOS applications:
$ cd travelly
$ cordova platform add ios
Creating ios project...
Now, in the platform folder, the ios subfolder appeared, and in the plugins folder, the ios.json file appeared. Let's open travelly/platforms/ios/Travelly.xcodeproj in Xcode.
The Xcode window should look as follows:

Now, let's run our application in the iOS emulator using the following steps:
Select the intended device from the toolbar's Scheme menu, such as the iPhone 6, as highlighted here:

Press the Run button that appears in the same toolbar to the left of Scheme. This button builds, deploys, and runs the application in the emulator. A separate emulator application opens to display the app:

A similar procedure can be done with the help of the Cordova CLI:
$ cordova build ios
This generates ios platform-specific code within the project's platforms subdirectory.
The cordova build command is a shorthand for the following command:
    $ cordova prepare ios
    $ cordova compile ios
To run our application in the iOS emulator, it is enough to execute the following command:
$ cordova emulate ios
We will see the same application in the emulator that we saw when run from Xcode.
To run the application on an iOS device, you must perform the following steps:
Join the Apple iOS Developer Program.
Create a Provisioning Profile within the iOS Provisioning Portal.
Verify that the Code Signing section's Code Signing Identity within the project settings is set to our provisioning profile name.
Let's assume that we already have a subscription to the iOS Developer Program. Now, you need to create an iOS Development Certificate and Provisioning Profile.
Go to https://developer.apple.com, then go to the "Member Center" link, and enter your Apple ID and password. After that, go to Developer Program Resources and select Certificates, Identifiers & Profiles. The following screen will appear:

Under the Certificates section, press the + button in order to start certificate generation. On the screen, select iOS App Development.
Then, press the Continue button. After that, we see the instructions for how to generate Certificate Signing Request (CSR) on our computer. At this stage, we can begin to generate the CSR on our computer. In the Applications folder on your Mac, open the Utilities folder and launch Keychain Access. Within the Keychain Access drop-down menu, go to Keychain Access | Certificate Assistant | Request a Certificate from a Certificate Authority. After that, we will see the following screen:

In the User Email Address field, I entered my current e-mail. Usually, this is the same e-mail to access the Apple Developer Portal. In the Common Name field, I usually enter my name. If you have a company, it might be the company name. I am the owner of an Apple Developer account, so I do not need to send a request by e-mail. I just clicked on Save to disk and then on the Continue button. I saved the CSR file on your computer and completed the process of generating the Certificate Signing request.
Now, go back to the browser with instructions for the generation of CSR and click on Continue. I selected the .certSigningRequest file saved on my Mac and clicked on the Generate button. Once the certificate generation is over, I downloaded a ready certificate on my computer and double-clicked on it to add to my Mac keychain.
At this stage, the generation of the certificate is completed. Now, you need to attach your project team. The Xcode project needs to be assigned to a team so that Xcode knows where to create your code signing and provisioning assets.
To assign the Xcode project to a team, follow these steps:
In the project navigator, view the Identity settings.
If necessary, select the target, click on General, and click on the disclosure triangle next to Identity to reveal the settings.
Choose your team from the Team pop-up menu.

This message appears because we have not generated a Provisioning Profile yet.
In order to generate a Provisioning Profile for our application, it must be registered with the Apple Developer Portal. To do this, on the presented Xcode screen, copy Bundle Identifier to the clipboard and switch to Apple Developer Portal. In the Identifiers section, press the + button. On the next page, you must enter the application Name and paste Bundle ID from the clipboard, as presented in the following screenshot:

After that, click on the Continue button, and on the next page, check the entered data and click on Submit. We added our application. Now, we need to register the device where we will be able to run our application.
To register the device in the Apple Developer Portal, go to Devices and click on the + button. On the form, you must enter the name of the device and its unique device identifier (UDID).

UDID can be found by connecting the Apple device to your computer in iTunes. If you go to the Device Manager tab and then to Summary, you will see the following screen:

Here, in the main section, you can copy the UDID by right-clicking on the UDID value. After that, go to the Apple Developer Portal, insert UDID, enter the Name of your device, and click on the Continue button:

Once the operation is complete, we will see our device in the Devices section. The next step is Provisioning Profile generation.
To generate a Provisioning Profile for our application, go to the Provisioning Profiles | Development and press the + button. After that, select the iOS Development application type and click on Continue.

In the next step, we will choose our application, Travelly, and go to the next page. Select the certificate generated by us and move on to the next step. In this step, we will select the devices on which we want to run our application:

At this stage, I chose two devices. I want to be able to test our application on both devices.
Finally, go to the next page and enter a name of the Provisioning Profile. Let's enter Travelly. Complete the generation by pressing the Generate button. Then, we can download this Provisioning Profile, or allow Xcode to it.
Now, in Xcode, we need to select a proper Provisioning Profile. Follow these steps:
In the project navigator, view the Identity settings.
If necessary, select the target, click on Build Settings, and click on the disclosure triangle next to Code Signing to reveal the settings.
Select Travelly as Provisioning Profile.

Alternatively, you can simply click on a provisioning profile, and it will be automatically installed in the Xcode.
That's all. Now, you can run the application on the device. Connect your device to your computer using the USB cable. Select the intended device from the toolbar's scheme menu; in my case, it is Cybind's iPhone. Press the Run button that appears in the same toolbar to the left of the scheme. This button builds, deploys, and runs the application in the device. We can see how the application started on our device.
Similarly, we can run the application on our device from the console:
$ cordova run ios
This command displays a lot of information because the Cordova CLI builds iOS projects using Xcode, which displays all the information about how it builds the application.
Congratulations! We have successfully executed our initial application on the real iOS device.
Setting up the project to run the application on the Android platform looks a little easier, but also has its complexities. To run the application in the Android simulator or on an Android device connected to our computer, we need the following components:
OS: Linux or Windows or Mac
Java: Oracle JDK
IDE: Android Studio
Android SDK
First, let's look at what platforms we have already added. This can be done using the platform list command of the Cordova CLI:
$ cordova platform list
Installed platforms: ios 3.7.0
Available platforms: amazon-fireos, android, blackberry10, browser, firefoxos
As you can see, we have only added the ios platform. Now, let's try to add the Android version of our application using the command platform, add:
$ cordova platform add android
If we had never been developing for Android on this computer, we could get an unsuccessful response. This can be as follows:
[Error: The command 'android' failed. Make sure you have the latest Android SDK installed, and the 'android' command (inside the tools/ folder) added to your path.
It can also look like this:
Error: ANDROID_HOME is not set and "android" command not in your PATH. You must fulfill at least one of these conditions.
It only means that we need to configure our environment for Android development. For a quick development start, Google has prepared the Android Studio. It includes the essential Android SDK components and IDE. Let's get started with JDK, Android SDK and Android Studio installation.
So, I do not have Java installed. I go to the official website, http://www.oracle.com/technetwork/java/javase/downloads/index.html, to get the latest version of it. I download JDK for MAC OS X and install it. You should pay attention that it should be JDK, not JRE. Only JDK provides the required functionality to build our Android application. After JDK installation let's run this command and check whether Java has been successfully installed:
$ java -version
java version "1.8.0_25"
Java(TM) SE Runtime Environment (build 1.8.0_25-b17)
Java HotSpot(TM) 64-Bit Server VM (build 25.25-b02, mixed mode)
OK! We have successfully installed the JDK.
Let's try to add the Android platform in our application using the Cordova CLI again:
$ cordova platform add android
Creating android project...
Error: Please install Android target "android-19".
Hint: Run "android" from your command-line to open the SDK manager.
Apparently, we have not installed all the necessary packages for development under Android 4.4.2 (API 19) yet. Open the Android SDK Manager using the android console command. Select Android 4.4.2 (API 19) and press Install. The installation process should look like this:
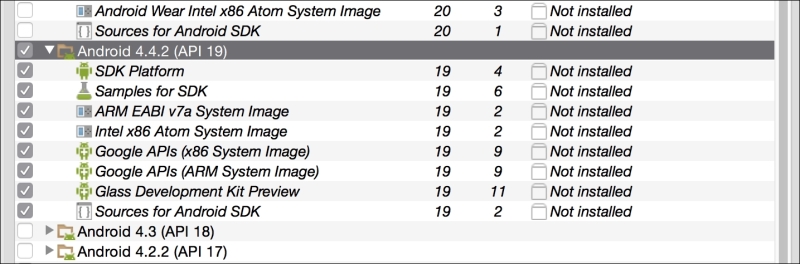
You also need to install all the following packages in order to make sure that they all run smoothly:
Android SDK Tools
Android SDK Platform Tools
Android SDK Build Tools
Google USB Driver
Intel x86 Emulator Accelerator (HAXM installed)
For Cordova command-line tools to work, or the CLI that is based upon them, we need to include the SDK's tools and platform-tools directories in our path. On a Mac, I use a text editor to create or modify the ~/.bash_profile file, adding a line such as the following one:
export PATH=${PATH}:/Development/adt-bundle/sdk/platform-tools:/Development/adt-bundle/sdk/tools
You can see the path to your Android SDK in the SDK Manager window. You can launch it by going to Android Studio | Tools | Android | SDK Manager.

Here, in the top-left corner, you can see the SDK Path value. It is what we included in the path.
Once all the required packages are installed let's try to add the Android platform again:
$ cordova platform add android
Creating android project...
Creating Cordova project for the Android platform:
  Path: platforms/android
  Package: com.cybind.travelly
  Name: Travelly
  Android target: android-19
Copying template files...
Project successfully created.
And we have successfully done it! Now, in our platforms directory, we got the android subfolder. In the plugins folder, there appeared a new file named android.json.
To get started, go to https://developer.android.com/sdk/index.html and download Android Studio (with the Android SDK for Mac):

Once downloaded, install it using the following steps:
Launch the
.dmgfile.Drag and drop Android Studio into the
applicationfolder.Open Android Studio and follow the setup wizard.
There will be one step where we need to add a path to the JDK. In my case, it looks like this:

On the license agreement screen, we will accept all the points:

It will take some time after that, and eventually, we will see the successful installation screen:

Now, let's try to open our Android project in Android Studio by following these steps:


Now, we can build and run the Android application directly from Android Studio.
We can add the Android emulator device now.
Open the terminal and enter the following command:
$ android avd
In the opened window, click on Create. In the window that appears, enter the parameters of the emulator. In my case, it looks like this:

Tip
Be sure to select Intel Atom (x86) in CPU/ABI. We need it to enable hardware-accelerated emulation. Sometimes, developers choose ARM by mistake that can cause the simulator to run slowly.
I entered the name of the device, selected the Nexus 4 (4.7", 768 x 1280: xhdpi) device, and targeted Android 4.4.2 - API Level 19.
After that, I clicked on the OK button. We successfully added the emulator.
Go back to the main window of Eclipse, highlight the project, and click on the Run button. As a result, we see our project running in the Android emulator:

So, we can run our application in the emulator from the console with this command:
$ cordova emulate android
To run the application on the device, we only need to connect it to our computer and run this command:
$ cordova run android
That's all! We have completed the configuration of our project to run on iOS and Android emulators and devices. Now, let's discuss some of the best development practices for PhoneGap applications.
We should mention some highlights before starting real development. They will help you understand why some mobile frameworks behave the way they do. The first thing we should understand is that a mobile device is more limited in resources than a computer. We should think of it from different aspects of the development.
Single-page application (SPA) is a web application or website that fits on a single web page with the goal of providing a more fluid user experience.
Loosely defined, a SPA is a client-side application that is run from one request of a web page. The user loads an initial set of resources (HTML, CSS, and JavaScript) and further updates (showing a new view, loading data) are done via AJAX.
Some SPA libraries you can use in your Cordova applications are:
AngularJS
EmberJS
Backbone
Kendo UI
Monaca
ReactJS
Sencha Touch
jQuery Mobile
Often, we need an interaction between our application and other servers. We need it to share data between multiple endpoints: other mobile devices, websites, and so on. Very often, the architecture is built in such a way that it sends not just data, but layout information as well.
It will be better to just create a needed set of data on the server side and send it with JSON, XML, or other formats. It can be customized as well. Do not send HTML through the Internet because it could be stored on the client. We will reduce the payload without sending HTML through Internet.
Cache static and dynamic data on the device. It can be filesystem, local storage, or database. Use the offline-first approach. We will discuss this approach in the upcoming chapters.
We can create the illusion of faster hybrid application with the following approaches:
Don't wait for the data to display the UI
Avoid the click event's 300 ms delay
Tip
Do not use click events on the mobile devices. It works fine on the devices, but most devices impose a 300 ms delay on them in order to distinguish between a touch and a touch hold event. Using touchstart or touchend will result in a dramatic improvement—300 ms doesn't sound like much, but it can result in jerky UI updates and behavior.
Using hardware-accelerated CSS transitions will be dramatically better than using JavaScript to create animations. See the list of resources at the end of this section for examples.
Combine images in sprites. It will decrease the number of requests and will improve the speed of image display. Just use CSS sprite sheets, which support high-resolution screens.
You can read about sprites on the following sites:
There are a lot of other resources that you can find online as well.
Compress CSS and JavaScript. Compress JPEG pictures. Don't use a full-stack framework just because you like a small piece of it. Use system fonts. Use fonts for icons.
Tip
For example, we can use FontAwesome from http://fortawesome.github.io/Font-Awesome/. It includes a lot of free icons we can use.
When you start building your application, you should think about the user, and how users of the specific platform feel about it: they just want the app to behave as expected. Your first stop should be each platform's design guidelines. Mobile OS manufacturers typically have official docs geared for professionals developing for their platform. These docs often include guides on UI design patterns.
For Android, check out Android designs (http://developer.android.com/design/patterns/index.html) pattern section
For iOS app designers, see iOS Human Interface Guidelines (https://developer.apple.com/library/ios/documentation/UserExperience/Conceptual/MobileHIG/index.html) in the iOS Developer Library
Implementing all of these components, patterns, and animations on your own can be quite a challenge. That is why there are already implemented frameworks with different meanings. Some are good in UX, some are sloppy. Some are light, some are heavy.
Tip
UX: This stands for user experience design. It is a process of enhancing customer satisfaction by improving usability, simplicity, and pleasure of the product.
UI: This stands for user interface. It is mainly a set of interface elements for presentation of the UX.
A great product experience starts with UX followed by UI.
When choosing a framework, in any technology—whether it is your frontend or backend—it is always important to remember what you are trying to achieve.
Are you building an iOS-only application or is it cross-platform? Are you trying to make impressive animations and transitions and smooth UX? Do you want to deploy your product fast? Does your target audience have high-end mobile devices, or are they mostly using old phones?
However, I think, what really matters is performance.
Here is short list of UI frameworks I know about:
Sencha Touch
jQuery Mobile
Ionic
Ratchet
Kendo UI
Topcoat
ReactJS
Framework7
Famo.us
Onsen UI
Let's look briefly at each framework.
This framework is pure JavaScript and CSS. Sencha Touch is a mature framework built to fit the most demanding app needs. It is a versatile enterprise-level workhorse using CSS3 and HTML5 best practices. It uses the Model–ViewController–Store pattern meant for serious business, with over 50 built-in components, from the basic ones such as component, container, form, and various fields to more complex carousel, lists, pickers, charts, grid, and much more. Sencha Touch includes themes for every popular mobile platform. Sencha Touch abstracts device APIs for their native packager and Cordova/PhoneGap. It has a large community and very detailed documentation. It takes some time to learn, but the documentation is awesome and everything goes smoothly. Unfortunately, it has a commercial license.
This jQuery-based framework is the most commonly used mobile application HTML5 framework. This is because jQuery is popular and transition to jQuery mobile is very easy. However, it is sluggish on mobile devices; it is not optimized as is Sencha Touch. It has an average UI, and the official documentation is lacking some information. There is no MVC support. It is even more sluggish when combined with PhoneGap.
Ionic is an open source framework. It is a pretty new library. Since its release, it has gained a lot of respect in the hybrid and mobile development community. Ionic provides a lot of utilities, and it is pretty easy to do small customizations for iOS, Android, and other operating systems. It uses Cordova for packaging from the box.
This is an open source framework from the Twitter Bootstrap creators. It provides a basic UI for iOS and Android (it's just UI components). To organize your application properly, you should architect it properly or use an additional library to do it for you. It means it doesn't support any kind of MV* pattern.
This jQuery-based framework is beautiful. It supports MVVM and has its own support for server-side communication (.NET, PHP and Java). It will cost you some money if you want to build a commercial application. It has great template support; every template looks like a native template. It supports MVC from the box and has great documentation.
This is just an open source library with well-done CSS. When you develop with Topcoat, you should care about the application structure, JavaScript, and performance on your own. It doesn't provide application wire framing or scaffolding.
This is the only view framework from Facebook. Yes, the developers had a little crooked soul; they did not make it for the sake of marketing. In fact, React is a view-oriented MVC framework, although it does not appear as such at first sight. The biggest advantage of React is that is uses a virtual DOM diff implementation for ultra-high performance. It is great with performance on the mobile device, but the learning curve is steep, and the documentation is still not too detailed or understood.
This is a free and full-featured HTML framework for building iOS apps. It is also an indispensable prototyping apps tool to show a working app prototype as soon as possible, in case you need to. It is easy to use and customize. It provides its own MVC framework. However, I would not use it for multiplatform development, because it represents only iOS UX/UI.
The Famo.us's mobile framework is a newborn baby. It's the newest framework on the market nowadays. Famo.us targets a specific need at this time: performance. With 60 fps animations, Famo.us is the choice for you if you want to brag in your hybrid app. Basically, Famo.us uses its own JavaScript engine that works with the GPU acceleration provided by CSS3 3D transformation functions to make animations as smooth as can be at 60 fps. Of course, we will not be able to reach 60 fps performance on old devices. This is for devices with good graphic cards. The Famo.us team is trying to tie it closely with the AngularJS framework. It is a good choice when building complex user experience animations, but the learning curve is steep, and the documentation is still not too detailed or understood.
Onsen UI is an Ionic competitor. It also comes with AngularJS support and provides the same solution as the Ionic team meant to build. Onsen UI was born as an answer for PhoneGap and Cordova developers who were struggling with the UI when starting a project, as the Internet lacks in mobile UI frameworks. The documentation in some places is not clear. I do not really like that I cannot use the default HTML layout but their own with ons- tags.
When I was researching these libraries, I compared them long enough to understand what I should choose to implement applications in this book. The main problem was the choice between Sencha Touch, Ionic and Onsen UI. Only these libraries have a sufficient set of ready-to-use components for the iOS and Android platforms and have solutions for an MV* pattern and a fairly good performance level on mobile devices. After some deliberation, I decided to choose the library that is the oldest on the market, has a huge community, and has good documentation. So, I selected Sencha Touch.
You just learned how to install and configure PhoneGap for iOS and Android development. You also learned how to create a basic application and successfully run it on emulators and real mobile devices. We discussed main frameworks to help us in future application implementation.
Keep the project structure as we developed here, and we will extend and improve it in the next chapter. You will learn how to organize your HTML/CSS/JavaScript part of the Cordova/PhoneGap application in the most graceful way.