


In this chapter we will cover:
Creating operating system groups and users
Checking hardware requirements
Checking OS requirements
Checking package, kernel parameters, and library requirements
Meeting host file requirements
Installing the Oracle 11gR2 RDBMS software for an OEM repository database
Creating an OEM repository database
Setting up a listener and a local net service name configuration
Meeting OEM repository database requirements
Oracle Enterprise Manager (OEM) 12c is a one-stop place for complete, integrated, and business-driven enterprise Cloud Management solutions. OEM is a monitoring and management software for all aspects of Oracle database, Fusion Middleware, and associated applications.
In this chapter, we will go through how to get started with the installation of OEM 12c. The objective of this chapter is to outline the prerequisites of the OEM 12c installation.
All of these recipes have been designed to work on a server running Oracle Enterprise Linux 5u3.
For the purpose of the installation, an SSH or a telnet client should be available. PuTTY client is used for this installation.
In order to install Oracle Enterprise Manager 12c, operating system groups and users need to be created. These users are required in order to create the OEM repository database and also to create the OEM Oracle management software/agent.
Before you get started, ensure that the server is connected to the network, and an SSH or a telnet client is available. Also, make sure you have access to the Unix server as a root user or as a privileged user.
In a telnet PuTTY session, perform the following steps as a root user or as a privileged user having access to root:
Create an Oracle Inventory group named
oinstall.# /usr/sbin/groupadd oinstallCreate two supplementary groups named
dbaandoper.# /usr/sbin/groupadd dba # /usr/sbin/groupadd oper
Create a Unix user named
oracleand set the password.# useradd -c "Oracle rdbms " -m -d /home/oracle -g oinstall -G oper,dba -u 1000 -s /bin/bash oracle # passwd oracle
Create a user named
oraoemand set the password.# useradd -c "Oracle Enterprise Manager " -m -d /home/oraoem -g oinstall -G oper,dba -u 4050 -s /bin/bash oraoem # passwd oraoem
Two Unix users, oracle and oraoem, are created in order to install an OEM repository and an OMS service respectively. Two distinct users are created to isolate the database and OMS software installations.
Users oracle and oraoem should be part of the Oracle inventory group oinstall. Please note that supplementary groups such as dba and oper are
optional groups to be created . However a single user can also be used to for this installation of OEM repository and OMS service.
In order to install Oracle Enterprise Manager 12c successfully, hardware requirements such as CPU, memory, and disk space need to be confirmed as per the Oracle recommended prerequisites.
Before you get started, ensure that the server is connected to the network, and an SSH or a telnet client is available. Also, make sure you have access to the Unix server as a root user or as a privileged user.
The following commands show how to identify the availability of CPU, RAM, heap size, and hard disk space on the server:
CPU count
# cat /proc/cpuinfo|grep "physical id"|sort|uniq|wc -l
Cores
# cat /proc/cpuinfo | grep "cpu cores" | uniq
cpu cores       : 4
# less  /proc/cpuinfo|grep processor
processor       : 0
processor       : 1
processor       : 2
processor       : 3
processor       : 4
processor       : 5
processor       : 6
processor       : 7
RAM
#  cat /proc/meminfo|grep MemTotal
MemTotal:     12300176 kB
Hard disk space on Mountpoint
# df -h|grep u01
Filesystem            Size  Used 	Avail Use% Mounted on
/dev/sda7              46G   12G   	32G  27% /u01
The preceding commands provide details about CPU, CPU cores, memory, and hard disk space on the server. They should be ratified against the minimum required prerequisites for the installation. In case the disk space is not adequate, then the required space should be added to the server for the target hardware as per Oracle documentation.
In this recipe, we will check the operating system's (OS) requirements, including the OS packages that are required for the progress of the OEM installation.
Before you start, ensure that the server is connected to the network, and an SSH or a telnet client is available. Also, make sure you have access to the Unix server as a root user or as a privileged user.
Perform the following steps to check the operating system's requirements as a root or as a privileged user with root privileges:
Install the Oracle validated package.
# yum install oracle-validatedCheck the contents of
/etc/sysctl.conf.fs.file-max = 327679 kernel.msgmni = 2878 kernel.msgmax = 8192 kernel.msgmnb = 65536 kernel.sem = 250 32000 100 142 kernel.shmmni = 4096 kernel.shmall = 1073741824 kernel.shmmax = 4398046511104 net.core.rmem_default = 262144 # For 11g recommended value for net.core.rmem_max is 4194304 net.core.rmem_max = 4194304 # For 10g uncomment the following line, comment other entries for this parameter and re-run sysctl -p # net.core.rmem_max=2097152 net.core.wmem_default = 262144 net.core.wmem_max = 262144 fs.aio-max-nr = 3145728 net.ipv4.ip_local_port_range = 1024 65000
Add or amend the following entries in the
sysctl.conffile located under/etc.fs.file-max = 6815744net.ipv4.ip_local_port_range = 9000 65500net.core.wmem_max = 1048576
# /sbin/sysctl -p
net.ipv4.ip_forward = 0
net.ipv4.icmp_echo_ignore_broadcasts = 1
net.ipv4.conf.all.accept_source_route = 0
….
kernel.sysrq = 1
net.ipv4.tcp_max_syn_backlog = 4096
fs.file-max = 6815744
kernel.msgmni = 2878
kernel.msgmax = 8192
kernel.msgmnb = 65536
kernel.sem = 250 32000 100 142
kernel.shmmni = 4096
kernel.shmall = 1073741824
kernel.shmmax = 4398046511104
net.core.rmem_default = 262144
net.core.rmem_max = 4194304
net.core.wmem_default = 262144
net.core.wmem_max = 1048576
fs.aio-max-nr = 3145728
net.ipv4.ip_local_port_range = 9000 65500
Include the following lines in the
/etc/security/limits.conffile for Repository installation as theoracleuser:oracle soft nproc 2047 oracle hard nproc 16384 oracle soft nofile 4096 oracle hard nofile 65536 oracle soft stack 10240
Include the following entry in the file
/etc/security/limits.conffor OMS installation as theoraoemuser:oraoem soft nofile 4096 oraoem hard nofile 65536
In order to install the Oracle Enterprise Manager 12c, operating system groups and users need to be created. These users are required in order to create the OEM repository database and also to install Oracle Management Server (OMS) and Oracle Management Agent.
Before you get started, make sure that you have access to the Unix server as a root user or as a privileged Unix user with root privileges.
Perform the following steps to check the operating system requirements:
Check the packages for OMS installation.
#  rpm -qa --queryformat "%{NAME}-%{VERSION}-%{RELEASE}(%{ARCH})\n" | grep glibc
glibc-common-2.5-34(x86_64)
glibc-devel-2.5-34(x86_64)
glibc-2.5-34(i686)
glibc-headers-2.5-34(x86_64)
glibc-devel-2.5-34(i386)
glibc-2.5-34(x86_64)
# rpm -qa --queryformat "%{NAME}-%{VERSION}-%{RELEASE}(%{ARCH})\n" | grep gcc
libgcc-4.1.2-44.el5(x86_64)
libgcc-4.1.2-44.el5(i386)
compat-gcc-34-3.4.6-4(x86_64)
gcc-4.1.2-44.el5(x86_64)
gcc-c++-4.1.2-44.el5(x86_64)
compat-gcc-34-c++-3.4.6-4(x86_64)
#  rpm -qa make*
make-3.81-3.el5
# rpm -qa binutils*
binutils-2.17.50.0.6-9.el5
# rpm -qa libaio*
libaio-0.3.106-3.2
libaio-devel-0.3.106-3.2
libaio-0.3.106-3.2
# rpm -qa libstdc*
libstdc++-4.1.2-44.el5
libstdc++-devel-4.1.2-44.el5
libstdc++-4.1.2-44.el5
libstdc++-devel-4.1.2-44.el5
# rpm -qa setarch*
Installing setarch rpm.
# yum install setarch
 # rpm -qa setarch*
setarch-2.0-1.1
# rpm -qa  rng-utils*
rng-utils-2.0-1.14.1.fc6
Ensure that the following packages, which are required for the Repository Database installation, are installed:
#  rpm -aq make binutils gcc libaio glib-common libstdc++ setarch sysstat rng-utils glibc
binutils-2.17.50.0.6-9.el5
libaio-0.3.106-3.2
glibc-2.5-34
libstdc++-4.1.2-44.el5
make-3.81-3.el5
gcc-4.1.2-44.el5
sysstat-7.0.2-3.el5
rng-utils-2.0-1.14.1.fc6
setarch-2.0-1.1
glibc-2.5-34
libstdc++-4.1.2-44.el5
libaio-0.3.106-3.2
The installation of any missing packages can be done as shown in the following example:
libaio-devel-0.3.106
unixODBC-2.2.11
unixODBC-devel-2.2.11
# yum install libaio-devel-0.3.106
# yum install unixODBC-2.2.11
# yum install unixODBC-devel-2.2.11
Verify the kernel parameter's settings.
Verify the value assigned to the
kernel.shmmaxparameter to set to a minimum of 4294967295.# cat /proc/sys/kernel/shmmax 4398046511104
In this particular case, the value set is higher than the required value. Therefore no change is required.
For OMS, the glibc-2.5 library should be available. Check the availability of the glibc-devdel-2.5 library.
# rpm -qa --queryformat "%{NAME}-%{VERSION}-%{RELEASE}(%{ARCH})\n" | grep glibc
glibc-common-2.5-34(x86_64)
glibc-devel-2.5-34(x86_64)
glibc-2.5-34(i686)
glibc-headers-2.5-34(x86_64)
glibc-devel-2.5-34(i386)
glibc-2.5-34(x86_64)
The preceding output implies that the library glibc-devdel-2.5 is not installed.
Download and install the correct library version.
Download the latest
rpmfiles from theyumrepository on the Oracle site, and then install the glibc-devdel-2.5 rpm package on the server, before proceeding with the installation of OEM; otherwise warning messages will arise during OMS prerequisite checks.# cd /etc/yum.repos.d wget http://public-yum.oracle.com/public-yum-el5.repo Length: 3974 (3.9K) [text/plain] Saving to: `public-yum-el5.repo' 100%[========================================================================>] 3,974 --.-K/s in 0s 10:08:54 (158 MB/s) - `public-yum-el5.repo' saved [3974/3974] # yum install glibc-devel-2.5-81.x86_64 # rpm -qa --queryformat "%{NAME}-%{VERSION}-%{RELEASE}(%{ARCH})\n" | grep glibc glibc-headers-2.5-81.el5_8.1(x86_64) glibc-common-2.5-81.el5_8.1(x86_64) glibc-devel-2.5-81.el5_8.1(x86_64) glibc-devel-2.5-81.el5_8.1(i386) glibc-2.5-81.el5_8.1(x86_64) glibc-2.5-81.el5_8.1(i686)
Rename public-yum-el5.repo file to some other name to avoid download of OEL5u3.
# cd  /etc/yum.repos.d
# mv public-yum-el5.repo public-yum-el5.repo.bkp
In order to install Oracle Enterprise Manager 12c, the hosts file needs to be correctly set.
Before you start, ensure that the server is connected to the network and an SSH or a telnet client is available. Also, make sure you have access to the Unix server as a root user or as a privileged user having root access.
Open the vi editor in a PuTTY session and include the following line in the /etc/hosts file. The details of the IP address and server name need to be specified, as follows:
999.999.99.999 servername.domain_name.com servername
The hosts file is required for the installation to complete successfully. The location of the hosts file will vary depending on the operating system being used. The previous file location is valid for Oracle Enterprise Linux.
Tip
Downloading the code support files
You can download the code support files for all Packt books you have purchased from your account at http://www.packtpub.com. If you purchased this book elsewhere, you can visit http://www.packtpub.com/support and register to have the files e-mailed directly to you.
Assuming that all of the prerequisites are met for the OMS and management repository, this recipe describes the installation of the Oracle 11g software for the OEM repository database
Before you start, ensure that the server is connected to the network, and an SSH or a telnet client is available. Also, make sure you have access to the Unix server as a root user or as a privileged user and a Unix user.
To install the RDBMS software, the X Windows server needs to be started. X Windows helps in providing a graphical user interface from the Unix server. Xming is used in this example, although any Windows software, such as Hummingbird Exceed, can also be used.
Download the Oracle software.
The Oracle RDBMS version used for the installation is 11.2.0.2. The software can be downloaded from the Oracle's metalink site. 11.2.0.2.5 Patch Set Update (patch13343424) is OS-specific and will be used to patch the database to ensure no patch bundles.
p10098816_112020_Linux-x86-64_1of7.zip
p10098816_112020_Linux-x86-64_2of7.zip
p10098816_112020_Linux-x86-64_3of7.zip
p10098816_112020_Linux-x86-64_4of7.zip
p10098816_112020_Linux-x86-64_5of7.zip
p10098816_112020_Linux-x86-64_6of7.zip
p10098816_112020_Linux-x86-64_7of7.zip
p13343424_112020_Linux-x86-64.zip
After downloading the software, copy the software to a staging directory on the server using scp. Unzip the software in the staging directory. In this example mount point/spare is created to be used as a staging directory.
cd /spare
unzip p10098816_112020_Linux-x86-64_1of7.zip
unzip p10098816_112020_Linux-x86-64_2of7.zip
chown -R oracle:oinstall /spare/database
Create the
oraInventorydirectory if it does not alredy exist on the server.# mkdir -p /home/oraInventory # chown -R oracle:oinstall /home/oraInventory
Change the ownership of the ORACLE_BASE directory (in this example,
/dboracle) to useroracle.# chown -R oracle:oinstall /dboracleNow, start a new session with SSH and connect as user
oracle. In this example the user has usedoracle.cd /spare/database $ export ORACLE_BASE=/dboracle $ export TEMP=/u01/tmp $ ./runInstaller
Select the I wish to receive security updates via My Oracle Support checkbox if you wish to receive security updates. In this example, we have left the option unchecked.

Click on the Next button.
Select the Skip software updates button on the next screen. Other options available are Use My Oracle Support Credentials for download or Use pre-downloaded software updates. Choose one of the options as per the requirement.
Click on the Next button.
Select the Install database software only option.

Click on the Next button.
Select the Single instance database installation option. Other options available for high availability are Oracle Real Application Cluster database installation and Oracle RAC One Node database installation.

Click on the Next button.
Select the default language as English, and then click on the Next button.
Select Enterprise Edition.

Click on the Next button.
The Oracle base location is selected automatically, as Oracle base is set in the Unix environment before installation. Specify or review the Oracle Base field and the Software Location field.

Click on the Next button.
The Oracle Inventory path will be detected by the installer automatically if any previous installation exists. In this example, it's a new installation, so you need to specify the Inventory Directory field.
The Oracle inventory group install will be selected by default.

Click on the Next button.
Database Administrator Group
dbaand Database Operator groupoperare chosen by default.
Click on the Next button.
Pre-requisites Checks screen is displayed. If any of the checks appear as failed (for example, if the minimum swap space available is 16 GB and the server has only, say, 12 GB), then resolve the issue before proceeding.
Click on the Next button.
Review the Summary screen of the software installation.

Click on the Install button.
The installation begins and will take some time to complete. The following screen is displayed. Log in to the server in another telnet session and execute the script as a root user or a privileged user with root privileges.

The following script appears in the preceding screenshot:
 #  . /home/oraInventory/orainstRoot.sh
 #. /dboracle/product/11.2.0/dbhome_1/root.sh
Click on OK after the execution of the script as a root user.

Click on the Close button. This marks the completion of the Oracle RDBMS 11gR2 installation.
Apply required patch set update.
The patch set update compatible with the Oracle 11.2.0.2 RDBMS software for the OEM repository database is 11.2.0.2.5 and needs to be installed. Also, ensure that you use the OPatch utility Version 11.2.0.1.3 or later.
If 11.2.0.3 is being installed, then apply the latest compatible patch set update.
An OEM repository is required to store information related to various hosts and targets that need to be monitored via OEM. This recipe describes the steps to create an OEM repository database.
Before you start, ensure that the server is connected to the network, and an SSH or a telnet client is available. Also, make sure you have access to the Unix server as a privileged user.
To create an OEM repository database, perform the following steps:
Connect to the server as the
oracleuser and invoke the Oracle utility Database Configuration Assistant (DBCA).$ cd /dboracle/product/11.2.0/dbhome_1/bin $ TEMP=/u01/tmp $ export TEMP ./dbca
The following window appears after performing the preceding step:

Click on the Next button to continue.
Select the Create a Database option and then click on the Next button.
Select the General Purpose or Transaction Processing option and click on Next.
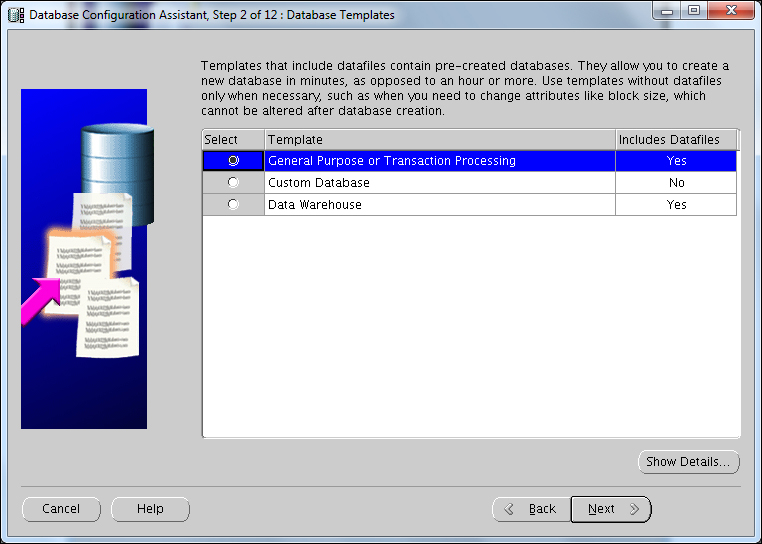
Enter a fully-qualified domain name value in the Global Database Name field and the SID field, and then click on Next.
In this example,
oem12cis used as the Global Database Name and the SID.Uncheck the Configure Enterprise Manager checkbox, and then click on Next.

Set up a password for the database, and then click on the Next button.
Select the Storage Type field as
File Systemfrom the drop-down list, and then select the Use Common location for All Database Files checkbox. Also, specify the Database Files Location field as/dborafiles.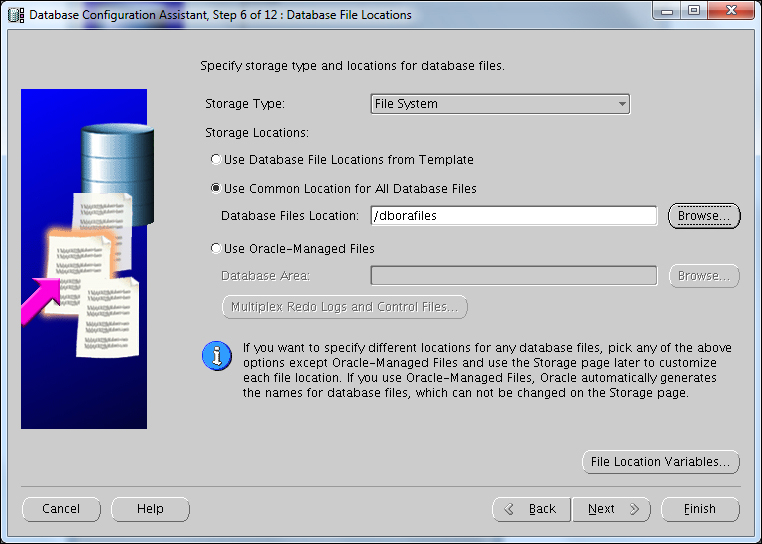
Click on the Next button.
Select the Flash Recovery Area option, and then click on the Next button.
No sample schemas or custom scripts are required. Click on Next.
Select the Custom option and set SGA size and PGA size. Set SGA Size to, say,
2048MB and PGA Size to1024MB. Then click on the Character Sets tab.Select Use Unicode (AL32UTF8) and choose a National Character Set of
UTF8, and then click on the Next button.Review the control files' locations on the Database Storage screen, and then click on the Datafiles tab in the left-hand side pane.
Review the data's filename and location, and then click on Redo Log Groups on the left-hand side pane.
The Redo logfile's size should be a minimum of 300 MB for an OEM12C repository. Set the redo log's File Size to
300MB for all three redo log groups.
Click on the Next button.
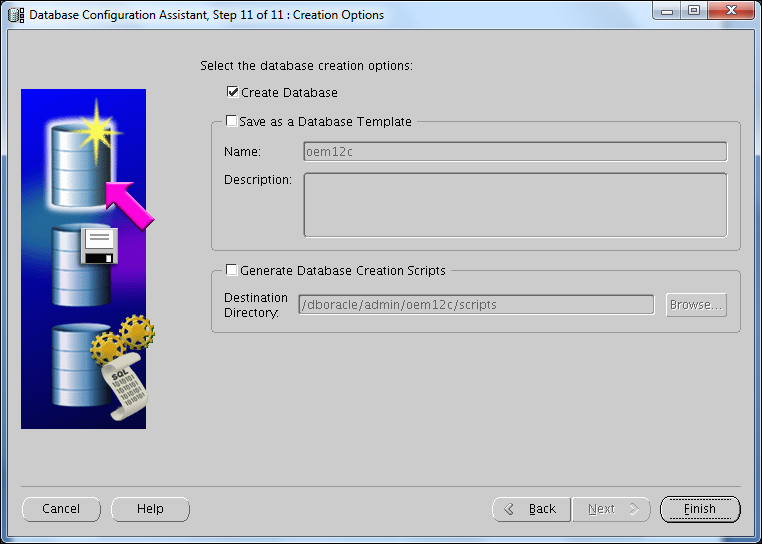
To create the database, click on Finish.
Select the Save as a Database Template and Generate Database Creation scripts checkboxes if you wish to take this template and create the database with the same configuration, by SQL scripts on another server. This is an optional selection.
Review the database configuration summary, and then click on OK to start the database creationonce it is complete, click on Exit. The repository database is now created.
The Listener is required to be configured in order to enable connectivity for the OEM repository database using SQL*Net. The Network Configuration Assistant (Netca) utility is used to do the network-related configuration for Oracle databases.
Before you start, ensure that the server is connected to the network, and an SSH or a telnet client is available. Also, make sure you have access to the Unix server.
Invoke the netca utility in order to configure the listener as an
oracleuser.$ ./netcaSelect the Listener configuration checkbox, and then click on Next.

Select Add, and then click on Next.
Use the default Listener name as
LISTENER,and then click on Next.Use the default TCP protocol, and then click on Next.
Select the Use the standard port number of 1521 option, and then click on Next.
Select No, and then click on Next.

Click on Next to complete the listener's configuration.
Create the
tnsnames.orafile manually, or usenetcato create a service name.The following entry is added to the
$ORACLE_HOME/network/admin/tnsnames.orafile in order to create a service name. Host name to be specified is where the OEM repository database resides.oem12c = (DESCRIPTION = (ADDRESS_LIST = (ADDRESS = (COMMUNITY = SVMUSER.world) (PROTOCOL = TCP) (Host = servername.domain_name.com) (Port = 1521) ) ) (CONNECT_DATA = (SID = oem12c) (GLOBAL_NAME = oem12c) ) )
Check whether the listener has been created successfully and has been registered with the listener.
$ lsnrctl statusCheck whether the database is reachable using the Net service name. The following command's output shows that the database is reachable.
[$ tnsping oem12c
There are some additional configuration requirements for an OEM
repository database, namely some table spaces should be autoextensible, have a minimum shared_pool_size, a specific number of job_queue_processes, and so on, before the database can be used as a repository for OEM.
Before you start, ensure that the server is connected to the network and an SSH or telnet client is available. Also, make sure you have access to the Unix server as a privileged user.
UNDOandTEMPtablespaces should beautoextensiblein the database. Also it is recommended to start with anUNDOtablespace of at least 256 MB.SQL> set lines 300 SQL> col tablespace_name form a16 SQL> col file_name form a37 SQL> select tablespace_name, file_name, bytes/1024/1024 as SIZE_MB, autoextensible from dba_data_files Union select tablespace_name, file_name, bytes/1024/1024 as SIZE_MB, autoextensible from dba_temp_files; 2 3 TABLESPACE_NAME FILE_NAME SIZE_MB AUTO --------------- ----------------------------------- ---------- ------------------------------------ SYSAUX /dborafiles/oem12c/sysaux01.dbf 490 YES SYSTEM /dborafiles/oem12c/system01.dbf 700 YES TEMP /dborafiles/oem12c/temp01.dbf 29 YES UNDOTBS1 /dborafiles/oem12c/undotbs01.dbf 75 YES USERS /dborafiles/oem12c/users01.dbf 5 YES
The following database parameter changes need to be done before using the database as a repository:
SQL> alter database datafile '/dborafiles/oem12c/undotbs01.dbf' resize 512M;
Database altered.
SQL> alter system set shared_pool_size=600m scope=spfile;
System altered.
SQL> alter system set processes=300 scope=spfile;
System altered.
SQL> alter system set job_queue_processes=20 scope=spfile;
System altered.
SQL> alter system set session_cached_cursors=200 scope=spfile;
System altered.
SQL> shutdown immediate;
Database closed.
Database dismounted.
ORACLE instance shut down.
SQL> startup
ORACLE instance started.
Total System Global Area 2137886720 bytes
Fixed Size                  2215064 bytes
Variable Size             671089512 bytes
Database Buffers         1459617792 bytes
Redo Buffers                4964352 bytes
Database mounted.
Database opened.
SQL> create pfile from spfile;
File created.
Although we explicitly specified not to configure the database with Enterprise Manager, this doesn't prevent the installation of a small part of some
sysmanobject in the database. We have to remove these objects from the database before we can use it as an OEM repository database:Unlock sysman user and reset password. SQL> select USERNAME, ACCOUNT_STATUS from dba_users where username like 'SYSMAN%'; SYSMAN EXPIRED & LOCKED SQL> alter user SYSMAN account unlock; SQL> alter user SYSMAN identified by xxxxxx; $ emca -deconfig dbcontrol db -repos drop STARTED EMCA at Apr 9, 2012 3:03:14 PM EM Configuration Assistant, Version 11.2.0.0.2 Production Copyright (c) 2003, 2005, Oracle. All rights reserved. Enter the following information: Database SID: oem12c Listener port number: 1521 Password for SYS user: Password for SYSMAN user: ---------------------------------------------------------------------- WARNING : While repository is dropped the database will be put in quiesce mode. ---------------------------------------------------------------------- Do you wish to continue? [yes(Y)/no(N)]: y Apr 9, 2012 3:04:23 PM oracle.sysman.emcp.EMConfig perform INFO: This operation is being logged at /dboracle/cfgtoollogs/emca/oem12c/emca_2012_04_09_15_03_14.log. Apr 9, 2012 3:04:24 PM oracle.sysman.emcp.EMDBPreConfig performDeconfiguration WARNING: EM is not configured for this database. No EM-specific actions can be performed. Some of the possible reasons may be: 1) EM is configured with different hostname then physical host. Set environment variable ORACLE_HOSTNAME=<hostname> and re-run EMCA script 2) ORACLE_HOSTNAME is set. Unset it and re-run EMCA script Apr 9, 2012 3:04:24 PM oracle.sysman.emcp.EMReposConfig invoke INFO: Dropping the EM repository (this may take a while) ... Apr 9, 2012 3:05:53 PM oracle.sysman.emcp.EMReposConfig invoke INFO: Repository successfully dropped Enterprise Manager configuration completed successfully FINISHED EMCA at Apr 9, 2012 3:05:53 PM
Update the
/etc/oratabfile by using the following command:oem12c:/dboracle/product/11.2.0/dbhome_1:Y