In this chapter, we will cover the following recipes:
Creating a Win32 Ogre application
Creating an MFC Ogre application
Creating an MFC Ogre application with a ribbon
Creating a Windows Forms Ogre application
Creating an Ogre plugin
Creating a custom resource manager
In this chapter, we'll show you how to create an Ogre 3D Windows application in Visual Studio 2010 using the Win32 API, the Microsoft Foundation Classes (MFC), and the .NET framework. We'll show you how to configure your project settings to support Ogre, and how to integrate Ogre into each type of application. We'll also create a custom Ogre plugin and a custom resource manager.
Before we get started, please note the folder structure that we'll be using. This will help you quickly find the files referred to in each recipe.
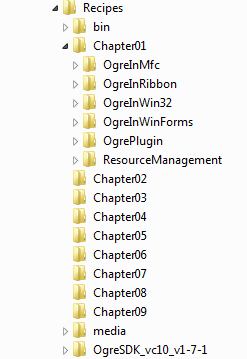
Executables for every sample project will be output in the bin/debug or bin/release folders depending on the project's build configuration. These folders also contain the following required DLLs and configuration files:
|
File name |
Description |
|---|---|
|
|
Main Ogre DLL. |
|
|
DirectX 9 Ogre render system DLL. This is necessary only if you want Ogre to use the DirectX 9 graphics library. |
|
|
OpenGL Ogre render system DLL. This is necessary only if you want Ogre to use the OpenGL graphics library. |
|
|
Octree scene manager Ogre plugin DLL. |
|
|
Particle effects Ogre plugin DLL. |
|
|
Ogre main configuration file that includes render system settings. |
|
|
Ogre resource configuration file that contains paths to all resource locations. Resources include graphics files, shaders, material files, mesh files, and so on. |
|
|
Ogre plugin configuration file that contains a list of all the plugins we want Ogre to use. Typical plugins include the |
In the bin/debug folder, you'll notice that the debug versions of the Ogre plugin DLLs all have a _d appended to the filename. For example, the debug version of OgreMain.dll is OgreMain_d.dll. This is the standard method for naming debug versions of Ogre DLLs.
The media folder contains all the Ogre resource files, and the OgreSDK_vc10_v1-7-1 folder contains the Ogre header and library files.
The Win32 application is the leanest and meanest of windowed applications, which makes it a good candidate for graphics. In this recipe, we will create a simple Win32 application that displays a 3D robot model that comes with Ogre, in a window. Because these steps are identical for all Win32 Ogre applications, you can use the completed project as a starting point for new Win32 applications.
To follow along with this recipe, open the solution located in the Recipes/Chapter01/OgreInWin32 folder in the code bundle available on the Packt website.
We'll start off by creating a new Win32 application using the Visual C++ Win32 application wizard.
1. Create a new project by clicking on File | New | Project. In the New Project dialog-box, expand Visual C++, and click on Win32 Project. Name the project
OgreInWin32. For Location, browse to theRecipesfolder and append\Chapter_01_Examples, then click on OK.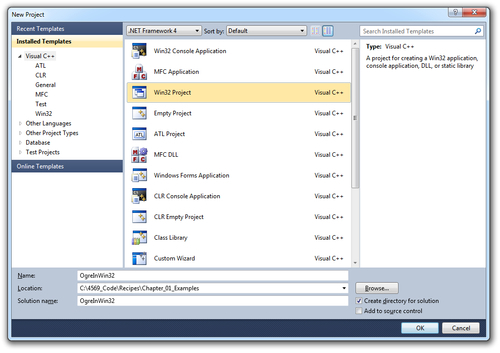
2. In the Win32 Application Wizard that appears, click on Next. For Application type, select Windows application, and then click on Finish to create the project. At this point, we have everything we need for a bare-bones Win32 application without Ogre.
3. Next, we need to adjust our project properties, so that the compiler and linker know where to put our executable and find the Ogre header and library files.
4. Open the Property Pages dialog-box, by selecting the Project menu and clicking on Properties.
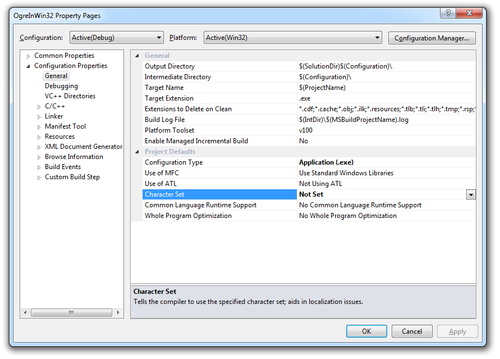
5. Expand Configuration Properties and click on General. Set Character Set to Not Set.
6. Next, click on Debugging. Select the Local Windows Debugger as the Debugger to launch, then specify the Command for starting the application as
..\..\..\bin\debug\$(TargetName)$(TargetExt).
7. Next we'll specify our VC++ Directories, so they match our Cookbook folder structure.

8. Select VC++ Directories to bring up the property page where we'll specify general Include Directories and Library Directories. Click on Include Directories, then click on the down arrow button that appears on the right of the property value, and click on <edit>.
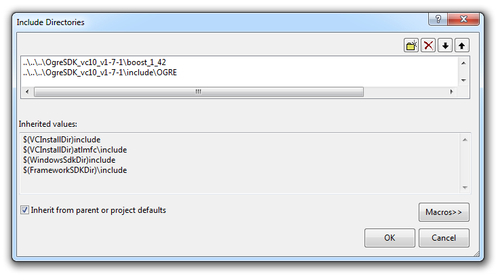
9. In the Include Directories dialog-box that appears, click on the first line of the text area, and enter the relative path to the Boost header files:
..\..\..\OgreSDK_vc10_v1-7-1\boost_1_42.10. Click on the second line, and enter the relative path to the Ogre header files
..\..\..\OgreSDK_vc10_v1-7-1\include\OGRE, and click OK.
11. Edit the Library Directories property in the same way. Add the library directory
..\..\..\OgreSDK_vc10_v1-7-1\boost_1_42\libfor Boost, and..\..\..\OgreSDK_vc10_v1-7-1\lib\debugfor Ogre, then click OK.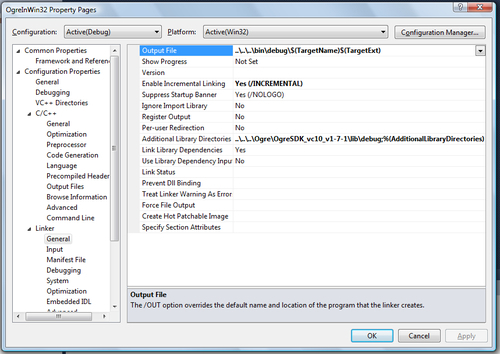
12. Next, expand the Linker section, and select General. Change the Output File property to
..\..\..\bin\debug\$(TargetName)$(TargetExt).13. Then, change the Additional Library Directories property to
..\..\..\Ogre\OgreSDK_vc10_v1-7-1\lib\debug.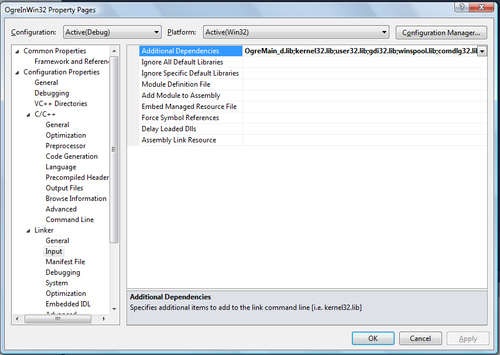
14. Finally, provide the linker with the location of the main Ogre code library. Select the Input properties section, and prepend
OgreMain_d.lib; at the beginning of the line.Note that if we were setting properties for the release configuration, we would use
OgreMain.libinstead ofOgreMain_d.lib.15. Now that the project properties are set, let's add the code necessary to integrate Ogre in our Win32 application.
Copy the
Engine.cppandEngine.hfiles from the Cookbook sample files to your new project folder, and add them to the project. These files contain theCEnginewrapper class that we'll be using to interface with Ogre.16. Open the
OgreInWin32.cppfile, and includeEngine.h, then declare a global instance of theCEngineclass, and a forward declaration of ourInitEngine()function with the other globals at the top of the file.CEngine *m_Engine = NULL; void InitEngine(HWND hWnd);
17. Next, create a utility function to instantiate our
CEngineclass, calledInitEngine().void InitEngine(HWND hWnd){ m_Engine = new CEngine(hWnd); }18. Then, call
InitEngine()from inside theInitInstance()function, just after the window handle has been created successfully, as follows:hWnd = CreateWindow(szWindowClass, szTitle, WS_OVERLAPPEDWINDOW, CW_USEDEFAULT, 0, CW_USEDEFAULT, 0, NULL, NULL, hInstance, NULL); if (!hWnd){ return FALSE; } InitEngine(hWnd);19. Our last task is to render the 3D scene and display it in the window when we receive a
WM_PAINTmessage. Add a call torenderOneFrame()to theWndProc()function, as follows:case WM_PAINT: hdc = BeginPaint(hWnd, &ps); m_Engine->m_Root->renderOneFrame(); EndPaint(hWnd, &ps); break;
And that's it!
Let's look at the CEngine class to see how we create and initialize an instance of the Ogre engine, and add a camera and robot model to the scene.
Open Engine.cpp, and look at the constructor for CEngine. In the constructor, we create an instance of the Ogre engine, and store it in the m_Root class member variable.
m_Root = new Ogre::Root("", "", Ogre::String(ApplicationPath +
Ogre::String("OgreInWin32.log")));
An instance of Ogre::Root must exist before any other Ogre functions are called. The first parameter to the constructor is the plugins configuration filename, which defaults to plugins.cfg, but we pass it an empty string because we are going to load that file manually later. The second parameter is the main configuration filename, which defaults to ogre.cfg, but we pass it an empty string, also because we'll be loading that file manually as well. The third parameter is the name of the log file where Ogre will write the debugging and the hardware information.
Note
Once the Ogre::Root instance has been created, it can be globally accessed by Root::getSingleton(), which returns a reference or Root::getSingletonPtr(), which returns a pointer.
Next, we manually load the configuration file ogre.cfg, which resides in the same directory as our application executable.
OgreConfigFile.load(Ogre::String(ApplicationPath + Ogre::String("ogre.cfg")), "\t:=", false);
The ogre.cfg configuration file contains Ogre 3D engine graphics settings and typically looks as follows:
# Render System indicates which of the render systems # in this configuration file we’ll be using. Render System=Direct3D9 Rendering Subsystem [Direct3D9 Rendering Subsystem] Allow NVPerfHUD=No Anti aliasing=None Floating-point mode=Fastest Full Screen=Yes Rendering Device=NVIDIA GeForce 7600 GS (Microsoft Corporation - WDDM) VSync=No Video Mode=800 x 600 @ 32-bit colour [OpenGL Rendering Subsystem] Colour Depth=32 Display Frequency=60 FSAA=0 Full Screen=Yes RTT Preferred Mode=FBO VSync=No Video Mode=1024 x 768
Once the main configuration file is loaded, we manually load the correct render system plugin and tell Ogre which render system to use.
Ogre::String RenderSystemName;
RenderSystemName = OgreConfigFile.getSetting("Render System");
m_Root->loadPlugin("RenderSystem_Direct3D9_d);
Ogre::RenderSystemList RendersList = m_Root->getAvailableRenderers();
m_Root->setRenderSystem(RendersList[0]);
There's actually a little more code in Engine.cpp for selecting the correct render system plugin to load, but for our render system settings the RenderSystem_Direct3D9_d plugin is all we need.
Next, we load the resources.cfg configuration file.
Ogre::ConfigFile cf;
Ogre::String ResourcePath = ApplicationPath + Ogre::String("resources.cfg");
cf.load(ResourcePath);
The resources.cfg file contains a list of all the paths where Ogre should search for graphic resources.
Then, we go through all the sections and settings in the resource configuration file, and add every location to the Ogre resource manager.
Ogre::ConfigFile::SectionIterator seci = cf.getSectionIterator();
Ogre::String secName, typeName, archName;
while (seci.hasMoreElements()){
secName = seci.peekNextKey();
Ogre::ConfigFile::SettingsMultiMap *settings = seci.getNext();
Ogre::ConfigFile::SettingsMultiMap::iterator i;
for(i = settings->begin(); i != settings->end(); ++i){
typeName = i->first;
archName = i->second;
archName = ApplicationPath + archName;
Ogre::ResourceGroupManager::getSingleton().
addResourceLocation(archName, typeName, secName);
}
}
Now, we are ready to initialize the engine.
m_Root->initialise(false);
We pass in false to the initialize() function, to indicate that we don't want Ogre to create a render window for us. We'll be manually creating a render window later, using the hWnd window handle from our Win32 Application.
Every graphics object in the scene including all meshes, lights, and cameras are managed by the Ogre scene manager. There are several scene managers to choose from, and each specializes in managing certain types of scenes of varying sizes. Some scene managers support rendering vast landscapes, while others are best for enclosed spaces. We'll use the generic scene manager for this recipe, because we don't need any extra features.
m_SceneManager = m_Root->createSceneManager(Ogre::ST_GENERIC, "Win32Ogre");
Remember when we initialized Ogre::Root, and specifically told it not to auto-create a render window? We did that because we create a render window manually using the externalWindowHandle parameter.
Ogre::NameValuePairList params;
params["externalWindowHandle"] =
Ogre::StringConverter::toString((long)hWnd);
params["vsync"] = "true";
RECT rect;
GetClientRect(hWnd, &rect);
Ogre::RenderTarget *RenderWindow = NULL;
try{
m_RenderWindow = m_Root->createRenderWindow("Ogre in Win32", rect.right
- rect.left, rect.bottom - rect.top, false, ¶ms);
}
catch(...){
MessageBox(hWnd, "Failed to create the Ogre::RenderWindow\nCheck that
your graphics card driver is up-to-date", "Initialize Render System",
MB_OK | MB_ICONSTOP);
exit(EXIT_SUCCESS);
}
As you have probably guessed, the createRenderWindow() method creates a new RenderWindow instance. The first parameter is the name of the window. The second and third parameters are the width and height of the window, respectively. The fourth parameter is set to false to indicate that we don't want to run in full-screen mode. The last parameter is our NameValuePair list, in which we provide the external window handle for embedding the Ogre renderer in our application window.
If we want to see anything, we need to create a camera, and add it to our scene. The next bit of code does just that.
m_Camera = m_SceneManager->createCamera("Camera");
m_Camera->setNearClipDistance(0.5);
m_Camera->setFarClipDistance(5000);
m_Camera->setCastShadows(false);
m_Camera->setUseRenderingDistance(true);
m_Camera->setPosition(Ogre::Vector3(200.0, 50.0, 100.0));
Ogre::SceneNode *CameraNode = NULL;
CameraNode = m_SceneManager->getRootSceneNode()->createChildSceneNode("CameraNode");
First, we tell the scene manager to create a camera, and give it the highly controversial name Camera. Next, we set some basic camera properties, such as the near and far clip distances, whether to cast shadows or not, and where to put the camera in the scene. Now that the camera is created and configured, we still have to attach it to a scene node for Ogre to consider it a part of the scene graph, so we create a new child scene node named CameraNode, and attach our camera to that node.
The last bit of the camera-related code involves us telling Ogre that we want the content for our camera to end up in our render window. We do this by defining a viewport that gets its content from the camera, and displays it in the render window.
Ogre::Viewport* Viewport = NULL;
if (0 == m_RenderWindow->getNumViewports()){
Viewport = m_RenderWindow->addViewport(m_Camera);
Viewport->setBackgroundColour(Ogre::ColourValue(0.8f, 1.0f, 0.8f));
}
m_Camera->setAspectRatio(Ogre::Real(rect.right - rect.left) /
Ogre::Real(rect.bottom - rect.top));
The first line of code checks whether we have already created a viewport for our render window or not; if not, it creates one with a greenish background color.
We also set the aspect ratio of the camera to match the aspect ratio of our viewport. Without setting the aspect ratio, we could end up with some really squashed or stretched-looking scenes.
Note
You may wonder why you might want to have multiple viewports for a single render window. Consider a car racing game where you want to display the rear view mirror in the top portion of your render window. One way to accomplish, this would be to define a viewport that draws to the entire render window, and gets its content from a camera facing out the front windshield of the car, and another viewport that draws to a small subsection of the render window and gets its content from a camera facing out the back windshield.
The last lines of code in the CEngine constructor are for loading and creating the 3D robot model that comes with the Ogre SDK.
Ogre::Entity *RobotEntity = m_SceneManager->createEntity("Robot",
"robot.mesh");
Ogre::SceneNode *RobotNode = m_SceneManager->getRootSceneNode()-
>createChildSceneNode();
RobotNode->attachObject(RobotEntity);
Ogre::AxisAlignedBox RobotBox = RobotEntity->getBoundingBox();
Ogre::Vector3 RobotCenter = RobotBox.getCenter();
m_Camera->lookAt(RobotCenter);
We tell the scene manager to create a new entity named Robot, and to load the robot.mesh resource file for this new entity. The robot.mesh file is a model file in the Ogre .mesh format that describes the triangles, textures, and texture mappings for the robot model. We then create a new scene node just like we did for the camera, and attach our robot entity to this new scene node, making our killer robot visible in our scene graph. Finally, we tell the camera to look at the center of our robot's bounding box.
Finally, we tell Ogre to render the scene.
m_Root->renderOneFrame();
We also tell Ogre to render the scene in OgreInWin32.cpp whenever our application receives a WM_PAINT message. The WM_PAINT message is sent when the operating system, or another application, makes a request that our application paints a portion of its window. Let's take a look at the WM_PAINT specific code in the WndProc() function again.
case WM_PAINT:
  hdc = BeginPaint(hWnd, &ps);
  m_Engine->m_Root->renderOneFrame();
  EndPaint(hWnd, &ps);
break;
The BeginPaint() function prepares the window for painting, and the corresponding EndPaint() function denotes the end of painting. In between those two calls is the Ogre function call to renderOneFrame(), which will draw the contents of our viewport in our application window.
During the renderOneFrame() function call, Ogre gathers all the objects, lights, and materials that are to be drawn from the scene manager based on the camera's frustum or visible bounds. It then passes that information to the render system, which executes the 3D library function calls that run on your system's graphics hardware, to do the actual drawing on a render surface. In our case, the 3D library is Direct X and the render surface is the hdc, or Handle to the device context, of our application window.
The result of all our hard work can be seen in the following screenshot:
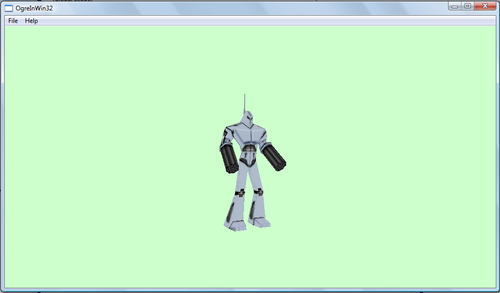
Flee in terror earthling!
If you want to use the release configuration instead of debug, change the Configuration type to Release in the project properties, substitute the word release where you see the word debug in this recipe, and link the OgreMain.lib instead of OgreMain_d.lib in the linker settings.
It is likely that at some point you will want to use a newer version of the Ogre SDK. If you download a newer version and extract it to the Recipes folder, you will need to change the paths in the project settings so that they match the paths for the version of the SDK you downloaded.
In the previous recipe, we showed you how to create a simple Win32 application. By incorporating the Microsoft Foundation Classes (MFC) library into our application, we gain access to a lot of extra functionality and user interface tools. In this recipe, we will show you how to create an Ogre MFC application that displays a 3D robot in a window.
To follow along with this recipe, open the solution located in the Recipes/Chapter01/OgreInMFC folder in the code bundle available on the Packt website.
We'll start by creating a new MFC application using the MFC Application Wizard.
1. Create a new project by clicking File | New | Project. In the New Project dialog-box, expand Visual C++, and click on MFC Application. Name the project
OgreInMFC. For Location, browse to yourRecipesfolder, append\Chapter_01_Examples, and click on OK.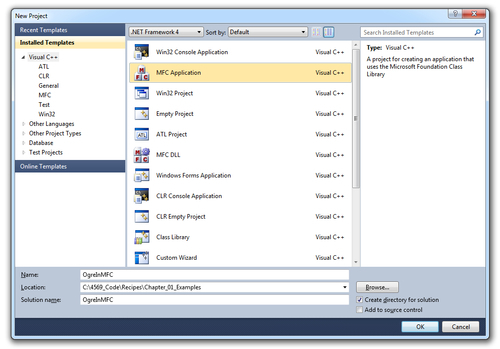
2. In the MFC Application Wizard, click on Next.

For the Application type, select Single document. Unselect Use Unicode libraries, and set Project style to MFC standard. Set the Visual style and colors to Office 2007 (Black Theme), unselect Enable visual style switching, and click on Next.
4. On the Document Template Properties page, change the File extension property to
scene(not necessarily for this recipe, but will be useful later), and click on Next.
5. On the Database Support page, click on Next.
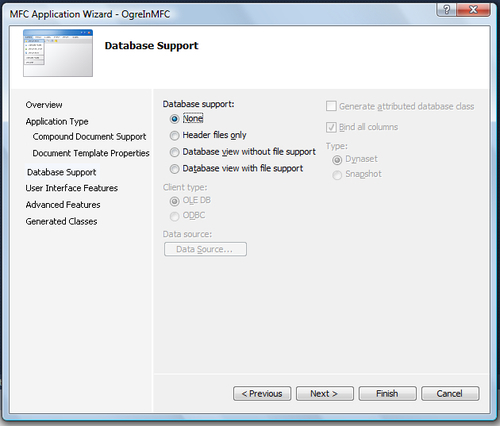
6. On the User Interface Features page, select Maximized so the application will start with its window maximized. Select Use a classic menu, and click on Next.

7. On the Advanced Features page, un-select Printing and print preview, and click on Next.
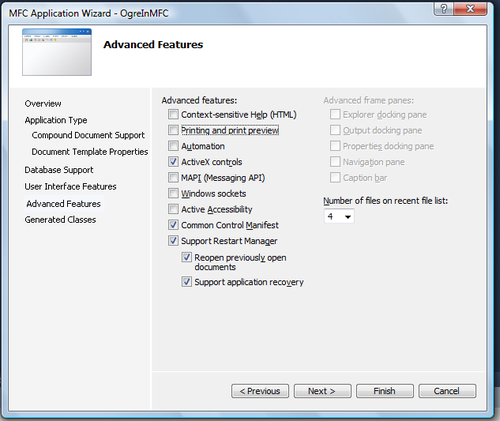
8. On the Generated Classes page, click on Finish to create the project.
9. The next step is to configure the project properties just like we did for our Win32 application, so that the compiler and linker know where to find the Ogre header and library files. Examine the project properties for the sample MFC application, and you will see that the properties are the same as in our Win32 application.
10. Next, copy the
Engine.cppandEngine.hfiles from the Cookbook sample MFC application to our new project folder, and add them to the project.11. Open
OgreInMfc.h, and add a new member variable for ourCEngineinstance, and a declaration of theInitEngine()function that we'll be adding.public: CEngine* m_Engine; void InitEngine(void);
12. Now, in
OgreInMfc.cpp, modify theCOgreInMfcAppconstructor to give our new member variable a default value.COgreInMfcApp::COgreInMfcApp() : m_Engine(NULL)
13. Then, add our familiar
InitEngine()function.void COgreInMfcApp::InitEngine(void){ m_Engine = new CEngine(); }14. Finally, call
InitEngine()at the end ofCOgreInMfcApp::InitInstance().InitEngine();
In our Win32 application, all of our Ogre setup code was done in the
CEngineconstructor. This time, we do not have a window handle inInitInstance(), so we can't set up the render window here. TheCEngineconstructor only creates the Ogre engine instance and initializes it.15. Now, add a function to the
OgreInMfcViewclass inOgreInMfcView.hcalledEngineSetup()that will contain the rest of our Ogre setup code.void EngineSetup(void);
While we're here, let's add a few more member variables that we'll need.
bool m_First;

Ogre::Camera*m_Camera;
Ogre::RenderWindow*m_RenderWindow;
Now open
OgreInMfcView.cpp, and create theEngineSetup()function.void COgreInMfcView::EngineSetup(void) {}16. First, we need to get the
Ogre::Rootinstance from CEngine, and use it to create a scene manager namedMFCOgre.Ogre::Root *Root = ((COgreInMfcApp*)AfxGetApp())->m_Engine- >GetRoot(); Ogre::SceneManager *SceneManager = NULL; SceneManager = Root->createSceneManager(Ogre::ST_GENERIC, "MFCOgre");
We also create a generic scene manager, and name it MFCOgre.
17. Next, we create a render window with our window handle, just as we did in the Ogre Win32 application.
Ogre::NameValuePairList parms;
parms["externalWindowHandle"] =
  Ogre::StringConverter::toString((long)m_hWnd);
parms["vsync"] = "true";

CRect   rect;
GetClientRect(&rect);

Ogre::RenderTarget *RenderWindow = Root->getRenderTarget("Ogre in
  MFC");

if (RenderWindow == NULL){
  try{
    m_RenderWindow = Root->createRenderWindow("Ogre in MFC",
      rect.Width(), rect.Height(), false, &parms);
  }
  catch(...){
    MessageBox("Cannot initialize\nCheck that graphic-card driver
      is up-to-date", "Initialize Render System", MB_OK |
      MB_ICONSTOP);
    exit(EXIT_SUCCESS);
  }
}
18. Then, we instruct the
Ogre::ResourceGroupManagerto initialize all resource groups.// Load resources Ogre::ResourceGroupManager::getSingleton().initialiseAllResourceGroups();
19. Next, we create and initialize our camera. We also add it to a new scene node.
// Create the camera
m_Camera = SceneManager->createCamera("Camera");
m_Camera->setNearClipDistance(0.5);
m_Camera->setFarClipDistance(5000);
m_Camera->setCastShadows(false);
m_Camera->setUseRenderingDistance(true);
m_Camera->setPosition(Ogre::Vector3(200.0, 50.0, 100.0));
Ogre::SceneNode *CameraNode = NULL;
CameraNode = SceneManager->getRootSceneNode()-
>createChildSceneNode("CameraNode");
20. After the camera is set up, we need to create a viewport that will take the contents of the camera's view, and draw it in our render window. We also need to set the camera's aspect ratio to match the aspect ratio of the render window.
Ogre::Viewport* Viewport = NULL;

if (0 == m_RenderWindow->getNumViewports()){
  Viewport = m_RenderWindow->addViewport(m_Camera);
  Viewport->setBackgroundColour(Ogre::ColourValue(0.8f, 1.0f,
    0.8f));
}

m_Camera->setAspectRatio(Ogre::Real(rect.Width()) /
  Ogre::Real(rect.Height()));
The last lines of code in
EngineSetup()create a robot entity that uses therobot.meshresource, and attach it to a new scene node. They also point the camera at the center of the robot's bounding box.Ogre::Entity *RobotEntity = SceneManager->createEntity("Robot", "robot.mesh"); Ogre::SceneNode *RobotNode = SceneManager->getRootSceneNode()- >createChildSceneNode(); RobotNode->attachObject(RobotEntity); Ogre::AxisAlignedBox Box = RobotEntity->getBoundingBox(); Ogre::Vector3 Center = Box.getCenter(); m_Camera->lookAt(Center);21. Next, we need to add a message handler for the
WM_PAINTmessage, and callEngineSetup()the first time the Ogre engine instance is available.22. To add the
WM_PAINTmessage handler, open the Class View and expand OgreInMfc. Then right-click on COgreInMfcView, and selectProperties. In the Properties window, click on the Messages icon, then scroll down till you findWM_PAINT. Click in the box next to WM_PAINT, and click on<add>OnPaint. Inside the resultingOnPaint()function, we add the following code:CEngine *Engine = ((COgreInMfcApp*)AfxGetApp())->m_Engine; if (Engine == NULL) return; Ogre::Root *Root = Engine->GetRoot(); if (m_First && Root != NULL){ m_First = false; EngineSetup(); }23. Once the Ogre engine instance is available, we need to instruct Ogre to render by calling
renderOneFrame(), so add the following code to the end of theOnPaint().if (Root != NULL){ Root->renderOneFrame(); }24. Open
OgreInMfcDoc.cpp, and add a call toUpdateAllViews()inCOgreInMfcDoc::OnNewDocument(), so that our view'sOnPaintmethod is called every time the user clicks on the New document button.BOOL COgreInMfcDoc::OnNewDocument(){ if (!CDocument::OnNewDocument()) return FALSE; UpdateAllViews(NULL); return TRUE; }
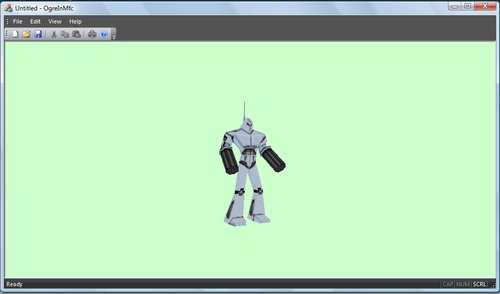
In this recipe, we divide the process of setting up Ogre into two steps. First, we create an instance of the Ogre engine and initialize it in the CEngine constructor, just as we do in the Creating a Win32 Ogre application recipe. The rest of the setup happens in the COgreInMfcView::EngineSetup() function.
When the user runs the program and clicks on the New button, the resulting COgreInMfcDoc::OnNewDocument() function call contains UpdateAllViews(NULL);, which will call our COgreInMfcView::OnPaint() method, and display our 3D scene. The following is a screenshot from our new MFC application:
Adding the ribbon to your MFC application is a great way to organize the user interface when your application has a lot of menus and options. In this recipe, we show how to use the MFC Application Wizard to create an application with a ribbon. We also show you how to add ribbon categories, category panels, and add controls to category panels.
To follow along with this recipe, open the solution located in the Recipes/Chapter01/OgreInRibbon folder in the code bundle available on the Packt website.
Let's start by creating a new MFC application using the MFC Application Wizard. During the wizard process, we'll customize our application to include a ribbon.
1. Create a new project by clicking File | New | Project. In the New Project dialog-box, expand Visual C++ under Installed Templates, select MFC and click on MFC Application, and name the project
OgreInRibbon. For Location, browse to yourRecipesfolder, append\Chapter_01_Examples, and click on OK.2. Click on Next on the Welcome to the MFC Application Wizard page. On the Application Type page, select Single Document under Application type. Unselect Use Unicode libraries. Under Visual style and colors, select Office 2007 (Black theme), and click on Next.
3. On the Compound Document Support page, make sure that None is selected, then click on Next.
4. On the Document Template Properties page, in the File extension box, type scene as the file name extension for documents that this application creates, and click on Next.
5. On the Database Support page, make sure that None is selected, then click Next.
6. On the User Interface Features page, select Use a ribbon. Select Maximized, then click on Next.

7. Remove Printing and print preview, and uncheck all Advanced frame panes checkboxes, then click on Next.
8. On the Generated Classes page, click on Finish to create the MFC application.
9. At this point, configure the project properties, just as we did for the Creating a Win32 Ogre application recipe.
10. Next, create a message handler for the
WM_PAINTmessage and insert ourInitEngine()andEngineSetup()functions, exactly as we did in the Creating an MFC Ogre application recipe.
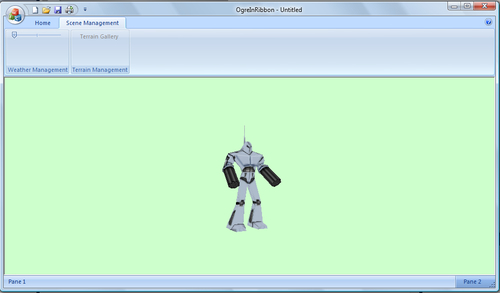
The MFC Application Wizard automatically adds a ribbon to the application window with one ribbon category named Home.
We created the Ogre engine instance, and initialize it just as we did in the Creating a MFC Ogre application recipe.
To add categories and panels to the ribbon, open the ribbon resource in the Resource View, by selecting the View menu, then click on Resource View. Expand OgreInRibbon, and then expand Ribbon. Double-click on IDR_RIBBON to bring up the Ribbon Editor.
Next, add a new category by double-clicking Category in the Toolbox. Right-click the new category, and click on Properties. In the Properties panel, change the Caption to Scene Management. Then, add two panels to this category by double-clicking Panel in the Toolbox. Change the Caption of one panel to Weather Management and the other to Terrain Management.
Now, we can add controls to each panel to manage weather and terrain resources.
The following is a screenshot of our Ogre MFC Application with a customized ribbon:
Windows Forms are a lightweight alternative to MFC, and in this recipe, we'll show you how to create a Windows Forms application that uses Ogre to render a 3D robot model.
To follow along with this recipe, open the solution located in the Recipes/Chapter01/OgreInWinForms folder in the code bundle available on the Packt website.
First, we'll create a new Windows Forms application using the New Project wizard.
1. Create a new project by clicking File | New | Project. In the Project Types pane, expand Visual C++, select CLR, then select Windows Forms Application in the Templates pane. Name the project
OgreInWinForms. For Location, browse to yourRecipesfolder, append\Chapter_01_Examples, and click on OK.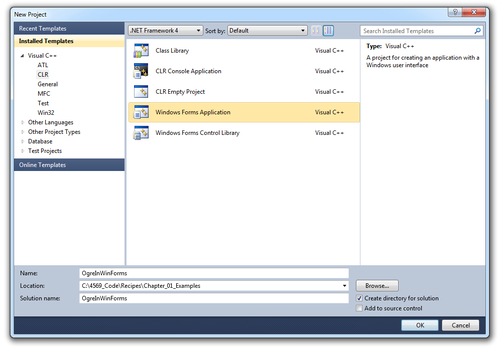
The Windows Forms Designer will appear showing Form1 of the Windows Forms application that we just created.
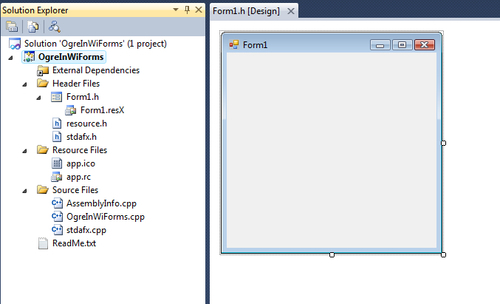
2. Next, in the Solution Explorer pane, right-click
Form1.h, and click View Code.In
Form1.h, add a newCEnginemember instance variable.public: CEngine *m_Engine;
3. In the constructor, create an instance of our
CEngineclass, and pass it our window handle.OgreForm(void) : m_Engine(NULL){ InitializeComponent(); m_Engine = new CEngine((HWND)this->Handle.ToPointer()); }4. Next, we add a
PaintEventHandlerfunction andResize EventHandlerfunction to theInitializeComponent()method, and set the default window state tomaximized.this->WindowState = System::Windows::Forms::FormWindowState::Maximized; this->Paint += gcnew System::Windows::Forms::PaintEventHandler(this, &OgreForm::Ogre_Paint); this->Resize += gcnew System::EventHandler(this, &OgreForm::OgreForm_Resize);
5. Create the functions for the event handlers we just added.
private: System::Void Ogre_Paint(System::Object^  sender,
  System::Windows::Forms::PaintEventArgs^  e) {
  m_Engine->m_Root->renderOneFrame();
}

private: System::Void OgreForm_Resize(System::Object^  sender,
  System::EventArgs^  e) {
  if (m_Engine != NULL) {
    m_Engine->m_Root->renderOneFrame();
  }
}
In the Ogre_Paint() and OgreForm_Resize() methods, we call renderOneFrame(), instructing Ogre to render to our form surface.
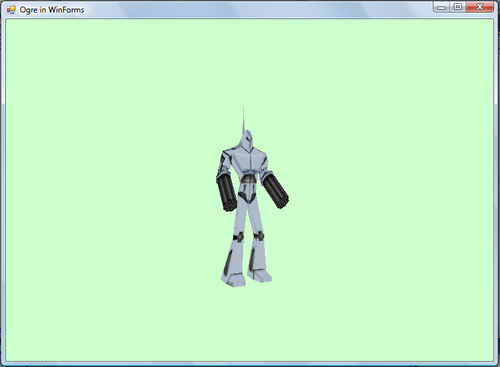
Windows Forms is a smart client technology for the .NET framework, a set of managed libraries that simplify common application tasks. In Windows Forms, a form is a visual surface on which you display information to the user. You ordinarily build Windows Forms applications by adding controls to forms and those controls respond to user actions, such as mouse clicks or key presses. A control is a discrete User Interface (UI) element that displays data or accepts data input. In this basic Windows Forms application, we have Ogre draw the contents of our 3D scene on a form surface.
The following is a screenshot of our Ogre Windows Forms application in action:
It's easy to add controls to our form. In the Toolbox, click on the control you want to add. Then, on the form, click where you want the upper-left corner of the control to be located, and drag to where you want the lower-right corner of the control to be. When you let go, the control will be added to the form.
You can also add a control to the form, programmatically, at runtime.
Ogre supports a plugin system for loading and unloading DLLs that provide additional functionality or override existing functionality. You may have already noticed that Ogre relies on the render system and scene manager plugins to render scenes and manage scene objects. In this recipe, we'll show how to create an Ogre plugin that loads a 3D robot and adds it to the scene when the plugin's initialise() function is called.
To follow along with this recipe, open the solution located in the Recipes/Chapter01/OgrePlugin folder in the code bundle available on the Packt website.
1. First, create an MFC application, and set the properties just like we did for the Creating an MFC Ogre application recipe.
2. Next, let's add a new Win32 DLL project to our solution.
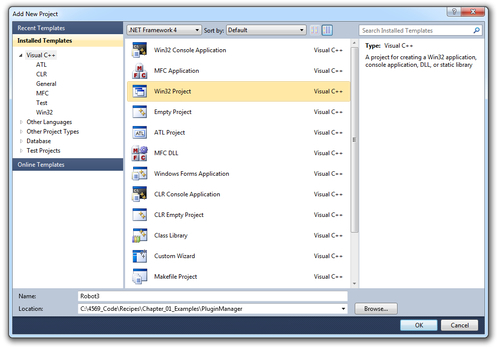
Create a new project by clicking File | New | Project. In the Project Types pane, expand Visual C++ and click Win32 Project. Name the project Robot3, and then click on OK.
3. Click on OK on the Win32 Application Wizard welcome page.
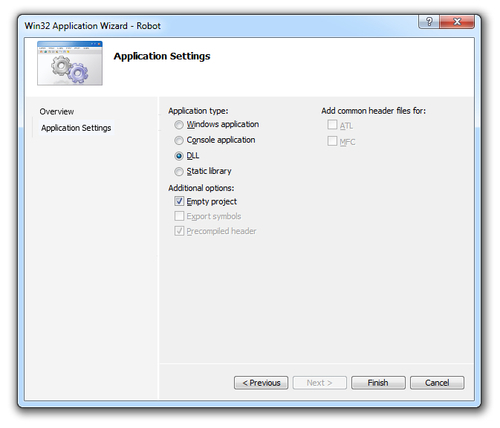
4. On the Application Settings page, set the Application type to DLL, check Empty project in Additional options, and click on Finish.
5. Next, modify the project properties, just like for the Win32 application project, and be sure to set the Linker Output File property, so our DLL ends up in the same folder as our MFC application executable.
6. Next, create an empty header file named
Robot.h, and add it to the Robot project. In the new header file, create a new class calledRobot3Pluginthat derives fromOgre::Plugin.#include "Ogre.h" #include "OgrePlugin.h" class Robot3Plugin : public Ogre::Plugin{ public: Ogre::String m_Name; Robot3Plugin(){ m_Name = "Robot"; } };7. Every subclass of
Ogre::Pluginmust implement thegetName(), install(), initialise(), shutdown(), anduninstall()methods, so add the following code to our newRobot3Pluginclass:const Ogre::String& getName() const { return m_Name; } void install(){} void initialise(){ Ogre::SceneManager *SceneManager = Ogre::Root::getSingleton().getSceneManager("OgrePlugin"); Ogre::Entity *RobotEntity = SceneManager->createEntity("Robot", "robot.mesh"); Ogre::SceneNode *RobotNode = SceneManager->getRootSceneNode()- >createChildSceneNode(); RobotNode->attachObject(RobotEntity); Ogre::AxisAlignedBox Box = RobotEntity->getBoundingBox(); Ogre::Vector3 Center = Box.getCenter(); Ogre::Camera *Camera = SceneManager->getCamera("Camera"); Camera->lookAt(Center); Ogre::Root::getSingleton().renderOneFrame(); } void shutdown(){} void uninstall(){}The
getName()function simply returns the unique name of our plugin. Every other method, except forinitialise(), we leave empty.In the
initialise()method, we load our robot mesh, create the robot entity, and attach it to ascenenode. We also point the camera at the center of the robot's bounding box, and then callrenderOneFrame(), which will result in Ogre drawing the scene to our application window.8. Create an empty file called
Robot3.cpp, and add it to the project.At the top of the
Robot3.cppfile, import the necessary headers and declare a global instance variable of ourRobot3Pluginclass.#include "Robot3.h" #include "Ogre.h" #include "OgrePlugin.h" Robot3Plugin *Robot;
9. Next, define two functions,
dllStartPlugin()anddllStopPlugin().extern "C" __declspec(dllexport) void dllStartPlugin(){ Robot = OGRE_NEW Robot3Plugin(); Ogre::Root::getSingleton().installPlugin(Robot); } extern "C" __declspec(dllexport) void dllStopPlugin(){ Ogre::Root::getSingleton().uninstallPlugin(Robot); OGRE_DELETE Robot; }The
dllStartPlugin()will be called by Ogre when it loads our plugin, anddllStopPlugin()will be called when the plugin is unloaded.10. Now we need to add a menu item, so that we can test loading the
Robotplugin.In the Resource View, expand Plugin Manager, PluginManager.rc, and then Menu. Double-click on the IDR_MAINFRAME resource item to open the menu editor.

11. Add the submenu
Loadto the main menu, expand it, and add a new item namedRobot Mesh.12. Next, we need to add an event handler for when the user selects the new menu item. Right-click on the RobotMesh menu item, and choose Add Event Handler.

13. In the Event Handler Wizard that appears, set the Function handler name to
OnLoadRobot, select CPluginManagerView from the Class List, and then press Add and Edit.Our event handler function looks like this:
void CPluginManagerView::OnLoadRobot(){
  Ogre::Root::getSingleton().loadPlugin("Robot3");
}
When we call
loadPlugin(), Ogre will load ourRobotplugin and calldllStartPlugin(), after which, Ogre will callinitialize(), and our robot will appear in our application window.
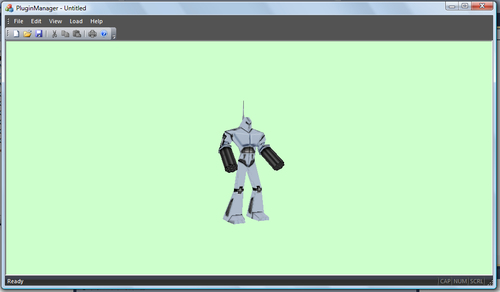
The process of creating an instance of the Ogre engine and initializing it is the same as in previous recipes. The main difference in this recipe is that we moved the loading of our robot mesh and creation of the robot entity into a plugin. Our plugin gets loaded when the user clicks our Load | Robot Mesh menu item.
The following is a screenshot from our sample project, featuring a killer robot after the user clicks the Load | Robot Mesh menu item:
In this recipe, we've chosen to load the robot 3d mesh in our plugin, but a more practical use would be to register an object factory or a scene manager. The Ogre Octree scene manager plugin and RenderSystem_GL plugin are good examples of full-featured Ogre plugins.
In this chapter:
Creating an MFC Ogre application
If you're interested in how to create a specific type of plugin, such as a scene manager, go to http://ogre3d.org, and download the Ogre source code. Within, you will find the source code for the Octree scene manager.
A common task for many graphics applications is loading and saving custom resources. In this recipe, we show you how to create a custom resource manager that loads Ogre 3D models from STL files.
The STL file format is used by the stereo lithography CAD software created by 3D Systems. This file format is supported by many other software packages, and is widely used for rapid prototyping and computer-aided manufacturing. STL files describe only the surface geometry of a three-dimensional object, without any representation of color, texture, or other common CAD model attributes. It contains the raw unstructured triangulated surface information as a series of unit normals and vertices, ordered by the right-hand rule.
To follow along with this recipe, open the solution located in the Recipes/Chapter01/ResourceManagement folder in the code bundle available on the Packt website.
1. First, create a new Ogre MFC application named
ResourceManager, by following the Creating an MFC Ogre application recipe.2. Next, we need the following three new classes.
StlFile:It's derived fromOgre::Resource, and will represent our custom resource.StlFileManager:It's derived fromOgre::ResourceManagerandOgre::Singleton<StlFileManger>. This is our custom resource manager forSTLFileresources.StlFileSerializer:It's derived fromOgre::Serializer, and is responsible for loading STL files, parsing them and creating meshes from the data.
3. Copy the
StlFile, StlFileManager, StlFileSerialzerheaders, and.cppfiles into your projects folder, and add them to the project.Any resource type we create that we want to add to an
Ogre::ResourceManagermust derive from theOgre::Resourceclass. It must implement theloadImpl()andunloadImpl()functions, which will be called when a resource manager attempts to load or unload the resource. TheStlFileSerializerdoes all the heavy lifting in terms of parsing the file data and creating Ogre 3D models. OurStlFileManagersimply keeps track of existingStlFileresources, and provides an interface for creating entities fromStlFileresources.4. Let's create an instance of our new resource manager, and register it with Ogre.
Add a new
StlFileManagermember variable inEngine.hcalledm_StlFileManager, and includeStlFileManager.h, then openEngine.cppand add the following code just after we createm_Root:m_StlFileManager = OGRE_NEW StlFileManager();
5. Next add the following code just before we call
m_Root->initialize():Ogre::ResourceGroupManager::getSingleton(). createResourceGroup("StlFile", true); Ogre::ResourceGroupManager::getSingleton(). initialiseResourceGroup("StlFile"); Ogre::ResourceGroupManager::getSingleton(). addResourceLocation(Ogre::String(ApplicationPath) + Ogre::String("..\\..\\media\\stl\\Tubes\\hoses\\curvature"), "FileSystem","StlFile");Here, we add a new resource group for our
StlFileresources, and add aFileSystemresource location whereOgrecan findStlFiles.6. Next, we modify our MFC view's
EngineSetup()function, and add code at the end, to create a new entity using theStlFileManager.Ogre::Entity *MobiusEntity = Engine->m_StlFileManager- >createEntity("Mobius", "1_4.stl"); Ogre::SceneNode *MobiusNode = SceneManager->getRootSceneNode()- >createChildSceneNode(); MobiusNode->attachObject(MobiusEntity); Ogre::AxisAlignedBox MobiusBox = MobiusEntity->getBoundingBox(); Ogre::Vector3 MobiusCenter = MobiusBox.getCenter(); m_Camera->lookAt(MobiusCenter); m_Camera->setPosition(300, 100, 200);
We create the entity and attach it to the scene, just as we did for the robot model in previous recipes. In this recipe, we call m_Camera->setPosition(), to move the camera further away, because the Mobius model is larger than the robot model.
Let's look at the StlFile resource class first.
class StlFile : public Ogre::Resource{
protected:
  void loadImpl();
  void unloadImpl();
  size_t calculateSize() const;
  Ogre::MeshPtr mMesh;

public:
  StlFile(Ogre::ResourceManager *creator,
    const Ogre::String &name,
    Ogre::ResourceHandle handle,
    const Ogre::String &group,
    bool isManual = false,
    Ogre::ManualResourceLoader *loader = 0
  );

  virtual ~StlFile();

  void setMesh(Ogre::MeshPtr mesh);
  Ogre::MeshPtr getMesh() const;
};
Any resource type we create that we want to add to an Ogre::ResourceManager must derive from the Ogre::Resource class. We must also implement the loadImpl() and unloadImpl() functions, which will be called when our resource manager attempts to load or unload our custom resource. Our resource is bare-bones, it only has a shared pointer to a mesh.
The loadImpl() for our StlFile resource looks like the following:
The loadImpl() for our StlFile resource looks like the following:
void StlFile::loadImpl() {
  if(Ogre::MeshManager::getSingleton().resourceExists(this->mName)) {
    setMesh(Ogre::MeshManager::getSingleton().getByName(this->mName));
  }
  else {
    StlFileSerializer serializer;
    Ogre::DataStreamPtr stream =
      Ogre::ResourceGroupManager::getSingleton().openResource(mName,
      mGroup, true, this);
    serializer.importStlFile(stream, this);
  }
}
In our loadImpl() function, we check to see if our mesh has already been loaded, and if not, we load one using our StlFileSerializer. The StlFileSerializer class has one key function called importStlFile(), which is where we parse the STL file and create a mesh object.
The STL file format is an ASCII file format that begins with the line:
solid name
The file then contains series of triangles, each represented as follows:
facet normal ni nj nk
  outer loop
    vertex v1x v1y v1z
    vertex v2x v2y v2z
    vertex v3x v3y v3z'
  endloop
endfacet
The file concludes with:
endsolid name
Here's how we parse the file:
void StlFileSerializer::importStlFile(Ogre::DataStreamPtr &stream,
  StlFile *pDest) {
  Ogre::SceneManager *sceneManager =
    Ogre::Root::getSingleton().getSceneManagerIterator().begin()->second;

  Ogre::ManualObject* ManualObject = sceneManager-
    >createManualObject(pDest->getName());
  ManualObject->setDynamic(false);
  ManualObject->begin("BaseWhiteNoLighting",
    Ogre::RenderOperation::OT_TRIANGLE_LIST);

  float x,y,z,nx,ny,nz;

  // first line is solid name (skip)
  stream->getLine();

  int TriangleIndex = 0;
  while(!stream->eof()) {
    // facet normal nx ny nz
    int ret = sscanf(stream->getLine().c_str(), "%*s %*s %f %f %f\n",
      &nx, &ny, &nz);
    if (ret!=3) continue;

    // skip outer loop declaration
    stream->getLine();

    for(int i = 0; i < 3; ++i) {
      //vertex x y z
      ret = sscanf(stream->getLine().c_str(), "%*s %f %f %f\n",
        &x, &y, &z);
      if (ret != 3) return;

      ManualObject->position(x, y, z);
      ManualObject->normal(nx, ny, nz);
      ManualObject->colour(Ogre::ColourValue(0.0f, 0.0f, 0.0f, 1.0f));
    }

    ManualObject->triangle(TriangleIndex * 3 + 0, TriangleIndex * 3 + 1,
      TriangleIndex * 3 + 2);
    TriangleIndex++;

    // skip outer loop end
    stream->getLine();

    // skip facet end
    stream->getLine();
  }

  ManualObject->end();

  pDest->setMesh( ManualObject->convertToMesh(pDest->getName()) );
}
In this function, we parse the STL file line-by-line, and feed the data into a ManualObject instance. ManualObject exists to make it easier to create meshes using thr code. Once we are finished parsing the file, we convert the ManualObject to a mesh, and pass it back to our StlFile instance.
Now let's look at the StlFileManager class.
StlFileManager::StlFileManager() {
  mResourceType = "StlFile";

  mLoadOrder = 30.0f;
  Ogre::ResourceGroupManager::getSingleton()._
    registerResourceManager(mResourceType, this);
}
We must register our resource manager with Ogre's resource group manager, so we do that in the constructor. The first parameter we pass to _registerResourceManager(), is the type of resource our manager supports, StlFile resources.
Finally, we have the StlFileManager::createEntity() method.
Ogre::Entity* StlFileManager::createEntity(const Ogre::String
  &entityName, const Ogre::String &meshName){
  // load the resource first
  StlFilePtr stlFile = load(meshName, "StlFile");
  if(stlFile.isNull()) {
    return NULL;
  }

  // get the first available scene manager
  Ogre::SceneManager* sceneManager =
    Ogre::Root::getSingleton().getSceneManagerIterator().begin()->second;
  return sceneManager->createEntity(meshName);
}
All that we're doing here is loading the requested StlFile resource, and then creating an entity using the mesh of the StlFile.
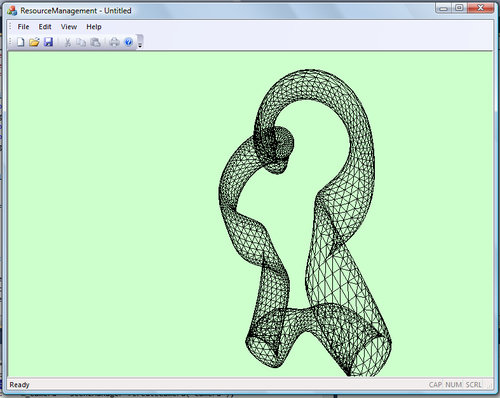
The following is a screenshot from the sample application, which has the camera mode set to wireframe, to better display the unusual shape of the Mobius.
