


When learning a new technology such as Ext JS it's complicated to find good material. We have to go from the library documentation to blogs and forums looking for answers, trying to figure out how the library and all the components work together. Even though there are tutorials in the official learning center, it would be great to have a guide to learn the library from the basics to a more advanced level; this is the main goal for this book.
Ext JS is a state of the art framework to create Rich Internet Applications (RIAs). The framework allows us to create cross-browser applications with a powerful set of components and widgets. The idea behind the framework is to create user-friendly applications in rapid development cycles.
This book will walk you through the very beginning, explaining to you why there are so many files when you download the library for the first time, and showing you the meaning of all the files and folders. We will learn when and how to use the library in every stage of the process of creating our first application and how we can make the components work together. We will also learn about architecture and how to use the Model-View-Controller (MVC) pattern in order to write maintainable and scalable code.
We will define layers to delegate specific responsibilities to each of them in order to have reusable code. Finally, we will learn how to prepare our code to deploy our application in a production environment, we will compress and obfuscate our code to be delivered faster.
Ext JS is not just a library of widgets anymore; the brand new version is a framework full of new exciting features for us to play with. Some of these features are the new class system, the loader, the new application package, which defines a standard way to code our applications and many more awesome stuff.
The company behind the Ext JS library is SenchaInc., they are working on great products that are based on web standards.
In this chapter, we will cover the basic concepts of this new framework. We'll learn how to import the library, the available tools to write our code, and we'll define the application that we'll build through the chapters of this book:
Should I use Ext for my next project?
Getting started with Ext JS
Our first program
Editors
Building an application
Ext JS is a great library to create RIAs that require a lot of interactivity with the user. If you need complex components to manage your information then Ext is your best option because it contains a lot of widgets such as the grid, forms, trees, panels, and a great data package and class system.
Ext JS is best suied for enterprise or intranet applications; it's a great tool to develop an entire CRM or ERP software. One of the more appealing examples is the Desktop sample (http://dev.sencha.com/deploy/ext-4.1.0-gpl/examples/desktop/desktop.html), it really looks and feels like a native application running in the browser; in some cases this is an advantage because the users already know how to interact with the components and we can improve the user experience.
Ext JS 4 came out with a great tool to create themes and templates in a very simple way. The framework for creating the themes is built on top of Compass and Sass, so we can modify some variables and properties and in a few minutes we can have a custom template for our Ext JS applications. If we want something more complex or unique we can modify the original template to suit our needs. This might be more time consuming depending on our experience with Compass and Sass.
Compass and Sass are extensions for CSS. We can use expressions, conditions, variables, mixins, and many more awesome things to generate well formatted CSS. We can learn more about Compass on their own website at http://compass-style.org/.
The new class system allows us to define classes incredibly easily. We can develop our application using the object-oriented programming paradigm and take advantage of the single and multiple inheritance. This is a great advantage because we can implement any of the available patterns such as the MVC, Observable, or any other. This will improve our code.
Another thing to keep in mind is the growing community around the library, there are lot of people around the world that are working with Ext JS right now. You can even join the meeting groups that have local reunions frequently to share knowledge and experiences, I recommend you to look for a group in your city or create one.
The new loader system is a great way to load our modules or classes on demand. We can load only the modules and applications that the user needs just in time. This functionality allows us to bootstrap our application faster by loading only the minimal code for our application to work.
One more thing to keep in mind, is the ability to prepare our code for deployment. We can compress and obfuscate our code for a production environment using the Sencha Command, a tool that we can run on our terminal to automatically analyze all the dependencies of our code and create packages.
Documentation is very important and Ext JS has a great documentation, very descriptive with a lot of examples, and code so that we can see it in action right on the documentation pages, we can also read the comments from the community or even help by commenting and extending the API content.
We should know that Ext JS has a dual license option for us. If we want to develop an open source project, we need to use the GPLv3 license for our own project, this way we don't need to pay a license for Ext. But, if we want to develop a commercial project and we don't want to share our code with the world, we have to buy a license for Ext JS on Sencha's ebsite at http://www.sencha.com.
Enough talking, let's start our journey! The first thing we should do is download the framework from the official website, http://www.sencha.com/products/extjs/. The version available at the time of writing this book is 4.1.1.
There are two types of licenses. The commercial license that you need to buy if you are planning to develop a closed source project, usually used for corporations, banks, or enterprises. The other available license is the GPLv3 for open source projects.Choose the license that meets your needs.
When you download and extract the library for the first time, probably you will get overwhelmed by the size of the zip and by the number of files and folders, but don't worry, the purpose of each file and the content of each folder will be explained shortly.
We can also use the available Content Delivery Network (CDN) so we don't need to store the library in our own computer or server:
The CSS file: http://cdn.sencha.io/ext-4.1.0-gpl/resources/css/ext-all.css
The JavaScript file: http://cdn.sencha.io/ext-4.1.0-gpl/ext-all.js
Before we start writing code we need to learn and understand a few concepts first. Ext JS is divided in three layers, as shown in the following screenshot. The purpose of these layers is to share code with Sencha Touch, a framework to create mobile web applications:
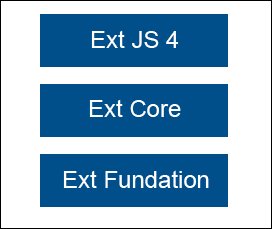
In the Ext Foundation layer the Ext object is created, as well as some useful utilities and the class system that allows us to extend classes, override methods and properties, add mixins and configurations to classes, and many more things.
The Ext Core layer contains the classes that manage the Document Object Model(DOM), setting and firing events, support for Ajax requests, and classes to search the DOM using CSS selectors.
Finally the Ext JS 4 layer contains all the components, widgets, and many more features that we're going to be learning in this book.
This is a natural question when you look at the downloaded files and folders for the first time, every file and folder is there for a purpose and now you're going to learn it:
The
buildfolder contains the descriptor files to create a custom version of the Ext JS library. In here, we can find the JSB3 files that describe the files and packages to build the library from the source code. These JSB3 files will be used by the JavaScript Builder utility that we will learn to use later in this book.The
buildsfolder contains the minified version of the library; we find the foundation, the core, and the Ext JS sandboxed version of the library. The sandboxed version allows us to run Ext 4 and any older version of the Ext library on the same page.The
docsfolder contains documentation of the API. Just open theindex.htmlfile and you're going to see the packages and classes with all the configuration, properties, methods and events available, guides and tutorials, links to watch videos online, and examples.The
examplesfolder contains a lot of examples of the components, layouts, and small applications that are built to show what we can do with the library. Open theindex.htmlfile and explore the samples and demos by yourself. It's important to say that some of them need to run on a web server, especially those that use Ajax.The
localefolder has the translations of 45 languages. By default the components are displayed in English, but you can translate them to any other language.The
jsbuilderfolder contains the tool to build and compress our source code; the tool is written in Java and uses the YUI Compressor to improve file minification. The minification process allows us to create packages with all the classes and files that are needed in our application, this is an important step before deploying our application in production.The
srcfolder contains all the classes of the framework. Each class is in its own file so we can read it easily, and every folder corresponds to the namespace assigned to the class. For example, the classExt.grid.Panelis in a file calledPanel.jsthat is in a folder calledgrid(src/grid/Panel.js).The
resourcesfolder is where the styles and images are located; also we can find the Sass files to create our custom theme in here. Sass is an extension of CSS3 to improve the language; we can use variables, mixins, conditionals, expressions, and more with Sass.The
welcomefolder contains the styles and images that are shown when we open theindex.htmlfile in therootfolder.If you look at the
rootfolder you can also see other JavaScript files. Basically, they are the compressed, debug, and development versions of the library.The
ext-all.jsfile is the complete library with all the components, utilities, and classes. This file is minified so we can use it for a production environment.The
ext-all-debug.jsfile is the same as theext-all.jsfile, but it is not minified so we can use this file to debug our application.The
ext-all-dev.jsfile is similar to theext-all-debug.jsfile but contains additional code to show more specific errors and warnings at development time; we should use this file when developing our application.The
ext.jsfile is the core and foundation layer for Ext JS. If we use this file, we're not loading the whole library; this file contains only the class system, the loader, and a few other classes. We can use theExt.Loaderclass to load just the required classes and not the entire framework; we should use this file only in developent environments.The
ext-debug.jsandext-dev.jsfiles follow the same concept as mentioned with theext-allfiles. Theext-debug.jsfile is an exact version of theext.jsfile but is not minified. Theext-dev.jsfile contains extra code to log more specific errors in a development environment.
Now that we have a basic understanding of the downloaded files and folders we can go to the next step and get our hands on some code.
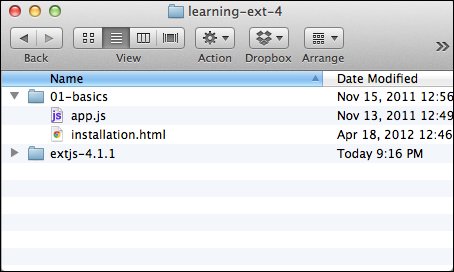
We need to setup our workspace to write all the examples of this book. Let's create a folder named learning-ext-4. For now we don't need a web server to host our examples, but in the following chapters we are going to use Ajax; therefore, it's a good idea to use our favorite web server to host our code from these first examples.
In our new folder we are going to create folders that contain the examples for each chapter in this book. At this point we have a folder called 01-basics
thatcorresponds to this chapter and other called extjs-4.1.1 that contains the Ext JS framework. Both folders are located at the same level.
Inside the 01-basics folder we're going to create a file called installation.html
, where we need to import the Ext library and create a JavaScript file called
app.js that will contain our JavaScript code:
Let's open the installation.html file in our favorite editor and type the following code:
<!DOCTYPE html>
<html>
<head>
<meta http-equiv="Content-Type" content="text/html; charset=utf-8">
<title>First program</title>

<!-- Importing the stylesheet for the widgets -->
<linkrel="stylesheet" type="text/css" href="../extjs-4.1.1/resources/css/ext-all.css">
<!-- Importing the Ext JS library -->
<script type="text/javascript" src="../extjs-4.1.1/ext-all-dev.js"></script>

<!--  Importing our application -->
<script type="text/javascript" src="app.js"></script>

</head>
<body>
</body>
</html>
Tip
Downloading the example code
You can download the example code files for all Packt books you have purchased from your account at http://www.packtpub.com. If you purchased this book elsewhere, you can visit http://www.packtpub.com/support and register to have the files e-mailed directly to you.
The previous code shows how to import the library for a development environment.First we import the stylesheet that is located at extjs-4.1.1/resources/css/ext-all.css, the second step is to import the whole library from extjs-4.1.1/ext-all-dev.js. Now we're ready to write our code in the app.js file.
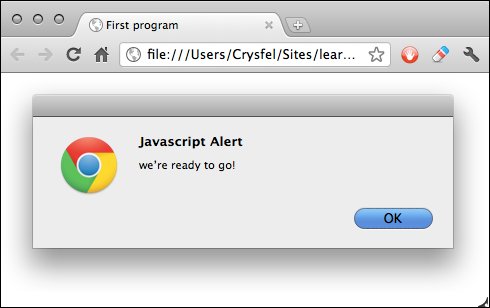
Before we can start creating widgets we need to wait until the DOM is ready to be used. Ext JS provides a function called Ext.onReady
, which executes a callback automatically when all nodes in the tree can be accessed. Let's write the following code in our app.js file:
Ext.onReady(function(){
alert("We're ready to go!");
});
One of the advantages of using Ext JS is that the library only uses one single object in the global scope called Ext to allocate all the classes and objects within the framework.
If you open the HTML file in your favorite browser you will see something like the following screenshot:
Tip
Feel free to use your favorite browser to work through the examples in this book. I recommend you to use Google Chrome because it has more advanced developer tools and it's a fast browser. If you are a Firefox fan, you can download the Firebug plugin, it's a powerful tool that we can use for debugging on Firefox.
If for some reason we can't see the alert message in our browser, it's because we haven't defined the correct path to the ext-all-dev.js file. If we look at the JavaScript console, we'll probably see the following error:
Uncaught ReferenceError: Ext is not defined
That means that the ext-all-dev.js file is not imported correctly. We need to make sure everything is correct with the path and refresh the browser again.
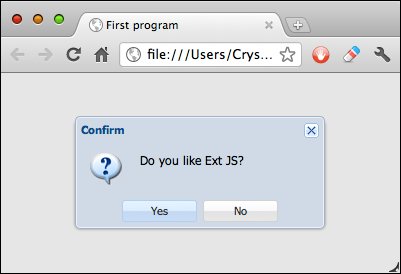
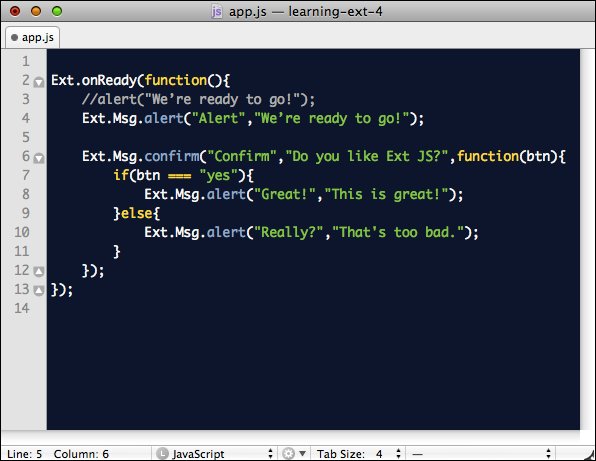
Now that we know how to execute code when the DOM is ready,let's send an alert message from the Ext library. Using the Ext.Msg object we can create different types of messages such as an alert, confirmation, prompt, progress bar, or even a custom message:
Ext.onReady(function(){
//alert("We're ready to go!");
Ext.Msg.alert("Alert","We're ready to go!");
});
Tip
If you're not getting any errors in the JavaScript console, but still you can't see the message on the screen, as seen in the preceding screenshot, make sure you have inserted the stylesheet correctly.
In this case we're using the alert method of the Ext.Msg object. The first parameter is the title of the message and the second parameter is the content of the message.That was easy, right? Now let's create a confirmation dialog box:
Ext.onReady(function(){
//alert("We're ready to go!");
Ext.Msg.alert("Alert","We're ready to go!");
Ex.Msg.confirm("Confirm","Do you like Ext JS?");
});
We use the confirm method to request two possible answers from the user. The first parameter is the title of the dialog box and the second parameter is the question or message we want to show to the user:
Before the confirmation dialog box appeared there was an alert that didn't show up. One important thing to keep in mind is that the messages and alerts from the Ext library don't block the JavaScript loop, unlike the native browser dialog box. This means that if we add another alert or custom message after the confirm method is called, we shall not see the confirmation dialog box anymore.
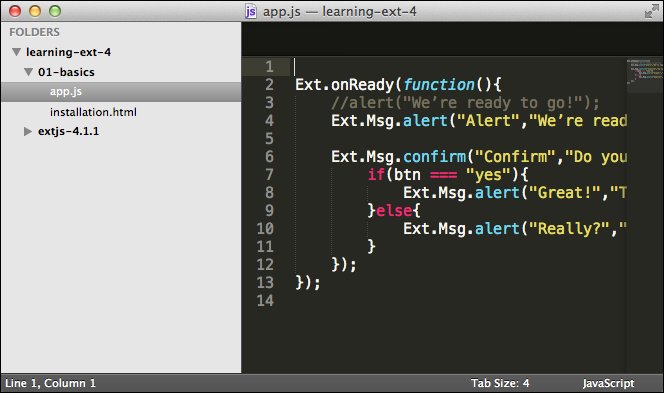
So far we have shown a confirmation dialog box requesting two possible answers to the user, but how can we know the user's response in order to do something according to the answer? There's a third parameter in the confirmation dialog box that is a callback function that will be executed when the user clicks on one of the two answers:
Ext.onReady(function(){
//alert("We're ready to go!");
Ext.Msg.alert("Alert","We're ready to go!");

Ext.Msg.confirm("Confirm","Do you like Ext JS?",
function(btn){
if(btn === "yes"){
Ext.Msg.alert("Great!","This is great!");
}else{
Ext.Msg.alert("Really?","That's too bad.");
}
});
});
The callback function is executed after the user clicks on the Yes or No button or closes the confirmation dialog box. The function receives as a parameter the value of the clicked button which is Yes or No; we can do whatever we want inside of the callback function. In this case we're sending a message depending on the given answer. Let's refresh our browser and test our small program to watch our changes. Confirmations are usually asked when a user wants to delete something, or maybe when he/she wants to trigger a long process, basically anything that has only two options.
Before we move on it's important to use the right tools in order to be more productive when building applications. There are many editors we can use to write our code. Let's review some of them.
The
Sublime Text 2 editor is a very light and fast editor. We can add many plugins to have a powerful development environment. The team behind this software is actively working on new improvements and new features; we have updates almost every day (if we compile the editor from the source code at github). The package manager for plugins works greatly to install new software from third-party developers.
We can use an evaluation version that never expires, but it's really worth buying the license for this great editor.
If we decide to work with this editor, we should use the JavaScript Lint plugin to validate our code every time we save our file (https://github.com/Kronuz/SublimeLinter). Code completion is always welcome, we have a plugin for that too, which is available at https://github.com/Kronuz/SublimeCodeIntel. And, of course, a snippet package for writing common Ext JS 4 code can be foud at https://github.com/rdougan/Sencha.sublime:
The
Eclipse editor is one of the most used editors out there. If you add the web tools plugin into the platform, you can get a JavaScript syntax validation, an Ext JS class autocomplete, HTML and CSS validation. The downside of these tools is that they require a lot of resources from your computer, but if you have enough RAM, this is a good option for writing your code:
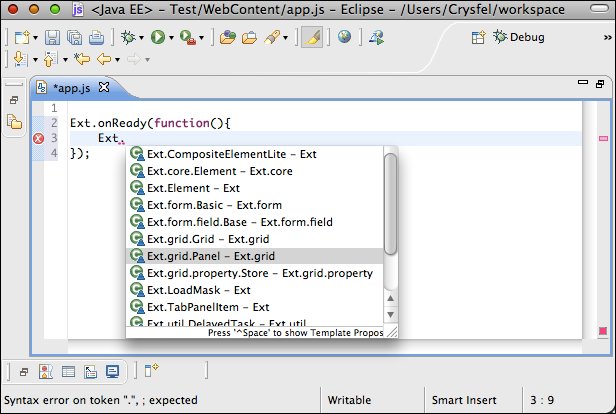
The previous screenshot shows the autocomplete class in action. As you can see when you type Ext you can select a class from the list. If you keep typing, it filters the classes that match your text.
You need to use the Spket plugin for adding the autocomplete functionality for Ext JS or any other JavaScript library. We can find the required steps to setup the Spketplugin at http://www.spket.com/extjs.html.
The Aptana editor is an IDE from Appcelerator. It's based on Eclipse but optimized for web applications. It's an open source project and free of charges.
Among other things, Aptana contains an autocomplete functionality for JavaScript and Ext JS, a JavaScript validator , CSS and HTML validator , a JavaScript debugger , Bundles , and so on:
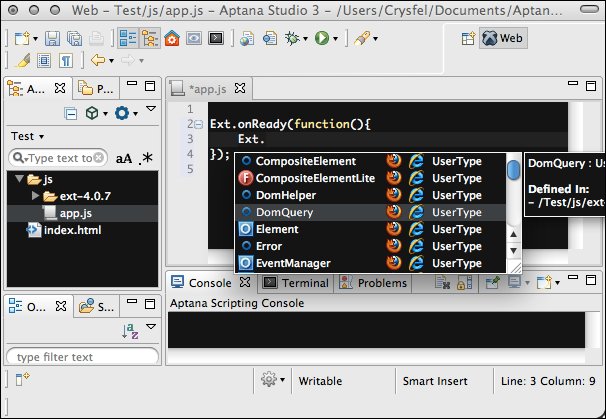
Aptana is a great tool when working with Python, Ruby, or PHP as the backend of our projects. It contains tools to work with those out-of-the-box languages and also contains tools to deploy your application in the cloud using Heroku or Engine Yard.
The Textmate editor is a light and fast editor for Mac OS. It's not free, but it's worth what you pay for. Textmate doesn't have an autocomplete functionality like Aptana or Eclipse, but it contains bundles to automate some repetitive tasks such as creating classes, documenting methods, properties, and things like that. I suggest you download the availabe bundles for Ext JS from https://github.com/edspencer/Sencha.tmbundle or create a custom bundle to automate these tasks:
The Sencha Architect desktop application is a tool that will help you design and develop an application faster than coding it by hand. The idea is to drag-and-drop the components into a canvas and then add the functionality. The Sencha Architect desktop application is a product from Sencha Inc. that aims to help developers to define components with a few clicks. We can create an Ext JS or Sencha Touch project. We can get a free trial from the official website of Sencha, we can also buy the license thee.
To start our application we need to create a project fo Ext 4. The Sencha Architect desktop application will show an empty canvas in the center, the available components and classes on the left-hand side, a project inspector and a configuration panel in the right-hand side:
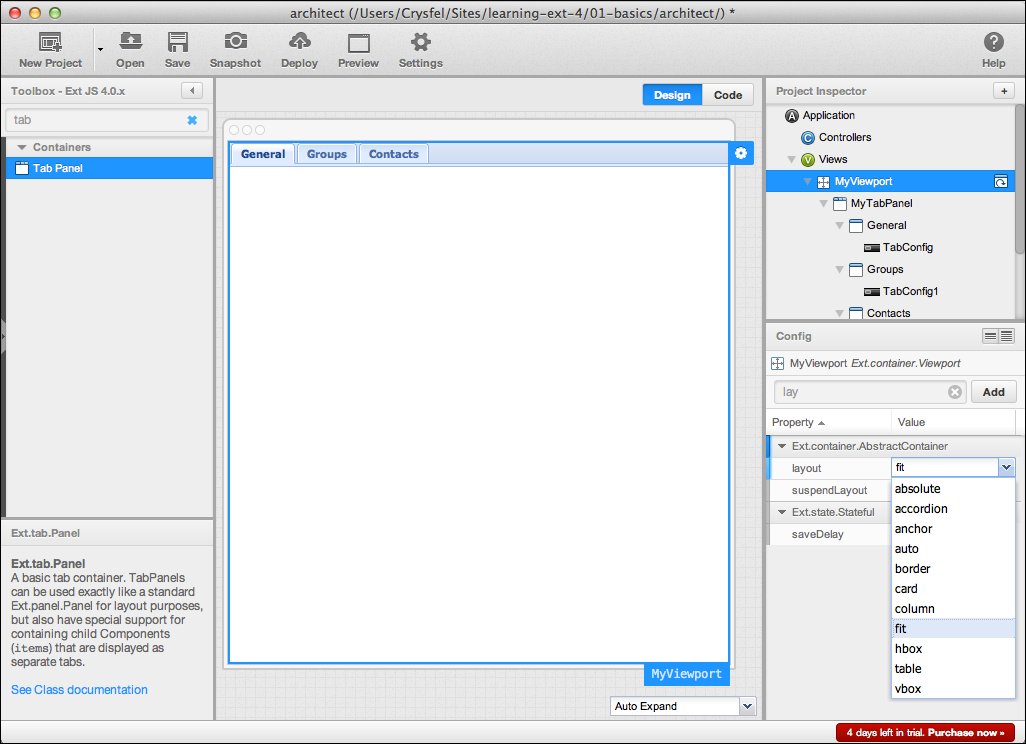
Now let's create a simple application with this tool. First we need to drag a viewport component from the left-hand side panel into the canvas; the width and height are set automatically. The viewport always takes all the available space on our browser.
The next step is to add a Tab Panel section inside the viewport. To do this let's drag the component to the viewport. We can change the title of the tabs by clicking in the text and typing the new title; in this case we're going to set General, Groups, and Contacts for each tab. At this point we haven't set the height of the Tab Panel section; we can set the height in the Property panel at the right-hand side or by dragging the border of the panel. Another option is to set the layout property of the viewport to fit, this will expand the Tab Panel section to fit the viewport. Just select the viewport and in the Property panel, look for the layout property and select fit from the combobox:
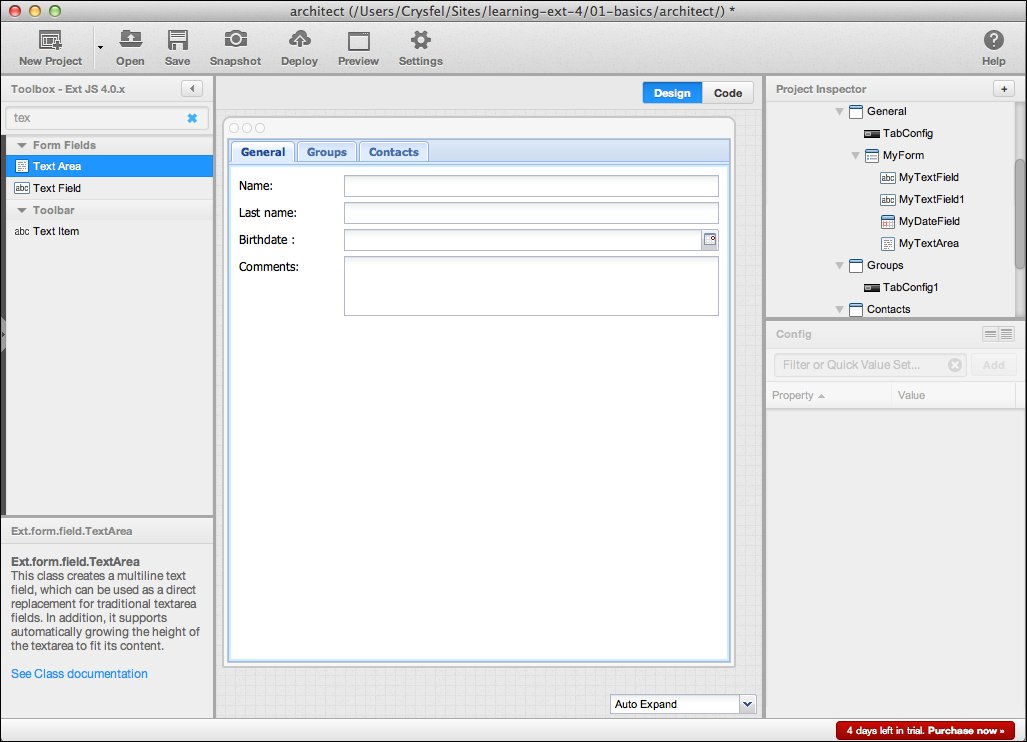
Let's add a form to the General tab by dragging the form panel component to the tabs container. We will see an empty form with the title MyForm. Let's look for the title property in the Property panel at the right-hand side and delete the title. We can also set the border property to zero in order to get rid of the border.
So far we have an empty form in the General tab, let's add some text fields to the form by dragging them to the empty form. For this example let's set the label of these fields to Name and Last name. Now let's add a field date and a text area for the Birthdate and Comments field:
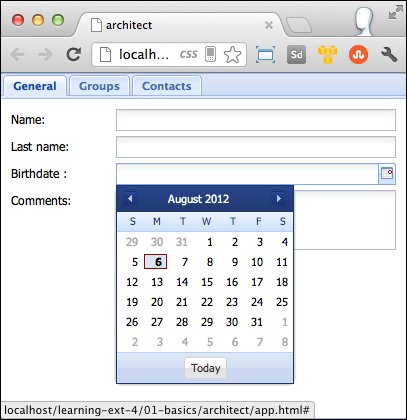
As we can see it's pretty simple and fast to create prototypes or interfaces with this tool. Now that we have our application let's see it in action, we just need to save our project and then click on the Preview button at the top bar. A prompt dialog box will appear asking us for the prefix of our application where our project is located. In here we can use http://localhost/learning-ext-4/01-basics/architect/, if we are using a web server. A new window of our default browser will open with a working example of the components that we have designed; we can play with it and see how it is working:
If we want to see the code that is generated, we need to go to the folder where we save our project. In there we will see all the files and classes that have been created for this small example.
The Sencha Architect desktop application is a great tool to build our interfaces. At the time of writing this book the application allows us to modify the code directly in the Architect, but this is not as easy as using a text editor or IDE.
Throughout the chapters of this book we're not going to use the Sencha Architect desktop application. I believe it's a good idea to understand how to create the components by code and once we know the basics we can use the Sencha Architect desktop application even better. If you are interested in using this tool, you should read the documenttion that is available online on Sencha's official website.
In this book we're going to be building a small invoice application. This will help us learn the most commonly used components in the library and the way they interact with each other. Most of the code and examples presented in this book are used to create the UI for the final application.
There are two approaches when we develop an application with Ext JS. We can use only a few widgets and render them within the HTML page in a specific div element along with other things and load as many pages as the system needs just like any other traditional web application. This is the first approach.
The second approach is to create a single web page application and only load data using Ajax and REST to transfer our data using JSON or XML. There's no need to create multiple views or pages in our project. We only need one and then we will dynamically create the required Ext JS components.
In this book we will go for the second option. We're going to develop a single web page application, loading our data using JSON. We're going to compress and minify our source code using the Sencha tools in order to deploy our application in a production environment.
The downside of this approach is that we lost the browser history. When the user clicks on the back button of the browser he/she will be redirected to the last visited page. Gmail, Twitter, and some other sites that use this approach usually append a hash tag to the URL in order to simulate and keep track of the user history. Ext JS comes with a solution for these issues and we can take advantage of that by implementing the required utilities.
We're going to build an application to handle clients and categories of invoices. The client's module should display a list of clients with the basic information about them. The application should allow the user to see and edit the details of the selected client in the list.
The categories module should allow the user to manage the invoices categories in a tree. The user should create children nodes from any existing category. If the user deleted a category that has invoices, then the category and its invoices should be deleted as well. We will be able to drag-and-drop invoices to any of the categories on the tree. We will allow the user to re-order the categories by dragging them with the mouse.
Before we start coding we should define the requirements about how we are going to do our application using wireframes, so we can have a better idea of the final product.
Tip
A wireframe is just a sketch of how we will create the layout of our modules. I'm using a free tool at mockflow.com, but we can even use a piece of paper and pen.
First we define the main menu using a toolbar at the top of the viewport. This menu wil contain the modules that we need and also it will display the name of the logged user in the right-hand side of the toolbar. The viewport is a component that takesall the available space on the browser, therefore we should have only one viewport in our application:

For the main content we're going to use tabs to display each module. When the user clicks on any option of the main menu a new tab will be opened. The user should be able to close the tab when he/she finishes his/her tasks.
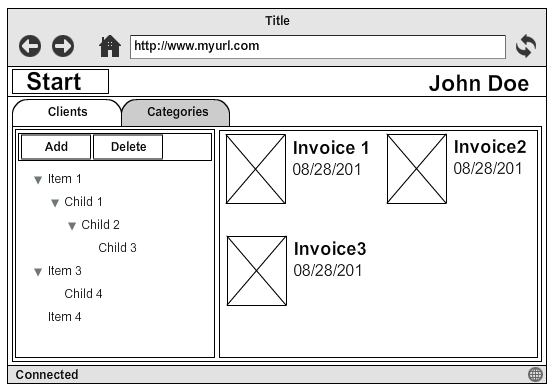
The Clients module, in the left-hand side, will contain a grid with the current clients in the application and in the right-hand side will be the form to create or edit a client.The module should look as the following screenshot:

When the user clicks on one of the clients of the grid, the form will be filled with the information of the selected client to be edited or deleted.
The New button will clear the form so the user can start filling the form with the information of a new client.
The Save button will submit the form data to the server in order to be saved. The server will create a new record or update the existing client in the database based on the sent ID.
The Delete button will remove the client from the database. Before sending the request the application should ask for confirmation. After the server responds with a success message, the form should be cleared and a feedback message should be displayed informing that the client has been deleted successfully. If an error occurs while deleting, an error message should be shown.
The second module manages the categories; we need to show a tree in order to display the categories correctly. Each time the user expands a category the application will make a request to the server asking for the children of the selected caegory:
The Add button will create a new node in the tree panel as a child of the selected category. If there's no selected category then the new category will become a child of the root node.
The Delete button will delete the category and all its children. For this action the application should ask for confirmation from the user.
The user will be able to drag-and-drop any of the invoices on the right-hand side panel to any of the categories on the left-hand side tree. We will also allow the user to re-order the categories on the tree by dragging them on the position they want.
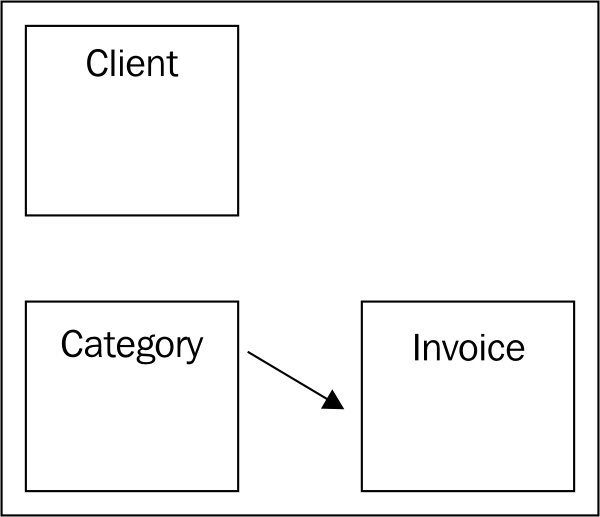
We need to define our models and how they are related to each other. According to the given requirements we need only three models, each of them are described as follows, as well as their fields:
Client: This describes a client entity.
This model contains ID, name, contact, address, and phone fields.
Category: This is used to classify many invoices.
This model contains ID, owner, name, created at fields.
Invoice: This belongs to one category and describes an invoice entity.
This model contains ID, category ID, name, date fields.
The following diagram represents the relationships between the models:
Ext JS 4 came with a great data package. We can define each of the previous models in a class that represents each entity; for now we're just defining and preparing things to start developing our application.
We are going to use Ajax to load and send data. In order to start developing we're going to need a web server. I suggest you use Apache because it's easy to install using some of the all-in-all packages such as XAMP or WAMP. If you are using a Mac OS you already have an installed Apache server, just turn it on by going to the Settings and Sharing configurations.
It's important to note that programming the services that manage the requests on the server side, to save and delete the information in the database, are out of the scope of this book. We're going to focus our attention on Ext JS programming and defining the JSON format to transfer the data. You can use whatever server-side language you want such as PHP, Python, Ruby, and so on to deal with the database.
Once you have your web server up and running create a learning-extjs-4 folder in the public content of your server. Inside that folder we will copy the Ext JS framework with all the files and folders that we have downloaded before. We are going to create a folder for each chapter of this book where we will create our examples. At the end we will have something like in the following screenshot:

In this chapter, we learned important concepts about the Ext JS library, such as the three layers in which the library is divided. We also learned the meaning of the files and folders that the Ext library has, importing the library, and the troubles we may have. We also have reviewed a few editors that will help us to be more productive in doing our job. Feel free to use your favorite editor.
Throughout the course of the book we're going to learn about the components and at the same time we're going to build an application using what we have defined in this chapter. In the next chapter, we're going to learn about how to create object-oriented JavaScript using the amazing class systems that come with the latest version of the Ext JS library; also we'll learn about DOM manipulation and events.