


 Download code from GitHub
In this chapter, we will cover the following recipes:
Installing NHibernate
Configuring NHibernate with hibernate.cfg.xml
Configuring NHibernate with App.config or Web.config
Configuring NHibernate with code
Configuring NHibernate with Fluent NHibernate
Configuring NHibernate logging
Generating the database
Scripting the database
Updating the database
Using NHibernate schema tool
NHibernate is a popular, mature, open source Object-Relational Mapper (ORM) based on Java's Hibernate project. ORMs, such as LINQ to SQL, Entity Framework, and NHibernate, translate between the database's relational model of tables, columns, and keys to the application's object model of classes and properties.
The NHibernate homepage, http://nhibernate.info, contains blog posts, the complete reference documentation, and a bug tracker. Support is available through the very active nhusers Google group at http://groups.google.com/group/nhusers. The NHibernate source code is hosted on GitHub at http://github.com/nhibernate/nhibernate-core. Precompiled binaries of NHibernate releases are also available on SourceForge and through NuGet at http://nuget.org/packages/NHibernate.
NHibernate provides an incredible number of configuration options and settings. The recipes in this chapter demonstrate several methods for configuring NHibernate and generating the necessary database schema.
Before we begin, let's get our Visual Studio solution and database set up. The following information will get you up and started with NHibernate.
Install Microsoft SQL Server 2012 Express (or a newer version) on your PC, using the default settings.
Create a blank database named
NHCookbook.
In Visual Studio, create a new C# class library project named
Eg.Corewith a directory for the solution namedCookbook.Delete the
Class1.csfile.In the Solution Explorer, right click the References node in the
Eg.Coreproject and select Manage NuGet Packages. In the top navigation of the now-opened NuGet Package Manager, make sure Browse is selected. Enter the wordNHibernatein the search box and wait for the results to show up:
Select the NHibernate package in the search results and click Install. This will install NHibernate and all required dependencies.
Add a new class named
TestClass, to theEg.Coreproject:public class TestClass { public virtual int Id { get; set; } public virtual string Name { get; set; } }
Instead of using the graphical package manager, you can use the Package Manager Console. It provides a faster way to install or update NuGet packages. To open the Package Manager Console simply click Tools | NuGet Package Manager | Package Manager Console. In the opened window you can simply write the following:
Install-Package NHibernate -Project Eg.Core
This will produce the same effect as the main recipe.
NHibernate offers several methods for configuration and a number of configuration settings.
In this recipe, we will show you how to configure NHibernate using the hibernate.cfg.xml configuration file, with a minimal number of settings to get your application up and running quickly. The recipe also forms the base for several other recipes in this chapter.
Complete the steps from the Installing NHibernate recipe in this chapter.
Add a console application project to your solution called
ConfigByXml.Set it as the Startup project for your solution.
Install NHibernate to
ConfigByXmlproject using the NuGet Package Manager Console.In
ConfigByXml, add a reference to theEg.Coreproject.
Add an XML file named
hibernate.cfg.xmlwith the following contents:<?xml version="1.0" encoding="utf-8"?> <hibernate-configuration xmlns="urn:nhibernate-configuration-2.2"> <session-factory> <property name="dialect"> NHibernate.Dialect.MsSql2012Dialect, NHibernate </property> <property name="connection.connection_string"> Server=.\SQLEXPRESS; Database=NHCookbook; Trusted_Connection=SSPI </property> <property name="adonet.batch_size"> 100 </property> </session-factory> </hibernate-configuration>On the Solution Explorer tab, right-click on
hibernate.cfg.xmland select Properties.Change Copy to Output Directory property from Do not copy to Copy if newer.
Open
Program.csand addusing NHibernate.Cfg;to the beginning of the fileAdd the following code to the
Mainmethod:var nhConfig = new Configuration().Configure(); var sessionFactory = nhConfig.BuildSessionFactory(); Console.WriteLine("NHibernate Configured!"); Console.ReadKey();Build and run your application. You will see the text NHibernate Configured!
The connection string we've defined points to the NHCookbook database running under the local Microsoft SQL Server.
Next, we define a few properties that tell NHibernate how to behave.
The dialect property specifies a dialect class that NHibernate uses to build SQL syntax specific to a Relational Database Management System (RDBMS). We're using the Microsoft SQL 2012 dialect. Additionally, most dialects set intelligent defaults for other NHibernate properties, such as connection.driver_class.
The connection.connection_string_name property references our connection string by name.
By default, NHibernate will send a single SQL statement and wait for a response from the database. When we set the adonet.batch_size property to 100, NHibernate will group up to 100 SQL INSERT, UPDATE, and DELETE statements in a single ADO.NET command and send the whole batch at once. In effect, the work of 100 round trips to the database is combined in one. Because a roundtrip to the database is, at best, an out-of-process call, and at worst, a trip through the network or even the Internet, this can improve performance significantly. Batching is currently supported when targeting Microsoft SQL Server, Oracle, or MySQL.
We change Copy to Output directory to ensure that our hibernate.cfg.xml file is copied to the build output directory.
By default, NHibernate looks for its configuration in the hibernate.cfg.xml file. However, the Configure method has three extra overloads, which can be used to provide configuration data from other sources, such as:
From a different file:
var cfgFile = "cookbook.cfg.xml";
var nhConfig = new Configuration().Configure(cfgFile);
From a file embedded into an assembly file:
var assembly = GetType().Assembly;
var path = "MyApp.cookbook.cfg.xml";
var nhConfig = new Configuration().Configure(assembly, path);
var doc = GetXmlDocumentWithConfig();
var reader = new XmlNodeReader (doc);
var nhConfig = new Configuration().Configure(reader);
There are several key components to an NHibernate application, as shown in this diagram:
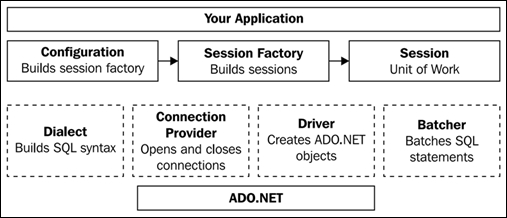
On startup, an NHibernate application builds a Configuration object. In this recipe, we build the configuration from settings in the hibernate.cfg.xml file. The Configuration object is responsible for loading mappings, investigating the object model for additional information, building the mapping metadata, and finally building a session factory. Building the session factory is a rather resource intensive operation, and is normally only done once, when the application starts up.
A session represents a Unit of Work in the application. Martin Fowler defines a Unit of Work as something that "maintains a list of objects affected by a business transaction and coordinates the writing out of changes and the resolution of concurrency problems". An NHibernate session tracks changes to entities and writes those changes back to the database all at once. In NHibernate, this process of waiting to write to the database is called transactional write-behind. In addition, the session is the entry point to much of the NHibernate API. More information about the Unit of Work pattern is available at http://martinfowler.com/eaaCatalog/unitOfWork.html and in Fowler's book, Patterns of Enterprise Application Architecture. A session factory is responsible for creating sessions.
The session acts as an intermediary between our application and several key NHibernate components. A typical application will not interact with these components directly, but understanding them is critical to understanding NHibernate. Unlike a session factory, building a session is very cheap.
A dialect is used to build correct SQL syntax for a specific RDBMS. For example, in some versions of Microsoft SQL Server, we begin a select statement with SELECT TOP 20 to specify a maximum result set size. Only 20 rows will be returned. Similarly, to perform this operation in SQLite, we append LIMIT 20 to the end of the select statement. Each dialect provides the necessary SQL syntax string fragments and other information to build correct SQL strings for the chosen RDBMS.
A driver is responsible for building a Batcher, creating IDbConnection and IDbCommand objects, and preparing those commands.
A connection provider is simply responsible for opening and closing database connections.
A batcher manages the batch of commands to be sent to the database and the resulting data readers. Currently, only the SqlClientDriver, OracleDataDriver, and MySqlDataDriver support batching. The drivers that don't support batching provide a NonBatchingBatcher to manage IDbCommands and IDataReaders and simulate the existence of a single logical batch of commands.
Here are some of the commonly used NHibernate properties:
|
Property name |
Description |
|---|---|
|
|
This property is a provider class to open and close database connections. |
|
|
This property is specific to the RDBMS used, and is typically set by the dialect. |
|
| |
|
|
This property is the name of connection string in |
|
| |
|
|
This property is required. A class to build RDBMS-specific SQL strings. Typically, this is one of the many dialects from the |
|
|
This is property is a Boolean value. It is set to true to log all SQL statements to |
|
|
This property is a class to manage contextual sessions. This is covered in depth in Chapter 3, Sessions and Transactions. |
|
|
This property is a comma-separated list of translations to perform on query strings. For example, True=1, Yes=1, False=0, No=0. |
|
|
This property is a class to convert RDBMS-specific ADO.NET Exceptions to custom exceptions. |
|
|
This property is a Boolean value. Prepares SQL statements and caches the execution plan for the duration of the database connection. |
|
|
This property is the number of seconds to wait for a SQL command to complete before timing out. |
|
|
This property is the number of SQL commands to send at once before waiting for a response from the database. |
|
|
This property enables tracking of some statistical information, such as the number of queries executed and entities loaded. |
|
|
This property adds line endings for easier-to-read SQL statements. |
Additional information about each of these settings is available in the reference documentation at http://nhibernate.info/doc/nhibernate-reference/index.html.
Many dialects set other NHibernate properties to sensible default values, including, in most cases, the connection.driver_class. NHibernate includes the following dialects in the NHibernate.Dialect namespace and drivers in the NHibernate.Driver namespace:
|
RDBMS |
Dialect(s) |
Driver(s) |
|---|---|---|
|
Microsoft SQL Server |
|
|
|
Oracle |
|
|
|
MySql |
|
|
|
PostgreSQL |
|
|
|
DB2 |
|
|
|
Informix |
|
|
|
Sybase |
|
|
|
Firebird |
|
|
|
SQLite |
|
|
|
Ingres |
|
|
Another common method for configuring NHibernate uses a .NET configuration file. In this recipe, we will show you how to configure NHibernate using App.config or Web.config files, to provide an identical configuration to the previous recipe.
Complete the steps in the Installing NHibernate recipe.
Add a console application project named
ConfigByAppConfigto your solution.Set it as the Startup project for your solution.
Install NHibernate to the
ConfigByAppConfigproject using the NuGet Package Manager Console.In
ConfigByAppConfig, add a reference to theEg.Coreproject.Add an
App.configfile to your project.
Open the
App.configfile.Declare a section for the NHibernate configuration, as shown here:
<configSections>
  <section name="hibernate-configuration" type="NHibernate.Cfg.ConfigurationSectionHandler,
NHibernate" />
</configSections>
Add a
connectionStringssection with a connection string:<connectionStrings> <add name="db" connectionString="Server=.\SQLEXPRESS; Database=NHCookbook; Trusted_Connection=SSPI"/> </connectionStrings>
Add your hibernate-configuration section:
<hibernate-configuration xmlns="urn:nhibernate-configuration-2.2">
  <session-factory>
    <property name="dialect">
      NHibernate.Dialect.MsSql2008Dialect, NHibernate
    </property>
    <property name="connection.connection_string_name">
      db
    </property>
    <property name="adonet.batch_size">
      100
    </property>
  </session-factory>
</hibernate-configuration>
Your completed
App.configfile should look similar to this:<?xml version="1.0" encoding="utf-8"?> <configuration> <configSections> <section name="hibernate-configuration" type="NHibernate.Cfg.ConfigurationSectionHandler, NHibernate" /> </configSections> <connectionStrings> <add name="db" connectionString="Server=.\SQLEXPRESS; Database=NHCookbook; Trusted_Connection=SSPI" /> </connectionStrings> <hibernate-configuration xmlns="urn:nhibernate-configuration-2.2"> <session-factory> <property name="dialect"> NHibernate.Dialect.MsSql2008Dialect, NHibernate </property> <property name="connection.connection_string_name"> db </property> <property name="adonet.batch_size"> 100 </property> </session-factory> </hibernate-configuration> </configuration>Open
Program.csand addusing NHibernate.Cfg;to the beginning of the file.In the
Mainmethod, add the following code to configure NHibernate:var nhConfig = new Configuration().Configure(); var sessionFactory = nhConfig.BuildSessionFactory(); Console.WriteLine("NHibernate Configured!"); Console.ReadKey();Build and run your application. You will see the text NHibernate Configured!
This recipe works in the same way as the previous recipe. However, in this recipe, we have moved the hibernate-configuration element from the hibernate.cfg.xml file to App.config. The connection.connection_string_name property references our connection string named db. We can name the connection string anything we like, as long as this property matches the connection string's name.
You can also configure NHibernate entirely in code. In this recipe, we'll show you how to do just that.
Complete the steps in the Installing NHibernate recipe.
Add a console application project to your solution called
ConfigByCode.Set it as the Startup project for your solution.
Install NHibernate to
ConfigByCodeproject using NuGet Package Manager Console.In
ConfigByCode, add a reference to theEg.Coreproject.
Add an
App.configfile with this configuration:<?xml version="1.0" encoding="utf-8"?> <configuration> <connectionStrings> <add name="db" connectionString="Server=.\SQLEXPRESS; Database=NHCookbook; Trusted_Connection=SSPI" /> </connectionStrings> </configuration>In
Program.cs, add the followingusingstatements:using NHibernate.Cfg; using NHibernate.Dialect;
In your
Mainfunction, add the following code to configure NHibernate:var nhConfig = new Configuration().DataBaseIntegration(db => { db.Dialect<MsSql2012Dialect>(); db.ConnectionStringName = "db"; db.BatchSize = 100; }); var sessionFactory = nhConfig.BuildSessionFactory(); Console.WriteLine("NHibernate Configured!"); Console.ReadKey();Build and run your application. You should see the text NHibernate Configured!
In this recipe, we create an NHibernate configuration using methods in the NHibernate.Cfg namespace. These methods offer full type safety and improved discoverability over code configurations in the previous version of NHibernate.
We specify dialect, connection.connection_string_name, and adonet.batch_size with the DatabaseIntegration method. Finally, we build a session factory using the BuildSessionFactory method.
Notice that we are still referencing the db connection string defined in our App.config file. If we wanted to eliminate the App.config file entirely, we could hardcode the connection string with this code:
db.ConnectionString = @"Connection string here...";
This, however, is completely inflexible, and will require a full recompile and redeployment for even a minor configuration change.
The third-party Fluent NHibernate library has its own syntax to configure NHibernate. In this recipe, we'll show you how to configure NHibernate using this syntax.
Complete the steps in Installing NHibernate recipe.
Add a console application project to your solution called
ConfigByFNH.Set it as the Startup project for your solution.
Install NHibernate to the
ConfigByFNHproject using NuGet Package Manager Console.Install the package
FluentNHibernatetoConfigByFNHproject using NuGet Package Manager Console.In
ConfigByFNH, add a reference to theEg.Coreproject.
Add an
App.configfile with this configuration:<?xml version="1.0" encoding="utf-8"?> <configuration> <connectionStrings> <add name="db" connectionString="Server=.\SQLEXPRESS; Database=NHCookbook; Trusted_Connection=SSPI" /> </connectionStrings> </configuration>In
Program.cs, add the followingusingstatements:using FluentNHibernate.Cfg; using FluentNHibernate.Cfg.Db;
In the
Mainmethod, add this code:var config = MsSqlConfiguration.MsSql2012 .ConnectionString(connstr => connstr.FromConnectionStringWithKey("db")) .AdoNetBatchSize(100); var nhConfig = Fluently.Configure() .Database(config) .BuildConfiguration(); var sessionFactory = nhConfig.BuildSessionFactory(); Console.WriteLine("NHibernate configured fluently!"); Console.ReadKey();Build and run your application. You should see the text NHibernate configured fluently!
Our fluent configuration can be broken down into three parts. First, we configure these properties:
We set the
dialectproperty toMsSql2012Dialectwhen we use theMsSql2012static property ofMsSqlConfiguration.The
connection.connection_string_nameobject is set todbwith a call toFromConnectionStringWithKey.We set
adonet.batch_sizeto 100 with a call toAdoNetBatchSize.
Next, from the fluent configuration, we build a standard NHibernate configuration. Finally, we build a session factory using the BuildSessionFactory method.
NHibernate has a very extensible logging mechanism, and provides a log4net log provider out of the box. The log4net library is a highly customizable, open source logging framework. In this recipe, we'll show you a simple log4net configuration to log important NHibernate events to the Visual Studio debug output window.
Install
log4netusing NuGet Package Manager.Open your application configuration file.
Inside the
configSectionselement, declare a section for the log4net configuration:<section name="log4net" type="log4net.Config.Log4NetConfigurationSectionHandler, log4net"/>
After the hibernate configuration element, add this log4net configuration:
<log4net>
<appender name="trace"
      type="log4net.Appender.TraceAppender, log4net">
  <layout type="log4net.Layout.PatternLayout, log4net">
  <param name="ConversionPattern"
       value=" %date %level %message%newline" />
  </layout>
</appender>
<root>
  <level value="ALL" />
  <appender-ref ref="trace" />
</root>
<logger name="NHibernate">
  <level value="INFO" />
</logger>
</log4net>
At the beginning of your
Mainfunction, insert the following code to configurelog4net:log4net.Config.XmlConfigurator.Configure();
Run your application.
Watch Visual Studio's debug output window.
The log4net framework uses appenders, layouts, and loggers to format and control log messages from our application, including log messages from NHibernate.
Appenders define the destination for log messages. In this recipe, we've defined a trace appender, which writes our log messages to System.Diagnostics.Trace. When we debug our application, Visual Studio listens to the trace and copies each message to the debug output window.
Loggers are the source of log messages. The root element defines values for all loggers, which can be overridden using the logger element. In our configuration, we've declared that all messages should be written to the appender named trace.
In log4net, the log messages have priorities. In ascending order, they are DEBUG, INFO, WARN, ERROR, and FATAL. In our configuration, we can define a log level with one of these priorities, or with ALL or OFF. A level includes its priority and all the priorities above it. For example, a level of WARN will also log ERROR and FATAL messages. ALL is equivalent to DEBUG: all messages will be logged, and OFF suppresses all messages.
With our configuration, log4net will write messages from NHibernate with a priority of INFO, WARN, ERROR, and FATAL, and ALL messages from other sources.
We can use log4net in our own application. Here's a simple example of what some code might look like with log4net logging:
using System.IO;
using log4net;
namespace MyApp.Project.SomeNamespace
{

    public class Foo
    {
        private static ILog log = LogManager.GetLogger(typeof(Foo));

        public string DoSomething()
        {
            log.Debug("We're doing something.");
            try
            {
                return File.ReadAllText("cheese.txt");
            }
            catch (FileNotFoundException)
            {
                log.Error("Somebody moved my cheese.txt");
                throw;
            }
        }
    }
}
We've defined a simple class named Foo. In the DoSomething() method, we write the log message, "We're doing something.", with a priority of DEBUG. Then we return the contents of the file cheese.txt. If the file doesn't exist, we log an error and throw the exception.
Because we passed in typeof(Foo) when getting the logger, the Foo logger is named MyApp.Project.SomeNamespace.Foo, similar to the type. This is the typical naming convention when using log4net.
Suppose we were no longer concerned with debug level messages from Foo, but we still wanted to know about warnings and errors. We can then redefine the log level with this simple addition to our configuration, as shown in the following code:
<logger name="MyApp.Project.SomeNamespace.Foo">
  <level value="WARN" />
</logger>
Alternatively, we can set the log level for the entire namespace or even the entire project with this configuration, as follows:
<logger name="MyApp.Project">
  <level value="WARN" />
</logger>
When we set NHibernate's show_sql configuration property to true, NHibernate will write all SQL statements to Console.Out. This is handy in some cases, but many applications don't use console output. With a properly configured logger, we can write the SQL statements to the trace output instead.
NHibernate also writes every SQL statement to a logger named NHibernate.SQL. These log messages have DEBUG priority. When we add the following snippet to our configuration, we can redefine the log level for this specific logger. We will get every SQL statement in the trace output, as follows:
<logger name="NHibernate.SQL">
   <level name="DEBUG" />
</logger>
NHibernate also provides the IInternalLogger interface which facilitates logger abstraction. If you want to use other log providers you can provide an implementation for your favorite logger. There is also an NHibernate.Logging project which provides implementation for the Common.Logging logging abstraction framework. Common.Logging supports log4net, NLog, and Enterprise Library logging frameworks, so you can use any of them with NHibernate via this abstraction. Download NHibernate.Logging from https://github.com/mgernand/NHibernate.Logging or install it from NuGet.
To enable the log provider you have to add the following lines to your App.config or Web.config:
<appSettings>
  <add key="nhibernate-logger"
       value =
"NHibernate.Logging.CommonLogging.CommonLoggingLoggerFactory, NHibernate.Logging.CommonLogging"/>
</appSettings>In this recipe, we'll show you how to generate all the necessary tables, columns, keys and relationships in your database - with two lines of code.
Complete the Configuring NHibernate with App.config recipe at the beginning of this chapter.
Open
Program.cs.Add these using statements to the beginning of the file:
using Eg.Core;
using NHibernate.Mapping.ByCode;
using NHibernate.Tool.hbm2ddl;
Modify the
Mainmethod to look like this:var nhConfig = new Configuration().Configure(); var mapper=new ConventionModelMapper(); nhConfig.AddMapping(mapper.CompileMappingFor(new[] {typeof (TestClass)})); var schemaExport = new SchemaExport(nhConfig); schemaExport.Create(false, true); Console.WriteLine("The tables have been created")); Console.ReadKey();Build and run your application.
Open your database and examine the tables. If everything worked, a table representing
TestClassshould have been created.
The hbm2ddl (hibernate mapping to data definition language) tool uses the mapping metadata in the configuration object to build a SQL script of our database objects. It then connects to our database and runs this script. In order to demonstrate the functionality, we added a mapping for TestClass. How mappings are created and used will be further discussed in Chapter 2, Models and Mapping.
Alternatively, we can use the hbm2ddl.auto configuration property to build our database schema automatically whenever our application calls BuildSessionFactory. We can set the property to the following values:
update: TheSchemaUpdateclass updates our database schema, avoiding destructive changes. This only works for dialects that implement the IDataBaseSchema interface, such as the SQL Server, Oracle, MySQL, PostgreSQL, SQLite, and Firebird dialects.create: TheSchemaExportclass creates our database schema from scratch for a fresh database.create-drop:SchemaExportrecreates the database schema by first dropping and then creating each table.validate: TheSchemaValidateclass compares the existing database schema to the schema NHibernate expects, based on your mappings. Similar toupdate, this requires a dialect that implementsIDataBaseSchema.
While create-drop is immensely helpful during development, only validate is suggested for production environments, as the tiniest mistake can have huge consequences. Rather, you should script the database, as shown in the next recipe, and run the script explicitly to set up your production database.
It's usually not appropriate for your application to recreate database tables each time it runs. In this recipe, we'll generate a SQL script to create your database objects.
Complete the Configuring NHibernate with App.config or Web.config recipe at the beginning of this chapter.
Open
Program.cs.Add these
usingstatements to the beginning of the file:using Eg.Core; using NHibernate.Mapping.ByCode; using NHibernate.Tool.hbm2ddl;
Modify the
Mainmethod to look similar to this:var nhConfig = new Configuration().Configure(); var mapper = new ConventionModelMapper(); nhConfig.AddMapping(mapper.CompileMappingFor(new[] { typeof(TestClass) })); var schemaExport = new SchemaExport(nhConfig); schemaExport .SetOutputFile(@"db.sql") .Execute(false, false, false); Console.WriteLine("An sql file has been generated at {0}", Path.GetFullPath("db.sql")); Console.ReadKey();Build and run your application.
Inspect the newly created
db.sqlfile.
Using the mapping metadata from the configuration object and the current dialect, hbm2ddl builds a SQL script for your entities.
It's usually required to update your database if mappings for your application have changed. In this recipe, we'll generate a SQL script to update your database objects.
Complete the Configuring NHibernate with App.config or Web.config recipe at the beginning of this chapter.
Open
Program.cs.Add these
usingstatements to the beginning of the file:using Eg.Core; using NHibernate.Mapping.ByCode; using NHibernate.Tool.hbm2ddl;
Modify the
Mainmethod to look similar to this:var nhConfig = new Configuration().Configure(); var mapper = new ConventionModelMapper(); nhConfig.AddMapping(mapper.CompileMappingFor(new[] { typeof(TestClass) })); var update = new SchemaUpdate(nhConfig); update.Execute(false, true); Console.WriteLine("The tables have been updated"); Console.ReadKey();Build and run your application. Inspect the table(s) in the database.
Modify
TestClassto include an additional property:public virtual string Description { get; set; }Build and run the application again. The
TestClasstable should now have a new column corresponding to theDescriptionproperty.
Using the mapping metadata from the configuration object and the current dialect, hbm2ddl analyzes the existing structure of your database and generates a script to fulfill the differences. The SchemaUpdate only adds missing objects, and does not try to remove anything.
In many cases, you'll want to include building or updating your database in some larger process, such as a build script or installation process. In this recipe, we'll show you how to use this command-line tool to run our hbm2ddl tasks.
Download the latest release of NHibernate Schema Tool from http://nst.codeplex.com/.
To install NHibernate Schema Tool, follow these steps:
Create a new folder in
C:\Program FilesnamedNHibernateSchemaTool.Copy
nst.exeto the newly created folder.Add
C:\Program Files\NHibernateSchemaToolto yourPATHenvironment variable.Complete the Configuring NHibernate with hibernate.cfg.xml recipe from the beginning of this chapter.
We haven't added any HBM mapping files to the Eg.Core project yet, so no tables will be created. In the next chapter, however, we will go into some depth on how these mappings are created.
NHibernate Schema Tool is a command-line wrapper for the hbm2ddl tool. This makes NST ideal for use in build scripts and continuous integration servers.
The /c argument specifies the configuration file. The /a argument specifies the assembly with our classes and mapping embedded resource files. The /o:Create option tells NHibernate to create our database objects. It also supports Update and Delete.
NST has several options, enabling a number of creative uses. NST supports these command-line options:

