


 Download code from GitHub
In this chapter, we are going to learn about tools used to perform development tasks for .NET Core 2.0 on Windows and Linux operating systems. Also, we will learn how to set up Linux and virtualization using VirtualBox and Hyper-V. This chapter will cover how to install .NET Core 2.0 and tools for Windows and Linux (Ubuntu). We will learn about the virtual machine (VM) setup for Ubuntu and create your first simple .NET Core 2.0 running application code. We will configure the VM to manage your first application. The purpose of this chapter is to get a general idea of the required tools and how to install .NET core 2.0 SDK for Windows and Linux, and give you basic F# understanding.
This chapter will cover the following:
- Downloading the required tools for Windows and Linux
- Installing .NET Core 2.0 and tools (Windows)
- Setting up an Ubuntu Linux VM
- Installing .NET Core 2.0 and tools (Linux)
- Creating simple running code
- F# primer
In this section, we will discuss the prerequisites to be downloaded for both Windows and Linux operating systems to start development with .NET Core 2.0. We will start with Windows and then move to Linux.
Microsoft offers the Visual Studio integrated development environment (IDE) for developers to develop computer programs for Microsoft Windows, as well as websites, web applications, web services, and mobile applications. Microsoft gives us the choice to pick from four Visual Studio adaptations—Community, Professional, Enterprise, and Code. You can download one of these, depending on your individual prerequisite. How these versions differ from each other is explained next.
Navigate to https://www.visualstudio.com/downloads in the browser of your choice. You will see four choices. Select the Visual Studio product based on your requirements.
All versions of Visual Studio 2017 are available for Windows and Macintosh operating systems:
- Visual Studio Community: This is a free, open source version of Visual Studio with limited features. This is for the individual developer.
- Visual Studio Professional: This version has professional developer tools, services, and subscription benefits for small teams (five members).
- Visual Studio Enterprise: This version supports all Visual Studio features and is meant for end-to-end solution development to meet the demanding quality and scaling needs of teams of all sizes. It is great for enterprise organizations. Some of the key features that come with this version are testing tools, architectural layer diagrams, live dependency validation, architecture validation, code clone detection, IntelliTrace, .NET memory dump analysis, and so on.
- Visual Studio Code: This is a free, open source version and cross-platform (Linux, macOS, Windows) editor that can be extended with plugins to meet your needs. It includes support for debugging, embedded Git control, syntax highlighting, extension support, intelligent code completion, snippets, and code refactoring.
Note
Make a note that Visual Studio is an IDE, while Visual Studio Code is an editor, just like Notepad is an editor. So Visual Studio Code is much more lightweight, fast, and fluid with great support for debugging and has embedded Git control. It is a cross-platform editor and supports Windows, Linux, and Macintosh. Debugging support is good and has rich IntelliSense and refactoring. Like most editors, it is keyboard-centric. It is a file and folders-based editor and doesn't need to know the project context, unlike an IDE. There is no File | New Project support in Visual Studio Code as you would be used to in Visual Studio IDE. Instead, Visual Studio Code offers a terminal, through which we can run dotnet command lines to create new projects.
So, for development in Windows, we can use either of these:
- Visual Studio 2017 IDE
- Visual Studio Code editor
If we choose Visual Studio 2017, all we need to do is download Visual Studio 2017 version 15.3 from https://www.visualstudio.com/downloads. It comes bundled with the .NET Core 2.0 SDK and its templates and so we will be ready for development immediately after installing it. Also with Visual Studio 2017, F# tools automatically get installed once we create an F# project or open an F# project for the very first time. So, the F# development setup is taken care of as well. We will see the installation of Visual Studio 2017 in the Installing .NET Core 2.0 and tools (Windows) section of this chapter.
If we choose Visual Studio Code for development, we need to download Visual Studio Code from https://code.visualstudio.com/download and the .NET Core 2.0.0 SDK from https://www.microsoft.com/net/core#windowscmd . We will look at the installation of Visual Studio Code in the Installing .NET Core 2.0 and tools (Windows) section of this chapter.
As mentioned in the preceding section, Microsoft Visual Studio Code is a cross-platform editor, and it supports Linux operating systems. So, we are going to use Visual Studio Code to create all the example applications on Linux in this book.
Let's start downloading the tools required to stop our development of .NET Core 2.0 applications on the Linux operating system:
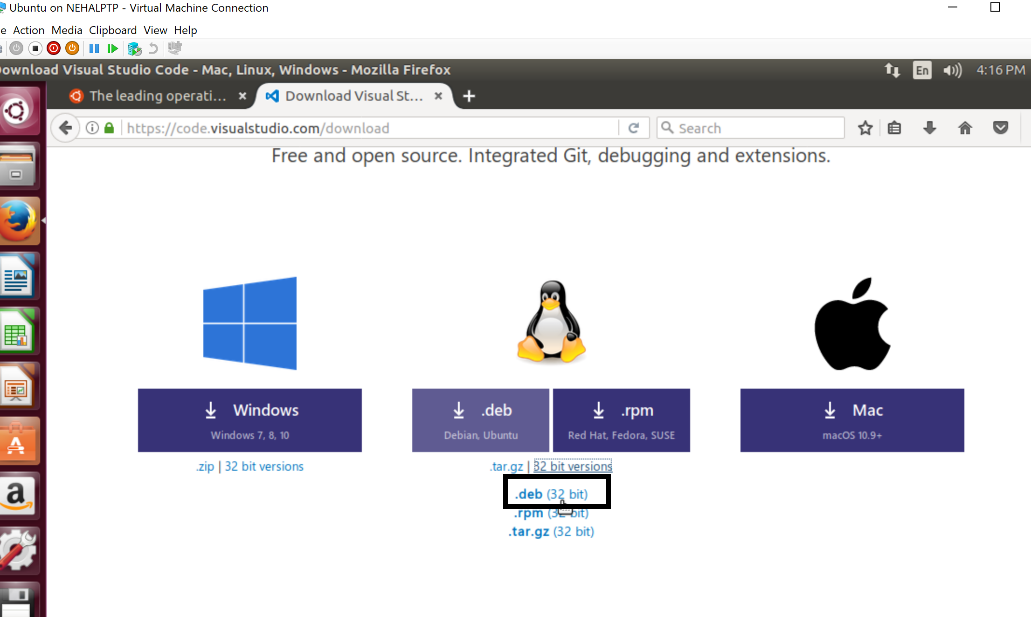
- Download Visual Studio Code from https://code.visualstudio.com/. We are going to install the Ubuntu 32-bit version, so we will download the Visual Studio Code 32-bit version. Select the
Linux x86 .debstable package for download, as shown in the following image:

If you have a Linux machine handy, you can skip the next download step. If you wish to try development on the Linux platform and have a Windows machine to work with, then the next two steps are for you.
- Download VirtualBox from https://www.virtualbox.org/. It is Oracle's open source general-purpose full virtualizer. At the time of writing this chapter, the latest version of VirtualBox is 5.1. The version 5.1.26 was released on July 27, 2017. Using this, we will set up a Linux (Ubuntu) virtual machine on the Windows host machine. Click on
Download VirtualBox5.1.It will open a page that has options onVirtualBox binaries. We can select an option based on the machine on which we are installing it. We are installing it on a Windows machine, so we will click onWindows hosts. In a similar way, we can select different platforms. On clickingWindows hosts, it will download the VirtualBox executableVirtualBox-5.1.26-117224-Win.exe:

VirtualBox needs the Ubuntu International Standards Organization (ISO) image to create the Ubuntu VM, so next we need to download the ISO image of Ubuntu.
- Download the ISO image of Ubuntu by navigating to https://www.ubuntu.com. By default, the virtual machine software uses 32-bit Linux, so we will select 32-bit. Hover over the
Downloads menu and click on the highlightedDesktoplink:

It will take us to the downloads page for the desktop. Click Download on Ubuntu for the desktop. It will start the download of Ubuntu 17.04 ISO. An ISO image of approximately 1.5 GB will be downloaded.
- Download .NET Core 2.0 SDK from https://www.microsoft.com/net/download/linux:

With this, we are done with the downloads for our setup in Linux. In the next section, we will learn how to install and set up these tools.
Note
Ubuntu 17.04: As of writing this chapter, this is the latest version, and its code name is Zesty Zapus, released on April 13, 2017. Ubuntu releases carry a version number in the form of XX.YY, with XX representing the year and YY representing the month of the official release. For example, the latest version released in April 2017 is represented by 17 (year) and 04 (month). Ubuntu code names use an adjective animal combination, that is an adjective word followed by the name of an animal, typically one that's unique. At the time of writing, Ubuntu 17.10 is due to be released in October 2017; examples covered here used the Ubuntu 17.04 version.
Now that we are done with the downloads, it's time to install. As seen in the last section on Windows, we have two options for development in Windows:
- Visual Studio 2017 version 15.3
- Visual Studio Code
Based on your choice, you can follow the appropriate installation steps.
Double-click on the executable file downloaded for Visual Studio 2017 version 15.3 in the earlier section. This will start the installation. C# comes by default in every Visual Studio installation, so there is nothing to do for C#. Visual Studio 2017 also comes with F# support in all its editions: Community, Professional, and Enterprise. F# is an optional component though. The installer includes it as a selectable workload, or you can select it manually in the Individual components tab, under the Development activities category. Select F# language support:

Visual Studio 2017 version 15.3 comes with the .NET Core SDK. Select .NET Core cross-platform development under Workloads during the Visual Studio 2017 version 15.3 installation:

For other versions of Visual Studio, download the .NET Core 2.0 SDK from https://www.microsoft.com/net/download/core, or update Visual Studio to 2017 15.3 and select .NET Core cross-platform development under Workloads.
Install Visual Studio Code by double-clicking the Visual Studio Code setup executable from its download location. It's a simple installation for Windows. Once Visual Studio Code is installed, launch it. The following screenshot shows the user interface layout of Visual Studio Code. It follows the conventional editor style and displays files and folders you have access to on the left side and the code content in the editor on the right side. It can be roughly divided into seven sections, as shown in the following screenshot:

Let's discuss them:
- Menu bar: The standard menu bar for doing various operations in the editor, such as opening a file/folder, editing, viewing and installing extensions, changing themes, debugging, running and configuring tasks, and getting help.
- Activity bar: Groups the most commonly performed activities on the leftmost side of the editor. It lets the user switch between the views. It is customizable and lets the user choose the views to be displayed in the bar, by right-clicking on the bar and selecting/unselecting the views. The bar itself can be hidden in the same way. By default, it has five views, as shown in the following screenshot:

EXPLORER: This view lets your browse, open, and manage all the files and folders in your project. You can create, delete, and rename files and folders, as well as move files and folders from here. You can also open the files/folders in Terminal (Command Prompt in Windows) from here by right-clicking and selecting
Open in Command Prompt. You can find the file/folder location as well from here.SEARCH: This view lets you search and replace globally across your open folder.
SOURCE CONTROL: This lets you work with Git source control by default.
DEBUG: This view displays the breakpoints, variables, and call stack for debugging.
EXTENSIONS: This is used to install and manage extensions in Visual Studio Code.
- Side bar: This contains the view selected from the activity bar.
- Command Palette: As stated earlier, Visual Studio Code is keyboard-centric, so anyone who loves using a keyboard is going to have a great time working on Visual Studio Code. The Ctrl + Shift + P key combination brings up what is called a Command Palette. We can access all the functionality of Visual Studio Code from here. To make effective use of Visual Studio Code, it is highly recommended that the reader makes himself/herself well versed with the commands from the help menu item links:

- Editor: The editor is where the content of the file is displayed and the user can edit it. Visual Studio Code provides a feature called Split Editor (open to the side in Linux). Go to the
Viewmenu in the menu bar and selectSplit Editor(alternatively you can type the command Ctrl +\). This will create a new editor region, where you can edit a group of files. These regions are called editor groups. The open editors can also be seen in the Explorer view in the sidebar. Visual Studio Code allows up to three editor groups, designated asLEFT,CENTER, andRIGHT,as shown in the following screenshot:

- Panels: Displays the
TERMINAL,OUTPUT,PROBLEMS, andDEBUG CONSOLEpanes below the editor. To see it in action, go to theViewmenu and click any of the menu items fromPROBLEMS,OUTPUT,DEBUG CONSOLE,and TERMINAL. Alternatively, you can also press their corresponding commands. We will see more on panels when we write our first application. - Status Bar: Displays information about the opened project and files being edited, such as errors, warnings, current line and column number, encoding, and file type.
Now we are familiar with Visual Studio Code, its layout, and basic functionality.
Note
Go to the Help menu and explore in detail the features that Visual Studio Code offers. The Interactive Playground highlights a number of features in Visual Studio Code and also lets you interactively try them out. The Help menu also has Documentation, Introductory Videos, Tips and Tricks, which are very handy.
Remember, Visual Studio Code is an editor and therefore we need to add support for the language we want to work with through extensions. Visual Studio Code is very rich in extensions. For our example and for the purpose of learning .NET Core 2.0, we will install extensions for C# and F#, as we will be working with them.
Let's start with C#, as after a fresh install we do not have support for C# and hence there would be no IntelliSense to work with on the editor. To install C#, let's switch to Extension ViewC#. We will choose C# for Visual Studio Code (powered by OmniSharp), as shown in the following screenshot:

Click Install and then click on Reload and Visual Studio Code will start supporting C# along with its IntelliSense.
Similarly, search F# and Install it. We will be using the Ionide-fsharp extension, as shown in the following screenshot:

With Visual Studio Code, we need to install .NET Core SDK - 2.0.0(x64) also, as Visual Studio Code doesn't install it. Double-click on the executable of .NET Core 2.0 SDK to install it, as shown in the following screenshot:

And with this, we are done with the installation of our prerequisites for development on the Windows platform. Next, we will set up a Linux (Ubuntu) VM and perform the installation of prerequisites there. If you are using a Windows platform and do not wish to set up a Linux VM, the next section can be skipped.
Note
The Visual Studio Code user interface was developed on the Electron framework, which is an open source framework used to build cross-platform desktop applications with JavaScript, HTML, and CSS. The editor is powered by Microsoft's Monaco Editor and gets its intelligence from OmniSharp/Roslyn and TypeScript. As all of these are open source, you can search them and see the source code in GitHub.
In this section, we will see how to set up Linux (Ubuntu) on a virtual machine, so that a Windows user can also develop and test their .NET Core 2.0 applications in Linux. To do so, let’s start with the VirtualBox setup. Oracle provides an open source VirtualBox executable, which we downloaded in the previous section. The following are the steps we need to follow to set up VirtualBox:
- Double-click on the VirtualBox executable. It will open a wizard. Before installation, click on
Disk usageand checkDisk Space Requirement. It is recommended that the virtual machine for Ubuntu Linux is set up with at least 2 GB RAM and 25 GB free hard drive space. So, instead of choosing the default drive (theCdrive in our case, where Windows is installed), select another drive if it exists (for example, theDdrive) so that you can easily allocate more space, and it also prevents any impact on the host operating system. - The VirtualBox setup needs approximately 241 MB of disk space to install. It's recommended to create a new folder (for example,
VirtualBox) to easily identify and track the VM.
- Keep clicking the
Nextbutton until the last page. At the end, a warning will be displayed that the installation of VirtualBox will reset the network connection and temporarily disconnect the machine from the network. This is alright if you are working on the same physical machine. So, click on theYesbutton and continue, and then click on theInstallbutton and finish the installation:

- Once the preceding installation is done, open the VirtualBox manager to create a new virtual machine. Click on
New and give the:Nameof the machine (for example,Ubuntu, as shown), and select theTypeasLinuxand theVersionasUbuntu (32 bit)

- We need to specify the memory size. More memory is good, but we should consider our disk space before selecting it. A minimum of 2 GB system memory is required for Ubuntu 17.04. Select
Createand then selectVDI (VirtualBox Disk Image)asHard disk file type. Select aDynamically allocatedhard disk. It will use space on your physical hard disk as it fills up (up to the maximum fixed size). Set the disk space maximum size to25 GBand click onCreate. It will create a virtual machine with the Ubuntu operating system (32-bit) and 4 GB RAM, and the full details will be displayed on the final page:

For Windows machines, we can use Hyper-V to create a Linux virtual machine. Let's start with the basic settings and important configuration changes:
- First, enable
Hyper-V Management ToolsandHyper-V PlatformfromWindows Features:

- Change the default virtual directory. By default, Hyper-V uses the same drive as that on which the OS is installed but this is not a good practice. We should change the default drive the drive on which the operating system is not installed, such as the
Ddrive in our case. It's a good practice to keep Windows and system files separate from other files. To make configuration changes, openHyper-V Manager and then. Instead of the default selection, change it to some other drive (Hyper-V SettingsDin our case). Create a new folder namedVirtual Machineon this new drive location:

- Create a virtual switch. A virtual switch is used to join computers and to create networks. We can create three types for virtual switches:
External: An accessible network where the virtual machines are hosted on the same physical computer and all external servers from which the host machine can connect.Internal: Creates a virtual switch that can be used only by the virtual machines that run on the same physical computer, and between virtual machines and the physical computer. An internal virtual switch doesn't provide connectivity to a physical network connection.Private: Creates a virtual switch that can be used only by the virtual machines that run on the same physical computer.
Create a Private or External type of virtual switch. This will be used for the virtual machine:

Open Network and Sharing Center on your host machine and then open the external virtual switch properties. You will find Hyper-V Extensible Virtual Switch. This provides network connectivity to the virtual machine. Enable this or the virtual machine won't be able to connect to the host machine network:

- Create a new virtual machine, and choose the name and location for the virtual machine. Select
Generation 1on the next page and selectExternal Virtual Switch. Select theInstall an operating system from a bootable CD/DVD-ROMoption and selectImage file (.iso),which we downloaded earlier for Ubuntu. Continue clicking theNextbutton in the wizard and the Ubuntu virtual machine will be created. Click onStartand connect to it:

- After connection, we will be able to see the following screen. Select
Install Ubuntuand set the language asEnglish. Choose theErase disk and install Ubuntuoption and then clickContinue:

- Provide the username and password that you want and click
Continue. Restart the system once the installation is done:

After restarting the virtual machine, it will display a login page. Enter the password that you provided while installing Ubuntu. On successful login, it will open the homepage, from where we can start Visual Studio Code and .NET Core 2.0 SDK installation on this Ubuntu machine.
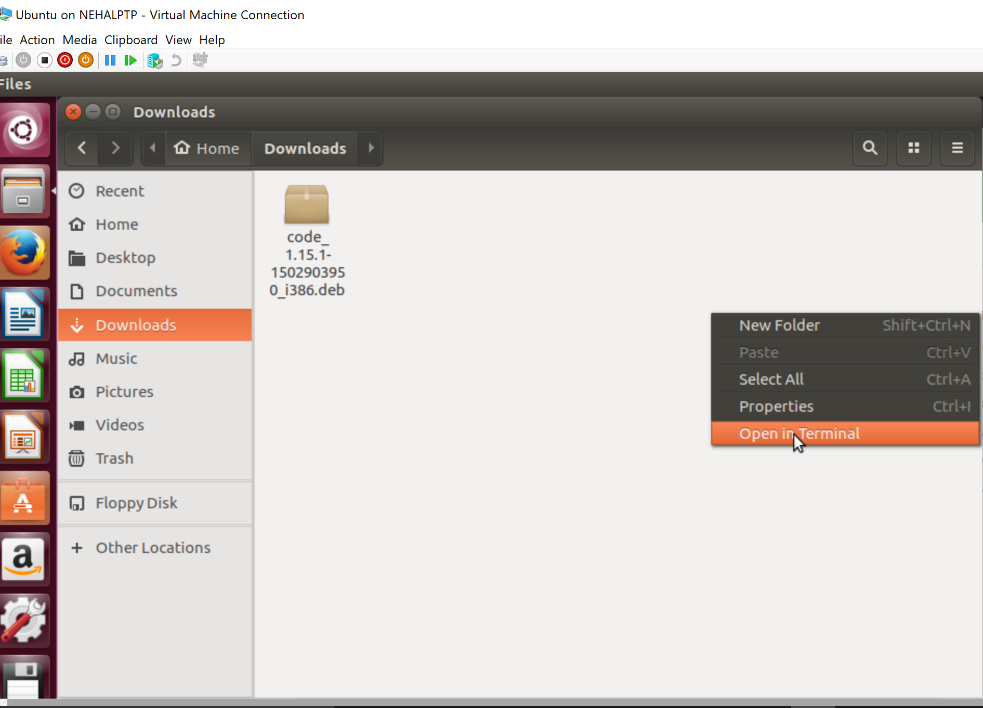
To install Visual Studio Code in Linux, download the .deb (32 bit) file from http://code.visualstudio.com/download, as shown in the following screenshot:
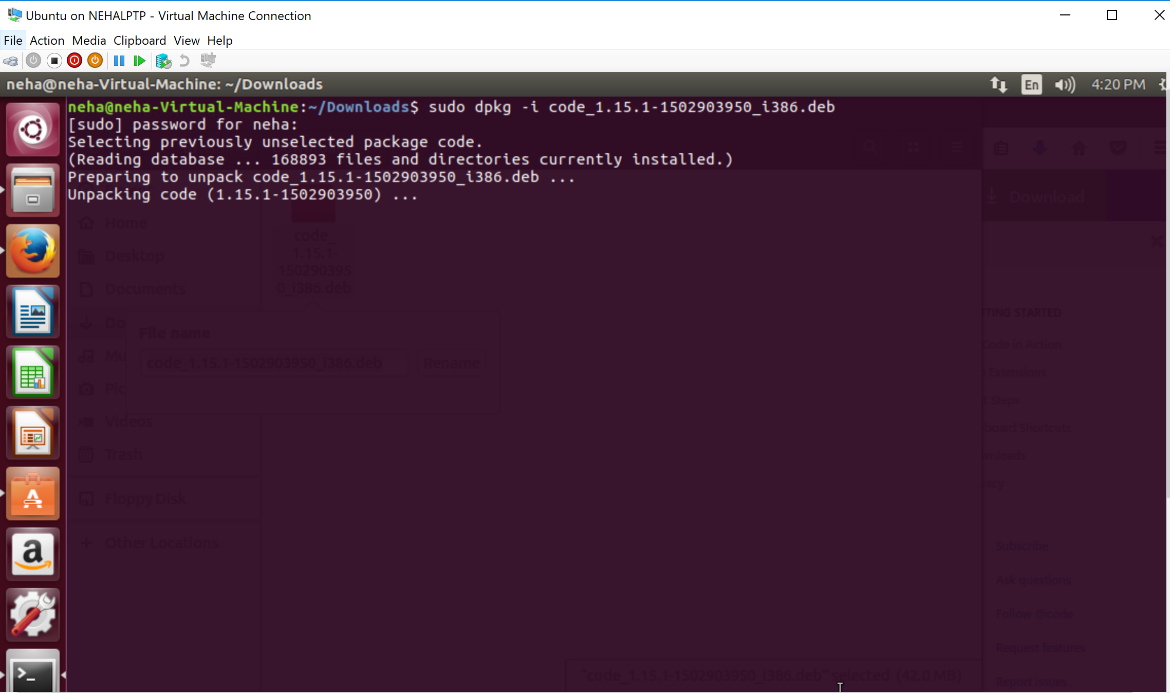
Open the folder location the .deb file has been downloaded to. Right-click and select Open in Terminal. This will open Terminal from this location. Run the following command:
sudo dpkg -i <fileName>.deb<fileName>: Enter the filename that was downloaded, which is code_1.15.1-1502903950_i386.deb in our case, as shown in the following screenshot:
Right-click on the Downloads folder, and select Open in Terminal. It will display the following terminal window:
It may show error messages stating that dependencies have not been installed. Run the following command to install the dependencies:
sudo apt-get install -fThis will complete the installation of Visual Studio Code in this Ubuntu machine.
Now, let's install the .NET Core 2.0 SDK. Open the folder location where the dotnet-sdk-2.0.0 file is downloaded. Right-click and select Open in Terminal. It will open Terminal from this location. Run the following command:
sudo apt-get install dotnet-sdk-2.0.0Congratulations! We are all set to run Visual Studio Code! Please refer to the Installing Visual Studio Code section of this chapter to get an overview of Visual Studio Code.
Open Extensions View from the Visual Studio Code activity bar. Search F# and install the Ionide-fsharp extension for F# language support, as we discussed in the Installing Visual Studio Code section under the Install .NET Core 2.0 and tools (Windows) section.
Now, search C# and install the C# for Visual Studio Code (powered by OmniSharp) extension for C# language support.
Let's create our very first .NET Core 2.0 application. We will create it using Visual Studio Code as well as Visual Studio 2017 in Windows, and with Visual Studio Code in Ubuntu.
The .NET Core 2.0 SDK installs the templates for creating the class library, console, web, MVC, razor, web API, and so on, for applications based on .NET Core 2.0. As our first application, we will create a simple MVC application on .NET Core 2.0, and get familiar with the application code and the .NET Core 2.0 command-line integration.
Let's start by creating this application in Windows using Visual Studio 2017, and then we will create the same application from Visual Studio Code, first in Windows and then in Linux.
For this, we need to perform the following steps:
- Open Visual Studio 2017.
- Go to
File|New|Project. In theNew Projectdialog, you should see the.NET Coretemplate insideVisual C#:
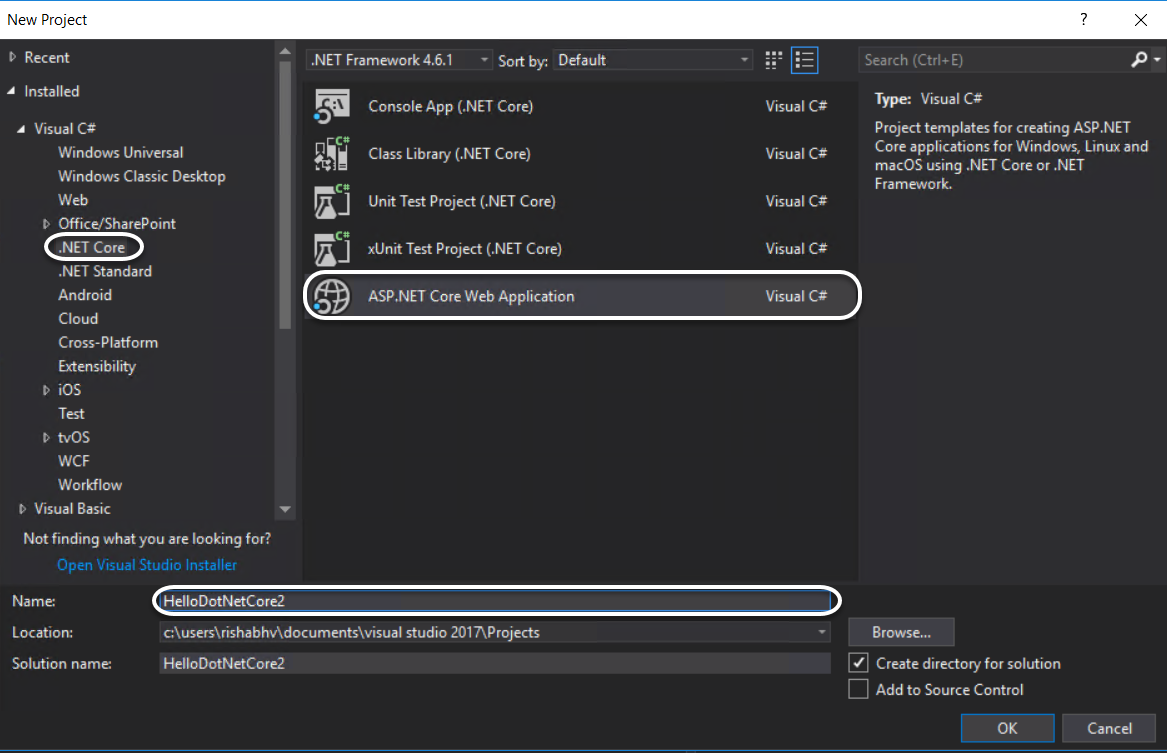
- Click on
.NET Coreand selectASP.NET Core Web Application. - Name the project
HelloDotNetCore2and clickOK.
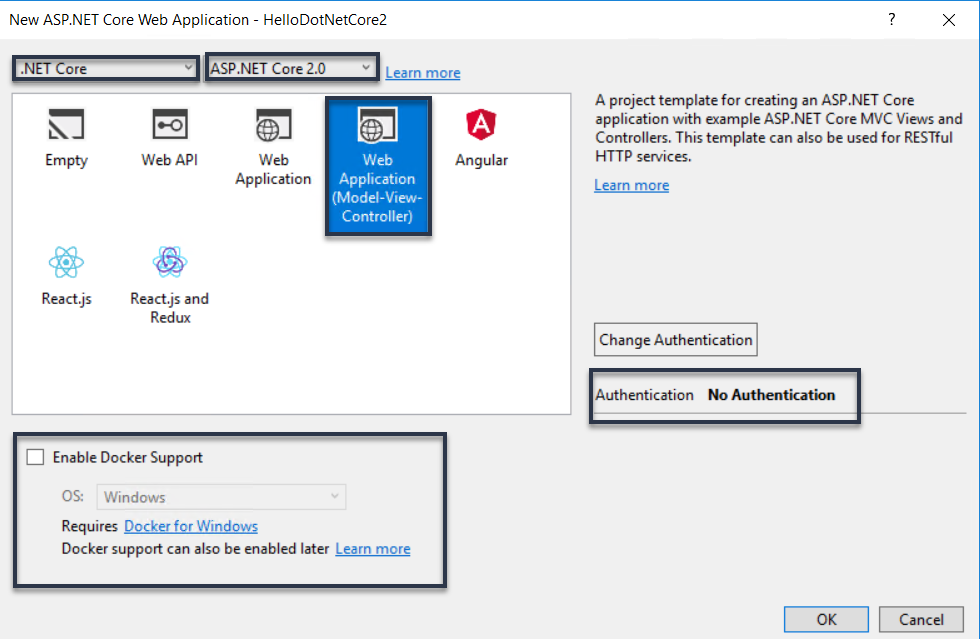
- It will show a
New ASP.NET Core Web Applicationdialog. Ensure.NET CoreandASP.NET Core 2.0are selected in the two dropdowns displayed in this dialog, as we are discussing .NET Core 2.0 here. The first dropdown signifies the target framework of the application and the second dropdown is the version of ASP.NET Core that we are using. You have the option to choose.NET Frameworkas the target framework in the first dropdown, but then the resulting application would not be cross-platform. If the application has to be cross-platform, it should target .NET Core. The second dropdown has the different versions of ASP.NET Core that have been released so far, such as 1.0, 1.1, and 2.0. We will keep it asASP.NET Core 2.0. You will also notice that with ASP.NET Core 2.0, the number of templates has increased from the previous version. Apart fromEmpty,Web API, andWeb Application, which were present in ASP.NET 1.1, we also have templates forWeb Application (Model-View-Controller),Angular,React.js, andReact.js and Redux. We will chooseWeb Application (Model-View-Controller)as our template. There is support for a Docker container but let's keep it unchecked for the time being. We will discuss Docker in detail in a later chapter. Also, keep theAuthenticationasNo Authentication. We will explore authentication options in detail in a later chapter. ClickOK:
- And voila! Visual Studio creates the
HelloDotNetCore2project for us and restores the required packages to build in the background. You can check this by inspecting thePackage Manager Consoleoutput. Your very first ASP.NET Core 2.0 is ready to be run:

- Click
Debugor press F5 to run the application. We will see a detailed walk- through of all the project artifacts in the next chapter.
Visual Studio is the IDE and is aware of projects and templates. As stated earlier, Visual Studio Code is a file and folder-based editor and hence it is not aware of projects and templates. So to create the same application through Visual Studio Code, we will make use of the .NET command line. Let's get going!
Open Visual Studio Code, go to View, and click on TERMINAL. It will open Command Prompt/the PowerShell terminal in the bottom section of Visual Studio Code. If you see the PowerShell terminal, type cmd so that it turns into Command Prompt. This is an optional step if you are comfortable with PowerShell.
Let's try and explore the commands available to create a new project, so let's type dotnet --help . This is the help command for dotnet and will let us know about the options that we have available for creating a .NET Core 2.0 MVC application as shown in the following screenshot:
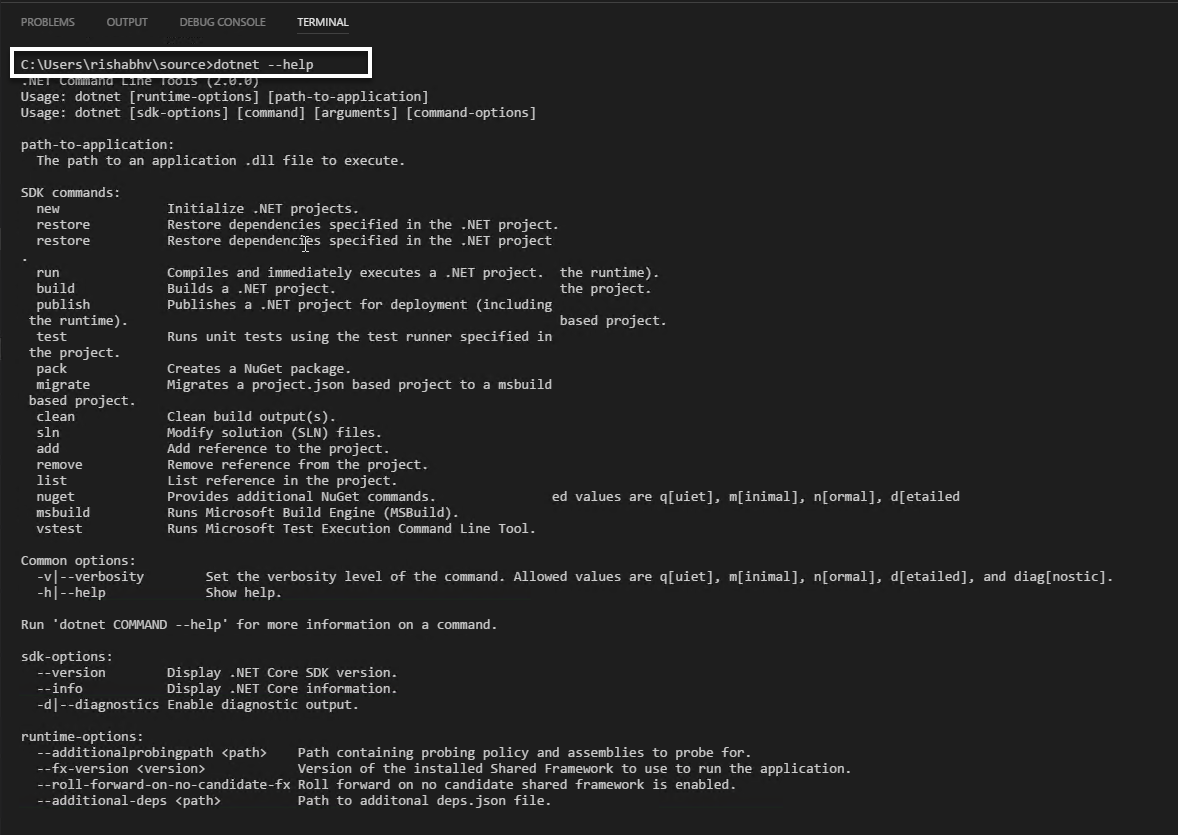
The SDK lists all the possible commands and options that can be used with explanations. So keep in mind, any time you need any help with .NET commands, SDK is there to help us. Just ask for help by typing dotnet --help in the terminal.
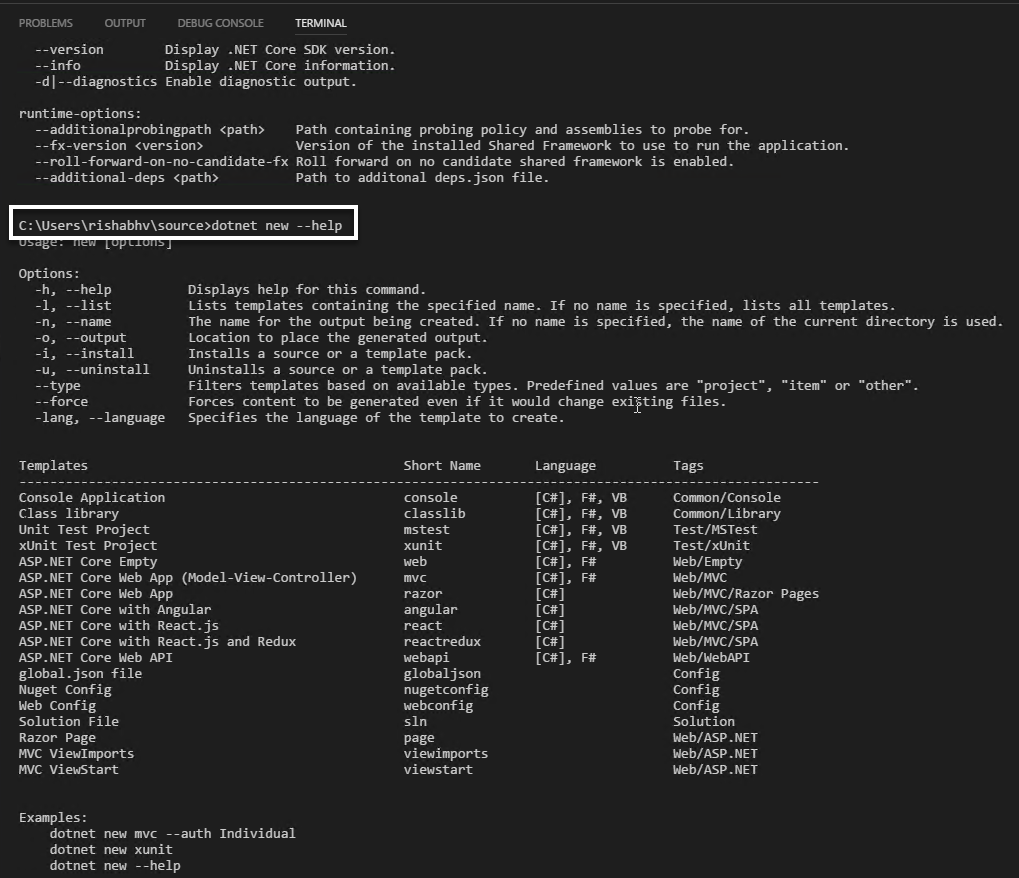
From the command list, it looks like the command of interest to us is the new command, as its description reads that this command initializes .NET projects.
So, let's ask SDK how to use the new command by typing dotnet new --help. This will let us know the command that we need to run to create a new MVC application:
Based on the preceding help text, let's enter the following command:
dotnet new mvc -lang C# -n HelloDotNETCore2This will create a new MVC project named HelloDotNetCore2 in the C# language, in the folder named HelloDotNetCore2 at the location of the terminal. Now let's build and run the application by typing the following commands:
cd HelloDotNetCore2
dotnet build
dotnet run
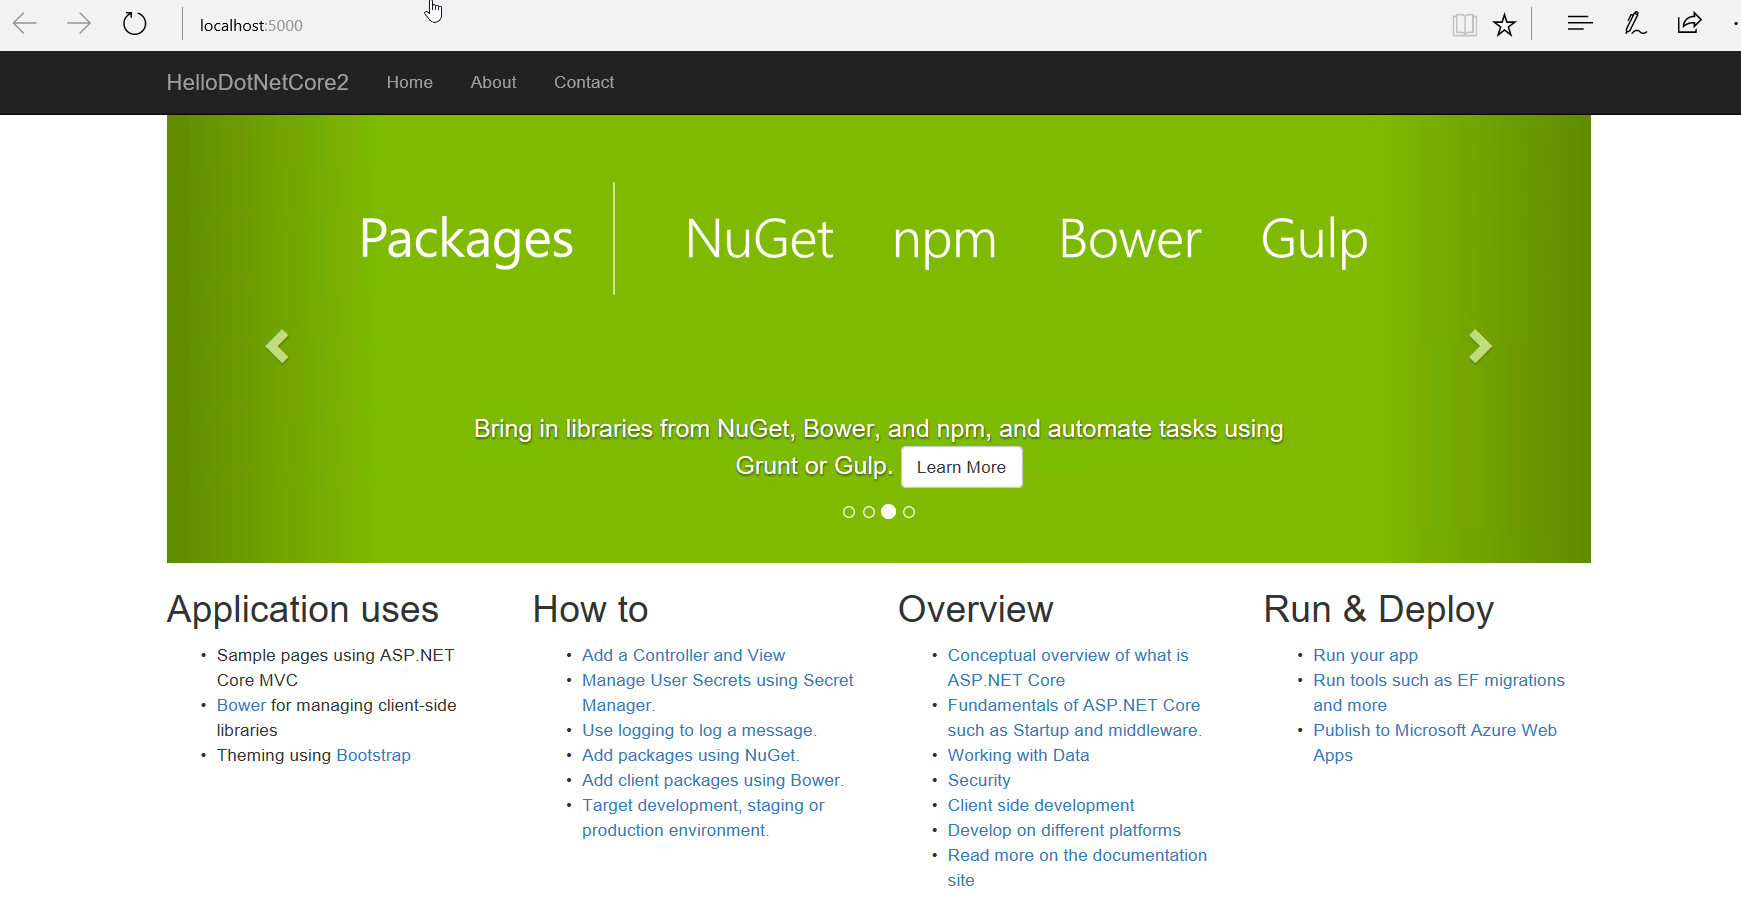
The first command navigates to the newly created folder, HelloDotNetCore2. Then, we build the application with the second command and run it through the third command. The dotnet build command is just to show that we have a build command as well. The dotnet run command actually builds and runs the application. Now, go to the browser of your choice and navigate to http://localhost:5000 to see the application running in your browser:
Alternatively, you can go to the Explorer view in the activity bar, open the HelloDotNetCore2 folder, and press F5. This will also build the application and launch it in the browser.
F# is a functional programming language. Functional programming treats programs as mathematical expressions. It focuses on functions and constants that don't change, rather than variables and states. F# is a Microsoft programming language for concise and declarative syntax. Let's begin with a brief history of how this language came into existence. The first attempt at functional programming was Haskell .NET. F# development began in 2005 and after that, various versions came along. At the time of writing this chapter, F# 4.1 is the latest version; it was released in March 2017. This comes with Visual Studio 2017 and supports .NET Core.
The F# language can be used for the following tasks:
- To solve mathematical problems
- For graphic design
- For financial modeling
- For compiler programming
- For CPU design
It is also used for CRUD applications, web pages GUI games, and other programs.
Keywords and their use in the F# language are outlined in the following table:
Keyword | Description |
| Indicates that either it has no implementation or is a virtual and has default implementation. |
| In verbose syntax, indicates the start of a code block. |
| Indicates an implementation of an abstract method; used together with an abstract method declaration to create a virtual method. |
| Used in conditional branching. A short form of else-if. |
| Used in type definitions and type extensions, indicates the end of a section of member definitions. In verbose syntax, used to specify the end of a code block that starts with the |
| Used to declare an exception type. |
| Used together with |
| Used in lambda expressions, and is also known as anonymous functions. |
| Used as a shorter alternative to the |
| Used to specify a base class or base interface. |
| Used to declare and implement interfaces. |
| Used to associate or bind a name to a value or function. |
| Used to declare a property or method in an object type. |
| Used to declare a variable; that is, a value that can be changed. |
| Used to implement a version of an abstract or virtual method that differs from the base version. |
| Used to indicate that a function is recursive. |
| Used in query expressions to specify what fields or columns to extract. Note that this is a contextual keyword, which means that it is not actually a reserved word and it only acts like a keyword in an appropriate context. |
| Used to indicate a method or property that can be called without an instance of a type, or a value member that is shared among all instances of a type. |
| Used to declare a structure type. Also used in generic parameter constraints. Used for OCaml compatibility in module definitions. |
| Used to declare a class, record, structure, discriminated union, enumeration type, unit of measure, or type abbreviation. |
| Used in a signature to indicate a value, or in a type to declare a member, in limited situations. |
| Used in a sequence expression to produce a value for a sequence. |
This reference is taken from the Microsoft official website, and a detailed explanation and description can be found at https://docs.microsoft.com/en-us/dotnet/fsharp/language-reference/keyword-reference.
In the F# language, we have two types of comments for a single line and for multiple lines. This is the same as C#. The following are the two types of comments:
Example: // returns an integer exit code
Example: (*Learn more about F# at http://fsharp.org *)
F# has a rich data type system. We can broadly classify them as:
- Integral types:
sbyte,byte,int16,uint16,int32,uint32,int64, andbigint - Floating point types:
float32,float, anddecimal - Text types:
charandstring - Other types:
bool
These types are also referred to as fundamental primitive types in F#. Apart from these, F# has an exhaustive list of predefined types as well, such as lists, arrays, records, enumerations, tuples, units, sequences, and so on. It is recommended that a person learning F# goes through the official Microsoft documentation on F# at https://docs.microsoft.com/en-us/dotnet/fsharp/.
F# uses the let keyword for the declaration of a variable, for example:
let square x = x*x
The compiler automatically detects this as a value type. If we pass a float value, the compiler will be able to understand that without declaring a data type. Variables in F# are immutable, so once a value is assigned to a variable, it can't be changed. They are compiled as static read-only properties.
The following example demonstrates this:
let x:int32 = 50
let y:int32 = 30
let z:int32 = x + y
Variables x, y, and z are all of type int32 and are immutable, meaning their value cannot be changed.
Let's print their values. The syntax is as follows:
printfn "x: %i" x
printfn "y: %i" y
printfn "z: %i" z
After the preceding code executes, the result is as follows:
x: 50
y: 30
z: 80
Now, suppose we want to modify the value of x from 50 to 60 and check that z reflects the updated sum; we will write the code as:
let x = 60
let y = 30
let z = x + y
On executing this code, we get the following errors, and rightly so because x and z are immutable:
Duplicate definition of value 'x'
Duplicate definition of value 'z'
The correct way of doing it would be to use mutable variables for the declaration, as shown here:
let mutable x = 60
let y = 30 //It's optional to make y mutable.
let mutable z = x + y
x <- 70
z <-  x + y
On printing the values again, we will see:
x: 70
y: 30
z: 100
F# has the following operators:
- Arithmetic operators
- Comparison operators
- Boolean operators
- Bitwise operators
Let's discuss these operators in detail.
Arithmetic operators supported by the F# language are outlined in the following table. Assuming variable X = 10 and variable Y = 40 , we have the following expressions:
Operator | Description | Example |
| Adds two values |
|
| Subtracts the second value from the first |
|
| Multiplies both values |
|
| Divides two values |
|
| Modulus operator and gives the value of the remainder after an integer division |
|
| Exponentiation operator; raises one variable to the power of another |
|
The following table shows all the comparison operators supported by F# . These operators return true or false.
Let's take X = 20 and Y = 30:
Operator | Description | Example |
| Verifies the values of two variables are equal; if not, then the condition becomes |
|
| Verifies the values of two variables are equal; if values are not equal then the condition becomes |
|
| Verifies the value of the left variable is greater than the value of the right variable; if not, then the condition becomes |
|
| Verifies the value of the left variable is less than the value of the right variable; if yes, then the condition becomes |
|
| Verifies the value of the left variable is greater than or equal to the value of the right variable; if not, then condition becomes |
|
| Verifies the value of the left variable is less than or equal to the value of the right variable; if yes, then the condition becomes |
|
The following table shows all the Boolean operators supported by the F# language. Let's take variable X as true and Y as false:
Operator | Description | Example |
| Boolean AND operator. If both the bool values are |
|
| Boolean OR operator. If either of the two bool values is |
|
| Boolean NOT operator. If the condition is |
|
Bitwise operators work on bits and perform bit-by-bit operations. The truth tables for &&& (bitwise AND), ||| (bitwise OR), and ^^^ (bitwise exclusive OR) are shown as follows. In the following table, the first variable is X and the second variable is Y:
|
|
|
|
|
|
|
|
|
|
|
|
|
|
|
|
|
|
|
|
|
|
|
|
|
It also supports ~~~(Unary, effect of flipping bits) , <<< (left shift operator), and >>>(right shift operator).
The F# language has the following (if...else and loop) types of decision-making statements.
The following table shows all the ways of implementing if statements:
Statement | Description |
| An |
| An |
| An |
Nested | You can use one |
F# provides the following types of loop:
Loop type | Description |
| The |
| This form of |
| Repeats a statement or group of statements while the given condition is true. It tests the condition before executing the loop body. |
nested loops | We can use one or more loop inside any other |
F# functions act like variables. We can declare and use them in the same way as we use variables in C#. A function definition starts with the let keyword, followed by the function name and parameters, a colon, its type, and the right-side expression, showing what the function does. The syntax is follows:
Let functionName parameters [ : returnType] = functionbody
In the preceding syntax:
functionNameis an identifier of the function.parametersgives the list of parameters separated by spaces. We can also specify an explicit type for each parameter and if not specified, the compiler tends to presume it from the function body as variables.functionbodycomprises an expression, or a compound expression, which has number of expressions. The final expression in the function body is the return value.returnTypeis a colon followed by a type and it is optional. If thereturnTypeis not specified, then the compiler determines it from the final expression in the function body.
Have a look at the following example for our syntax:
let addValue (x : int) = 5 + x
A function can be called by passing the function name followed, by a space, and then arguments (if any) separated by spaces, as shown here:
let sum = addValue 3
We can perform many tasks using F# functions, some of which are as follows:
- We can create a new function and link that function with a type as it acts as a variable type:
let square x = x*x - We can perform some calculations as well, such as:
let square x = x*x
- We can assign a value. Taking the same example:
let square x = x*x
- We can pass a function as a parameter to another function like this:
let squareValue = List.map square[1;2;3] // using square function
- We can return a function as a result of another function example:
let squareValue = List.map square[1;2;3]
The order of files in a project matters in an F# solution. The file used in any function should be placed above the file where the function is used, because F# has a forward-only model of compilation.
Unlike C#, where the file sequence doesn't matter, the sequencing of files does matter in F#. For example, consider that Program.fs is using DotNetCorePrint.fs. So, DotNetCorePrint.fs should be placed above Program.fs in the solution; otherwise, it will throw a compilation error. To move a file up or down, we can right-click on the file and select Move Up or the keys Alt + the up arrow to move the file. The ordering of the files in Solution Explorer can be seen in the following screenshot:

We are now going to see how to write and read in F#. To read and write into the console, we can use the following commands:
- To write:
System.Console.Write("Welcome!") - To read:
System.Console.Read() - To print:
printfn "Hello"
Let's compare F# with C#:
F# | C# |
The F# user is free from the obligation of defining types; for example: The compiler can identify (
| The C# user is bound to provide a type:
|
F# has immutable data, and the value never changes; for example:
In the preceding example, to add one more number, ( | C# has mutable as well as immutable data. Strings are immutable, the rest are all mutable, for example:
In the preceding example, we created a list and added a new item to the same list. The list gets modified. |
F# compiles code in an order. It is favoured for data processing and algorithmic computation. It doesn't work on visibility; it works sequentially.
| C# code works on visibility. The sequence doesn't matter. |
The order of files in a project matters in the F# solution. A file used in any method should be placed above the file where the method has been used.
| The order doesn't matter in C#.
|
F# has precise syntax; it focuses on what not and how; for example:
Right-click F# uses declarative syntax, not imperative syntax as in C#. F# helps us to minimize accidental complexity, meaning complexity that is not a part of the problem, but which we introduced as part of the solution, for example:
Quicksort smaller
| C# code implementation is more about how to implement. It sometimes increases unnecessary complexity as part of the solution to a problem. Quick sort has a very complex algorithm and a high chance of increasing accidental complexity. |
In this chapter, we discussed downloading Visual Studio Code, .NET Core 2.0, an Ubuntu 17.04 ISO image, and the tools required to start .NET Core application creation, as well as how to install them on Windows and Linux machines. We also discussed how to set up a Ubuntu Linux virtual machine and introduced the F# language.
In the following chapter, you'll be introduced to native libraries in .NET Core, used to extend console capabilities. We will discuss Interop with existing libraries and ncurses.


