


Multimedia is a very old human endeavor. And curiously, it all started with images, more than 30,000 years ago, painted by pre-historic humans on cave walls. The Chauvet caves and Lascaux caves, in France have the oldest paintings known to man (refer to the following image).

Source: Sacred destinations (2009).Lascaux cave painting. Retrieved April 14, 2009, from http://www.sacred-destinations.com/france/lascaux-caves.htm (Public domain)
This was the first technology invented to express and capture not only the world we experienced through our senses, but also our imagination and creativity in a medium that could be shared with others.
When compared to these paintings, written text is quite recent, and it marks the beginning of History, more than 9,000 years ago (that's the reason we call the period before it the pre-History). After stone, papyrus was used in ancient Egypt, then parchment, and later paper, invented in China and brought to Europe in the 12th Century.
The 19th Century saw great developments in multimedia. From photography to motion pictures, from mass production of paper to the new process of printing images and text on the same page, all of it was invented during this time.
Ironically, it took mankind almost all of the 30,000 years since the paintings on cave walls to get a combination of text, image, sound, and video, all working in the same medium. The first motion pictures articulating all of these elements were first watched in the 1920's, with soundtracks, subtitles, and of course, pictures—still or moving.
The real revolution started with the advent of computers and the Internet, and later on the World Wide Web in the beginning of the 90's, and economically-accessible technology for the masses. And finally, after thousands of years of human history, we (not just an elite few) can now create multimedia easily, and share it without great effort. In a way, it's a new era for human imagination, creativity, and expression.
This book is about exploring these new possibilities for not only we teachers and educators, but also we students and learners, for teaching, learning, and imagining in new ways, in our everyday life. And of course, we will be using Moodle for all of this.
By the end of this chapter we will:
Know a little bit about the history of multimedia
Understand some reasons for using multimedia in Moodle
Attach a sound file to a Moodle forum post
Embed an online video in a Moodle forum post
Insert an image in a Moodle forum post
Choose equipment and software with which to start creating multimedia
Moodle was built around an idea of learning that happens when a group of people constructs things for one another, creating, collaboratively, a small culture of shared artifacts with shared meanings.
Moodle makes available many resources (web pages, books, files, links, and so on) and activities (forums, assignments, quizzes, lessons, databases, glossaries, and so on) to support teaching and learning, but what can distinguish working with these from paper and pencil work is the way we explore the possibilities of computers and the Web to articulate multimedia elements with text. Creating these multimedia elements, a very powerful concept too, is not possible using Moodle (it is not in its scope either), so when I am talking about using multimedia in Moodle I am mainly referring to the creation of multimedia using other kind of tools, particularly by students, and guided and later integrated, discussed, and assessed through Moodle.
Using multimedia in this way can provide more opportunities, to a group of teachers and students, for the construction of, in this case, multimedia artifacts. We will try to use multimedia not only as a product for better delivery, but also to improve the ways in which students can construct.
It is usually said that multimedia can be beneficial for learning, as it can approach diverse learning styles, add interactivity and learner control, and reduce the time required to learn or extend the information presented through different channels. When we talk about multimedia elements, we are talking about content; however, I would say that pedagogy is even more important. That is why we should also value diverse classroom practices around multimedia rather than just using it exclusively for delivery.
I would like to quote the words of Seymour Papert (1993):
Across the world children have entered a passionate and enduring love affair with the computer
Note
Papert, Seymour: Preface to The Children's Machine: Rethinking School in the Age of the Computer. Retrieved 14 August, 2008, from http://www.papert.org/articles/ChildrensMachine.html
I believe that this also applies to multimedia—using multimedia in Moodle is a way of engaging our students and making subjects more interesting to them.
This book was written around the design of an online course called Music for an everyday life using Moodle, which is available at http://www.musicforaneverydaylife.com. This course is open to everyone (no enrolment key is needed; it has a guest access), so you can share it with colleagues as it is licensed under a Creative Commons Attribution license. This gives you a lot of freedom in using and remixing the course's content in your own course.
You might ask, why music? Music, besides being fun and horizontal to all cultures, is a subject that can easily gather contributions from areas such as Science (for example, Waves and Sound), Geography (with instruments from around the world, such as the Ukelele), Languages (music in itself is a language), World History (from medieval music to jazz), or even Social Sciences (the law around creative works). This book was not made for musicians in particular, and one of its main challenges was to reach different educators from different subjects. Music is simply the way to get all of these perspectives working together.
The main goal of the course is to develop a basic music literacy that can be used in the daily life of teenagers and adults.
I'm not a professional musician (barely a talented amateur) so I'm not expecting the course, Music for an everyday life, to be THE online reference in music education. Music was chosen as the main subject of the course so that it could be meaningful to as many people as possible. As it permeates all areas of life, I have tried to create a curriculum that reflected this, approaching music from a broader perspective, and not just basic music theory or instrument playing.
When designing this course, I tried to combine my experience in teaching (mainly science and ICT in education), and my time as a student in a Jazz school in Portugal, and all that teenage period that some of us go through, when we want to be stars, live somewhere between a studio and a stage, sell CDs, and be famous. Some of my friends who accompanied me during this period are now professional musicians (one has just graduated in the conservatory of Amsterdam), others changed paths despite their talent, and are now business men or designers. I became a science teacher; the studio times are gone, and I really like what I do now, but music will always be a part of my life, and this course was an opportunity to remember and share it with others.
The course, Music for an everyday life, will be organized around 10 modules (adding one pre-session for preparation and one post-session for follow up), corresponding to three hours of work each, for a total of 30 hours. The course can be used either in distance education or combined with regular classes, what we call blended-learning or b-learning.

Each of the course's 10 modules will have a standard structure, starting with:
One multimedia resource for a delivery moment
Two student activities, involving the creation of multimedia artifacts (as a group or individually, computer based, online based, classroom based, or out-of-school based) with informal peer assessment and interaction
One moment of formal assessment

For each module, we will develop multimedia content such as images, audio, video, and interactive content, so in total we will create some dozens of multimedia artifacts that are hopefully relevant, are easy-to-do, and are as little time consuming as possible to develop, for us teachers and trainers with busy schedules.
Using multimedia for delivery, and building our own teaching material, can be time-consuming, and as we know, being a teacher or a trainer is time consuming just by itself, without the need for any extra work load. This book will focus on simple multimedia elements that you can create without a huge effort, for your everyday life as a teacher or a trainer. Even if you are an enthusiast of digital technologies, keep this in mind—leave time and space for your students or trainees to explore the tools and create multimedia elements. Don't put all of the weight on your side. Better learning is not necessarily a consequence of instruction, so the focus of the course will be on giving the learner better opportunities to create and share multimedia artifacts, and to dialogue about and reflect on these constructions with others.
Nowadays, you can find a lot of free content on the Web that can be used for educational purposes without limitations. I would like to thank the authors of this content for their contribution to this culture of sharing in which we are now living. The same goes for the communities of free software, and the companies that provide software for free, for opening opportunities to many people, on which this book and the course are built upon. Building on their work is like "standing on the shoulders of giants".
The course modules will be organized around the following themes:
1. Music evolves—dealing with the history of music across the ages and within different genres.
2. A world of music—approaching the cultural diversity and music in different cultures.
3. Music and media—having a critical look at the message underlying music, especially in lyrics and music videos.
4. Music as a language—understanding basic music theory and learning to play an instrument.
5. Being a musician—exploring some daily events in the life of musicians.
6. Spaces for music—looking at music studios and technologies that support musical creation.
7. Music and the commons—understanding the business of music and alternative ways of licensing and distributing it.
8. The science of music—having a look at music from a science perspective, mainly sound and waves.
9. Music, dance, and emotion—exploring the links between music, dance, and emotions.
10. What's good music?—reflecting on quality criteria for music.
Some assumptions are made as the pre-requisites both for this book and for the course. These have to deal with the knowledge, hardware, and software that will be required to complete all of the proposed tasks.
The course will be for music beginners who probably have an instrument, such as a piano or guitar (this is not a necessity, as we will be also creating music using a computer), and who have an intermediate knowledge of how to use a computer, the Web, and Moodle from a student's perspective. This means that students are expected to already know how to manage files and folders, use a digital camera, and download photos and videos to a computer, how to install, uninstall, open, and close programs, and so on.
The pre-requisites for using this book are more-or-less the same, with the only difference being to know how to use Moodle from a teacher's perspective. This means that you should know how to create and configure resources and activities in general, upload files, use Moodle's HTML editor at least for text formatting, manage users, and run a simple course with forums, assignments, and basic quizzes (not, of course, for absolute novices in Moodle—there are some nice books from Packt if you need to improve your skills). If you are thinking that this is too much, and that technologies for multimedia creation are far too complicated for you or for your "older" students, have a look at this video http://www.youtube.com/watch?v=pQHX-SjgQvQ from the show "Øystein og jeg" on Norwegian Broadcasting (NRK) about a medieval helpdesk and this new technology called "book". I usually show it when the "age" argument comes up, and with it the usual assumption that older people can't learn a new technology. They can—it's just a matter of time and attitude.
If you are on a tight budget, this is not a limitation for creating multimedia. It's easy to get a digital camera that, in addition to taking photos, also records videos, or to find a cheap headset that can be used to produce some sound, and all of this for less than €100/£90/USD$130.
Digital cameras are now widespread and are an interesting replacement for a regular camera. They allow us to create pictures (and most of them allow the recording of videos as well) that can be archived to a computer, USB disk, or the Web. These days, even a regular mobile phone has a camera, so this can also be an option. You can also find cheap webcams and headsets. Thus, a low-budget equipment kit would consist of:
A consumer digital camera that can capture videos
A webcam
A headset
If you want to spend a little bit more on equipment (and the budget allows this) you can build a simple home studio consisting of:
An USB audio interface to which you can connect instruments and microphones
A microphone with a tripod and a cable
Headphones
A mid-range webcam
A mid-range digital camera that captures good quality videos
A tripod for the camera
A tablet
A scanner
I will be using all of this equipment, plus a range of free software tools, to create the course, Music for an everyday life, always trying to select examples that can be transposed to other subjects. If you are an amateur musician, you probably know how to select this kind of equipment and will not have any problems. But if you are a science teacher, for example, don't worry. I'm a science teacher as well, just one who happens to have studied some Jazz, and the activities that we will perform will not demand any science or music knowledge. As I have told you before, the challenge of this book is to reach people in several subject areas. Let's establish a basic requirement associated with this book and with the participation, as a student, in the course in Moodle:
A consumer digital camera that captures videos and photos with 2 Megapixels or more
A webcam with a minimum of 640x480 pixels video and photo resolution
An headset (better than just a microphone, because if you have the computer speakers on, there is the risk of feedback)
A computer with an Internet connection (of course)
It is also assumed that the computer that will be used to perform the tasks of the course (and this book) has a Microsoft (XP or Vista), Macintosh, or Linux operating system and some minimum requirements, such as more than 512 MB of memory (ideally more than 1GB), at least one USB port, headphones, a microphone, the respective ports for these, and enough free disk space to install and use the applications suggested in this book (10 GB should be enough).
For the rest of the requirements, free software will do the trick.
Throughout the course we will be using as much cross-platform, free, Open Source software as possible. However, in a few cases, the only Microsoft-compatible software will be the single choice (around four tasks will use Windows-only software) due to the lack of adequate alternatives on other OSes, or its broader distribution (this distribution will probably also apply to the readers of this book). Either way, as we will focus on processes and tasks that are "standard", I expect that these will also be useful, no matter which platform you use. Similar software for other platforms will be referred to as well.
Picking up software for multimedia production is very easy nowadays as many options are available for every need. Another challenge for this book is to select the ones with simpler interfaces, that are as multi-platform as possible, and of course, that are free. Sometimes, it will not be possible to get completely cross-platform software (software that can run in GNU/Linux, Mac OS, and Microsoft Windows), but such cases will be rare. The reason for selecting free software as far as possible is that it reduces the barriers to installation on schools' computers and students' personal computers (licenses for this kind of use are generally very open and usually free), so we can invest our money in equipment and time, instead.
As we go along building the course in the following chapters, other tools will be introduced. It's overwhelming if you get a list of 20+ applications to install at the beginning of the book, so we will introduce new tools as they are needed. Using many tools and strategies and lots of multimedia is not necessarily good, so the proposed tools will always have a context where they make sense, and can be used not only for improved delivery, but also for designing activities that are expected to motivate, engage, and create better opportunities for learning.
Moodle, as a Web based learning management system/virtual learning environment, is prepared for a range of multimedia elements (not for creation, but for integration). We can easily add images, videos, and sound files. And if everything works out as expected, we will just need to make a link to the multimedia file, and Moodle will do the rest to embed a player and show it.
However, there are some Moodle settings that we should be aware of that make this use of multimedia easier. We should ask our Moodle administrator to:
Enable the multimedia plugins: In the Site administration block, go to Modules | Filters and click on the closed eye next to the plug-in name to open it). Then click on Settings, enable the swf plugin, and save the changes.
Allow the EMBED and OBJECT tags: In the Site administration block, go to Security | Site policies and select the checkbox for this field, and save the changes.
Use the HTML editor: In the Site administration block, go to Appearance | HTML editor and select the checkbox for this field and save the changes. This option is usually enabled by default.
Enable RSS Feeds: In the Site administration block, go to Server | RSS and select the checkbox for this field and save the changes. After this, you will need to enable RSS feeds in each module that generates them: the Database, the Forum, and the Glossary. In the Site administration block, go to Modules | Activities and select the checkbox for Enable RSS Feeds, after clicking on the name of each of these modules, and then save the changes.
Increase the maximum upload file size: Multimedia files can be sometimes larger than common document files, so having a good upload size limit will be helpful. A maximum upload size of 16 MB will be enough for common uses. If our Moodle installation has less than that, we could ask our administrator to increase it. In the
php.inifile (or in the.htaccessfile), change the following values:post_max_size = 16777216andupload_max_filesize = 16777216. In Apachehttp.conforphp.conf, change the value ofLimitRequestBodyto16777216. Then, in the Site administration block, go to Security | Site policies and in the dropdown box for the Maximum uploaded file size field, select the Server limit. Again, all of the Modules that allow attachments, for example, the Assignment and the Forum, will need individual configuration. Go to Modules | Activities and select 16 MB from the dropdown box for the Maximum attachment size field in these two modules and save the changes. Also remember that teachers can change the maximum upload size for each course (go to Settings) and in each of these activities created in a course that allow file uploading.Note that Moodle administrators can refuse to change some of these settings as they can overload the server, so we may need to ask them to upload larger files for us. Multimedia files, especially videos, can be very large files, so we should have some preoccupation with the size of the files we upload. An alternative that we will explore in this book is to host our files on online services and then embed (a concept we will see in a moment) these in Moodle. This will save server space for our school or institution, but can raise other questions such as blocked websites, bandwidth, or e-safety that we will see in this book. Another alternative is to use file formats that have good size/quality ratios, and we will learn how to select and use such file formats later on.
After going through these steps, it's a good time to try it out to see if everything is working. Let's start with three simple tasks, involving an image, a sound, and a video on a forum, respectively.
Note
For further help and tutorials, go to http://www.musicforaneverydaylife.com/getting-ready
1. Go to the Flickr Creative Commons (CC) licensed content at http://www.flickr.com/creativecommons/by-2.0 and search for a photo under an Attribution license (when an image is termed as CC attribution it means that we can use these images without any restrictions, except for needing to cite the author—we will have a look at copyright issues in Chapter 8).
2. On the results page, choose an image. Next, right-click on the image (if you are a Mac user and have a one-button mouse, click on it while pressing the CTRL key on the keyboard), and save the picture to your computer.
3. Finally, upload the image as an attachment to a new forum post, citing the source.
You should be able to see a screenshot similar to the following:
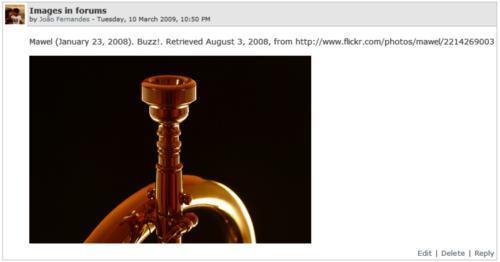
In this case, Moodle has automatically inserted the image for us. It has a width that will fit well in the screen. Sometimes, when the image has a width above say, 800 or 1024 pixels (depending on the monitor on which it is displayed), we will have to resize it, preferably before we upload it to Moodle. You don't have to worry about that for now.
Pictures are sometimes better than a thousand words. We can use them in specific cases of the forum to:
Share photos and report study visits
Share and discuss a painting, a drawing, or a cartoon
Create a collaborative photo story, where each post is an element of the story
Share screen captures of works made with software
1. Select a song from the Wired CD (http://creativecommons.org/wired).
2. Download it to your computer, again by right-clicking on the link to the music, and saving the target of the link to your computer.
3. Write a forum post in Moodle citing the source of the music (never forget the sources—the license of the music of this CD allows non-commercial sharing).
4. Upload the sound file as an attachment on the forum post.
If everything works as expected you should see a screen similar to the following:

Moodle's multimedia plugin is automatically inserting a Flash Player for our MP3 file. The multimedia plugin processes the page, looking for links to multimedia files, and when it finds one, it tries to insert a player.
Note
In the case of MP3 files, we should ensure that we have the Flash Player plugin installed on our browser. We can go to http://www.adobe.com/shockwave/welcome and check this (if we don't have the Shockwave Player installed, that's not a problem). Flash Player allows the playing of multimedia content, such as audio, video, or animations inside browsers and nowadays it has become almost a standard on the Web.
We should also have the necessary players for file formats such as Quicktime Movie (*.mov files) and Windows Media Video (*.wmv files) installed on our computer and working inside our browser—for example, a Quicktime Player, available at http://www.apple.com/quicktime/download/.
There are many uses for audio in other Moodle activities (such as the quiz or the assignment), but we'll just focus on the forum for now. We could:
Share an interview or comment, and vote and comment on it
Make a class selection of music themes
Do a roleplay activity in which each student plays a character
Ask for a poetry selection and declamation by students
Start a collaborative and iterative composition of a musical theme, where each new post builds on the one before
Generate a podcast through the conversion of the forum's RSS Feed
Host a Q&A between the teacher, invited experts, and students
Use a text-to-speech tool to create fictitious dialogues
Do some ear training exercises
Do a show-and-tell exercise
1. Go to TeacherTube (http://www.teachertube.com) and search for a video. In the results page, choose one and click on it.
2. Copy the URL shown in the Embeddable w/out Video Search field that you will see to the right of the video.
3. Open a new forum post and write something about it. Do not forget to mention the source of the video.
4. In the HTML editor, use the Enter key after the source and then click on the< > button to switch to HTML mode. Paste the code after the HTML tag<br /> (which corresponds to a line break in the text), as shown in the following screenshot:

5. Post your message, and the result will look similar to the following screenshot:

This embed procedure is very helpful, and you should keep these very simple steps in mind:
1. Copy the embed code.
2. Click on the< > button in the HTML editor.
3. Paste the embed code.
In a post, the size of the video (width and height) will fit well in the screen, but if we were embedding it in a Moodle block, we will have to change something in the code used "as is". We will leave that for later, when it's needed.
Using forums with videos is a great way to start a discussion, and it can also be used to:
Comment on a video excerpt
Create a collaborative video selection
Broadcast a live event
Post a video to add subtitles and comments
Post a silent video for students to submit a soundtrack
Post a video tutorial capturing procedures for a software application
We have just tried three simple examples of using content that was not made by us. Creating our own multimedia content is another story; but nowadays it can be quite easy, with the price of equipment going down, software interfaces getting simpler to use, and a wide variety of free software being available for multimedia editing. We now don't have any excuses for not using it, except for a lack of time. The subsequent chapters in this book will deal with this multimedia production, explaining and showing how to create these resources for delivery and active learning, not just as products, but also as activities for your students to participate in.
To give you just a flavor of what the course will be, here is a list of some examples that will be developed either for the course by the teachers, or during the course activities by the students:
Produce video tutorials explaining some tasks in music software and exploring some web sites
Add a soundtrack and remix a video
Broadcast a live video through Moodle
Create an interactive timeline of the history of music
Create a collective world map with multimedia place marks of world instruments
Design a music studio floor plan
Draw a cartoon strip about a scene in the life of a musician
Direct a stop-motion animation
Create a collaborative multimedia music styles glossary
Create interactive diagrams and charts
Use multimedia Moodle quizzes, lessons, and assignments with multimedia
And many other such exciting activities!
We have had an overview of the evolution of multimedia, considering some of the potential advantages of its uses in teaching and learning. These uses can be aligned with the underlying learning philosophy of Moodle, focusing not just on delivery but also on active learning, where students will use the tools for multimedia creation to augment their possibilities to construct, share, dialogue with, and reflect upon those constructions with others.
We also considered the basic knowledge, equipment, and software required to start creating our course, Music for an everyday life, which will gather contributions from History, Geography, Social Sciences, Science, and other fields of human knowledge. And finally, we saw some of the requirements for using multimedia in Moodle, and made three simple experiments on a forum, with pictures, sound, and video, to see if everything was working as expected.
So, let's start, just like the Chauvet and Lascaux caves, with images!
