


Most readers, by now, will be familiar with Moodle through the excellent publications from Packt, but a quick overview is useful to remind ourselves of why it has been chosen for this subject guide. In addition, the methods and practices in this book will be supported through a Moodle site set up to support Design Technology (DT).
Support can be found at www.dtmoodle.org.uk. Please feel free to register and join in with the discussions and help each other out. The more material we can amass together, the easier it will be for all of us.
In this chapter, we will take a look at setting up a very basic Moodle course in order to begin building our more DT specific elements. We will briefly look at setting up some basic resources and then add some interactive materials. These on their own would build a useful course, but we will then extend the facilities and features in order to maximize student participation and curriculum support. We will also look at the basic reporting and assessment tools available and how to enhance the look of your course. These will build the foundations from which we can build more sophisticated and comprehensive sites to support DT.
Moodle is a Virtual Learning Environment (VLE) that is based on open source principles and the educational philosophy called social constructivism.
Note
You can find out more about the philosophical underpinnings through a search on the Internet or through Moodle's own document page at http://docs.moodle.org/en/Philosophy.
This methodology holds that the best and most effective way for people to learn is by a collaborative sharing of knowledge and practice. Moodle is therefore designed from the ground up to support collaborative learning practices and methods. In addition, Moodle is part of the open source movement, which is a large community of people who support each other and work towards some shared goals. At the time of writing, this number is close to 850,000. If you join in with the Moodle community through forums and conferences, you will find a wealth of information and help available from people throughout the world. This large pool of people is really what makes Moodle work so well. There is a good chance that any problem that you may have had with an aspect of using Moodle has already been solved by someone else or a group of people. This will save you a great deal of valuable time and energy.
Once you have logged in to a Moodle site, you will have been granted some sort of role. In most instances, as we are dealing with supporting students, this is likely to be a teacher role. This role will allow you to customize your own courses and add material to them, as well as support and assess the progress of the students who are also enrolled in the course.
The three key roles you are likely to deal with will be your own as teacher, the non-editing teacher role for class-based assistants, and the student role. The basic overview of roles can be found on the Administration panel under Users. The overview of the roles is displayed there, as shown in the following screenshot:

When you log on to your own course, you will see the various roles that users have been granted. Once you log in to Moodle, you will see which courses you have access to. If you are watching a particular course, you will see the role that you are assigned, as shown in the following screenshot:

Moodle is a Virtual Learning Environment (VLE) that is based on open source principles and the educational philosophy called social constructivism.
Note
You can find out more about the philosophical underpinnings through a search on the Internet or through Moodle's own document page at http://docs.moodle.org/en/Philosophy.
This methodology holds that the best and most effective way for people to learn is by a collaborative sharing of knowledge and practice. Moodle is therefore designed from the ground up to support collaborative learning practices and methods. In addition, Moodle is part of the open source movement, which is a large community of people who support each other and work towards some shared goals. At the time of writing, this number is close to 850,000. If you join in with the Moodle community through forums and conferences, you will find a wealth of information and help available from people throughout the world. This large pool of people is really what makes Moodle work so well. There is a good chance that any problem that you may have had with an aspect of using Moodle has already been solved by someone else or a group of people. This will save you a great deal of valuable time and energy.
Once you have logged in to a Moodle site, you will have been granted some sort of role. In most instances, as we are dealing with supporting students, this is likely to be a teacher role. This role will allow you to customize your own courses and add material to them, as well as support and assess the progress of the students who are also enrolled in the course.
The three key roles you are likely to deal with will be your own as teacher, the non-editing teacher role for class-based assistants, and the student role. The basic overview of roles can be found on the Administration panel under Users. The overview of the roles is displayed there, as shown in the following screenshot:
When you log on to your own course, you will see the various roles that users have been granted. Once you log in to Moodle, you will see which courses you have access to. If you are watching a particular course, you will see the role that you are assigned, as shown in the following screenshot:
In the example site, there is a course for each of the key areas of the DT subjects, and these are broken down into the levels that correspond with qualifications in the UK:

There will obviously be some overlap as many of the subjects will cover all of these levels. However, for now this is a useful way to organize the subject matter. The courses themselves can then be created in one or all of these categories. The way that they are organized will depend on how the institution manages all teaching on a VLE. As you can see in the previous screenshot, you have the Add new category and Add a new course buttons to add new categories and courses respectively. The following example shows a possible approach to structuring the courses within a level. It shows all Level 2 courses:

As stated earlier, these are the UK subject areas, but they are the subject areas that are general to the field of DT and therefore useful as vehicles for understanding the processes of this book.
The courses themselves are then organized in relation to the exam board specifications. For example, the main areas of resistant materials then become the labels that make up a course structure.
The type of layout shown in the previous screenshot has been organized by the topic's course format. When setting up a course, there are currently several styles that can be used, such as topics or weekly. The style chosen would depend on how you wish to deliver your learning material. It could also be organized on a monthly basis, which is useful for intensive revision periods before public examinations. In many cases, students will work through the material at different times, so a topic-based approach will allow them to access the material they need, while still seeing the overall picture of the course. A weekly layout, though more detailed, may be somewhat overwhelming. If you are working in a blended environment, where there are specific dates associated with your meetings with students, you may choose the weekly format. This format will track the course with dates so that students know very specifically the stage they have reached.
The most basic building blocks of Moodle, or indeed any VLE, are static resources. Chances are that you have already created a wealth of worksheets and supporting documents for your subject area and these may already exist on an Intranet. An Intranet is an internal network, as opposed to the Internet, which is the network of computers outside of your organization. The Intranet resources can easily be added to Moodle, but in a more structured way than just allowing students access to a named folder on an Intranet. In addition, they can be organized with a more meaningful context and linked in to other more interactive resources to build a detailed learning resource.
In order to add material to the site, it first needs to be placed on the server itself. Moodle is a web-based system that links material stored in an area designated for the course being used to an easy-to-use web interface. Therefore, you need to upload your material to the site in order to make the resource available.
In order to do this, you first need to enable the edit functions on the course itself. You can achieve this by clicking the following button, which appears at the top-right corner of all your courses:
To add a file to the site, choose the Add a resource drop-down bar, as shown in the following screenshot, and select the option to Link to a file or web site. The resource menu that opens will be common to most elements you add to Moodle, so is worth looking at in some detail. Once you have understood this process, it is easy to modify and replicate it for all other aspects of Moodle; again, this is a very useful design feature in and of itself.

The process of adding material to Moodle courses involves the following steps:
1. Naming the element.
2. Summarizing the element.
3. Linking to the resource (such as a file or website).
4. Presentation of the information.
5. Assigning permissions to user groups.
As you can see in the following screenshot, the name is required (designated by the *) as this will appear as the link in the course itself:
Giving some detail to the element may help students understand its purpose better if it is not immediately obvious. The field itself is labeled as Description and will be displayed to students in the main window when they first access the resource. You could use this to add some more detail if the resource or website link itself is not obvious. For example, you might note that the website link you have provided will help them with a specific aspect of their coursework.
As you can see, you can either type in a web address as the link to the resource, or you upload a file to the system and then click on Choose to make it available. If you choose an uploaded file, the system will present you with a file manager window and ask you to select a file to upload. This can be done from anywhere, which gives a great deal of flexibility. If the file is already there, then simply click on the Choose or upload a file button, as shown in the following screenshot:

Moodle is an online system, and as such, it is based on open standards and practices. Many students may not have access to proprietary office software at home and may therefore be disadvantaged by being asked to use that software for their homework, though Microsoft does provide free readers for Word and PowerPoint. If you use something such as OpenOffice, you can give your students a copy to take home on a CD, thus guaranteeing they have the same software and are not using something that was illegally obtained. OpenOffice also outputs files as .docs and .pdfs. A PDF reader is also freely available on the Internet.
Once you have chosen the material, such as a health and safety guideline for working with metals or corrosive construction materials such as lime, you need to decide if it is easier to display in the same window or a new one. I find it less distracting if the resource opens into another window, but this is a personal choice.
The grouping feature needs to be explained briefly, though it will be covered in a later chapter as it is very useful. It also needs to be enabled by the site administrator in order to be available (for details, please see Chapter 9, Tracking Progress with the Gradebook). Its main use here is for the purpose of differentiation. If grouping has been enabled at the site level, and assuming you have set your class up into groups such as Intermediate and Advanced, you can specify a grouping for this particular element resource. The students who make that group will see and use the resource, but all other students will not. This makes it useful for either advanced material for gifted and talented students, or more remedial material for students who have not yet grasped the concepts fully and need extra support. For example, a sub-group of your Product Design group may be working on some extra credit work relating to the electronic elements used in circuit design. These students can work on this material without the remainder of the group being distracted by material that they do not understand yet.
The other key (resource) feature of Moodle, which can be used to build up the structure of the course, is the web page (element) resource. This is accessed by choosing the Compose a web page in the drop-down resource list, which is part of resources, as shown in the following screenshot:

The nature of this should be quite self-explanatory as it presents a basic HTML editor for composing instructions or extra research material. However, the other great advantage is that once it has been composed, it becomes part of the system's database, and as such, can then be searched as with any other data. This is not possible with pre-formatted files, such as word-processed documents, though obviously they are convenient as they can be downloaded.
Since it is a web-based resource, it means that pictures and links can be embedded and the HTML features such as color coding can be used as well. In addition, if the auto-linking feature of Moodle has been enabled, any word that appears in this web page, that is, also in a glossary, will be linked. This is obviously an advantage in a jargon-rich subject such as design technology; it helps reinforce the student's grasp of the key terms. This will be shown in more detail in Chapter 5, Assessing Student Progress.
Once you have created some static resources and web-based instructional pages, you should have enough initial material to start carrying out some assessment. Moodle has a detailed and sophisticated gradebook and all aspects of the site that have some method of grading can be used to build up a picture of your student's learning progress. The most basic type of assessment, however, will probably be the assignment.
There are various ways to assess your students, and even though this is an online learning system, you can still have assignments that are not necessarily uploaded and stored. Many elements in Design Technology will be such that they may not lend themselves to an online system. For example, you may have students create some basic recipe for homework to test their ability to follow instructions or to make base sauces. You can obviously take a picture of the result and include this as part of the assessment, but the assessment itself is an aesthetic one based on taste and smell. In this instance, you can set up an assignment that does not require an accompanying file upload called Offline activity, but still allows a mark to be recorded. The following screenshot shows this type of assignment choice:

For another assignment, there may be a requirement for multiple file uploads, such as in a product design, and some of these may require several drafts. Both of these instances (as well as many others), are well catered for in Moodle and we will go into these in some depth in Chapter 8, Assessing Student Progress, but for now, we need to add an assignment.
By choosing the Add an activity drop-down menu, seen in the following screenshot, you can see that there are four types of assignment that can be added:
Advanced uploading of files
Online text
Upload a single file
Offline activity

The interface for all assignments is broadly similar and requires, as a minimum, the naming of the assignment and the type of grading associated. If it is an informal piece of work, you can leave it so that no grade is required. You can also use some of the features in this setup interface to determine whether or not it is based on a deadline or even if they are allowed to re-submit based on any feedback improvements you suggested.
In this screenshot, there is a customized scale based on the vocational specifications of some exam boards in the UK, which is marked from pass to distinction. Scales will be discussed in more detail in Chapter 9. Once you add this type of custom scale to your course, students will be notified of its presence the next time they log in. Also, if the calendar is enabled, they will see any due dates. Once they submit some work (even by handing it to you) and you assign a grade, the grade will appear in the gradebook.
Much that is created in the world of design is often brought about through discussion and an interchange of ideas. With this in mind, it is useful to be able to create some areas for student discussion. These can be quite formal discussions where you present design ideas and get some feedback from students in order to assess their grasp of the principles, or they could be more informal discussions to let them test out some of their more esoteric ideas. The module to use for this type of activity is the forum, which we look at in detail in Chapter 3, Encouraging Reflective Practices Using Forums and Blogs as part of reflective practice.
As with the assignments explained before, forums are added from the Add an activity drop-down menu once editing has been enabled. The interface is similar to assignments we looked at previously and the basic requirements here are the name of the forum, a description of what it is for, and the basic layout. The layout, as listed, refers to the organization of the forum, such as how comments are displayed to the users. As with the assignment module, there are a few basic options to choose from:
A single simple discussion
Each person posts one discussion
Q and A forum
Standard forum for general use (the default)
In the forum description box, you can set the scene for what this discussion is about and possibly pose a question that will prompt the student's responses. The rest of the settings determine whether or not students are forced to subscribe and if they can use the "read tracking" feature to monitor their own participation. You may, for example, want to force all students to be subscribed in a discussion relating to health and safety, as it is so fundamental to all aspects of Design Technology because students are working with dangerous equipment such as lathes or making food for the public in Food Technology. In the following screenshot, we have chosen the option to not force everyone to be subscribed:

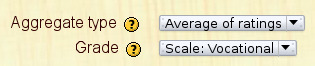
If the forum is something that you would like to use for formative assessment, by this we mean part of the student's publicly recognized qualification such as a GCSE in the UK, you can assign grading, which may be another way to assess how well students understand design principles. Much of what is created in Design Technology is peer assessed, so this acts as a good model for what they will encounter in the real world and may set some good habits. In the following screenshot, this marking is based on a Vocational scale, which in the UK would be: Pass, Merit, or Distinction.
This type of marking makes a useful starting point for other discussions. It may be that you attach a picture of an iconic chair design. You may then prompt a discussion to ask if students agree that it is well designed. If the bulk of them disagree and rate it as only so-so, perhaps it could be a generation thing. What is it about this design that makes it so unattractive to the group? How would they change it? The discussion can be limited to a number of posts to make sure it does not go too far off topic. Grading is discussed in depth in Chapter 9.
Once you have added some static resources and hopefully promoted some lively discussions, it might be useful to give some short tests to the students for you to gauge their current knowledge. For example, after a lesson on hydraulics, you may design a short quiz of the key words and functions in a model of a hydraulic pump. If all students miss a certain key term, you can then address this in more detail in a follow-up lesson. It also acts as a useful signpost for students to know where they are in terms of understanding key concepts. As with all activities on Moodle, quizzes can be somewhat informal and not use a rigid number scale. Alternatively, they may be limited to a time and a specific computer for more formal assessment that forms part of a recognized qualification. All of their attempts will be placed into their gradebook and can be set to measure a highest grade or an average, depending on what you are measuring. Quizzes will be dealt with in depth in Chapter 5.
The quiz interface is the same as other modules in Moodle in terms of naming the activity, describing what it is about, and then creating the content of it—the quiz questions in this case. Once you select Quiz from the activities drop-down menu, you will see the basic naming and description fields. The following table lists a series of presentational options available:
|
Option name |
Sub-options |
Description |
|---|---|---|
|
Timing |
Open the quiz Close the quiz Time limit Time between attempts |
A range of options here allow you to make the quiz appear to students in a set date range. You can also assign a time so that students can get practice of a 30 minute public exam. You can also make sure that they don't take the quiz quickly after the first attempt as they have memorized a few answers. |
|
Display |
Questions per page Shuffle |
How many questions should students see? Maybe one per page so that they can focus. You can make questions shuffle each time they retake so they don't learn the answer patterns only. |
|
Number of Attempts |
Attempts allowed Adaptive |
Maybe use one attempt for exam practice, but many attempts for practice drills. Students can see their mistakes and try again so that they learn from their errors. |
|
Grades |
Method Penalties |
Use the highest or average grade. Students' grade is marked down after each unsuccessful answer. |
|
Security |
Browser security Password Require network address |
The quiz will take over the desktop so they can't copy and paste. The quiz will require a password The quiz will only be available on a specific computer or set of computers. |
These options described briefly are hopefully self-explanatory and the help buttons associated with them are quite detailed if you are unsure. The main issue is what type of quiz you are creating: is it formal or informal? For example, are you asking a small number of yes/no questions to students in order to make sure that they followed today's lesson or will this form part of their certificated course? The security option allows you to specify a range of computer IP addresses, so that you could specify 10 computers in one part of your school. This would allow manual supervision at least.
Note
For a more detailed overview of some of the security issues discussed here, you might look at the corresponding Moodle docs at: http://docs.moodle.org/en/Adding/updating_a_quiz#Security_section.
Once you have chosen your options for the quiz such as the time and display as previously discussed, you can save it. You then need to return to the course and click on the newly-created link to the quiz in order to add the questions. The resulting window shows that you can create questions for this specific course, albeit they can be used on other courses if required or add them to a more general category to form a question bank. The edit tab displayed will open some sub-menus, one of which will be Questions where you can add your questions. The quiz module is dealt with in greater detail in Chapter 5. There are several question types to choose from:
Multiple Choice
Short Answer
Numerical
True/False
Matching
Embedded Answers
Random Short-Answer Matching
Random
Description
Calculated
Essay
The type of question chosen will be determined by what it is you are testing. In most cases, the multiple-choice type will be most commonly used due to familiarity. However, you may use the short answer type when you are testing for something very specific such as the properties of plastics are: x, y, z, or even to test for spelling skills. Short answer quiz questions can be used when students are expected to know and be able to write very specific pieces of information and where you are testing this recall ability. You may also use an essay type question like those that exist in a more formal exam situation such as showing a picture and asking students to write what the picture tells them about a certain recipe, or type of material, for example. Do bear in mind, however, that the essay type of a question will still need to be graded manually.
The most basic type of question, as indicated, is likely to be the multiple-choice style of question. Once you have chosen this from the drop-down option for a question, you will be presented with the usual box to enter a name for the question and a box for the actual question text. As this is an HTML box, it is easy enough to upload and embed an image here. The advantages to this in design are quite clear. You may also insert a table with multiple pictures if the question is trying to determine the differences or similarities between a certain number of items such as wood working joints or metal joins. If there is more than one possible answer, this can be specified in the interface, as long as you remember to add up the possible answers to make the requisite 100 percent for the total.
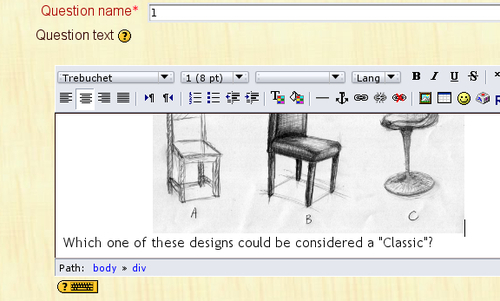
In the previous screenshot, you can see that a sketch has been scanned and uploaded to the quiz to create the question. This could be work carried out by you or some other image (always bear in mind the copyright issues). It might be likely in this case that all of the chairs are "Classics", in which case you would need to enable multiple answers and assign the appropriate marks to each correct choice, such as 25 percent each or 33.333 percent each, as shown in the following screenshot:
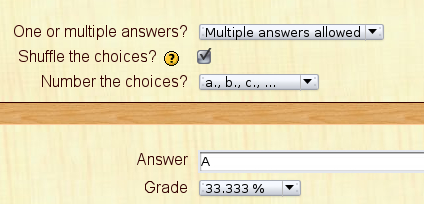
The previous screenshot shows that the quiz will allow three correct answers for this question and that each correct answer will carry a mark of 33.333 %. Students will need to get all three answers correct to get a full mark. Each wrong answer will reduce their score for the question.
Students taking the quiz, or any other assessed module, would then gain grades in their gradebook, which could then be used to assess their progress or achievement.
Note
Further guidance and suggestions on the use and creation of quizzes can be found at: http://docs.moodle.org/en/Effective_quiz_practices.
As students interact with your course materials, join in with discussions, and take various quizzes, they build up some marks in the gradebook that we will look at in detail in Chapter 9. Some of these marks will be automatically assigned, as with quizzes and peer assessed forums, but others will require a mark from staff and some feedback.
Note
Please note that an over reliance on automated grading may not be as effective as a teaching method, so it needs to be used in conjunction with more hands-on methods of feedback and encouragement.
Depending on how the gradebook is set up, the students will be able to see their grades when they log in and staff or teachers enrolled on that course will be able to see all their students' grades.

Gradually, as you can see in the previous screenshot, you can build up a clear picture of how your students are doing and can spot problems to intervene as quickly as possible. You can also give detailed feedback on assignments and posts to forums in order to guide your students and create an effective framework for their learning in the subject. The gradebook itself, as we shall see in Chapter 9, can also be divided into categories of marks such as coursework or extra credit; so, it could be a useful guide for students' ability in all areas of their learning. It can be used to track homework assignments that might be a fast and effective way of gauging areas where students are having difficulties with your material. Information here would therefore allow you to modify your resources or discuss with the students other strategies that they could employ.
The report features of Moodle allow you to get an idea of when and how students are accessing and participating in your courses. The level of participation and quality of participation might be useful for Continuing Professional Development (CPD) as a gauge as to the effectiveness of your teaching strategies and material. If a student is not meeting their targets, but claims that they are spending the requisite number of hours on the online material, it is easy enough to create a report about this to see if they are indeed logging on at home and what they are looking at. For example, you could choose the Participation report under the reports menu on the course, as shown in the following screenshot:

You can select the homework assignment activity or activities, and quickly see who has accessed them. The following screenshot shows a report of student's activity (or lack thereof) on the assignments associated with a Food Technology course. In this case, three students have not read the material set for homework so they are not allowed to undertake a practical assignment in class as they are underprepared.

The final element of setting up your working course on Moodle is the course format. Various blocks can be added to the course in order to support and enhance learning and communication among course participants and these can be positioned in a way that makes your course more interactive and perhaps conducive to learning. You can add a calendar, which will tell students about upcoming events such as guest speakers, assignments that are pending, construction demonstrations held at local colleges, or quizzes that have been added. You can also enable a blogging facility so that students can post their own personal reflections on the course for others to read and comment upon their recent work placements. Blogs will be addressed in more detail in Chapter 3. You can add RSS blocks that will pull in information from other websites and keep students up-to-date in developments from companies and government departments. All of these can be arranged in the course format to encourage and stimulate learning and the exchange of information as much as possible. The more interactive these elements, hopefully the more engaged and interactive the students will become.

The previous screenshot shows that this course has a rolling news feed from the BBC technology website and also an add-on block called slideshowgallery, which rotates some of the student's work in a small block. These are only some of the multitude of blocks that can be added to a course, though it is always good not to overdo it. The amount of modules and blocks that can be added to your site is growing daily. Some of these are heavily developed by members of the Moodle core team, while others are personal projects that have been uploaded by users to share. It is best to try these on a test site before placing them on your main site.
Now that we have a basic grasp of the key aspects of creating a Moodle course and using some of the available tools, we will now delve deeper and introduce some other tools and functions to extend this repertoire. We also introduce some third-party tools, which bring even more functionality and features to the way in which we can teach DT in Moodle. Some of these are not part of the downloadable Moodle, but have been tested by the wider community. In the next chapter, we will begin to compile our course by introducing methods to assist students in data gathering by using the Database and Questionnaire modules.