Moodle is a free learning management system that enables you to create powerful, flexible, and engaging online learning experiences. I use the phrase 'online learning experiences' instead of 'online courses' deliberately. The phrase 'online course' often connotes a sequential series of web pages, some images, maybe a few animations, and a quiz put online. There might be some email or bulletin board communication among the teacher and students. However, online learning can be much more engaging than that.
Moodle's name gives you insight into its approach to e-learning. From the official Moodle documentation:
The word Moodle was originally an acronym for Modular Object-Oriented Dynamic Learning Environment, which is mostly useful to programmers and education theorists. It's also a verb that describes the process of lazily meandering through something, doing things as it occurs to you to do them, an enjoyable tinkering that often leads to insight and creativity. As such, it applies both to the way Moodle was developed, and to the way a student or teacher might approach studying or teaching an online course. Anyone who uses Moodle is a Moodler.
The phrase 'online learning experience' connotes a more active and engaging role for the students and teachers, as in:
Web pages that can be explored in any order
Courses with live chats among students and teachers
Forums where users can rate messages on their relevance or insight
Online workshops that enable students to evaluate each other's work
Impromptu polls that let the teacher evaluate the students opinion on a course's progress
Directories set aside for teachers to upload and share their files
All these features create an active learning environment, full of different kinds of student-to-student and student-to-teacher interaction. This is the kind of user experience that Moodle excels at, and the kind that this book will help you create.
This book is for anyone who wants to make the most of Moodle's features to produce an interactive online learning experience. If you're an educator, corporate trainer, or just someone with something to teach, this book can guide you through the installation, configuration, creation, and management of a Moodle site. It is suitable for people who perform the task of creating and setting up the learning site, and for those who create and deliver courses on the site. That is, it is for site administrators, course creators, and teachers.
Whether you are the site creator, or a course creator, you can use this book as you would use a project plan. As you work your way through each chapter, the book provides guidance on making decisions that meet your goals for your learning site. This helps you create the kind of learning experience that you want for your teachers (if you're the site creator) or students (if you're the teacher). You can also use this book as a traditional reference manual. But its main advantages are its step-by-step, project-oriented approach, and the guidance it gives you about creating an interactive learning experience.
Moodle is designed to be intuitive to use, and its online help is well written. It does a good job of telling you how to use each of its features. What Moodle's help files don't tell you is, when and why to use each feature, and what effect it will have on the student experience. These are exactly the topics discussed in this book.
The appendix contains a checklist of the major steps for creating a Moodle site and populating it with courses. The steps are cross-referenced to the relevant sections of this book. Download this checklist from the Packt Publishing website (http://www.packtpub.com/support/3537_Checklist.zip), print it, and keep it handy while creating your Moodle site.
When you create a Moodle learning site, you usually follow a defined series of steps. This book is arranged to support that process. Each chapter shows you how to get the most from each step. The steps are listed here, with a brief description of the chapters that supports the step.
As you work your way through each chapter, your learning site will grow in scope and sophistication. By the time you finish this book, you should have a complete, interactive learning site. As you learn more about what Moodle can do, and see your courses taking shape, you may want to change some things you did in the previous chapters. Moodle offers you this flexibility. And this book helps you determine how those changes will cascade throughout your site.
Every Learning Management System (LMS) has a paradigm, or approach, that shapes the user experience and encourages a certain kind of usage. An LMS might encourage sequential learning by offering features that enforce a given order on each course. It might discourage student-to-student interaction by offering few features that support it, while encouraging solo learning by offering many opportunities for the student to interact with the course material. In this chapter, you will learn what Moodle can do and what kind of user experience your students and teachers will have, while using Moodle. You will also learn about the Moodle philosophy, and how it shapes the user experience. With this information, you'll be ready to decide how to make the best use of Moodle's many features, and to plan your online learning site.
Most of the decisions you make while installing and configuring Moodle will affect the user experience. Not just students and teachers, but course creators and site administrators are also affected by these decisions. While Moodle's online help does a good job of telling you how to install and configure the software, it doesn't tell you how the settings you choose affect the user experience. Chapter 2 covers the implications of these decisions, and helps you configure the site so that it behaves in the way you have envisioned it.
In Moodle, every course belongs to a category. Chapter 3 takes you through creating course categories, and then creating courses. Just as you chose site-wide settings during installation and configuration, you choose course-wide settings while creating each course. This chapter tells you the implications of the various course settings so that you can create the experience you want for each course. Finally, Chapter 3 takes you through the usage of the various blocks, each of which adds a well-defined function to the site or to the course. After creating the categories and courses, and deciding which blocks to use, you've created a framework for your site. Then, you're ready to fill your courses with learning material, which you'll do in Steps 4 through 6.
In most online courses, the core material consists of web pages that the students view. These pages can contain text, graphics, movies, sound files, games, exercises, and so on. Anything that appears on the World Wide Web can appear on a Moodle web page. Chapter 4 covers adding web pages to Moodle courses, plus other kinds of static course material such as plain-text pages, links to other websites, labels, and directories of files. This chapter also helps you determine when to use each of these types of materials.
In this context, 'interactive' means interaction between the student and teacher, or the student and an active web page. Student-to-student interaction is covered in the next step. This chapter covers activities that involve interaction between the student and an active web page, or between the student and the teacher. Interactive course material includes:
Surveys posed by the teacher
Journals written by the student and read by the teacher
Lessons that guide students through a defined path based upon their answers to review questions and quizzes
Chapter 5 tells you how to create these interactions, and how each of them affects the student and teacher experience. You'll need this information to help you manage Moodle's interactive features.
Social course material enables student-to-student interaction. Moodle enables you to add chats, forums, and wikis to your courses. These types of interactions will be familiar to many students. You can also create glossaries that are site-wide and specific to a single course. Students can add to the glossaries. Finally, Moodle offers a powerful workshop tool, which enables students to view and evaluate each other's work. Each of these interactions makes the course more interesting, but also more complicated for the teacher to manage. Chapter 6 helps you make the best use of Moodle's social features. The result is a course that encourages students to contribute, share, and evaluate.
Previous chapters covered the many features that you can add to a Moodle course. The same features can be added to the Front Page of your Moodle site. The Front Page can be anything from a simple welcome message to a full-fledged course of its own. This chapter helps you create a public face for your Moodle site. You can show a Login Page or the Front Page of your site. The content and behavior of the login and Front Pages can be customized. You can choose to allow anonymous users, require students to be registered, or use a combination of Guest and registered access. Each of these options affects the kind of welcome that new and existing students get, when they first see your site. Chapter 7 helps you determine which options to use, and how to combine them to get the effect you desire.
Moodle offers several tools to help teachers administer and deliver courses. It keeps detailed access logs that enable teachers to see exactly the content that the students accessed, and when they did it. It also enables teachers to establish custom grading scales, which are available site-wide, or for a single course. Student grades can be accessed online, and also downloaded to a spreadsheet program. Finally, teachers can collaborate in special forums (bulletin boards) reserved just for them.
As Moodle is open source, new modules are constantly being developed and contributed by the Moodle community. The modules that are part of Moodle's core distribution are covered in this book. Additional modules extend Moodle's capabilities. While this book cannot cover every module available, it can cover the process of installing and integrating new modules into your site. One of the modules included with the core distribution is a PayPal module. Chapter 9 covers how this module is used for pay sites. This chapter also covers backing up and restoring the entire site, individual courses, and components within a course.
Moodle is designed to support a style of learning called Social Constructionism. This style of learning is interactive. The social constructionist philosophy believes that people learn best when they interact with the learning material, construct new material for others, and interact with other students about the material. The difference between a traditional class and the social constructionist philosophy is the difference between a lecture and a discussion.
Moodle does not require you to use the social constructionist method for your courses. However, it best supports this method. For example, Moodle enables you to add five kinds of static course material that a student reads, but does not interact with:
Text pages
Web pages
Links to anything on the Web (including material on your Moodle site)
A view into one of the course's directories
A label that displays any text or image
However, Moodle enables you to add six types of interactive course materials. This is the course material that a student interacts with, by answering questions, entering text, or uploading files:
Assignment (uploading files to be reviewed by the teacher)
Choice (a single question)
Journal (an online journal)
Lesson (a conditional, branching activity)
Quiz (an online test)
Survey (with results available to the teacher and/or students)
Moodle also offers five kinds of activities where students interact with each other. These are used to create social course materials:
Chat (live online chat between students)
Forum (you can have none or several online bulletin boards for each course)
Glossary (students and/or teachers can contribute terms to site-wide glossaries)
Wiki (these are a familiar tool for collaboration to most younger students and many older students)
Workshop (these support peer review and feedback of assignments that the students upload)
So far, we have listed five kinds of static course materials, and eleven kinds of interactive course materials. In addition, some of Moodle's add-on modules add more types of interaction. For example, one add-on module enables students and teachers to schedule appointments with each other.
As Moodle encourages interaction and exploration, your students' learning experience will often be non-linear. Conversely, Moodle has few features for enforcing a specific order upon a course. For example, there is no feature in Moodle that would require a student to complete Course 101 before allowing the student to enroll in Course 102. Instead, you would need to manually enroll the student in each course. Also, there is no Moodle feature that would require a student to complete Topic 1 in a course before allowing the student to see Topic 2. If you wanted to enforce that kind of linear course flow, you would need to manually place the student into the group that is authorized to view Topic 1, and then upon completion, place the student into the group that is authorized to view Topics 1 and 2, and so on.
As a site administrator or teacher, enforcing a linear path through a course catalog, or through the material in an individual course, often requires manual intervention. However, if you design your site with Moodle's non-linear style in mind, you will find that it offers you great flexibility and the ability to create engaging online courses.
As Moodle becomes more popular, there is more demand for features that enforce a linear flow through a course. Modules are being developed to lock and open activities based upon a student's performance in previous activities. Check the Moodle.org news, roadmap, and modules pages for the status of these efforts.
In this section, I'll take you on a tour of a Moodle learning site. You will see the student's experience from the time the student arrives at the site, enters a course, and works through some material in the course. You will also see some student-to-student interaction, and some functions used by the teacher to manage the course. Along the way, I'll point out many features that you will learn to implement in this book, and how the demo site is using those features.
The Front Page of your site is the first thing most visitors will see. This section takes you on a tour of the Front Page of my demonstration site. Probably the best Moodle demo site on the Web is http://demo.moodle.org.
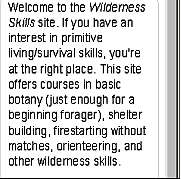
When a potential student arrives at the demonstration learning site, the student sees the Front Page. Later in this book, you'll learn to control what an anonymous visitor to your learning site sees on the Front Page. You can require the visitor to register and log in before seeing any part of your site, or allow the visitor to enter with a Guest account. Like most sites, my demonstration site allows anonymous visitors to see a lot of information about the site on the Front Page:
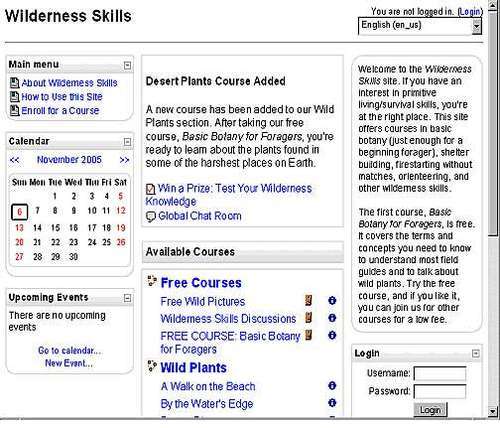
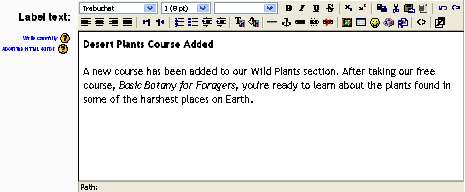
One of the first things a visitor will notice is the announcement at the top and center of the page, Desert Plants Course Added. Below the announcement are two activities: a quiz, Win a Prize: Test Your Wilderness Knowledge, and a chat room, Global Chat Room. Selecting either of these activities will require the student to register with the site.

Note the line Some courses may allow guest access in the middle of the page. You can set three levels of access for your entire site, and for individual courses:
Anonymous access allows anyone to see the contents of your site's Front Page. Note that there is no Anonymous access for courses. Even if a course is open to Guests, the visitor must either manually log in the user as Guest or the site must automatically log in a visitor as Guest.
Guest access requires the user to login as Guest. This enables you to track usage, by looking at the statistics for the user Guest. But as everyone is logged in as the user Guest, you can't track individual users.
Registered access requires the user to register on your site. You can allow people to register with or without email confirmation, require a special code for enrolment, manually create their accounts, import accounts from another system, or use an outside system (like and LDAP server) for your accounts. There's more on this in Chapter 2.
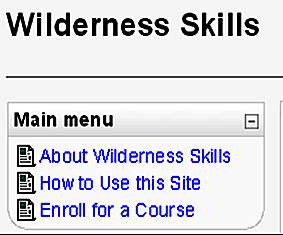
Returning to the Front Page, notice the Main menu in the upper left corner. This menu consists of three documents that tell the user what the site is about, and how to use it.
In Moodle, icons tell the user the kind of resources that will be accessed by a link. In this case, the icon tells the user these are web or text pages. The course materials that a student observes or reads, such as web or text pages, hyperlinks, and multimedia files are called Resources. In Chapter 4, you will learn how to add Resources to a course.
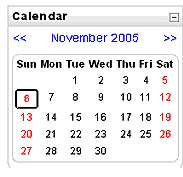
There is a Calendar and the Upcoming Events below the Main menu . These are blocks, which you can choose to add to the Front Page, and to each course individually.
Other blocks display a summary of the current course, a list of courses available on the site, the latest news, who is online, and other information. In the lower right of the Front Page you can see the Login block. Chapter 3 tells you how to use these blocks.
You can add these blocks to the Front Page of your site because the Front Page is essentially a course. Anything that you can add to a course—such as resources and blocks—can be added to the Front Page.
On the right side of the Front Page you see a Site Description. This is optional. If this were a course, you could choose to display the Course Description.
The Site or Course Description can contain anything that you can put on a web page. It is essentially a block of HTML code that is put onto the Front Page.
You can choose to display available courses on the Front Page of your site. In the Demonstration site, I've created a category for Free Courses and another for Wild Plants. Free Courses allow Guest users to enter. Courses in other categories require users to register.
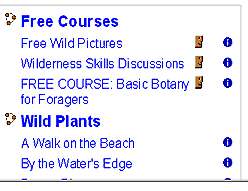
Clicking on the information icon _ch4.jpg) next to each course displays the Course Description. Clicking on a course name takes you into the course. If the course allows anonymous access, you are taken directly into the course. If the course allows Guest access, or requires registration, you are taken to the Login screen.
next to each course displays the Course Description. Clicking on a course name takes you into the course. If the course allows anonymous access, you are taken directly into the course. If the course allows Guest access, or requires registration, you are taken to the Login screen.
Now let us take a look inside the course.
In the next screenshot, the user has logged in as Guest and entered the Basic Botany course. We know this from the breadcrumbs trail at the top left of the screen, which tells us the name of the site and of the course. In the upper right, we see a confirmation that the user has logged in under the name Guest.
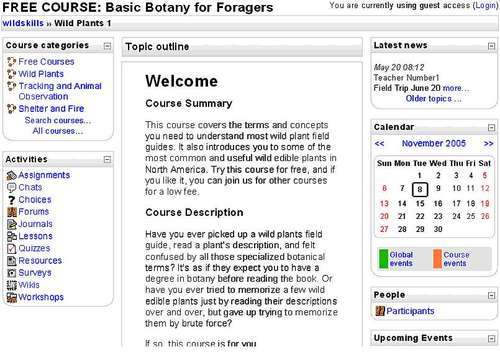
Similar to the Front Page, this course displays the Calendar and Upcoming Events blocks. It also displays blocks for the Latest news, People, Activities, and Course categories. The Activities block lists all of the types of Activities and Resources that are available in this course. Clicking on a link will display that type of activity. For example, clicking Quizzes displays this screen:
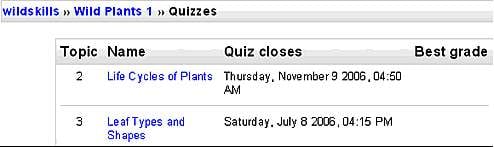
Note that the breadcrumbs at the top now indicate the site name, course name, and also indicate that you are viewing the quizzes in the course. The course is organized by Topic, and the number of each Topic is displayed in the left column. As the user is logged in as Guest, and many users can use that ID, the Best grade column is not meaningful here. It indicates only the highest grade for everyone who has ever attempted this quiz with Guest access. Clicking on the name of a quiz takes the user to that quiz. In the breadcrumbs at the top of the page (the navigation line), clicking on Wild Plants 1, takes the user back to the course.
Earlier, I commented on the non-linear nature of many Moodle courses. Note that even though the user has not completed Topic 1, the quizzes for Topic 2 and 3 are open to the user. Also, looking at the Activities block, you can see that all the resources for this course are available to the user at all times. Later, we'll discuss features that enable you to selectively hide and show different activities.
Moodle also enables you to organize a course by week, In that case, each section is labeled with a date, instead of a number. Or, you can choose to make your course a single, large discussion forum.
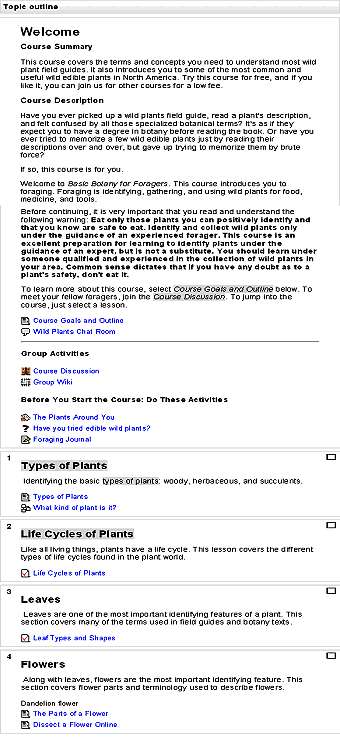
Most courses are organized by Topic. Note that the first topic, which I've labeled Welcome, is not numbered. Moodle gives you a Topic 0 to use as the course introduction.
Teachers can hide and show topics at will. This enables a teacher to open and close activities as the course progresses.
Topics are the lowest level of organization in Moodle. The hierarchy is: Site | Course Category | Course Subcategory (optional) | Course | Topic. Every item in your course belongs to a topic, even if your course consists only of Topic 0.
Clicking on Course Discussion, under Group Activities, takes the student to the course-wide forum. Clicking on the topic line opens that thread. You can see in this screenshot that the teacher started with the first post. Then William Rice left a test message, and a student replied to the original post:
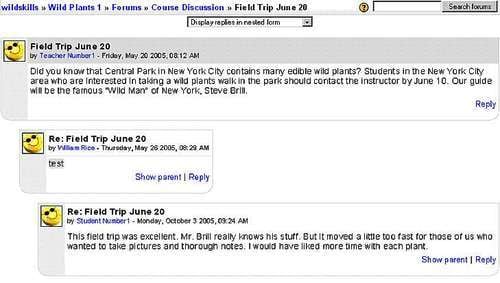
That test message doesn't serve our students. Fortunately, the teacher has editing rights to this forum. So he or she can delete posts at will. The teacher can also rate posts for their relevance, as shown in the following screenshot:
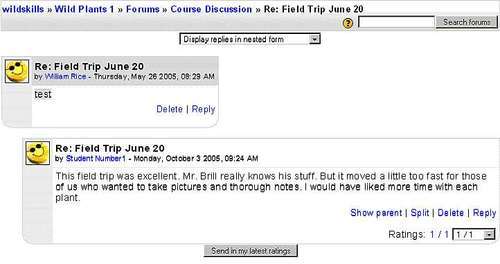
As Moodle supports an interactive and collaborative style of learning, students can also be given the ability to rate forum posts and materials submitted by other students. You'll find out more about forums in Chapter 6.
Next, the student will enter a workshop called Observing the Familiar.
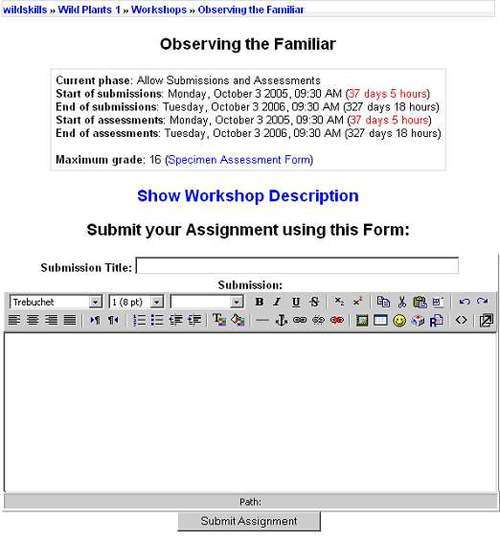
In this workshop, the student writes and updates some defined observations. These observations are then rated by other students in the course. When the student first enters the workshop, he or she sees directions for completing the workshop:
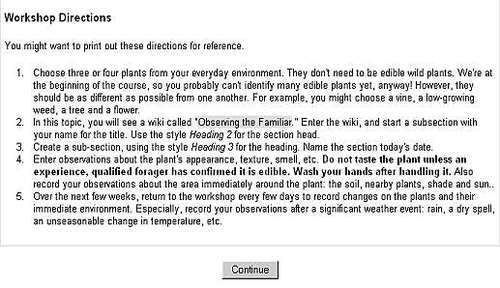
After reading these directions, the student continues to the workshop submission form (shown at the right).
Note the online word processor that the student uses to write the assignment. This gives the student basic WYSIWYG features. The same word processor appears when course creators create web pages, or when students write online Assignment entries, and at other times when a user is editing and formatting text.
At the top of the page, you can see that this workshop has opening and closing dates for submissions, and for assessments. It also has a maximum point value of 16. When the students assess each others' work, they will see the evaluation criteria and how many points each criterion is worth.
If you're able to read Step 5 in the workshop directions above, you can see that the student should return to this workshop every few days to update this assignment. To enable this, the course creator used a feature that allows students to resubmit workshops. The course creator could have chosen to allow a single submission, instead.
In the previous subsection, you saw how a student submits an assignment to a workshop. After each of the students submits an assignment, the student is given a chance to assess other students' work. In the following screenshot, Student Number2 has just submitted an assignment, and now can assess the work of Student 1. Student 2 would begin the assessment by clicking on the Assess link.
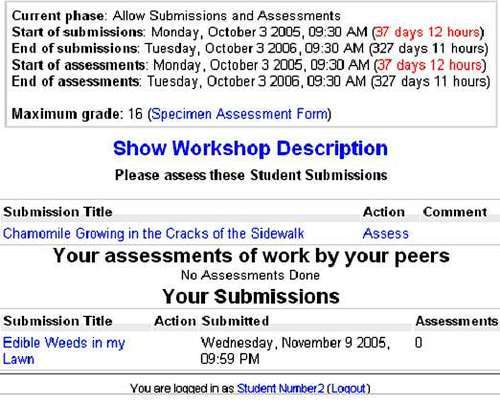
Under Your assessments of work by your peers, you can see that this user has not yet assessed anyone else's work. Under Your Submissions, you can see the title of this user's submission, and also note that no one has assessed the submission yet.
The Specimen Assessment Form at the top of the page displays the form that the student will use to assess others' work. However, it is a sample form. So it does not affect anyone's assessment.
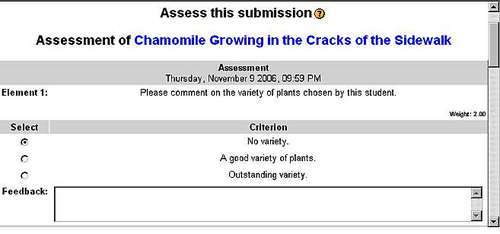
Clicking the Assess link brings up the assessment form for Student 1's workshop submission. The current user, Student 2, uses this form to assess the work. The teacher will have the opportunity to grade Student 2's assessment of Student 1's workshop. So not only does Moodle give you the ability to grade students' work, but also the ability to grade their assessments of other students' work. Because Moodle emphasizes collaborative effort, there are several places where a teacher can grade students on the quality of their collaboration.
Let us see what happens when you turn on the editing mode to make changes.
When a Guest user or a registered student browses your learning site, Moodle displays pages normally. However, when someone with course creator privilege logs in, Moodle offers a button for switching to the Editing mode:

Clicking Turn editing on puts Moodle into the Editing mode:
|
Normal Mode  |
Editing Mode 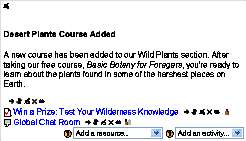 |
Let's walk through the icons that become available in editing mode.
Clicking the Edit icon  enables you to edit the content that precedes the icon. In this example, clicking the Edit icon that follows the paragraph enables you to edit the announcement:
Clicking the Edit icon next to the quiz, Win a Prize, takes you to the editing window for that quiz. In that window, you can create, add, and remove quiz questions, change the grading scheme, and apply other settings to the quiz.
Clicking the Delete icon  deletes the item that precedes the icon. If you want to remove an item from a course, but you're not sure you'll want to use it later, then don't delete the item. Instead, hide it from view. Hiding and showing content is explained below.
I call these the Hidden/Shown icons  /
/ instead of Hide/Show because the icons indicate the current state of an item, and not what will happen when you click on them. The Hidden icon indicates that an item is hidden from the students. Clicking it shows the item to the students. The Shown icon indicates that an item is shown for the students. Clicking it hides the item from the students.
If you want to remove an item from a course while keeping it for later use, or if you want to keep an item hidden from students while you're working on it, hide it instead of deleting it.


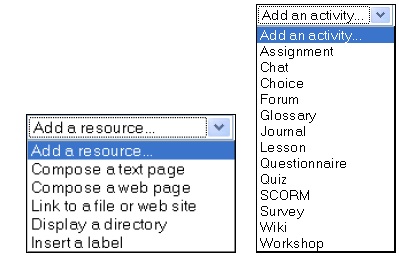
Course material that a student observes or reads, such as web or text pages, hyperlinks, and multimedia files, are called resources. Course material that a student interacts with, or materials that enable interaction among students and teachers are called activities. Now let us see how to add some resources and activities to your Moodle site.
In the Editing Mode, you can add resources and activities to a course. Moodle offers more activities than resources, such as Chat, Forum, Journal, Quiz, Wiki, and more.
You add resources and activities using the drop-down menus that appear in the Editing Mode:
Selecting an item brings you to the Editing window for that type of item. For example, selecting Link to a file or website displays the window to the right. Note that you can do much more than just specify a hyperlink. You can give this link a user friendly name, and a summary description. You can also open it in a new window, and do much more.
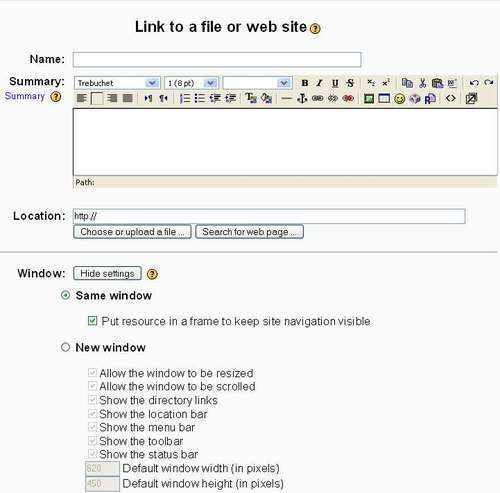
Almost every resource and activity that you add to Moodle has a Summary. This Summary appears when a student selects the item. Also, if the item appears in a list (for example, a list of all the resources in a course), the Summary is displayed.
While building courses, you will spend most of your time in the Editing window for the items that you add. You will find their behavior and appearance to be very consistent. The presence of a Summary is one example of that consistency. Another example is the presence of the Help icon  next to the title of the window. Clicking this icon displays an explanation of this type of item.
All the contents of the Administration block are displayed only when someone with administration, or course creator privileges has logged in. Students see a much more limited view of this block. The following screenshot shows the student's view of the Administration block on the left, and the teacher's on the right:
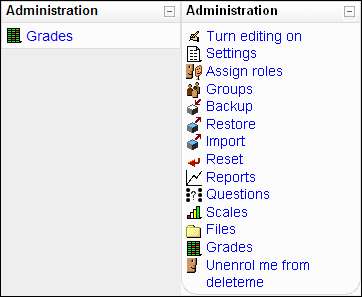
The choices on this block change depending on whether you are viewing the Front Page or a course, and the privileges that you have.
Choices in this block affect only the current course. For example, selecting Logs from the Front Page displays a page where you can view logs for all site activity, while selecting it from the course displays logs just for that course.
This short tour introduced you to the basics of the Moodle experience. The following chapters take you through installation of Moodle and creation of courses. If you work through those chapters in order, you will discover that many features are not mentioned in this tour. And, as Moodle is open source, new features can be added at any time. Perhaps, you will be the one to contribute a new feature to the Moodle community.
Moodle runs on any web server that supports the PHP programming language, and a database. It works best, and there is more support, when running on the Apache web server with a MySQL database. These requirements, Apache, PHP, and MySQL are common to almost all commercial web hosts, even the low-cost ones.
The Moodle learning management system resides in three places on your web host:
The application occupies one directory, with many subdirectories for the various modules.
Data files students and teachers upload, such as photos and assignments submitted by students, reside in the Moodle data directory.
Course materials that you create with Moodle (web pages, quizzes, workshops, lessons, and so on), grades, user information, and user logs reside in the Moodle database.
The following screenshot shows you my Moodle application directory. Without even knowing much about Moodle, you can guess the function of several directories. For example, the admin directory holds the PHP code that creates the administrative pages, the lang directory holds translations of the Moodle interface, and the mod directory holds the various modules:
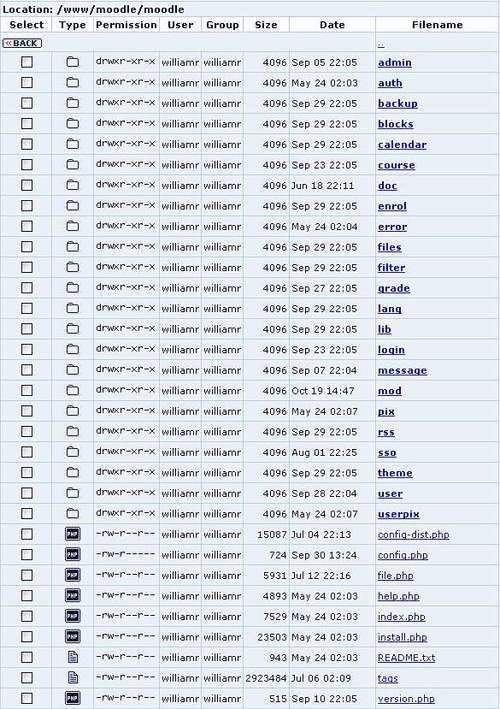
The index.php file is the Moodle Home Page. If a student were browsing my Moodle site, the first page the student would read is the http://moodle.williamrice.com/index.php file.
In my site, the free course Basic Botany for Foragers happens to be course number 4. Only the Moodle system knows it as course number 4. We know it as Basic Botany for Foragers. When a student enters that course, the URL in the student's browser reads http://moodle.williamrice.com/moodle/course/view.php?id=4. In the previous screenshot, you can see that /course is one of the directories in my Moodle installation. As the user navigates around the site, different .php pages do the work of presenting information.
As each of Moodle's core components and modules is in its own subdirectory, the software can be easily updated by replacing old files with new ones. You should periodically check the http://www.moodle.org website for news about updates and bug fixes.
Moodle stores the files uploaded by the users in a data directory. This directory should not be accessible to the general public over the Web. That is, you should not be able to type in the URL for this directory and access it using a web browser. You can protect it either by using an .htaccess file, or by placing the directory outside the web server's documents directory.
In my installation, the previous screenshot shows you that the web document directory for moodle.williamrice.com is /www/moodle. Therefore, I placed the data directory outside /www/moodle, in /www/moodledata:
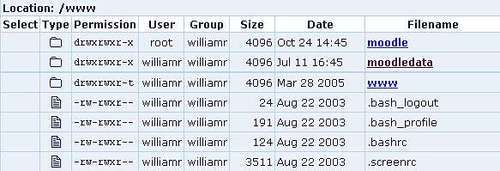
On my server, the directory /www/moodledata corresponds to the subdomain www.moodledata.williamrice.com. This subdomain is protected from open access by a
.htaccess file. The directory /www/www corresponds to the root domain, www.williamrice.com.
While the Moodle data directory stores files uploaded by students, the Moodle database stores most of the information in your Moodle site. The database stores objects that you create using Moodle. For example, Moodle enables you to create web pages for your courses. The actual HTML code of these web pages is stored in the database. Links that you add to a course, the settings, and content of forums and wikis, quizzes created with Moodle are all examples of data stored in the Moodle database.
The three parts of Moodle—application, data directory, and database—work together to create your learning site. Chapter 9 talks about backing up and disaster recovery, which is an obvious application of this knowledge. However, knowing how the three parts work together is helpful while upgrading, troubleshooting, and moving your site between servers.
Moodle encourages exploration and interaction among students and teachers and also between them. As a course designer and teacher, you will have the most tools at your disposal if you work with this tendency and make your learning experiences as interactive as possible. Creating courses with forums, peer-assessed workshops, journals, surveys, and interactive lessons is more work than creating a course from a series of static web pages. However, it is also more engaging and effective, and you will find that it is worth the effort to use Moodle's many interactive features.
While teaching an online course in Moodle, remember that Moodle enables you to add, move, and modify course material and grading tools on-the-fly. If it is permitted by your institution's policies, don't hesitate to change a course in response to the students' needs.
Finally, learn the basics of Moodle's architecture, and at least read over the 'installation' and 'configuration' in Chapter 2. Don't be afraid of the technology. If you can master the difficult art of teaching, you can master using Moodle to its full potential.