


In this chapter, we will cover the following recipes:
Single node installation of MongoDB
Starting a single node instance using command-line options
Single node installation of MongoDB with options from the config file
Connecting to a single node from the Mongo shell with a preloaded JavaScript
Connecting to a single node from a Java client
Starting multiple instances as part of a replica set
Connecting to the replica set from the shell to query and insert data
Connecting to the replica set to query and insert data from a Java client
Starting a simple sharded environment of two shards
Connecting to a shard from the Mongo shell and performing operations
In this chapter, we will look at starting up the MongoDB server. Though it is a cakewalk to start the server for development purposes and with the default settings, there are numerous options that let us tune the startup behavior. We will start the server as a single node; then, we'll introduce various configurations before we conclude by starting up a simple replica set and a sharded setup. So, let's get started by installing and setting up the MongoDB server in the easiest way possible, for simple development purposes.
In this recipe, we will look at the process of installing MongoDB in the standalone mode. This is the simplest and quickest way to start a MongoDB server but is seldom used for production use cases. However, this is the most common way to start the server for the purpose of development. In this recipe, we will start the server without looking at a lot of other startup options.
Well, assuming that we have downloaded the MongoDB binaries from the download site, extracted them, and have the bin directory of MongoDB in the operating system's path variable (this is not mandatory but it really becomes convenient), the binaries can be downloaded from http://www.mongodb.org/downloads after selecting your host operating system.
Perform the following steps to start with the single node installation of MongoDB:
Create the
/data/mongo/dbdirectory (or any of your choice). This will be our database directory, and it needs to have permission to let themongodprocess (the mongo server process) write to it.We will start the server from the console with the /
data/mongo/dbdata directory as follows:$ mongod --dbpath /data/mongo/db
If you see the following message on the console, you have successfully started the server:
[initandlisten] waiting for connections on port 27017
Starting a server can't get easier than this. Despite the simplicity in starting the server, there are a lot of configuration options that will be used to tune the behavior of the server on startup. Most of the default options are sensible and need not be changed. With the default values, the server should be listening to port 27017 for new connections, and the logs will be printed out to the standard output.
In this recipe, we will see how to start a standalone single Node server with some command-line options. We will see an example where we will perform the following tasks:
Starting the server that listens to port
27000Writing logs to
/logs/mongo.logSetting the database directory to
/data/mongo/db
Since the server is started for development purposes, we don't want to preallocate full size database files (we will soon see what this means).
If you have already seen and executed the steps mentioned in the Single node installation of MongoDB recipe, you need not do anything different. If all the prerequisites are met, we are good for this recipe too.
You can start a single node instance using command-line options with the following steps:
The
/data/mongo/dbdirectory for the database and/logs/for the logs should be created and present on your filesystem with appropriate write permissions.Execute the following command:
> mongod --port 27000 --dbpath /data/mongo/db --logpath /logs/mongo.log --smallfilesTip
Downloading the example code
You can download the example code files for all Packt books you have purchased from your account at http://www.packtpub.com. If you purchased this book elsewhere, you can visit http://www.packtpub.com/support and register to have the files e-mailed directly to you.
OK, this wasn't too difficult and is similar to the previous recipe, but we have some additional command-line options this time around. MongoDB actually supports quite a few options at startup, and we will see a list of the ones that are most common and important in my opinion:
For an exhaustive list of the options available, use the --help or -h option. The preceding list of options is not exhaustive, and we will see some more coming up in the upcoming recipes as and when we need them. In the next recipe, we will see how to use a config file instead of the command-line arguments.
The Single node installation of MongoDB with options from the config file recipe to use config files to provide startup options
To start a replica set, refer to the Starting multiple instances as part of a replica set recipe
To set up a sharded environment, refer to the Starting a simple sharded environment of two shards recipe
As we can see, providing options from the command line does the work, but it starts getting awkward as soon as the number of options we provide increases. We have a nice and clean alternative to providing the startup options from a configuration file rather than as command-line arguments.
If you have already seen and executed the steps mentioned in the Single node installation of MongoDB recipe, you need not do anything different, and all the prerequisites of this recipe are the same.
The /data/mongo/db directory for the database and /logs/ for the logs should be created and present on your filesystem, with the appropriate write permissions. Let's take a look at the steps in detail:
Create a
configfile that can have any arbitrary name. In our case, let's say we create the file at/conf/mongo.conf. We will then edit the file and add the following lines of code to it:port = 27000 dbpath = /data/mongo/db logpath = /logs/mongo.log smallfiles = true
Start the Mongo server using the following command:
> mongod --config /conf/mongo.conf
All the command-line options we discussed in the previous recipe, Starting a single node instance using command-line options, hold true. We are just providing these options in a configuration file instead. If you have not visited the previous recipe, I recommend that you do so, as this is where we have discussed some of the common command-line options. The properties are specified as <property name> = <value>. For all those properties that don't have values, for example, the smallfiles option, the value given is a Boolean value, true. If you need to have a verbose output, you will add v=true (or multiple v's to make it more verbose) to our config file. If you already know what the command-line option is, it is pretty easy to guess the value of the property in the file. It is the similar to the command-line option, with just the hyphen removed.
This recipe is about starting the Mongo shell and connecting to a MongoDB server. Here, we'll also demonstrate how to load JavaScript code into the shell. Though this is not always required, it is handy when we have a large block of JavaScript code, including variables and functions with some business logic in them that is required to be executed from the shell frequently, and we want these functions to be available in the shell always.
It is not necessary for the MongoDB server to run to start a shell. We will rarely start a shell without connecting it to a running MongoDB server. To start a server on the localhost without much of a hassle, take a look at the first recipe, Single node installation of MongoDB, and start the server.
Let's take a look at the steps in detail:
First, we will start by creating a simple JavaScript file; let's call it
hello.js. Type in the following lines in thehello.jsfile:function sayHello(name) { print('Hello ' + name + ', how are you?') }Save this file at
/mongo/scripts. (it can be saved at any other location too).In the command prompt, execute the following command:
> mongo --shell /mongo/scripts/hello.jsOn executing this, we should see the following message on our console:
MongoDB shell version: 2.4.6
connecting to: test
>
Test the database that the shell is connected to by typing the following command:
> dbThis should print out
teston the console.Now, type in the following command on the shell:
> sayHello('Fred')
Hello Fred, how are you?
The JavaScript function we executed here is of no practical use, but it's just used to demonstrate how a function can be preloaded upon the startup of the shell. There can be multiple functions in the .js file that contain valid JavaScript code, possibly some complex business logic.
When we executed the mongo command without any arguments, we connected to the MongoDB server that runs on the localhost and listens for new connections on the default port 27017. The format of the command is as follows:
mongo <options> <db address> <.js files>
If there are no arguments passed to the mongo executable, it is equivalent to passing db address as localhost:27017/test.
Let's look at some example values of the db address command-line option and its interpretation:
mydb: This will connect to the server that runs on the localhost and listens for connection on port27017. The database connected will bemydb.mongo.server.host/mydb: This will connect to the server that runs onmongo.server.hostand the default port27017. The database connected will bemydb.mongo.server.host:27000/mydb: This will connect to the server that runs onmongo.server.hostand the port27000. The database connected will bemydb.mongo.server.host:27000: This will connect to the server that runs onmongo.server.hostand the port27000. The database connected will be the default database,test.
Now, there are quite a few options available on the Mongo client too. We will see a few of them in the following table:
This recipe is about setting up the Java client for MongoDB. You will be repeatedly referring to this recipe while working on others, so read it very carefully.
The following are the prerequisites for this recipe:
Version 1.6 or above of Java SDK is recommended.
Use the latest available version of Maven. Version 3.1.1 was the latest at the time of writing this book.
Use the MongoDB Java driver. Version 2.11.3 was the latest at the time of writing this book.
Connectivity to the Internet to access the online Maven repository or a local repository is needed. Alternatively, you might choose an appropriate local repository accessible to you from your computer.
The Mongo server is up and running on the localhost and on port
27017. Take a look at the first recipe, Single node installation of MongoDB, and start the server.
Let's take a look at the steps in detail:
Install the latest version of JDK if you don't already have it on your machine. We will not be going through the steps to install JDK in this recipe but, before moving on with, next step, the JDK should be present. Type
javac -versionon the shell to check for the version installed.Once the JDK is set up, the next step is to set up Maven. Skip the next three steps if Maven is already installed on your machine.
Maven needs to be downloaded from http://maven.apache.org/download.cgi. Choose the binaries in the
.tar.gzor.zipformat and download it. This recipe is executed on a machine that runs on the Windows platform; thus, these steps are for installation on Windows. The following screenshot shows the download page of Maven:
Once the archive is downloaded, we need to extract it and put the absolute path of the
binfolder in the extracted archive in the operating system'spathvariable. Maven also needs the path of the JDK to be set as theJAVA_HOMEenvironment variable. Remember to set the root of your JDK as the value of this variable.All we need to do now is type
mvn -versionin the command prompt. If you see the version of Maven on the command prompt, we have successfully set up Maven:> mvn -versionAt this stage, we have Maven installed, and we are now ready to create our simple project to write our first Mongo client in Java. We will start by creating a
projectfolder. Let's assume that we create a folder calledMongo Java. Then, we will create a folder structuresrc/main/javain thisprojectfolder. The root of the project folder then contains a file calledpom.xml. Once this folder creation is done, the folder structure should look as follows:Mongo Java +--src | +main | +java |--pom.xmlWe just have the project skeleton with us now. We will now add some content to the
pom.xmlfile. Not much is needed for this. Add the following code snippet in thepom.xmlfile and save it:<project> <modelVersion>4.0.0</modelVersion> <name>Mongo Java</name> <groupId>com.packtpub</groupId> <artifactId>mongo-cookbook-java</artifactId> <version>1.0</version> <packaging>jar</packaging> <dependencies> <dependency> <groupId>org.mongodb</groupId> <artifactId>mongo-java-driver</artifactId> <version>2.11.3</version> </dependency> </dependencies> </project>Finally, we will write our Java client that will be used to connect to the Mongo server and execute some very basic operations. The following is the Java class located at
src/main/javain thecom.packtpub.mongo.cookbookpackage, and the name of the class isFirstMongoClient:package com.packtpub.mongo.cookbook; import com.mongodb.BasicDBObject; import com.mongodb.DB; import com.mongodb.DBCollection; import com.mongodb.DBObject; import com.mongodb.MongoClient; import java.net.UnknownHostException; import java.util.List; /** * Simple Mongo Java client * */ public class FirstMongoClient { /** * Main method for the First Mongo Client. Here we shall be connecting to a mongo * instance running on localhost and port 27017. * * @param args */ public static final void main(String[] args) throws UnknownHostException { MongoClient client = new MongoClient("localhost", 27017); DB testDB = client.getDB("test"); System.out.println("Dropping person collection in test database"); DBCollection collection = testDB.getCollection("person"); collection.drop(); System.out.println("Adding a person document in the person collection of test database"); DBObject person = new BasicDBObject("name", "Fred").append("age", 30); collection.insert(person); System.out.println("Now finding a person using findOne"); person = collection.findOne(); if(person != null) { System.out.printf("Person found, name is %s and age is %d\n", person.get("name"), person.get("age")); } List<String> databases = client.getDatabaseNames(); System.out.println("Database names are"); int i = 1; for(String database : databases) { System.out.println(i++ + ": " + database); } System.out.println("Closing client"); client.close(); } }It's now time to execute the preceding Java code. We will execute it using Maven from the shell. You should be in the same directory as the
pom.xmlfile of the project:mvn compile exec:java -Dexec.mainClass=com.packtpub.mongo.cookbook.FirstMongoClient
Those were quite a lot of steps to follow! Let's look at some of them in more detail. Everything up to step 6 is straightforward and doesn't need any explanation. Let's look at the other steps.
The pom.xml file we have here is pretty simple. We defined a dependency on Mongo's Java driver. It relies on the online repository (http://search.maven.org) for resolving the artifacts. For a local repository, all we need to do is define the repositories and pluginRepositories tags in pom.xml. For more information on Maven, refer to the Maven documentation at http://maven.apache.org/guides/index.html.
Now, for the Java class, the org.mongodb.MongoClient class is the backbone. We will first instantiate it using one of its overloaded constructors that gives the server's host and port. In this case, the hostname and port were not really needed as the values provided are the default values anyway, and the no-argument constructor would have worked well too. The following line of code instantiates this client:
MongoClient client = new MongoClient("localhost", 27017);The next step is to get the database; in this case, test using the getDB method. This is returned as an object of type com.mongodb.DB. Note that this database might not exist, yet getDB will not throw any exception. Instead, the database will get created whenever we add a new document to the collection in this database. Similarly, getCollection on the DB object will return an object of type com.mongodb.DBCollection, representing the collection in the database. This too might not exist in the database and will get created automatically upon the insertion of the first document.
The following lines of code from our class show how to get an instance of DB and DBCollection:
DB testDB = client.getDB("test");
DBCollection collection = testDB.getCollection("person");
Before we insert a document, we will drop the collection so that even upon multiple executions of the program, we will have just one document in the person collection. The collection is dropped using the drop() method on the DBCollection object's instance. Next, we will create an instance of com.mongodb.DBObject. This is an object that represents the document to be inserted in the collection. The concrete class used here is BasicDBObject, which is a type of java.util.LinkedHashMap class, where the key is a string and the value is an object. The value can be another DBObject, too, in which case it is a document nested within another document. In our case, we have two keys: name and age. These are the field names in the document to be inserted, and the values are of type string and integer, respectively. The append method of BasicDBObject adds a new key-value pair to the BasicDBObject instance and returns the same instance, which allows us to chain the append method calls to add multiple key value pairs. DBObject is then inserted into the collection using the insert method. This is how we instantiated a DBObject for the person and inserted it in the collection:
DBObject person = new BasicDBObject("name", "Fred").append("age", 30);
collection.insert(person);
The findOne method on DBCollection is straightforward and returns one document from the collection. This version of findOne doesn't accept DBObject (which, otherwise, acts as a query executed before a document is selected and returned) as a parameter. This is synonymous to executing a db.person.findOne() from the Mongo shell.
Finally, we will simply invoke getDatabaseNames to get a list of databases names in the server. At this point of time, we should at least be having the test and local databases in the returned result. Once all the operations are completed, we will close the client. The MongoClient class is thread-safe; generally, one instance is used per application. To execute the program, we will use Maven's exec plugin. On executing step 9, we will see the following output on the console:
[INFO] --- exec-maven-plugin:1.2.1:java (default-cli) @ mongo-cookbook-java ---
Dropping person collection in test database
Adding a person document in the person collection of test database
Now finding a person using findOne
Person found, name is Fred and age is 30
Database names are
1: local
2: test
Closing client
[INFO] ------------------------------------------------------------------------
[INFO] BUILD SUCCESS
[INFO] ------------------------------------------------------------------------
[INFO] Total time: 5.183s
[INFO] Finished at: Wed Oct 30 00:42:29 IST 2013
[INFO] Final Memory: 7M/19M
[INFO] ------------------------------------------------------------------------
In this recipe, we will look at starting multiple servers on the same host but as a cluster. Starting a single Mongo server is enough for development purposes or applications that are not mission-critical. For crucial production deployments, we need the availability to be high where, if one server instance fails, another instance takes over and the data remains available for querying, inserting, or updating. Clustering is an advanced concept, and we won't be doing it justice by covering this whole concept in one recipe. In this recipe, we will touch the surface and get into more details in other recipes in Chapter 4, Administration, later in the book. In this recipe, we will start multiple Mongo server processes on the same machine for testing purpose. In the production environment, they will be running on different machines (or virtual machines) in the same or different data centers.
Let's see in brief exactly what a replica set is. As the name suggests, it is a set of servers that are replicas of each other in terms of data. Looking at how they are kept in sync with each other and other internals is something we will defer to some later recipes in Chapter 4, Administration, but one thing to remember is that write operations will happen only on one node, the primary one. All the querying also happens from the primary node by default, though we might permit read operations on secondary instances explicitly. An important fact to remember is that replica sets are not meant to achieve scalability by distributing the read operations across various nodes in a replica set. Their sole objective is to ensure high availability.
Though not a prerequisite, taking a look at the Starting a single node instance using command-line options recipe will definitely make things easier, just in case you are not aware of the various command-line options and their significance while starting a Mongo server. Also, the necessary binaries and setup as mentioned in the Single node installation of MongoDB recipe must be mastered before we continue with this recipe. Let's sum up what we need to do.
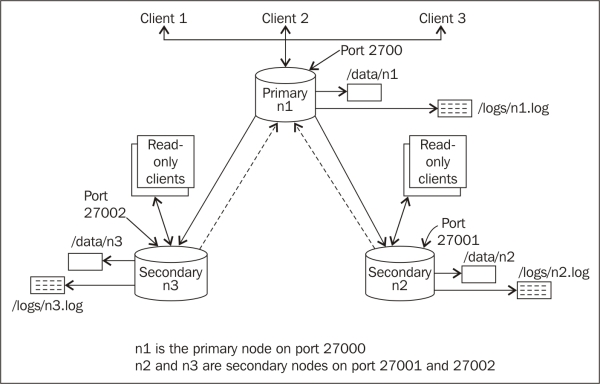
We will start three mongod processes (Mongo server instances) on our localhost. Then, we will create three data directories, /data/n1, /data/n2, and /data/n3, for node 1, node 2, and node 3, respectively. Similarly, we will redirect the logs to /logs/n1.log, /logs/n2.log, and /logs/n3.log. The following diagram will give you an idea as to how the cluster will look like:
Let's take a look at the steps in detail:
Create the
/data/n1,/data/n2, and/data/n3directories,/logsfor data, and logs of the three nodes. On the Windows platform, you can choose thec:\data\n1,c:\data\n2,c:\data\n3, orc:\logs\directory (or any other directory of your choice) for data and logs, respectively. Ensure that these directories have appropriate write permissions for the Mongo server to write the data and logs.Start the three servers as follows (note that users on the Windows platform need to skip the
--forkoption, as it is not supported):$ mongod --replSet repSetTest --dbpath /data/n1 --logpath /logs/n1.log --port 27000 --smallfiles --oplogSize 128 --fork $ mongod --replSet repSetTest --dbpath /data/n2 --logpath /logs/n2.log --port 27001 --smallfiles --oplogSize 128 --fork $ mongod --replSet repSetTest --dbpath /data/n3 --logpath /logs/n3.log --port 27002 --smallfiles --oplogSize 128 --fork
Start the Mongo shell and connect to any of the Mongo servers that are running. In this case, we will connect to the first one (the one listening to port
27000). Execute the following command:$ mongo localhost:27000Try to execute an
insertoperation from the Mongo shell after connecting to it as follows:> db.person.insert({name:'Fred', age:35})This operation should fail as the replica set is not initialized yet. More information can be found in the How it works… section of this recipe.
The next step is to start configuring the replica set. We will start by preparing a JSON configuration in the shell:
cfg = {
   '_id':'repSetTest',
  'members':[
       {'_id':0, 'host': 'localhost:27000'},
       {'_id':1, 'host': 'localhost:27001'},
       {'_id':2, 'host': 'localhost:27002'}
   ]
}
The last step is to initiate the replica set with the preceding configuration as follows:
> rs.initiate(cfg)
Execute rs.status() after a few seconds on the shell to see the status. In a few seconds, one of them should become primary, and the remaining two should become secondary.
We described the common options and all these command-line options in the Starting a single node instance using command-line options recipe in detail.
As we are starting three independent mongod services, we have three dedicated database paths on the filesystem. Similarly, we have three separate logfile locations for each of the processes. We then started three mongod processes with the database and logfile path specified. As this setup is for test purposes and started on the same machine, we used the --smallfiles and --oplogSize options. Avoid using these options in the production environment. As these are running on the same host, we also choose the ports explicitly to avoid port conflicts. The ports we chose here are 27000, 27001, and 27002. When we start the servers on different hosts, we might or might not choose a separate port. We can very well choose to use the default one whenever possible.
The --fork option demands some explanation. By choosing this option, we started the server as a background process from our operating system's shell and got the control back in the shell, where we can then start more such mongod processes or perform other operations. In the absence of the --fork option, we cannot start more than one process per shell and will need to start three mongod processes in three separate shells. This option, however, doesn't work on the Windows platform, and we need to start one process per shell. We can, however, execute the following command to spawn a new shell and then start the new Mongo service in this newly spawned shell:
start mongod --replSet repSetTest --dbpath c:\data\c1 --logpath c:\logs\n1.log --port 27000 --smallfiles --oplogSize 128
The preceding command allows us to have a batch file (a .bat file) that contains all the logic to create the relevant directories and then spawn three mongod processes in three shells.
Let's get back to the replica set creation; we are not yet done with setting up a replica set. If we take a look at the logs generated in the log directory, we will see the following lines in it:
[rsStart] replSet can't get local.system.replset config from self or any seed (EMPTYCONFIG)
[rsStart] replSet info you may need to run replSetInitiate -- rs.initiate() in the shell -- if that is not already done
Though we started three mongod processes with the --replSet option, we still haven't configured them to work with each other as a replica set. This command-line option is just used to tell the server on startup that this process will be running as part of a replica set. The name of the replica set is the same as the value of this option passed on the command prompt. This also explains why the insert operation executed on one of the nodes failed before the replica set was initialized. In mongo replica sets, only one node is the primary node where all the inserts and querying happen. In the preceding diagram, node n1 is shown as the primary node and listens to port 27000 for client connections. All the other nodes are slave/secondary instances that sync themselves up with the primary node; hence, querying too is disabled on them by default. It is only when the primary node goes down that one of the secondaries takes over and becomes a primary node. It is, however, possible to query the secondary instances for data, as we showed in the preceding diagram. We will see how to query from a secondary instance in the next recipe.
Well, all that is left now is to configure the replica set by grouping the three processes we started. This is done by first defining a JSON object as follows:
cfg = {
   '_id':'repSetTest',
  'members':[
       {'_id':0, 'host': 'localhost:27000'},
       {'_id':1, 'host': 'localhost:27001'},
       {'_id':2, 'host': 'localhost:27002'}
   ]
}
There are two fields, _id and members, for the unique ID of the replica set and an array of the hostnames and port numbers of the mongod server processes as part of this replica set, respectively. Using the localhost to refer to the host is not a very good idea and is usually discouraged. However, in this case, we started all the processes on the same machine; thus, we are OK with it. It is, however, preferred to refer to the hosts by their hostnames even if they are running on the localhost. Note that you cannot mix referring the instances using the localhost and hostnames both in the same config. You can use either the hostnames or the localhost. To configure the replica set, we then connect to any one of three running mongod processes; in this case, we will connect to the first one and then execute the following command from the shell:
> rs.initiate(cfg)
The _id in the cfg object passed has the same value as the value we gave to the --replSet option in the command prompt when we started the server processes. Not giving the same value will throw the following error:
{
        "ok" : 0,
        "errmsg" : "couldn't initiate : set name does not match the set name host Amol-PC:27000 expects"
}
If all goes well and the initiate call is successful, you will see something like the following JSON response on the shell:
{
       "info" : "Config now saved locally.  Should come online in about a minute.","ok" : 1
}
In a few seconds, you should see a different prompt for the shell from which we executed this command. It should now become a primary or secondary node. The following command is an example of the shell connected to a primary member of the replica set:
repSetTest:PRIMARY>
Executing rs.status() should give us some stats on the replica set status. The stateStr field here is important, and it contains the text PRIMARY, SECONDARY, and so on.
If you are looking to convert a standalone instance to a replica set, the instance with data needs to become a primary instance first, and then empty secondary instances will be added, to which the data will be synchronized. For more information on how to perform this operation, visit http://docs.mongodb.org/manual/tutorial/convert-standalone-to-replica-set/.
The Connecting to the replica set from the shell to query and insert data recipe to perform more operations from the shell after connecting to a replica set
Chapter 4, Administration, for more advanced recipes on replication
In the previous recipe, we started a replica set of three mongod processes. In this recipe, we will be working on top of it and will connect to it from the client application, perform querying, insert data, and take a look at some of the interesting aspects of the replica set from a client's perspective.
The prerequisite for this recipe is that the replica set should be set up, and it should be up and running. For details on how to start the replica set, refer to the Starting multiple instances as part of a replica set recipe.
Let's take a look at the steps in detail:
Create the
/data/n1,/data/n2,/data/n3, and/logsdirectories for data and logs of the three nodes, respectively.We will start two shells here: one for primary and one for secondary. Execute the following command in the command prompt:
mongo localhost:27000The prompt of the shell tells whether the server to which we connected is primary or secondary. It should show the replica set's name followed by
:and then followed by the server's state. In this case, if the replica set is initialized and is up and running, we will see eitherrepSetTest:PRIMARY>orrepSetTest:SECONDARY>.Suppose the first server we connected to is a secondary server, then we need to find the primary server as follows:
Execute the
rs.status()command in the shell and look out for thestateStrfield. This should give us the primary server. Use the Mongo shell to connect to this server. At this point, we should have two shells running: one connected to a primary node and the other connected to a secondary node.
In the shell connected to the primary node, execute the following insert command:
repSetTest:PRIMARY> db.replTest.insert({_id:1, value:'abc'})There is nothing special about it. We have just inserted a small document in a collection that we use for the replication test.
By executing the following query on the primary node, we should get one result:
repSetTest:PRIMARY> db.replTest.findOne()
{ "_id" : 1, "value" : "abc" }
So far so good. Now, we will go to the shell that is connected to the secondary node and execute the following command:
repSetTest:SECONDARY> db.replTest.findOne()On doing this, we will see the following error on the console:
{ "$err" : "not master and slaveOk=false", "code" : 13435 }Now, execute the following command on the console:
repSetTest:SECONDARY> rs.slaveOk(true)Execute the query we executed in step 7 again on the shell. This will now get the following results:
repSetTest:SECONDARY>db.replTest.findOne()
{ "_id" : 1, "value" : "abc" }
Execute the following insert command on the secondary node; it should not succeed with the following message:
repSetTest:SECONDARY> db.replTest.insert({_id:1, value:'abc'}) not master
We have done a lot of things in this recipe, and we will try to throw some light on some of the important concepts to remember.
We basically connected to a primary and a secondary node from the shell and performed (I would say, tried to perform) the select and insert operations. The architecture of a Mongo replica set is made up of one primary (just one; no more, no less) and multiple secondary nodes. All writes happen on the primary node only. Note that replication is not a mechanism to distribute a read-request load that enables us to scale the system. Its primary intent is to ensure high availability of data. By default we are not permitted to read data from the secondary nodes. In step 6, we simply inserted data from the primary node and then executed the query to get the document that we inserted. This is straightforward, and there is nothing related to clustering here. Just note that we inserted the document from the primary node and then queried it back.
In the next step, we executed the same query but, this time, from the secondary node's shell. By default, querying is not enabled on the secondary node. There might be a small lag in replicating the data, possibly due to heavy data volumes to be replicated, network latency, and hardware capacity to name a few of the causes; thus, querying on the secondary node might not reflect the latest inserts or updates made on the primary node. If, however, we are OK with it and can live with the slight lag in the data being replicated, all we need to do is enable querying on the secondary node explicitly by just executing one command, rs.slaveOk() or rs.slaveOk(true). Once this is done, we are free to execute queries on the secondary nodes too.
Finally, we tried to insert data in a collection of the slave node. Under no circumstances this is permitted, regardless of whether we have executed rs.slaveOk(). When rs.slaveOk() is invoked, it just permits the data to be queried from the secondary node. All the write operations still have to go to the primary node and then flow down to the secondary node. The internals of replication will be covered in a different recipe in the Understanding and analyzing oplogs recipe in Chapter 4, Administration.
In this recipe, we will demonstrate how to connect to a replica set using a Java client and execute queries and insert data using the Java client for MongoDB. We will also see how the client would automatically failover to another member in the replica set should a primary member goes down.
We first need to take a look at the Connecting to a single node from a Java client recipe, as it contains all the prerequisites and steps to set up Maven and other dependencies. As we are dealing with a Java client for replica sets, a replica set must be up and running. Refer to the Starting multiple instances as part of a replica set recipe for details on how to start the replica set.
Let's take a look at the steps in detail:
First, we need to write/copy the following piece of code (this Java class is also available for download from the book's site):
package com.packtpub.mongo.cookbook;

import com.mongodb.BasicDBObject;
import com.mongodb.DB;
import com.mongodb.DBCollection;
import com.mongodb.DBObject;
import com.mongodb.MongoClient;
import com.mongodb.ServerAddress;

import java.util.Arrays;

/**
 *
 */
public class ReplicaSetMongoClient {

    /**
     * Main method for the test client connecting to the replica set.
     * @param args
     */
    public static final void main(String[] args) throws Exception {
        MongoClient client = new MongoClient(
                Arrays.asList(
                        new ServerAddress("localhost", 27000),
                        new ServerAddress("localhost", 27001),
                        new ServerAddress("localhost", 27002)
                )
        );
        DB testDB = client.getDB("test");
        System.out.println("Dropping replTest collection");
        DBCollection collection = testDB.getCollection("replTest");
        collection.drop();
        DBObject object = new BasicDBObject("_id", 1).append("value", "abc");
        System.out.println("Adding a test document to replica set");
        collection.insert(object);
        System.out.println("Retrieving document from the collection, this one comes from primary node");
        DBObject doc = collection.findOne();
        showDocumentDetails(doc);
        System.out.println("Now Retrieving documents in a loop from the collection.");
        System.out.println("Stop the primary instance manually after few iterations");
        for(int i = 0 ; i < 20; i++) {
            try {
                doc = collection.findOne();
                showDocumentDetails(doc);
            } catch (Exception e) {
                //Ignoring or log a message
            }
            Thread.sleep(5000);
        }
    }

    /**
     *
     * @param obj
     */
    private static void showDocumentDetails(DBObject obj) {
        System.out.printf("_id: %d, value is %s\n", obj.get("_id"), obj.get("value"));
    }
}
Connect to any of the nodes in the replica set, say to
localhost:27000, and, from the shell, executers.status(). Take a note of the primary instance in the replica set and connect to it from the shell iflocalhost:27000is not a primary node. Now, switch to the admin database as follows:repSetTest:PRIMARY>use adminNow, execute the preceding program from the operating system shell as follows:
$ mvn compile exec:java -Dexec.mainClass=com.packtpub.mongo.cookbook.ReplicaSetMongoClientShut down the primary instance by executing the following command on the Mongo shell connected to the primary node:
repSetTest:PRIMARY> db.shutdownServer()Watch the output on the console where the
com.packtpub.mongo.cookbook.ReplicaSetMongoClientclass is executed using Maven.
An interesting thing to observe is how we instantiate a MongoClient instance. It is done as follows:
MongoClient client = new MongoClient(Arrays.asList(new ServerAddress("localhost", 27000),new ServerAddress("localhost", 27001),new ServerAddress("localhost", 27002)));The constructor takes a list of com.mongodb.ServerAddress. This class has a lot of overloaded constructors, but we chose to use the one that takes the hostname and port number. Here. we provided all the server details in a replica set as a list. We haven't mentioned what the primary node is and what the secondary nodes are. The MongoClient class is intelligent enough to figure this out and connect to the appropriate instance. The list of servers provided is called the seed list. It need not contain an entire set of servers in a replica set, though the objective is to provide as much as we can. The MongoClient class will figure out all the server details from the provided subset. For example, if the replica set is of five nodes but we provide only three servers, it still works fine. On connecting with the provided replica set servers, the client will query them to get the replica set metadata and figure out the rest of the provided servers in the replica set. In the preceding case, we instantiated the client with three instances in the replica set. If the replica set has five members, instantiating the client with just three of them as we did earlier is still good enough, and the remaining two instances will be automatically discovered.
Next, we will start the client from the command prompt using Maven. Once the client is running in the loop to find one document, we will bring down the primary instance. We will see something like the following output on the console:
_id: 1, value is abc
Now, retrieving documents in a loop from the collection.
Stop the primary instance manually after a few iterations:
_id: 1, value is abc
_id: 1, value is abc
Nov 03, 2013 5:21:57 PM com.mongodb.ConnectionStatus$UpdatableNode update
WARNING: Server seen down: Amol-PC/192.168.1.171:27002
java.net.SocketException: Software caused connection abort: recv failed
        at java.net.SocketInputStream.socketRead0(Native Method)

        at java.net.SocketInputStream.read(SocketInputStream.java:150)
        …
WARNING: Primary switching from Amol-PC/192.168.1.171:27002 to Amol-PC/192.168.1.171:27001
_id: 1, value is abc
As we can see, the query in the loop was interrupted when the primary node went down. The client, however, switched to the new primary node seamlessly, well, nearly seamlessly, as the client might have to catch an exception and retry the operation after a predetermined interval has elapsed.
In this recipe, we will set up a simple sharded setup made up of two data shards. There will be no replication to keep it simple, as this is the most basic shard setup to demonstrate the concept. We won't be getting deep into the internals of sharding, which we will explore further in Chapter 4, Administration.
Here is a bit of theory before we proceed. Scalability and availability are two important cornerstones for building any mission-critical application. Availability is something that was taken care of by replica sets, which we discussed in the previous recipes of this chapter. Let's look at scalability now. Simply put, scalability is the ease with which the system can cope with an increasing data and request load. Consider an e-commerce platform. On regular days, the number of hits to the site and load is fairly modest, and the system response times and error rates are minimal (this is subjective).
Now, consider the days where the system load becomes twice or three times an average day's load (or even more), for example, say on Thanksgiving Day, Christmas, and so on. If the platform is able to deliver similar levels of service on these high-load days compared with any other day, the system is said to have scaled up well to the sudden increase in the number of requests.
Now, consider an archiving application that needs to store the details of all the requests that hit a particular website over the past decade. For each request that hits the website, we will create a new record in the underlying data store. Suppose each record is of 250 bytes with an average load of 3 million requests per day, then we will cross the 1 TB data mark in about 5 years. This data will be used for various analytic purposes and might be frequently queried. The query performance should not be drastically affected when the data size increases. If the system is able to cope with this increasing data volume and still gives a decent performance comparable to that on low data volumes, the system is said to have scaled up well against the increasing data volumes.
Now that we have seen in brief what scalability is, let me tell you that sharding is a mechanism that lets a system scale to increasing demands. The crux lies in the fact that the entire data is partitioned into smaller segments and distributed across various nodes called shards. Let's assume that we have a total of 10 million documents in a Mongo collection. If we shard this collection across 10 shards, we will ideally have 10,000,000/10 = 1,000,000 documents on each shard. At a given point of time, one document will only reside on one shard (which, by itself, will be a replica set in a production system). There is, however, some magic involved that keeps this concept hidden from the developer querying the collection, who gets one unified view of the collection irrespective of the number of shards. Based on the query, it is Mongo that decides which shard to query for the data and return the entire result set. With this background, let's set up a simple shard and take a closer look at it.
Apart from the MongoDB server already installed, there are no prerequisites from a software perspective. We will create two data directories, one for each shard. There will be one directory for data and one for logs.
Let's take a look at the steps in detail:
We will start by creating directories for logs and data. Create the
/data/s1/db,/data/s2/db, and/logsdirectories. On Windows, we can havec:\data\s1\db, and so on for thedataandlogdirectories. There is also a config server that is used in a sharded environment to store some metadata. We will use/data/con1/dbas the data directory for the config server.Start the following
mongodprocesses, one for each of the two shards and one for the config database, and onemongosprocess (we will see what this process does). For the Windows platform, skip the--forkparameter as it is not supported:$ mongod --shardsvr --dbpath /data/s1/db --port 27000 --logpath /logs/s1.log --smallfiles --oplogSize 128 --fork $ mongod --shardsvr --dbpath /data/s2/db --port 27001 --logpath /logs/s2.log --smallfiles --oplogSize 128 --fork $ mongod --configsvr --dbpath /data/con1/db --port 25000 --logpath /logs/config.log --fork $ mongos --configdb localhost:25000 --logpath /logs/mongos.log --fork
In the command prompt, execute the following command. This will show a
mongosprompt:$ mongo MongoDB shell version: 2.4.6 connecting to: test mongos>
Finally, we set up the shard. From the
mongosshell, execute the following two commands:mongos> sh.addShard("localhost:27000") mongos> sh.addShard("localhost:27001")
On the addition of each shard, we will get an
okreply. Something like the following JSON message will be seen giving the unique ID for each shard that is added:{ "shardAdded" : "shard0000", "ok" : 1 }
Let's see what we did in the process. We created three directories for data (two for the shards and one for the config database) and one directory for logs. We can have a shell script or a batch file to create the directories as well. In fact, in large production deployments, setting up shards manually is not only time-consuming but also error-prone.
Let's try to get a picture of what exactly we have done and what we are trying to achieve.
The following diagram shows the shard setup we just built:
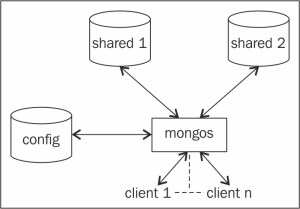
If we look at the preceding diagram and the servers started in step 2, we will see that we have shard servers that will store the actual data in the collections. These were the first two of the four processes that started listening to port 27000 and 27001. Next, we started a config server, which is seen on the left-hand side in the preceding diagram. It is the third server of the four servers started in step 2, and it listens to port 25000 for incoming connections. The sole purpose of this database is to maintain the metadata of the shard servers. Ideally, only the mongos process or drivers connect to this server for the shard details/metadata and the shard key information. We will see what a shard key is in the next recipe, where we will play around with a sharded collection and see the shards we created in action.
Finally, we have a mongos process. This is a lightweight process that doesn't do any persistence of data and just accepts connections from clients. This is the layer that acts as a gatekeeper and abstracts the client from the concept of shards. For now, we can view it as a router that consults the config server and takes the decision to route the client's query to the appropriate shard server for execution. It then aggregates the result from various shards if applicable and returns the result to the client. It is safe to say that no client directly connects to the config or the shard servers; in fact, ideally, no one should connect to these processes directly, except for some administration operations. Clients simply connect to the mongos process and execute their queries, or insert or update operations.
Just by starting the shard servers, the config server and mongos process don't create a sharded environment. On starting up the mongos process, we provided it with the details of the config server. What about the two shards that will be storing the actual data? The two mongod processes that started as shard servers are, however, not yet declared anywhere as shard servers in the configuration. That is exactly what we do in the final step by invoking sh.addShard() for both the shard servers. The mongos process is provided with the config server's details on startup. Adding shards from the shell stores this metadata about the shards in the config database; then, the mongos processes will query this config database for the shard's information. On executing all the steps of this recipe, we will have an operational shard. Before we conclude, the shard we set up here is far from ideal and not how it will be done in the production environment. The following diagram gives us an idea of how a typical shard will be in a production environment:
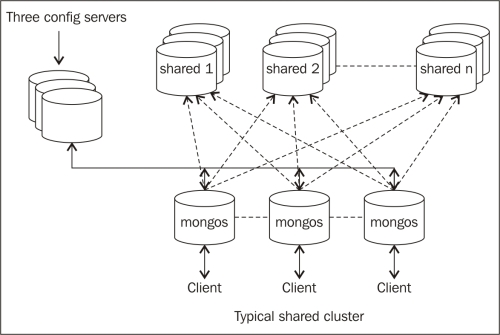
The number of shards will not be two but much more. Also, each shard will be a replica set to ensure high availability. There will be three config servers to ensure the availability of the config servers too. Similarly, there will be any number of mongos processes created for a shard that listens for client connections. In some cases, it might even be started on a client application's server.
In this recipe, we will be connecting to a shard from a command prompt; we will also see how to shard a collection and observe the data splitting in action on some test data.
Obviously, we need a sharded mongo server setup that is up and running. See the previous recipe for more details on how to set up a simple shard. The mongos process, as in the previous recipe, should be listening to port number 27017. We have got some names in a JavaScript file called names.js. This file needs to be downloaded from this book's site and kept on the local filesystem. The file contains a variable called names, and the value is an array with some JSON documents as the values, each one representing a person. The contents look as follows:
names = [
  {name:'James Smith', age:30},
  {name:'Robert Johnson', age:22},
…
]Let's take a look at the steps in detail:
Start the Mongo shell and connect to the default port on the localhost as follows (this will ensure that the names will be available in the current shell):
mongo --shell names.js
MongoDB shell version: 2.4.6
connecting to: test
mongos>
Switch to the database that will be used to test sharding as follows (we call it
shardDB):mongos> use shardDBEnable sharding at the database level as follows:
mongos> sh.enableSharding("shardDB")Shard a collection called
personas follows:mongos>sh.shardCollection("shardDB.person", {name: "hashed"}, false)Add test data to the sharded collection as follows:
mongos> for(i = 1; i <= 300000 ; i++) {
... person = names[Math.round(Math.random() * 100) % 20]
... doc = {_id:i, name:person.name, age:person.age}
... db.person.insert(doc)
 }
Execute the following command to get a query plan and the number of documents on each shard:
mongos> db.person.find().explain()
This recipe demands some explanation. We have downloaded a JavaScript file that defines an array of 20 people. Each element of the array is a JSON object with a name and age attribute. We started the shell that connects to the mongos process loaded with this JavaScript. We then switched to shardDB, which we will use for the purpose of sharding.
For a collection to be sharded, the database in which it will be created needs to be enabled for sharding first. We do this using sh.enableSharding().
The next step is to enable the collection to be sharded. By default, all the data will be kept on one shard and will not be split across different shards. Think about how Mongo will be able to meaningfully split the data. The whole intention is to split it meaningfully and as evenly as possible so that whenever we query based on a shard key, Mongo will easily be able to determine which shard(s) to query. If a query doesn't contain a shard key, the execution of the query will happen on all the shards, and the data will then be collated by the mongos process before returning it to the client. Thus, choosing the right shard key is very crucial.
Let's now see how to shard the collection. We will do this by invoking sh.shardCollection("shardDB.person", {name: "hashed"}, false). There are three parameters here.
The first parameter specifies a fully qualified name of the collection in the
<db name>.<collection name>format. This is the first parameter of theshardCollectionmethod.The second parameter specifies the field name to shard upon in the collection. This is the field that will be used to split the documents on the shards. One of the requirements of a good shard key is that it should have high cardinality (the number of possible values should be high). In our test data, the name value has a very low cardinality and thus, is not a good choice as a shard key. We thus hash this key when using it as a shard key. We do so by mentioning the key as
{name: "hashed"}.The last parameter specifies whether the value used as a shard key is unique or not. The
namefield is definitely not unique; thus, it will be false. If the field was, say, the person's social security number, it could have been set as true. Also, SSN is a good choice for a shard key due to its high cardinality. Remember though, for the query to be efficient, the shard key has to be present in it.
The last step is to see the execution plan to find all the data. The intent of this operation is to see how the data is being split across two shards. With 3,00,000 documents, we expect something around 1,50,000 documents on each shard. From the explain plan's output, the shard attribute has an array with a document value for each shard in the cluster. In our case. we have two; thus. we have two shards that give the query plan for each shard. In each of them, the value of n is something to look at. It should give us the number of documents that reside on each shard. The following code snippet is the relevant JSON document we see from the console. The number of documents on shards one and two is 164938 and 135062, respectively:
"shards" : {
  "localhost:27000" : [
    {
      "cursor" : "BasicCursor",
      "isMultiKey" : false,
      "n" : 164938,
      "nscannedObjects" : 164938,
      "nscanned" : 164938,
      "nscannedObjectsAllPlans" : 164938,
      "nscannedAllPlans" : 164938,
      "scanAndOrder" : false,
      "indexOnly" : false,
      "nYields" : 1,
      "nChunkSkips" : 0,
      "millis" : 974,
      "indexBounds" : {

      },
      "server" : "Amol-PC:27000"
    }
  ],
  "localhost:27001" : [
    {
      "cursor" : "BasicCursor",
      "isMultiKey" : false,
      "n" : 135062,
      "nscannedObjects" : 135062,
      "nscanned" : 135062,
      "nscannedObjectsAllPlans" : 135062,
      "nscannedAllPlans" : 135062,
      "scanAndOrder" : false,
      "indexOnly" : false,
      "nYields" : 0,
      "nChunkSkips" : 0,
      "millis" : 863,
      "indexBounds" : {

      },
      "server" : "Amol-PC:27001"
      }
    ]
  }
There are a couple of additional things that I recommend you all to do.
Connect to the individual shard from the Mongo shell and execute queries on the person collection. See that the counts in these collections are similar to what we see in the preceding plan. Also, one can find out that no document exists on both the shards at the same time.
We discussed in brief how cardinality affects the way the data is split across shards. Let's do a simple exercise. We will first drop the person collection and execute the shardCollection operation again but, this time, with the {name: 1} shard key instead of {name: "hashed"}. This ensures that the shard key is not hashed and stored as is. Now, load the data using the JavaScript function we used earlier in step 5 and then execute explain on the collection once the data is loaded. Observe how the data is now split (or not) across the shards.
A lot of questions might now come up, such as what are the best practices, what are some tips and tricks, how is the sharding thing pulled off by MongoDB behind the scenes in a way transparent to the end user, and so on.
This recipe only explained the basics. All these questions will be answered in Chapter 4, Administration.
