


Windows PowerShell is a very dynamic language. There are many ways to improve the user experience such as adding new cmdlets (pronounced command-lets) that expose more functionality in the shell, or by adding new providers that allow users to traverse the data, just like one would traverse files and folders on a hard drive. The users can easily add functions to their profiles or load more complex modules that add a host of new features. As more and more vendors including Microsoft, start to pick up the pace of PowerShell support for their products, the more difficult it will be to find and understand all of the new components. Windows Server 2012 alone offers thousands of new cmdlets for interacting with the operating system. Luckily PowerShell features, such as the integrated help and the alias system, provide ways to understand and access cmdlets, and have been an integral part of the language since its inception. These features can help even the most seasoned Powe rShell users understand and experiment with cmdlets for the first time.
The cmdlets are commands that can have data piped in and out of them. This allows multiple cmdlets to be chained together to form a pipeline of processing, simplifying scripts, and making them read more like English language. As an example, we can select processes based on their memory usage and output their names with a simple pipeline of the cmdlet. The following command explains this:
PS C:\> Get-Process | Where-Object WorkingSet -gt 100MB | Select-Object -Name
Name
----
chrome
svchost
Simplifying the way users find and use cmdlets has been a major corner stone of PowerShell from the beginning, but there have been certain areas where improvement is necessary. The three areas that Microsoft focused on during the most recent version of PowerShell, have been the user avoidance of the command line, the contextual help system, and cmdlet discovery.
Often users are accustomed to a Graphical User Interface (GUI) because it offers contextual clues, steps, and more natural feedback. The command line can seem primitive and daunting. To help prevent some of this shell-shock, Microsoft implemented a transitional cmdlet, Show-Command, that displays the required parameters and help in a GUI rather than on the command line.
The second area that Microsoft has focused on is the cmdlet discovery. In PowerShell 2.0, modules were introduced. The modules allowed developers to create simple and pluggable bunches of related cmdlets and providers into a single unit that could be loaded and unloaded at will. These modules are starting to become the standard that Microsoft itself has used for developing new product or component based PowerShell support. Although not all their PowerShell support ships as modules, a large majority does. The problem was that, modules needed to be loaded explicitly before any of their functionality could be used. As more and more modules are implemented and installed, it becomes increasingly difficult to find the proper module and cmdlet. Additionally, it requires two commands instead of one: one to load the module and one to call the target cmdlet.
The final area is the contextual help system, which was plagued by the fact that it was static. It only allowed users and vendors to update help when everything else was updated. This was a headache for both parties.
In this chapter we will see the following:
The new
Show-Commandcmdlet and how it transitions into PowerShell a bit easierThe updatable contextual help system which ensures that we are up to date with the latest versions of contextual help
The cmdlet and module auto-discovery system, which makes working with all the cmdlets and modules in a system easier
Often the command line can seem like an unfamiliar and daunting area of the operating system, which new users are reluctant to investigate. The lack of a user interface which can be clicked on often outweighs the benefits that short, quick commands can offer. In PowerShell 3.0, Microsoft has added a simple cmdlet to aid in eliminating this stumbling block. This cmdlet is Show-Command.
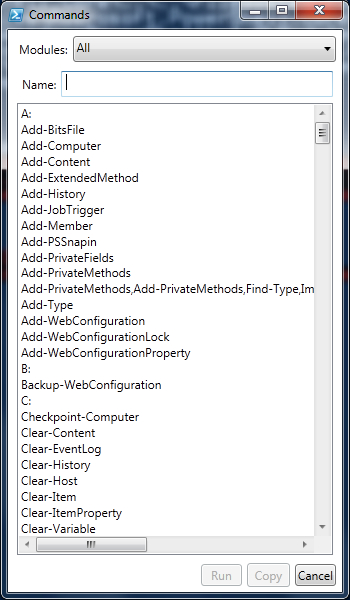
Running Show-Command without any parameters opens a user interface with a drop-down list of available modules and a list box full of all the cmdlet, aliases, drives, and functions available in those modules. The commands in the list will depend on what is installed on the machine and the list will differ per machine. This is done as follows:
PS C:\> Show-Command
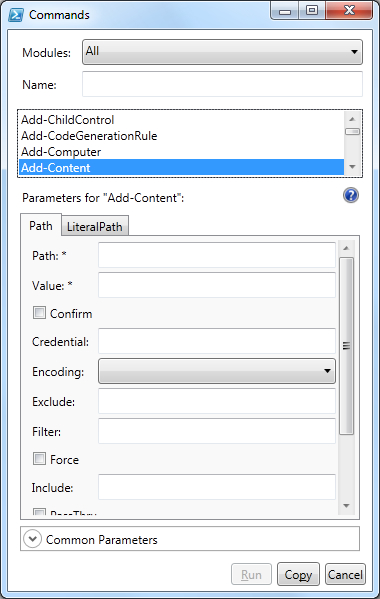
There is a textbox for searching the list available under the Modules drop-down list. If you select one of the commands, drives, or functions, a new pane will open at the bottom of the window, as shown in the following screenshot, which shows all the parameters for the cmdlet and allows you to run, copy, or view the help for a particular item:
You can pass the name of a cmdlet to the Show-Command cmdlet through the Name parameter as well. In this mode, the Show-Command user interface allows for input into the named cmdlet. All the parameters and parameter sets are available for the user to select from and provide input. For this, you can enter the following command:
PS C:\> Show-Command -Name Get-Process
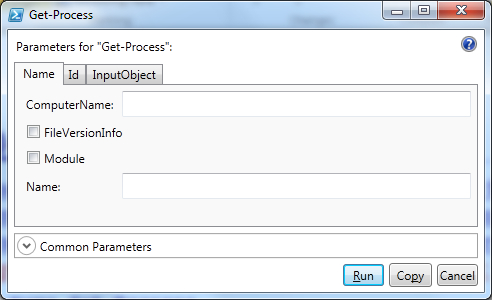
By clicking on the Copy button, a string of text is copied to the clipboard, which is the result of the data entered into the user interface. This text could then be pasted into a script editor or the command line for execution. When clicking on the Run button, the command is executed and the output is not displayed in the user interface, but rather written to the console. Additionally, the size of the resulting window can be adjusted using the Height and Width parameters of the cmdlet.
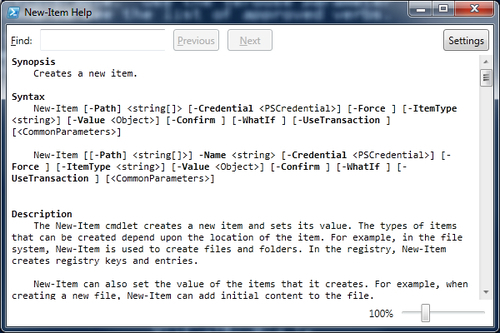
Another interesting feature of the Show-Command cmdlet is the ? button (shown in the previous screenshot). This button is only available when the Name parameter is specified or a cmdlet is selected from the first view shown previously. Clicking on the button will open a new window with the help for the current command. This is explained by the following command:
PS C:\> Show-Command New-Item
The output is shown in the following screenshot:
Note
Note that the cmdlet Show-Command is blocking the view and you will not be able to interact with the PowerShell console while the window is open.
The Show-Command is an interesting cmdlet to add to an until-now-command line-only shell. The benefit is that it offers a simple visual view of many cmdlets and the respective help. This can help users overcome the shell-shock, which is often associated with opening PowerShell for the first time. Additionally, the cmdlets can be of value to administrators looking to shortcut some of the unnecessary typing that must be done for the cmdlets with lots of parameters. Rather than having to type them out, you can now find yourself tabbing through the Show-Command user interface.
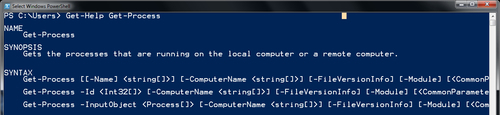
For a first-time user to the language, Get-Help is the most important cmdlet in the bunch (some may argue this is true for all users!). Not only does it offer the syntax definitions, but also examples, detailed explanations, and links to online resources as well. This is shown in the following screenshot:
In the previous versions of the language, the PowerShell help was a static resource that would only be updated during major releases. For example, in PowerShell 2.0, links integrated into the help would point users to the Internet for additional, possibly updated resources. This required using the Online parameter of the Get-Help cmdlet, as follows:
PS C:\> Get-Help Get-Process -Online
The use of the Online parameter was cumbersome as it drove the user outside of the shell and into the default browser. Additionally, any documentation errors could not be corrected in the local help and could lead users astray. Microsoft has improved the user experience of the help system in the latest version of PowerShell. Rather than making it a static resource, the help system has become a dynamic feature, much like the rest of PowerShell. This allows users to retrieve the most updated help directly from Microsoft and other developers to ensure the best and the most reliable information.
To understand how to update the help, it makes sense to understand what the help is made out of. The help system is comprised of a collection of text- and XML-like files stored in the PowerShell installation directory or within module directories themselves. Long-winded topic discussions are stored simply in about_*.txt files within the PowerShell installation directory. These files are retrieved using Get-Help and specifying the full name or a distinguishable part of the title of the help topics, using the following command:
PS C:\> Get-Help Name about_Modules
The same command would work by just specifying modules as the Name parameter as follows:
PS C:\> Get-Help Name modules
Help that is directly related to cmdlet is stored within a unique format called Microsoft Assistance Markup Language (MAML). The entirety of cmdlet help is formatted into these files; including descriptions, examples, and detailed parameter explanations. The MAML help files are stored within the module directories themselves. The help system parses the different pieces of the MAML document, as you request them using the Get-Help cmdlet.
In the latest version of PowerShell, the help system can now download and install help from the Internet or from the file system. The improved help system now takes advantage of a new key that is a part of the module's manifest. This key, HelpInfoURI, points to the location of the updated help files. Module authors can specify this URI by using the New-ModuleManifest cmdlet or by editing the PSD1 manifest file for a module.
There are two new cmdlets that have been added to the help system. The Save-Help cmdlet is capable of downloading help files from the Internet and storing them packaged as a combination of XML and cabinet (CAB) files. These files can then be provided to Update-Help for installation. Update-Help is capable of both downloading help files from the Internet and installing them. It can consume the files downloaded by Save-Help as well and install them.
The Save-Help cmdlet downloads the help for modules and saves the modules to the local file system or share. As the cmdlet saves the help to the $PSHome\Modules directory, if an alternate path is not specified, you will need to be part of the administrators' group and run an elevated PowerShell command prompt by right-clicking and selecting Run As Administrator. The Save-Help cmdlet uses a HelpInfo XML file of a module to gather the correct URL for downloading the help files. When the help files are downloaded, they will be organized into a single HelpInfo XML file accompanied by several CAB files, one for each language. The CAB files contain the actual help documentation. You don't have to worry about extracting any of the data from the CAB file as the Update-Help cmdlet will do this for you.
The Save-Help cmdlet can specify an alternate path using the LiteralPath or DestinationPath parameters. The LiteralPath parameter will not expand wildcards. Note that the path will not be created by this cmdlet. The following command shows this:
PS C:\> Save-Help -DestinationPath C:\MyHelpDirectory
You can download help for a single module as well. You cannot specify the help for a single cmdlet. To download help for a single module use the Module parameter as follows:
PS C:\> Save-Help -Module Microsoft.PowerShell.Core -DestinationPath C:\MyHelpDirectory
There is a restriction enforced by the Save-Help cmdlet which prevents you from downloading the help more than once in a 24-hour period. To bypass this you can use the Force parameter, as shown in the following command:
PS C:\> Save-Help -Module Microsoft.PowerShell.Core -Force -DestinationPath C:\MyHelpDirectory
The Update-Help cmdlet is responsible for installing help downloaded from the Internet or local folder or file share. By default, the Update-Help cmdlet will download files from the Internet and install them if they are out of date. If you run Update-Help without parameters it will update help for each module loaded into the current session. You will need to be part of the administrators' group and run as administrator, to update any of the core PowerShell modules, because they are stored in the system directory. This will update all currently loaded modules directly from the Internet if they are out of date. The following command can be used for this:
PS C:\> Update-Help
Alternatively, you can update help from a local folder or file share. The Update-Help cmdlet expects that these files are in the format that Save-Help creates. You will need to have both the HelpInfo XML file along with any CAB files in the specified folder or share. To invoke Update-Help in this way, you can use the LiteralPath or SourcePath parameters as shown in the following command:
PS C:\> Update-Help —SourcePath C:\MyHelpDirectory
Like the Save-Help cmdlet, the Update-Help cmdlet, by default, only allows you to download the help once per day. To bypass this you can use the Force parameter as follows:
PS C:\> Update-Help —Module Microsoft.PowerShell.Core —Force
Again, like the Save-Help cmdlet, the Update-Help cmdlet allows you to specify a particular module and culture when updating help. By default, the cmdlet will use the current culture. In this example, it would download and install the help for the Microsoft.PowerShell.Core module for the German culture, as follows:
PS C:\> Update-Help —Module Microsoft.PowerShell.Core UICulture de-DE
The cmdlet offers a Recurse parameter that will search the SourcePath directory, recursively, for HelpInfo XML and CAB files using the following commands:
PS C:\> Update-Help —SourcePath \\fileServer01\HelpFiles -Recurse
In addition to accepting strings for module names through the Module parameter, the cmdlet Update-Help and cmdlet Save-Help will accept PSModuleInfo objects through the InputObject parameter as well. This parameter accepts pipeline input. The Get-Module cmdlet returns PSModuleInfo objects. This allows you to use the two modules in unison and create a pipeline between the two. For example, you could get all the modules that are available and update them. This is shown in the following command:
PS C:\> Get-Module —ListAvailable | Update-Help
In the same way, with Save-Help, you could save the help for all modules in a particular directory, as follows:
PS C:\> Get-Module —ListAvailable | Save-Help —DestinationPath C:\MyHelpDirectory
The Get-Help cmdlet has been updated with a simple usability feature. Microsoft added a progress indicator that is now present when searching for help on a particular cmdlet. Because the number of cmdlets and modules is growing exponentially, and the cmdlet discovery is expanding beyond the session (as you'll soon see), this subtle but necessary feature has been added, as shown in the following screenshot:

Finding cmdlets and functions in PowerShell is very easy. You can simply type Get-Command to get a list of all the cmdlets and functions available in the current session. Adding new functions or cmdlets to the session can be done by running scripts, or even writing your own as you go.
In PowerShell 2.0, the concept of a module was introduced. A module is a packaged set of cmdlets, aliases, functions, types and other components that can be loaded and unloaded from a session. Often these modules serve a single purpose, for example Hyper-V support or Diagnostics. Keep in mind that roles or features may need to be enabled before accessing particular modules. The Hyper-V module for example is only available if the Hyper-V role is enabled. To access modules in the current session you can simply type Get-Module as follows:
PS C:\> Get-Module
ModuleType Name                      ExportedCommands
---------- ----                      ----------------
Manifest   Microsoft.PowerShell.Core {Add-History, Add-...
Manifest   Microsoft.PowerShell.M... {Add-Computer, Add-...
Manifest   Microsoft.PowerShell.S... {ConvertFrom-...
Manifest   Microsoft.PowerShell.U... {Add-Member, Add-Type,..
To take the command a step further you can issue it with the ListAvailable parameter too. This will show all modules that are currently installed in the specified modules directories within the system, as shown in the following command:
PS C:\> Get-Module -ListAvailable
The Get-Module cmdlet is looking for folders within the directories that contain modules manifests. Module manifests outline what is contained in and exported from the module. Notice the previous output the ExportedCommands property of each record returned by the Get-Module cmdlet. This property shows which commands are to be exported from the module and thus available to the user in the session. Module authors are advised to set the CmdletsToExport key in their module manifests. This ensures that the module will not actually have to be loaded in order to view which cmdlets are provided by the module. If this key is not populated, the module may be loaded in order to discover the cmdlets that are exported.
Note
By default, the module directories include the user module path, %userprofile%\Documents\WindowsPowerShell\Modules, and the system module path, %windir%\System32\WindowsPowerShell\v1.0\Modules. These values are stored within the $env:PSModulePath environment variable.
In the previous versions of PowerShell, you would be responsible for knowing which module contained the cmdlets you were attempting to use. You would then have to call the Import-Module cmdlet followed by the name of the module. This would make the cmdlet available to you in the command line. This is no longer the case in PowerShell 3.0.
In the newest version of PowerShell, the cmdlet auto-discovery cmdlet does that work for you. Simply typing the name of a cmdlet which is available in any module, imported or not, will execute as expected. For example, the WebAdministration module contains a Get-Website cmdlet. Note that the web server role needs to be enabled to gain access to the WebAdministration module.
In PowerShell 2.0, before being able to use Get-Website you would first have to import the WebAdministration module, using the following commands:
PS C:\>Import-Module WebAdministration
PS C:\> Set-Location IIS:
PS ISS:\>Get-Website -Name "Default Web Site"
There are two pain points associated with the previous interaction. First, the user must know which module contains the cmdlet they are intending to use. Finding the cmdlet could be done by calling Get-Module and then parsing the ExportedCmdlets parameter, as follows:
PS C:\> Get-Module -ListAvailable | Where-Object { $_.ExportedCommands.Keys -eq "Get-Website" }
The command returns nothing in this case because the WebAdministration module does not define the ExportedCmdlets key in the module manifest. Instead it specifies the wildcard character, *, signifying that all cmdlets are exported. Due to this, we would need to import every module in order to search for the cmdlet. This could be very time consuming and resource intensive if a system had a lot of modules installed.
The second pain point is the need to make sure a module is currently imported into a session before calling any cmdlets. This can be a problem when multiple scripts are chained together. For example, if Script1.ps1 was run first, and it imported module x, and then Script2.ps1 used cmdlets from module x it would work correctly. If Script2.ps1 was run by itself it would fail because it did not import module x.
The auto-discovery cmdlet removes the need to load a module explicitly before calling cmdlets that it includes. For example, rather than performing the previous imports you could simply call it Get-Website as follows:
PS C:\>Get-Website
Right before execution of the Get-Website cmdlet, PowerShell imported the module for us. This is not the only circumstance where a cmdlet module will be automatically loaded. There are actually two other actions that will implicitly load a module. The first action is when attempting to load the help for a cmdlet using Get-Help as follows:
PS C:\> Get-Help Get-Website
Again this will load the module right before getting the help for the cmdlet. This is necessary because the module contains the help information, thus Get-Help requires that the module be loaded before reading the help. The last circumstance where a module will be implicitly loaded is when you use the Get-Command cmdlet to retrieve a CmdletInfo object using following command:
PS C:\> Get-Command Get-Website
Using a Get-Command call with a wildcard character will not load the module into the current session. The about_Modules help topic explains why. The following sentence supports this, which can be found at
http://msdn.microsoft.com/en-us/library/windows/desktop/hh847804.aspx.
Get-Command commands that include a wildcard character (*) are considered to be discovery, not use, and do not import any modules.
It is possible to modify how modules are auto-loaded in your PowerShell session. You can adjust the value of the PSModuleAutoLoadingPreference variable. The default value for this variable is All. All signifies that during any of the these actions the module containing the target cmdlet will be auto-loaded. The other two values are ModuleQualified and None. ModuleQualified loads modules only when a command is prefixed by the module name, as follows:
PS C:\> Get-Command "MyModule\MyCommand"
In any other circumstance the module will not be loaded. Setting PSModuleAutoLoadingPreference to None will turn off module auto-loading.
There is one other change that affects when modules are imported. In PowerShell 2.0, modules that relied on other modules, could specify the RequiredModules property and list the other modules that were required by the module. If the other modules were not already imported when the target module was being imported, an error would be shown and the module would not be imported successfully. This has changed in PowerShell 3.0. Instead of the primary module load failing immediately if the other modules are not loaded, an attempt to load all the dependent modules will be made before loading the target module.
This effectively alleviates the two pain points seen in the previous versions of PowerShell. The cmdlets can be used without having to load their modules. This reduces script dependencies and saves a bit of typing. In addition, it enables administrators to search for cmdlets and the help of cmdlets without having to know the details of where they are stored.
The cmdlet auto-discovery is a great new feature but has a few caveats that need to be understood when working with the new version of PowerShell. The first thing to note is that the help system searches the module directories in a specific order. The local user's module directory is the first to be searched, followed by the system module directory. This is very important to understand because PowerShell allows for functions to be overwritten. This means that it is possible to have two separate modules that contain those cmdlets. For example, if you have two virtual machine management modules, say HyperVModule and VirtualBoxModule, and they both have Get-VM cmdlet.
Here is an example of one of the module manifests:
#HyperVModule.psd1 – Module Manifest

@{
ModuleVersion = '1.0'
GUID = '256c636c-7e77-493c-971e-fe16cfe0601c'
Author = 'Adam Driscoll'
CompanyName = 'Get-VM'
Copyright = '2011 Adam Driscoll'
Description = 'Test Hyper-V Module'
PowerShellVersion = '3.0'
#Some fields removed …
NestedModules = @('HyperVModule.ps1')
CmdletsToExport = 'Get-VM'
}
As you can see the module will export the cmdlet Get-VM. The CmdletsToExport property is what the system is evaluating to determine where cmdlets are stored during auto-discovery. Here is an example of one of the source files:
function Get-VM
{
    Write-Host "HyperVModule:Get-VM"
}
As you can see, we are a defining a function, Get-VM, which simply prints out the name of the module and the name of the cmdlet. In the case of the VirtualBoxModule, we have defined a very similar structure, except it will print out VirtualBoxModule:Get-VM rather than the string presented in the previous script snippet.
Imagine that the HyperVModule is stored in the local user module directory while VirtualBoxModule is stored in the system module directory. Typing Get-VM in the shell will then load the HyperVModule and execute that cmdlet.
Executing the Get-VM on the command line would now result in the following:
PS C:\> Get-VM
HyperVModule:Get-VM
To execute the other version of the cmdlet you will need to first load the VirtualBoxModule explicitly, and then execute the cmdlet as follows:
PS C:\> Import-Module VirtualBoxModule
PS C:\> Get-VM
VirtualBoxModule:Get-VM
The cmdlet auto-discovery is great when attempting to locate a particular cmdlet, but as seen previously it behaves differently when there are multiple cmdlets with one name.
Although this is an issue there are several ways to work around it. Even when both the cmdlets are loaded, it is still possible to fully qualify the name of the cmdlet we would like to execute. For example, if we wanted to execute the Get-VM cmdlet of VirtualBoxModule, we could do the following:
PS C:\> VirtualBoxModule\Get-VM
VirtualBoxModule:Get-VM
In addition to using the default fully qualified name, we could use the Prefix parameter of the Import-Module cmdlet as well. This allows us to change the prefix for the cmdlet. For example, we could define a new prefix for the VirtualBoxModule as follows:
PS C:\> Import-Module VirtualBoxModule -Prefix VBM
PS C:\> VBM\Get-VM
VirtualBoxModule:Get-VM
Note
In PowerShell 2.0, this prefix was defined by the module name. But in PowerShell 3.0 module authors have the option of changing the prefix by specifying the DefaultCommandPrefix key in the manifest of the module.
Another problem associated with this circumstance is attempting to find these cmdlets. Get-Command is not set up to find cmdlets beyond the first one it finds when there are no wildcards associated with the name. Once it locates the cmdlet it is looking for, it will simply stop looking and return that cmdlet. So executing the following will only return the HyperVModule version of Get-VM because it looks in the user module directory before looking in the system module directory:
PS C:\ Get-Command Get-VM
CommandType     Name                         ModuleName
-----------     ----                         ----------
Function        Get-VM                       HyperVModule

PS C:\ Users\Adam> Get-Module

ModuleType Name                      ExportedCommands
---------- ----                      ----------------
Manifest   HyperVModule              Get-VM
…
Notice that it has loaded the module after calling Get-Command. Although in most circumstances the Get-Command works in our favor, this time we were attempting to search for all the Get-VM cmdlets available to us. As you can see, the HyperVModule is now loaded into our session. In order to find the other cmdlet we need to get a bit more complex in the way we search the system. The following command will retrieve all the available modules and filter through each one of their exported commands, returning only modules that contain a Get-VM cmdlet:
PS C:\ > Get-Module -ListAvailable | Where-Object { $_.ExportedCommands.ContainsKey('Get-VM') }
Directory: C:\Users\Adam\Documents\WindowsPowerShell\Modules
ModuleType Name                      ExportedCommands
---------- ----                      ----------------
Manifest   HyperVModule              Get-VM

    Directory: C:\Windows\system32\WindowsPowerShell\v1.0\Modules

ModuleType Name                      ExportedCommands
---------- ----                      ----------------
Manifest   VirtualBoxModule          Get-VM
The reason the previous cmdlet works is that it does not actually force either of the modules to load into the session via cmdlet auto-discovery. Instead, internally it reads the manifest files and searches for cmdlet within those manifests and returns the corresponding modules. Instead of using such a complicated command it is possible to once again use the Get-Command cmdlet. Albeit, this example may not work in every circumstance, it will work for the previous example as follows:
PS C:\> Gt- Command Get-VM*
CommandType     Name        ModuleName
-----------     ----        ----------
Function        Get-VM      HyperVModule
Function        Get-VM      VirtualBoxModule
Because we used a wildcard in the call to Get-Command, the system did not use the auto-discovery cmdlet as explained earlier. The problem with this method is that it may find cmdlets simply starting with Get-VM in addition to the cmdlets we are actually searching for.
Another issue associated with cmdlet auto-discovery is that it can mask issues associated with the modules it is attempting to auto-load. If, for instance, I had incorrectly typed the NestedModule property in the HyperVModule manifest, I would receive an error while attempting to load the module with Import-Module, shown as follows:
#Notice I'm missing a close single quote
CompanyName = 'Get-VM
This is what happens when I attempt to load the module explicitly with the Import-Module cmdlet as follows:
PS C:\Users\Adam> Import-Module HyperVModule
Import-Module : The module manifest 'C:\Users\Adam\Documents\WindowsPowerShell\Modules\HyperVModule\HyperVModule.psd1'
could not be processed because it is not a valid PowerShell restricted language file. Please remove the elements that are not permitted by the restricted language
If I were now to attempt to call the Get-VM cmdlet, I would receive an error. Rather than continuing on to the next module that contains Get-VM, the VirtualBoxModule, PowerShell stops processing because of an error in the HyperVModule as follows:
PS C:\ > Get-VM
The term 'Get-VM' is not recognized as the name of a cmdlet, function, script file, or operable program. Check the spelling of the name, or if a path was included, verify that the path is correct and try again.
This is important to note for both duplicate cmdlet scenarios and for module development, as the issue will not be obvious. The cmdlet auto-discovery is a very helpful feature but understanding the few caveats associated with it are a fundamental part of using it.
As seen in this chapter, Microsoft has taken some big steps forward in providing a better user experience for PowerShell users. We learned that the updatable help system allowed developers and users the benefit of the most up-to-date examples and descriptions for all the cmdlets and topics that a module may expose. The Show-Command cmdlet ensured that users, that may be weary of the command line, will feel at home with a simple graphical user interface to enter parameter values and view the help. The improvements to cmdlet discovery ensured that as the list of modules grow, the users will still be able to easily find and use the cmdlets that they need to.
In the next chapter we will look at some of the new usability enhancements to some of the core components common to every PowerShell user.