In this chapter, we will cover the following recipes:
- Planning your DPM deployment
- Preparing your DPM deployment
- Installing SQL Server for the DPM database
- Enabling the Transport Layer Security 1.2 protocol for DPM
- Installing DPM
- Automating the installation of DPM
- Upgrading to the latest release of DPM
- Migrating legacy storage to Modern Backup Storage
- Installing the DPM agents
- Upgrading the DPM agents
Data protection in today's world is becoming more critical than ever. With increasing amounts of data in this all-connected world comes more data that needs to be protected. As shown in the Enterprise Strategy Group (ESG) 2016 report, backup is one of the top five priorities that IT administrators continue to have in today's world:

System Center 2019's Data Protection Manager (DPM) is the latest release by Microsoft, and with it comes a lot of improvements and new features. DPM is well-recognized in the industry for protection of Microsoft workloads and VMware environments. With DPM 2019, you can back up the most common workloads that exist in any modern data center today.
The following diagram provides an overview of the DPM backup functionality:
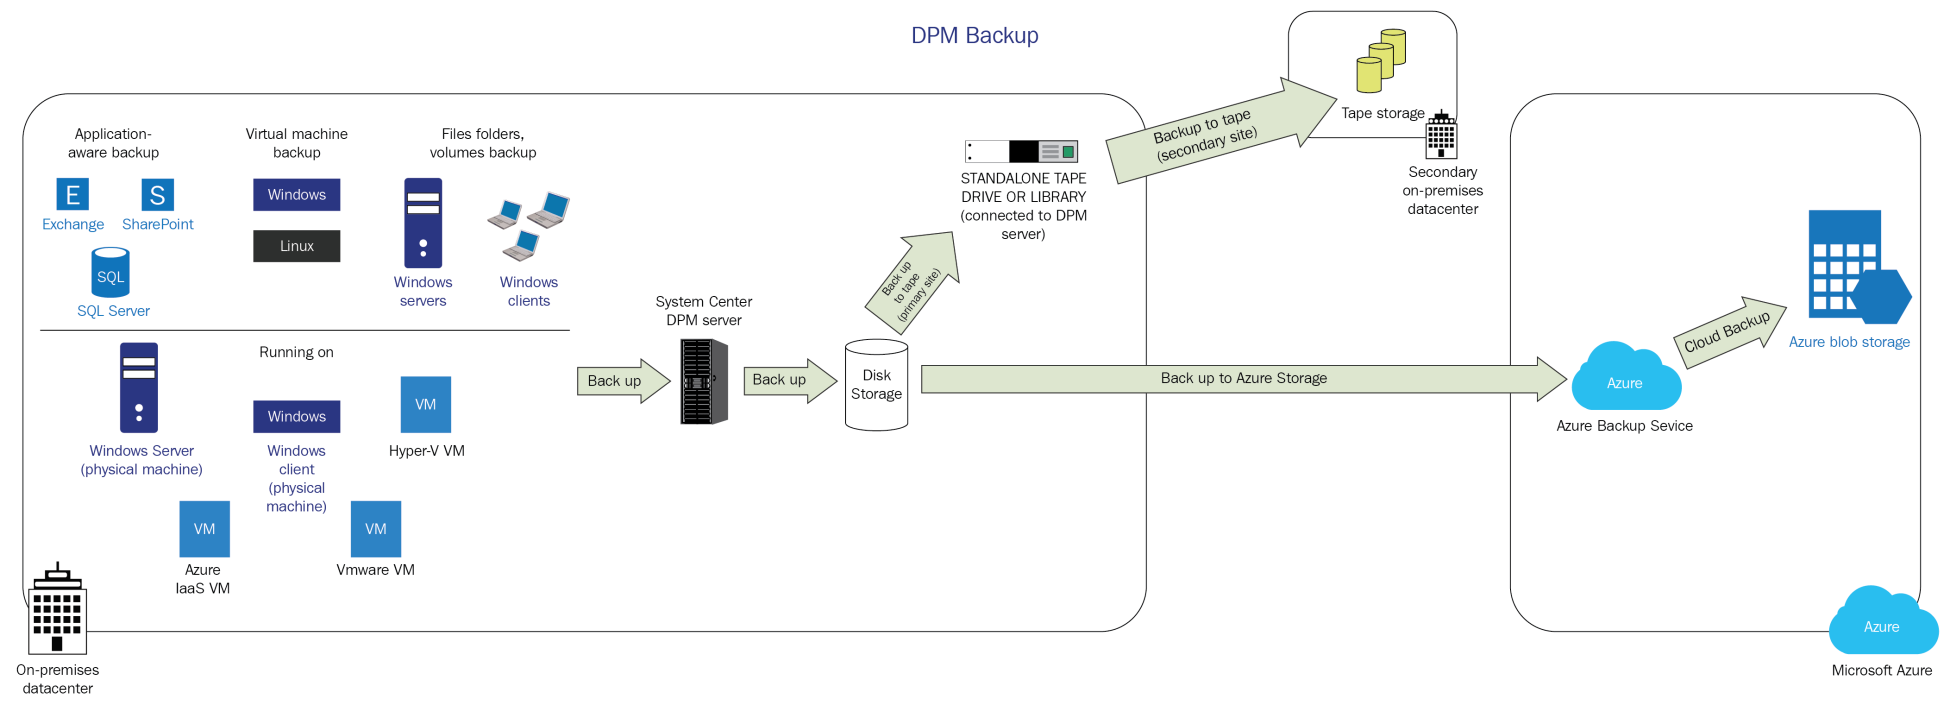
Typical malware attacks that happen today include ransomware, which is where target machines are forced to either re-encrypt their data or remove it permanently. If production data is impacted, then the backups that follow are impacted on too. Microsoft System Center DPM and Azure backup now provide security features that protect sensitive data. These security features ensure that you are able to secure your backups and recover your data if the production and backup servers are compromised. These features are built on three main principles—Prevention,Alerting, andRecovery—that help organizations to increase preparedness against attacks and equip them with a robust backup solution.
This chapter is designed to provide you with the necessary skills and techniques for dealing with installing and upgrading tasks for your Microsoft System Center DPM server. After reading this chapter, you will have the knowledge to carry out common DPM installation, migration, and planning activities, such as configuring the DPM firewall, calculating the storage requirements, preparing the SQL Server for the DPM database, installing and upgrading to the latest release of DPM, automating the installation of DPM, and much more.
This recipe will cover the planning steps that you should consider before you start preparing to deploy your DPM servers.
Before you start planning your DPM server deployment, it's imperative that you start working on classifying the data sources that you would like to protect. A common strategy that I have observed that many companies still follow is to backup everything once a day. This is not a good approach.
There are, of course, several servers within your datacenter that need to be regularly backed up, but not all servers are the same. It is vital to adapt to your business continuity and disaster-recovery plan before you start any implementation. You can do this by identifying all of the services and working with all of the stakeholders in your company to develop more effective backup approaches, and then break down those services into smaller components to clearly see how or why they are of importance to your business.
From a more technical perspective, there are some considerations that need to be addressed during the planning phase, such as the following:
- The total amount of data that should be protected
- Firewall settings
- Network consideration
- Who can interact with DPM
- Untrusted domains/workgroup
- Backup repository
To start provisioning resources for the DPM server that you want to deploy, you must first take into consideration the following:
- Starting with DPM 2016 onward, Microsoft removed the Logical Disk Manager (LDM) limits for protection groups. The absence of LDM limits allows the data sources to grow and shrink as many times as needed, without the need for manual intervention. DPM 2016 or later does not need to allocate storage to data sources beforehand compared to DPM 2012 R2. This will allow the backups to adjust dynamically as needed, thus achieving higher efficiency with less storage requirements. The snapshot limits do not apply to protection groups that have been created in DPM 2016, as DPM does not use disks anymore. Instead, it uses volumes. Please read Chapter 2, DPM Post-Installation and Management Tasks, for more information on this.
- Here are the suggested data limits according to Microsoft for a single DPM server:
- DPM can protect up to 600 volumes. The limit for each DPM is 120 TB, 80 TB ReplicaPoint Volume, and 40 TB RecoveryPoint.
- The total amount of SQL DBs that can be protected by one DPM server is 2,000 and the total size is 80 TB.
- The total amount of clients that can be protected with one DPM server is 3,000 and the total size is 80 TB.
- The total amount of virtual machines that can be protected with one DPM server is 800 and the total size is 80 TB.
- Firewall configuration for DPM deployment is required on the DPM server, on the machines that you want to protect, and on the SQL Server used for the DPM database (if you're hosting your DPM database on a remote SQL Server). If Windows Firewall is enabled when you install DPM, then DPM automatically configures the firewall settings on the DPM server.
Note
The firewall settings, including the port numbers, are documented in the following link: https://docs.microsoft.com/en-us/system-center/dpm/plan-dpm-deployment?view=sc-dpm-1711#BKMK_Firewall.
- The backup network for Hyper-V is not listed as a requirement by Microsoft. However, we strongly recommend isolating the backup traffic from the host Management OS by leveraging a converged network in Hyper-V where you combine multiple physical NICs with Switch-Embedded Teaming (SET) and Quality of Service (QoS) so that you can isolate all network traffic while maintaining resiliency. This implementation can be seen in following diagram:

Note
The required permissions needed are documented at the following link: https://docs.microsoft.com/en-us/system-center/dpm/plan-dpm-deployment?view=sc-dpm-1711#BKMK_Users.
- If you want to protect multiple domains, you can create a two-way transitive trust between the domains. By doing this, the DPM server will work in both domains without any limitations. However, this approach comes with a security risk—please take into consideration that you need to create a two-way transitive trust between the untrusted domains.
- Starting with System Center 2012 R2 Data Protection Manager, Microsoft added support for the protection of computers in workgroups and untrusted domains using NTLM with local accounts. However, in scenarios where an organization does not allow for the creation of local accounts, this solution does not work.
- As an alternative, you can use certificate-based authentication for computers in workgroups or untrusted domains. Please refer to Chapter 8, Protecting Workgroups and Untrusted Domains, for more information.
- A major part of your DPM deployment will be figuring out how to store data that's been backed up by DPM. There are currently three different solutions:
You should not just consider one of these three as an option. Instead, you need to focus on the requirements of the backup strategy in your organization by discussing the Recovery Point Objective (RPO) and Recovery Time Objective (RTO) with all stakeholders.
When you are planning for data source protection, you can choose the backup target based on how frequently you need to access and restore the data. For example, if the data sources will be used for archiving and need to be accessed once per month, you can go with Azure Backup. If the protected data sources need an archiving solution but should also be able to restore quickly, you can go with Virtual Tape Library (VTL) or Azure Backup. If you need to restore the data sources as quickly as possible, you go with disk storage on-premises. Finally, if the workloads need an off-site secure solution, you can go with Azure Backup.
Note
More information about the difference between RPO and RTO can be found here: https://en.wikipedia.org/wiki/Recovery_point_objective.
Having all of the information we have just discussed and presented in an organized manner, you can now start designing the structure of the Backup as a Service (BaaS). A piece of advice here—make sure that you spend enough time on the planning phase and take small steps toward your goal and never rush an implementation. You will probably bump into a challenge or two, so it is of key importance to work using a well-defined structure.
- Follow this blog post to learn more about how to set the firewall rules for DPM using Windows PowerShell: https://charbelnemnom.com/2017/03/installing-system-center-data-protection-manager-2016-agent-on-windows-server-2016-core-scdpm-dpm-ws2016/.
- Follow the following blog post to learn more on how to isolate DPM backup traffic: https://charbelnemnom.com/2014/04/isolate-dpm-backup-traffic-in-hyper-v/.
This recipe will cover the preparation steps that you must consider before you install the DPM server.
It's important to configure DPM properly and provide enough resources, or you will end up with quite a bad installation that could be part of the services you would like to provision within your data center. In the end, the DPM server can never work faster than what the underlying dependent architecture or technology allows.
There are certain requirements and considerations that you want to keep in mind when you deploy System Center DPM. By properly preparing a decent design, you can ensure that your DPM is scalable for future scenarios.
- First things first, you want to decide how to deploy DPM server:
- Virtual or physical deployment
- Deduping DPM data
- SQL Server consideration
- DPM server requirement
- Disks and storage consumption
A common question that we have heard a lot is, can we deploy DPM in a virtual or physical machine? The DPM server can be deployed either in a physical deployment or via a virtual machine. However, running DPM in a virtual machine has more benefits, such as the following:
- It is easier to move the DPM server to new hardware if needed (portability).
- Easier to recover (protected DPM virtual machine).
- You can enable de-duplication on the VHDXs attached to the DPM server. The VHDXs files could reside on a Scale-Out File Server (SOFS), on a Storage Spaces Direct (S2D) cluster, or any other type of storage, such as NAS or SAN.
- Backup storage is one of the top consumers of storage infrastructure, so storage optimization techniques such as compression and de-duplication have always been priorities for backup IT administrators.
- De-duplication involves locating duplicate blocks of storage and replacing them with a reference and a single instance of the duplicate block. Depending on the workload that is being written to the storage and the block sizes used to perform the de-duplication, storage savings can range anywhere from 50 to 90 percent.
- With the introduction of S2D in Windows Server 2016 and Storage Spaces with SOFS in Windows Server 2012 R2, customers can create commodity storage that is built natively on a Windows-based server with local attached storage in S2D as well as Windows-based servers with JBODs, which can be a viable alternative to traditional SANs.
Note
In Windows Server 2016, Dedup is only supported on the NTFS filesystem and NOT on ReFS. However, in Windows Server 2019, Microsoft added Dedup support for ReFS volumes. Additionally, Dedup cannot be used for storing backups of volumes on physical DPM servers.
For DPM deployments, you need to have the following:
- An instance of SQL Server installed and running to host the DPM database. The instance can be collocated on the DPM server or remotely.
- A disk to be used as a dedicated space for DPM backup storage.
- A DPM protection agent installed on the computers and servers you want to protect.
- DPM uses SQL Server as a database to store backup information for the workloads, servers, and computers it protects. At the time of writing this book, the following SQL Server versions are supported with DPM Long-Term Servicing Channel (LTSC) and Semi-Annual Channel (SAC):
- SQL Server 2017: Standard or Enterprise 64-bit (starting with DPM 2019 and DPM 1901 onward)
- SQL Server 2017: Standard or Enterprise 64-bit (starting with DPM 1801 and DPM 1807 as upgrade only); you can upgrade SQL Server 2016 and SQL Server 2016 SP1/SP2, to SQL Server 2017
- SQL Server 2016: Standard or Enterprise 64-bit (starting with DPM 2016 with Update Rollup 2 onward)
- SQL Server 2014: Standard or Enterprise 64-bit with all service packs and updates
- SQL Server 2012 SP2 onward: Standard or Enterprise 64-bit
- DPM server is designed to run on a dedicated, single-purpose server. The following applications and roles are not supported to run side-by-side with DPM:
- Application server role
- Operations Manager Management server
- Exchange server
- A server running on a cluster node
- The following Windows Server operating systems are supported with DPM 2016 or later:
- Windows Server 2019, Datacenter and Standard editions
- Windows Server 2016, Datacenter and Standard editions
- Windows Server 2012 R2, Datacenter and Standard editions
Note
Please note that if you install DPM 2016 or later on Windows Server 2012 R2, you will lose the benefit of using MBS. MBS technology uses ReFS block-cloning technology that was introduced in Windows Server 2016 to store incremental backups. Installing DPM on Windows Server 2016 or Windows Server 2019 dramatically improves storage utilization and performance.
Note
A very important fact to be aware of is that the internet Small Computer System Interface (iSCSI) should not be considered as your primary choice for DPM backup storage due to some challenges that often occur when leveraging this technology. The most common challenge is that the initiation of the iSCSI target sometimes fails, and therefore the entire DPM disk volume fails.
iSCSI will work in smaller deployments with DPM, but if your main objective is to provide a more stable and performant solution, you should consider using Storage Spaces Direct (S2D). If your company does not provide S2D, you should use a Direct Attached Storage (DAS) solution and provision VHDX files to the virtual DPM servers. Microsoft recommendation moving forward is to create tiered volume using Storage Spaces with small SSD around 2 to 5% of total data disk to improve the ReFS cloning performance. As noted earlier, the recommendation is to deploy DPM as a virtual machine on top of Hyper-V.
As discussed earlier, DPM 2016 or later on Windows Server 2016 and Windows Server 2019 comes with MBS, which uses ReFS Block-Cloning technology for storing backup files. This leads to immense storage and performance savings. Furthermore, DPM uses incremental backups to store data. This means that it will transfer the complete data to be backed up initially. After that, it will transfer only the changed bits. Hence, the size of the data is determined by the initial size, the size of the changed bits (which depends on the churn percentage and the total size), the number of recovery points per day, and the retention period of the copies. Hence, small data, with a small churn, may take up more space if there are a large number of copies stored per day, and if they are retained for a long time.
Calculating DPM storage is one of the biggest challenges, since we need to calculate the size of the disks for storage pools that are used for the protection of data sources. Microsoft recommends that you figure out the actual size of the DPM data storage by multiplying the total amount of protected data by 1.5. For instance, if you want to protect 10 TB of data, you need 15 TB of storage from a minimal perspective. However, from a maximum perspective, you need to multiply the total amount of protected data by 3.
Note
The best way to calculate data storage for specific workloads is to use the DPM storage calculator. To download the DPM storage calculator, go to https://www.microsoft.com/en-us/download/details.aspx?id=54301.
The DPM team released this calculator to help you provision storage for DPM by using storage savings and efficiency. Based on inputs, the calculator suggests the amount of storage that will be needed to store the backups to disk (on-premises) and to Azure Backup. For more information about Azure Backup, please refer toChapter 10, Integrating DPM with Azure Backup.
You can plan the backup storage requirements by using the storage calculator in three simple steps, as follows:
- Gather information about the size, type, number, and churn of workloads that have to be backed up. The churn is the amount of new data every day (that is, written or appended to existing backup files).
- Calculate the number of DPM servers that would be required.
- Decide on the policy you want to use, depending on the needs and resources available. This calculator may help you understand the resource requirements. If you expect the data to grow over time, you need to enter the maximum size expected for the workload, instead of the current size. Similarly, the churn values given are the average values. Please change the values if the workloads are expected to churn more or less. If you wish to remove a workload, simply set the
Total Size of workloadto0.
You could also calculate the storage, including the growth rate. Note that this may change a bit depending on what you have for specific data types. With DPM, you can always add more storage later as needed. For monthly and yearly storage, this would need to be sent to tape and/or to Azure Backup. DPM cannot do long-term storage to disk.
Note
Please note that the maximum daily recovery points to a disk cannot exceed 48. The maximum number of recovery points for the entire retention period is 512 for applications and 64 for files and folders. For Azure Backup, the maximum number of recovery points per day is 2. Hence, the maximum number of weekly, monthly, and yearly backups is 14, 62, and 732.
Planning for decent hardware to host the DPM disk volume is very important. You don't need a premium disk solution for the DPM disk volume, but you can use decent hardware that can easily scale out. Adding DPM volumes can be done via the DPM console or via PowerShell. For more information on this topic, please read the Enabling Modern Backup Storage recipe in Chapter 2, DPM Post-Installation and Management Tasks.
It's important to know the limitations of a DPM server that has been upgraded from DPM 2012 R2 and used a legacy storage pool:
- The disk that you want to add to the DPM storage pool must be dynamic in disk management.
- DPM cannot be installed on the disk that's used for the storage pool.
- You can attach or associate custom volumes with protected data sources. Custom volumes can be on basic or dynamic disks, but you can't manage the space on these volumes in the DPM Administrator Console.
Follow this article to learn more on how to reduce DPM storage by enabling de-duplication on MBS: https://charbelnemnom.com/2016/10/how-to-reduce-dpm-2016-storage-consumption-by-enabling-deduplication-on-modern-backup-storage/.
This recipe will cover the installation process in two scenarios:
- Local SQL Server instance
- Remote SQL Server instance
SQL Server is a core component and is required for the System Center Data Protection Manager database. It is of major importance that the installation and design of SQL Server is well-planned and implemented. If you have an undersized installation of SQL Server, it will provide you with a negative experience while operating the System Center Data Protection Manager.
Note
Starting with DPM 2012 R2 and later, SQL Server is no longer a part of the installation media for DPM, which is a good thing. The majority of users need to understand SQL more and also understand that if you have a poorly set-up SQL Server, you will have a bad experience with the product hosting its database on that SQL Server. Remember to set up your SQL Server using domain service accounts, use a dedicated disk for the DPM database, and keep monitoring SQL's performance with a proactive monitoring approach.
The following requirements are recommended for a SQL Server database:
- RAM: 8 GB
- Disk: 3 GB
- Required features: Database Engine Services, Reporting Services
- Collations:
SQL_Latin1_General_CP1_CI_AS - AlwaysOn: Not Supported
- Clustered SQL Server: Supported
The following steps will cover the installation process of a local SQL Server that has been collocated with the DPM server on the same operating system.
Make sure that your operating system is fully patched and that is has been rebooted before you start the installation of SQL Server 2016. Now, follow these steps:
- Insert the SQL Server 2016 media and start the SQL server's setup. In the
SQL Server Installation Center, click onInstallationand click onNew SQL Server stand-alone installation… - The
Setup Support Ruleswill start and will identify any problems that might occur during the SQL server's installation. When the operation is complete, click onOKto continue. - In the
Product Keystep, enter the product key that ships with SQL server license and click onNextto continue. - The next step is the
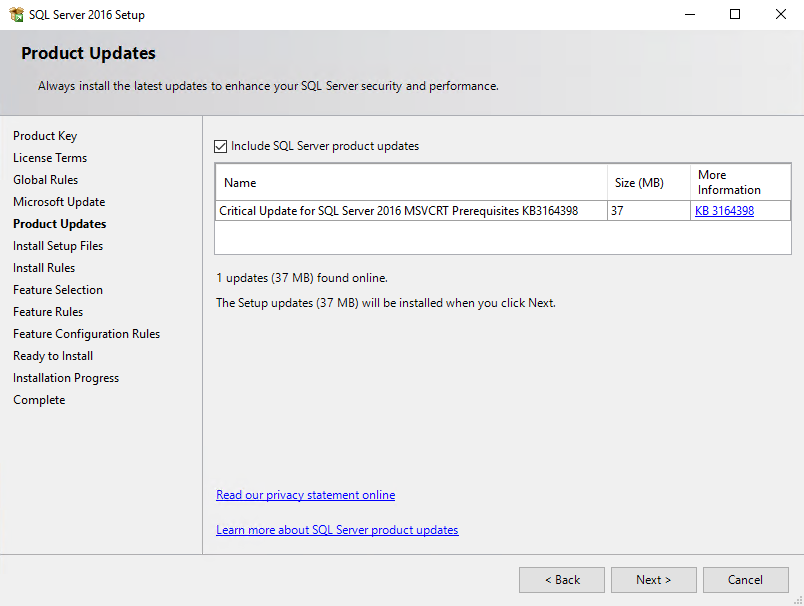
License Termsstep, which is where you check theI accept the license termscheckbox if you agree with the license terms. Click onNextto continue. - The SQL Server installation will verify whether there are any product updates available from the Microsoft Update service. Check the
Use Microsoft Update to check for updates (recommended)checkbox and click onNextto continue. - Select the
Include SQL Server product updatescheckbox and click onNextto continue:
- Next is the
Install Setup Filesstep, which initializes the actual installation. When these tasks have finished, click onInstallto continue. - Verify that all of the rules have passed in the
Install Rulesstep of the SQL Server installation process. Resolve any warnings or errors and click theRe-runbutton to run the verification again. If all of the rules have passed, click onNextto continue. - In
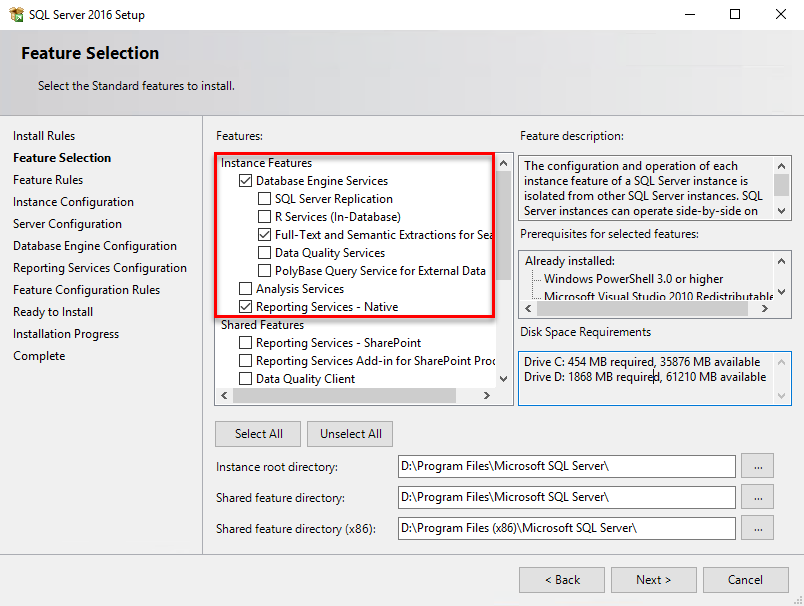
Feature Selection, choose the SQL Server features that you would like to install. System Center Data Protection Manager requires the following:Database Engine ServiceFull-Text and Semantic Extractions for SearchReporting Services – Native
- Click on
Nextto continue:
- In the
Collationtab, make sure thatSQL_Latin1_General_CP1_CI_ASis listed in theDatabase Engine Configuration. If not, then click on theCustomize…button to choose the correct collation and then click onNextto continue. - The next step is the
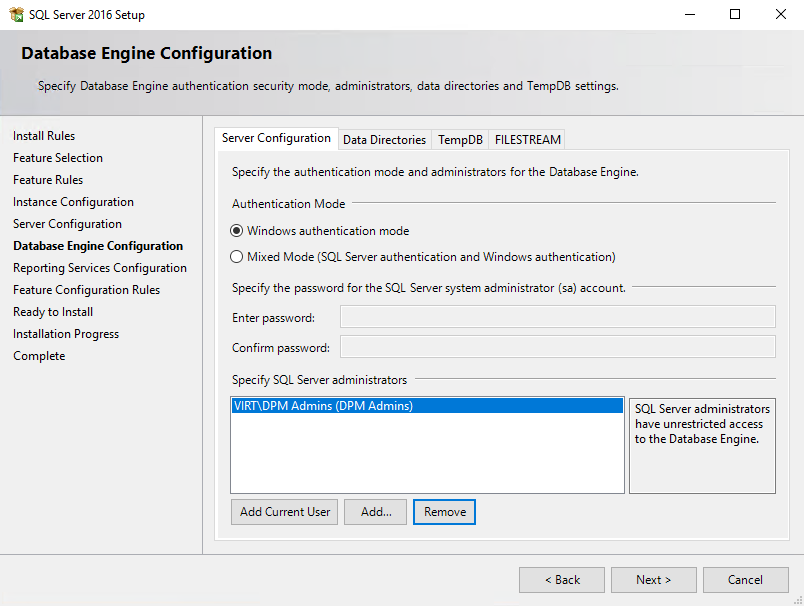
Database Engine Configurationstep. Enter the authentication security mode, administrators, and directories. In theAuthentication Modesection, chooseWindows Authentication mode. In theSpecify SQL Server administratorssection, click theAdd...button and add theDPM Adminsgroup into Active Directory:
- Click on the
Data Directoriestab as well as theTempDBtab to verify that all of your SQL Server configurations point to a dedicated disk. Click onNextto continue. - In the
Reporting Services Configurationstep, under theReporting Services Native Mode, chooseInstall and configureand click onNextto continue. - Verify the configuration in the
Ready to Installstep and click onInstallto start the installation. - The
Installation Progressstep will show you the current status of the installation process. When the installation has completed,SQL Server 2016 Setupwill show you a summary of theCompletestep. That is the final step page of the SQL Server Server 2016 installation wizard. - Click on the
Closebutton to endSQL Server 2016 Setup.
Note
After installing SQL Server, please make sure that you install an important update for SQL Server 2016 RTM (KB3210111). Please note that, starting with SQL Server 2014 and later, SQL Server Management Studio (SSMS) is not part of the installation media and you need to download it separately. At the time of writing this book, SSMS version 17.8.1 is the latest generation of SQL Server Management Studio that supports SQL Server 2017. However, if you install SSMS version 17.X and later on the same OS, DPM installation will fail with the following error:An unexpected error occurred during the installation – ID: 4387. Alternatively, you can download SSMS version 16.5.3 from the following link, which will work side-by-side with DPM:http://go.microsoft.com/fwlink/?LinkID=840946.
When you need to build a large hosted DPM solution within your modern datacenter, you may want to use a dedicated backend SQL Server that is either a standalone SQL Server or a clustered one, for high availability. This step will cover the procedure to prepare a remote SQL server for hosting the DPM database.
After installing your backend SQL Server, you must prepare it for hosting the DPM database. Now look at the following steps:
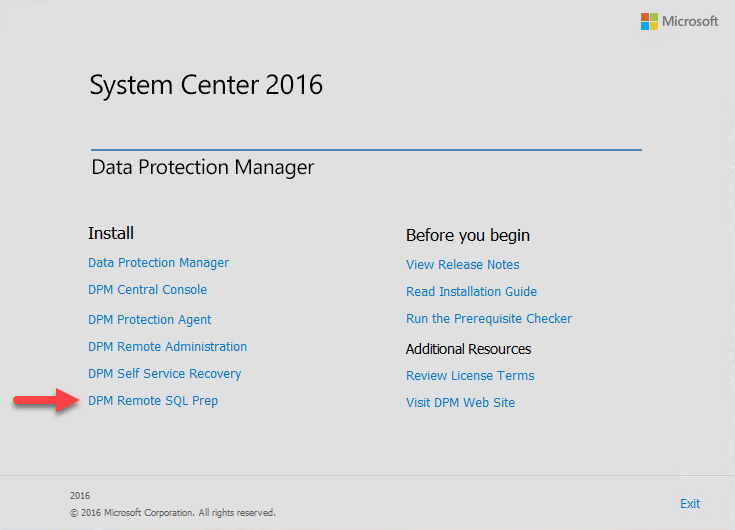
- Insert the DPM media on the SQL Server and run the setup. In the setup screen, click on the
DPM Remote SQL Preplink:
- The next step is to go through the
Microsoft Software License Terms, where you must check theI accept the license terms and conditionscheckbox if you agree with the license terms. Click onOKto continue. - The installation wizard will start and install the
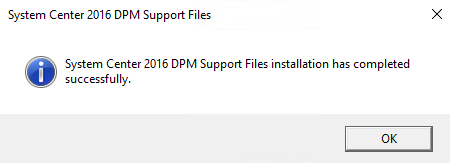
DPM Support Files; this is a very quick installation. - When the installation has finished, a message box appears that informs you that the installation has finished and that the
System Center DPM Support Fileshave been successfully installed:
SQL Server is a very important component for System Center Data Protection Manager. If the SQL Server is undersized or misconfigured in any way, it will reflect negatively on the performance of DPM.
It is crucial to plan, design, and measure the performance of SQL Server before you install the DPM server so that you know it will fit the scale you are planning for and the workloads that it should host.
This recipe will cover how to enable the Transport Layer Security (TLS) protocol version 1.2 for the DPM Management server.
TLS is a protocol that provides privacy and data integrity between two communicating applications. In this case, this is between DPM server and protected servers. TLS is the most widely deployed security protocol used today.
Several known vulnerabilities have been reported against SSL and earlier versions of TLS. Microsoft recommend that you upgrade to TLS 1.2 for secure communication.
To enable TLS protocol version 1.2 in your DPM environment, you need to perform the following steps:
- Install all of the required updates.
- Make sure that the DPM setup is functional as it was before applying the updates (for example, you can check if you are able to launch the DPM console).
- Change the configuration settings to enable TLS 1.2.
- Ensure that all required SQL Server services are up and running.
- Finally, validate the protection and recovery process.
To enable TLS protocol version 1.2, follow these steps:
- Make sure that you are running Windows Server 2012 R2, Windows Server 2016, or Windows Server 2019 and that it is up-to-date with the latest security fixes.
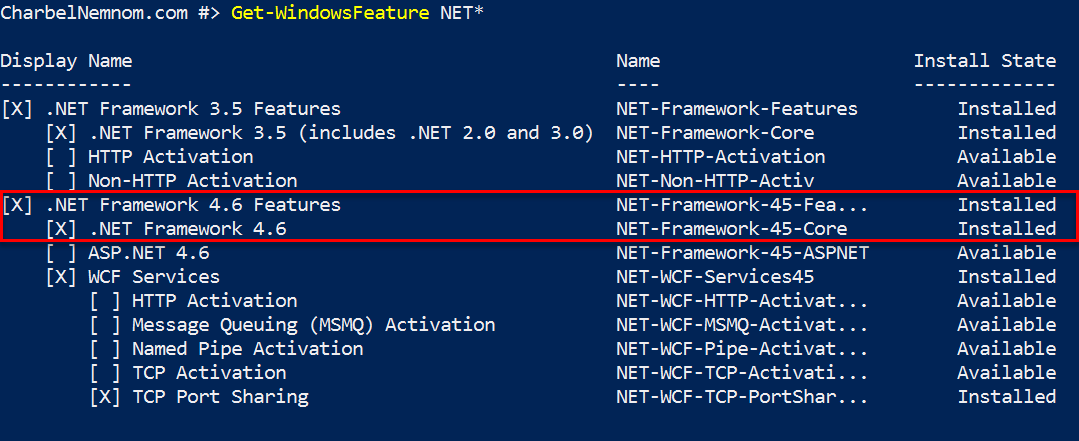
- Make sure that .NET version 4.6 is installed on all of your machines (DPM server, protected servers) .NET version 4.7 is supported on Windows Server 2019. You can use the following PowerShell command to determine whether .NET has been installed:
Get-WindowsFeature NET*:
- For the DPM database and for all SQL Servers that you intend to protect with DPM, you need to make sure that you are running a SQL Server that supports TLS 1.2. You can follow the instructions described here to find out whether you need this update: https://support.microsoft.com/en-in/help/3135244/tls-1-2-support-for-microsoft-sql-server.
- You need to make sure that SQL Server 2012 Native client 11.0 is installed on the DPM Management Server. You can verify whether SQL Native client 11.0 is installed by running the following PowerShell command on SQL Server:
Get-odbcdriver -name "SQL Server Native Client*". You can download Microsoft SQL Server 2012 Native client 11.0 from the following link: https://www.microsoft.com/en-us/download/details.aspx?id=50402.
- Make sure that you are running a DPM server that supports TLS 1.2. Starting with DPM 2012 R2 Update Rollup 14, DPM 2016 Update Rollup 4 including DPM 1801, DPM 1807, DPM 2019, and DPM 1901, the DPM team added TLS version 1.2 support.
- System Center components now generate both SHA1 and SHA2 self-signed certificates. This is a requirement for enabling TLS1.2. If case CA signed certificates are used for workgroup machines or untrusted domains, please ensure that they are either SHA1 or SHA2. In other words, TLS 1.2 supports only SHA1 and SHA2 certificates. Hence, all of the certificates must be updated to be SHA1 or SHA2.
- You need to implement these settings on all of the Windows machines in the environment on which System Center Data Protection agent is installed, including the DPM management server. Follow these steps to disable all of the SCHANNEL protocols except TLS 1.2 system-wide so that only TLS 1.2 protocol is used for communication. Making these registry changes does not affect the use of Kerberos or NTLM protocols:
- Open the registry on your server(s) by running
regeditin the run window and navigate to the following location:HKEY_LOCAL_MACHINE\SYSTEM\CurrentControlSet\Control\SecurityProviders\SCHANNEL\Protocols - Add the SSL 2.0, SSL 3.0, TLS 1.0, TLS 1.1, and TLS 1.2 keys under Protocol.
- Now, create two keys called
ClientandServerunder the SSL 2.0, SSL 3.0, TLS 1.0, TLS 1.1, and TLS 1.2 keys.
- Open the registry on your server(s) by running
- Now create two
REG_DWORDvalues under theServerandClientkeys if you want to enable the TLS 1.2 protocol: set theDisabledByDefaultvalue to0and theEnabledvalue to1. You will now have something that looks as follows:

- If you want to disable the protocol, you can set the
DisabledByDefaultvalue to1and theEnabledvalue to0. - After we have enabled the TLS 1.2 protocol on all systems, we need to set DPM to use only TLS 1.2. The following settings should be implemented on the DPM management server and all other servers on which DPM agents are installed, that is, Hyper-V hosts, File Server, SQL, Exchange, SharePoint, and so on. Follow these steps to create these settings:
- Open the registry on your server by running
regeditin the run window and navigate to the following location:HKEY_LOCAL_MACHINE\SOFTWARE\Microsoft\.NETFramework\v4.0.3031. - Now, create the
REG_DWORDvalue under the registry:SchUseStrongCrypto [Value = 1]. - Navigate to the following registry location:
HKEY_LOCAL_MACHINE\SOFTWARE\WOW6432Node\Microsoft\.NETFramework\v4.0.30319. - Now, create the same
REG_DWORDvalue under the preceding registry as well:SchUseStrongCrypto [Value = 1].
- Open the registry on your server by running
- Finally, you need to restart the system (DPM server and the protected server).
For all kinds of workloads backed up by DPM TLS 1.2 enabled (that is, SQL, SharePoint, Exchange, File Servers, Hyper-V hosts, Hyper-V VMs, VMWare VMs, Clients, System State, and BMR), you can do the following:
- Attach the Protected Server in the workgroup/untrusted domain to DPM.
- While Creating Protection Groups, all data sources on the protected server will be displayed.
- Protect different kinds of workloads to disk, to tape, and to the cloud.
- Recover the different kinds of workloads at the Original Location, Alternate Location, recover cloud recovery points, and use an External DPM server.
There are two scenarios that are impacted when using TLS 1.2 with DPM:
The DPM agent can be installed on the protected server either directly from the DPM server for the servers in the domain, or using certificate-based authentication for computers in a workgroup or untrusted domain. Please refer to Chapter 8, Protecting Workgroups and Untrusted Domains. DPM uses elements of the .NET Framework on the protected server to communicate if certificate-based authentication is used. TLS 1.2 needs .NET 4.5 or above. Since DPM is built with .NET 4.0—which does not support TLS 1.2 directly—when DPM tries to communicate with the protected servers, establishing the connection will fail.
DPM requires a MARS agent to back up data to the cloud. The MARS agent also leverages the .NET Framework, and changes need to be made on the DPM server to ensure that the backups continue smoothly when TLS 1.2 is enabled. Check out https://support.microsoft.com/en-ie/help/4022913/how-to-resolve-azure-backup-agent-issues-when-disabling-tls-1-0-for-pc to resolve Azure Backup agent issues when enabling TLS 1.2.
For more information about Azure Backup, please checkChapter 10, IntegratingDPM with Azure Backup.
Check out the following article to learn more about how to automate and enable TLS 1.2 in System Center Data Protection Manager: https://charbelnemnom.com/2018/08/how-to-enable-tls-1-2-protocol-in-system-center-data-protection-manager-dpm-scdpm-tls1-2.
This recipe will cover two installation scenarios:
- Installing DPM using a local SQL Server
- Installing DPM using a remote SQL Server
Before you start installing System Center Data Protection Manager, it is recommended that you read the Planning your DPM deployment and Preparing your DPM deployment recipes in this chapter.
This step will cover the installation process of DPM using a local SQL Server on the same operating system as DPM.
Make sure that your operating system is fully patched and rebooted before you start the installation. Now follow these steps:
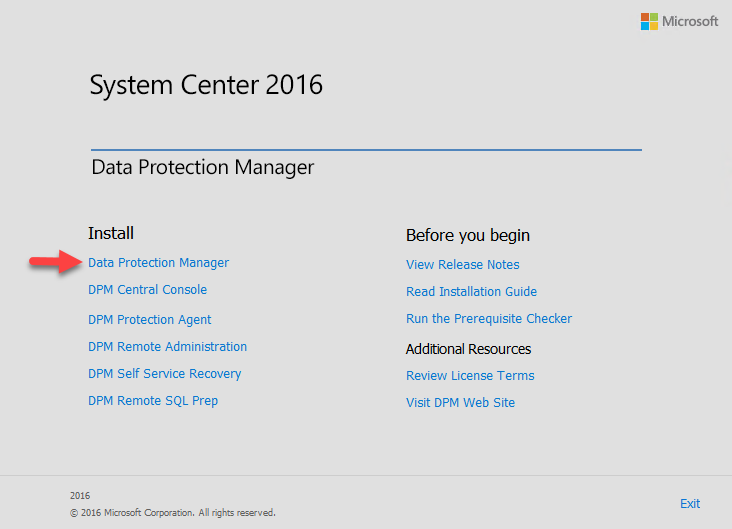
- Insert the DPM media and start the setup for System Center Data Protection Manager. When the installation list is presented, click on
Data Protection Managerto start the installation:
- The installation wizard will now prompt you with eight different installation steps. Currently, you are on the
Welcomestep. To continue with the installation, click onNext. - The next step is the
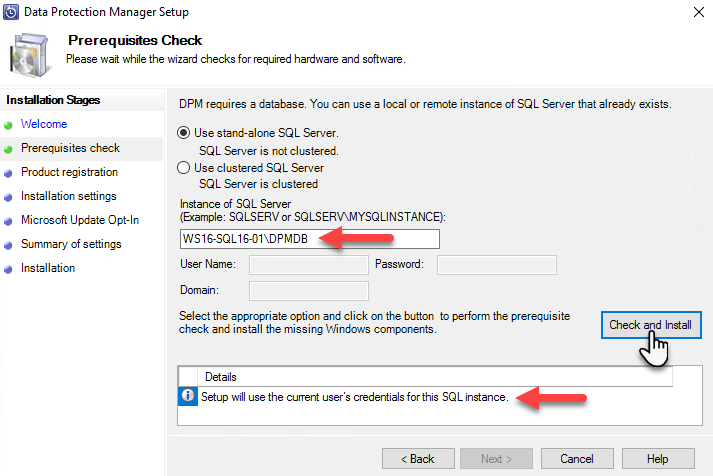
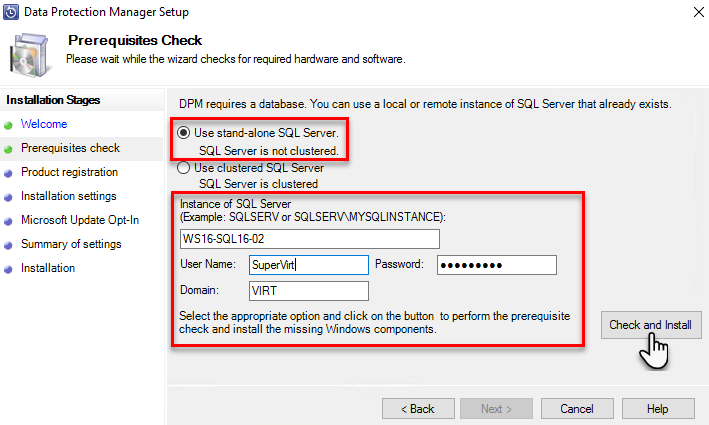
Prerequisites Check, where you can choose to install the DPM database by using a standalone or a clustered SQL Server.
- In the
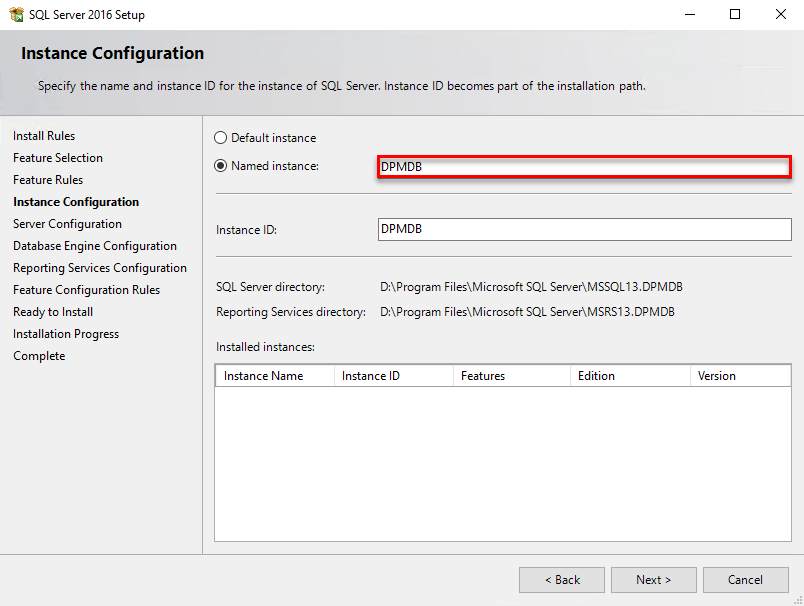
Instance of SQL Serverbox, type in your server name and the instance name that should host your DPM database. In this example, the server name and SQL instance isWS16-SQL16-01\DPMDB:
Note
Please note that when you install DPM and use a local SQL Server installation, the setup will use the current user's credentials for the SQL Server instance. If the domain account that is logged on and performing the installation is not a member of the DPM Admin group in the Active Directory, the installation will fail.
- Click on the
Check and Installbutton to run a verification that all of the prerequisites have been met before the installation can continue. - In this step, there are some prerequisites that will be installed as part of the required Windows components by DPM. The Hyper-V role and Hyper-V PowerShell module will be installed as well during this step. You will be required to restart afterward.
Note
The Hyper-V role needs to be installed on the DPM server for Item-Level Recovery (ILR) support. Please read Chapter 3, Protecting Hyper-V VMs, for more information on this.
- Simply restart the DPM server and start the installation wizard one more time. When you run the prerequisites checker in the
Prerequisites Checkstep, it will be successful. Click onNext >to continue. - In the
Product Registrationstep, enter theUser name,Company, andProduct keyand click onNext >to continue. - The next step of the installation wizard brings up the
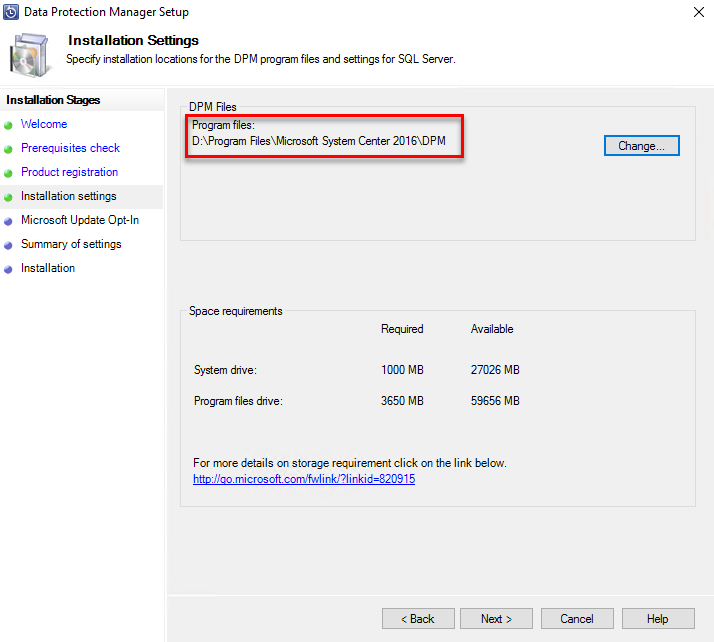
Installation Settings, which is where you specify the location of the DPM files and read the summary of theSpace requirements. If you want to place the DPM files in a specific location, then click on theChange…button and specify the new destination. We recommend that you store theDPM Fileson a separate drive. To continue to the next step, click onNext >:
- You can specify in the
Microsoft Update Opt-Inbox whether the local Windows Update should be redirected so that you can use Microsoft Updates instead. - Choose the most appropriate option for your implementation and click on
Next >to continue. - In the
Summary of settingssection, you can verify your installation's configuration. If everything looks good, click on theInstallbutton to start the installation.
Note
Finally, you need to install and update DPM server to the latest Update Rollup (UR) if you are using the Long-Term Servicing Channel (LTSC). At the time of writing this book, DPM 2016 Update Rollup 6 has been released and is available for download. You can download it at https://www.catalog.update.microsoft.com/Search.aspx?q=4456327. If you are using the Semi-Annual Channel (SAC) for DPM (that is, DPM 1801, 1807, 1901, and so on), then the Semi-Annual Channel, with its more frequent release cycle, will not receive update releases.
This step will cover and explain the configuration needed to complete a DPM installation when you are using a backend, dedicated, standalone server or a SQL cluster for achieving a high-availability scenario.
Before you can start your DPM sever installation, you need to prepare SQL Server so that you can host the DPM database. Please read the Installing SQL Server for DPM Database recipe in this chapter, since it is a prerequisite.
The only difference in the installation wizard when you install the DPM server on a separate machine or on the same server with SQL Server is the Prerequisites Check step. Now, follow these steps:
- Insert the DPM media on a separate machine and start the setup for System Center Data Protection Manager. When the installation list is presented, click on
Data Protection Managerto start the installation. - In the
Prerequisites Checkstep of the installation wizard, you have the option to choose whether you would like to place the DPM database on a remote standalone SQL Server or a SQL cluster.
- For a standalone backend remote SQL Server hosting your DPM database, enter
SQLSERVER\INSTANCEin theInstance of SQL Serverfield:
Note
The account that's used for this configuration must be a member of the DPM Admin group in the Active Directory.
- In the case of a SQL clustered environment, you must specify both the
SQL Server Instancefor the DPM database and also where theInstance of SQL Server Reporting Serviceis located, since the SQL Server Reporting Service does not support being clustered:
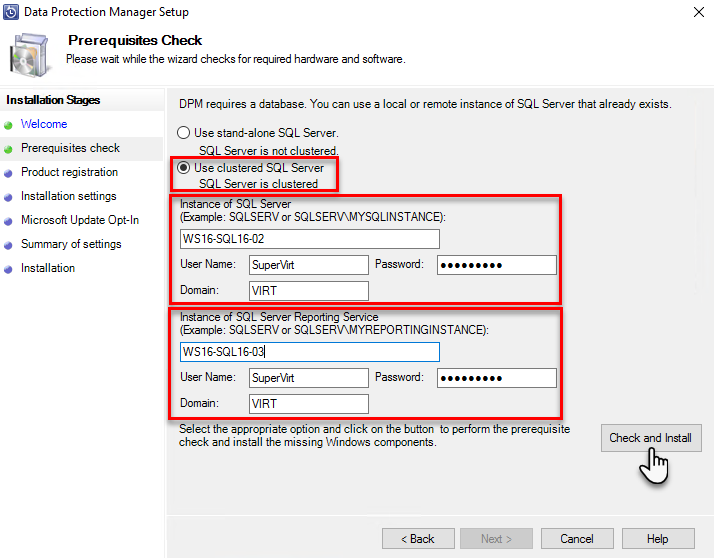
- Enter the
Instance of SQL Serverfor the DPMDB and also provide information for theInstance of SQL Server Reporting Servicethat will host the reporting for the DPM server. - Provide the credentials that have rights in the SQL Server configuration; the accounts should be members of the DPM Admin group in the Active Directory. Click on the
Checkbutton to check the prerequisites. - Click on
Next >to continue with the installation wizard.
The installation media for System Center Data Protection Manager will provide you with the installation bits for the DPM software. Since the 2012 R2 release of DPM, the SQL media is no longer included on the DPM media, so you need to consider how you design and install the SQL Server that will host the DPM server software.
The DPM server installation wizard will provide you with the right configuration that's needed regarding the SQL Server Reporting Services (SSRS) configuration for the DPM reports. The SSRS does not support being clustered.
When System Center Data Protection Manager's installation has completed successfully, DPM's setup will create the following firewall exceptions for you:
- Exception for DCOM communication on port 135 (TCP and UDP) in all profiles
- Exception for
Msdpm.exein all profiles - Exception for
DPMRA.exein all profiles - Exception for
AMSvcHost.exein all profiles - Exception for DPMAM Service communication on port
6075(TCP and UDP) in all profiles
This recipe will cover how to automate the installation of DPM Server.
In the Installing DPM recipe in this chapter, we showed you how to install DPM using a local SQL Server and using a remote SQL Server. However, this was a manual installation.
Automating the installation of DPM consists of two steps:
- Installing the SQL Server instance
- Installing the DPM server
You can disregard the first step if you already have SQL Server deployed locally or on a remote server in your environment.
In this recipe, we will cover the installation of SQL Server and DPM in an automated fashion.
Make sure that your operating system is fully patched and rebooted before you start the installation. Now follow these steps:
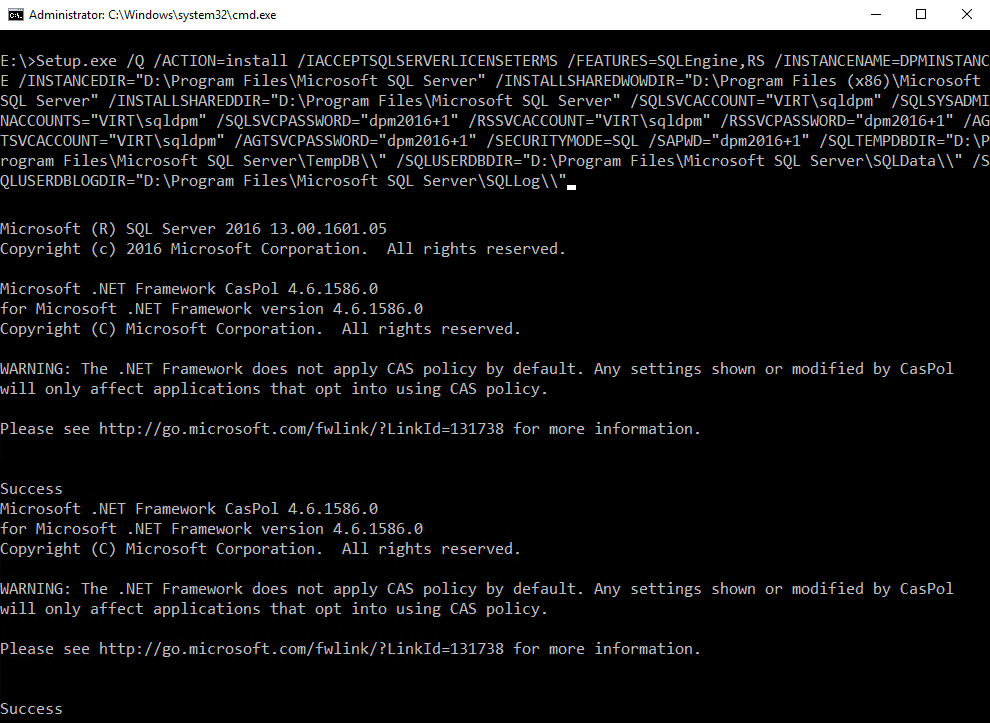
- Install the SQL Server instance:
- Mount the SQL Server 2016 media and then open the Command Prompt (cmd).
- Browse to the drive letter where SQL Server is mounted.
- Type in the following command to automate the installation of SQL Server and add all of the required features:
Note
Please make sure to update the domain name and SQL Service accounts in the following command so that they match your environment.
Setup.exe /Q /ACTION=install /IACCEPTSQLSERVERLICENSETERMS /FEATURES=SQLEngine,RS /INSTANCENAME=DPMINSTANCE /INSTANCEDIR="D:\Program Files\Microsoft SQL Server" /INSTALLSHAREDWOWDIR="D:\Program Files (x86)\Microsoft SQL Server" /INSTALLSHAREDDIR="D:\Program Files\Microsoft SQL Server" /SQLSVCACCOUNT=”VIRT\sqldpm” /SQLSYSADMINACCOUNTS=”VIRT\sqldpm” /SQLSVCPASSWORD="dpm2016+1" /RSSVCACCOUNT=”VIRT\sqldpm” /RSSVCPASSWORD="dpm2016+1" /AGTSVCACCOUNT=”VIRT\sqldpm” /AGTSVCPASSWORD="dpm2016+1" /SECURITYMODE=SQL /SAPWD=”dpm2016+1” /SQLTEMPDBDIR=”D:\Program Files\Microsoft SQL Server\TempDB\\” /SQLUSERDBDIR=”D:\Program Files\Microsoft SQL Server\SQLData\\” /SQLUSERDBLOGDIR=”D:\Program Files\Microsoft SQL Server\SQLLog\\”Please refer to the following screenshot for its output:
- Make sure that you have downloaded SQL Server Management Studio (SSMS) version 16.5.3 and that you have copied it to the server: http://go.microsoft.com/fwlink/?LinkID=840946.
- Open the
cmd.exewindow and type in the following command:
SSMS-Setup-ENU.exe /install /quiet /norestart- Install the DPM server:
dism.exe /Online /Enable-feature /All /FeatureName:Microsoft-Hyper-V /FeatureName:Microsoft-Hyper-V-Management-PowerShell /quiet /norestartNote
DPM supports Item-Level Recovery (ILR), which allows you to perform a granular recovery of files, folders, volumes, and virtual hard disks (VHDXs) from a host-level backup of Hyper-V virtual machines. The Hyper-V Role and PowerShell Management Tools features are required by the DPM server. Please read Chapter 3, Protecting Hyper-V VMs, for more information.
- Once the Hyper-V role is installed, you need to restart the DPM server before you move on to the next step.
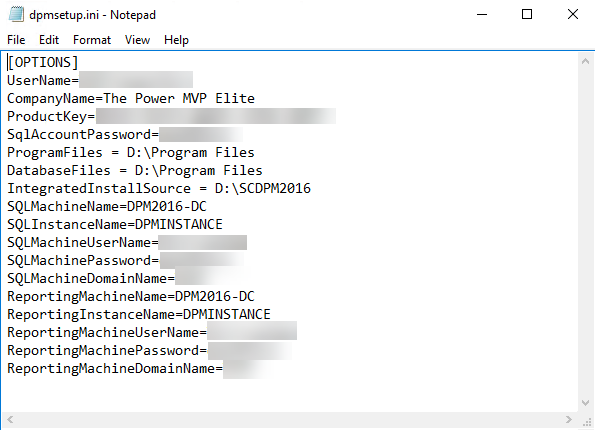
- Once the DPM server has been restarted, open Notepad, copy the following scripts into it, and then save the file as
DPMSetup.ini:
- Once the DPM server has been restarted, open Notepad, copy the following scripts into it, and then save the file as
Note
Please note that you can use the same script that follows, regardless of whether the SQL Server instance has been installed on the DPM server or on a remote SQL Server.
[OPTIONS]
 UserName=<Domain-name\Username>
 CompanyName=<Ur-Company>
 ProductKey=XXXX-XXXX-XXXX-XXXX-XXXX
 SqlAccountPassword=<The password for the SQL sa account>
 ProgramFiles = <Location path where you want to install DPM>
 DatabaseFiles = <Location path where you want to install DPMDB>
 IntegratedInstallSource = <Location path where the DPM media is extracted>
 SQLMachineName=<Name of the SQL Server Computer> OR <SQL Cluster Name>
 SQLInstanceName=<Name of the SQL Server instance>
 SQLMachineUserName=<Domain-name\Username> SQLMachinePassword=<Password for the user name Setup must use>
 SQLMachineDomainName=<Domain name to which the SQL Server computer is attached to>
 ReportingMachineName=<Name of the SQL Server Computer> OR <SQL Cluster Name>
 ReportingInstanceName=<Name of the SQL Server instance>
 ReportingMachineUserName=<Domain-name\Username>
 ReportingMachinePassword=<Password for the user name Setup must use>
 ReportingMachineDomainName=<Domain name to which the SQL Server computer is attached to>
- The following screenshot shows you what the
DPMSetup.inifile will look like:
- The following screenshot shows you what the
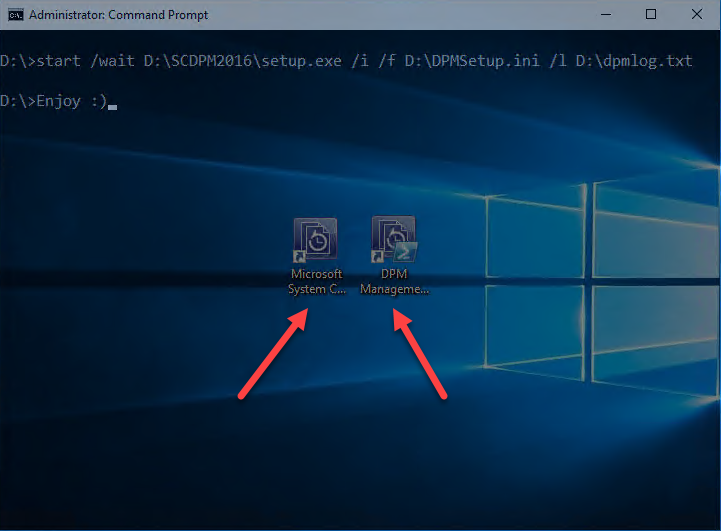
- After saving the
DPMSetup.inifile, in an elevated command prompt on the DPM server, type in the following command and press Enter:
- After saving the
start /wait D:\SCDPM2016\setup.exe /i /f D:\DPMSetup.ini /l D:\dpmlog.txtNote
The D:\SCDPM2016\ path indicates the media in the DPM location where you'll run setup.exe. D:\DPMSetup.ini is the location path where you saved the DPMSetup.ini file.
Note
Finally, you need to install and update the DPM server to the latest Update Rollup (UR) if you are using the Long-Term Servicing Channel (LTSC). At the time of writing this book, DPM 2016 Update Rollup 6 has been released, and you can download it from the following link: https://www.catalog.update.microsoft.com/Search.aspx?q=4456327. If you are using the Semi-Annual Channel (SAC) for DPM (that is, DPM 1801, 1807, 1901, and so on), then the Semi-Annual Channel, with its more frequent release cycle, does not receive update releases.
The final result of an automated installation will be better than a manual implementation. Thus, this will ensure that you have a consistent deployment across your environment.
Check out the following blog post to learn more about how to automate the installation of DPM using System Center Virtual Machine Manager: https://charbelnemnom.com/2017/01/how-to-deploy-dpm-2016-using-vmm-2016-on-ws2016-scdpm-scvmm-sysctr-hyperv-ws2016/.
This recipe will cover the supported upgrade scenarios from the previous version of DPM to the latest release of DPM.
Before you get started with the upgrade, make sure that your existing installation has the necessary updates by following the upgrade path:
- As a minimum requirement, upgrade your existing DPM 2012 R2 to DPM 2012 R2 Update Rollup 10. At the time of writing this book, Update Rollup 14 is also available for DPM 2012 R2. You can download UR 10 from the following link: http://www.catalog.update.microsoft.com/Search.aspx?q=4043315.
- Upgrade DPM 2012 R2 with Update Rollup 10 or Update Rollup 14 to the latest DPM version.
- Update the DPM agents on the protected servers.
- Upgrade Windows Server 2012 R2 to Windows Server 2016 or Windows Server 2019.
Note
Please note that it is possible to upgrade DPM 2016 or later from DPM 2012 R2, which is running on Windows Server 2012 R2. However, if you want to use the latest features that come with DPM 2016 or later, such as MBS, Microsoft recommends installing DPM 2016 or later on a new installation of Windows Server 2016 or Windows Server 2019. Please check the Installing DPM recipe in this chapter for more information.
The following steps will illustrate the upgrade process:
- Mount the latest DPM media on the DPM 2012 R2 server and double-click
Setup.exeto open the System Center Wizard. - Under
Install, clickData Protection Manager. This starts the setup. SelectI accept the license terms and conditionsand follow the setup wizard. - The last step in the wizard is the
Installationprocess. Here, you can keep an eye on the upgrade progress in real time. When the upgrade has finished, click on theClosebutton:

Note
Finally, you need to install and update DPM server to the latest UR if you are using the LTSC. At the time of writing this book, DPM 2016 Update Rollup 6 has been released. You can download it from the following link: http://www.catalog.update.microsoft.com/Search.aspx?q=4456327. If you are using the Semi-Annual Channel (SAC) for DPM (that is, DPM 1801, 1807, 1901, and so on), then the Semi-Annual Channel, with its more frequent release cycle, does not receive update releases.
- Update the DPM agents on the protected servers. Please check out the Installation of DPM Agents recipe in this chapter for more information on this.
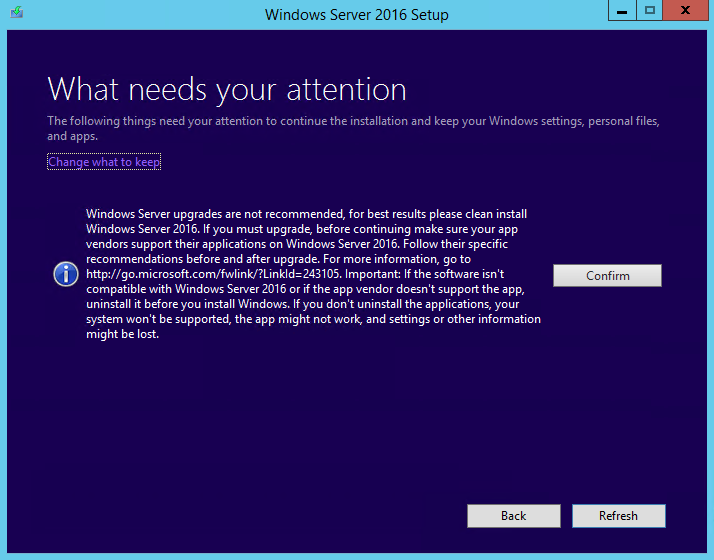
- The last step is to upgrade Windows Server 2012 R2 to Windows Server 2016. Mount the Windows Server 2016 media on the DPM server and double-click
Setup.exeto open the Windows Server 2016 Setup Wizard. - Select
Download and install updates (recommended)and click onNextto continue. - Select the image you want to install. If your exiting DPM server is installed on Windows Server 2012 R2 Datacenter, and then select
Windows Server 2016 Datacenter (Desktop Experience). Click onNextto continue. - Accept the
Applicable notices and license terms. ClickAcceptto continue. - Select
Keep personal files and appsand click onNextto continue. - Please wait until Windows finishes checking updates, and then click on
Nextto continue.
- Click
Confirmnext to the information note:

Upgrading DPM 2012 R2 to the latest DPM release is a straightforward process. In this example, we are running SQL Server 2012 with SP3 as a local instance on the same OS.
As a part of your upgrade, you may also want to move the DPM database if you ever encounter the following scenarios:
- You are merging instances of SQL Server.
- You are moving to a remote SQL Server that's more powerful than SQL Server.
- You want to add fault tolerance by using a SQL Server cluster.
- You want to move from a remote SQL Server to a local SQL server or vice versa.
The DPM setup allows you to migrate the DPM database to different SQL Servers during the upgrade process.
In the upgrade scenario where you have a primary and a secondary DPM server, the preceding recommended strategies apply. However, it is recommended that you always start the upgrade process with your secondary DPM server and then upgrade your primary DPM server; this is to avoid any unnecessary disturbance.
If you are going to upgrade from DPM 2012 R2 or DPM 2016 (LTSC), to DPM 1801 or DPM 1807 (SAC), then make sure to follow this path:
- If you are upgrading from DPM 2012 R2, then first upgrade to DPM 2012 R2 Update Rollup 14.
- If you are upgrading from DPM 2016, then first upgrade to DPM 2016 Update Rollup 4.
- Upgrade to DPM 1801, and then apply DPM 1807 update. You can download 1807 update from the following link: http://catalog.update.microsoft.com/v7/site/Search.aspx?q=4339950.
- Update the agents on the protected servers.
- Upgrade the DPM Remote Administrator on all production servers.
- Backups continue without rebooting your production server.
For more information about the supported upgrade scenarios, please check the following article:
https://docs.microsoft.com/en-us/system-center/dpm/upgrade-dpm?view=sc-dpm-1801
This recipe will cover how to migrate legacy storage to MBS.
After upgrading DPM 2012 R2 to DPM 2016 and the operating system to Windows Server 2016, as described in the Upgrading to the latest release of DPM recipe in this chapter, you can update your existing protection groups to the new DPM features. By default, the protection groups haven't been changed, and continue to function as they were configured in DPM 2012 R2.
Note
After upgrading to Windows Server 2016 and DPM 2016 or later, you can no longer create new protection groups using legacy storage. All newly created protection groups will leverage MBS. We strongly recommend moving existing protection groups to MBS to take advantage of the new storage space-saving improvements.
You also need to make sure that you have added a new volume to DPM by using Modern Backup Storage technology. Please refer to the Enabling Modern Backup Storage (MBS) recipe in Chapter 2, DPM Post-Installation and Management Tasks:
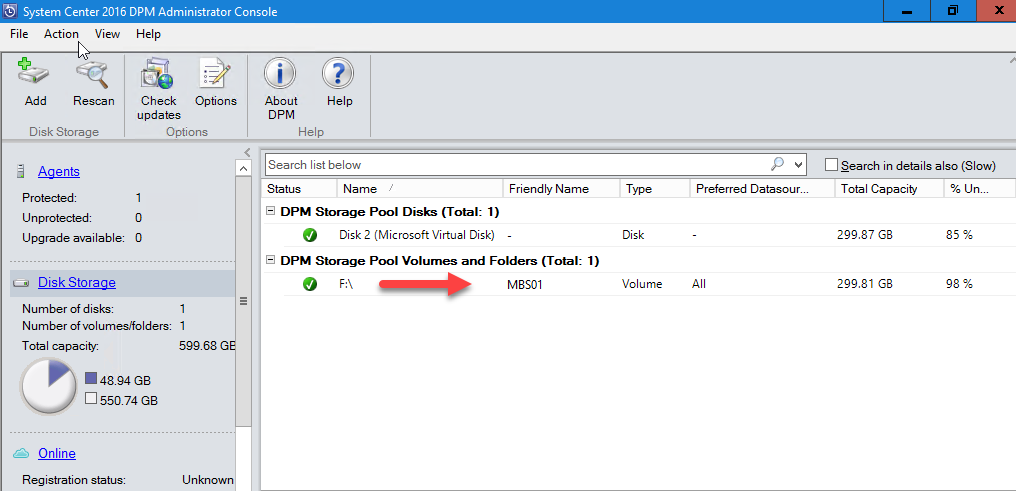
To update the protection group, you need to stop the protection of all data sources with Retain Data, and then add the data sources to a new protection group. DPM will begin protecting these data sources using MBS:
- Open the Administrator Console, select the
Protectionfeature, and in theProtection Group Memberlist, right-click the member and selectStop protection of member...:
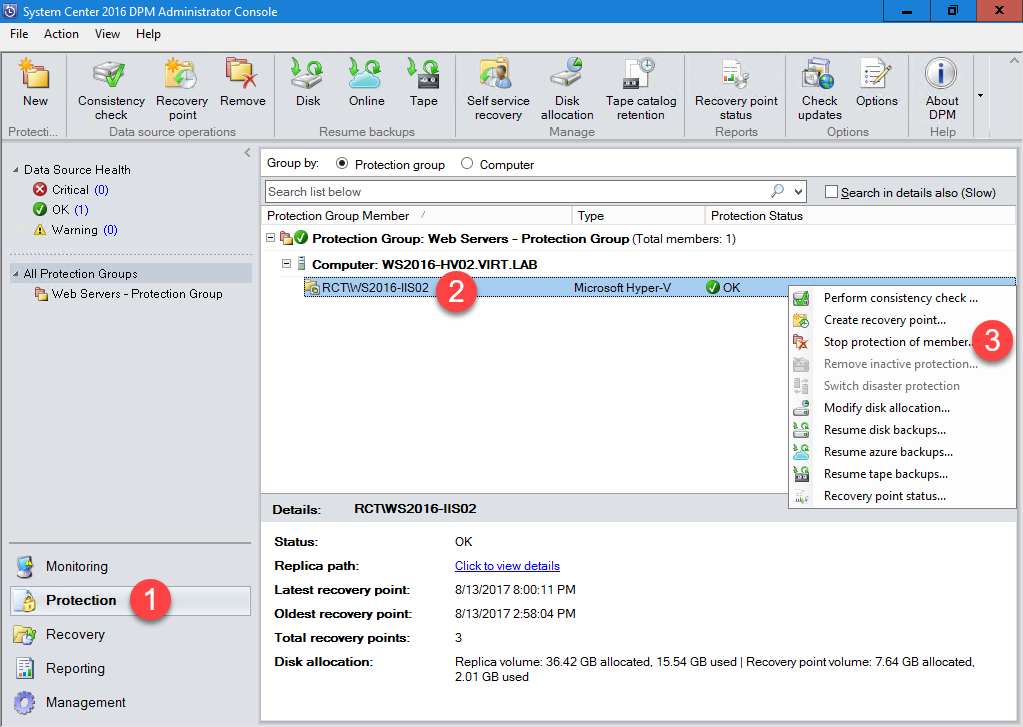
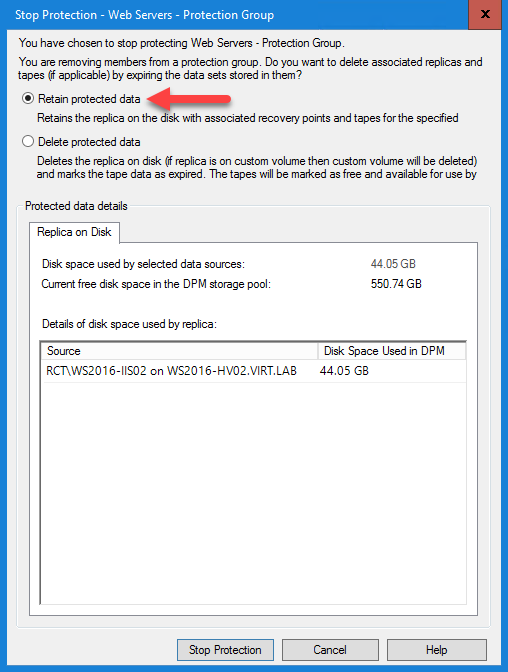
The end result is that you will have a single new protection group that uses MBS. The previous protection group that was created in DPM 2012 R2 will be removed. The old recovery points will be maintained since we did not delete the protected data:

Note
You might need to perform a Consistency Check (CC) after the initial replica is created for the new protection group so that the protection status will be in a healthy state.
This recipe will cover the installation of a DPM agent from the DPM console as well as a manual-based installation.
Before you can start protecting a workload within your datacenter, you must install a DPM agent on the server hosting the workload that you would like to protect (that is, Hyper-V, SQL Server, Exchange, and so on).
You can install the DPM agent via the DPM Administrator Console in push mode; however, there are some scenarios where you will not able to perform a push installation of the DPM agent to the server hosting the workload that you would like to protect. On the DPM server, you can find two executables for the DPM agent that you can share or download to a removable media. Then, you can install the agent manually. The DPM agent is also available on the DPM installation media. There are two different executables here:
DpmAgentInstaller_x86.exeis for 32-bit operating systemsDpmAgentInstaller_x64.exeis for 64-bit operating systems
Both are applicable for Windows server and Windows client operating systems.
The following steps will illustrate the process of installing DPM agent in two different ways.
- Open the DPM Administrator Console and click
Management|Agents. ClickInstallon the tool ribbon to open theProtection Agent Installation Wizard. - On the
Select Agent Deployment Methodpage, clickInstall agents|Next. - On the
Select Computerspage, DPM will display a list of available computers that are in the same domain as the DPM server. Add the required computer.
- The
Advancedbutton page is enabled only when there is more than one version of a protection agent available for installation on the computers. You can use this option to install a previous version of the protection agent that was installed before you upgraded DPM server to a more recent version. However, it's recommended that you always keep the protection agent updated. - Click
Next >to continue. - On the
Enter Credentialspage, type the username and password for a domain account that is a member of the local administrators group on the selected computer(s). - If you select a node in a cluster, DPM detects all of the additional nodes in the cluster and displays the
Select Cluster Nodespage. On theSelect Cluster Nodespage, select an option that you want DPM to use for installing agents on additional nodes in the cluster. Then, clickNext. - In the
Choose Restart Methodstep, select the method that you want to use to restart the selected computers after the protection agent has been installed.
Note
For greenfield agent installation, the computer must be restarted before you can start protecting data. A restart is necessary to load the volume filter that DPM uses to track and transfer block-level changes between the DPM server and the protected computers.
- If any of the computers that you have selected are members of a cluster, an additional
Choose Restart Methodpage will appear that you can use so that you can select the method to restart the clustered computers.
Note
Please note that you need to install a protection agent on all of the nodes in a cluster to successfully protect the clustered data.
- Choose an appropriate option and click on
Next >to continue. - In the
Summarypage, you can verify the information you have chosen and then click onInstallto initialize the installation and configuration process of the DPM agent. - After a short period of time, the
Agentwill appear in the DPM console and report back with statusOK.
You can perform a manual installation in two different ways:
- By providing the FQDN of the DPM server when running the
DpmAgentInstallerexecutable - By providing the NetBIOS name of the DPM server using
setdpmserver.exeif the DPM agent is already installed but not configured
Now follow these steps:
- On the computer that you want to protect, open an elevated command window, and then run
net use Z: \\<DPMServerName>\d$, whereZis the local drive letter that you want to assign and<DPMServerName>is the name of the DPM server that will protect the computer.d$is where DPM software is installed. - For a 64-bit computer, type the following:
cd /d <assigned drive letter>:\Program Files\Microsoft System Center 2019\DPM\DPM\ProtectionAgents\RA\5.0.<build number>.0\amd64 Here, <assigned drive letter> is the drive letter that you assigned in the previous step and <build number> is the latest DPM build number. For example:
cd /d "Z:\Program Files\Microsoft System Center 2019\DPM\DPM\ProtectionAgents\RA\5.0.158.0\amd64"For a 32-bit computer, type the following:
cd /d <assigned drive letter>:\Program Files\Microsoft System Center 2019\DPM\DPM\ProtectionAgents\RA\5.0.<build number>.0\i386 Here, <assigned drive letter> is the drive that you mapped in the previous step and <build number> is the latest DPM build number.
To install the protection agent for a 64-bit computer, run the following command:
DPMAgentInstaller_x64.exe <DPMServerName> Here, <DPMServerName> is the fully qualified domain name (FQDN) of the DPM server.
- To install the protection agent for a 32-bit computer, run the following command:
DPMAgentInstaller_x86.exe <DPMServerName> Here, <DPMServerName> is the FQDN of the DPM server.
- Select
I accept the license terms and conditionsfor the Microsoft Software License Terms, and clickOK. - The installation will start and you will receive a confirmation message that states
Agent installation completed successfully. The DPM agent has now been configured and the appropriate firewall exceptions have been made in the domain profile of the Windows Firewall. Press Enter key to close the window.
Note
To perform a silent installation and to accept the EULA license in a silent installation , you can use the /q and /IAcceptEULA options after the command. For example: DPMAgentInstaller_x64.exe /q <DPMServerName> /IAcceptEULA.
- If the DPM agent is already installed, you should run the
setdpmserver.exeexecutable with the–dpmservernameswitch to configure the DPM server that the DPM agent should report to as follows:
Setdpmserver –dpmservername DPM2019After installing the agent manually, you must attach the DPM agent to the DPM server. You can do this via the DPM Administrator console or via the DPM PowerShell cmdlet.
- Open the DPM console and go to
Management. Click onProduction Serversand, at the top-left corner of the console, click on theAddbutton to start theProduction Server Addition Wizard.
- Under the
Select Agent Deployment Methodpage, clickAttach agents, followed byComputer on trusted domain. Click theNext >button to continue:
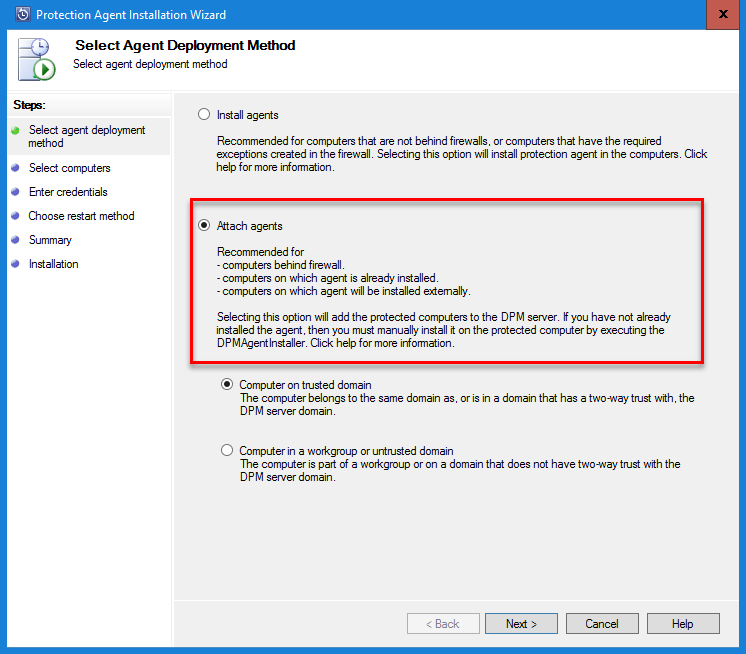
Note
If you want to attach a DPM agent in a workgroup or untrusted domain, please refer to Chapter 8, Protecting Workgroups and Untrusted Domains, for more information.
- In the
Select Computerspage, choose the server that you would like to attach to the DPM server and click onNext >to continue.
Note
You can also provide a list of servers that you would like to have attached. The list should have all of the FQDN of every server per row in a simple text file. Click on the Add From File... button to import the files' data.
- In the
Enter Credentialspage, enter the credentials that should be used to execute this process. Keep in mind that the credentials you provide must have administrative rights on the server that you are trying to attach. Provide the credentials and click onNext >to continue. - In the
Summarypage, verify the configuration and click onAttachto start. - Verify that the
Attach protected computertask has been successful. ClickCloseto close theProtection Agent Installation Wizard. - The
Agentwill appear in the DPM console and report back with statusOK.
The DPM agent is the core component for the DPM so that it's able to provide restore capabilities for your data. The DPM relies on the DCOM object of the protected server which is mapped to the DPMRA service so that the SQL job on the DPM server starts. System Center Data Protection Manager stores all protection group configurations as SQL Jobs, and the SQL Server Agent initializes the DPM agent to start creating snapshots by using the underlying architecture of the Volume Shadow Copy Service (also known as Volume Snapshot Service or VSS) within the operating system.
The setdpmserver.exe executable command has the ability to configure the DPM agent to set which DPM server the DPM agent reports to. It also provides the configuration needed for the local Windows Firewall so that the DPM agent can start reporting to the DPM server.
System Center Data Protection Manager manages data replication and provides management of the DPM agents using two different TCP ports:
57185719
TCP port 5718 is used for data replication and TCP port 5719 is used by the DPM agent coordinator. The coordinator is the function within the DPM agent architecture that manages the installation, uninstallation, and updates of the DPM agent. For more information regarding firewall ports and configuration, please read the Planning your DPM deployment recipe in this chapter.
This recipe covers how you can upgrade DPM agents from the DPM console and also provides information about other scenarios.
Microsoft keeps releasing updates that are critical to apply, since they contain new enhancements that will provide you with optimization of the DPM software. They also enable new restore capability features for your workload.
After you have upgraded DPM 2012 R2 to the latest DPM release, you must upgrade all of the DPM agents that are attached to the DPM server before protection can continue. This is something you need to do manually:
- Open the DPM console, select
Managementand, on the left-hand side of the console, click onAgents. In the display pane, you will see DPM agents reportingUpdate Available. - Right-click the agents that you want to update and choose
Updatefrom the drop-down list.
Note
Starting with DPM 2016 or later, once the agent has been updated, no reboot is required. DPM will continue to protect your workloads. However, we have seen some servers reboot automatically, even if the option to automatically reboot is not checked, so make sure to upgrade the agent during a maintenance window.