


In this chapter, we will cover:
Selecting your virtual environment
Installing and configuring Windows Server 2008 R2
Installing and configuring SQL Server 2008 R2
Installing and configuring SharePoint Server 2010
Installing Microsoft Office 2010 Professional
Installing Visio Premium 2010
Installing SharePoint Designer 2010
Installing recommended developer tools
Setting up your first web application
Before one can consider himself/herself a true SharePoint 2010 developer, you must be capable of creating your very own development environment. Rather like the Jedi requirement of crafting your very first light saber; ok, it's not really that mystical, or that difficult to do, but I assure you that you will find the experience highly gratifying.
This chapter will take you through all the recipes that you require to build your very own development environment. This will be done in a step-by-step manner, via the suggested best practice of using a Windows Server 2008 R2 server as the base operating system running on a virtual machine.
Tip
This chapter will result in a standalone self-contained environment that will serve you very well as you learn SharePoint development, while teaching you the key ingredients that are required for you to be successful.
This chapter is not meant to be followed as a guide for building any type of production server - for example, it does not follow best practices for database naming or service accounts; having SQL and/or Active Directory on the same box; PowerShell automation, and so on. It may not be sufficient as a development standard in your organization, so please consult with your IT department before doing real SharePoint development for your clients.
What if you have the Windows 7 64-bit version? Can you install and run SharePoint Server 2010 and all other required software and tools? Absolutely you can! Please use your favorite search engine to seek out the instructions to do so. However, I don't recommend it in practice, unless you have no other choice. SharePoint is a server-based piece of software, and installing this on your desktop will inflict a heavy price on performance due to the many services (such as Search) that SharePoint will want to run frequently! There are scripts out there that help shut down and start up these SharePoint services to help you out. However, I personally like the convenience of isolating SharePoint 2010 and related development activities to a virtual machine. You can completely shut this down and put it away for when you need it—by literally putting it on an external drive. Also, I find myself developing solutions for many different clients and projects, and in fact, I have set up a virtual machine for each project, so that, in future, I can pick up the project for that client from exactly where I left it, by simply firing up the corresponding virtual environment.
We will be covering selection of a virtual environment in the next section. However, I thought I would mention that if you have a Windows Server 2008 R2 operating system on hand capable of running Hyper V , then you have the option of bypassing a full build, and downloading the Information Worker virtual machine, fully configured with SharePoint 2010, Visual Studio, and even FAST Search. Use your favorite search engine to find information worker vm download. Follow the instructions to download, set up, and activate this virtual machine on a trial basis (180 day maximum life span).
Presuming you are still reading, you have decided that building your own virtual environment is the way to go. So let's get to it! I urge you to be patient during this task — this chapter will take a couple of days for you to complete, as you download many GBs of software and wait patiently through sometimes long installation processes.
For the software that you will require throughout this chapter, you have two main choices:
Preferred: If you or the company that you work for has, access to a Microsoft Developer Network (MSDN) subscription, then you can download the required software that provides you with the corresponding activation keys. The main advantage of this approach is that your virtual environment will be permanent and licensed, thus you don't have to worry about the software expiring.
Alternative: Every single software product mentioned in this chapter is available for download on a trial basis from the Microsoft site. The main disadvantage of this approach is that each and every piece of software has a different trial use period. Many have the ability to extend the trial period, but eventually the environment will be rendered effectively inoperable and you will have to build the environment again from scratch. Also, note that the environment is not a properly licensed version, and is therefore only for trial, exploration, and evaluation uses.
Prisoners serving life sentences (in Canada) have what is known as a faint hope clause where you have a glimmer of a chance of getting parole after 15 years. However, those waiting for Microsoft to provide us a version of Virtual PC that can run Virtual Hard Drives (VHDs) hosting 64-bit operating systems (such as Windows Server 2008 R2), have no such hope of ever seeing that piece of software. But miracles do happen, and I hope that the release of a 64-bit capable Virtual PC renders this section of the chapter obsolete. If this has in fact happened, go with it and proceed to the following section.
Head into your computer's BIOS settings and enable the virtualization setting. The exact setting you are looking for varies widely, so please consult with your manufacturer's documentation. This setting seems universally defaulted to off, so I am very sure you will need to perform this action.
Since you are still reading, however, it is safe to say that a miracle has not yet happened. Your first task is to select a suitable virtualization technology that can support a 64-bit guest operating system. The recipe here is to consider the choices in this order, with the outcome of your virtual environment being selected:
Microsoft Virtualization: Hyper-V certainly has the ability to create and run Virtual Hard Disks (VHDs) with 64-bit operating systems. It's free—that is, you can install the Hyper-V role, but it requires the base operating system to be Windows Server 2008 R2. It can be brutal to get it running properly on something like a laptop (for example, because of driver issues). It won't be a good idea to get Windows 2008 Server running on a laptop, primarily because of driver issues. I recommend that if your laptop is running Windows 7, look at creating a dual boot, and a boot to VHD where this other boot option / partition is Windows Server 2008 R2. The main disadvantage is coming up with an (preferably licensed) installation of Windows Server 2008 R2 as the main computer operating system (or as a dual boot option). Or perhaps your company runs Hyper-V on their server farm and would be willing to host your development environment for you? Either way, if you have managed to get access to a Hyper-V server, you are good to go!
VMware Workstation: Go to http://www.vmware.com and download my absolute favorite virtualization technology—VMware Workstation—fully featured, powerful, and can run on Windows 7. I have used it for years and love it. You must of course pay for a license, but please believe me, it is a worthwhile investment. You can sign up for a 30 day trial to explore the benefits. Note that you only need one copy of VMware Workstation to create a virtual machine. Once you have created it, you can run it anywhere using the freely available VMware Player.
Oracle Virtual Box: Go to http://www.virtualbox.org/ and download this free software that will run on Windows 7 and create and host 64-bit guest operating systems. The reason that this is at the bottom of the list is that I personally do not have experience using this software. However, I have colleagues who have used it and have had no problems with it. Give this a try and see if it works as equally well as a paid version of VMware.
With your selected virtualization technology in hand, head to the next section to install and configure Windows Server 2008 R2, which is the base operating system required for an installation of SharePoint Server 2010.
SharePoint 2010 requires the Windows Server 2008 R2 operating system in order to run. In this recipe, we will configure the components of Windows Server 2008 necessary in order to get ready to install SQL Server 2008 and SharePoint 2010.
Download Windows Server 2008 R2 from your MSDN subscription, or type in windows server 2008 R2 trial download into your favorite search engine to download the 180-day trial from the Microsoft site.
This book does not cover actually installing the base operating system. The specific instructions to do so will be dependent upon the virtualization software selected as per the Selecting your virtual environment recipe. Generally, it will be provided as an ISO image (the file extension will be .iso). ISO means a compressed disk image, and all virtualization software that I am aware of will let you mount (attach) an ISO image to the virtual machine as a CD Drive. This means that when you elect to create a new virtual machine, you will normally be prompted for the ISO image, and the installation of the operating system should proceed in a familiar and relatively automated fashion.
So for this recipe, ready means that you have your virtualization software up and running, the Windows Server 2008 R2 base operating system is installed, and you are able to log in as the Administrator (and that you are effectively logging in for the first time).
Log in as the Administrator. You will be prompted to change the password the first time—I suggest choosing a very commonly used Microsoft password—Password1 . However, feel free to select a password of your choice, but use it consistently throughout this chapter.
The Initial configuration tasks screen will come up automatically. On this screen:
Activate windows using your 180 day trial key or using your MSDN key.
Select Provide computer name and domain. Change the computer name to a simpler one of your choice. In my case, I named the machine OPENHIGHWAY. Leave the Member of option as Workgroup. The computer will require a reboot.
In the Update this server section, choose Download and install updates. Click on the Change settings link and select the option Never check for updates and click OK. Click the Check for updates link. The important updates will be selected. Click on Install Updates. Now is a good time for a coffee break! You will need to reboot the server when the updates complete.
In the Customize this server section, click on Add Features. Select the Desktop Experience, Windows, PowerShell, Integrated, Scripting, and Environment options. Choose Add Required Features when prompted to do so. Reboot the server when prompted to do so.
If the Initial configuration tasks screen appears now, or in the future, you may now select the checkbox for Do not show this window at logon. We will continue configuration from the Server Manager, which should be displayed on your screen. If not, launch the Server Manager using the icon on the taskbar.
We return to Server Manager to continue the configuration:
Tip
OPTIONAL: Click on Configure Remote Desktop if you have a preference for accessing your virtual machine using Remote Desktop (RDP) instead of using the virtual machine's console software.
In the Security Information section, click Go to Windows Firewall. Click on the Windows Firewall Properties link. From the dialog, go to each of the tabs, namely, Domain Profile, Private Profile, and Public Profile and set the Firewall State to Off on each tab and click OK.
Click on the Server Manager node, and from the main screen, click on the Configure IE ESC link. Set both options to Off and click OK.
From the Server Manager, expand the Configuration node and then expand Local Users and Groups node, and then click on the
Usersfolder. Right-click on the Administrator account and select Properties. Select the option for Password never expires and click OK.From the Server Manager , click the Roles node. Click the Add Roles link. Now, click on the Introductory screen and select the checkbox for Active Directory Domain Services. Click Next, again click on Next, and then click Install. After completion, click the Close this wizard and launch the Active Directory Domain Services Installation Wizard (dcpromo.exe) link. Now, carry out the following steps:
From the new wizard that pops up, from the welcome screen, select the checkbox Use advanced mode installation, click Next, and again click on Next on the Operating System Compatibility screen.
Select the option Create a new domain in a new forest and click Next.
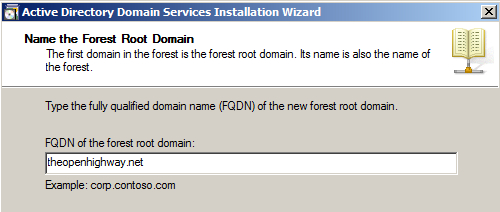
Choose your domain (FQDN)! This is completely internal to your development server and does not have to be real. For book purposes, I am using theopenhighway.net, as shown in the following screenshot. Then click Next:
From the Set Forest Functional Level drop-down, choose Windows Server 2008 R2 and click Next.
Click Next on the Additional Domain Controller Option screen. Select Yes on the Static IP assignment screen. Click Yes on the Dns Delegation Warning screen.
Click Next on the Location for Database, Log Files, and SYSVOL screen.
On the Directory Services Restore Mode Administrator Password screen, enter the same password that you used for the Administrator account, in my case, Password1. Click Next.
Click Next on the Summary screen.
Click on the Reboot On Completion screen. Otherwise reboot the server after the installation completes.
You will now configure a user account that will run the application pools for the SharePoint web applications in IIS. From the Server Manager, expand the Roles node. Keep expanding the Active Directory Domain Services until you see the
Usersfolder. Click on theUsersfolder. Now carry out the following:Right-click on the
Usersfolder and select New | User
Enter SP_AppPool in the full name field and also enter SP_AppPool in the user logon field and click Next.
Enter the password as Password1 (or the same as you had selected for the Administrator account). Deselect the option for User must change password at next logon and select the option for Password never expires. Click Next and then click Finish.
A loopback check is a security feature to mitigate against reflection attacks, introduced in Windows Server 2003 SP1. You will likely encounter connection issues with your local websites and it is therefore universally recommended that you disable the loopback check on a development server. This is done from the registry editor:
Click the Start menu button, choose Run…, enter Regedit, and click OK to bring up the registry editor.
Navigate to HKEY_LOCAL_MACHINE | SYSTEM | CurrentControlSet | Control | Lsa
Right-click the Lsa node and select New | DWORD (32-bit) Value
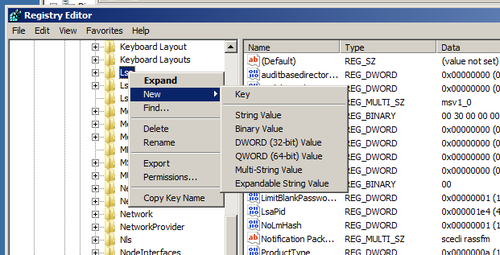
In the place of New Value #1 type DisableLoopbackCheck.

Right-click DisableLoopbackCheck, select Modify, change the value to 1, and click OK
Congratulations! You have successfully configured Windows Server 2008 R2 and are ready for our next recipe Installing and configuring SQL Server 2008 R2
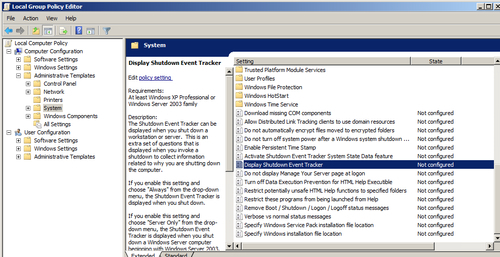
The Windows Shutdown Event Tracker is simply annoying on a development machine. To turn this feature off, click the Start button, select Run…, enter gpedit.msc, and click OK. Scroll down, right-click on Display Shutdown Event Tracker, and select Edit. Select the Disabled option and click OK, as shown in the following screenshot:
SharePoint 2010 requires Microsoft SQL Server as a fundamental component of the overall SharePoint architecture. The content that you plan to manage in SharePoint, including web content and documents, literally is stored within and served from SQL Server databases. The SharePoint 2010 architecture itself relies on information stored in SQL Server databases, such as configuration and the many service applications. In this recipe, we will install and configure the components of SQL Server 2008 necessary to install SharePoint 2010.
I do not recommend SQL Server Express for your development environment, although this is a possible, free, and valid choice for the installation of SharePoint 2010. In my personal experience, I have valued the full power and flexibility of the full version of SQL Server as well as not having to live with the constraints and limitations of SQL Express. Besides, there is another little reason too! The Enterprise edition of SQL Server is either readily available with your MSDN subscription or downloadable as a trial from the Microsoft site.
Download SQL Server 2008 R2 Enterprise from your MSDN subscription, or type in sql server 2008 enterprise R2 trial download into your favorite search engine to download the 180-day trial from the Microsoft site.
For SQL Server 2008 R2 Enterprise, if you have MSDN software, then you will be provided with an ISO image that you can attach to the virtual machine.
If you download your SQL Server from the Microsoft site as a trial, extract the software (it is a self-extracting EXE) on your local machine, and then share the folder with your virtual machine. Finallly, run the Setup.exe file.
Here is your recipe for installing SQL Server 2008 R2 Enterprise. Carry out the following steps to complete this recipe:
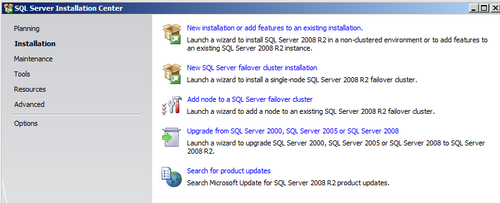
You will be presented with the SQL Server Installation Center; on the left side of the screen, select Installation, as shown in the following screenshot:
For the choices presented on the Installation screen, select New installation or add features to an existing installation.
The Setup Support Rules (shown in the following screenshot) will run to identify any possible problems that might occur when installing SQL Server. All rules should pass. Click OK to continue:

You will be presented with the SQL Server 2008 R2 Setup screen. On the first screen, you can select an evaluation or use your product key (from, for example, MSDN) and then click Next.
Accept the terms in the license, but do not check the Send feature usage data to Microsoft checkbox, and click Next.
On the Setup Support Files screen, click Install. All tests will pass except for a warning that you can safely ignore (the one noting we are installing on a domain controller), and click Next, as shown in the following screenshot:

On the Setup Role screen, select SQL Server Feature Installation and click Next.
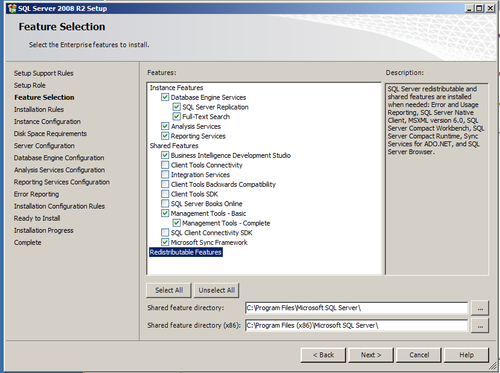
On the Feature Selection, as shown in the following screenshot, carry out the following tasks:
In Instance Features, select Database Engine Services (and both SQL Server Replication and Full Text Search), Analysis Services, and Reporting Services
In Shared Features, select Business Intelligence Development Studio, Management Tools Basic (and Management Tools Complete), and Microsoft Sync Framework
Finally, click Next.
On the Installation Rules screen, click Next
On the Instance Configuration screen, click Next.
On the Disk Space Requirements screen, click Next
On the Server Configuration screen:
Set the Startup Type for SQL Server Agent to be Automatic
Click on the button Use the same account for all SQL Server services. Select the account NT AUTHORITY\SYSTEM and click OK.
Finally, click Next.
On the Database Configuration Engine screen:
Look for the Account Provisioning tab and click the Add Current User button under Specify SQL Server administrators.
Finally, click Next
On the Analysis Services Configuration screen:
Look for the Account Provisioning tab and click the Add Current User button under Specify which users have administrative permissions for Analysis Services.
Finally, click Next.
On the Reporting Services Configuration screen, select the option to Install but do not configure the report server. Now, click Next.
On the Error Reporting Screen, click Next.
On the Installation Configuration Rules screen, click Next.
On the Ready to Install screen, click Install.
Your patience will be rewarded with the Complete screen! Finally, click Close. The Complete screen is shown in the following screenshot:

You can close the SQL Server Installation Center.
Configure SQL Server security for the SP_AppPool account:
Click Start | All Programs | SQL Server 2008 R2 | SQL Server Management Studio.
On Connect to server, type a period (.) in the Server Name field and click Connect.
Expand the Security node.
Right-click Logins and select New Login.
Use the Search function and enter SP_AppPool in the box Enter object name to select. Click the check names button and then click OK. In my case, you see the properly formatted THEOPENHIGHWAY\SP_AppPool in the login name text box.
On the Server Roles tab, ensure that the dbcreator and securityadmin roles are selected (in addition to the already selected public role).
Finally, click OK.
Congratulations! You have successfully installed and configured SQL Server 2008 R2 Enterprise and are ready for our next recipe Installing and configuring SharePoint Server 2010.
We are ready to get to the main event of the chapter! In this recipe, we deal with the installation and configuration of SharePoint 2010 itself.
Download SharePoint Server 2010 from your MSDN subscription, or type in sharepoint server 2010 trial download into your favorite search engine to download the 180-day trial from the Microsoft site.
There are a few pre-requisites that need to be in place before the actual installation of SharePoint 2010. So, let us prepare a few ingredients for our recipe in advance.
From Internet Explorer in the virtual machine:
Use your favorite search engine to find ado.net data services update for .net framework 3.5 sp1. Look for the Download Details link, which should be the first result (on the Microsoft site). This update is required in order to enable the REST–based data services that SharePoint 2010 relies upon.
Look for the x64 version and download it from the Microsoft site to the desktop of the virtual machine. Now, launch the installation.
Click Yes when prompted with Do you want to install the following Windows software update?, which is shown in the following screenshot:

It is now time for our second coffee break. Click Close after the Installation Complete screen appears. We are nearly there! We are going to get into the SharePoint 2010 setup in order to install the required pre-requisites. If you have the MSDN software, you will be provided with an ISO image that you can attach to the virtual machine. If you downloaded it from Microsoft as a trial, download it to your virtual machine settings and sharing a folder from the host machine. Double-click the EXE file to launch the installation. Ensure your virtual machine has internet connectivity (test by using Internet Explorer to navigate to http://www.microsoft.com). Run Splash.hta.
Installing the SharePoint 2010 pre-requisites:
Click on the Install Software Prerequisites link. Once you click on this link, you will see the following screen:

On the Microsoft SharePoint 2010 Products Preparation Tool - Welcome screen, click Next.
On the License Terms for Software Products screen, select the I accept the terms of the License Agreement(s) checkbox and click Next.
It is now time for our third coffee break. Watch for any prompts to reboot the server.
On the Installation Complete screen, click Finish.
Now, let's get to the main recipe for which you have patiently been waiting for!
Here is your recipe to install SharePoint 2010:
Click on the Install SharePoint Server link.
On the Enter your product key screen, enter either your MSDN software key or your trial license key.
On the Read the Microsoft Software License Terms screen, select the checkbox I accept the terms of this agreement and click on Continue.
On the Choose a file location screen, click Install Now. The Installation Progress screen will show the proceeding of the installation.
Fourth coffee break? You might want to consider switching to decaf.
Note! This is a good time to actually take a snapshot of your virtual machine (or back it up), as this can be a good a starting point if in the future you have to set up another separate development machine.
When you see the Run Configuration Wizard, leave the checkbox Run the SharePoint Products Configuration Wizard selected and click Close.
On the SharePoint Products Configuration Wizard or the Welcome screen, click Next.
Click Yes to the warning regarding services that may need to be restarted.
On the Connect to a Server Farm screen, choose the option to Create a new server farm and click Next.
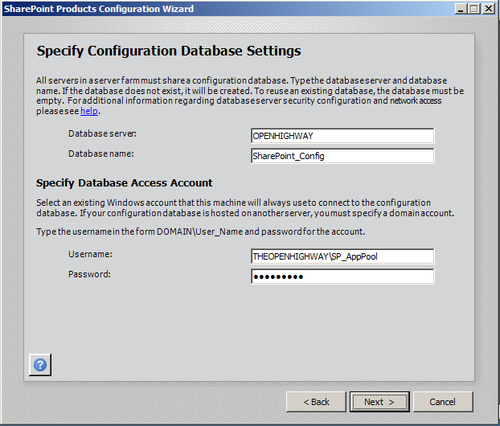
On the Specify Configuration Database Settings screen, specify your machine name in the Database Server text field. Use the SP_AppPool account, which was previously set up, and specify your password in the Password field of the Database Access Account section and click Next.
On the Specify Farm Security Settings screen, choose a passphrase of Password1 (or the same as you have used for the Administrator account) and click Next.
On the Configure SharePoint Central Admin Web Application Page, select the checkbox Specify port number and enter the value 9999 (or a different port number of your preference). Leave the default authentication provider as NTLM and click Next.
On the Completing the SharePoint Products Configuration Wizard, click Next.
You are probably sick of coffee by now. Please take the time to check your e-mail, voice messages, Facebook, Twitter, and Linked In.
On the Configuration Successful screen, click Finish.
Configure SharePoint 2010 via the Initial Farm Configuration Wizard:
Internet Explorer will open and navigate to the adminconfigintro.aspx page in Central Administration or the Initial Farm Configuration Wizard
On the Help make SharePoint better screen, select the option No, I don't wish to participate and click OK.
On the How do you want to configure your SharePoint farm? screen, click on Start the Wizard.
On the next screen in the Service Account, select Use existing managed account and ensure that the SP_AppPool account is selected. In the Services section, de-select Access Services and Word Automation Services and click Next
You are almost there! Reward yourself with a quick online match in your favorite game on your favorite console while you wait for the configuration to complete.
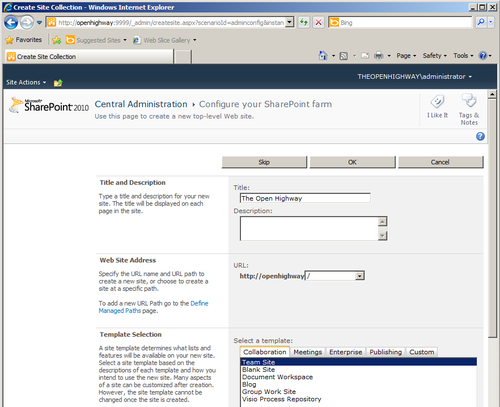
The wizard will have created a web application using the machine name, in my case, http://openhighway. You now get to create your very first Site Collection. Choose a title based on your company name (in my case, The Open Highway), choose the Team Site template and click OK, as shown in the following screenshot:
Your hard and patient work is rewarded with the This completes the Farm Configuration Wizard screen!
Click on the Site URL to open and test that your new Team Site (and therefore SharePoint 2010) is operating correctly. DO NOT DESPAIR OR PANIC if you receive a rather nasty looking Error screen!

Many times in a development machine, depending on the resources assigned to it and the power of the desktop/laptop you are running with - navigation to the URL will simply TIME OUT. Breathe deeply. Refresh the browser. See! There is your Team Site. Congratulations! Bookmark this URL in your Internet Explorer favorites. The following screenshot shows my Team Site:

Congratulations! You have successfully installed and configured SharePoint Server 2010 and are ready for our next step – to install Microsoft Office and your development tools.
From the home page of your Team Site, click on the Site Actions menu and select More Options. If you are prompted with the following screen with the Install Microsoft Silverlight link, then click on the link and take the opportunity now to install it! The user interface of SharePoint 2010 relies on Silverlight in many cases:
When the Silverlight install downloads, click Run on the security warning on the Install Silverlight dialog and then click Install Now, as shown in the following screenshot:

SharePoint 2010 is tightly integrated with, and was specifically designed to exploit, Microsoft Office 2010. So Office 2010 is a key tool for you to leverage in your SharePoint 2010 solutions, such as Word, Excel, and so on. Together with Visio and SharePoint Designer , these applications will be an important part of your development toolkit.
Download Microsoft Office 2010 Professional Plus from your MSDN subscription, or type in Microsoft office 2010 professional plus trial download into your favorite search engine to download the 60-day trial from the Microsoft site.
Wherever the software comes from, it will be presented as an EXE file. Make the file available to your virtual machine, for example, by going to your virtual machine settings and sharing a folder from the host machine. Or you could choose to download the software directly to your VM environment. Double-click the EXE file to launch the installation.
Here is the recipe to install Microsoft Office Professional Plus 2010:
On the first screen, enter your product key (either MSDN or trial key).
Accept the terms of the license agreement and click Continue.
On the Choose the installation you want screen, click Customize.
(Recommended) On the next screen, Installation Options tab, mark Microsoft Access, Microsoft OneNote, Microsoft Outlook, and Microsoft Publisher as Not Available / not installed (red mark). You can always install these later if you wish to experiment with these applications with SharePoint. Finally, click Install Now.

Click Close when the installation completes.
We want to take a moment to initialize Office. From the Windows Start menu, launch Microsoft Word.
On the Help protect and improve Microsoft Office screen, select the option Don't make changes and click OK.
Take the opportunity to activate Office if this has not been (automatically) done already.
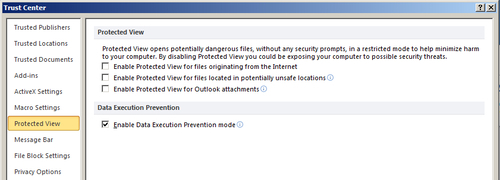
On the File tab in the ribbon, select Options. On the Word Options screen, select Trust Center on the left-hand side. Click the Trust Center Settings button. On the Trust Center screen, select Protected View on the left-hand side, as shown in the following screenshot. Deselect the first three checkboxes and click OK twice:
Close Microsoft Word.
Congratulations! You have installed Microsoft Office Professional Plus 2010.
Here we will install Visio 2010, and later in this book, we will exploit the key new capability to design SharePoint workflows.
Download Visio Premium 2010 from your MSDN subscription, or type in visio premium 2010 trial download into your favorite search engine to download the trial from the Microsoft site.
If you have the MSDN software, you will be provided with an ISO image that you can attach to the virtual machine as a CD Drive. In this case, run SETUP.EXE.
If you downloaded from Microsoft as a trial, make the file available to your virtual machine, for example, by going to your virtual machine settings, and sharing a folder from the host machine. In this case, run VisioSingleImage.exe.
Here is the simple recipe to install Visio 2010:
On the first screen, enter your product key (either MSDN or the trial key) for Visio Premium
Accept the terms of the license agreement and click Continue.
On the Choose the installation you want screen, click Install Now.
Click Close when the installation completes.
Congratulations! You have installed Visio Premium 2010.
In this recipe, we will install SharePoint Designer 2010. This is a powerful tool to create no-code solutions for SharePoint, but it is also a critical tool for the developer to exploit all of SharePoint's out-of-the-box capabilities before turning to code solutions in Visual Studio.
SharePoint Designer 2010 is a FREE tool you can download from the Microsoft site and install without the need for a license key. Type sharepoint designer 2010 download into your favorite search engine to download the software. Make the file available to your virtual machine, for example, by going to your virtual machine settings, and sharing a folder from the host machine. Otherwise, you could choose to download the software directly to your virtual machine environment. Double-click the EXE file to launch the installation.
Here is the simple recipe to install SharePoint Designer 2010:
Accept the terms of the license agreement and click Continue.
On the Choose the installation you want screen, click Install Now.
Click Close when the installation completes.
Congratulations! You have installed SharePoint Designer 2010.
Visual Studio 2010 is, believe it or not, the very first version of Visual Studio to incorporate a complete set of SharePoint 2010 development tools—ones that we of the SharePoint development world have been longing for for many years. You might overhear our excitement by murmuring "Wow!" We can press F5 and then we can even debug our software! For those ASP.NET developers who might be new to SharePoint development in 2010, you might say "Yeah, so what?" Of course you can! To which we might reply "But you don't understand!!!". Anyway, I digress, this could be the subject of another whole chapter about what we used to have to deal with, which would add absolutely no value whatsoever to your task at hand today. Suffice to say, Visual Studio is your primary SharePoint customization platform that you will discover as we go through the book. For now, let us get this tool installed into your virtual environment.
Download Visual Studio 2010 from your MSDN subscription—get the Ultimate version if you have it, download the Professional version, or type Microsoft visual studio 2010 ultimate trial into your favorite search engine to download the 30-day trial from the Microsoft site.
Note
Note that there is an option on the start page of Visual Studio to register the software and extend this trial for a further 60 days.
Either way, you will be provided with an ISO image that you can attach to the virtual machine as a CD Drive. Run Autorun.EXE.
Here is the recipe for installing Visual Studio 2010:
On the Microsoft Visual Studio 2010 Setup screen, click on Install Microsoft Visual Studio 2010
Under the Help Improve Setup section, de-select Yes, send information about my setup experiences to Microsoft Corporation.
Click the Next button when it is available.
Click I have read and accept the license terms and click Next.
Under Select features to install, select the Custom option and click Next.
Deselect options for Visual Basic, Visual C++, Visual F#, Dofuscator, and SQL Server 2008 Express. Finally, click Install.
It's probably been long enough now, so have another coffee break and enjoy!
Click Finish when the installation completes and restart the server when prompted.
When rebooted, you can exit the wizard.
Congratulations! You have successfully installed Visual Studio 2010.
You may now realize the point which we are at. I will put forward to you that by my experience, the most effective development platform for the SharePoint 2010 developer is a standalone virtual machine, where Visual Studio is installed within a full server-based installation of SharePoint 2010. Only time will tell whether you agree with me!

While Visual Studio 2010 certainly contains an excellent set of tools for the SharePoint 2010 developer, both Microsoft and the community at large are constantly providing you with further excellent sample code, utilities, and productivity aids. In this section, I recommend three key tools that you should have, and will direct you to a location where you can find more!
Here is the recipe for installing key SharePoint developer tools:
Mandatory for all SharePoint developers is the SharePoint 2010 SDK that includes many code samples and documentation. Use your favorite search engine to find Microsoft SharePoint 2010 SDK.
Highly recommended is the SharePoint Guidance available at http://www.microsoft.com/spg, with additional information available at http://spg.codeplex.com.
Highly recommended is the Community Kit for SharePoint. It is a set of best practices, templates, Web Parts, tools, and source code that enables practically anyone to create a community website based on SharePoint technology for practically any group of people with a common interest. It is available from http://cks.codeplex.com.
Highly recommended is the SharePoint Manager 2010 tool. It is a SharePoint object model explorer that enables you to browse every site on the local farm and view / change every property. It is from http://spm.codeplex.com.
Suggested are the Visual Studio 2010 SharePoint Power Tools, especially if you plan to develop Sandboxed Solutions . Use your favorite search engine to find Visual Studio 2010 SharePoint Power Tools.
You have successfully installed the key tools every SharePoint developer should have at hand.
There are far too many excellent tools contributed by the community to be mentioned here, and more being created all the time. Some will be useful to accelerate some very specific development task. The primary source is CodePlex at http://www.codeplex.com. Search the site for SharePoint 2010, or more generally, SharePoint (as some tools support both the current and older versions of SharePoint).
You are ready to start developing on SharePoint 2010! Well almost. I am going to strongly recommend a development approach for you. I ask for a moment of patience as I explain.
A specific SharePoint site (say, a Team Site) lives within a Site Collection. The site collection in turn lives within a Web Application (in IIS) and that web application will have an associated content database (literally, a SQL Server database that has been created to hold the content within the site collections of that web application). You may also know this as the SharePoint containment hierarchy.
My advice then revolves around creating an entirely new web application for the project you want to work on. Let's say that project is a new collaboration Intranet for the company The Open Highway. I want to host that on the URL http://intranet.theopenhighway.net. So I'd like to create that very web application locally, including mimicking the URL I ultimately want to use. That way, when I actually want to deploy my application, I'll be quite certain that it should operate perfectly well in the target environment.
But why do I say your first web application? Did SharePoint not create for itself the first content database, web application, and site collection with a Team Site at its root? Why, yes it did, located at a URL that is your machine name. In my case, that would have been http://OPENHIGHWAY. And the clarification is that SharePoint created that. The key word here is your first web application.
Here are the advantages of creating a new web application for each client / project you want to work on, in addition to the deployment advantage already mentioned:
You are programming and testing against the real URL, which the application will run against
Via a change to the Hosts file (you will see this shortly), you can switch on the fly between your local environment and a deployed environment (testing, production)
Each web application has its own content database, which means your project / client is isolated from others and that implies easy backup and easy movement between environments
Leave the original machine name web application intact so that if anything goes wrong you can rely on a pristine and reliable website to benchmark against
Please follow the best practice of creating a new and separate web application for your next project to see if you agree with this approach and benefits.
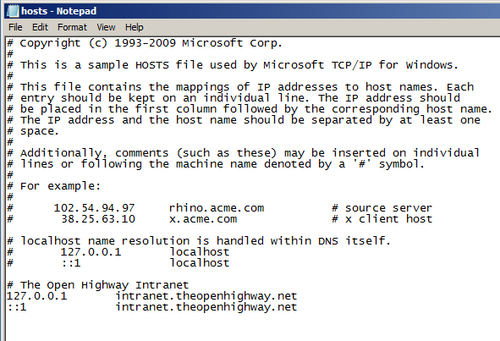
You must first create a Hosts entry for the URL that you wish to use. Use Windows Explorer to navigate to the directory C:\Windows\System32\drivers\ and so on. Right-click on the Hosts file and select Open. On the Open With dialog, select Notepad and click OK. Copy and paste the three lines referring to the local intranet. Remove the hash marks (#) from lines two and three and then replace the local host with your URL. The result will look as follows:
Close the notepad and save the changes.
Here is the recipe to create a new web application:
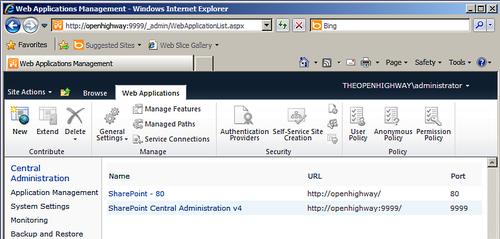
Launch SharePoint Central Administration and click on Application Management. From this screen, click on Manage Web Applications and the following screen will be displayed:
In the ribbon, click on the New button. Fill in the screen similarly to the following screenshot. Choose your own name for the web application. Change the port to 80, and enter the URL that you created as the Host Header:
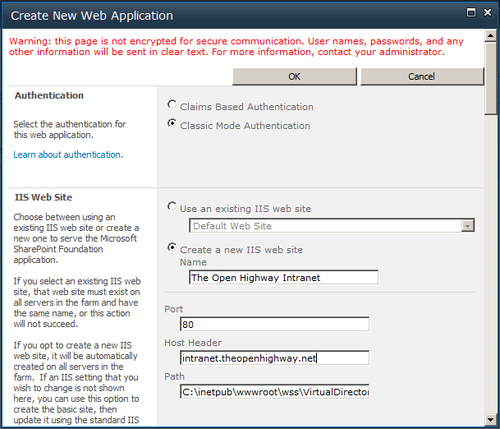
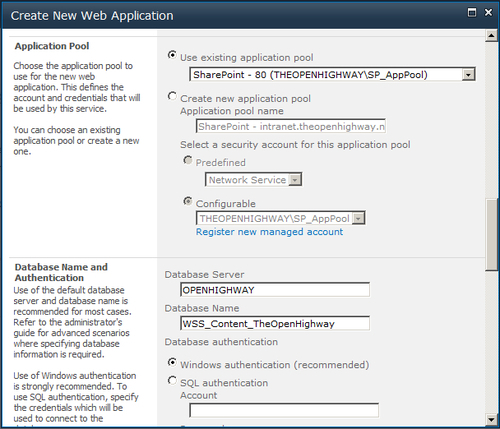
Scroll down the window. Leave the Security Configuration and Public URL sections at their defaults. As shown in the following screenshot, in the Application Pool section, select the Use existing application pool and select the one that begins with SharePoint – 80. In the Database Name and Authentication sections, change that unusably ugly GUID at the end of the database name to something meaningful. In my case, the database name is WSS_Content_TheOpenHighway:
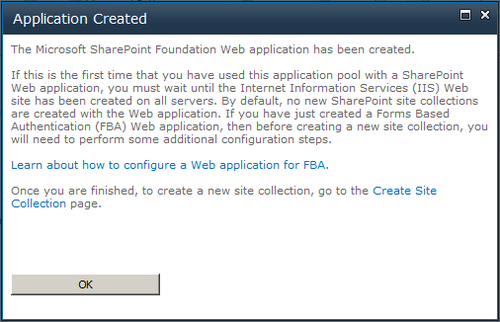
Scroll down to the bottom of the window. Leave all the remaining settings at their default and click OK. Please wait while your changes are processed. Truer words have never been spoken. Please wait patiently until you see the Application Created screen. Click on the Create Site Collection link, as shown in the following screenshot:
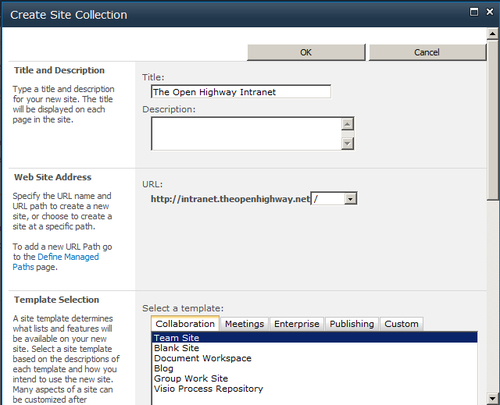
Type in a Title for your website (in my case, The Open Highway Intranet) and leave the template selection at the default of Team Site, as shown in the following screenshot:
Scroll to the bottom of the window, enter the Administrator account as the Primary Site Administrator, and press OK, as shown in the following screenshot:

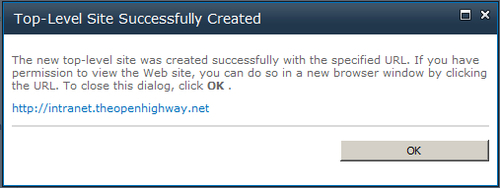
You will be rewarded with the Top Level Site Successfully Created screen, as shown in the following screenshot:
Click on the URL link to launch your new Team Site! Don't forget! If you get the dreaded Error screen, it is just a time out. Refresh the browser and you will see your site. You will be prompted to log in. We will fix this in a moment. In the meantime, enter the Administrator and the password you chose (in my case, Password1).
There are a couple of small helpful clean up notes, but otherwise you are ready to code! See you in Chapter 2, SharePoint Development with Visual Studio
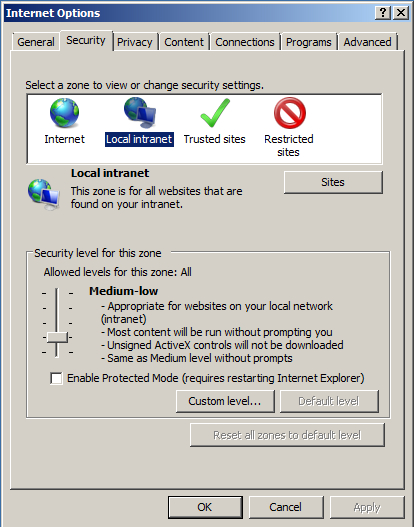
With your Team Site open, add the URL to your favorites. Using the Tools menu drop-down, select Internet Options. Click on the Security tab and click on the Local Intranet icon, as shown in the following screenshot:
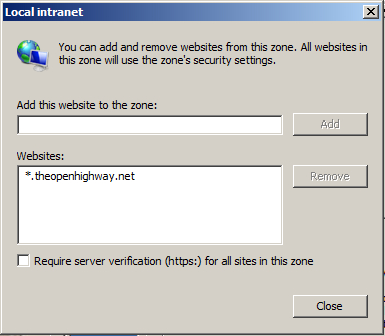
Click on Sites and then Advanced. Enter *.theopenhighway.net in the Add this website to the zone: text box (actually, your URL) and click the Add button, as shown in the following screenshot. Then click Close and click OK thrice:
The advantage? With your URL in the Local intranet zone, Windows Authentication is now integrated. No more prompts to login!