Download code from GitHub
Configuring Core Networking
Before any operating system can "talk" to its siblings, it needs to have an address – in that same way that you do (well, houses do) in order to be able to receive post. Correctly configured network addresses are fundamental to rock-solid networking functions and services that build on, such as Domain Name System (DNS), Dynamic Host Configuration Protocol (DHCP), and Active Directory.
This chapter explains IPv4 and IPv6 addressing, interoperability, and routing in the Windows Server 2016 operating system.
In this chapter, we will cover the following topics:
- Configuring IPv4 addresses and options
- Classless Inter-Domain Routing (CIDR)
- Subnetting
- Configuring IPv6 addressing
- IPv4 and IPv6 interoperability
- Configuring routing
Technical requirements
In this chapter, you will need the Windows Server 2016 operating system – either the Standard Edition or the Enterprise Edition. If you plan to use your own lab to prepare for the exam, then you can use Hyper-V on Windows Server or the Windows client operating systems. Of course, you can practice on real hardware as well, but it is a lot more practical to practice in a virtualized environment. Any virtualization environment or hypervisor will work just fine, and you can set up your own practice lab in the Microsoft Azure cloud as well.
Configuring addressing
At the heart of every networked, connected system, whether hardware or software, there needs to be a solid, stable network foundation, which is backed up by a properly working addressing scheme. Only then can you build reliable core and advanced services on top of it. Windows Server 2016 is no exception and many core roles and features are directly dependable on the fundamental networking services. These roles and capabilities are instrumental in network presence and server functionality, such as DHCP, DNS, Active Directory Domain Services (AD DS), Network Policy Server (NPS), or Internet Information Server (IIS).
Configuring IPv4 addresses and options
Microsoft Windows uses a collection of protocols to communicate over the network, called Transmission Control Protocol/Internet Protocol (TCP/IP). TCP/IP is a suite of protocols developed in 1969 by the U.S. Department of Defense in order to connect different branches of the U.S. military and enable them to communicate. At first, in the early 1960s, different U.S. military departments chose different vendors as computer system suppliers. For instance, the navy chose Unisys, the army chose Digital Equipment Corporation (DEC), and the air force chose International Business Machines (IBM). After a while, the departments needed to communicate between themselves and to exchange data, but it was difficult since each department had a different computer system. The Department of Defense started a project to connect all the branches and enable them to communicate. The TCP/IP suite of protocols was developed, and the fourth iteration of the IP protocol, IPv4, became the standard to connect the world's computers and devices.
TCP provides the reliable delivery of messages and defines delivery mechanisms for data transfers. In comparison, IP manages network routing from the sender to the receiver. The TCP/IP suite of protocols works by mapping to a layered protocol architecture stack, or model, and it is aligned with the Open System Interconnect (OSI) architectural model. The OSI uses a seven-layer architecture model, while TCP/IP uses a four-layer architectural model. Additionally, each TCP/IP layer corresponds to one or more OSI layers.
The four layers that the TCP/IP model uses are network interface, internet, transport, and application. The seven OSI layers are physical, data-link, network, transport, session, presentation, and application.
The following diagram shows the TCP/IP protocol architecture layers along with the OSI model layers:

Each layer provides specific functionality within its architectural layer model, such as routing, addressing, packaging, or session communication. There are four TCP/IP Architecture Layers, as shown in the diagram: Network Interface Layer, Internet Layer, Host-to-Host or Transport Layer, and Application Layer.
The network interface layer or network access layer addresses physical transmissions, by putting packets of data onto the medium and retrieving data packets off the medium.
The internet layer deals with routing, addressing, and packaging tasks; the common internet protocols are IP, Address Resolution Protocol (ARP), Internet Group Management Protocol (IGMP), and the Internet Control Message Protocol (ICMP).
The transport layer protocols are TCP and the User Datagram Protocol (UDP). TCP is a reliable, connection-oriented protocol, which is responsible for packet delivery, while UDP is a connectionless and unreliable protocol, which is used to transfer smaller-sized packets.
The application layer is the protocol that directly communicates and exchanges data with applications; the best-known representatives are Hypertext Transfer Protocol (HTTP), File Transfer Protocol (FTP), and Simple Mail Transfer Protocol (SMTP).
TCP also uses ports, which are specific endpoints for data packet delivery. Let's suppose that a user is browsing the internet using a web browser, sending and receiving emails through their favorite email client, and uploading a file using an FTP client. If there were no ports, how would the computer know what data packet belongs to each application? The answer is by using standardized and predefined port numbers. This is so that multiple applications can send and receive information to and from the network at the same time.
The following screenshot lists some well-known ports:

IP address
In order to communicate, TCP/IP ensures that each host on the network has its own logical IP address. There is also a physical, or a Media Access Control (MAC), address that represents physical communication hardware, which is used to send and receive data packets. The host IP address is a 32-bit binary number in a binary notation, known also as dotted decimal notation. Such a number, comprised of 32 "zeros" or "ones", is hard to read and, therefore, is segmented into four parts, called octets. Such a notation is also called the w.x.y.z notation:

Binary numbers use the number two (2) as the base for calculations and use only two characters to form a number—that is, zero (0) and one (1). The low-order bit or the rightmost bit has a decimal value of one (1) and the leftmost or high-order bit has the decimal value of 128. If the value of the bit in an octet is set to zero (0), then the value of the bit is multiplied by zero, and the result is, naturally, zero. If the value of the bit in an octet is set to one (1), then the value of the bit is multiplied by one, and the result of the multiplication is the actual value of the bit. The sum of all multiplied values is the decimal value of the octet.
For example, the 10101000 binary number is calculated as follows:
1×128 + 0×64 + 1×32 + 0×16 + 1×8 + 0×4 + 0×2 + 0×1 =
= 128 + 0 + 32 + 0 + 8 + 0 + 0 + 0 = 168
The following diagram demonstrates the relationship and conversion from a binary to a decimal notation:

The following example shows an IPv4 number in binary format. As you can see, reading, interpreting, and performing calculations with numbers displayed in this format is very hard:
32-bit number: 11000000101010000000000100001100
To enhance readability, a number is separated into octets, however, even so, calculating values is not easy:
11000000 10101000 00000001 00001100
Each binary octet is then converted to a decimal number:

Each octet or decimal is separated by a period or a dot, and is displayed in dotted decimal notation for better readability: 192.168.1.12. In this way, the hardly-readable binary format that machines use is presented in a form that we can understand better.
IPv4 has three types of addresses, as follows:
- Broadcast: This type of address is used in "one-to-everyone" communications and is assigned to all network interfaces on a subnet. Packets sent from an interface to a broadcast address receive all the interfaces on that network.
- Multicast: This type of address is used in "one-to-many" types of communication, where a sender transmits a packet that receives more than one network interface.
- Unicast: This type of address is used in "one-to-one" communications, where one network interface sends the data packet and only one network interface receives the packet.
Unicast addresses are also defined by a network ID and a host ID. The network ID, network address, or a subnet is a fixed portion of an IPv4 address that groups a set of network interfaces located on the same network segment. Routers separate network segments that must be unique on a TCP/IP network. A host ID or a host address represents a variable part of an IPv4 address and is unique to the network subnet.
Internet address classes
Internet address classes are defined to segment the available address space into networks of different sizes. Classes A, B, and C are reserved for unicast communication, D is reserved for multicast addresses, and the E class is reserved for experimental uses. The addressing scheme where classes are used is called classful.
Furthermore, the term subnet mask describes which bits of an address define the network ID, and which bits represent the host ID.
The following table presents the default subnet masks and address classes:

The class A address range
The class A network has the high-order bit set to zero. It includes address ranges from 0.0.0.0 to 128.0.0.0. It has an 8-bit prefix for network IDs (/8) and a subnet mask that is equivalent to 255.0.0.0. The 0.0.0.0 network is reserved for special purposes and 127.0.0.0 is reserved as a loopback address range, which leaves 126 out of 128 possible network IDs for use. The reservation of a whole 127.0.0.0 network ID for a loopback address is an obvious example of extremely bad address assignment planning. This bad planning originated in the early days of the internet; back then, we could not imagine how big and important the internet would become and how the explosion of interconnected devices would lead to the depletion of the IPv4 address space. The class A has 128 network IDs and 16,777,216 possible host addresses.
The following screenshot shows the structure of a class A address:

The class B address range
The class B network has two high-order bits set to 10, includes ranges from 128.0.0.0 to 192.0.0.0, has a 16-bit prefix for network IDs (/16), and has a subnet mask that is equivalent to 255.255.0.0. Class B has a maximum of 16,384 network IDs and 65,536 possible host addresses.
The following screenshot shows the structure of a class B address:

The class C address range
The class C network has 2 high-order bits set to 110, includes ranges from 192.0.0.0 to 224.0.0.0, has a 24-bit prefix for network IDs (/24), and has a subnet mask that is equivalent to 255.255.255.0. Class C has the biggest number of possible network IDs or 2,097,152 network addresses, with each network capable of addressing 256 hosts.
The following screenshot shows the structure of a class C address:

The class D address range
Class D is exclusively reserved for IPv4 multicast addresses. Here, the high-order bits are set to 1,110 and network addresses range from 224.0.0.0 to 240.0.0.0.
The class E address range
Class E is reserved for experimental use, where the high-order bits are set to 1,111 and the class uses the network ID of 240.0.0.0.
Understanding CIDR
Network classes were designed with then-current situations in mind, where class A was designed to have the smallest number of networks but the largest number of hosts per network, and class C was designed to have the largest number of networks but the smallest number of hosts per network. The class A networks were distributed among the largest corporations that were supposed to have the largest number of hosts, and the class C networks were supposed to be distributed to the various companies that were smaller in size.
In classless addressing, the addresses no longer belong to class A, B, or C – as the name implies – but the suffix to the address is added. This defines how many high-order bits of the address belong to the network ID and how many belong to the host ID; this is also called CIDR.
For example, a 192.168.1.12 address is a class C address. However, in a CIDR notation, this address is noted as 192.168.1.12/24 if a default, class-specific subnet mask is used. In this case, /24 means that the 24 high-order bits are used for the network ID portion and the remaining 8 bits are used for the host ID portion:

The Internet Assigned Numbers Authority (IANA) is the authoritative body that assigns or issues the blocks of CIDR addresses to regional internet registries. For example, the body is responsible for addressing assignments to European, Asian, or North American internet registries, which then further assign the blocks of addresses to local internet registrars. By using classless addressing, finer and adjustable segmentation of the address space is possible, resulting in fewer addresses being wasted.
In a usual network addressing scheme, the number of addresses available for assignment to hosts is n-2, where n is the maximum number of available network IDs in a network. For example, there are 256 host IDs in a class C 192.168.1.0 network. The number of addresses that can be assigned to hosts is 256 - 2 = 254. The first host address (192.168.1.0, in this example) is always reserved for referring to the network itself and the last network ID (192.168.1.255, in this example) is always reserved to a broadcast address.
In more complex network environments, less common addressing schemes are possible, such as networks with a /31 and /32 suffix. These are one-host networks, where the host ID is equal to the broadcast address. However, these are beyond the scope of this book and won't be mentioned further.
The following table shows the values of IPv4 CIDR block prefixes, available addresses, and subnet masks:

In the next section, we will learn how to divide a network range into smaller, multiple networks.
Subnetting
Subnetting is a technique to divide a network (a subnet ID or a network range) into several, smaller networks. In other words, subnetting is a method to divide a network range into smaller, multiple networks by "borrowing" the host ID bits and turning them into network ID bits. Let's suppose that a network registrar authority, or an internet service provider (ISP), has assigned you a block of addresses. Or, that the current, internal, networking scheme in your company allows you to use a certain network ID. The network in this example is a class C network, 192.168.0.0, with a subnet mask of 255.255.255.0 and a suffix network of /24:

This configuration gives you only one network with 254 (256-2) addressable host addresses.
In order to be able to accommodate more networks within a given range, you need to subnet the network. If, for example, you need seven networks, then you need to take the number of bits assigned to a host ID portion and assign them to a network ID part of the network.
So, how many bits should you take? The answer is the number of bits that will give you enough network IDs. The simple calculation of 2n, where n is the number of bits you take, will give you the number of available networks. In this case, since you need 7 networks, the calculation of 23 (that is, borrowing 3 bits) will give you a number of 8, which is slightly above your requirements and satisfies the required number of networks. The downside, however, is that subnetting increases the number of networks but decreases the number of hosts (or host IDs). This is logical, because while you have more bits that represent the network ID, you also have fewer bits available for the host ID portion.
So, how do you or the computer know which bits you have borrowed from the host ID portion? Well, the subnet mask provides this information. The subnetting process also involves changing or increasing the subnet mask to the appropriate value that determines which bits are used for the network ID and which are used for the host ID. The following example shows you which bits have been "borrowed", which part is the network ID, and which part is the host ID:

This subnet configuration allows you to have 23=8 networks and 25-2=30 hosts in total. Depending on the number of networks/hosts you need, you can increase or decrease the number of subnet bits (or borrowed bits) to adjust the number of hosts and networks. The following table shows the number of subnets needed and the number of bits to borrow up to the 16 subnet bits. You can easily calculate the number of available subnets all the way to the theoretically borrowed 32 bits if you are subnetting a class A network range:

As mentioned earlier, the network ID portion of an address (where the host ID bits are set to zero) represents a network ID, and the last host ID (where all the host ID bits are set to one) represents a broadcast address. The following table shows the subnetted 192.168.0.0/27 network range with all its corresponding network IDs:

After subnetting 192.168.0.0/24 to 192.168.0.0/27, the available subnet network IDs, host ID address ranges, and broadcast addresses will be as follows:

The IPv4 standard defines the portion of the IPv4 address range that is not routable on the internet and is suitable for private use, hence its name, the private IP address range. These three address ranges are defined solely for private use, that is, in the private addressing schemes using systems that are not directly connected to the internet. To be able to access the internet, a host configured with a private IP address needs to use Network Address Translation (NAT). This allows internal addresses to be mapped to one or more publicly available IP addresses. NAT helps keep an internal network isolated while addressing the shortage of publicly available IP addresses.
The following table shows the list of class A, B, and C private IP address ranges:

The private IP addresses are defined in RFC 1918, which is available at http://tools.ietf.org/html/rfc1918.
Configuring IPv6 addressing
Initially, the address space of 4,294,967,296 possible addresses (232) seemed inexhaustible and the address space was generously segmented and assigned. Back then, such thinking seemed reasonable because nobody expected the exponential growth of the internet or such a large number of connected devices. Nowadays, we are facing the depletion of the IPv4 address space, which was predicted years ago. The need for a solution to this problem led to development of the sixth generation of the IP protocol – IPv6. The IPv4 address is 32 bits long, while IPv6 uses 128-bit long addresses. Compared to IPv4, IPv6 has a four times larger address space of 2128, or 340,282,366,920,938,463,463,374,607,431,768,211,456 addresses. This is significantly more than IPv4; however, IPv6 was not designed solely with host addressing in mind, but also to be able to accommodate newer 64-bit macOS addresses.
Converting from binary to hexadecimal notation
IPv4 addressing uses decimal notation and IPv6 uses hexadecimal notation, where the 128-bit address is divided into 16-bit chunks.
For example, the following number is a binary form of an IPv6 address:
00111101101011110010000000001011000000000000010000111100111100100100000011111110000000000000000001010000111111101111111110101011
The 128-bit-long binary address number is divided into 16-bit-long chunks, as follows:
0011110110101111 0010000000001011 0000000000000100 0011110011110010 0100000011111110 0000000000000000 0101000011111110 1111111110101011
Each binary chunk is then converted to a hexadecimal format and the blocks are separated by colons:
3DAF:200B:0004:3CF2:40FE:0000:50FE:FFAB
The following table shows the decimal values and their corresponding hexadecimal and binary values:

Zero suppression
IPv6 addresses are quite large; therefore, when multiple contiguous blocks of zeros occur, these can be shortened or substituted with a double colon, (::), which simplifies the address notation. For example, a contiguous block of zeros in the 3DAF:200B:0004:3CF2:40FE:0000:50FE:FFAB address can be shortened to a single zero, such as 3DAF:200B:0004:3CF2:40FE:0:50FE:FFAB, or by a double colon: 3DAF:200B:0004:3CF2:40FE::50FE:FFAB.
You can suppress the leading zeros of the 16-bit block as well, for example, 3DAF:200B:4:3CF2:40FE::50FE:FFAB.
Furthermore, only 16-bit contiguous blocks can be substituted or suppressed, and not parts of the 16-bit block; for instance, the FF04:30:0:0:0:0:0:4 address cannot be compressed to FF04:3::4. The unicast FF02:0:0:0:0:0:0:3 IPv6 address, on the other hand, can be shortened to FF02::3.
Similar to IPv4 address types, IPv6 also has different address types:
- Unicast: This address type represents a single interface or a node. It is used in one-to-one communications where one interface sends packets to a single receiver.
- Multicast: This address type represents multiple interfaces. It is used in a one-to-many communication model, where one sender sends packets to multiple recipients or interfaces on a network.
- Anycast: This address type represents multiple interfaces. It is used in a one-to-many-to-one communication model, where a sender sends a packet to multiple interfaces but a single interface is the recipient of the message. The one recipient that receives the message is defined as the nearest, being the one that is closest in terms of routing distance.
There are also other types of IPv6 addresses, as follows:
- Global unicast: Similar to IPv4 public addresses, these addresses are globally routable and reachable.
- Link-local: Hosts use link-local addresses to communicate with other hosts on the same network. The first 10 bits of a link-local address are always 1111 1110 10, and the next 54 bits of a network address are always 0. The remaining 65 bits are interface ID bits that identify the host within a LAN. This creates the address prefix of fe80::/64.
- Site-local: These addresses are the same as the IPv4 private addresses. They can be used with private networks that do not have a direct IPv6 connection, and they can be used in addition to global addresses.
- Unique local: The unique local addresses are not routable on the internet, but they are routable between private network subnets.
- Special IPv6 address: These networks are reserved for special uses and purposes.
- Transition addresses: These addresses support the transition from IPv4 to IPv6:
- IPv4-compatible address: This address type uses the 0:0:0:0:0:0:w.x.y.z or ::w.x.y.z format, where w.x.y.z is the dotted decimal IPv4 address notation. This type of address uses nodes that communicate with both IPv4 and IPv6 protocols.
- IPv4-mapped address: This type of address uses IPv4-only nodes that can communicate with IPv6 nodes.
- 6to4 address: This type of address is used in communications between two nodes over the internet; the nodes use both IPv4 and IPv6.
For a better understanding of the relationship between IPv4 and IPv6, the following table compares the networking concepts and terminology of both standards:

IPv6 autoconfiguration
One of the advantages of IPv6 over IPv4 is the capability to autoconfigure the client in the absence of the DHCP server. Although there is such a thing in IPv4 as autoconfiguration or Automatic Private IP Addressing (APIPA), it provides only local connectivity with no routing support. On the other hand, IPv6 autoconfiguration enables the IPv6 host to automatically configure itself without using an addressing protocol, such as DHCP for IPv6 or DHCPv6. By using IPv6 autoconfiguration, the IPv6 host can also autoconfigure other IPv6 addressing settings such as configuration parameters and the addresses of routers. Specifically, IPv6 autoconfiguration is specified in RFC 4862.
Autoconfiguration address states
There are three possible autoconfiguration address states, as follows:
- If an IPv6 node has an address autoconfiguration state that is invalid, then it can no longer receive or send unicast traffic. When an address lifetime expires, it enters the invalid state.
- If an IPv6 node has an address autoconfiguration state that is valid, then it means that it can send and receive unicast traffic. The Router Advertisement message determines the period that an address can exist in the valid state. The valid state itself can be preferred or deprecated. The address state is always equal to or greater than the preferred lifetime.
- If a node's address has been verified and it is unique, then the address enters the valid preferred state. A node can communicate on the network and can send and receive packets for the period of validity determined by the Router Advertisement message, that is, the time an address remains in the preferred and tentative states.
- If a node has a valid but deprecated address, it can still communicate and use the deprecated address, but this address is discouraged for new communications.
Autoconfiguration types
There are three autoconfiguration types, as follows:
- Autoconfiguration is completed through an address configuration protocol, such as Dynamic Host Configuration Protocol v6 (DHCPv6). The autoconfiguration is stateful if a node gets configuration through Router Advertisement messages. This does not include the address prefixes that require the host to use and address the configuration protocol.
- Autconfiguration is stateful if a node has obtained an address through the Router Advertisement message and the address includes stateless address prefixes.
- Stateful and stateless autoconfiguration types; the host receives Router Advertisement messages that require hosts to use the address configuration protocol and includes stateless address prefixes.
The autoconfiguration process
An address autoconfiguration for an IPv6 host is performed and described in the following steps:
- A host sends a Router Solicitation message.
- If a host receives a Router Solicitation message, then it is configured using the information obtained in this message.
- If a host does not receive a Router Solicitation message, then it can use the address configuration protocol (DHCPv6) to configure itself with the address and other configuration parameters.
- The stateless address prefix and the 64-bit address identifier are both used to obtain a tentative address. The existence of a duplicate tentative address is verified during the process. If an address is not a duplicate, and, therefore, not in use, the address is initialized and a host obtains valid and preferred lifetimes in the Router Advertisement message.
Similar to DHCP for the configuration of IPv4 addresses, DHCPv6 also uses UDP messages, which DHCPv6 servers and relay agents listen for on UDP port 547. Unlike DHCP for IPv4, DHCPv6 has no broadcast addresses or messages.
The list of valid DHCPv6 messages and their comparison to DHCP IPV4 messages is shown in the following table:
| DHCPv6 message | Description | DHCPv4 Equivalent |
| Solicit | This is sent by a client to locate servers. | DHCPDISCOVER |
| Advertise | This is sent by a server in response to a Solicit message to indicate availability. | DHCPOFFER |
| Request | This is sent by a client to request addresses or configuration settings from a specific server. | DHCPREQUEST |
| Confirm | This is sent by a client to all servers to determine whether a client's configuration is valid for the connected link. | DHCPREQUEST |
| Renew | This is sent by a client to a specific server to extend the lifetimes of assigned addresses and obtain updated configuration settings. | DHCPREQUEST |
| Rebind | This is sent by a client to any server when a response to the Renew message is not received. | DHCPREQUEST |
| Reply | This is sent by a server to a specific client in response to a Solicit, Request, Renew, Rebind, Information-Request, Confirm, Release, or Decline message. | DHCPACK |
| Release | This is sent by a client to indicate that the client is no longer using an assigned address. | DHCPRELEASE |
| Decline | This is sent by a client to a specific server to indicate that the assigned address is already in use. | DHCPDECLINE |
| Reconfigure | This is sent by a server to a client to indicate that the server has new or updated configuration settings. The client then sends either a Renew or Information-Request message. | N/A |
| Information-Request | This is sent by a client to request configuration settings (but not addresses). | DHCPINFORM |
| Relay-Forward | This is sent by a relay agent to forward a message to a server. The Relay-Forward message contains a client message encapsulated as the DHCPv6 Relay-Message option. | N/A |
| Relay-Reply | This is sent by a server to send a message to a client through a relay agent. Relay-Reply contains a server message that is encapsulated as the DHCPv6 Relay-Message option. | N/A |
Implementing IPv6 stateless addressing
A typical DHCPv6 stateful host configuration includes the following exchange of messages in the process of obtaining an IPv6 address and configuration settings:
- A client sends a Solicit message to locate the servers.
- A server sends an Advertise message to indicate whether it is capable of providing IPv6 configuration settings and addresses.
- A client sends a Request message to a server to request configuration settings and an address.
- A server sends a Reply message that contains configuration settings and an address.
To configure a Windows Server 2016 DHCP role as a stateless DHCPv6 server, follow the following steps:
IPv4 and IPv6 interoperability
Interoperability between IPv4 and IPv6 addressing is often achieved and configured using transition technologies. The RFC 1752 contains the recommendations for the transition criteria such as new and existing host upgrades and configuration.
The definitions for the transition mechanisms for IPv6 hosts and routers are contained in the RFC 4213 document and the following addresses are defined to ease the transition process from IPv4 to IPv6:
- IPv4-compatible addresses: The IPv4-compatible address is used by nodes communicating with IPv6 over an IPv4-only infrastructure. The IPv6 traffic is encapsulated with an IPv4 header and sent to a destination host. The IPv4-compatible addresses support has been deprecated and it is not supported in Windows operating systems.
- IPv4-mapped addresses: The IPv4-mapped address, 0:0:0:0:0:FFFF:w.x.y.z or ::FFFF:w.x.y.z, is used for the internal representation of an IPv4 node to an IPv6 node. w.x.y.z is the dotted-decimal representation of a public IPv4 address.
- Intra-Site Automatic Tunnel Addressing Protocol (ISATAP) addresses: ISATAP addresses are defined in RFC 5214 and are composed of an ::0:5efe:w.x.y.z interface identifier and a valid 64-bit unicast address prefix. If a node's address is based on a private IPv4 address, then ::0:5EFE:w.x.y.z is used, where w.x.y.z is a private IPv4 address.
Alternatively, if a node's address is a public IPv4 address, then ::200:5EFE:w.x.y.z is used, where w.x.y.z is a public IPv4 address. ISATAP nodes do not require manual configuration to enable the functionality – it can be done automatically through Router Advertisement messages.
Enabling ISATAP is possible by using several methods, as follows:
- The netsh command. For example, use netsh interface ipv6 isatap set router w.x.y.z.
- By using the GPO or Group Policy Objects settings.
- By using PowerShell; you can use the following PowerShell command to configure ISATAP: Set-NetIsatapConfiguration – Router w.x.y.z.
- 6to4 addresses: 6to4 addresses are defined in RFC 3056 and are based on the 002:WWXX:YYZZ::/48 prefix, where WWXX:YYZZ is the colon hexadecimal representation of 2001::/32. 6to4 traffic is encapsulated with an IPv4 header and sent over an IPv4 network. Encapsulation or tunneling is done automatically on the sending and receiving end, or on a forwarding router.
A Windows Server 2016 computer can act as a 6to4 router by completing the following steps (using Netsh or PowerShell):
- You can enable the 6to4 service as follows:
- Netsh: netsh interface 6to4 set state enabled
- PowerShell: Set-Net6to4Coniguration -State Enabled
- You can enable forwarding on the 6to4 tunneling interface as follows:
- Netsh: netsh interface ipv6 set interface InterfaceNameOrIndex forwarding=enabled
- PowerShell: Set-NetIPInterface -InterfaceAlias Name -AddressFamily IPv6 -Forwarding Enabled
- Teredo addresses: Teredo addresses are defined in RFC 4380 and are based on the prefix. They are used to create global IPv6 addresses for the nodes that are connected to the IPv4 network and provide support for NAT nodes. If, for example, your internal network is using private IPv4 addresses and you want to provide IPv6 connectivity though the internet, then Teredo is your choice as it supports NAT.
To configure Teredo, use the PowerShell Set-NetTeredoConfiguration cmdlet.
Configuring routing
To be able to forward the packets from one network to the other, Windows Server 2016 can act as a router for both IPv4 and IPv6 traffic, thanks to the built-in server role. In this way, the Windows Server 2016 computer can act on the network in a similar way to a hardware router device, with additional, Windows operating system-specific functionality. To be able to route traffic to and from different networks or subnets, you will need two or more physical network adapters.
Before you can configure a Windows Server 2016 as a router, you need to install a supporting role. To install a server role that supports routing, perform the following steps:
- Open Server Manager.
- Click on the Manage menu and choose Add Roles and Features.
- On the Before You Begin screen, click on Next. To skip this page next time, select Skip this page by default.
- On the Installation Type page, select Role-based or feature-based installation, and then click on Next.
- On the Server Selection page, under Server Pool, make sure that the current server is selected. Alternatively, select the server on which you want to install the routing support role. Then, click on Next.
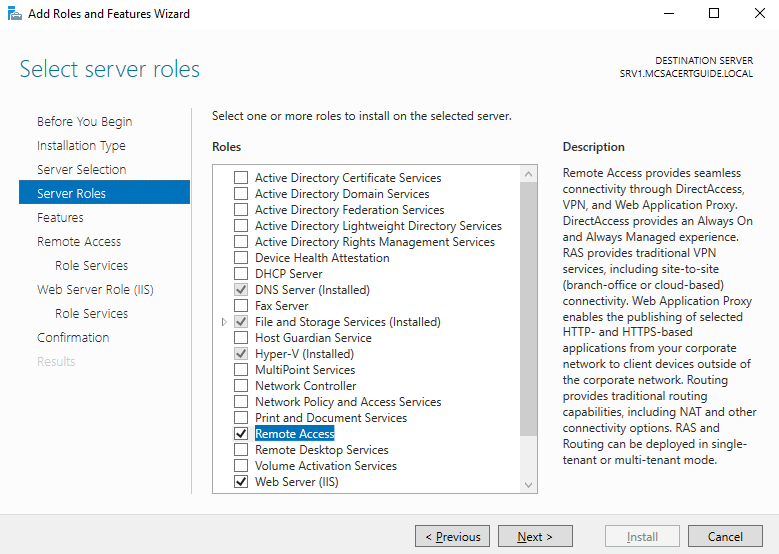
- On the Server Role page, select the Remote Access role; then, click on Next:
- On the Features page, click on Next.
- On the Remote Access page, read the information and then click on Next.
- On the Role Services page, select Routing, and then click on Add Features if Add Roles and Features Wizard prompts you to install features required for the routing role:
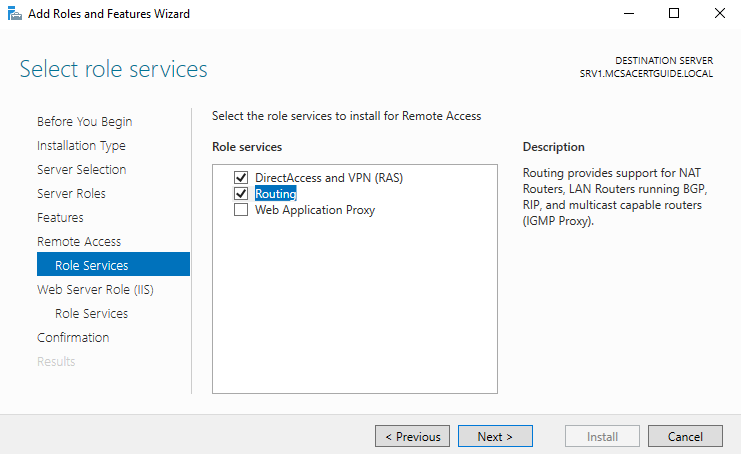
- The wizard automatically selects the DirectAccess and VPN (RAS) role and Web Server Role (IIS); then, click on Next.
- On the Role services page for Web Server Role (IIS), click on Next.
- On the Confirmation page, click on Install.
- When the installation finishes, observe the installation progress page and click on Close.
- After the installation finishes, observe the Server Manager window and the yellow triangle containing an exclamation mark near the flag.
- Click on the flag and yellow triangle:
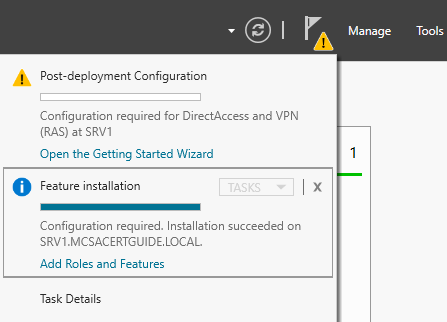
- The menu shows that the installed DirectAccess and VPN role needs post-deployment configuration in order to be functional.
To configure Windows Server 2016 functionality as a router, perform the following steps:
- Open Server Manager.
- Click on the Tools menu and choose Routing and Remote Access.
- The Routing and Remote Access window opens. Right-click on a server that you want to configure and choose Configure and Enable Routing and Remote Access.
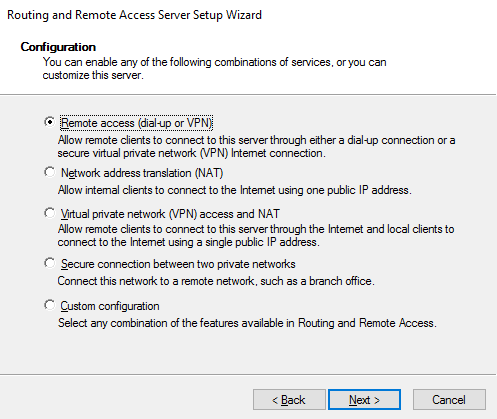
- The Routing and Remote Access Server Setup Wizard starts. Then, click on Next.
- On the Configuration page, select Custom configuration, and then click on Next:
- On the Custom Configuration page, select LAN routing, and then click on Next:
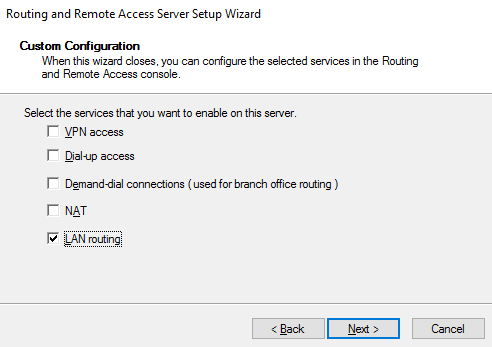
- Click on Finish.
- Now, wait a few seconds; when the Routing and Remote Access dialog box appears, click on Start Service.
To enable a routing protocol on a Windows Server 2016 operating system, complete the following steps:
- Open Server Manager.
- Click on the Tools menu and choose Routing and Remote Access.
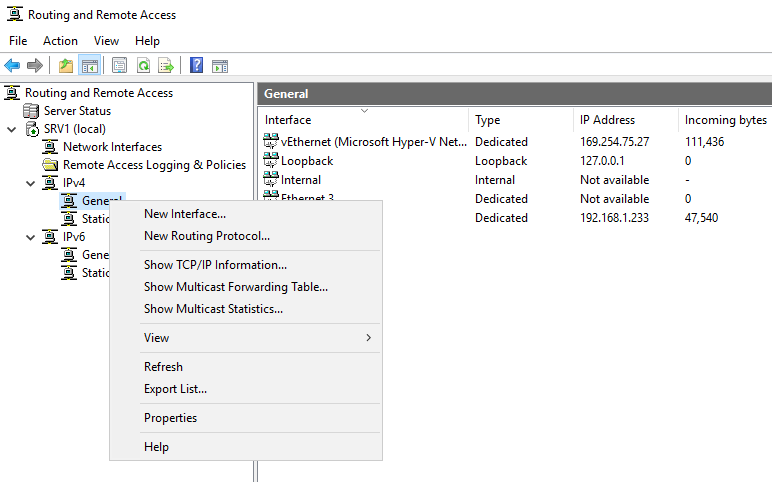
- Under the IPv4 node, right-click on General and choose New Routing Protocol…:
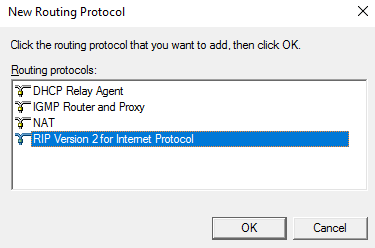
- Select RIP Version 2 for Internet Protocol and click on OK:
- Note that you will not be able to add the RIP protocol if there are no usable network interfaces installed on a computer. Right-click on RIP and select New Interface….
- Choose a network interface to enable RIP on and click on OK; a RIP Properties page opens.
- You can accept the defaults, or make the desired changes, and then click on OK to enable the RIP routing protocol on an applicable network interface.
Windows Server 2016 supports Border Gateway Protocol (BGP). BGP is a dynamic routing protocol, which means that it "learns" the routes between connected sites. To install BGP support in the Windows Server 2016 operating system, you must enable the support for each tenant using the PowerShell Enable-RemoteAccessRoutingDomain command.
The following example demonstrates how to install RAS in multitenancy mode with VPN, RAS, and BGP support:
$Sample_RoutingDomain = "SampleTenant"
Install-RemoteAccess -MultiTenancy
Enable-RemoteAccessRoutingDomain -Name $Sample_RoutingDomain -Type All -PassThru
To enable BGP only, without multitenancy capabilities, use the following PowerShell command:
Install-RemoteAccess –VpnType RoutingOnly
Summary
In this chapter, we looked at IPv4 addressing and options. We learned about the different internet address classes. Then, we looked at interoperability and routing in the Windows Server 2016 operating system. In the next chapter, we will proceed with the installation of the DNS server role.