


 Download code from GitHub
Since Xamarin made its appearance several years ago, developers have been delighted with being able to create native mobile applications that target non-Microsoft platforms, and with having the option of developing apps using either C# or F# programming languages, which enables developers to distribute their app ideas on iOS and Android platforms.
As you progress through this book, you will learn how to apply best practice principles when developing cross-platform mobile applications and design patterns using the Xamarin.Forms platform, which allows developers to build cross-platform user interface layouts that can be shared across Android, iOS, and Windows Phone mobile platforms.
Since each of these apps can be written using a single programming language, it makes sense to write a single codebase that would compile and build separate apps for each of these different platforms.
This chapter will begin by setting up a basic structure of an app built using Xamarin.Forms, which will be the foundation for the subsequent chapters, where we will continually build upon this, applying new concepts. In this chapter, you will see how to create an initial cross-platform native app using Xamarin.Forms and how to go about adding new, and updating existing, packages within your solution.
You'll learn how to create C# classes that will act as the model for our app, as well as creating content pages that will form the user interface. To end the chapter, you will learn about the differences between developing apps using Xamarin Studio and/or Microsoft Visual Studio.
This chapter will cover the following points:
Creating the Xamarin.Forms
TrackMyWalksmobile app solutionUpdating the
TrackMyWalkssolution packages using theNuGetpackage managerCreating the
TrackMyWalksdata modelCreating the
ContentPagesfor theTrackMyWalkssolutionUnderstanding the differences between Xamarin Studio and Visual Studio
In this section, we will take a look at how we can go about creating a new Xamarin.Forms solution for the first time. We will begin by developing the basic structure for our application, as well as by adding the necessary entity models and designing the user interface files.
Before we can proceed, we need to create our TrackMyWalks project. It is very simple to create this using Xamarin Studio. Simply follow the steps listed below:
Launch the Xamarin Studio application. You will be presented with the following screen:
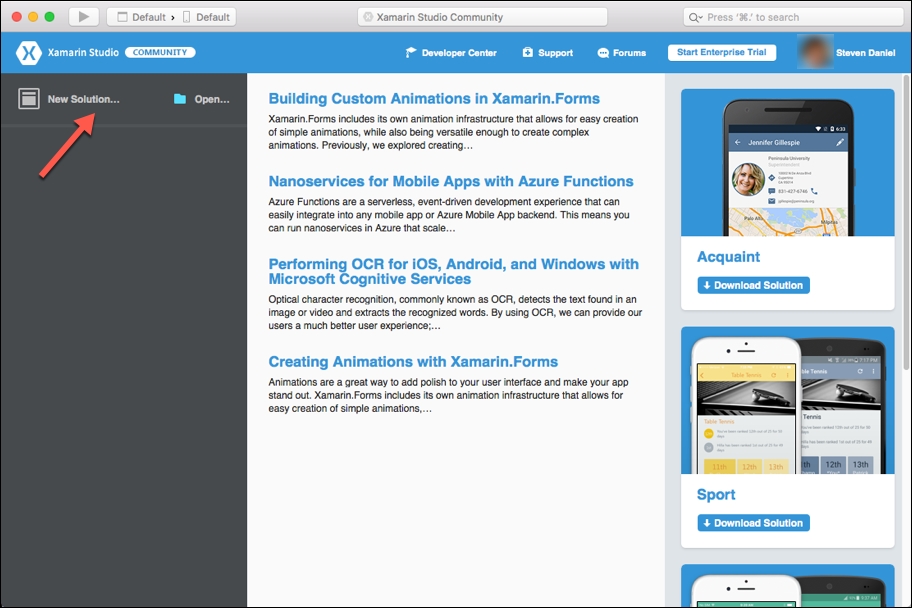
Next, click on the New Solution... button, or alternatively choose the File | New | Solution... or simply press Shift + Command + N.
Next, choose the Forms App option which is located under the Multiplatform | App section. Ensure you have selected C# as the programming language to use:

Next, enter
TrackMyWalksto use as the name for your app in the App Name field.Then, specify a name for the Organization Identifier field.
Next, ensure that both the Android and iOS checkboxes have been selected in the Target Platforms fields.
Then, ensure that the Use Portable Class Library option has been selected in the Shared Code section, as shown in the following screenshot.
Tip
The difference between using a Portable Class Library versus a Shared Library is essentially that a Portable Class Library enables developers to write code once, so that it can be used within different platform projects such as Websites, Android, and iOS. A Shared Library enables developers to copy all the files within the library project to all the projects that are contained within the solution during compilation for the various platforms that will use it.

Next, ensure that the Use XAML for user interface files option has not been selected.
Then, click on the Next button to proceed to the next step in the wizard.

Next, ensure that the Create a project directory within the solution directory. checkbox has been selected.
Then, click on the Create button to save your project to the specified location.
Once your project has been created, you will be presented with the Xamarin development environment along with several project files that the template has created for you, as shown in the following screenshot:
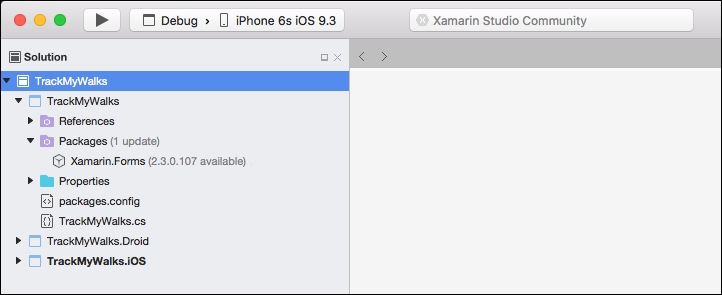
As you can see from the preceding screenshot, the TrackMyWalks solution has been divided into three main areas. The following table provides a brief description of what each area is used for:
|
Platform specific project |
Description |
|
|
This is the Portable Class Library (PCL) project that will be responsible for acting as the main architectural layer for the This project contains all of the business logic, data objects, Any code that you create within this project can be shared across multiple platform-specific projects. |
|
|
This project is an Android specific project that contains all of the code and assets required to build and deploy the Android app contained within the solution. By default, this project contains a reference to the |
|
|
This project is an iOS specific project that contains all of the code and assets required to build and deploy the iOS app contained within the solution. By default, this project contains a reference to the |
TrackMyWalks.cs which is part of the TrackMyWalks Portable Class Library. The TrackMyWalks.cs file contains a class named App that inherits from the Xamarin.Forms.Application class hierarchy, as can be seen in the following code snippet:
    //
    //  TrackMyWalks.cs
    //  TrackMyWalks
    //
    //  Created by Steven F. Daniel on 04/08/2016.
    //  Copyright © 2016 GENIESOFT STUDIOS. All rights reserved.
    //
    using Xamarin.Forms;

    namespace TrackMyWalks
    {
        public class App : Application
       {
            public App()
            {
    // The root page of your application
                var content = new ContentPage
                {
                    Title = "TrackMyWalks",
                      Content = new StackLayout {
                          VerticalOptions = LayoutOptions.Center,
                            Children = { new Label {
                                HorizontalTextAlignment =
                                TextAlignment.Center,
                                Text = "Welcome to Xamarin Forms!"
                            }
                        }
                    }
                };

                MainPage = new NavigationPage(content);
            }

            protected override void OnStart()
           {
                // Handle when your app starts
            }
            protected override void OnSleep()
            {
                // Handle when your app sleeps
            }
            protected override void OnResume()
            {
                // Handle when your app resumes
            }
         }
       }
The App constructor method sets up the MainPage property to a new instance of the ContentPage that will simply display some default text as created by the project wizard. Throughout this chapter, we will be building the initial user interface page views and then modifying the MainPage property for our App class, contained within the TrackMyWalks.cs file.
In this section, we will take a look at how to update the Xamarin.Forms packages contained within our TrackMyWalks solution. Basically, you will notice that each project contained within our solution contains a Packages folder.
The Xamarin.Forms package is essentially a NuGet package that gets automatically included in our solution whenever we specify that we want to create a Xamarin.FormsApp project template.
From time to time, you will notice that Xamarin will notify you whenever a package is out of date and needs to be updated to ensure that you are running the latest version.
Note
A NuGet package, is essentially the package manager for the Microsoft Development Platform that contains the client tools that provide the capability for producing and consuming .NET packages.
Let's take a look at how to go about updating the NuGet packages within our TrackMyWalks solution to ensure that we are running the latest Xamarin.Forms packages. Perform the following steps:
Right-click on the
TrackMyWalkssolution and choose the Update NuGet Packages menu option, as shown in the following screenshot: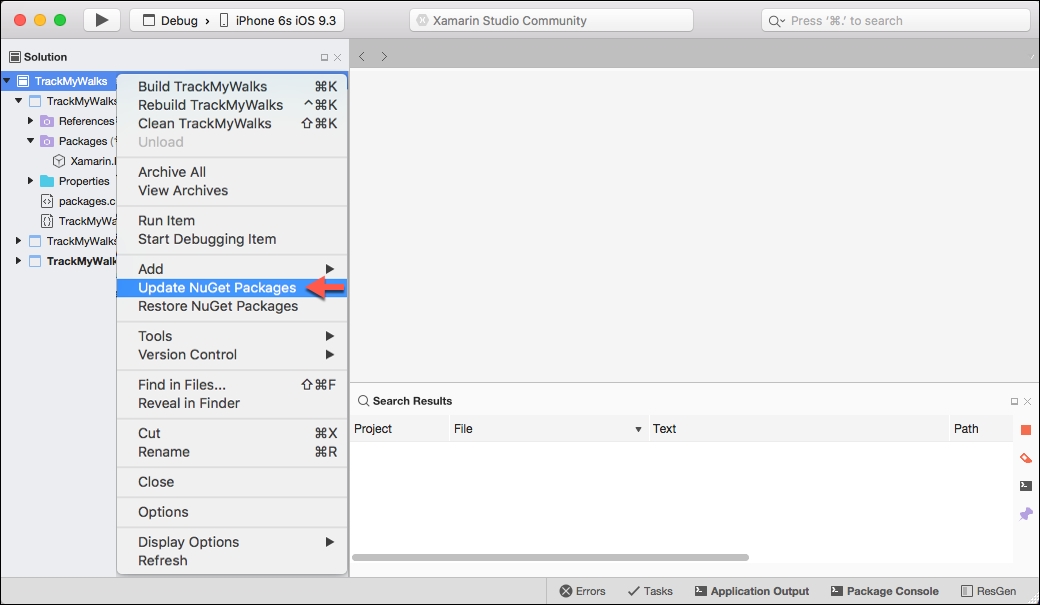
Once you have selected this option, Xamarin Studio will proceed to update each package that is contained within the
TrackMyWalkssolution for each of the platform-specific projects, and will display a progress indicator similar to the one shown in the following screenshot:
During the package update process, some packages that are contained as part of each platform-specific project require you to accept their license terms prior to installing, which is shown in the following screenshot:

Click on the Accept button to accept the license terms and conditions for the packages displayed within the dialog box and to install the packages, as shown in the preceding screenshot.
Now that you have successfully updated the Xamarin.Forms packages within your solution, we can now proceed with building the user interface files for the TrackMyWalks solution.
In this section, we will proceed to create our TrackMyWalks model that will represent our walk entries. As we progress throughout this chapter, we will see how we can use this model to set up and initialize some walk entries for our main WalksPage using a ListView control so that we can display walk entry for each row within the ListView.
Let's take a look at how we can achieve this, by following the steps below:
Create a new folder within the
TrackMyWalksPortable Class Library project solution, calledModelsas shown in the following screenshot:
Next, create a new class file within the
Modelsfolder, as shown in the following screenshot:
Then, choose the Empty Class option under the General section and enter in
WalkEntriesfor the name of the new class file to be created as shown in the following screenshot: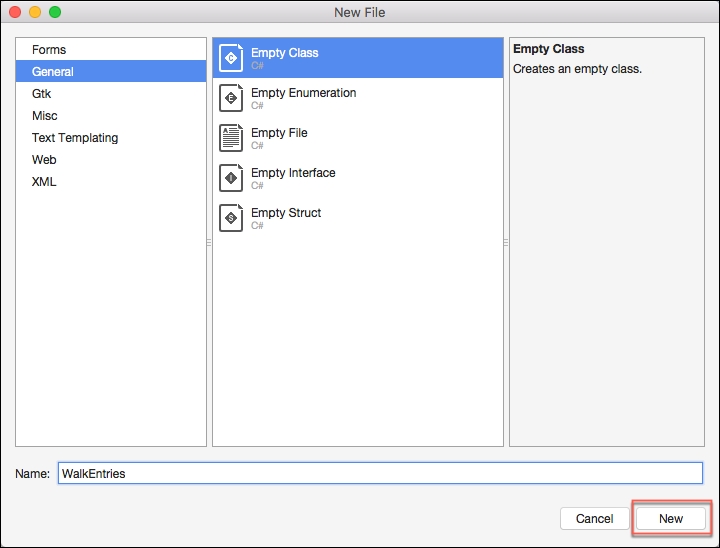
Next, click on the New button to allow the wizard to proceed and create the new file, as shown in the preceding screenshot.
Congratulations, you have created your first folder and C# class file for our solution. We can now proceed with adding the property descriptors that will be used to define our model.
Ensure that the
WalkEntries.csfile is displayed, then locate theWalkEntriesclass constructor and enter the following highlighted code sections:
        //
        //  WalkEntries.cs
        //  TrackMyWalks
        //
        //  Created by Steven F. Daniel on 04/08/2016.
        //  Copyright © 2016 GENIESOFT STUDIOS. All rights reserved.
        //

        namespace TrackMyWalks.Models
        {
            public class WalkEntries
            {
                public string Title { get; set; }

                public string Notes { get; set; }

                public double Longitude { get; set; }

                public double Latitude { get; set; }

                public double Kilometers { get; set; }

                public string Difficulty { get; set; }

                public double Distance { get; set; }

                public string ImageUrl { get; set; }
            }
         }
In the preceding code snippet, we have successfully defined the model that will be used to represent our walk entries. In the next section, we will use this model to set up and initialize some walk entries for our main WalksPage using a ListView control, then use a DataTemplate to describe how the model data should be displayed for each row within the ListView.
As mentioned in the previous section, the WalksPage will essentially serve as the main entry point for our application. We will use our WalkEntries model to populate some static walks information data, then display this information within a ListView control using a DataTemplate. So let's get started by following these steps:
Firstly, create a new folder within the
TrackMyWalksPortable Class Library project solution calledPages, as you did in the previous section.Next, from the New File screen, select the Forms section within the left section pane.
Then, select the Forms ContentPage option in the right pane.
Next, enter
WalksPagefor the name of the new class to be created.Finally, click on the New button, as shown in the following screenshot:

Next, ensure that the
WalksPage.csfile is displayed within the code editor and enter in the following highlighted code sections.
        //
        // WalksPage.cs
        // TrackMyWalks
        //
        // Created by Steven F. Daniel on 04/08/2016.
        // Copyright © 2016 GENIESOFT STUDIOS. All rights reserved.
        //
        using System.Collections.Generic;
        using Xamarin.Forms;
        using TrackMyWalks.Models;

        namespace TrackMyWalks
        {
         public class WalksPage : ContentPage
         {
         public WalksPage()
         {
         var newWalkItem = new ToolbarItem
         {
         Text = "Add Walk"
         };
         newWalkItem.Clicked += (sender, e) =>
         {
          Navigation.PushAsync(new WalkEntryPage());
         };

         ToolbarItems.Add(newWalkItem);

         var walkItems = new List<WalkEntries>
         {
         new WalkEntries {
         Title = "10 Mile Brook Trail, Margaret River",
         Notes = "The 10 Mile Brook Trail starts in the Rotary Park
        near Old Kate, a preserved steam " +
         "engine at the northern edge of Margaret River. ",
         Latitude = -33.9727604,
         Longitude = 115.0861599,
         Kilometers = 7.5,
         Distance = 0,
         Difficulty= "Medium",
         ImageUrl = "http://trailswa.com.au/media/cache/media/
         images/trails/_mid/FullSizeRender1_600_480_c1.jpg"
         },
         new WalkEntries {
         Title = "Ancient Empire Walk, Valley of the Giants",
         Notes = "The Ancient Empire is a 450 metre walk trail
         that takes you around and through some of " +
         "the giant tingle trees including the most popular
        of the gnarled veterans, known as Grandma Tingle.",
         Latitude = -34.9749188,
         Longitude = 117.3560796,
         Kilometers = 450,
         Distance = 0,
         Difficulty = "Hard",
         ImageUrl = "http://trailswa.com.au/media/cache/media/
        images/trails/_mid/Ancient_Empire_534_480_c1.jpg"
         },
         };

         var itemTemplate = new DataTemplate(typeof(ImageCell));
         itemTemplate.SetBinding(TextCell.TextProperty, "Title");
         itemTemplate.SetBinding(TextCell.DetailProperty, "Notes");
         itemTemplate.SetBinding(ImageCell.ImageSourceProperty,
           "ImageUrl");

         var walksList = new ListView {

             HasUnevenRows = true,
             ItemTemplate = itemTemplate,
             ItemsSource = walkItems,
             SeparatorColor = Color.FromHex("#ddd"),
             };

         // Set up our event handler
         walksList.ItemTapped += (object sender,
         ItemTappedEventArgs e) =>
         {
         var item = (WalkEntries)e.Item;
         if (item == null) return;
         Navigation.PushAsync(new WalkTrailPage(item));
         item = null;
         };
         Content = walksList;
         }
         }
        }
In the preceding code snippet, we began by declaring our newWalkItem variable that instantiates from the ToolbarItem class which will be used to attach a new Add Walk button to the main toolbar of the base ContentPage.ToolbarItems collection to provide a way for users to add new walk trail information within the app.
Next, we create an event for our new WalkItem using the Clicked event of the ToolbarItem class, which will be used to navigate to the new WalksEntryPage.
In our next step, we declare a new variable walkItems that is a collection of list items to store each of our walk entries within our model and then use the DataTemplate class to describe how we want our model data to be displayed within each of the rows declared within the ListView.
Finally, we set up an event handler for our ListView that will be used to move to the WalksTrailPage to display information about the item selected.
In this section, we will begin building the user interface for our new WalkEntryPage. This page is called when the user clicks on the Add Walk button from the main page and will be used to allow the user a means of adding new walk information to be used within the application.
There are a number of ways you can go about presenting this information to collect data. For the purpose of this app, we will be using a TableView, but you could quite easily use a StackLayout and present this information as a series of Labels and EntryCells.
Let's begin by creating the new WalkEntryPage by performing the following steps:
Create a new
ContentPagecalledWalkEntryPage, as you did in the section entitled Creating the walks main page, located within this chapter.Next, ensure that the
WalkEntryPage.csfile is displayed within the code editor and enter in the following highlighted code sections:
        //
        // WalkEntryPage.cs
        // TrackMyWalks
        //
        // Created by Steven F. Daniel on 04/08/2016.
        // Copyright © 2016 GENIESOFT STUDIOS. All rights reserved.
        //
        using Xamarin.Forms;
        using TrackMyWalks.Models;
        using System.Collections.Generic;

        namespace TrackMyWalks
        {
         public class WalkEntryPage : ContentPage
         {
         public WalkEntryPage()
         {
         // Set the Content Page Title
         Title = "New Walk Entry";

         // Define our New Walk Entry fields
          var walkTitle = new EntryCell
         {
          Label = "Title:",
        Placeholder = "Trail Title"
         };
        var walkNotes = new EntryCell
        {
         Label = "Notes:",
         Placeholder = "Description"
         };
         var walkLatitude = new EntryCell
         {
         Label = "Latitude:",
         Placeholder = "Latitude",
         Keyboard = Keyboard.Numeric
         };
         var walkLongitude = new EntryCell
         {
         Label = "Longitude:",
         Placeholder = "Longitude",
         Keyboard = Keyboard.Numeric
         };
         var walkKilometers = new EntryCell
         {
         Label = "Kilometers:",
         Placeholder ="Kilometers",
         Keyboard = Keyboard.Numeric
         };
         var walkDifficulty = new EntryCell
         {
         Label = "Difficulty Level:",
         Placeholder ="Walk Difficulty"
         };
         var walkImageUrl = new EntryCell
         {
         Label = "ImageUrl:",
         Placeholder ="Image URL"
         };

         // Define our TableView
         Content = new TableView
         {
         Intent = TableIntent.Form,
         Root = new TableRoot
         {
         new TableSection()
         {
         walkTitle,
         walkNotes,
         walkLatitude,
         walkLongitude,
         walkKilometers,
         walkDifficulty,
         walkImageUrl
         }
         }
         };
         var saveWalkItem = new ToolbarItem {
         Text = "Save"
         };
         saveWalkItem.Clicked += (sender, e) => {
         Navigation.PopToRootAsync(true);
         };

         ToolbarItems.Add(saveWalkItem);
         }
         }
        }
In the preceding code snippet, we began by declaring a number of EntryCell labels for our user interface to capture information entered by the user for-Title, Notes, Latitude, Longitude, Kilometers, Difficulty and ImageURL. As you progress through this book, you will learn how to customize the look and feel of the EntryCells by creating a customized platform-specific picker for the Walk Difficulty and Kilometers.
Next, we define our TableView and add each of our EntryCell fields to the TableSection property of the TableView control. Each TableSection that is defined within a TableView consists of a heading and one or more ViewCells, which, in our case, are the EntryCell fields.
Finally, we declare and add a ToolbarItem called saveWalkItem to our ContentPageToolbarItems collection, then create an event that, when clicked, will save the walk information entered to the main walks page. Obviously, we will be refactoring the new WalkEntryPage throughout this book, which, when the Save button is pressed, will actually send this information to the server using a RESTful API and refresh the main TrackMyWalks page.
In this section, we will begin building the user interface for our WalksTrailPage. This page is called when the user clicks on an entry within the ListView on our TrackMyWalks main content page and will be used to display information associated with the chosen trail:
Create a new
ContentPagecalledWalkTrailPageas you did in the section entitled Creating the walks main page, located within this chapter.Next, ensure that the
WalkTrailPage.csfile is displayed within the code editor and enter the following highlighted code sections:
        //
        // WalkTrailPage.cs
        // TrackMyWalks
        //
        // Created by Steven F. Daniel on 04/08/2016.
        // Copyright © 2016 GENIESOFT STUDIOS. All rights reserved.
        //
        using Xamarin.Forms;
        using TrackMyWalks.Models;

        namespace TrackMyWalks
        {
         public class WalkTrailPage : ContentPage
         {
         public WalkTrailPage(WalkEntries walkItem)
         {
         Title = "Walks Trail";

         var beginTrailWalk = new Button
         {
         BackgroundColor = Color.FromHex("#008080"),
         TextColor = Color.White,
         Text = "Begin this Trail"
         };

         // Set up our event handler
         beginTrailWalk.Clicked += (sender, e) =>
         {
         if (walkItem == null) return;
         Navigation.PushAsync(new DistanceTravelledPage (walkItem));
         Navigation.RemovePage(this);
         walkItem = null;
         };

         var walkTrailImage = new Image()
         {
         Aspect = Aspect.AspectFill,
         Source = walkItem.ImageUrl
         };

         var trailNameLabel = new Label()
        {
         FontSize = 28,
         FontAttributes = FontAttributes.Bold,
         TextColor = Color.Black,
         Text = walkItem.Title
        };

         var trailKilometersLabel = new Label()
         {
         FontAttributes = FontAttributes.Bold,
         FontSize = 12,
         TextColor = Color.Black,
         Text = $"Length: { walkItem.Kilometers } km"
         };

         var trailDifficultyLabel = new Label()
         {
         FontAttributes = FontAttributes.Bold,
         FontSize = 12,
         TextColor = Color.Black,
         Text = $"Difficulty: { walkItem.Difficulty } "
         };

         var trailFullDescription = new Label()
         {
        FontSize = 11,
         TextColor = Color.Black,
         Text = $"{ walkItem.Notes }",
         HorizontalOptions = LayoutOptions.FillAndExpand
         };

         this.Content = new ScrollView
         {
         Padding = 10,
         Content = new StackLayout
         {
         Orientation = StackOrientation.Vertical,
         HorizontalOptions = LayoutOptions.FillAndExpand,
         Children =
         {
         walkTrailImage,
         trailNameLabel,
         trailKilometersLabel,
         trailDifficultyLabel,
         trailFullDescription,
         beginTrailWalk
         }
         }
         };
         }
         }
        }
In the preceding code snippet, we began by importing our TrackMyWalks.Models class as we will be using this to extract the information passed in from our WalksPage.
Next, we declare our beginTrailWalk variable that inherits from the Button class; then we set up the Clicked event of the Button class, which will be used to navigate to the DistanceTravelledPage content page when clicked to display information about our trail after removing our walks trail content page from the NavigationPage hierarchy.
In the next step, we declare an image variable walkTrailImage and set the Source property of the image to be the image of the selected walkItem from the ListView. We then declare and initialize a number of label objects that will contain the walkItem information that has been passed from the WalksPage content page ListView control and displayed.
Next, we define a ScrollView control that is part of the Xamarin.Forms.Core base class, then add each of our form Image and Label fields to the StackLayout control. The ScrollView control is a fantastic control that allows our ContentPage to scroll its contents should the information be too big to fit within the actual device's screen real estate.
In this section, we will need to add the Xamarin.Forms.Maps NuGet package to our core project, as well as for each of the platform-specific projects for both iOS and Android platforms. This package is required in order to use the Xamarin.FormsMap control in the DistanceTravelled content page that we will be building in the next section.
Right-click on the
TrackMyWalkssolution and choose the Add Packages... menu option, as shown in the following screenshot:
This will display the Add Packages dialog. Enter in
mapswithin the Search dialog and then select and click the Xamarin.Forms.Maps option within the list, as shown in the following screenshot:
Finally, click on the Add Package button to add the
Xamarin.Forms.MapsNuGet package to theTrackMyWalkscore solution.Repeat the same process to add the
Xamarin.Forms.MapsNuGet package for both the iOS and Android projects that are contained within theTrackMyWalkssolution.
Now that you have added the NuGet Package for the Xamarin.Forms Map, we can begin to utilize this control within the DistanceTravelled content page that we will be covering in the next section.
In this section, we will begin building the user interface for our DistanceTravelledPage content page. This page is called when the user clicks on the Begin this Trail button from the WalksTrailPage content page, which will be used to display information about the chosen trail, as well as placing a pin placeholder within the Xamarin.Forms.Maps control and calculating the distance travelled, and time taken:
Create a new
ContentPagecalledDistanceTravelledPageas you did in the previous section.Next, ensure that the
DistanceTravelledPage.csfile is displayed within the code editor and enter the following highlighted code sections:// // DistanceTravelledPage.cs // TrackMyWalks // // Created by Steven F. Daniel on 04/08/2016. // Copyright © 2016 GENIESOFT STUDIOS. All rights reserved. // using Xamarin.Forms; using Xamarin.Forms.Maps; using TrackMyWalks.Models; namespace TrackMyWalks { public class DistanceTravelledPage : ContentPage {Then, update the
DistanceTravelledPagemethod constructor to include thewalkItemparameter for the chosen walk, as shown by the following highlighted code sections:public DistanceTravelledPage(WalkEntries walkItem) { Title = "Distance Travelled";
Next, we declare a
trailMapvariable that will point to an instance of theXamarin.Forms.Mapscontrol to create a placeholder pin marker within the map control. Using the latitude and longitude coordinates, enter the following highlighted code sections:// Instantiate our map object var trailMap = new Map(); // Place a pin on the map for the chosen walk type trailMap.Pins.Add(new Pin { Type = PinType.Place, Label = walkItem.Title, Position = new Position(walkItem.Latitude, walkItem.Longitude) }); // Center the map around the list of walks entry's location trailMap.MoveToRegion(MapSpan.FromCenterAndRadius(new Position(walkItem.Latitude, walkItem.Longitude), Distance.FromKilometers(1.0)));
Then, we declare a number of
Labelobjects that contain ourwalkIteminformation, which has been passed from theWalkTrailPagecontent page so that we can trail related information. Enter in the following highlighted code sections:var trailNameLabel = new Label() { FontSize = 18, FontAttributes = FontAttributes.Bold, TextColor = Color.Black, Text = walkItem.Title }; var trailDistanceTravelledLabel = new Label() { FontAttributes = FontAttributes.Bold, FontSize = 20, TextColor = Color.Black, Text = "Distance Travelled", HorizontalTextAlignment = TextAlignment.Center }; var totalDistanceTaken = new Label() { FontAttributes = FontAttributes.Bold, FontSize = 20, TextColor = Color.Black, Text = $"{ walkItem.Distance } km", HorizontalTextAlignment = TextAlignment.Center }; var totalTimeTakenLabel = new Label() { FontAttributes = FontAttributes.Bold, FontSize = 20, TextColor = Color.Black, Text = "Time Taken:", HorizontalTextAlignment = TextAlignment.Center }; var totalTimeTaken = new Label() { FontAttributes = FontAttributes.Bold, FontSize = 20, TextColor = Color.Black, Text = "0h 0m 0s", HorizontalTextAlignment = TextAlignment.Center };
Next, we declare our
walksHomeButtonvariable that inherits from the Button class and proceed to set up our click handler, which will be used to navigate our app to the mainWalksPagecontent page when clicked. Enter the following highlighted code sections:var walksHomeButton = new Button { BackgroundColor = Color.FromHex("#008080"), TextColor = Color.White, Text = "End this Trail" }; // Set up our event handler walksHomeButton.Clicked += (sender, e) => { if (walkItem == null) return; Navigation.PopToRootAsync(true); walkItem = null; };
Then, we define a
ScrollViewcontrol that is part of theXamarin.Forms.Corebase class and proceed to add each of our formButtonandLabelfields to theStackLayoutcontrol. Enter the following highlighted code sections:this.Content = new ScrollView { Padding = 10, Content = new StackLayout { Orientation = StackOrientation.Vertical, HorizontalOptions = LayoutOptions.FillAndExpand, Children = { trailMap, trailNameLabel, trailDistanceTravelledLabel, totalDistanceTaken, totalTimeTakenLabel, totalTimeTaken, walksHomeButton } } }; } } }
In the preceding code snippet, we began by importing our TrackMyWalks.Models class as we will be using this to extract the information passed in from our WalksPage. The Xamarin.Forms.Maps NuGet package is a cross-platform library that allows developers to display and annotate information within the map. We will be using this control to create a pin placeholder within the map control, along with additional details associated with the trail.
Next, we declare our trailMap variable that points to an instance of the Xamarin.Forms.Maps control and create a placeholder pin marker within the map containing the details for the chosen trail, then center in on the map to show the area for our walks location, derived by the latitude and longitude coordinates. We then declare and initialize a number of Label objects that contain the walkItem information that has been passed from the WalkTrailPage content page and declare our walksHomeButton variable that inherits from the Button class, then set up the Clicked event for the Button class, which will be used to navigate back to the TrackMyWalks when clicked.
Finally, we define a ScrollView control that is part of the Xamarin.Forms.Core base class, then add each of our form Button and Label fields to the StackLayout control.
In our next section, we will need to initialize the Xamarin.Forms.Maps NuGet package library within each of our platform-specific start up classes (for example, AppDelegate.cs for iOS and MainActivity.cs for Android). Let's take a look at how we can achieve this by following the steps below.
Ensure that the
AppDelegate.csfile is displayed within the code editor and enter the following highlighted code sections:
        //
        //  AppDelegate.cs
        //  TrackMyWalks
        //
        //  Created by Steven F. Daniel on 04/08/2016.
        //  Copyright © 2016 GENIESOFT STUDIOS. All rights reserved.
        //
        using Foundation;
        using UIKit;

        namespace TrackMyWalks.iOS
        {
            [Register("AppDelegate")]
            public partial class AppDelegate :
        global::Xamarin.Forms.Platform.iOS.FormsApplicationDelegate
            {
                public override bool FinishedLaunching(UIApplication app,
        NSDictionary options)
                {
                    global::Xamarin.Forms.Forms.Init();
                    Xamarin.FormsMaps.Init();
                    LoadApplication(new App());
                    return base.FinishedLaunching(app, options);
                }
            }
        }
In the preceding code snippet, we began by initializing our AppDelegate class to use the Xamarin.Forms.Maps library, by adding the Xamarin.FormsMaps.Init which initializes the Xamarin.Forms platform, so that our TrackMyWalks solution can use the maps. If this is omitted from this class, the DistanceTravelledPage content page will not display the map and will not work as expected.
Note
For more information on Xamarin.Forms.Maps library, as well as the various types of different classes available, please refer to the Xamarin developer documentation at
https://developer.xamarin.com/api/namespace/Xamarin.Forms.Maps/
.
In this section, we will begin building the user interface for our Splash page which will only be used for the Android platform, since iOS already contains a method of achieving this. The splash page will simply display the default Xamarin icon, but as we progress throughout this book, we will be refactoring this page to include a more suitable image for our app:
Create a new
ContentPagecalledSplashPageas you did in the previous section.Next, ensure that the
SplashPage.csfile is displayed within the code editor and enter the following highlighted code sections:// // SplashPage.cs // TrackMyWalks // // Created by Steven F. Daniel on 04/08/2016. // Copyright © 2016 GENIESOFT STUDIOS. All rights reserved. // using System; using System.Threading.Tasks; using Xamarin.Forms; namespace TrackMyWalks { public class SplashPage : ContentPage {Then, locate the
SplashPageconstructor method and enter the following highlighted code sections:public SplashPage() { AbsoluteLayout splashLayout = new AbsoluteLayout { HeightRequest = 600 }; var image = new Image() { Source = ImageSource.FromFile("icon.png"), Aspect = Aspect.AspectFill, }; AbsoluteLayout.SetLayoutFlags(image, AbsoluteLayoutFlags.All); AbsoluteLayout.SetLayoutBounds(image, new Rectangle(0f, 0f, 1f, 1f)); splashLayout.Children.Add(image); Content = new StackLayout() { Children = { splashLayout } }; }Next, locate the
OnAppearingmethod and enter the following highlighted code sections:protected override async void OnAppearing() { base.OnAppearing(); // Delay for a few seconds on the splash screen await Task.Delay(3000); // Instantiate a NavigationPage with the MainPage var navPage = new NavigationPage(new WalksPage() { Title = "Track My Walks" }); Application.Current.MainPage = navPage; } } }
In the preceding code snippet, we began by importing our System.Threading.Tasks class. This class will be used to perform a slight delay to allow our user to see the splash screen, as defined within the OnAppearing class method.
We then create a splashLayout variable of type AbsoluteLayout that will be used to position and size each of the child elements proportionally within our view, and then set the HeightRequest property.
Next, we declare an image variable that inherits from the Image class; then assign the Source property to the image that we would like to use and set the images Aspect property so that the image fills the view.
In our final steps, we define values for both of the LayoutFlags and LayoutBounds properties on the AbsoluteLayout class so that the image resizes within the view. Then we add our splashLayout to the content page using the StackLayout control. Finally, we override the OnAppearing class method of the Xamarin.Forms.Page page life cycle, which gets called immediately prior to the page becoming visible on the screen, and then specify a delay of three seconds prior to instantiating a new instance of the NavigationPage, which will call our WalksPage to be the main content root page.
In this section, we need to initialize the App class of Xamarin.Forms library to call our SplashPage and set the root page for our application if the detected OS device is Android. Let's take a look at how we can achieve this:
Open the
TrackMyWalks.cslocated within theTrackMyWalksgroup and ensure that it is displayed within the code editor.Next, locate the
Appmethod and enter the following highlighted code sections, as shown in the following code snippet:
        //
        //  TrackMyWalks.cs
        //  TrackMyWalks
        //
        //  Created by Steven F. Daniel on 04/08/2016.
        //  Copyright ©2016 GENIESOFT STUDIOS. All rights reserved.
        //
        using Xamarin.Forms;

        namespace TrackMyWalks
        {
            public class App : Application
            {
                public App()
                {
                    // Check the Target OS Platform
                    if (Device.OS == TargetPlatform.Android)
                    {
                        MainPage = new SplashPage();
                    }
                    else
                    {
                        // The root page of your application
                        var navPage = new NavigationPage(new TrackMyWalks.
                         WalksPage()
                         {
                            Title = "Track My Walks"
                        });
                        MainPage = navPage;
                    }
                }
            }
        }
In the preceding code snippet, we began checking the Device.OS class to determine what OS Xamarin.Forms is running on, then used the TargetPlatform class to determine whether our app is being run on Google'sAndroid OS platform. If our app is running on Android, we set the App constructor methods MainPage to a new instance of the ContentPage that will simply use the SplashPage as the root page. Alternatively, we create a new instance of the NavigationPage class and set this to our WalksPage to be the main content root page for our ContentPage.
When developing cross-platform mobile apps, you currently have a choice of using either Xamarin Studio or Microsoft's Visual Studio development environments. It is worth noting that, although the screenshots and example code used throughout this book have been developed using Xamarin Studio running on an Apple Macintosh computer, the code should compile fine on a Windows machine running Microsoft Visual Studio 2015.
However, there are some differences that you need to be aware of before embarking on the journey of building your mobile development solutions. If you are running Xamarin Studio on a Windows machine, you will get an Android project solution whenever you create a new Xamarin.Forms solution.
If you want to integrate and develop apps for Windows Phone, you will need to ensure that you are running Microsoft Visual Studio on a Windows machine. When developing apps for iOS applications, you will need to prepare your Mac to be the Xamarin build host by firstly enabling Remote Login on your Mac within the System Preferences section, and then selecting the Mac to be the build host from within the Microsoft Visual Studio environment on your Windows machine.
Note
For more information on how to prepare your Mac to be the Xamarin build host, refer to the Xamarin developer documentation at https://developer.xamarin.com/guides/ios/getting_started/installation/windows/connecting-to-mac/.
Now that you have an understanding of the differences between Xamarin Studio and Microsoft Visual Studio, our next step is to compile, build and run the TrackMyWalks application within the iOS simulator.
In this section, we will take a look at how to compile and run the TrackMyWalks application. You have the option of choosing to run your application using an actual device, or choosing from a list of simulators available for an iOS device.
The version number of the simulator is dependent on the version of the iOS SDK that is installed on your computer. Perform the following steps:
To run the app, choose your preferred device from the list of available iOS simulators and select the Run menu option, as shown in the following screenshot:

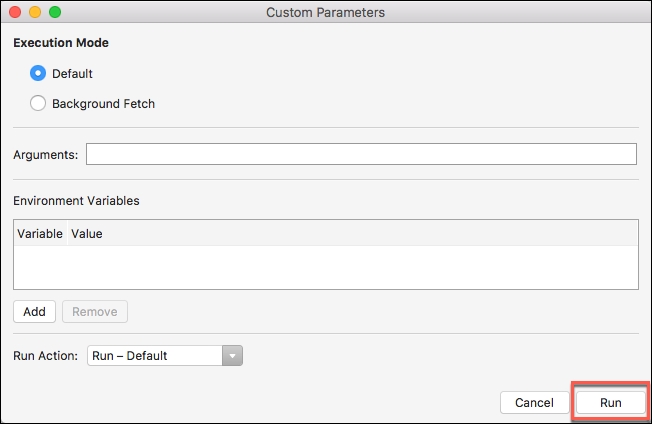
Next, choose the Run With sub-menu item, and then choose the Custom Configuration... then click on the Run button from the Custom Parameters dialog, as shown in the following screenshot:
Alternatively, you can also build and run the
TrackMyWalksapplication by pressing Command + Return key combinations.
When the compilation is complete, the iOS simulator will appear automatically and the TrackMyWalks application will be displayed, as shown in the following screenshot:
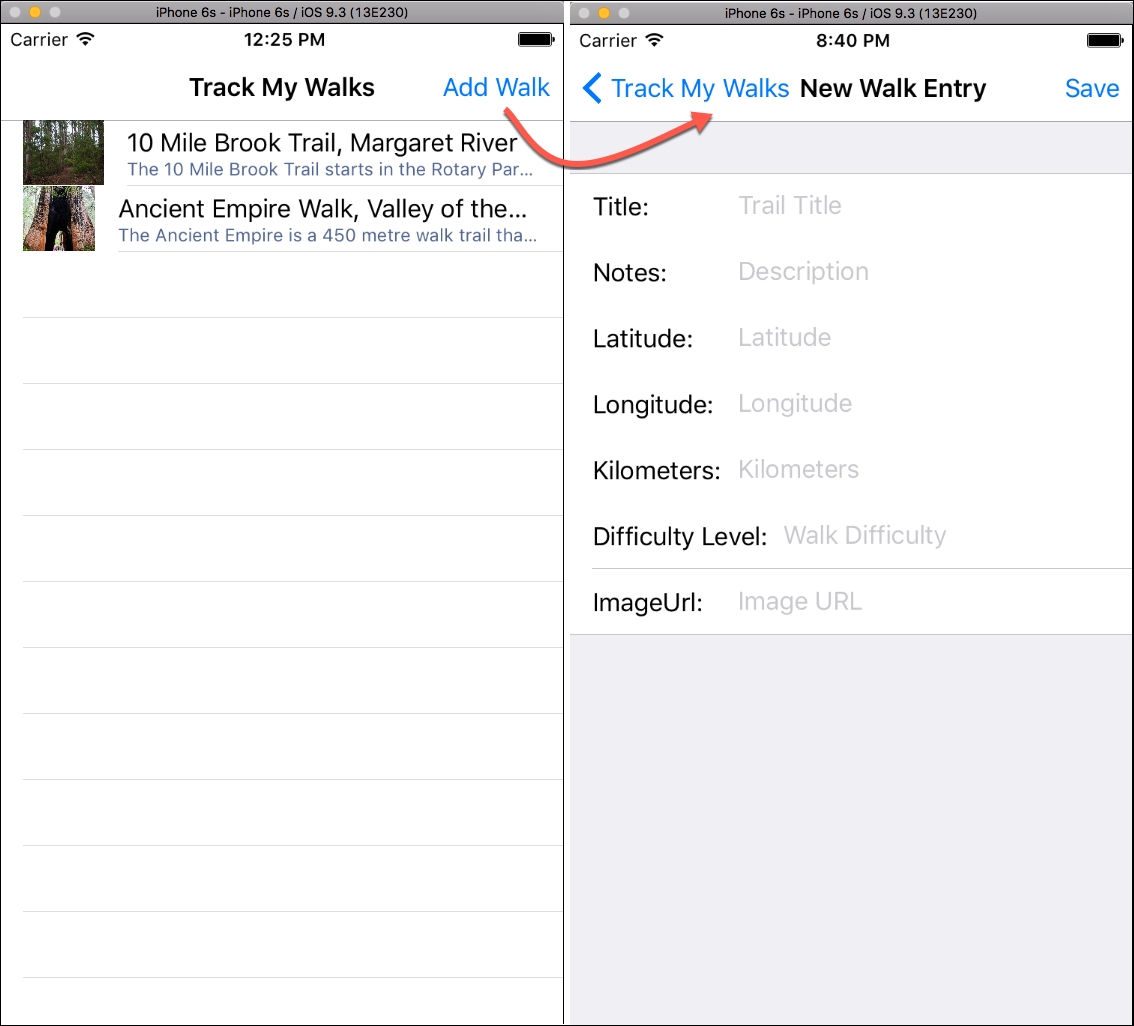
As you can see from the preceding screenshot, this currently displays a list of static walk trail entries, that are displayed within our ListView. When the user clicks on the Add Walk button link, this will display the new WalkEntry content page, so they can begin entering new Walk trail information.
Currently, this page doesn't save entered information, but as we progress throughout this book, we will be refactoring these pages to allow for this to happen. Upon clicking the Save button, the user will be redirected back to the main Track My Walks page.
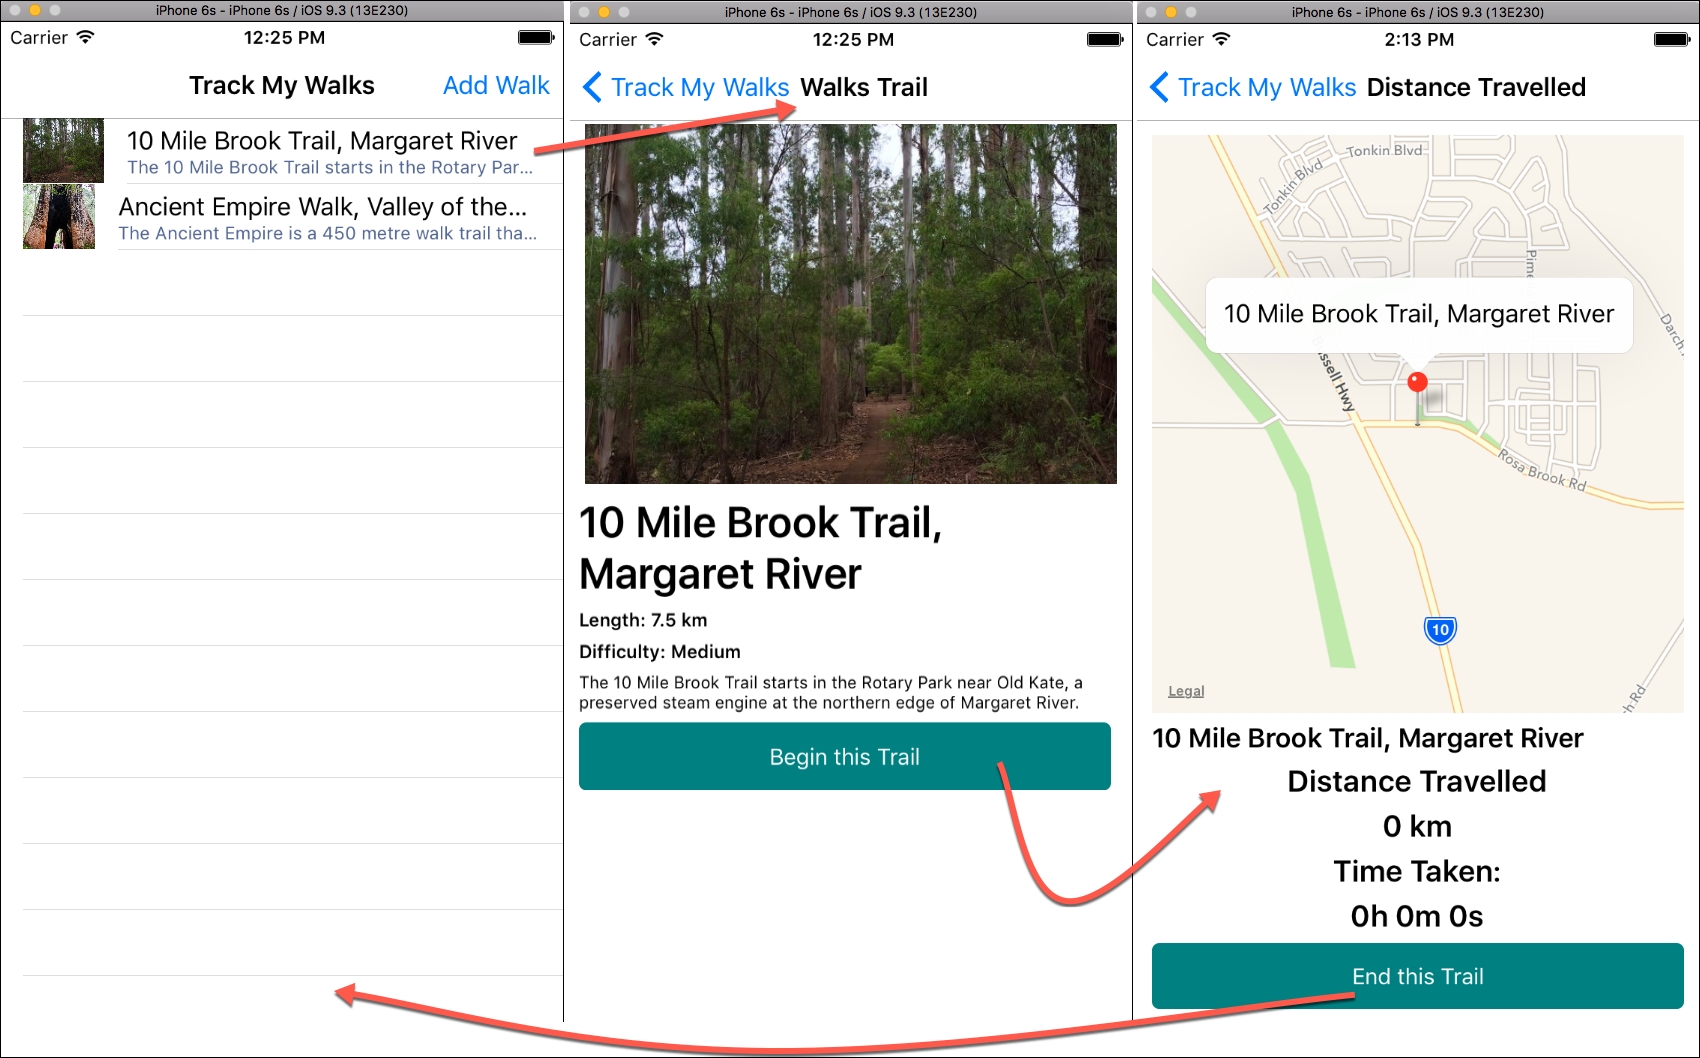
The preceding screenshot shows you the navigation flow between each of the pages when a trail has been selected from the list, with the final screen showing the distance travelled page along with the placeholder pin marker showing the trail location within the map view.
Congratulations, you have successfully built the foundation for the TrackMyWalks application, as well as the user interface for each of the content pages that will be used by our app. As we progress through this book, we will be enhancing our app to include better architectural design patterns, nicer looking user interface elements, as well as real-time data being synchronized through the use of RESTful web service APIs.
In this chapter we explored how to go about creating a Xamarin.Forms cross-platform application for both iOS and Android platforms. We then moved on to building a series of content pages with static data.
Next, we looked at how to use the default Xamarin.Forms navigation APIs to help move between each of the content pages, which we will refactor quite a bit when we cover this in Chapter 3, Navigating within the MVVM Model - The Xamarin.Forms Way to use a more flexible, customized navigation service. Finally, we talked about some of the differences between using Xamarin Studio and Microsoft Visual Studio for development, before running our TrackMyWalks app within the simulator.
In the next chapter, you will learn about the concepts behind the Model-View-View-Model (MVVM) pattern architecture, how to implement the MVVM model within your application, and the process of how to add new ViewModels to your Xamarin solution.

