


Installing and Managing Windows Server 2019
Now that we have taken a look at some of the features inside the graphical interface of Windows Server 2019, I realize that some of you may be sitting back thinking That's great to read about, but how do I really get started playing around with this for myself? Reading about technology is never as good as experiencing it for yourself, so we want some rubber to meet the road in this chapter. One of the biggest goals of this book is to make sure we enable you to use the product. Rattling off facts about new features and efficiencies is fine and dandy but ultimately worthless if you aren't able to make it work in real life. So, let's make this chunk of raw server metal do some work for us.
In this chapter, we will be covering the following:
- Requirements for installation
- Installing Windows Server 2019
- Installing roles and features
- Centralized management and monitoring
- Windows Admin Center (WAC)
- Enabling quick server rollouts with Sysprep
Technical requirements
When planning the build of a new server, many of the decisions that you need to make are licensing-type decisions. What roles do you intend to install on this server? Can the more common Server 2019 Standard edition handle it, or do we need the Datacenter edition for our purposes? Is Server Core going to be beneficial from a security perspective, or do we need the full Desktop Experience? In these days of Hyper-V Servers with the ability to spin up virtual machines on a whim, we oftentimes proceed without much consideration of the hardware of a server, but there are certainly still instances where physical equipment will be hosting the Windows Server 2019 operating system. In these cases, you need to be aware of the requirements for this new platform, so let us take a minute to list those specifics. This information is available in longer form on the Microsoft Docs website if you need to double-check any specifics, but here are your summarized minimum system requirements (https://docs.microsoft.com/en-us/windows-server/get-started-19/sys-reqs-19):
- CPU: 1.4 GHz 64-bit that supports a number of things—NX, DEP, CMPXCHG16b, LAHF/SAHF, PrefetchW, and SLAT.
- RAM: 512 MB ECC memory minimum, or a recommended 2 GB minimum for a server running Desktop Experience. I can tell you that it is possible to install and run Desktop Experience with far fewer than 2 GB (such as inside a test lab), but the performance of that server will not be on par with what it could be.
- Disk: Server 2019 requires a PCI Express (PCIe) storage adapter. ATA/PATA/IDE are not allowed for boot drives. The minimum storage space requirement is 32 GB, but Desktop Experience consumes about 4 GB more space than Server Core, so take that into consideration.
Those are sort of the bare minimum specs if you just want to spin up Server 2019 and poke around at it. For production systems, increase these numbers by a lot. There is no magic answer here—the specs you need depend on the workloads you expect to throw at your server. There are additional components that it would be good to look for when building a new system that are required for particular roles and features as well. Things such as UEFI and a TPM chip are quickly becoming mainstream and used by more and more services with every operating system update. In particular, if you are interested in security and protection via BitLocker or working with strong certificates or the new Shielded VMs, you will want to make sure that your systems include TPM 2.0 chips.
Installing Windows Server 2019
In general, the installation process for Microsoft operating systems has improved dramatically over the past 15 years. I assume that a lot of you, as IT professionals, are also the de facto neighborhood computer guru, being constantly asked by friends and family to fix or rebuild their computers. If you're anything like me, this means you are still occasionally rebuilding operating systems such as Windows XP. Looking at the bright blue setup screens and finding a keyboard with the F8 key are imperative to this process. To spend two hours simply installing the base operating system and bringing it up to the highest service pack level is pretty normal. Compared to that timeline, installation of a modern operating system such as Windows Server 2019 is almost unbelievably fast and simple.
It is very likely that the majority of readers have completed this process numerous times already, and, if that is the case, feel free to skip ahead a couple of pages. But for anyone new to the Microsoft world, or new to IT in general, I'd like to take just a couple of quick pages to make sure you have a baseline to get started with. Without earning your Installing an OS 101 badge on your tool belt, that shiny server will make for an interesting piece of wall art.
Burning that ISO
The first thing you must do is acquire some installation media. The most straightforward way to implement a single new server is to download an .ISO file from Microsoft, burn that .ISO to a DVD, and slide that DVD in to be used for installation. Since the website links and URLs are subject to change over time, the most trustworthy way to acquire your .ISO file to be used for installation is to open a search engine, such as Bing, and type Download Windows Server 2019. Once you have landed on the official Microsoft downloads page, click on the link to download your .ISO file and save it onto the hard drive of your computer.
The trickiest part of getting an .ISO file to be a workable DVD used to be the need to download some kind of third-party tool in order to burn it to a disc while making it bootable. If you are running an older client operating system on your computer, this may still be the case for you. I have watched many who are new to this process take the .ISO file, drag it over to their disc drive, and start burning the disc. This creates a DVD with the .ISO file on it, but that .ISO is still packaged up and not bootable in any way, so the disc would be worthless to your new piece of server hardware. Luckily, the newer versions of the Windows client operating systems have built-in functions for dealing with .ISO files that make the correct burning process very simple.
Once you have your .ISO file for the Windows Server 2019 installation downloaded onto your computer, insert a fresh DVD into your disc drive and browse to the new file. Simply right-click on the .ISO file, and then choose your menu option for Burn disc image. This launches a simple wizard that will extract and burn your new .ISO file the correct way onto the DVD, making it a bootable installation media for your new server, as shown in Figure 2.1:

Figure 2.1: Burning your .ISO file onto DVD
It is probable when you attempt to download Windows Server 2019 and use this Windows Disc Image Burner utility with a DVD that you grabbed off your stack of standard blank DVDs, that you will receive the following error message: The disc image file is too large and will not fit on the recordable disc.
This should come as no surprise because our operating system installer files have been getting larger and larger over the years. We have now reached the critical tipping point where the standard Server 2019 ISO installer is larger than a standard 4.7 GB DVD disc. To burn this ISO onto a DVD, you will need to hit the store and find some dual-layer discs that can handle more data.
Creating a bootable USB stick
DVDs can be cumbersome and annoying, and now they are also too small for our purposes. Therefore, when installing the newer, larger operating systems it is becoming commonplace to prep a USB stick to use for the installation of the operating system, rather than relying on a DVD.
To do this, all you need is a Windows computer, a USB stick that is at least 8 GB, and access to the internet. You will need to download the same ISO that we discussed earlier, as that contains all of the installation files for Server 2019. Then you will also need to download and install some kind of bootable USB creation tool. There are various free ones available (Rufus is pretty popular), but the one straight from Microsoft is called the Windows 7 USB/DVD Download Tool. Why does it have this crazy name that includes the words Windows 7 right in it? Don't ask me.
But, it works nonetheless and is a quick, easy, and free way to prep your bootable USB sticks for fresh operating system installations. I should point out that this tool has nothing to do with Windows 7. It will take any .ISO file and turn it into a bootable USB stick. That ISO can be a Windows 10 or Server 2019 ISO file and it still works just fine. You can also install and run the Windows 7 USB/DVD Download Tool on a Windows 10 workstation without any trouble.
Once the USB DVD Download Tool is installed, launch the application and simply walk through the 4-step wizard.
This process will erase and format your USB stick. Make sure nothing important is stored there!
You will need to identify the ISO that you want the tool to grab information from, then choose your USB stick from a drop-down list. After that, simply click the Begin copying button and this tool will turn your USB stick into a bootable stick capable of installing the entire Windows Server 2019 OS, as shown in Figure 2.2:
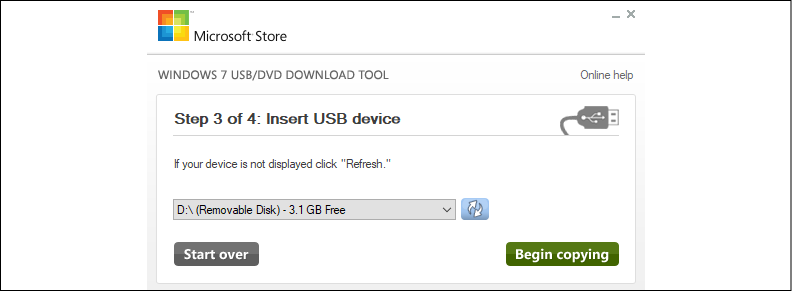
Figure 2.2: Creating a bootable USB stick
Running the installer
Now go ahead and plug your newly created DVD or bootable USB into the new server hardware. Boot to it, and you will finally see the installation wizard for Windows Server 2019. Now, there really are not that many options for you to choose from within these wizards, so we won't spend a lot of time here. For the most part, you are simply clicking on the Next button in order to progress through the screens, but there are a few specific places where you will need to make decisions along the way.
After choosing your installation language, the next screen seems pretty easy. There's just a single button that says Install now. Yes, that is what you want to click on, but I want you to notice the text in the lower-left corner of your screen. If you are ever in a position where you have a server that cannot boot and you are trying to run some recovery or diagnostic functions in order to resolve that issue, you can click on Repair your computer in order to launch into the recovery console. But for our fresh server installation, go ahead and click on Install now, as shown in Figure 2.3:
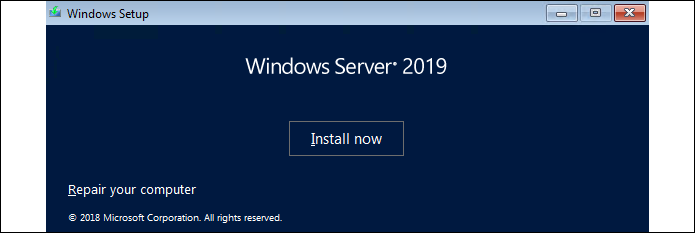
Figure 2.3: Installing Windows Server 2019
You will now be asked to input a product key to activate Windows. If you have your keys already available, go ahead and enter one now. Otherwise, if you are simply installing this to test Server 2019 and want to run in trial mode for a while, you can click on the link that says I don't have a product key in order to bypass this screen.
The next screen is an interesting one, and the first place that you really need to start paying attention. You will see four different installation options for Windows Server 2019. There are what seem to be the "regular" installers for both Server 2019 Standard as well as Server 2019 Datacenter, and then a second option for each that includes the words Desktop Experience. Typically, in the Microsoft installer world, clicking on Next through every option gives you the most typical and common installation path for whatever it is that you are installing. Not so with this wizard. If you simply glide by this screen by clicking on Next, you will find yourself at the end with an installation of Server Core. We will talk more about Server Core in a later chapter of the book, but for now, I will just say that if you are expecting to have a server that looks and feels like what we talked about in Chapter 1, Getting Started with Windows Server 2019, this default option is not going to be the one that gets you there. This "Desktop Experience" that the wizard is talking about is the full Windows Server graphical interface, which you are more than likely expecting to see once we are done with our installation. So, for the purposes of our installation here, where we want to interact with the server using full color and a mouse, go ahead and decide whether you want the Standard or Datacenter edition, but make sure you choose the option that includes Desktop Experience before clicking on the Next button, as shown in Figure 2.4:
Figure 2.4: Windows Server 2019 installation options
In some previous versions of Windows Server, we had the ability to migrate back and forth from a full Desktop Experience to Server Core and back again, even after the operating system was installed. This does not work in Windows Server 2019! The ability to transition between the two modes has disappeared, so it is even more important that you plan your servers properly from the beginning.
The next screen details licensing terms to which you need to agree, and then we come to another screen where the top option is most likely not the one that you intend to click on. I do understand why the Upgrade function is listed first for a consumer-class Windows 10 machine, but it has historically been a pretty rare occurrence that administrators accomplish in-place upgrades to Windows Servers. In a perfect world where everything always works flawlessly following upgrades, this would be a great way to go. You could have many servers all doing their jobs, and every time that a new operating system releases, you simply run the installer and upgrade them. Voila—magic! Unfortunately, it doesn't always work like that, and I almost never see server administrators willing to take the risks in doing an in-place upgrade to an existing production server. It is much more common that we are always building brand new servers alongside the currently running production servers. Once the new server is configured and ready to accept its responsibilities, then, and only then, does the actual workload migrate over to the new server from the old one. In a planned, carefully sculpted migration process, once the migration of duties is finished, then the old server is shut down and taken away.
If we were able to simply upgrade the existing servers to the newest operating system, it would save an awful lot of time and planning. But this is only feasible when you know that the upgrade is actually going to work without hiccups, and most of the time we are not prepared to take that risk. If an upgrade process goes sideways and you end up with a broken server, then you are looking at a costly repair and recovery process on a business-critical production server. You may very well be looking at working through the night or weekend as well. Would you rather spend your time planning a carefully formed cutover, or recovering a critical server with the business breathing down your neck because they cannot work? My money is on the former.
Microsoft has announced that the Windows Server 2019 installer handles upgrades from Windows Server 2016 much better than any other Windows Server in-place upgrade path in history. Now that I have done a number of them in the wild, I have to say that I agree! Upgrading from any Server version earlier than 2016 is still recommended to be a lift and shift, prepping a brand new server and moving the workload, but if you are already running Server 2016 and are looking to move to Server 2019, in-place upgrades are now a real possibility. However, there are still particular roles that will not accept change like this and would fail following such an upgrade, so as to whether or not in-place upgrades from 2016 to 2019 are a reality in the real world…I guess that's up to you...
Now back to the topic at hand. In the Windows Server world, we rarely touch the Upgrade option. So go ahead and choose the Custom: Install Windows only (advanced) option, which is where we will get into our options for installing this copy of Windows Server 2019 fresh into a new location on the hard drive, as shown in Figure 2.5:
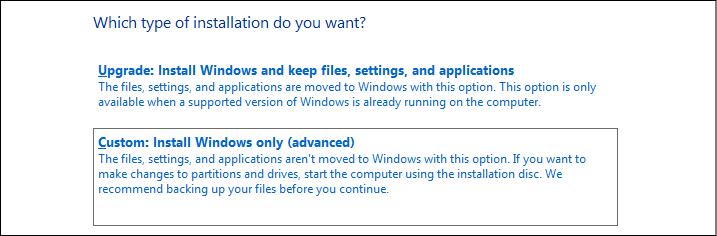
Figure 2.5: In-place upgrade or Custom installation
Now we decide where we want to install our new copy of Windows Server 2019. In many cases, you will simply click on Next here, because your server will have just a single hard disk drive, or maybe a single RAID array of disks, and, in either case, you will see a single pool of free space onto which you can install the operating system. If you have multiple hard drives installed on your server and they have not been tied together in any way yet, then you will have multiple choices here of where to install Windows Server. We have just a single hard disk attached here, which has never been used, so I can simply click on Next to continue. Note here that if your drives had existing or old data on them, you have the opportunity here, with some disk management tools, to format the disk, or delete individual partitions. If you are using some specialized disks that take specific drivers, there is also a Load driver button that you can use to inject these special drivers into the installation wizard in order to view these kinds of disks.
Also, it is important to note on this screen that while there is a button to create a New disk partition, you do not have to do this in order to continue. Many new admins assume that you must manually create the partition so Windows knows where to install its files. On the contrary, if you have unallocated space selected as I do in Figure 2.6 and then simply click Next, the installer will take care of creating the necessary partitions for you:
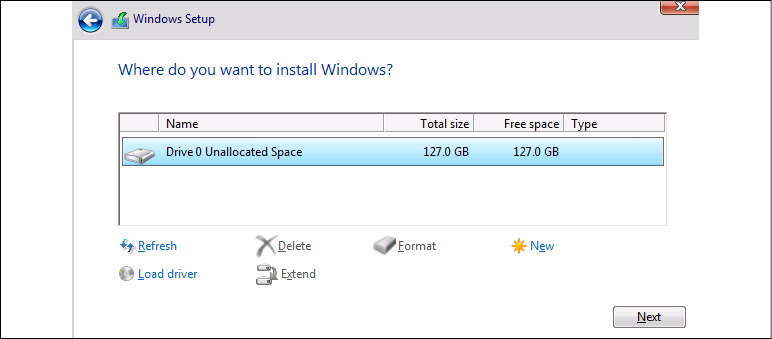
Figure 2.6: Windows installation destination
That's it! You will see the server installer start going to town copying files, installing features, and getting everything ready on the hard drive. This part of the installer runs on its own for a few minutes, and the next time you need to interact with the server it will be within the graphical interface where you get to define the administrator password. Once you have specified a password, you will find yourself on the Windows desktop. Now you are really ready to start making use of your new Windows Server 2019.
Installing roles and features
Installing the operating system gets your foot in the door, so to speak, using your server as a server. However, you can't actually do anything useful with your server at this point. On a client desktop system, the base operating system is generally all that is needed to start working and consuming data. The server's job is to serve up that data in the first place, and, until you tell the server what its purpose is in life, there really isn't anything useful happening in that base operating system. This is where we need to utilize roles and features. Windows Server 2019 contains many different options for roles. A role is just what the name implies: the installation of a particular role onto a server defines that server's role in the network. In other words, a role gives a server some purpose in life. A feature, on the other hand, is more of a subset of functions that you can install onto a server. Features can complement particular roles or stand on their own. There are pieces of technology available in Windows Server 2019 that are not installed or turned on by default because these features wouldn't be used in all circumstances. Everything in the later chapters of this book revolves around the functionality provided by roles and features. They are the bread and butter of a Windows server, and, without their installation, your servers make good paperweights, but not much else. As we will not be taking the time in each chapter to cover the installation of every particular role or feature that will be used within the chapter, let's take some time right now to cover the most common paths that admins can take in order to get these roles and features installed onto their own servers.
Installing a role using the wizard
Without a doubt, the most common place that roles and features get installed is right inside the graphical wizards available as soon as your operating system has been installed. By default, a tool called Server Manager launches automatically every time you log into Windows Server 2019. We will take a closer look at Server Manager itself later in this chapter, but, for our purposes here, we will simply use it as a launching platform in order to get to our wizard, which will guide us through the installation of our first role on this new server we are putting together.
Since you have just logged into this new server, you should be staring at the Server Manager dashboard. Right in the middle of the dashboard, you will see some links available to click on, a quick-start list of action items numbered one through five. If you haven't already done so, put into place any local server configuration that you may need on this machine through the first link, which is called Configure this local server.
Items that you will likely want in place are things such as a permanent hostname for the server, IP addressing, and, if you are joining this server to an existing domain (we will discuss domains in Chapter 3, Active Directory), you typically handle that process prior to implementing any new roles on the server. But, in our case, we are more specifically interested in the role installation itself, so we will assume that you have already configured these little bits and pieces to have your server identified and routing on your network.
Go ahead and click on step 2, Add roles and features. Another way you can launch the same wizard is by clicking on the Manage menu from the top bar inside Server Manager and then choosing Add Roles and Features from the drop-down list. Selecting either link will bring you into our wizard for installation of the roles, as shown in Figure 2.7:
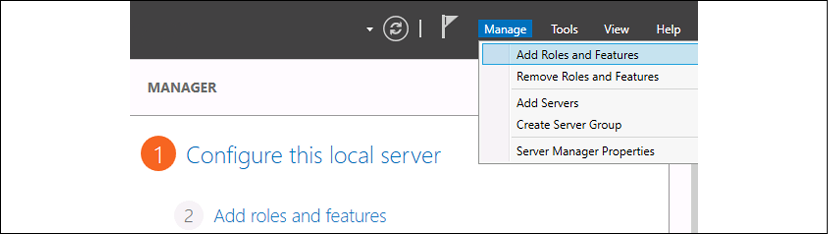
Figure 2.7: Adding roles
You are first taken to a summary screen about installing roles. Go ahead and click on Next to bypass this screen. Now we get into our first option, which is an interesting one. We are first asked if we want to continue with a role-based or feature-based installation, which is exactly what we have been talking about doing. But the second option here, Remote Desktop Services installation, is important to note. Most of us consider the Remote Desktop Services (RDS) components of Windows Server to be just another role that we can choose when setting up our server, similar to the installation of any other role. While that is basically true, it is important to note that RDS is so functionally different from the other kinds of roles that the entry path into the installation of any of the RDS components invokes its own wizard, by choosing the second option here. So, if you ever find yourself looking for the option to install RDS, and you have glossed over this screen because you are so used to clicking Next through it like I am, remember that you need to head back there to tell the wizard that you want to deal with an RDS component, and the remainder of the screens will adjust accordingly.
At the moment, I am working on building out a new test lab full of Windows Server 2019 boxes, and I am still in need of a domain controller (DC) to manage Active Directory in my environment. Before installing Active Directory on a server, it is critical that I have a few prerequisites in place, so I have already accomplished those items on my new server. The items that I need to have in place prior to the AD DS role installation are: having a static IP address assigned and making sure that the DNS server setting in my NIC properties points somewhere, even if only to this server's own IP address. I also need to make sure that the hostname of my server is set to its final name, because once you turn it into a domain controller it is not supported to change the hostname. I have already accomplished these items on my server, so I will continue through my role installation wizard here by leaving the option Role-based or feature-based installation and clicking on Next, as shown in Figure 2.8:
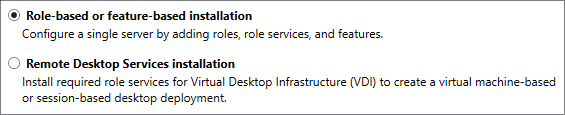
Figure 2.8: Select Role-based or feature-based installation
Our Server Selection screen is a very powerful one. If you've been through this process before, you have likely glossed over this screen, simply clicking on the Next button in order to progress through it. But, essentially, what this screen is doing is asking you where you would like to install this new role or feature. By default, each server will only have itself listed on this screen, and so clicking on Next to continue is more than likely what you will be doing. But there are a couple of neat options here. First of all, if your Server Manager is aware of other servers in your network and has been configured to monitor them, you will have the option here to install a role or feature remotely onto one of the other servers. We will dig a little deeper into this capability shortly. Another feature on this page, which I haven't seen many people utilize, is the ability to specify that you want to install a role or feature onto a virtual hard disk. Many of us work with mostly virtual servers in this day and age, and you don't even need your virtual server to be running in order to install a role or feature to it! If you have access to the .VHDX file, the hard disk file, from where you are running Server Manager, you can choose this option, which will allow you to inject the new role or feature directly into that hard drive. But, as is the case 99% of the times that you will wander through this screen, we are logged directly into the server where we intend to install the role, and so we simply click on Next, as shown in Figure 2.9:
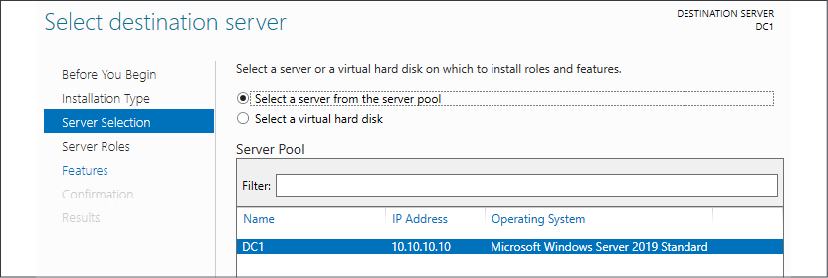
Figure 2.9: Selecting the destination server
Now we have our list of roles that are available to be installed. Clicking on each role will give you a short description of the purpose of that role if you have any questions, and we will also be talking more about the core infrastructural pieces in our next few chapters to give you even more information about what the roles do. All we need to do here in order to install a role onto our new server is check the box and click on Next. Since this is going to be a domain controller, I will choose the Active Directory Domain Services role, and I will multipurpose this server to also be a DNS server and a DHCP server. With these roles, there is no need to rerun through this wizard three separate times to install all of these roles; I can simply check them all here and let the wizard run the installers together. Whoops, when I clicked on my first checkbox, I got a pop-up message that the Active Directory Domain Services role requires some additional features in order to work properly. This is normal behavior, and you will notice that many of the roles that you install will require some additional components or features to be installed. All you need to do is click on the Add Features button, and it will automatically add in these extra pieces for you during the installation process. An example of this is shown in Figure 2.10:
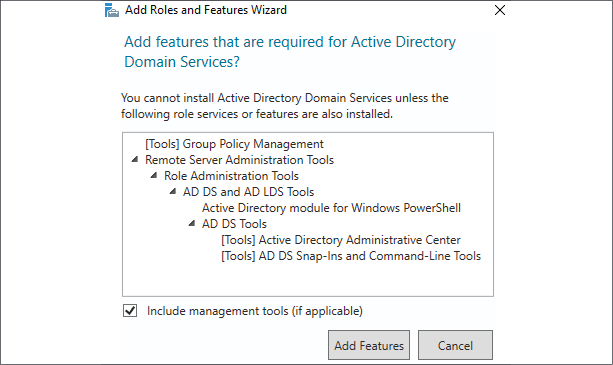
Figure 2.10: Additional features
Now that we have all three of our roles checked, it's time to click on Next. And, just to make it clear to all of you readers, I was not required to install all of these roles at the same time; they are not all dependent on each other. It is very common to see these roles all installed onto the same server, but I could split them up onto their own servers if I so desired. In a larger environment, you may have AD DS and DNS installed together, but you might choose to put the DHCP role onto its own server, and that is just fine.
I am configuring this server to support a small lab environment, so, for me, it makes sense to put these core infrastructure services together in the same box, as shown in Figure 2.11:
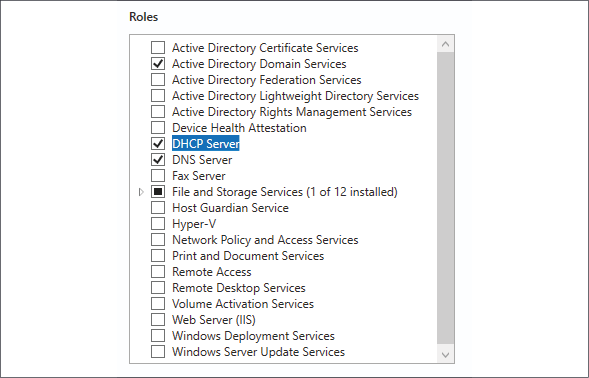
Figure 2.11: Role selection
After clicking on Next, we have now landed on the page where we can install additional features to Windows Server 2019. In some cases, you may have originally intended only to add a particular feature, and in these cases, you would have bypassed the Server Roles screen altogether, and gone immediately to the Features installation screen. Just like with the role installation screen, go ahead and check off any features that you would like to install, and click on Next again. For our new domain controller, we do not currently require any additional features to be specifically added, so I will just finish out the wizard, which starts the installation of our new roles.
After the installation process has been completed, you may or may not be prompted to restart the server, depending on which roles or features you installed and whether or not they require a restart. Once you have landed back inside Server Manager, you will notice that you are now being prompted near the top with a yellow exclamation mark. Clicking here displays messages about further configurations that may be required in order to complete the setup of your new roles and make them live on the server. The roles for AD DS, DNS, and DHCP are now successfully installed, but there is some additional configuration that is now required for those roles to do their work. For example, to finish turning my server into a domain controller, I need to run through a promotion process to define my domain, or to specify an existing domain that I want to join. There are also some loose ends that I need to tie up before putting DHCP into action:
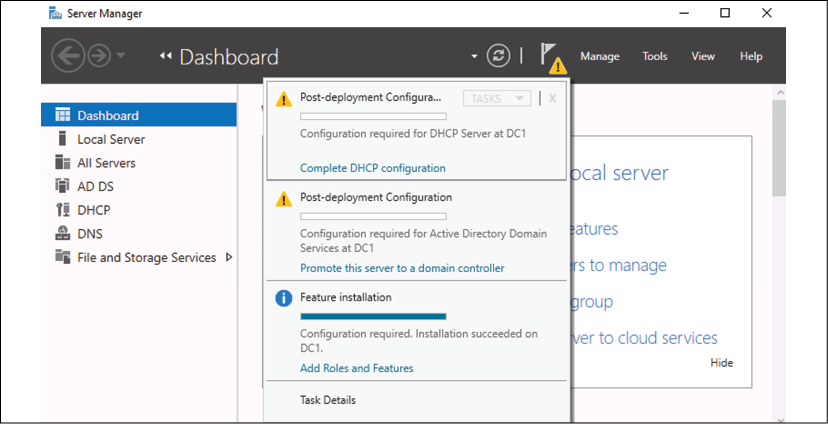
Figure 2.12: Post-deployment Configuration
Installing a feature using PowerShell
Now that you have seen the graphical wizards for installing roles and features, you could certainly always use them to put these components into place on your servers. But Microsoft has put much effort into creating a Windows Server environment where almost anything within the operating system can be manipulated using PowerShell, and the addition of roles and features is included in those capabilities. Let's take a look at the appropriate commands we can use to manipulate roles and features on our server right from a PowerShell prompt. We will view the available list of roles and features, and we will also issue a command to install a quick feature onto our server.
Open up an elevated PowerShell prompt, most easily accomplished via the quick admin tasks menu, accessed by right-clicking on the Start button. Then use the following command to view all of the available roles and features that we can install onto our server. It will also show you which ones are currently installed:
Get-WindowsFeature
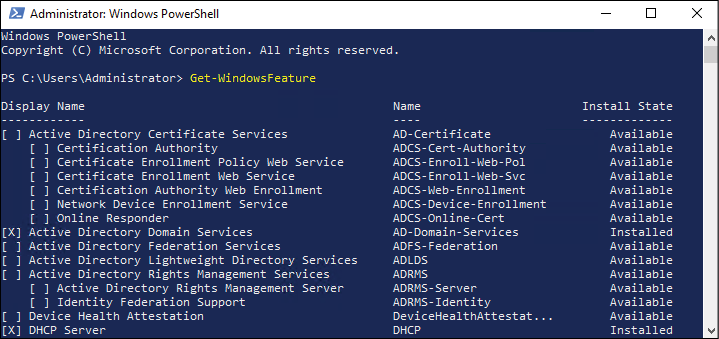
Figure 2.13: A list of all the roles and features available and installed
What I would like to do on this server is install the Telnet Client feature. I use Telnet Client pretty regularly for testing network connections, so it is helpful to have on this machine. Unfortunately, my PowerShell window currently has pages and pages of different roles and features in it, and I'm not sure what the exact name of the Telnet Client feature is in order to install it. So, let's run Get-WindowsFeature again, but this time let's use some additional syntax in the command to pare down the amount of information being displayed. I want to see only the features that begin with the letters TEL, as shown in the following examples:
Get-WindowsFeature -Name TEL*

Figure 2.14: A list of features beginning with the letters TEL
There it is! Okay, so now that I know the correct name of the feature, let's run the command to install it, as shown in the following example:
Add-WindowsFeature Telnet-Client
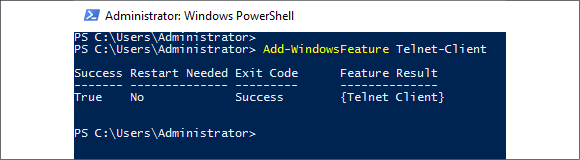
Figure 2.15: Install Telnet Client
One last thing to show you here—there is also a way to manipulate the Get-WindowsFeature cmdlet in order to quickly show only the roles and features currently installed on a server. Typing Get-WindowsFeature | Where Installed presents us with a list of the currently installed components. If I run that on my domain controller, you can see all the parts and pieces of my roles for AD DS, DNS, and DHCP, as well as my newly installed Telnet Client feature, as shown in Figure 2.16:

Figure 2.16: A list of all installed components
Centralized management and monitoring
Whether you are installing new roles, running backups and maintenance programs, or troubleshooting and repairing a server, it is common sense that the first thing you would do is log directly into the server that you need to work on. Long ago this meant walking up to the server itself and logging on with the keyboard and mouse that were plugged right into that hardware. Then, quite a number of years ago, this became cumbersome and technology advanced to the point where we had the Remote Desktop Protocol (RDP) available to us. We quickly transitioned over to log into our servers remotely using RDP. Even though it's been around for many years, RDP is still an incredibly powerful and secure protocol, giving us the ability to quickly connect to servers from the comfort of our desk. And, as long as you have proper network topology and routing in place, you can work on a server halfway around the world just as quickly as one sitting in the cubicle next to you. In fact, I recently read that mining rights were being granted in outer space. Talk about a co-location for your datacenter! Maybe someday we will be using RDP to connect to servers in outer space. While this might be a stretch in our lifetimes, I do have the opportunity to work with dozens of new companies every year, and, while there are some other tools available for remotely managing your server infrastructure, RDP is the platform of choice for 99% of us out there.
Why talk about RDP? Because you probably all use it on a daily basis, and I needed to let you know that Windows Server 2019 includes some tools that make it much less necessary to our day-to-day workflow. The idea of centralized management in the server world has been growing through the last few Windows Server operating system rollouts. Most of us have so many servers running that checking in with them all daily would consume way too much time. We need some tools that we can utilize to make our management and monitoring, and even configuration processes, more efficient in order to free up time for more important projects.
Server Manager
If you have worked on Windows Server recently, you are familiar with the idea that logging into any of your servers automatically invokes a large window on top of the desktop. This auto-launching program is Server Manager. As the name implies, it's here to help you manage your server. However, in my experience, the majority of server administrators do not utilize Server Manager. Instead, they close it as fast as they can and curse at it under their breath, because it's been popping up and annoying them during every server login for the past 10 years.
Stop doing that! It's here to help, I promise. Figure 2.17 shows the default view of Server Manager on my new domain controller:
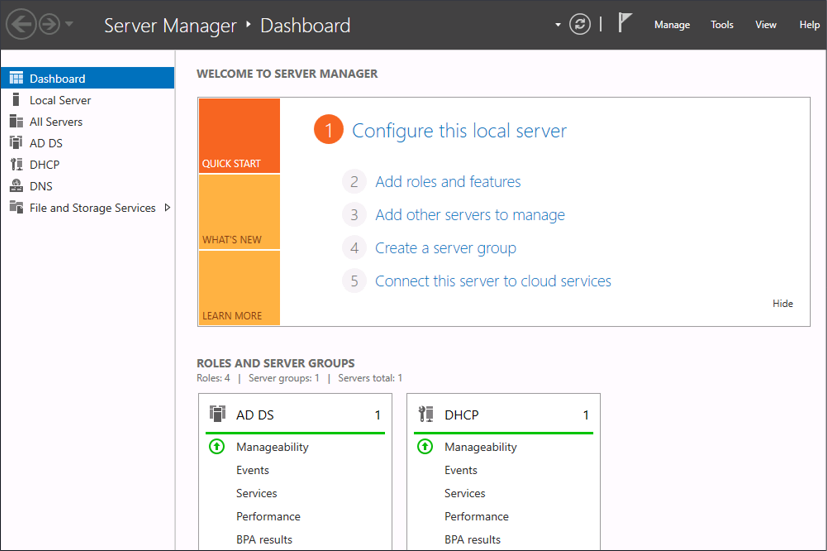
Figure 2.17: Server Manager on my domain controller
What I like about this opening automatically is that it gives me a quick look into what is currently installed on the server. Looking at the column on the left side shows you the list of roles installed and available for management. Clicking on each of these roles brings you into some more particular configuration and options for the role itself. I often find myself hopping back and forth between many different servers while working on a project, and leaving Server Manager open gives me a quick way of double-checking that I am working on the correct server. The ROLES AND SERVER GROUPS section at the bottom is also very interesting. You might not be able to see the colors in the picture if you are reading a printed copy of this book, but this gives you a very quick view into whether or not the services running on this server are functioning properly. Right now, both my AD DS and DHCP functions are running normally, I have a nice green bar running through them. But, if anything was amiss with either of these roles, it would be flagged bright red, and I could click on any of the links listed under those role headings in order to track down what the trouble is.
Up near the top-right corner, you see a few menus, the most useful of which, to me, is the Tools menu. Click on that, and you see a list of all the available Administrative Tools to launch on this server. Yes, this is essentially the same Administrative Tools folder that has existed in each of the previous versions of Windows Server, now stored in a different location. Based on my experience, Server Manager is now the easiest way to access this myriad of tools all from a single location:
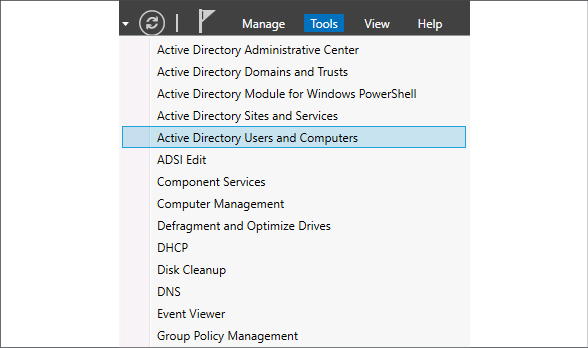
Figure 2.18: The Tools menu in Server Manager
So far, the functions inside Server Manager that we have discussed are available on any installation of Windows Server 2019, whether it is standalone or part of a domain. Everything we have been doing is only dealing with the local server that we are logged into. Now, let's explore what options are available to us in Server Manager for the centralization of management across multiple servers. The new mentality of managing many servers from a single server is often referred to as managing from a single pane of glass. We will use Server Manager on one of our servers in the network to make connections to additional servers, and after doing that we should have much more information inside Server Manager that we can use to keep tabs on all of those servers.
Front and center inside the Server Manager console is the section entitled Welcome to Server Manager. Under that, we have a series of steps or links that can be clicked on. The first one lets you configure settings that are specific only to this local server. We have already done some work with the second step when we added a new role to our server. Now we will test out the third step, Add other servers to manage.
By the way, this same function can also be called by clicking on the Manage menu at the top, and then choosing Add Servers., as shown in Figure 2.19:
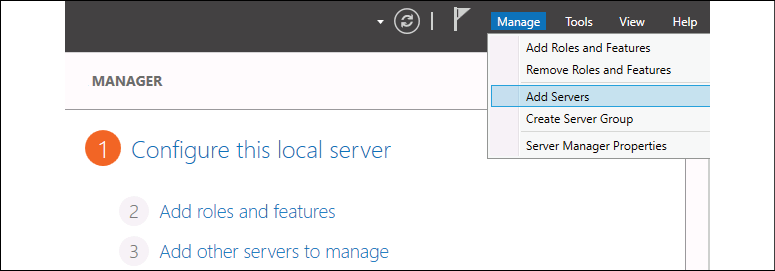
Figure 2.19: Adding servers
Most of you will be working within a domain environment where the servers are all domain-joined, which makes this next part really easy. Simply click on the Find Now button, and the machines available within your network will be displayed. From here, you can choose the servers that you want to manage, and move them over to the Selected column on the right, as shown in Figure 2.20:
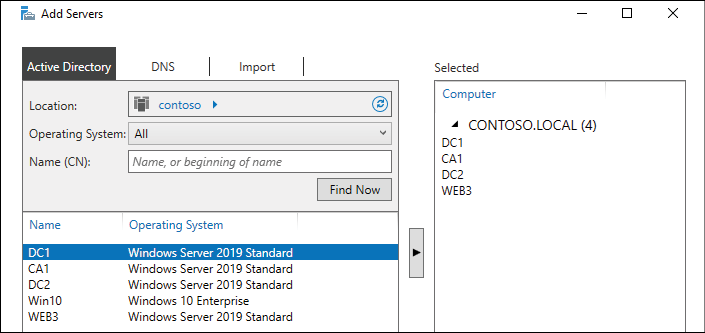
Figure 2.20: Select the servers you want to manage
After clicking OK, you will see that Server Manager has transformed in order to give you more information about all of these servers and roles that are installed on them. Now when you log into this single server, you immediately see critical maintenance information about all of the systems that you have chosen to add here. You could even use one dedicated server to handle the management of your whole arsenal of servers. For example, I am currently logged into a brand new server called CA1. I do not have any roles installed on this server, so, by default, Server Manager looks pretty basic. As soon as I add other servers (my domain controllers) to be managed, my Server Manager on the CA1 server now contains all of the details about CA1 and my domain controllers, so I can view all facets of my infrastructure from this single pane. As you can see in Figure 2.21, I even have some flags here indicating that some services are not running properly within my infrastructure:

Figure 2.21: Managing servers on Server Manager Dashboard
Clicking on the All Servers link, or into one of the specific roles, gives you even more comprehensive information collected from these remote servers. Adding multiple servers into Server Manager is not only useful for monitoring but for future configurations as well. You remember a few pages ago when we added a new role using the wizard? That process has now evolved to become more comprehensive, since we have now tapped this server into our other servers in the network.
If I now choose to add a new role from inside Server Manager that is aware of multiple servers in the network, when I get to the screen asking me where I want to install that role, I see that I can choose to install a new role or feature onto one of my other servers, even though I am not working from the console of those servers, as shown in Figure 2.22:
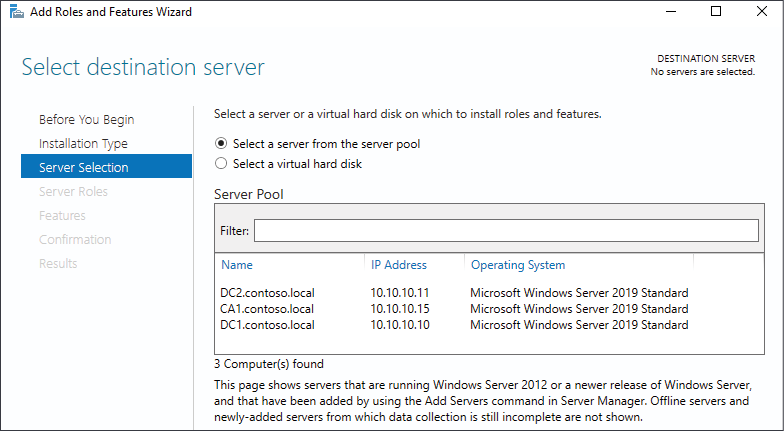
Figure 2.22: Selecting a server to install a new role or feature on
If I wanted to install the AD DS role onto DC2, a server I'm prepping as a second domain controller in my environment, I would not have to log into the DC2 server. Right here, from Server Manager running on CA1, I could run through the Add Roles wizard, define DC2 as the server that I want to manipulate, and install the role directly from here.
Remote Server Administration Tools (RSAT)
Using Server Manager on a single server to manage and monitor all of your servers is pretty handy, but what if we could take one more step out of that process? What if I told you that you didn't have to log into any of your servers, but could perform all of these tasks from the computer sitting on your desk?
This is possible by installing a toolset from Microsoft called the Remote Server Administration Tools (RSAT). I have a regular Windows 10 client computer online and running in our network, also domain-joined. I am now going to add an optional feature to this Windows 10 computer to give it the RSAT toolset.
Open up Settings on the client computer and type the word optional into the search bar. One of the options presented will be Manage optional features. Go ahead and click that. Once inside Optional features, click the button to Add a feature. This will open a list of many optional features to choose from, including a lot of language options, but if you scroll down in the list you will eventually come to a number of different entries that start with RSAT:. If there were only a select number of the tools that you wanted to use from this Windows 10 client, you could be selective here and only install the admin consoles that you actually need. Since this is a test lab and I want as many options as possible, I am simply going to check the box next to every item that begins with RSAT:, as you can see in Figure 2.23:
Figure 2.23: Installing RSAT features
If your computer is running a version of Windows 10 that is older than 1809, you won't find these options on your Settings screen. Instead, you can download and install the whole RSAT package from the following link: https://www.microsoft.com/en-us/download/details.aspx?id=45520.
After walking through the process to get these tools on my Windows 10 client computer, I can't seem to find any program that is called the Remote Server Administration Tool. That would be correct. Even though the names of these features we are installing all begin with RSAT, the components that are getting installed onto your system are the actual Windows Server system tools. If you peruse your Start menu, you will now find Server Manager, just like on a server, along with a folder full of Windows Administrative Tools! This makes sense, except that if you don't realize the name discrepancy, it can take you a few minutes to figure out why you cannot find what you just installed.
So, go ahead and launch Server Manager by finding it in the Start menu, or by using the search bar, or even by saying Hey Cortana, open Server Manager. Sorry, I couldn't resist. But whatever your method, open up Server Manager on your desktop computer and you will see that it looks and feels just like Server Manager in Windows Server 2019. And, in the same way that you work with and manipulate it within the server operating system, you can take the same steps here in order to add your servers for management.
In Figure 2.24, you can see that I have walked through the step to Add other servers to manage and selected some of the servers that are within my test network. I now have access, right here from my Windows 10 client computer, to manage and monitor all of the servers in my lab, without even having to log into them:
Figure 2.24: Centralized management via Server Manager
Does this mean RDP is dead?
With these new and improved ways to manage the underlying components of your servers without having to log into them directly, does this mean that our age-old friend RDP is going away? Certainly not! We will still have the need to access our servers directly sometimes, even if we go all-in with using the newer management tools. And I also expect that many administrators out there will continue using RDP and full desktop-based access for all management and monitoring of their servers simply because that is what they are more comfortable with, even if newer, more efficient ways now exist to accomplish the same tasks.
Remote Desktop Connection Manager
Since most of us do still utilize RDP occasionally (or often) when bouncing around between our servers, let's take a quick look at a tool that can at least make this task more manageable and centralized. I won't spend a lot of time looking over individual features or capabilities of this tool, since it is a client-side tool and not something that is specific to Windows Server 2019. You can use this to handle RDP connections for any and all of your servers, or even all of the client computers in your network. Remote Desktop Connection Manager is an incredibly useful platform for storing all of the different RDP connections that you make within your environment. You can save connections so that you don't have to spend time trying to remember server names, sort servers into categories, and even store credentials so that you don't have to type passwords when connecting to servers. Though a disclaimer should come with that one—your security folks may not be happy if you choose to employ the password storing feature.
Unfortunately, I can no longer provide you with a Microsoft download link for this tool, as the official Microsoft stance is that they are no longer making improvements to Remote Desktop Connection Manager, and that you should instead utilize the built-in MSTSC program or the universal Remote Desktop client application from the Microsoft Store. At this moment in time, these toolsets are limited in capability compared to what RDCM used to offer, and so I will leave it up to you as to which you prefer to pursue. There are still plenty of ways to find the RDCM installer if you seek it out online. You should be aware, however, that the reason it was discontinued and removed from Microsoft's own download pages is that a security vulnerability is present in the RDCM tool. This vulnerability would require an attacker to convince you, the admin, to launch an RDG file on your computer, which would then allow the attacker to extract data from your computer. So the risk is in your hands as to whether you think you could refrain from ever doing that or not. Here is a screenshot of the RDCM tool so you can have an idea of what it looks and feels like:
Figure 2.25: The RDCM tool
I almost removed this entire section from the book due to the security vulnerability and the official download no longer being available. In the end, I decided to leave it in place, not to make any official recommendations on what you should do, but to at least pass on the idea that there are options available to you for quick and easy RDP connection management when you are dealing with many different servers. There are plenty of alternative third-party toolsets that can accomplish the same thing, so while the Microsoft-provided Remote Desktop Connection Manager is no longer officially available, there are both free and paid applications that have been written by other companies that can be used to perform the same tasks.
Windows Admin Center (WAC)
Now forget everything I just told you about remote server management and focus here instead. I'm kidding…sort of. All of the tools we have already discussed are still stable, relevant, and great ways to interact with and manage your bunches of Windows servers. However, there's a new kid in town, and Microsoft expects them to be very popular.
Windows Admin Center (WAC) is a server and client management platform that is designed to help you administer your machines in a more efficient manner. This is a browser-based tool, meaning that, once installed, you access WAC from a web browser, which is great. No need to install a management tool or application onto your workstation—simply sit down and tap into it with a URL.
WAC can manage your servers (all the way back to Server 2008 R2), your server clusters, and even has some special functionality for managing hyper-converged infrastructure clusters. You have the ability to manage servers hosted on-premises as well as inside Azure, and you can even manage client machines in the Windows 10 flavor.
What's the cost for such an amazing, powerful tool? FREE!
Windows Admin Center even has support for third-party vendors to be able to create extensions for the WAC interface, so this tool is going to continue growing. If you have been following along with the test lab configuration in the book so far, you will recognize the words "Windows Admin Center" from a pop-up window that displays itself every time that Server Manager is opened. Microsoft wants administrators to know about WAC so badly that they are reminding you that you should start using it every time that you log into a Server 2019 box, as shown in Figure 2.26:
Figure 2.26: Even Server Manager recommends using WAC
Installing Windows Admin Center
Enough talk, let's try it out! First, we need to choose a location to install the components of WAC. True, I did say that one of the benefits was that we didn't need to install a client software component, but what I meant was that once WAC is implemented, then tapping into it is as easy as opening up a browser. That website needs to be installed and running somewhere, right? While you could throw the whole WAC system onto a Windows 10 client, let's take the approach that will be more commonly utilized in the field and install it onto a server in our network. I have a system running called WEB3 that is not yet hosting any roles or websites; it's just an empty server at this point. Sounds like a good place for something like this.
Download WAC from here: https://www.microsoft.com/en-us/windows-server/windows-admin-center.
Once downloaded, simply run the installer on the host machine. There are a few simple decisions you need to make during the wizard, most notable is the screen where you define port and certificate settings. In a production environment, it would be best to run port 443 and provide a valid SSL certificate here so that traffic to and from this website is properly protected via HTTPS, but, for my little test lab, I am going to run 443 with a self-signed certificate, just for testing purposes. Don't use self-signed certificates in production!

Figure 2.27: Installing WAC
Once the installer is finished, you will now be hosting the Windows Admin Center website on this server. For my particular installation, that new web address is https://WEB3.contoso.local.
Launching Windows Admin Center
Now for the fun part, checking this thing out. To tap into Windows Admin Center, you simply open up a supported browser from any machine in your network and browse to the WAC URL. Once again, mine is https://WEB3.contoso.local. Interestingly, Internet Explorer is not a supported browser. Microsoft recommends Edge but also works with Chrome. I am logged into my Windows 10 workstation, and will simply open up the Edge browser and try to hit my new site, as shown in Figure 2.28:
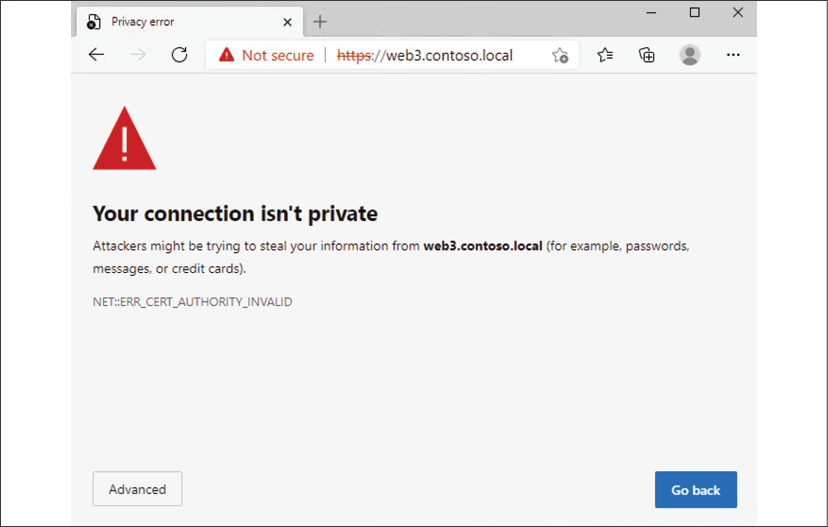
Figure 2.28: Opening a WAC URL in Microsoft Edge
As you can see, I am dealing with a certificate warning. This is to be expected because I am using a self-signed certificate, which, once again, is a bad idea. I only justify it because I'm running in a test lab. Since I am expecting this and am okay with the risk for our purposes today, I can click the Advanced button and then click the Continue to web3.contoso.local link to proceed. Interestingly, I am now presented with a credentials prompt:
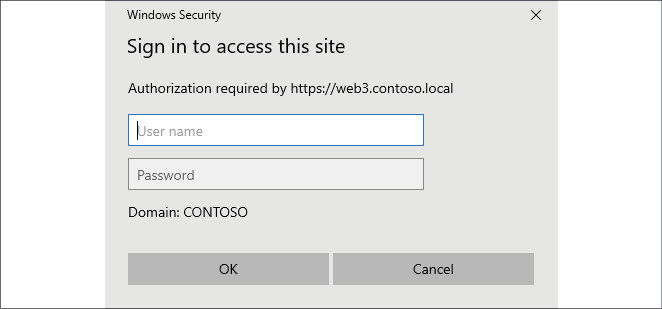
Figure 2.29: Sign in to use WAC
Even though I am logged into a Windows 10 computer that is domain-joined and I am logged in with domain credentials, the WAC website does not automatically try to inject those credentials for its own use but rather pauses to ask who you are. If I simply input my domain credentials here, I am now presented with the Windows Admin Center interface, as shown in Figure 2.30:
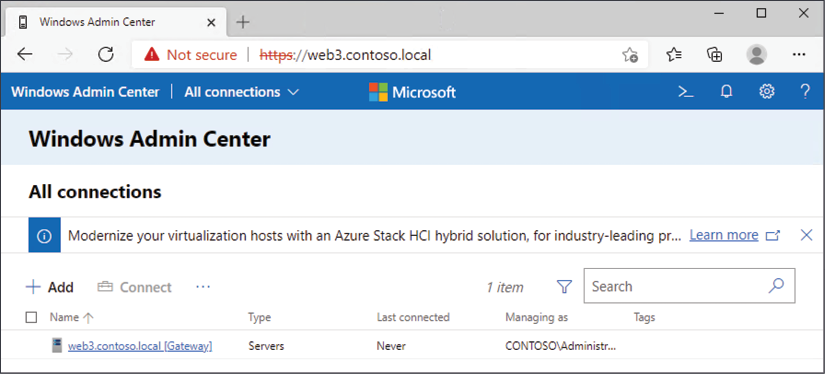
Figure 2.30: WAC interface
Adding more servers to Windows Admin Center
Logging into WAC is great, but not very useful until you add a bunch of machines that you want to manage. To do that, simply click the + Add button that is shown onscreen. You will be presented with choices to add a new server, a new PC, a Windows Server failover cluster, Azure Stack HCI, or even an Azure VM. Make your selection and input the required information. I don't have any clusters in my test lab, not yet anyway, so I am going to add in connections to the standard servers that I have been running in the environment. If I select the option to add Windows servers, I can type out the individual server names, import a list of server names, or even select the option to Search Active Directory. I'll go ahead and try that search function to test how well this works. I have already set up a number of different servers in my lab and joined them to my domain (we'll talk more about domains in the next chapter)—but how do I make WAC search for them here? When I click Search Active Directory, I still get a field asking me to type in a server name, but there is a note about wildcards being allowed. Aha! If you simply type an asterisk (*) into the search field and click the Search button, Windows Admin Center polls your domain and presents a full list of machines that can be added to the console:
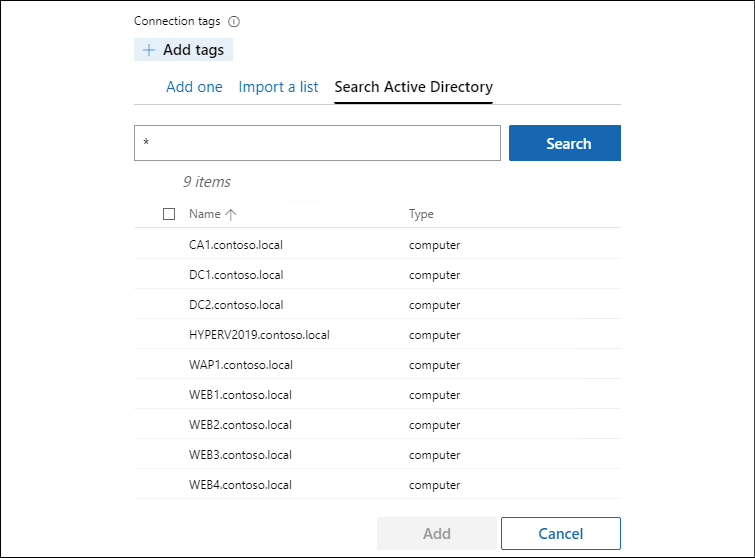
Figure 2.31: Search using *
Now simply select the checkboxes next to each server that you would like to administer via Windows Admin Center and click the Add button. You can see in Figure 2.32 that WAC now contains information about all of the servers in my environment:

Figure 2.32: Server information in WAC
Managing a server with Windows Admin Center
Beginning the management of a server from within WAC is as simple as clicking on the server name. As you can see in Figure 2.33, I have selected my DC1 server, as it is currently the only machine with some real roles installed and running:
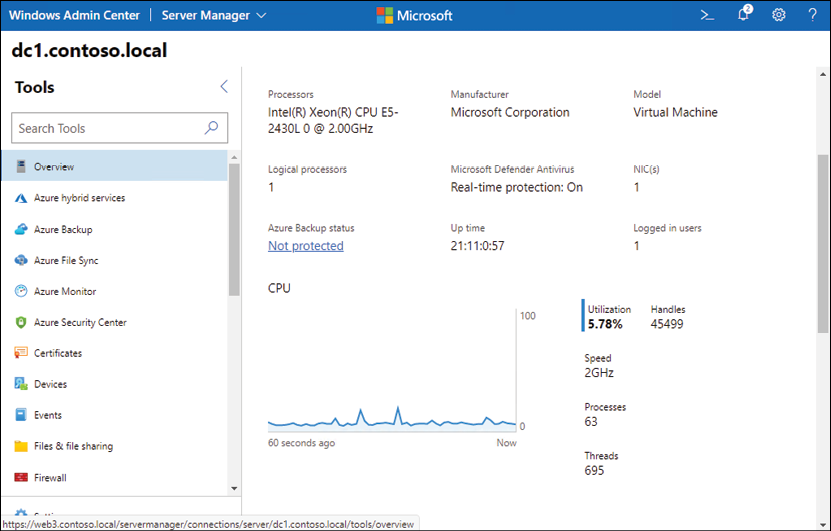
Figure 2.33: DC1 server information
From this interface, I can manage many different aspects of my DC1 server's operating system. There are power control functions, the ability to run backups on my server, I can even view and install certificates from here! You can monitor the performance of the server, view its event logs, manipulate the local Windows Firewall, and launch a remote PowerShell connection to the server. The goal with Windows Admin Center is for it to be your one-stop shop for remotely managing your servers, and I would say it is well on its way to accomplishing that goal.
I don't yet have any Server Core instances running in my lab but rest assured that WAC can be used to manage Server Core instances just as well as servers running Desktop Experience. This makes Windows Admin Center even more potent and intriguing to server administrators. When we get to our chapter on Server Core, we'll make sure to wrap back to this idea and in some way manipulate a Server Core instance through this Windows Admin Center console.
Changes are easy as pie
Monitoring information about your servers from a single place like WAC is great and powerful, but the coolest part about WAC is that you have some serious capabilities to manipulate your servers as well, straight from this web interface. This is yet another place where you can add roles or features onto your servers, create scheduled tasks, start or stop services, or even do things like edit the registry and add Windows Firewall rules. Let's make a quick change to our DC1 server to prove this out. All of my VMs are inside a test lab that is running within Hyper-V, and so interaction with my servers to this point has been directly from Hyper-V console sessions. It is basically like I am walking up to these servers and logging into them from the console, every single time I need to interact with them. At this point, RDP has never been enabled on DC1, but I wonder if there is a way to enable that easily, right from inside our Windows Admin Center?
Scrolling down through my list of tools on the left side of WAC, I suddenly spot one called Remote Desktop. Sounds like the right place to be! Clicking on Remote Desktop spins for a second as WAC reaches out and queries information from DC1. Then I am presented with a summary that states "Remote desktop connections are not allowed to this computer" with a button that allows me to Go to settings. Inside the Remote Desktop settings screen, I have here the same options that I would see if I were to log directly into DC1 and edit the Remote Desktop settings from inside the classic advanced System properties screens. You can see in Figure 2.34 that I have now selected the option Allow remote connections to this computer—previously this had not been enabled:
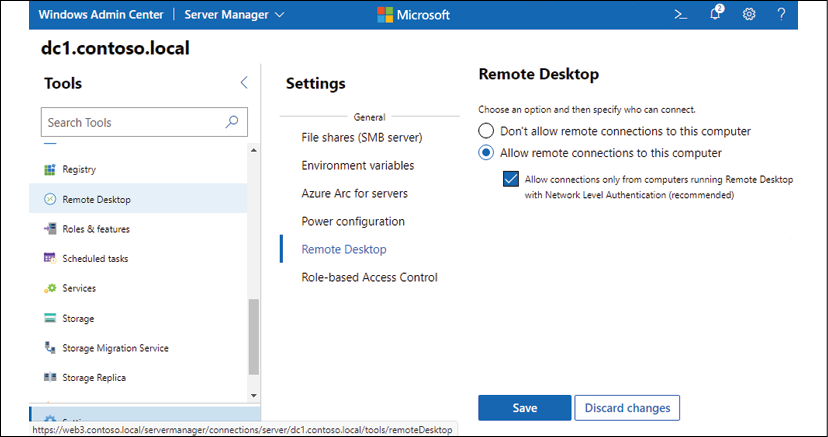
Figure 2.34: Remote Desktop settings
Simply changing the setting here and clicking the Save button causes Windows Admin Center to reach out to DC1 and enable this Remote Desktop setting, after which I can immediately connect to it using RDP from my Windows 10 computer. I never needed to log into DC1 to enable remote logins to DC1!
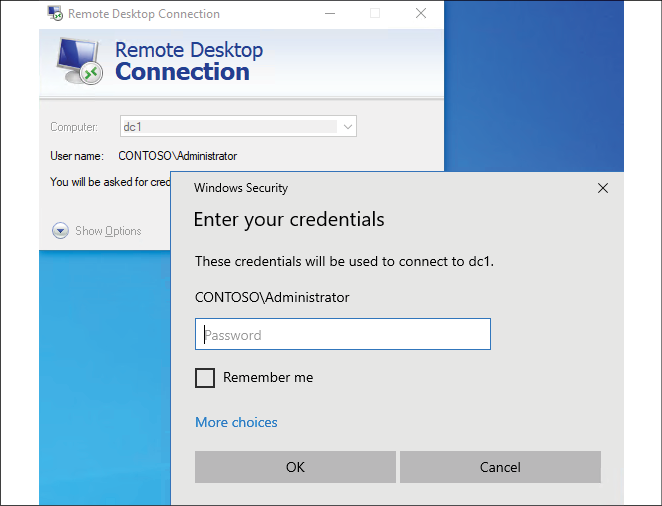
Figure 2.35: RDP is now enabled
Azure integrations
You'll notice inside WAC that there are numerous tools related to Azure. If you have an Azure environment or are thinking about getting started with one, your on-premises Windows Admin Center can be used to administer both on-premises servers as well as Azure servers. WAC can also be used to bind your on-premises environment together with your Azure environment through things like Azure File Sync and Azure Backup. These tools can be a powerful way of creating a hybrid cloud configuration, where you maintain servers in both environments, and can also be used to help ease a transition from a traditional datacenter into a cloud-only mentality.
Enabling quick server rollouts with Sysprep
At the beginning of this chapter, we walked through the process of installing the Windows Server 2019 operating system onto your new server. Whether this was a physical piece of hardware or a virtual machine that we were working with, the installation process was essentially the same. Plugging in the DVD or USB stick, booting to it, and letting the installer run its course is an easy enough thing to do, but what if you need to build out ten new servers instead of just one? This process would soon start to get tedious, and it would seem like you were wasting a lot of time having to do the exact same thing over and over again. You would be correct—this does waste a lot of time, and there is an easier and faster way to roll out new servers as long as you are building them all from a relatively similar hardware platform. If you are building out your servers as virtual machines, which is so often the case these days, then this process works great and can save you quite a bit of time with new server builds.
Now, before I go too far down this road of describing the Sysprep process, I will also note that there are more involved technologies available within the Windows infrastructure that allow automated operating system and server rollouts that can make the new server rollout process even easier than what I am describing here. The problem with some of the automated technologies is that the infrastructure required to make them work properly is more advanced than many folks will have access to if they are just learning the ropes with Windows Server. In other words, to have a fully automated server rollout mechanism isn't very feasible for small environments or test labs, which is where a lot of us live while we are learning these new technologies.
So, anyway, we will not be focusing on an automation kind of approach to server rollouts, but rather we will be doing a few minutes of extra work on our very first server, which then results in saving numerous minutes of setup work on every server that we build afterward. The core of this process is the Sysprep tool, which is baked into all versions of Windows, so you can take this same process on any current Windows machine, whether it be a client or a server.
Sysprep is a tool that prepares your system for duplication. Its official name is the Microsoft System Preparation Tool, and to sum up what it does in one line, it allows you to create a master image of your server that you can reuse as many times as you want in order to roll out additional servers. A key benefit to using Sysprep is that you can put customized settings onto your master server and install things such as Windows Updates prior to Sysprep, and all of these settings and patches will then exist inside your master image.
Using Sysprep saves you time by not having to walk through the operating system installation process, but it saves you even more time by not having to wait for Windows Update to roll all of the current patches down onto every new system that you create.
Now, some of you might be wondering why Sysprep is even necessary. If you wanted to clone your master server, you could simply use a hard disk imaging tool, or, if you were dealing with virtual machines, you could simply copy and paste the .VHDX file itself in order to make a copy of your new server, right? The answer is yes, but the big problem is that the new image or hard drive that you just created would be an exact replica of the original one. The hostname would be the same, and, more importantly, some core identification information inside Windows, such as the operating system's security identifier (SID) number, would be exactly the same. If you were to power on both the original master server and a new server based on this exact replica, you would cause conflicts and collisions on the network as these two servers fight for their right to be the one and only server with that unique name and SID. This problem exacerbates itself in domain environments, where it is even more important that each system within your network has a unique SID/GUID—their identifier within Active Directory. If you create exact copies of servers and bring them both online, let's just say neither one is going to be happy about it. If you do this inside a production environment, you can wreak havoc on your network. I know from personal experience what it looks like to help someone recover their domain after a domain controller's hard drive was simply copied, pasted, and turned on as a second server. It's the definition of a bad day.
Sysprep fixes all of these inherent problems with the system duplication process by randomizing the unique identifiers in the operating system. To prepare ourselves to roll out many servers using a master image we create with Sysprep, here is a quick-reference summary of the steps we will be taking:
- Install Windows Server 2019 onto a new server
- Configure customizations and updates onto your new server
- Run Sysprep to prepare and shut down your master server
- Create your master image of the drive
- Build new servers using copies of the master image
And now let's cover these steps in a little more detail.
Installing Windows Server 2019 onto a new server
First, just like you have already done, we need to prepare our first server by getting the Windows Server 2019 operating system installed. Refrain from installing any full roles onto the server, because, depending on the role and its unique configuration, the Sysprep process that we run shortly could cause problems for individual role configurations. Install the operating system and make sure device drivers are all squared away, and you're ready for the next step.
Configuring customizations and updates onto your new server
Next, you want to configure customizations and install operating system updates onto your new server. Each setting or installation that you can do now that is universal to your batch of servers will save you from having to take that step on your servers in the future. This portion may be slightly confusing because I just told you a minute ago not to install roles onto the master server. This is because a role installation makes numerous changes in the operating system, and some of the roles that you can install lock themselves down to a particular hostname running on the system. If you were to do something like that to a master server, that role would more than likely break when brought up on a new server. Customizations that you can put into place on the master server are things such as plugging in files and folders that you might want on all of your servers, such as an Admin Tools folder or something like that. You could also start or stop services that you may or may not want running on each of your servers, and change settings in the registry if that is part of your normal server prep or hardening process. Whatever changes or customizations you put into place, it's not a bad idea to run a full slew of tests against the first new server that you build from this master image, just to make sure all of your changes made it through the Sysprep process.
Now is also the time to let Windows Update install and to put any patches on this new server that you want to have installed on all of your new servers in the future. There is nothing more frustrating than installing a new operating system in 5 minutes, only to have to sit around and wait 4 hours for all of the current updates and patches to be installed before you can use the new server. By including all of these updates and patches in the master image, you save all of that download and installation time for each new server that you spin up.
Continue to save yourself time and effort by creating new copies of your master images every few months. This way the newest patches are always included in your master image and it continues to save you more and more time throughout the life of Windows Server 2019.
Running Sysprep to prepare and shut down your master server
Now that our master server is prepped how we want, it is time to run the Sysprep tool itself. To do that, open up an administrative Command Prompt and browse to C:\Windows\System32\Sysprep. Now you can make use of the Sysprep.exe utility inside that folder to launch Sysprep itself.
As with many executables that you run from Command Prompt, there are a variety of optional switches that you can tag onto the end of your command to make it do specific tasks. From your Command Prompt window, if you simply run the sysprep.exe command, you will see a graphical interface for Sysprep, where you can choose between the available options, as shown in Figure 2.36:
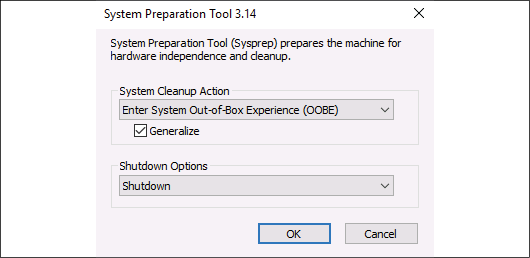
Figure 2.36: Sysprep options
Since I always use the same set of options for Sysprep, I find it easier to simply include all of my optional switches right from the command-line input, therefore bypassing the graphical screen altogether. Here is some information on the different switches that are available to use with sysprep.exe:
/quiet: This tells Sysprep to run without status messages on the screen./generalize: This specifies that Sysprep is to remove all of the unique system information (SID) from the Windows installation, making the final image usable on multiple machines in your network, because each new one spun up from the image will get a new, unique SID./audit: This restarts the machine into a special audit mode, where you have the option of adding additional drivers into Windows before the final image gets taken./oobe: This tells the machine to launch the mini-setup wizard when Windows next boots./reboot: This restarts when Sysprep is finished./shutdown: This shuts down the system (not a restart) when Sysprep is finished. This is an important one and is one that I typically use./quit: This closes Sysprep after it finishes./unattend: There is a specialanswerfilethat you can create that, when specified, will be used in conjunction with the Sysprep process to further configure your new servers as they come online. For example, you can specify in thisanswerfilethat a particular installer or batch file is to be launched upon the first Windows boot following Sysprep. This can be useful for any kind of cleanup tasks that you might want to perform, for example, if you had a batch file on your system that you used to flush out the log files following the first boot of new servers.
The two that are most important for our purpose of wanting to create a master image file that we can use for quick server rollouts in the future are the /generalize switch and the /shutdown switch. /generalize is very important because it replaces all of the unique identification information, the SID info, in the new copies of Windows that come online. This allows your new servers to co-exist on the network with your original server, and with other new servers that you bring online. The /shutdown switch is also very important because we want this master server to become sysprepped and then immediately shut down so that we can create our master image from it.
Make sure that your server does NOT boot into Windows again until after you have created your master image or taken your master copy of the .VHDX file. The first time that Windows boots it will inject the new SID information, and you want that only to happen on new servers that you have created based on your new image.
So, rather than simply throwing all of the switches at you and letting you decide, let's take a look at the ones that I typically use. I will make use of /generalize so that I make my new servers unique, and I also like to use /oobe so that the mini-setup wizard launches during the first boot of Windows on any of my new systems. Then, I will of course also use /shutdown, because I need this server to be offline immediately following Sysprep so that I can take a copy of the hard drive to be used as my master image. So, my fully groomed sysprep command is shown in the following code:
sysprep.exe /generalize /oobe /shutdown
After launching this command, you will see Sysprep moving through some processes within Windows, and after a couple of minutes, your server will shut itself down, as shown in Figure 2.37:
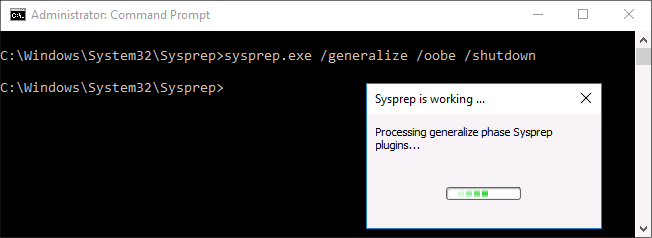
Figure 2.37: Sysprep and shutting down
You are now ready to create your master image from this hard disk.
Creating your master image of the drive
Our master server is now shut down, and we are ready to create our master image from this server. If it is a physical server, you can use any hard disk imaging utility in order to create an image file from the drive. An imaging utility like those from the company Acronis will create a single file from your drive. This file contains an image of the entire disk that you can use to restore down onto fresh hard drives in new servers in the future. On the other hand, most of you are probably dealing with virtual servers most often in your day-to-day work lives and prepping new servers in the virtual world is even easier.
Once our master server has been sysprepped and shut down, you simply create a copy of the .VHDX file. Log into your Hyper-V Server, copy and paste the hard disk file, and you're done. This new file can be renamed WS2019_Master_withUpdates.VHDX , or whatever you would like it to be named, in order to help you keep track of the current status on this image file. Save this image file or copy of the .VHDX file somewhere safe on your network, where you will be able to quickly grab copies of it whenever you have the need to spin up a new Windows Server 2019.
Building new servers using copies of the master image
Now we get to the easy part. When you want to create new servers in the future, you simply copy and paste your master file into a new location for the new server, rename the drive file to be something appropriate for the server you are creating, and boot your new virtual machine from it. Here is where you see the real benefit from the time that Sysprep saves, as you can now spin up many new servers all at the same time, by doing a quick copy and paste of the master image file and booting all of your new servers from these new files. No need to install Windows or pull out that dusty installation DVD!
As the new servers turn on for the first time and boot into Windows, they will run through the out-of-box-experience, mini-setup wizard. Also, in the background, the operating system gives itself a new random and unique hostname and SID information so that you can be sure you do not have conflicts on your network with these new servers.
New servers created from a sysprepped image file always receive a new hostname when they boot. This often confuses admins who might have named their master server something such as MASTER. After booting your new servers, you can expect to see randomized names on your new servers and you will have to rename them according to their new duties in life.
For example, before running Sysprep and creating my master image, the server that I was working on was named DC1 because I had originally intended to use it as a domain controller in my network. However, because I had not installed the role or configured anything domain-related on it, this server was a perfect candidate for displaying the Sysprep process and so I used it in our text today. I sysprepped it, shut it down, made a copy of its .VHDX file (to be my master image file), and then I started DC1 back up. You can now see inside the system properties that I am back to having a randomized hostname, and so if I still want to use this server as DC1, I will have to rename it again now that it has finished booting through mini-setup, as shown in Figure 2.38:
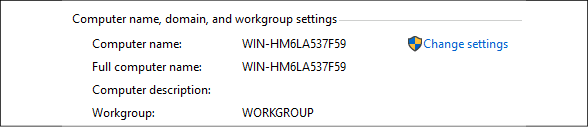
Figure 2.38: System properties
Hopefully, this process is helpful information that can save you time when building out new servers in your own environments. Get out there and give it a try the next time you have a new server to build! You can further benefit yourself with the Sysprep tool by keeping many different master image files. Perhaps you have a handful of different kinds of servers that you prep regularly—there is nothing stopping you from creating a number of different master servers and creating multiple master images from these servers.
Summary
Anyone interested in being a Windows Server administrator needs to be comfortable with installing and managing their servers, and covering those topics establishes an important baseline for moving forward. It is quite common in today's IT world for new operating system releases to be thoroughly tested, both because server hardware resources are so easily available to us through virtualization technologies, and because most business systems are now being designed for 100% uptime. This kind of reliability requires very thorough testing of any platform changes, and, in order to accomplish such testing of the Windows Server 2019 operating system in your environment, you will be burning quite a bit of time spinning through the basic installation processes numerous times. I hope that you can put the suggestions provided in this chapter to good use in saving you precious extra minutes when dealing with these tasks in your Windows Server world.
Years ago, quite a bit of effort was regularly put into figuring out which roles and services could co-exist because the number of servers available to us was limited. With the new virtualization and cloud paradigm shift, many companies have a virtually unlimited number of servers that can be running, and this means we are running much larger quantities of servers to perform the same jobs and functions. Management and administration of these servers then becomes an IT burden and adopting the centralized administration tools and ideas available within Windows Server 2019 will also save you considerable time and effort in your daily workload. In the next chapter, we will start to dive into some of the most commonly used roles and tools in a Windows Server environment, the core infrastructure technologies surrounding Active Directory.
Questions
- What is the name of the new web-based, centralized server management tool from Microsoft (fun fact, this toolset was formerly known as Project Honolulu)?
- True or False—Windows Server 2019 needs to be installed onto rack-mount server hardware.
- True or False—By choosing the default installation option for Windows Server 2019, you will end up with a user interface that looks quite like Windows 10.
- What is the PowerShell cmdlet that displays currently installed roles and features in Windows Server 2019?
- True or False—Server Manager can be used to manage many different servers at the same time.
- What is the name of the toolset that can be installed onto a Windows 10 computer, in order to run Server Manager on that client workstation?
- What are the supported web browsers that can be used to interact with Windows Admin Center?