Chapter 1: Installing and Upgrading Veeam
Veeam Backup & Replication v11a is part of Veeam Availability Suite, which is ready for the modern data center and allows you to back up all your workloads, including cloud, virtual, physical, and applications. It is simple yet flexible to meet your most challenging environment needs. This chapter will discuss how to install and upgrade the software, what components make up Veeam Backup & Replication v11a, and some best practices and optimizations. There will be practical examples throughout this chapter of optimizing specific elements that make up the Veeam environment. We will also touch on some websites, such as the Best Practices Guide for Veeam, among others, to give you resources to help set up Veeam in your environment. As they say about Veeam – "It Just Works."
In this chapter, we're going to cover the following main topics:
- Understanding the best practices and optimizations for Veeam installation
- How to configure and optimize proxy servers
- How to set up repository servers for success
- Understanding the scale-out backup repository
- Upgrading Veeam Backup & Replication to v11a
Technical requirements
To ensure a successful installation, you will require the following:
- You must have deployed a Windows 2019/2022 server with the necessary disk space to install the application (2008 R2 SP1 is also currently supported). Windows 10 and other modern Windows desktop operating systems are also supported.
- You must have downloaded the latest ISO file from www.veeam.com, which requires registration on the site and allows you to obtain a trial license. At the time of this writing, version
11.0.1.1261_20210923is the current release. - Veeam Best Practices website: https://bp.veeam.com/vbr/.
- Veeam Documentation website: https://helpcenter.veeam.com/docs/backup/vsphere/overview.html?ver=110.
Understanding the best practices and optimizations for Veeam installation
The installation of Veeam Backup & Replication v11a is a straightforward process. Setting up Veeam, if not done right, can lead to components not working correctly and poor performance, among other things. However, if you set up Veeam correctly, it will protect your data and environment with minimal configuration. This section will go through the installation process and touch on the best practices and optimizations for your environment.
Installing Veeam Backup & Replication v11a
Before installing Veeam, you need to ensure that you have a server deployed, either Windows 2019 or 2022, with enough disk space for the installation.
Note
Veeam will configure the default backup repository on the drive with the most available disk space, whether that is the OS drive, Application drive, or Catalog drive.
The disk layout should be similar to the following:
- OS drive: This is where your operating system resides and should be used only for this.
- Application drive: This will be your application installation drive for Veeam and all its components.
- Catalog drive: Veeam uses a catalog that can generate around 10 GB of data per 100 VMs backed up with file indexes. If this will be a significant storage requirement for your deployment, it may be advisable to allocate the
Catalogfolder to a separate drive.
Once your server is ready and you have downloaded the ISO file and mounted it, follow these steps to install Veeam:
- Run the
setup.exefile on the mounted ISO drive:

Figure 1.1 - Main installation screen
- Click on the Install button under the Veeam Backup & Replication 11a section on the left or the Install link on the right-hand side under Standalone components.
- You will be prompted to install the Microsoft Visual C++ runtime. Click OK to proceed. Once you've installed it, you may be prompted to reboot your server. Click YES to proceed:

Figure 1.2 – Installing Microsoft Visual C++
The preceding screenshot shows the Visual C++ Redistributable installation request. The following screenshot shows the Reboot option once Visual C++ Redistributable has been installed:

Figure 1.3 – Reboot prompt after installing Microsoft Visual C++
Note
You may need to mount the ISO again after rebooting the server before proceeding.
- At this point, you will see the License Agreement window, so you will need to select the two checkboxes to place a checkmark and then click Next to continue.
- You will now need to provide a valid license file, whether it's been purchased or a trial; if you do not have this at this stage of the installation, you can click Next to continue, and Veeam will operate in the Community (Free) Edition. When you obtain the license file, you can install that within the application under the menu and license:

Figure 1.4 – License dialogue window
- The next screen is where you choose which components you want to install and in which directory. Veeam recommends that all of them are selected:
- Veeam Backup & Replication: The main application.
- Veeam Backup Catalog: Used when you turn on guest OS indexing within your jobs.
- Veeam Backup & Replication Console: This is where you go to view, create, and edit jobs and manage the environment.
- After clicking Next, the installer will then do a system check for any pre-requisites required. Should something be missing, you will be prompted and have the option to install the missing components:

Figure 1.5 – System Configuration Check – missing components
- Click the Install button to install the missing components.
- Once all the components have passed, you can click Next to move to the following screen. Unlike in previous versions of Veeam Backup & Replication, the following screen does not give you the option to input a user account to run the services. Instead, with Version 11a of Veeam, you need to select the checkbox next to Let me specify different settings and then click Next.
- You will now have the opportunity to enter a user account for the Veeam services, better known as a Service Account. There are some recommended settings for this service account:
- You must have Local Administrator rights on the Veeam server.
- If you are using a separate SQL Server and not the Express edition (Microsoft SQL Server 2016 SP2 Express edition) that comes with Veeam's Install, you will require permissions to create the database.
- You will need full NTFS permissions to the folder that will contain the catalog.
For more details about these permissions, please visit
https://helpcenter.veeam.com/docs/backup/vsphere/required_permissions.html?ver=110:

Figure 1.6 – Server user account
For this setup, I am using an account that I have created on my lab server. In contrast, in a production scenario, you would already have a service account set up in Active Directory to enter at this stage.
- The next screen lets you select the type of SQL installation you will be using. For a lab scenario, using SQL Express is good enough. If you are in an enterprise environment, the recommended best practice is to use an external SQL Server for the best performance. Also, take note that you can use Windows authentication or SQL Server authentication:

Figure 1.7 – SQL Server instance for Veeam
- After selecting the appropriate options, click Next once again.
- The following window is for TCP/IP port configuration; you can adjust these settings if you use different ports, but the default ports should suffice:

Figure 1.8 – Port Configuration defaults

Figure 1.9 – Data Locations – directory selection
- Here, you must specify the Application drive under Instant recovery write cache, which mounts restore points during recovery. Please use the dedicated drive you set up for Guest file system Catalog.
The installer is now ready to complete by installing the local SQL Express instance and then the application. Veeam will also set the user account you selected to start all the services:

Figure 1.10 – Ready to Install – checking for updates
- After reviewing the setup, click Install to proceed with the installation and start setting up the components that work together with the backup server.
Now, let's start configuring the required settings for Veeam to work with VMware:
- Repository server: The server that's used to store the backup files.
- Proxy servers: The servers that perform all the backup tasks.
- VMware vCenter Credentials: This is used to connect and see your clusters, hosts, vApps, and virtual machines. vCenter Server is not required as standalone ESXi hosts are also supported if they're licensed in VMware.
- When you first launch the Veeam Backup & Replication console, you will be taken directly to the INVENTORY tab, and Virtual Infrastructure will be in focus:

Figure 1.11 – Initial console screen
- This screen is where we will begin adding the Virtual Center so that you can start backing up your virtual machines. Click on the ADD SERVER option to start this process. You will then be prompted to select what kind of server to add. Choose VMware vSphere and then either vSphere or vCloud Director:

Figure 1.12 – vSphere or vCloud Director selection
You would typically select vSphere here; however, if you have vCloud Director in your environment, you may also want to choose this option. When you choose vSphere, you will be prompted for two things to complete the connection:
- The DNS or IP address of your vCenter server (DNS is the preferred method).
- Credentials – this can either be a vsphere.local user or a domain account that's been set up for access.
- Enter the required credentials, click Next, and then click Apply to complete the VMware vSphere setup. You will now see your vCenter server listed under the Virtual Infrastructure section of the console and will be able to browse the hosts and virtual machines.
Now, let's look at the next piece that's required for the infrastructure, which is the proxy server. By default, the Veeam Backup & Replication server is your VMware Backup Proxy and File Backup Proxy. Due to the limitations of my lab, I am going to use this server as an example, but in the real world, you would add multiple proxy servers to your environment for better performance and as per best practices. Also, based on best practices, you would typically disable the Veeam Backup & Replication server from being a proxy server to allow the other proxy servers to handle the workload.
The next component you will require is a repository server, which is the location where Veeam Backup & Replication will store your backup files. By default, Veeam Backup & Replication creates a Default Backup Repository, typically on the biggest drive attached to your backup server. This location will be where the Configuration Backups usually get backed up. There are multiple options for adding a repository:

Figure 1.13 – Add Backup Repository selection
The first three selections are for block storage, while the last one is Object storage, which is used as part of a scale-out backup repository as the capacity tier for offloading data.
You have now installed and done the basic configuration that's required for Veeam Backup & Replication. We will now look at how to optimize proxy servers and repository servers.
How to configure and optimize proxy servers
Proxy servers are the workhorses of the Veeam Backup & Replication v11a application, and they do all the heavy lifting or processing of tasks for backup and restore jobs. When you set up Veeam, you need to ensure that the proxy servers get configured as per best practices:
- https://bp.veeam.com/vbr/VBP/2_Design_Structures/D_Veeam_Components/D_backup_proxies/vmware_proxies.html
- https://helpcenter.veeam.com/docs/backup/vsphere/backup_proxy.html?ver=110
When you decide to deploy a proxy server, Veeam Backup & Replication will install two components on the server:
- Veeam Installer Service: This is used to check the server and upgrade software as required.
- Veeam Data Mover: This is the processing engine for the proxy server and does all the required tasks.
Veeam Backup & Replication proxy servers use a transport mode to retrieve data during backup. Three standard modes are available, and they are listed in order, starting with the most efficient method:
- Direct Storage access: The proxy is placed in the same network as your storage arrays and can retrieve data directly from there.
- Virtual Appliance: This mode mounts the VMDK files to the proxy server for what we typically call Hot-Add Mode to back up the server data.
- Network: This mode is the least efficient but is used when the previous methods are unavailable. It moves the data through your network stack. It is recommended not to use 1 GB but rather 10 GB.
In addition to these standard transport modes, which are provided natively for VMware environments, Veeam provides two other transport modes: Backup from Storage Snapshots and Direct NFS. These provide storage-specific transport options for NFS systems and storage systems that integrate with Veeam.
See the integration with storage systems guide for more details: https://helpcenter.veeam.com/docs/backup/vsphere/storage_integration.html?ver=110.
Along with the transport modes, there are specific tasks that the proxy server performs:
- Retrieving the VM data from storage
- Compressing
- Deduplicating
- Encrypting
- Sending the data to the backup repository server (backup job) or another backup proxy server (replication job)
Veeam proxy servers leverage what is known as VMware vStorage APIs for Data Protection (VADP) when using all transport modes other than Backup from Storage Snapshots and Direct NFS.
You should consider the following regarding your proxy servers:
- Operating System: Most software vendors will always recommend the latest and greatest, so if you choose Windows, then choose 2022. Alternatively, you can select Linux using the latest release (Example – Ubuntu 20.04.1 LTS). Note that for Linux VMware, backup proxies support all transport modes as of Veeam Backup & Replication v11a.
- Proxy Placement: Depending on the transport mode for the server, you will need to place it as close to the servers you want to back up, such as on a specific host in VMware. The closer to the source data, the better!
- Proxy Sizing: This can be tricky to determine and will depend on the physical or virtual server. Veeam proxy servers complete what are called tasks, which is where one virtual disk is processed for a VM or one physical disk is processed for a server. Therefore, Veeam recommends one physical core or one vCPU and 2 GB of RAM per task.
Veeam has a formula to calculate the required resources for a proxy server:
- D = Source data in MB
- W = Backup window in seconds
- T = Throughput in MB/s = D/W
- CR = Change rate
- CF = Cores required for full backup = T/100
- CI = Cores required for incremental backup = (T * CR)/25
Based on these requirements, we can use a data sample to perform the calculations:
- 1,000 virtual machines
- 400 TB of data
- An 8-hour backup window
- 5% change rate
Using these numbers, we can perform the following calculations:


We can use the numbers we calculated to determine the required amount of cores needed to run both full and incremental backups to meet our defined SLA:


Based on our calculations and considering that you require 2 GB of RAM for each task, you need a virtual server with 146 vCPUs and 292 GB of RAM. This size may seem like a considerable server, but keep in mind that it uses the sample data. Your calculations will likely be much smaller or possibly more extensive, depending on your dataset.
Should you decide to use a physical server as a proxy, you should have a server with 2–10 core CPUs. In the case of our sample data, two physical servers are what you require. If you are using virtual servers for proxies, the best practice is to configure them with a maximum of 8 vCPUs and add as many as needed for your environment – in this case, we would need nine servers.
Should you want to size things based on incremental backups only, your requirements are less than half of the full backup sizing – 29 vCPUs and 58 GB of RAM.
There are limitations for proxy servers that you need to be aware of when it comes to job processing and performance. As we noted previously, a proxy server performs tasks, which are assigned CPU resources. Concurrent task processing is dependent on the resources you have available in your infrastructure and the number of proxy servers you have deployed. As shown in the following screenshot, when it comes to adding a proxy server to Veeam Backup & Replication, there is the Max concurrent tasks option, which correlates to the number of CPUs that are assigned:

Figure 1.14 – Max concurrent tasks limitation for proxy servers
Task limits can be found at https://helpcenter.veeam.com/docs/backup/vsphere/limiting_tasks.html?ver=110.
Important Note
Job performance gets impacted based on the tasks of a proxy server. For example, if you had a proxy server with 8 CPUs and added two virtual machines for backup, one with four disks and another with six disks, the proxy server would process only eight of the 10 disks in parallel. The remaining two disks would have to wait on resources before backing up.
You should now be able to right-size your proxy servers regarding CPU and RAM and understand proxy placement and how it processes tasks. Proxy servers send data to repository servers, which is the focus of the next section.
How to set up repository servers for success
A repository server is a storage location for your backups, so setting them up right the first time will ensure that you have the best performance. When creating a repository, it is always a good idea to follow the Veeam Backup & Replication best practices:
https://bp.veeam.com/vbr/VBP/2_Design_Structures/D_Veeam_Components/D_backup_repositories/.
The following are some things to consider when setting up a repository:
- ReFS/XFS: With Windows 2019/2022, ensure you format your repository drive(s) as ReFS with 64k block sizing to take advantage of space savings for synthetic full and GFS. For Linux, you need to set up XFS and Reflink to take advantage of space-saving and Fast Cloning. In both of these situations, storage efficiency will be realized for synthetic full backups. This efficiency prevents duplication but is not deduplication.
- Sizing: Ensure that you adhere to the Veeam Backup & Replication recommendation of 1 core and 4 GB of RAM per repository task. Just like proxy servers, your repository servers have task limits as well. At a minimum, you need two cores and 8 GB of RAM.
When you calculate the sizing requirements, you need to take into account your proxy servers and the amount of CPU that's been configured; you then need to use a 3:1 ratio for the core count on a repository server.
Example: Your proxy server gets configured with 8 CPUs; you need to configure the repository server with 2 CPUs based on this rule of 3:1. To configure the RAM, you must multiply the CPU count by four to end up with 8 GB of RAM.
When you use the Windows ReFS filesystem as your repository, you also need to consider the overhead that's required for the filesystem and add another 0.5 GB of RAM per terabyte of ReFS.
Setting up your task limits for a repository server is different than a proxy server due to the way tasks are consumed. The setting you have chosen will be handled differently:
- Per-VM Backup Files: When selected, this creates a backup chain per VM located in a job. Therefore, if the backup job has 10 virtual machines, it will consume 10 repository tasks and 10 proxy tasks.
- No Per-VM Selection: The backup job consumes one repository task, and the proxy task will remain the same with one task per virtual disk.
Note
To find out more about task limits, go to https://helpcenter.veeam.com/docs/backup/vsphere/limiting_tasks.html?ver=110.
When you're setting up a repository for the first time, you can set the task limit:

Figure 1.15 – Repository task limit
Important Note
When you limit the number of tasks per repository and have jobs with many virtual machines requiring backups, this will be one of the bottlenecks in your environment. You also need to ensure that you do not set the limit too high as that could overwhelm your storage, causing performance degradation. Make sure that you test all your components and the resources that are available for your backup infrastructure.
After completing this section, you should be able to choose which type of filesystem you wish to use for your repository and size it correctly based on your CPU and RAM. We also discussed the per-VM versus no per-VM methods. Now, we will use this knowledge to tie this into creating a scale-out backup repository.
Understanding the scale-out backup repository
So, what is a scale-out backup repository, or SOBR, you ask? A SOBR uses multiple backup repositories, called performance extents, to create a sizeable horizontal scaling repository system. Veeam Backup & Replication can use multiple repositories of various types, such as the following:
- Windows Backup Repositories: NTFS or the recommended ReFS
- Linux Backup Repositories: XFS with Reflink
- Shared Folder: NFS, SMB, or CIFS
- Deduplication storage appliances
SOBR can expand with on-premises storage such as block storage or even a cloud-based object repository known as a capacity extent. Veeam Backup & Replication combines the performance extents, capacity extents, and archive extents into one to summarize their capacities:

Figure 1.16 – Scale-out backup repository
The ability to use a SOBR is dependent on the license version that you are using with Veeam Backup & Replication:
- Enterprise: Allows for a total of two SOBRs with three extents.
- Enterprise Plus: Provides an unlimited number of SOBRs with as many performance extents as needed, but only one capacity tier per SOBR.
Tip
Should you happen to downgrade your licensing from Enterprise Plus or Enterprise to Standard, you will lose the ability to target your jobs to the SOBR. You can, however, restore data from the SOBR.
The different license types limit you in the number of SOBRs and extents per SOBR you can configure. As we noted previously, there is a limit of two for Enterprise and an unlimited number for Enterprise Plus.
Tip
For the best performance and manageability, it is best to keep your SOBR limited to three to four extents if possible. If you are using object storage, then one of the components of the SOBR will be the capacity tier.
The scale-out repository works with many types of jobs or tasks in Veeam Backup & Replication:
- Backup jobs
- Backup copy jobs
- VeeamZIP jobs
- Agent backups – Linux or Windows agent v2.0 or later
- NAS backup jobs
- Nutanix AHV backup jobs
- Veeam Agent for MAC
- Veeam backups for Amazon and Microsoft Azure (via backup copy jobs)
The next thing to keep in mind is the limitations of using a SOBR as there are certain things you cannot do:
- Only Enterprise & Enterprise Plus License.
- You cannot use it as a target for configuration backup jobs, replications jobs, VM copy jobs, Veeam Agents v1.5 or earlier for Windows, or v1.0 Update1 or earlier for Linux.
- Adding a repository as an extent to a SOBR will not be allowed if there is an unsupported job using the repository.
- Rotating drives are not supported.
- You are unable to use the same extent in two scale-out repositories.
Please refer to the following limitations page on the Veeam Backup & Replication website for more details: https://helpcenter.veeam.com/docs/backup/vsphere/limitations-for-sobr.html?ver=110.
When it comes to the makeup of the scale-out repository, there are three tiers:
- Performance tier: Fast storage and fastest access to data
- Capacity tier: Typically, this is object storage for archival and offloading capabilities
- Archive tier: Additional object storage for long-term archival and infrequently accessed
You will want to ensure the performance tier is the fastest storage so that when access to files and restores is required, it is the quickest. When you create a standard repository before adding it to a SOBR, there are specific settings retained in the SOBR:
- The number of simultaneous tasks it can perform
- The storage read and write speeds
- Data decompression settings on the storage
- The block alignment settings of the storage
The SOBR will not inherit a repository backed by rotating drives or if you chose to use the per-VM backup option; this is on by default in a SOBR.
Something else to think about is the backup file placement policy that you will use. There are pros and cons to both and specific operating systems, such as ReFS and XFS, that require one over the other. The two types of placement policies are as follows:
- Data locality
- Performance
Please refer to the Performance Tier page on the Veeam Backup & Replication website for more information: https://helpcenter.veeam.com/docs/backup/vsphere/backup_repository_sobr_extents.html?ver=110.
Data locality allows the scale-out to place all backup files in the chain to the same extent within the SOBR, keeping files together. The metadata file (VBM) is located on all the extents in the SOBR for consistency and if files need to move extents. In contrast, the Performance policy will enable you to choose which extents to use for both full backup files (VBK) and incremental files (VIB).
For further information on backup placement, see this page on the Veeam Backup & Replication website: https://helpcenter.veeam.com/docs/backup/vsphere/backup_repository_sobr_placement.html?ver=110.
Now, when it comes to the capacity tier, there can only be one per scale-out, and it is required to be one of the following:

Figure 1.17 – Object Storage options for capacity extent
Using a capacity tier as part of your SOBR is suitable for the following reasons:
- You can tier off older data or when your SOBR reaches a specific percentage capacity to allow you to free up storage space.
- Company policy stipulates you keep a certain amount of data onsite, then all older data after X days is tiered off to the capacity tier.
- Using it falls into the 3-2-1-1-0 rule, where one copy of the information is offsite. See this blog post for more details on the 3-2-1-1-0 rule: https://www.veeam.com/blog/3-2-1-rule-for-ransomware-protection.html.
You specify the capacity tier after creating it as a standard repository and during the SOBR wizard:
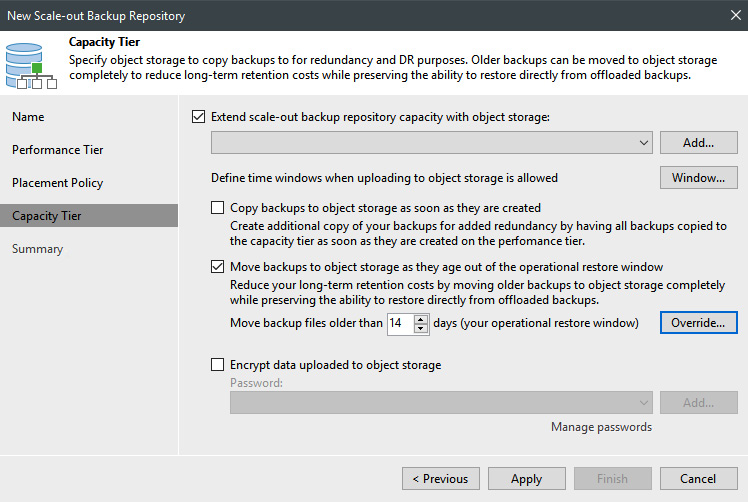
Figure 1.18 – Capacity tier of the scale-out wizard
Please visit the Capacity Tier page on the Veeam Backup & Replication website for more information: https://helpcenter.veeam.com/docs/backup/vsphere/capacity_tier.html?ver=110.
We are now going to tie everything we've learned together and create a SOBR. First, you need to open the Veeam Backup & Replication console and select the BACKUP INFRASTRUCTURE section at the bottom left. Then, click on the Scale-out Repositories option on the left:

Figure 1.19 – The Scale-out Repositories section of the console
Once you are in this section, you can either click the Add Scale-out Repository button in the toolbar or, on the right-hand pane, you can right-click and select Add Scale-out backup repository….
At this point, you must name the scale-out and give it a thoughtful description; the default name is Scale-out Backup Repository 1. Then, click Next to go to the Performance Tier section of the wizard:

Figure 1.20 – Scale-out wizard – Performance Tier
In this section, click the Add… button and choose the standard repositories that will be part of your scale-out. You can also click on the Advanced button to choose two options:
- Use per-VM backup files (recommended)
- Perform a full backup when the required extent is offline
Click the Next button to proceed. At this point, you must pick your placement policy, which will be Data Locality or Performance. As we mentioned previously, if you're using ReFS or XFS, you must select Data Locality to take advantage of the storage savings each operating system provides. Click Next after making your choice.
You can now choose to use Capacity Tier for your SOBR or just click the Apply button to finish. Note that when you select a capacity tier, there are several options you can enable:
- Copy backups to object storage as soon as they get created in the performance tier.
- Move backups to object storage as they age out of the restore window. The default is 14 days. You can also click on the Override button to specify offloading until space is below a certain percentage.
- You can also encrypt your data upload to the object storage as another level of security:

Figure 1.21 – Capacity tier selection for scale-out
Note that some capacity tier targets support immutability. This feature is an essential attribute in the war on ransomware. In v11a, capacity tier targets that support immutability include AWS S3 with object lock and S3-compatible object storage systems.
Please see the Veeam Readiness program to determine whether your object storage is supported here: https://www.veeam.com/alliance-partner-technical-programs.html?programCategory=objectImmutable.
Once complete, you will see your new scale-out repository. When you select it, you will see the performance tier extents and the capacity tier if you chose it:

Figure 1.22 – Scale-out repository created
If you want further information on the SOBR, visit this page on the Veeam Backup & Replication website: https://helpcenter.veeam.com/docs/backup/vsphere/sobr_add.html?ver=110.
The final thing to discuss is how to manage the SOBR after creating it. Once created, you may need to do any of the following:
- Edit its settings to change the performance policy, for example.
- You may need to rescan the repository to update the configuration in the database.
- Extend the performance tier by adding another extent to the SOBR.
- Put an extent in maintenance mode to either perform maintenance on the server that holds it or evacuate the backups to remove the extent.
- Switch an extent into what is called Sealed Mode, where you do not want any more writes to it but you can still restore from it. This allows you to replace the extent with a new one.
- Run a report on the SOBR.
- Remove an extent from the SOBR, which requires maintenance mode, evacuate, and then remove.
- Remove the SOBR altogether.
Once it's been set up within Veeam Backup & Replication, the SOBR is pretty self-sufficient. Still, there is maintenance that you need to do to ensure optimal performance, and plenty of storage is available for backups.
For more information on SOBR management, please visit the following page on the Veeam Backup & Replication website: https://helpcenter.veeam.com/docs/backup/vsphere/managing_sobr_data.html?ver=100.
Upgrading Veeam Backup & Replication to v11a
In this section, we will discuss the process that's required to upgrade your existing Veeam Backup & Replication environment to v11a. If you have Veeam Backup & Replication v10 installed, you can proceed with the following steps to conduct the upgrade.
Important Note
If you have Veeam Enterprise Manager installed on your server, you will get prompted to upgrade this first before upgrading Veeam Backup & Replication.
Once your server is ready and you have downloaded the ISO file and mounted it, follow these steps to upgrade your server and components:
- Run the
setup.exefile on the mounted ISO drive:

Figure 1.23 – Main installation screen – Upgrade
- Click on the Upgrade button under the Veeam Backup & Replication 11a section on the left or the Upgrade link on the right-hand side under Standalone components.
- You will be prompted to install the Microsoft Visual C++ runtime. Click OK to proceed. Once it's been installed, you may be prompted to reboot your server, so click YES to proceed:

Figure 1.24 – Installing Microsoft Visual C++
The preceding screenshot shows the Visual C++ Redistributable installation request. The following screenshot shows the Reboot option once Visual C++ Redistributable has been installed:

Figure 1.25 – Reboot prompt after installing Microsoft Visual C++
Note
You may need to mount the ISO again after rebooting the server before proceeding.
- At this point, you will see the License Agreement window, so you need to select the two checkboxes to place a checkmark and then click Next to continue.
- You will be shown which components are installed and will be upgraded during the process. Click Next to continue:

Figure 1.26 – Components to upgrade
- You will now need to provide a valid license file, whether it's been purchased or a trial; if you do not have one at this stage of the installation, you can click Next to continue, and Veeam will operate in the Community (Free) Edition. The upgrade should already show that the v10 license has been updated to v11a; otherwise, when you obtain the license file, you can install that within the application under the menu and license:

Figure 1.27 – The Provide License window
The following screenshot shows the Veeam Installer creating the v11a license from the existing license within your Veeam Backup and Replication software:

Figure 1.28 – License file during the upgrade process created
- After clicking Next, the installer will then do a system check for any prerequisites. Should something be missing, you will be prompted and have the option to install the missing components:

Figure 1.29 – System Configuration Check – missing components
- Click the Install button to install the missing components.
- Once all the components have passed, you can click Next to move to the next screen. The dialog box on the next page is where you specify your Veeam service account, which will be used during the installation. Here, select the The following user account: option:

Figure 1.30 – Service account for Veeam services
The account must have the following properties:
- Local administrator rights on the Veeam server.
- If you are using a separate SQL Server and not the Express edition that comes with the installation, you will need permission to update the database.
- You will need full NTFS permissions for the folder that will contain the catalog.
For all the detailed permissions, please visit
https://helpcenter.veeam.com/docs/backup/vsphere/required_permissions.html?ver=110.
For this setup, I am using an account that I created on my lab server. In contrast, in a production scenario, you would already have a service account set up in Active Directory to enter at this step.
- The next screen selects the SQL installation you are already using. In a lab, a scenario using SQL Express is good enough. The VeeamBackup database will also be upgraded as that will be used from the v10 installation. If you are in an enterprise environment, the recommended best practice is to use an external SQL Server for the best performance. Also, take note that you can use Windows authentication or SQL Server authentication:

Figure 1.31 – SQL Server instance for Veeam
- After selecting the appropriate options, click Next once more.
- Upon clicking Next, you will be reminded that the VeeamBackup databases will get upgraded. Click Yes to proceed.
- You will then be at the final screen, called Ready to Install, where you can turn on Update remote components automatically, which is highly recommended.
The installer is now ready to complete by stopping the services, upgrading the application, and processing the database upgrades. Veeam will also set the user account you selected to start all the services:

Figure 1.32 – Ready to Install – Update remote components automatically
- After reviewing the setup, click Install to proceed with the upgrade.
Note
The installation process for the upgrade can take some time to complete, depending on the size of your SQL database. Please be patient as it will tell you once it's finished.
- Once the installation has been completed, you will be presented with the Installation succeeded dialog. Click Finish to close the upgrade window:

Figure 1.33 – Installation succeeded window
- You may be prompted to restart your server for the configuration changes to take effect. Click Yes if you're prompted and allow your system to restart.
- Once your system has rebooted, launch the Veeam Backup & Replication console using the respective icon on your desktop. Click on the Connect button, and the application will open. All the components will have been upgraded based on the checkbox shown in Figure 1.32:

Figure 1.34 – Veeam Backup & Replication console login screen
Note
Had Update remote components automatically not been selected, you would have been prompted with a dialog that has all the components selected, and you would need to click Apply to proceed.
The upgrade process is now complete, and all of your jobs should continue to run as scheduled.
Summary
This chapter has provided you with the tools required to install Veeam Backup & Replication v11a and the components that make up the installation. We discussed the prerequisites, including the versions of SQL Server that you can use – Express or SQL Standard/Enterprise. Then, we addressed how to set up proxy servers, configuration best practices, and optimal settings. This part was then followed by a discussion on repositories, how to create them, and included best practices and optimizations for best performance. After, we looked at scale-out backup repositories and how to set them up, which included the performance tier, the capacity tier, and managing them once they've been set up. Lastly, we looked at the upgrade process for Veeam Backup & Replication to update an existing instance from version 10 to 11a.
This chapter should have helped ensure that you have all the basics covered. This will help in the next chapter, where we will look at the 3-2-1-1-0 rule and keeping data safe.