


 Download code from GitHub
Ever since I was 12 years old and wrote my first program in the basic programming language, programming has been a passion for me. Even as programming became my career, it always remained more of a passion than a job, but over the past few years, that passion has waned. I was unsure why I was losing that passion. I attempted to recapture it with some of my side projects, but nothing really brought back the excitement that I used to have. Then, something wonderful happened! Apple announced Swift. Swift is such an exciting and progressive language that it has brought a lot of that passion back and made programming fun for me again.
In this chapter, you will learn:
What Swift is
Some of the features of Swift
What Playgrounds are
How to use Playgrounds
What the basic syntaxes of the Swift language are
Swift is Apple's new programming language that was introduced at the Worldwide Developers Conference (WWDC) in 2014 alongside the integrated development environment Xcode 6 and iOS 8. Swift was arguably the most significant announcement at WWDC 2014 and very few people, including Apple insiders, were aware of the project's existence prior to it being announced.
It was amazing, even by Apple's standards, that they were able to keep Swift a secret for as long as they could and that no one suspected they were going to announce a new development language. At WWDC 2015, Apple made another big splash when they announced Xcode 7 and Swift 2. Swift 2 is a major enhancement to the Swift language. During that conference, Chris Lattner said that a lot of the enhancements were based on direct feedback that Apple received from the development community.
Swift can be thought of as Objective-C reimagined using modern concepts and safe programming patterns. In Apple's own words, Swift is like Objective-C without the C. Chris Lattner, the creator of Swift, said Swift took language ideas from Objective-C, Rust, Haskell, Ruby, Python, C#, CLU, and far too many others to list. At WWDC 2014, Apple really stressed that Swift was safe by default. Swift was designed to eliminate many common programming errors, making applications more secure and less prone to bugs. Swift 2 added two additional core features to the language—availability and error handling—which are designed to make it even easier to write safe code.
The development of Swift started in 2010 by Chris. He implemented much of the basic language structure with only a few people being aware of its existence. It wasn't until late 2011 that other developers began to really contribute to Swift and in July of 2013, it became a major focus of the Apple Developer Tools group.
Chris started working at Apple in the summer of 2005. He has held several positions in the Developers Tools group, and is currently the director and architect of that group. On his home page (http://www.nondot.org/sabre/), he notes that Xcode's Playgrounds (read more on Playgrounds a little later in this chapter) became a personal passion of his because it makes programming more interactive and approachable. We will be using Playgrounds a lot in the book as a test and experimentation platform.
There are a lot of similarities between Swift and Objective-C. Swift adopts the readability of Objective-C's named parameters and dynamic object model. When we refer to Swift as having a dynamic object model, we are referring to the ability for types to change at runtime. This includes adding new (custom) types and changing/extending the existing types.
Swift also provides seamless access to the existing Cocoa and Cocoa Touch frameworks. This gives Objective-C developers a certain amount of familiarity when they begin to learn Swift because how these frameworks functioned with Objective-C is how they function with Swift.
While there are a lot of similarities between Swift and Objective-C, there are significant differences between them as well. Swift's syntax and formatting are a lot closer to Python than Objective-C, but Apple did keep the curly braces. I know Python people would disagree with me, and that is all right because we all have different opinions, but I like the curly braces. Swift actually makes the curly braces required for control statements, such as if and while, which eliminates bugs, such as the goto fail, in Apple's SSL library.
Swift was also built to be fast. At WWDC 2014, Apple showed a number of benchmarks, which proved that Swift significantly outperformed Objective-C. Swift uses the LLVM compiler, which is included with Xcode 7 to transform the Swift code into highly optimized native code that is tuned to get the most out of Apple's modern hardware.
If you are an iOS or OS X developer and you are still not convinced that learning Swift is a good idea, then maybe this one paragraph from Apple's Swift page (https://developer.apple.com/swift/) will help convince you:
"Swift is a successor to the C and Objective-C languages. It includes low-level primitives such as types, flow control, and operators. It also provides object-oriented features such as classes, protocols, and generics, giving Cocoa and Cocoa Touch developers the performance and power they demand."
The first line in that paragraph, which says that Swift is a successor to the C and Objective-C languages, is the most important line. This line and other Apple documentation tell us that Apple sees the Swift language as its application and systems programming language of the future. While Objective-C is not going away anytime soon, it sounds like it will be taking a backseat to Swift in the very near future.
When Apple said that Swift is Objective-C without the C, they were really only telling us half of the story. Objective-C is a superset of C and provides object-oriented capabilities and a dynamic runtime to the C language. This meant that Apple needed to maintain compatibility with C, which limited the enhancements it could make to the Objective-C language. As an example, Apple could not change how the switch statement functioned and still maintains the C compatibility.
Since Swift did not need to maintain the same C compatibility as Objective-C, Apple was free to add any feature/enhancement to the language. This allowed Apple to include the best features from many of today's most popular and modern languages, such as Objective-C, Python, Java, Ruby, C#, Haskell, and many others.
The following chart shows a list of some of the most exciting enhancements that Swift includes:
|
Swift feature |
Description |
|---|---|
|
Type inference |
Swift can automatically deduce the type of the variable or constant, based on the initial value. |
|
Generics |
Generics allow us to write code only once to perform identical tasks for different types of objects. |
|
Collection mutability |
Swift does not have separate objects for mutable or non-mutable containers. Instead, you define mutability by defining the container as a constant or variable. |
|
Closure syntax |
Closures are self-contained blocks of functionality that can be passed around and used in our code. |
|
Optionals |
Optionals define a variable that might not have a value. |
|
Switch statement |
The Switch statement has been drastically improved. This is one of my favorite improvements. |
|
Multiple return types |
Functions can have multiple return types using tuples. |
|
Operator overloading |
Classes can provide their own implementation of the existing operators. |
|
enums with Associated values |
In Swift, we can do a lot more than just defining a group of related values with enumerations. |
There is one feature that I did not mention in the preceding chart because it is technically not a feature of Swift; it is a feature of Xcode and the compiler. This feature is Mix and Match, which allows us to create applications that contain both Objective-C and Swift files. It also allows us to systematically update the current Objective-C applications with Swift classes and use current Objective-C libraries/frameworks in our Swift applications.
Tip
Mix and Match lets Objective-C and Swift files coexist in the same project. This allows us to begin using Swift without throwing away our existing Objective-C code base or projects.
Before we begin our journey into the wonderful world of Swift development, let's take a detour and visit a place that I have loved ever since I was a kid—the playground.
When I was a kid, the best part of the school day was going to the playground. It really did not matter what we were playing; as long as we were on the playground, I knew it would be fun. When Apple introduced Playgrounds as part of Xcode 6, I was excited just by the name, but I wondered if Apple could make its Playground as fun as the playgrounds from my youth. While Apple's Playgrounds might not be as fun as playing kickball when I was 9 years old, it definitely brings a lot of fun back to experimenting and playing with code.
Playgrounds are interactive work environments that let us write code and see the results immediately. As changes are made to the code, the results also change in real time. This means that Playgrounds are a great way to learn and experiment with Swift.
Playgrounds also make it incredibly easy to try out the new APIs, prototype new algorithms, and demonstrate how code works. We will be using Playgrounds throughout this book to show how our sample code works. Therefore, before we really get into Swift development, let's spend some time learning about and getting comfortable with Playgrounds.
Do not worry if the Swift code does not make a lot of sense right now, as we go through the book, this code will begin to make sense. We are simply trying to get a feel of Playgrounds right now.
A Playground can have several sections, but the three that we will be using in this book are:
The following screenshot shows how the sections are arranged in a Playground:
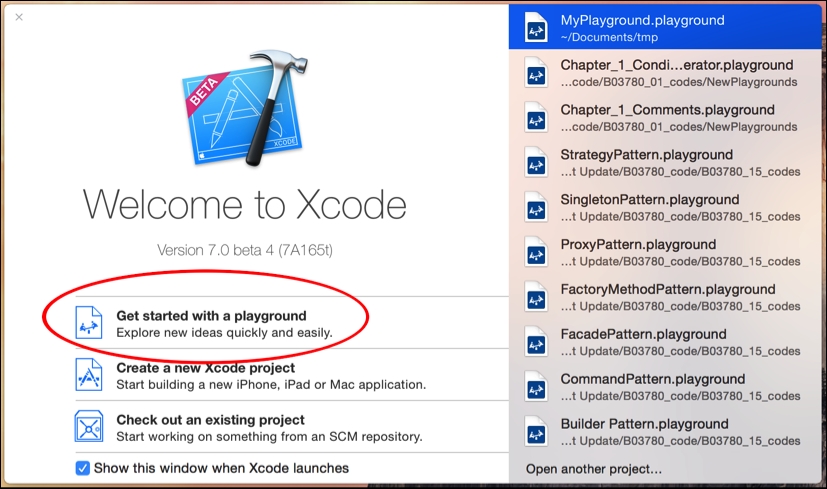
Let's start a new Playground. The first thing we need to do is to start Xcode. Once Xcode has started, we can select the Get started with a playground option, as shown in the following screenshot:
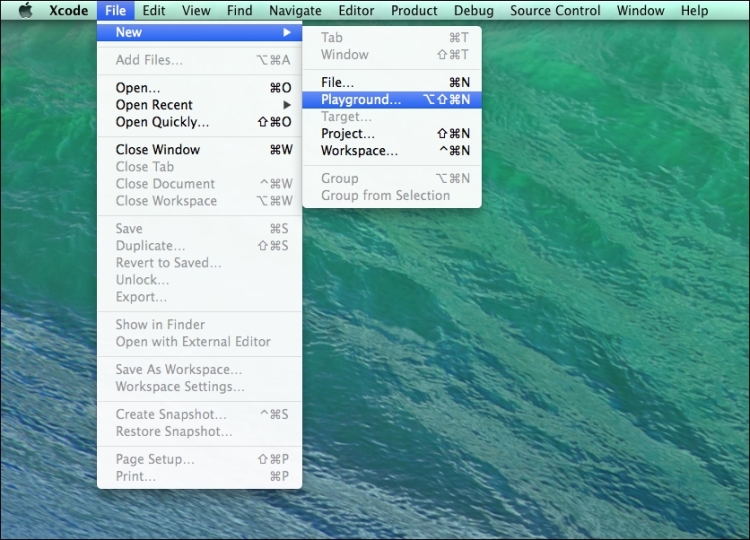
Alternatively, we can navigate to the Playground by going to File | New from the top menu bar, as shown in the following screenshot:
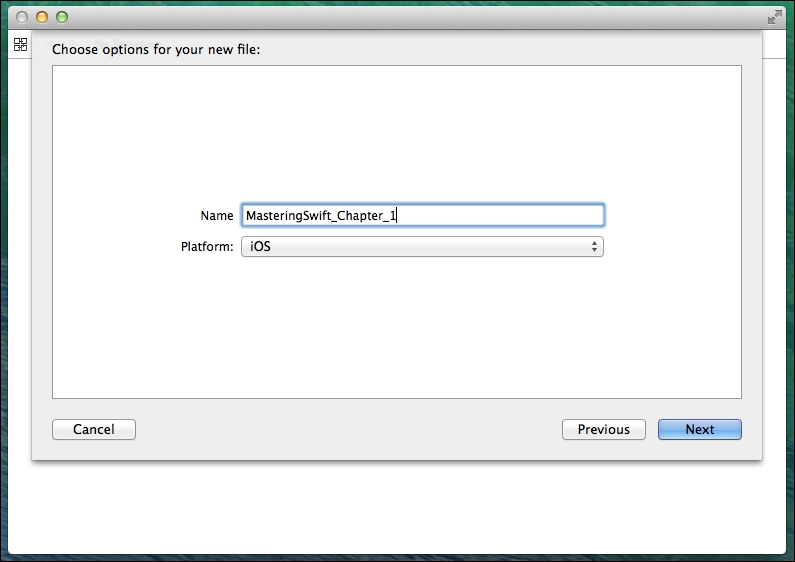
Next, we should see a screen similar to the following screenshot that lets us name our Playground and select whether the Playground is an iOS or OS X Playground.
For most of the examples in this book, it is safe to assume that you can select either iOS or OS X unless it is otherwise noted:
Finally, we are asked for the location to save our Playground. After we select the location, the Playground will open up and look similar to the following screenshot:
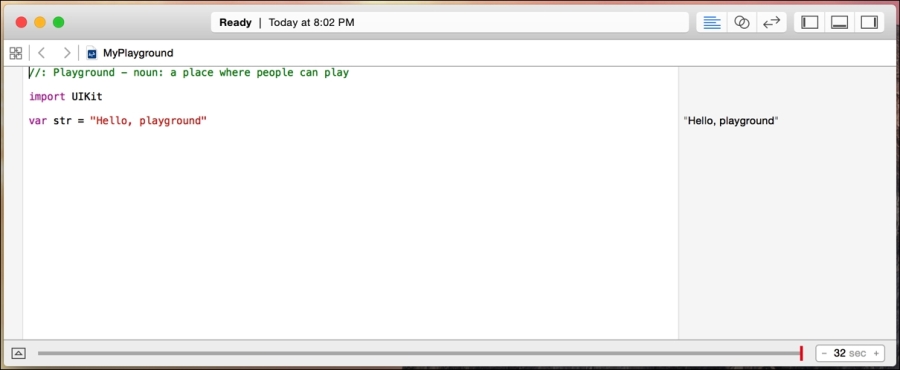
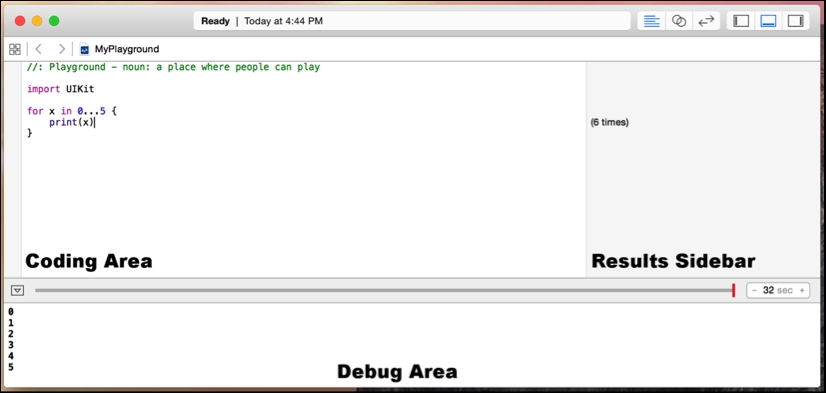
In the preceding screenshot, we can see that the coding area of the Playground looks similar to the coding area for an Xcode project. What is different here is the sidebar on the right-hand side. This sidebar is where the results of our code are shown. The code in the previous screenshot imports iOS' UIKit framework and sets a variable named str to the string, Hello, playground. You can see the content of the str string in the sidebar to the right of the code.
By default, a new Playground does not open the debug area. You can open it manually by pressing the shift + command + Y keys together. Later in the chapter, we will see why the debug area is so useful.
When you start a new iOS Playground, the Playground imports UIKit (Cocoa Touch). This gives us access to the UIKit framework that provides the core infrastructure for iOS applications. When we start a new OS X Playground, the Playground imports Cocoa. This gives us access to the OS X Cocoa framework.
What the last paragraph means is if we want to experiment with the specific features of either UIKit or Cocoa, we will need to open the correct Playground. As an example, if we have an iOS Playground open and we want to create an object that represents a color, we would use a UIColor object. If we had an OS X playground open, we would use an NSColor object to represent a color.
As you will see throughout this book, Playgrounds are great at showing the results of code as text in the results sidebar. However, they can also do a lot more than just text, such as images, graphs, and display views. Let's take a look at how we would show an image in a Playground. The first thing we need to do is to load the image into the resource directory of our Playground.
The following steps show how to load an image into the resource directory:
Let's begin by showing the project navigator sidebar. To do this, in the top menu bar, navigate to View | Navigators | Show Project Navigator or use the command + 1 keyboard shortcut. The project navigator looks similar to this:

Once we have the Project Navigator open, we can drag the image into the
Resourcesfolder so that we can access it from our code. Once we drag the image file over it and drop it, it will appear in theResourcesfolder, as shown here:
Now, we can access the image that is in our
Resourcesfolder within our code. The following screenshot shows how we would do this. The actual code that we use to access the image is not as important at this time as knowing how to access resources within a playground:
To view the image, we need to hover our cursor in the results sidebar over the section that shows the width and height of the image. In our example, the width and height section shows w 256 h 256. Once we hover the mouse pointer over the width and height, we should see two symbols, as shown in the following screenshot:

We can press either of the symbols to show the image. The one that is shaped like a circle with a plus sign in it will display the image within the playground's code section, while the one that looks like an eye will pop the image up outside the playground. The following screenshot shows what it shows if we press the circle with a plus sign in it:

Having the ability to create and display graphs can be very useful when we want to see the progression of our code. Let's look at how we can create and display graphs in a playground.
We can also graph the value of numeric variables over time. This feature is really useful when we are prototyping new algorithms because it allows us to see the value of the variable throughout the course of the calculations.
To see how graphing works, take a look at the following Playground:
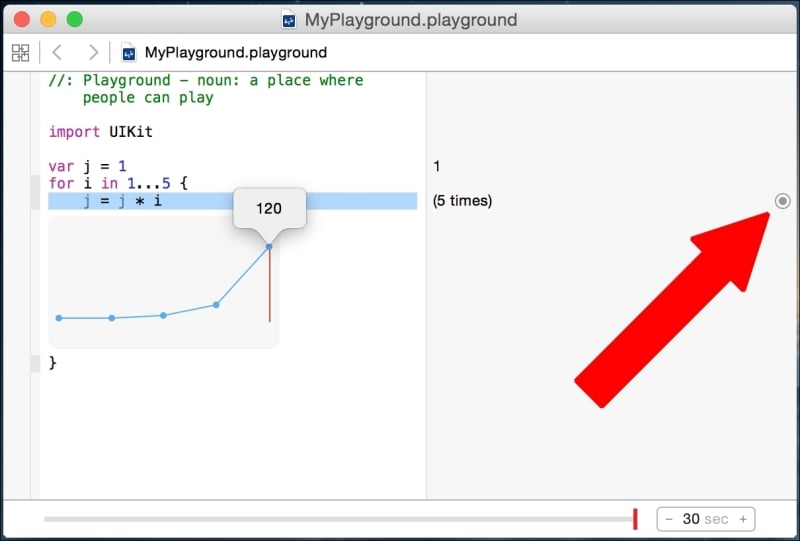
In this playground, we set the variable j to 1. Next, we create a for loop that assigns numbers 1 through 5 to the variable i. At each step in the for loop, we set the value of the variable j to the current value of j multiplied by i. The graph shows the values of the variable j at each step of the for loop. We will be covering for loops in detail later in this book.
To bring up the graph, click on the symbol that is shaped like a circle with a dot in it. We can then move the timeline slider to see the values of variable j at each step of the for loop.
There is a lot more that we can do with Playgrounds, and we have only scratched the surface in our quick introduction here. As we proceed through the book, we will be using Playgrounds for almost all of the sample code and demonstrate other features of Playgrounds as they are used.
Before we leave this brief introduction, let's take a look at what Playgrounds are not so that we can understand when not to use Playgrounds:
Playgrounds should not be used for performance testing: The performance you see from any code that is run in a Playground is not representative of how fast the code will run when it is in your projects
Playgrounds do not support user interaction: Users cannot interact with code that is run in a Playground
Playgrounds do not support on-device execution: You cannot run the code that is present in a Playground as an external application or on an external device
If you are an Objective-C developer, and you are not familiar with modern languages such as Python or Ruby, the code in the previous screenshots may have looked pretty strange. The Swift language syntax is a huge departure from Objective-C, which was based largely on Smalltalk and C.
The Swift language uses very modern concepts and syntax to create very concise and readable code. There was also a heavy emphasize on eliminating common programming mistakes. Before we get into the Swift language itself, let's take a look at some of the basic syntax of the Swift language.
Writing comments in Swift code is a little different from writing comments in Objective-C code. We still use the double slash // for single line comments and the /* and */ for multiline comments.
What has changed is how we document the parameters and the return value. To document any parameter, we use the :parm: field, and for the return value, we use the :return: field.
The following Playground shows examples of both single line and multiline comments to properly comment a function:
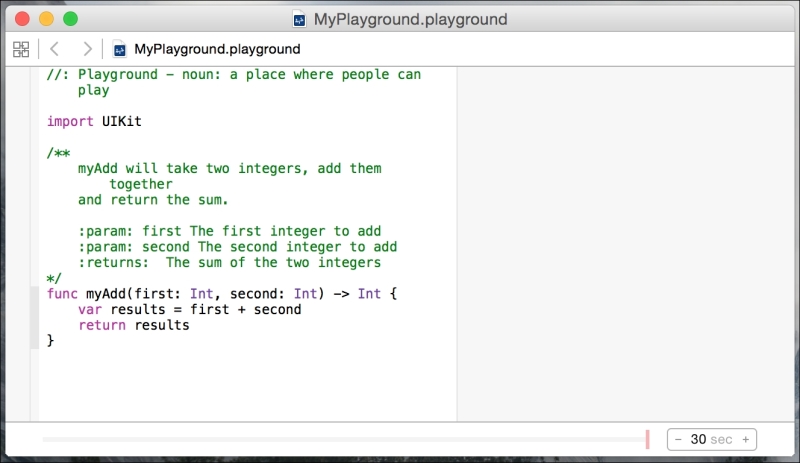
To write good comments, I would recommend using single line comments within a function to give quick one-line explanations of your code. We will then use the multiline comments outside of functions and classes to explain what the function and class does. The preceding Playground shows a good use of comments. By using proper documentation, as we did in the preceding screenshot, we can use the documentation feature within Xcode. If we hold down the option key and then click on the function name anywhere in our code, Xcode will display a popup with the description of the function.
This next screenshot shows what that popup would look similar to:
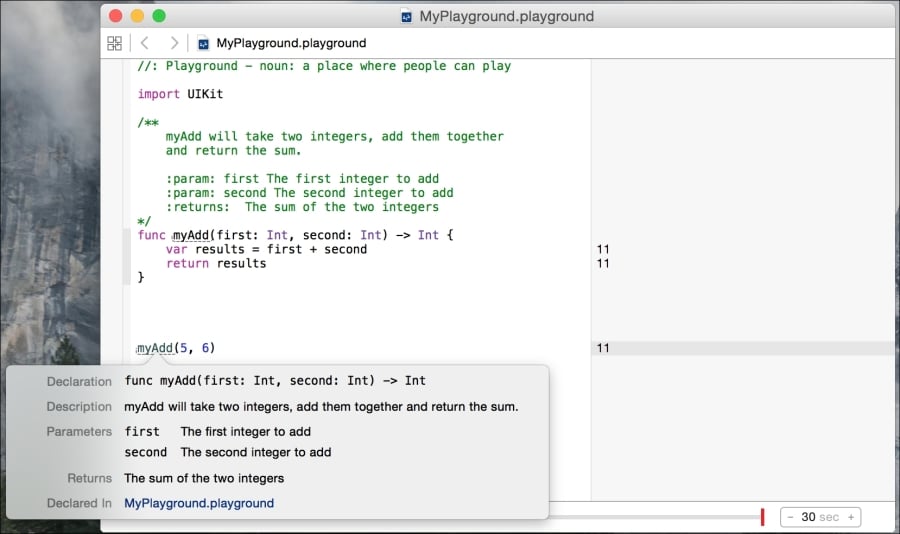
This screenshot shows the documentation feature of Xcode if we hold down the option key and then click on the myAdd() method. We can see that the documentation contains five fields. These fields are:
Declaration: This is the function's declaration
Description: This is the description of the function as it appears in the comments
Parameters: The parameter descriptions are prefixed with the
:param:tag in the comment sectionReturns: The return description is prefixed with the
:return:tag in the comment sectionDeclared In: This is the file that the function is declared in so that we can easily find it
You may have probably noticed, from the code samples so far, that we are not using semicolons at the end of lines. The semicolons are optional in Swift; therefore, both lines in the following Playground are valid in Swift. You can see the results of the code in the results sidebar, as shown in the following screenshot:
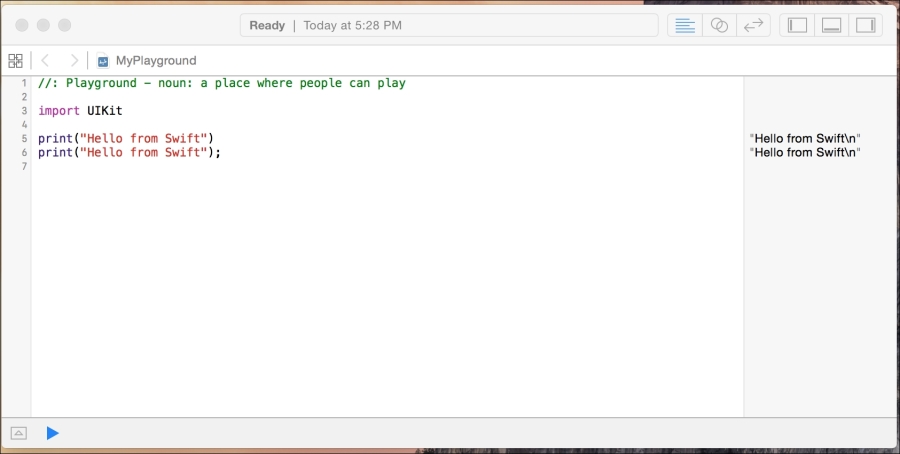
For style purposes, it is strongly recommended that you do not use semicolons in your Swift code. If you are really set on using semicolons in your code, then be consistent and use them on every line of code; however, Swift will not warn you if you forget them. I will stress again, that it is recommended that you do not use semicolons in Swift.
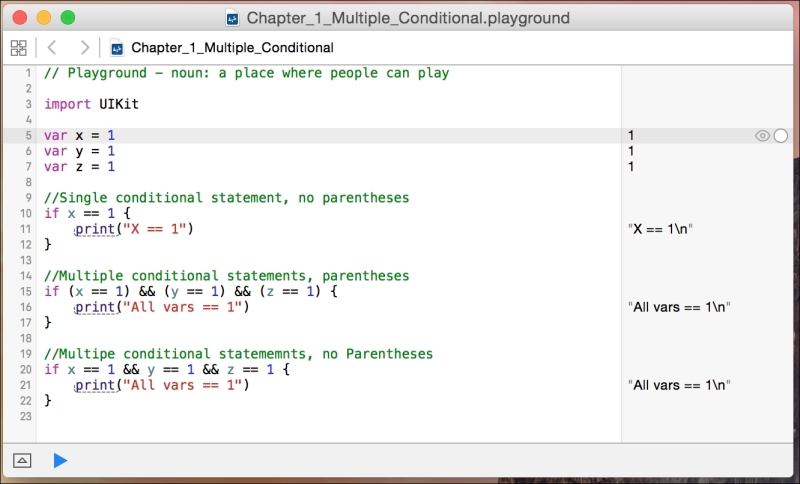
In Swift, parentheses around conditional statements are optional, for example, both if statements in the following Playground are valid. You can see the results of the code in the sidebar, as shown in the following screenshot:
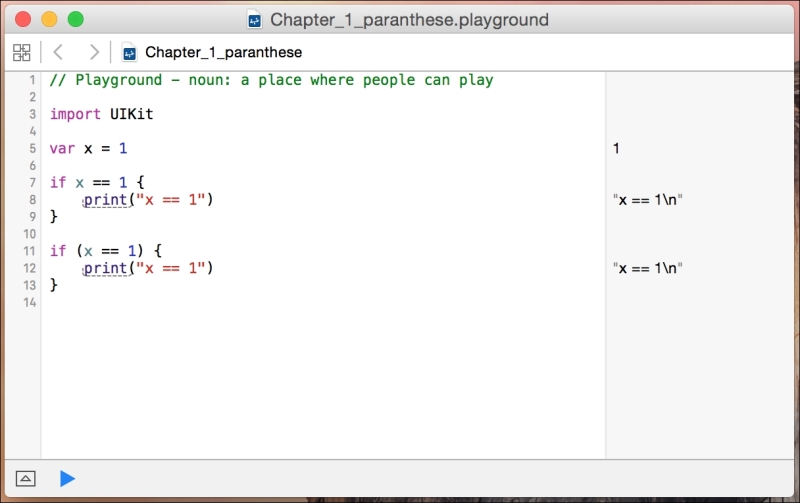
For style purposes, it is recommended that you do not include the parentheses in your code unless you have multiple conditional statements on the same line. For readability purposes, it is good practice to put parentheses around the individual conditional statements that are on the same line.
See the following Playground for samples:
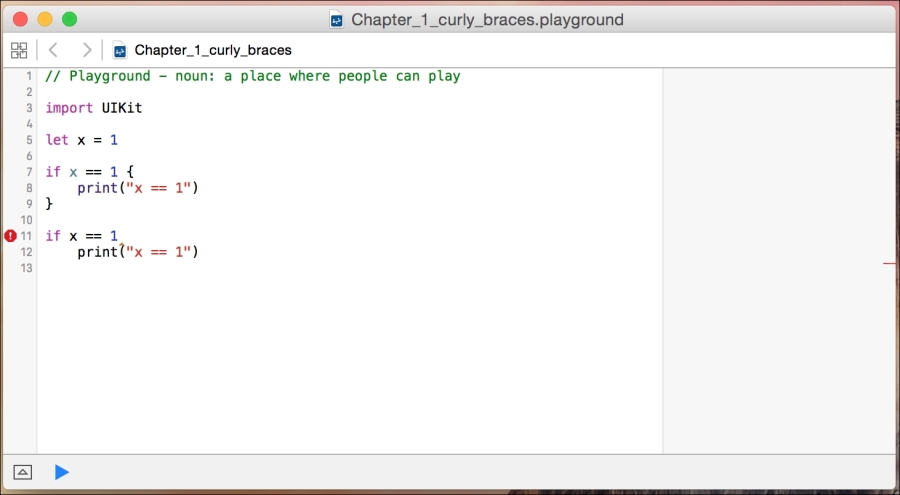
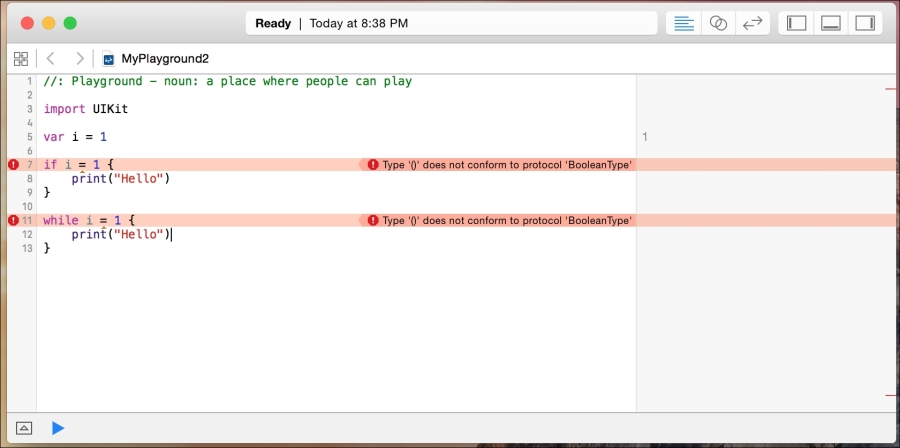
In Swift, unlike most other languages, the curly bracket is required after statements. This is one of the safety features that are built into Swift. Arguably, there have been numerous security bugs that may have been prevented if the developer would have used curly braces. A good example of this is Apple's goto fail bug. These bugs could also have been prevented by other means such as unit testing and code reviews, but requiring developers to use curly braces, in my opinion, is a good security standard.
The following Playground shows you what error you get if you forget to include the curly braces:
In most other languages, the following line of code is valid, but it probably is not what the developer meant to do:
if (x = 1) {}Tip
Downloading the example code
You can download the example code files from your account at http://www.packtpub.com for all the Packt Publishing books you have purchased. If you purchased this book elsewhere, you can visit http://www.packtpub.com/support and register to have the files e-mailed directly to you.
In Swift, this statement is not valid. Using an assignment operator (=) in a conditional statement (if and while) will throw an error. This is another safety feature built into Swift. It prevents the developer from forgetting the second equals sign (=) in a comparison statement. This error is shown in the following Playground:

All good computer books that are written to teach a computer language have a section that shows a user how to write a Hello World application. This book is no exception. In this section, we will show you how to write two different Hello World applications.
Our fist Hello World application will be the traditional Hello World application that simply prints Hello World to the console. Let's begin by creating a new Playground and naming it Chapter_1_Hello_World. The Playground can be either an iOS or an OS X Playground.
In Swift, to print a message to the console, we use the print() function. The print() function has been greatly enhanced in Swift 2. Prior to Swift 2, we had two separate print functions: print() and println(). Now both of these functions have been combined into the single print() function.
In the most basic form, to print out a single message, we would use the print function as shown in the following code:
print("Hello World")Usually, when we use the print() function, we want to print more than just static text. We can include the value of variables and/or constants using a special sequence of characters, \( ), or by separating the values within the print() function with commas. The following code shows how to do this:
var name = "Jon"
var language = "Swift"

var message1 = " Welcome to the wonderful world of "
var message2 = "\(name) Welcome to the wonderful world of \(language)!"

print(name, message1, language, "!")
print(message2)
We can also define two parameters in the print function that change how the message is displayed in the console. These parameters are the separator and terminator parameters. The separator parameter defines a string that is used to separate the values of the variables/constant in the print() function. By default, the print() function separates each variable/constant with a space. The terminator parameter defines what character is put at the end of the line. By default, the newline character is added at the end of the line.
The following code shows how we would create a comma-separated list that does not have a newline character at the end:
var name1 = "Jon"
var name2 = "Kim"
var name3 = "Kailey"
var name4 = "Kara"

print(name1, name2, name3, name4, separator:", ", terminator:"")
There is one other parameter that we can add to our print() function. This is the toStream parameter. This parameter will let us redirect the output of the print() function. In the following example, we redirect the output to a variable named line:
var name1 = "Jon"
var name2 = "Kim"
var name3 = "Kailey"
var name4 = "Kara"

var line = ""

print(name1, name2, name3, name4, separator:", ", terminator:"", toStream:&line)
The print() function use to simply be a useful tool for basic debugging, but now with the new enhanced print() function, we can use it for a lot more.
In this chapter, we showed you how to start and use Playgrounds to experiment with Swift programming. We also covered the basic Swift language syntax and discussed proper language styles. The chapter concluded with two Hello World examples.
In the next chapter, we will see how to use variables and constants in Swift. We will also look at the various data types and how to use operators in Swift.

