


A large deployment will have a large number of nodes. If you are growing your installation from scratch, you might have to start with a single Puppet master. At a certain point in your deployment, a single Puppet master just won't cut it—the load will become too great. In my experience, this limit is around 600 nodes. Puppet agent runs begin to fail on the nodes and catalogs fail to compile. There are two ways to deal with this problem: divide and conquer or conquer by dividing.
That is, we can either split up our Puppet master, dividing the workload among several machines, or we can make each of our nodes apply our code directly using Puppet agent (this is known as a masterless configuration). We'll examine each of these solutions separately.
When you start to think about dividing up your puppetserver, the main thing to realize is that many parts of Puppet are simply HTTP TLS transactions. If you treat these things as a web service, you can scale up to any size required, using HTTP load balancing techniques.
Puppet is a web service. There are several different components supporting that web service, as shown in the following diagram:
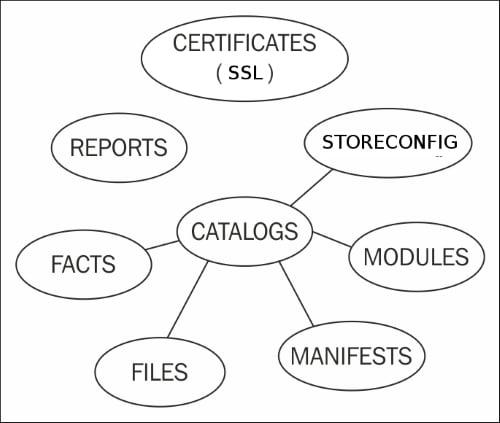
Each of the different components in your Puppet infrastructure (SSL CA, reporting, storeconfigs, and catalog) compilation can be split up into their own server or servers, as explained in the following sections.
Unless you are having issues with certificate signing consuming too many resources, it's simpler to keep the signing machine as a single instance, possibly with a hot spare. Having multiple certificate signing machines means that you have to keep certificate revocation lists synchronized.
Reporting should be done on a single instance if possible. Reporting options will be covered in Chapter 7, Reporting and Orchestration.
Storeconfigs should be run on a single server; storeconfigs allows for exported resources and is optional. The recommended configuration for storeconfigs is PuppetDB, which can handle several thousand nodes in a single installation.
Catalog compilation is one task that can really bog down your Puppet installation. Splitting compilation among a pool of workers is the biggest win to scale your deployment. The idea here is to have a primary point of contact for all your nodes—the load balancer. Then, using proxying techniques, the load balancer will direct requests to specific worker machines within your Puppet infrastructure. From the perspective of the nodes checking into Puppet master, all the interaction appears to come from the main load balancing machine.
When nodes contact the Puppet master, they do so using an HTTP REST API, which is TLS encrypted. The resource being requested by a node may be any of the accepted REST API calls, such as catalog, certificate, resource, report, file_metadata, or file_content. A complete list of the HTTP APIs is available at http://docs.puppetlabs.com/guides/rest_api.html.
When nodes connect to the Puppet master, they connect to the master service. In prior versions of Puppet (versions 3.6 and older), the accepted method to run the Puppet master service was through the Passenger framework. In Puppet 3.7 and above, this was replaced with a new server, puppetserver. Puppet version 4 and above have deprecated Passenger; support for Passenger may be completely removed in a future release. puppetserver runs Puppet as a JRuby process within a JVM that is wrapped by a Jetty web server. There are many moving parts in the new puppetserver service, but the important thing is that Puppet Labs built this service to achieve better performance than the older Passenger implementation. A Puppet master running the puppetserver service can typically handle around 5,000 individual nodes; this is a vast improvement.
Note
A quick word on versions, Puppet has now changed how they distribute Puppet. Puppet is now distributed as an all-in-one package. This package includes the required Ruby dependencies all bundled together. This new packaging has resulted in a new package naming scheme, named Puppet collections or PC. Numbering begins at 1 for the PC packages, so you will see PC1 as the package and repository name, the version of Puppet contained within those packages is version 4. Additionally, Puppet Enterprise has changed its name to a year based system; the first release of that series was 2015.1, which had a PC release of 1.2.7. More information on Puppet collections can be found at https://puppetlabs.com/blog/welcome-puppet-collections.
The puppetserver uses the same design principles as PuppetDB. PuppetDB uses a new framework named Trapperkeeper. Trapperkeeper is written in Clojure and is responsible for managing the HTTP/TLS endpoints that are required to serve as a Puppet master server. More information about Trapperkeeper is available at the project website at https://github.com/puppetlabs/trapperkeeper.
To build a split Puppet master configuration, we will first start with an empty machine running an enterprise Linux distribution, such as CentOS, RedHat Enterprise Linux, or Springdale Linux. I will be using Springdale Linux 7 for my example machines. More information on Springdale is available at https://springdale.math.ias.edu/. I will start by building a machine named lb (load balancer), as my first Puppet master. The puppetserver process uses a lot of memory; the lb machine needs to have at least 2.5GB of memory to allow the puppetserver process to run.
Tip
If you are setting up a lab environment where you won't run a large number of nodes, you can reconfigure puppetserver to use less memory. More information is available at http://docs.puppetlabs.com/puppetserver/latest/install_from_packages.html#memory-allocation.
To enable the puppetserver service on a node, install the Puppet Labs yum repository rpm onto the machine. At the time of writing, the latest release rpm is puppetlabs-release-pc1-0.9.2-1.el7.noarch.rpm, which is available from Puppet Labs at http://yum.puppetlabs.com/el/7/PC1/x86_64/puppetlabs-release-pc1-0.9.2-1.el7.noarch.rpm.
This is to be installed using the following yum command:
[thomas@lb ~]$ sudo yum install http://yum.puppetlabs.com/el/7/PC1/x86_64/puppetlabs-release-pc1-0.9.2-1.el7.noarch.rpm
puppetlabs-release-pc1-0.9.2-1.el7.noarch.rpm               | 4.1 kB  00:00:00
...

Installed:
puppetlabs-release-pc1.noarch 0:0.9.2-1.el7

Complete!
After installing the puppetlabs-release-pc1 rpm, install the puppetserver rpm. This can be done with the following command:
[thomas@lb ~]$ sudo yum install puppetserver
Installing puppetserver will automatically install a few Java dependencies. Installing puppetserver will also install the puppet-agent rpm onto your system. This places the Puppet and Facter applications into /opt/puppetlabs/bin. This path may not be in your PATH environment variable, so you need to add this to your PATH variable either by adding a script to the /etc/profile.d directory or appending the path to your shell initialization files.
Tip
If you are using sudo, then you will have to add /opt/puppetlabs/bin to your secure_path setting in /etc/sudoers, as well.
Now that the server is installed, we'll need to generate new X.509 certificates for our Puppet infrastructure.
To generate certificates, we need to initialize a new CA on the lb machine. This can be done easily using the puppet cert subcommand, as shown here:
[thomas@lb ~]$ sudo /opt/puppetlabs/bin/puppet cert list -a
Notice: Signed certificate request for ca
With the CA certificate generated, we can now create a new certificate for the master. When nodes connect to Puppet, they will search for a machine named puppet. Since the name of my test machine is lb, I will alter Puppet configuration to have Puppet believe that the name of the machine is puppet. This is done by adding the following to the puppet.conf file in either the [main] or [master] sections. The file is located in /etc/puppetlabs/puppet/puppet.conf:
certname = puppet.example.com
The domain of my test machine is example.com and I will generate the certificate for lb with the example.com domain defined. To generate this new certificate, we will use the puppet certificate generate subcommand, as shown here:
[thomas@lb ~]$ sudo /opt/puppetlabs/bin/puppet certificate generate --dns-alt-names puppet,puppet.example.com,puppet.dev.example.com puppet.example.com --ca-location local
Notice: puppet.example.com has a waiting certificate request
true
Now, since the certificate has been generated, we need to sign the certificate, as shown here:
[thomas@lb ~]$ sudo /opt/puppetlabs/bin/puppet cert sign puppet.example.com --allow-dns-alt-names
Notice: Signed certificate request for puppet.example.com
Notice: Removing file Puppet::SSL::CertificateRequestpuppet.example.com at '/etc/puppetlabs/puppet/ssl/ca/requests/puppet.example.com.pem'
The signed certificate will be placed into the /etc/puppetlabs/puppet/ssl/ca/signed directory; we need to place the certificate in the /etc/puppetlabs/puppet/ssl/certs directory. This can be done with the puppet certificate find command, as shown here:
[thomas@lb ~]$ sudo puppet certificate find puppet.example.com --ca-location local
-----BEGIN CERTIFICATE-----
MIIFvDCCA6SgAwIBAgIBAjANBgkqhkiG9w0BAQsFADAoMSYwJAYDVQQDDB1QdXBw
...
9ZLNFwdQ4iMxenffcEQErMfkT6fjcvdSIjShoIe3Myk=
-----END CERTIFICATE-----
In addition to displaying the certificate, the puppet cert sign command will also place the certificate into the correct directory.
With the certificate in place, we are ready to start the puppetserver process.
Enterprise Linux 7 (EL7) based distributions now use systemd to control the starting and stopping of processes. EL7 distributions still support the service command to start and stop services. However, using the equivalent systemd commands is the preferred method and will be used in this book. systemd is a complete rewrite of the System V init process and includes many changes from traditional UNIX init systems. More information on systemd can be found on the freedesktop website at http://www.freedesktop.org/wiki/Software/systemd/.
To start the puppetserver service using systemd, use the systemctl command, as shown here:
[thomas@lb ~]$ sudo systemctl start puppetserver
puppetserver will start after a lengthy process of creating JVMs. To verify that puppetserver is running, verify that the Puppet master port (TCP port 8140) is listening for connections with the following command:
[thomas@lb ~]$ sudo lsof -i :8140
COMMAND  PID   USER   FD   TYPE DEVICE SIZE/OFF NODE NAME
java    4299 puppet   28u  IPv6  37899      0t0  TCP *:8140 (LISTEN)
At this point, your server will be ready to accept connections from Puppet agents. To ensure that the puppetserver service is started when our machine is rebooted, use the enable option with systemctl, as shown here:
[root@puppet ~]# sudo systemctl enable puppetserver.service
ln -s '/usr/lib/systemd/system/puppetserver.service' '/etc/systemd/system/multi-user.target.wants/puppetserver.service'
With Puppet master running, we can now begin to configure a load balancer for our workload.
At this point, the lb machine is acting as a Puppet master running the puppetserver service. Puppet agents will not be able to connect to this service. By default, EL7 machines are configured with a firewall service that will prevent access to port 8140. At this point, you can either configure the firewall using firewalld to allow the connection, or disable the firewall.
Note
Host based firewalls can be useful; by disabling the firewall, any service that is started on our server will be accessible from outside machines. This may potentially expose services we do not wish to expose from our server.
To disable the firewall, issue the following commands:
[thomas@client ~]$ sudosystemctl disable firewalld.service
rm '/etc/systemd/system/dbus-org.fedoraproject.FirewallD1.service'
rm '/etc/systemd/system/basic.target.wants/firewalld.service'
[thomas@client ~]$ sudosystemctl stop firewalld.service
Alternatively, to allow access to port 8140, issue the following commands:
[thomas@lb ~]$ sudo firewall-cmd --add-port=8140/tcp
success
[thomas@lb ~]$ sudo firewall-cmd --add-port=8140/tcp --permanent
success
We will now create a load balancing configuration with three servers: our first lb machine and two machines running puppetserver and acting as Puppet masters. I will name these puppetmaster1 and puppetmaster2.
To configure the lb machine as a load balancer, we need to reconfigure puppetserver in order to listen on an alternate port. We will configure Apache to listen on the default Puppet master port of 8140. To make this change, edit the webserver.conf file in the /etc/puppetlabs/puppetserver/conf.d directory, so that its contents are the following:
webserver: {
  access-log-config = /etc/puppetlabs/puppetserver/request-logging.xml
  client-auth = want
  ssl-host = 0.0.0.0
  ssl-port = 8141
  host = 0.0.0.0
  port = 18140
}
This will configure puppetserver to listen on port 8141 for TLS encrypted traffic and port 18140 for unencrypted traffic. After making this change, we need to restart the puppetserver service using systemctl, as follows:
[thomas@lb ~]$ sudo systemctl restart puppetserver.service
Next, we will configure Apache to listen on the master port and act as a proxy to the puppetserver process.
To configure Apache to act as a proxy service for our load balancer, we will need to install httpd, the Apache server. We will also need to install the mod_ssl package to support encryption on our load balancer. To install both these packages, issue the following yum command:
[thomas@lb~]$ sudo yum install httpd mod_ssl
Next, create a configuration file for the load balancer that uses the puppet.example.com certificates, which we created earlier. Create a file named puppet_lb.conf in the /etc/httpd/conf.d directory with the following contents:
Listen 8140
<VirtualHost *:8140>
  ServerNamepuppet.example.com
  SSLEngine on
  SSLProtocol -ALL +TLSv1 +TLSv1.1 +TLSv1.2
  SSLCipherSuite ALL:!ADH:RC4+RSA:+HIGH:+MEDIUM:-LOW:-SSLv2:-EXP
  SSLCertificateFile /etc/puppetlabs/puppet/ssl/certs/puppet.example.com.pem
  SSLCertificateKeyFile /etc/puppetlabs/puppet/ssl/private_keys/puppet.example.com.pem
  SSLCertificateChainFile /etc/puppetlabs/puppet/ssl/ca/ca_crt.pem
  SSLCACertificateFile    /etc/puppetlabs/puppet/ssl/ca/ca_crt.pem
  # If Apache complains about invalid signatures on the CRL, you can try disabling
  # CRL checking by commenting the next line, but this is not recommended.
  SSLCARevocationFile     /etc/puppetlabs/puppet/ssl/ca/ca_crl.pem
  SSLVerifyClient optional
  SSLVerifyDepth  1
  # The `ExportCertData` option is needed for agent certificate expiration warnings
  SSLOptions +StdEnvVars +ExportCertData
  # This header needs to be set if using a loadbalancer or proxy
  RequestHeader unset X-Forwarded-For
  RequestHeader set X-SSL-Subject %{SSL_CLIENT_S_DN}e
  RequestHeader set X-Client-DN %{SSL_CLIENT_S_DN}e
  RequestHeader set X-Client-Verify %{SSL_CLIENT_VERIFY}e

  ProxyPassMatch ^/(puppet-ca/v[123]/.*)$ balancer://puppetca/$1
  ProxyPass / balancer://puppetworker/
  ProxyPassReverse / balancer://puppetworker

  <Proxy balancer://puppetca>
    BalancerMember http://127.0.0.1:18140
  </Proxy>
  <Proxy balancer://puppetworker>
    BalancerMember http://192.168.0.100:18140
    BalancerMember http://192.168.0.101:18140
  </Proxy>

</VirtualHost>
This configuration creates an Apache VirtualHost that will listen for connections on port 8140 and redirect traffic to one of the three puppetserver instances. One puppetserver instance is the instance running on the load balancer machine lb. The other two are Puppet master servers, which we have not built yet. To continue with our configuration, create two new machines and install puppetserver, as we did on the lb machine; name these servers, as puppetmaster1 and puppetmaster2.
In our load balancing configuration, communication between the lb machine and the Puppet masters will be unencrypted. To maintain security, a private network should be established between the lb machine and the Puppet masters. In my configuration, I gave the two Puppet masters IP addresses 192.168.0.100 and 192.168.0.101, respectively. The lb machine was given the IP address 192.168.0.110.
The following lines in the Apache configuration are used to create two proxy balancer locations, using Apache's built-in proxying engine:
<Proxy balancer://puppetca>
  BalancerMember http://127.0.0.1:18140
</Proxy>
<Proxy balancer://puppetworker>
  BalancerMember http://192.168.0.100:18140
  BalancerMember http://192.168.0.101:18140
</Proxy>
The puppetca balancer points to the local puppetserver running on lb. The puppetworker balancer points to both puppetmaster1 and puppetmaster2 and will round robin between the two machines.
The following ProxyPass and ProxyPassMatch configuration lines direct traffic between the two balancer endpoints:
ProxyPassMatch ^/(puppet-ca/v[123]/.*)$ balancer://puppetca/$1
ProxyPass / balancer://puppetworker/
ProxyPassReverse / balancer://puppetworker
These lines take advantage of the API redesign in Puppet 4. In previous versions of Puppet, the Puppet REST API defined the endpoints using the following syntax:
environment/endpoint/value
The first part of the path is the environment used by the node. The second part is the endpoint. The endpoint may be one of certificate, file, or catalog (there are other endpoints, but these are the important ones here). All traffic concerned with certificate signing and retrieval will have the word "certificate" as the endpoint. To redirect all certificate related traffic to a specific machine, the following ProxyPassMatch directive can be used:
ProxyPassMatch ^/([^/]+/certificate.*)$ balancer://puppetca/$1
Indeed, this was the ProxyPassMatch line that I used when working with Puppet 3 in the previous version of this book. Starting with Puppet 4, the REST API URLs have been changed, such that all certificate or
certificate authority (CA) traffic is directed to the puppet-ca endpoint. In Puppet 4, the API endpoints are defined, as follows:
/puppet-ca/version/endpoint/value?environment=environment
Or, as follows:
puppet/version/endpoint/value?environment=environment
The environment is now placed as an argument to the URL after ?. All CA related traffic is directed to the /puppet-ca URL and everything else to the /puppet URL.
To take advantage of this, we use the following ProxyPassMatch directive:
ProxyPassMatch ^/(puppet-ca/v[123]/.*)$ balancer://puppetca/$1
With this configuration in place, all certificate traffic is directed to the puppetca balancer.
In the next section, we will discuss how TLS encryption information is handled by our load balancer.
When a Puppet agent connects to a Puppet master, the communication is authenticated with X.509 certificates. In our load balancing configuration, we are interjecting ourselves between the nodes and the puppetserver processes on the Puppet master servers. To allow the TLS communication to flow, we configure Apache to place the TLS information into headers, as shown in the following configuration lines:
# This header needs to be set if using a loadbalancer or proxy
RequestHeader unset X-Forwarded-For
RequestHeader set X-SSL-Subject %{SSL_CLIENT_S_DN}e
RequestHeader set X-Client-DN %{SSL_CLIENT_S_DN}e
RequestHeader set X-Client-Verify %{SSL_CLIENT_VERIFY}e
These lines take information from the connecting nodes and place them into HTTP headers that are then passed to the puppetserver processes. We can now start Apache and begin answering requests on port 8140.
Security-Enhanced Linux (SELinux) is a system for Linux that provides support for
mandatory access controls (MAC). If your servers are running with SELinux enabled, great! You will need to enable an SELinux Boolean to allow Apache to connect to the puppetserver servers on port 18140. This Boolean is httpd_can_network_connect. To set this Boolean, use the setsebool command, as shown here:
[thomas@lb ~]$ sudo setsebool -P httpd_can_network_connect=1
SELinux provides an extra level of security. For this load balancer configuration, the Boolean is the only SELinux configuration change that was required. If you have unexplained errors, you can check for SELinux AVC messages in /var/log/audit/audit.log. To allow any access that SELinux is denying, you use the setenforce command, as shown here:
[thomas@lb ~]$ sudo setenforce 0
More information on SELinux is available at http://selinuxproject.org/page/Main_Page.
Now a configuration change must be made for the puppetserver processes to access certificate information passed in headers. The master.conf file must be created in the /etc/puppetlabs/puppetserver/conf.d directory with the following content:
master: {
  allow-header-cert-info: true
}
After making this change, puppetserver must be restarted.
At this point, there will be three puppetserver processes running; there will be one on each of the Puppet masters and another on the lb machine.
Before we can use the new master servers, we need to copy the certificate information from the lb machine. The quickest way to do this is to copy the entire /etc/puppetlabs/puppet/ssl directory to the masters. I did this by creating a TAR file of the directory and copying the TAR file using the following commands:
[root@lb puppet]# cd /etc/puppetlabs/puppet
[root@lb puppet]# tar cf ssl.tar ssl
With the certificates in place, the next step is to configure Puppet on the Puppet masters.
To test the configuration of the load balancer, create site.pp manifests in the code production directory /etc/puppetlabs/code/environments/production/manifests with the following content:
node default {
  notify { "compiled on puppetmaster1": }
}
Create the corresponding file on puppetmaster2:
node default {
  notify { "compiled on puppetmaster2": }
}
With these files in place and the puppetserver processes running on all three machines, we can now test our infrastructure. You can begin by creating a client node and installing the puppetlabs release package and then the puppet-agent package. With Puppet installed, you will need to either configure DNS, such that the lb machine is known as puppet or add the IP address of the lb machine to /etc/hosts as the puppet machine, as shown here:
192.168.0.110 puppet.example.com puppet
Next, start the Puppet agent on the client machine. This will create a certificate for the machine on the lb machine, as shown here:
[thomas@client ~]$ sudo puppet agent -t
Info: Creating a new SSL key for client
Info: csr_attributes file loading from /etc/puppetlabs/puppet/csr_attributes.yaml
Info: Creating a new SSL certificate request for client
Info: Certificate Request fingerprint (SHA256): FE:D1:6D:70:90:10:9E:C9:0E:D7:3B:BA:3D:2C:71:93:59:40:02:64:0C:FC:D4:DD:8E:92:EF:02:7F:EE:28:52
Exiting; no certificate found and waitforcert is disabled
On the lb machine, list the unsigned certificates with the puppet cert list command, as shown here:
[thomas@lb ~]$ sudo puppet cert list
  "client" (SHA256) FE:D1:6D:70:90:10:9E:C9:0E:D7:3B:BA:3D:2C:71:93:59:40:02:64:0C:FC:D4:DD:8E:92:EF:02:7F:EE:28:52
Now sign the certificate using the puppet cert sign command, as shown:
[thomas@lb ~]$ sudo puppet cert sign client
Notice: Signed certificate request for client
Notice: Removing file Puppet::SSL::CertificateRequest client at '/etc/puppetlabs/puppet/ssl/ca/requests/client.pem'
With the certificate signed, we can run puppet agent again on the client machine and verify the output:
[thomas@client ~]$ sudo puppet agent -t
Info: Retrieving pluginfacts
Info: Retrieving plugin
Info: Caching catalog for client
Info: Applying configuration version '1441254717'
Notice: compiled on puppetserver1
Notice: /Stage[main]/Main/Node[default]/Notify[compiled on puppetmaster1]/message: defined 'message' as 'compiled on puppetmaster1'
Notice: Applied catalog in 0.04 seconds
If we run the agent again, we might see another message from the other Puppet master:
[thomas@client ~]$ sudo puppet agent -t
Info: Retrieving pluginfacts
Info: Retrieving plugin
Info: Caching catalog for client
Info: Applying configuration version '1441256532'
Notice: compiled on puppetmaster2
Notice: /Stage[main]/Main/Node[default]/Notify[compiled on puppetmaster2]/message: defined 'message' as 'compiled on puppetmaster2'
Notice: Applied catalog in 0.02 seconds
An important thing to note here is that the certificate for our client machine is only available on the lb machine. When we list all the certificates available on puppetmaster1, we only see the puppet.localdomain certificate, as shown in the following output:
[thomas@puppet ~]$ sudo puppet cert list -a
+ "puppet.example.com" (SHA256) 9B:C8:43:46:71:1E:0A:E0:63:E8:A7:B5:C2:BF:4D:6E:68:4C:67:57:87:4C:7A:77:08:FC:5A:A6:62:E9:13:2E (alt names: "DNS:puppet", "DNS:puppet.dev.example.com", "DNS:puppet.example.com")
However, running the same command on the lb machine returns the certificate we were expecting:
[thomas@lb ~]$ sudo puppet cert list -a
+ "client"             (SHA256) E6:38:60:C9:78:F8:B1:88:EF:3C:58:17:88:81:72:86:1B:05:C4:00:B2:A2:99:CD:E1:FE:37:F2:36:6E:8E:8B
+ "puppet.example.com" (SHA256) 9B:C8:43:46:71:1E:0A:E0:63:E8:A7:B5:C2:BF:4D:6E:68:4C:67:57:87:4C:7A:77:08:FC:5A:A6:62:E9:13:2E (alt names: "DNS:puppet", "DNS:puppet.dev.example.com", "DNS:puppet.example.com")
So at this point, when the nodes connect to our lb machine, all the certificate traffic is directed to the puppetserver process running locally on the lb machine. The catalog requests will be shared between puppetmaster1 and puppetmaster2, using the Apache proxy module. We now have a load balancing puppet infrastructure. To scale out by adding more Puppet masters, we only need to add them to the proxy balancer in the Apache configuration. In the next section, we'll discuss how to keep the code on the various machines up to date.
At this point, we are can scale out our catalog compilation to as many servers as we need. However, we've neglected one important thing: we need to make sure that Puppet code on all the workers remains in sync. There are a few ways in which we can do this and when we cover integration with Git in Chapter 3, Git and Environments, we will see how to use Git to distribute the code.
A simple method to distribute the code is with rsync. This isn't the best solution, but for example, you will need to run rsync whenever you change the code. This will require changing the Puppet user's shell from /sbin/nologin to /bin/bash or /bin/rbash, which is a potential security risk.
Note
If your Puppet code is on a filesystem that supports ACLs, then creating an rsync user and giving that user the rights to specific directories within that filesystem is a better option. Using setfacl, it is possible to grant write access to the filesystem for a user other than Puppet. For more information on ACLs on Enterprise Linux, visit the Red Hat documentation page at https://access.redhat.com/documentation/en-US/Red_Hat_Enterprise_Linux/7/html/Storage_Administration_Guide/ch-acls.html.
First, we create an SSH key for rsync to use to SSH between the Puppet master nodes and the load balancer. We then copy the key into the authorized_keys file of the Puppet user on the Puppet masters, using the ssh-copy-id command. We start by generating the certificate on the load balancer, as shown here:
lb# ssh-keygen -f puppet_rsync
Generating public/private rsa key pair.
Enter passphrase (empty for no passphrase):
Enter same passphrase again:
Your identification has been saved in puppet_rsync.
Your public key has been saved in puppet_rsync.pub.
This creates puppet_rsync.pub and puppet_rsync. Now, on the Puppet masters, configure the Puppet user on those machines to allow access using this key using the following commands:
[thomas@puppet ~]$ sudo mkdir ~puppet/.ssh
[thomas@puppet ~]$ sudo cp puppet_rsync.pub ~puppet/.ssh/authorized_keys
[thomas@puppet ~]$ sudo chown -R puppet:puppet ~puppet/.ssh
[thomas@puppet ~]$ sudo chmod 750 ~puppet
[thomas@puppet ~]$ sudo chmod 700 ~puppet/.ssh
[thomas@puppet ~]$ sudo chmod 600 ~puppet/.ssh/authorized_keys
[thomas@puppet ~]$ sudo chsh -s /bin/bash puppet
Changing shell for puppet.
Shell changed.
[thomas@puppet ~]$ sudo chown -R puppet:puppet /etc/puppetlabs/code
The changes made here allow us to access the Puppet master server from the load balancer machine, using the SSH key. We can now use rsync to copy our code from the load balancer machine to each of the Puppet masters, as shown here:
[thomas@lb ~]$ rsync -e 'ssh -i puppet_rsync' -az /etc/puppetlabs/code/ puppet@puppetmaster1:/etc/puppetlabs/code
Note
Creating SSH keys and using rsync
The trailing slash in the first part /etc/puppetlabs/code/ and the absence of the slash in the second part puppet@puppetmaster1:/etc/puppetlabs/code is by design. In this manner, we get the contents of /etc/puppetlabs/code on the load balancer placed into /etc/puppetlabs/code on the Puppet master.
Using rsync is not a good enterprise solution. The concept of using the SSH keys and transferring the files as the Puppet user is useful. In Chapter 2, Organizing Your Nodes and Data, we will use this same concept when triggering code updates via Git.
A second option to keep the code consistent is to use NFS. If you already have an NAS appliance, then using the NAS to share Puppet code may be the simplest solution. If not, using Puppet master as an NFS server is another. However, this makes your Puppet master a big, single point of failure. NFS is not the best solution for this sort of problem.
Using a clustered filesystem, such as gfs2 or glusterfs is a good way to maintain consistency between nodes. This also removes the problem of the single point of failure with NFS. A cluster of three machines makes it far less likely that the failure of a single machine will render the Puppet code unavailable.
The third option is to have your version control system keep the files in sync with a post-commit hook or scripts that call Git directly such as r10k or puppet-sync. We will cover how to configure Git to do some housekeeping for us in Chapter 2, Organizing Your Nodes and Data. Using Git to distribute the code is a popular solution, since it only updates the code when a commit is made. This is the continuous delivery model. If your organization would rather push code at certain points (not automatically), then I would suggest using the scripts mentioned earlier on a routine basis.
Now that we have our Puppet infrastructure running on two Puppet masters and the load balancer, you might notice that the load balancer and the certificate signing machine need not be the same machine.
To split off the Puppet certificate authority (puppetca) from the load balancing machine, make another Puppet master machine, similar to the previous Puppet master machines (complete with the master.conf configuration file in the /etc/puppetlabs/puppetserver/conf.d directory). Give this new machine the following IP address 192.168.0.111.
Now, modify the puppet_lb.conf file in the /etc/httpd/conf.d directory such that the proxy balancer for puppetca points to this new machine, as shown here:
<Proxy balancer://puppetca>
  BalancerMember http://192.168.0.111:18140
</Proxy>
Now restart Apache on the load balancer and verify that the certificate signing is now taking place on the new puppetca machine. This can be done by running Puppet on our client machine with the --certname option to specify an alternate name for our node, as shown here:
[thomas@client ~]$ puppet agent -t --certname split
Info: Creating a new SSL key for split
Info: csr_attributes file loading from /home/thomas/.puppetlabs/etc/puppet/csr_attributes.yaml
Info: Creating a new SSL certificate request for split
Info: Certificate Request fingerprint (SHA256): 98:41:F6:7C:44:FE:35:E5:B9:B5:86:87:A1:BE:3A:FD:4A:D4:50:B8:3A:3A:69:00:87:12:0D:9A:2B:B0:94:CF
Exiting; no certificate found and waitforcert is disabled
Now on the puppetca machine, run the puppet cert list command to see the certificate waiting to be signed:
[thomas@puppet ~]$ sudo puppet cert list
  "split" (SHA256) 98:41:F6:7C:44:FE:35:E5:B9:B5:86:87:A1:BE:3A:FD:4A:D4:50:B8:3A:3A:69:00:87:12:0D:9A:2B:B0:94:CF
When we run the puppet cert list command on the load balancer, we see that the split certificate is not shown:
thomas@lb ~]$sudo puppet cert list -a
+ "client"             (SHA256) E6:38:60:C9:78:F8:B1:88:EF:3C:58:17:88:81:72:86:1B:05:C4:00:B2:A2:99:CD:E1:FE:37:F2:36:6E:8E:8B
+ "puppet.example.com" (SHA256) 9B:C8:43:46:71:1E:0A:E0:63:E8:A7:B5:C2:BF:4D:6E:68:4C:67:57:87:4C:7A:77:08:FC:5A:A6:62:E9:13:2E (alt names: "DNS:puppet", "DNS:puppet.dev.example.com", "DNS:puppet.example.com")
With this split we have streamlined the load balancer to the point where it is only running Apache. In the next section, we'll look at how else we can split up our workload.
We have already split our workload into a certificate-signing machine (puppetca) and a pool of catalog compiling machines (Puppet masters). We can also create a report processing machine and split-off report processing to that machine with the report_server setting. What is interesting as an exercise at this point is that we can also serve up files using our load balancing machine.
Based on what we know about the Puppet HTTP API, we know that requests for file_buckets and files have specific URIs, which we can serve directly from the load balancer without using puppetserver, or Apache or even Puppet. To test the configuration, alter the definition of the default node to include a file, as follows:
node default {
  include file_example
}
Create the file_example module and the following class manifest:
class file_example {
  file {'/tmp/example':
    mode=>'644',
    owner =>'100',
    group =>'100',
    source => 'puppet:///modules/file_example/example',
  }
}
Create the example file in the files subdirectory of the module. In this file, place the following content:
This file is in the code directory.
Now, we need to edit the Apache configuration on the load balancer to redirect file requests to another VirtualHost on the load balancer. Modify the puppet_lb.conf file so that the rewrite balancer lines are, as follows:
ProxyPassMatch ^/(puppet-ca/v[123]/.*)$ balancer://puppetca/$1
ProxyPassMatch ^/puppet/v[123]/file_content/(.*)$ balancer://puppetfile/$1

ProxyPass / balancer://puppetworker/
ProxyPassReverse / balancer://puppetworker

<Proxy balancer://puppetca>
  BalancerMember http://192.168.0.111:18140
</Proxy>
<Proxy balancer://puppetfile>
  BalancerMember http://127.0.0.1:8080
</Proxy>
<Proxy balancer://puppetworker>
  BalancerMember http://192.168.0.100:18140
  BalancerMember http://192.168.0.101:18140
</Proxy>
This configuration will redirect any requests to /puppet/v3/file_content to port 8080 on the same machine. We now need to configure Apache to listen on port 8080, create the files.conf file in the /etc/httpd/conf.d directory:
Listen 8080
<VirtualHost *:8080>
  DocumentRoot /var/www/html/puppet
  LogLevel debug
  RewriteEngine on
  RewriteCond %{QUERY_STRING}     ^environment=(.*)&.*$    [NC]
  RewriteRule^(.*)$       /%1/$1      [NC,L]
</VirtualHost>
In version 4 of Puppet, the environment is encoded as a parameter to the request URL. The URL requested by the node for the example file is /puppet/v3/file_content/modules/file_example/example?environment=production&. The files.conf configuration's RewriteCond line will capture the environment production into %1. The RewriteRule line will take the requested URL and rewrite it into /production/modules/file_example/example. To ensure that the file is available, create the following directory on the load balancer machine:
/var/www/html/puppet/production/modules/file_example
Create the example file in this directory with the following content:
This came from the load balancer
Now, restart the Apache process on the load balancer. At this point we can run the Puppet agent on the client node to have the /tmp/example file created on the client node, as shown here:
[thomas@client ~]$ sudo puppet agent -t
Info: Retrieving pluginfacts
Info: Retrieving plugin
Info: Caching catalog for client
Info: Applying configuration version '1441338020'
Notice: compiled on puppetmaster1 -- does that work?
Notice: /Stage[main]/Main/Node[default]/Notify[compiled on puppetmaster1 -- does that work?]/message: defined 'message' as 'compiled on puppetmaster1 -- does that work?'
Notice: /Stage[main]/File_example/File[/tmp/example]/content:

Info: Computing checksum on file /tmp/example
Info: /Stage[main]/File_example/File[/tmp/example]: Filebucketed /tmp/example to puppet with sum accaac1654696edf141baeeab9d15198
Notice: /Stage[main]/File_example/File[/tmp/example]/content: content changed '{md5}accaac1654696edf141baeeab9d15198' to '{md5}1a7b177fb5017e17daf9522e741b2f9b'
Notice: Applied catalog in 0.23 seconds
[thomas@client ~]$ cat /tmp/example
This came from the load balancer
The contents of the file have now been placed on the client machine and, as we can see, the contents of the file are coming from the file that is in the subdirectory of /var/www/html.
Tip
One important thing to be considered is security, as any configured client can retrieve files from our gateway machine. In production, you might want to add ACLs to the file location.
As we have seen, once the basic proxying is configured, further splitting up of the workload becomes a routine task. We can split the workload to scale to handle as many nodes as we require.
Depending on the size of your deployment and the way you connect to all your nodes, a masterless solution may be a good fit. In a masterless configuration, you don't run the Puppet agent; rather, you push Puppet code to a node and then run the puppet apply command. There are a few benefits to this method and a few drawbacks, as stated in the following table:
|
Benefits |
Drawbacks |
|---|---|
|
No single point of failure |
Can't use built-in reporting tools, such as dashboard |
|
Simpler configuration |
Exported resources require nodes having write access to the database. |
|
Finer-grained control on where the code is deployed |
Each node has access to all the code |
|
Multiple simultaneous runs do not affect each other (reduces contention) |
More difficult to know when a node is failing to apply a catalog correctly |
|
Connection to Puppet master not required (offline possible) |
No certificate management |
|
No certificate management |
The idea with a masterless configuration is that you distribute Puppet code to each node individually and then kick off a Puppet run to apply that code. One of the benefits of Puppet is that it keeps your system in a good state; so when choosing masterless, it is important to build your solution with this in mind. A cron job configured by your deployment mechanism that can apply Puppet to the node on a routine schedule will suffice.
The key parts of a masterless configuration are: distributing the code, pushing updates to the code, and ensuring that the code is applied routinely to the nodes. Pushing a bunch of files to a machine is best done with some sort of package management.
Many masterless configurations use Git to have clients pull the files, this has the advantage of clients pulling changes. For Linux systems, the big players are rpm and dpkg, whereas for Mac OS, installer package files can be used. It is also possible to configure the nodes to download the code themselves from a web location. Some large installations use Git to update the code, as well.
The solution I will outline is that of using an rpm deployed through yum to install and run Puppet on a node. Once deployed, we can have the nodes pull updated code from a central repository rather than rebuild the rpm for every change.
To start our rpm, we will make an rpm spec file. We can make this anywhere since we don't have a master in this example. Start by installing rpm-build, which will allow us to build the rpm.
# yum install rpm-build
Installing
  rpm-build-4.8.0-37.el6.x86_64
Later, it is important to have a user to manage the repository, so create a user called builder at this point. We'll do this on the Puppet master machine we built earlier. Create an rpmbuild directory with the appropriate subdirectories and then create our example code in this location:
# sudo -iu builder
$ mkdir -p rpmbuild/{SPECS,SOURCES}
$ cd SOURCES
$ mkdir -p modules/example/manifests
$ cat <<EOF> modules/example/manifests/init.pp
class example {
  notify {"This is an example.": }
  file {'/tmp/example':
    mode => '0644',
    owner => '0',
    group => '0',
    content => 'This is also an example.'
  }
}
EOF
$ tar cjf example.com-puppet-1.0.tar.bz2 modules
Next, create a spec file for our rpm in rpmbuild/SPECS as shown here:
Name:           example.com-puppet
Version: 1.0
Release: 1%{?dist}
Summary: Puppet Apply for example.com

Group: System/Utilities
License: GNU
Source0: example.com-puppet-%{version}.tar.bz2
BuildRoot: %(mktemp -ud %{_tmppath}/%{name}-%{version}-%{release}-XXXXXX)

Requires: puppet
BuildArch: noarch

%description
This package installs example.com's puppet configuration
and applies that configuration on the machine.


%prep

%setup -q -c
%install
mkdir -p $RPM_BUILD_ROOT/%{_localstatedir}/local/puppet
cp -a . $RPM_BUILD_ROOT/%{_localstatedir}/local/puppet

%clean
rm -rf %{buildroot}

%files
%defattr(-,root,root,-)
%{_localstatedir}/local/puppet

%post
# run puppet apply
/bin/env puppet apply --logdest syslog --modulepath=%{_localstatedir}/local/puppet/modules %{_localstatedir}/local/puppet/manifests/site.pp

%changelog
* Fri Dec 6 2013 Thomas Uphill <thomas@narrabilis.com> - 1.0-1
- initial build
Then use the rpmbuild command to build the rpm based on this spec, as shown here:
$ rpmbuild -baexample.com-puppet.spec
…
Wrote: /home/builder/rpmbuild/SRPMS/example.com-puppet-1.0-1.el6.src.rpm
Wrote: /home/builder/rpmbuild/RPMS/noarch/example.com-puppet-1.0-1.el6.noarch.rpm
Now, deploy a node and copy the rpm onto that node. Verify that the node installs Puppet and then does a Puppet apply run.
# yum install example.com-puppet-1.0-1.el6.noarch.rpm
Loaded plugins: downloadonly
…
Installed:
example.com-puppet.noarch 0:1.0-1.el6
Dependency Installed:
augeas-libs.x86_64 0:1.0.0-5.el6
...
puppet-3.3.2-1.el6.noarch
…
Complete!
Verify that the file we specified in our package has been created using the following command:
# cat /tmp/example
This is also an example.
Now, if we are going to rely on this system of pushing Puppet to nodes, we have to make sure that we can update the rpm on the clients and we have to ensure that the nodes still run Puppet regularly, so as to avoid configuration drift (the whole point of Puppet).
There are many ways to accomplish these two tasks. We can put the cron definition into the post section of our rpm, as follows:
%post
# install cron job
/bin/env puppet resource cron 'example.com-puppet' command='/bin/env puppet apply --logdest syslog --modulepath=%{_localstatedir}/local/puppet/modules %{_localstatedir}/local/puppet/manifests/site.pp' minute='*/30' ensure='present'
We can have a cron job be part of our site.pp, as shown here:
cron { 'example.com-puppet':
  ensure   => 'present',
  command  => '/bin/env puppet apply --logdest syslog --modulepath=/var/local/puppet/modules /var/local/puppet/manifests/site.pp',
  minute   => ['*/30'],
  target   => 'root',
  user     => 'root',
}
To ensure that the nodes have the latest versions of the code, we can define our package in site.pp:
package {'example.com-puppet': ensure => 'latest' }In order for that to work as expected, we need to have a yum repository for the package and have the nodes looking at that repository for packages.
Creating a yum repository is a very straightforward task. Install the createrepo rpm and then run createrepo on each directory you wish to make into a repository:
# mkdir /var/www/html/puppet
# yum install createrepo
…
Installed:
createrepo.noarch 0:0.9.9-18.el6
# chown builder /var/www/html/puppet
# sudo -iu builder
$ mkdir /var/www/html/puppet/{noarch,SRPMS}
$ cp /home/builder/rpmbuild/RPMS/noarch/example.com-puppet-1.0-1.el6.noarch.rpm /var/www/html/puppet/noarch
$ cp rpmbuild/SRPMS/example.com-puppet-1.0-1.el6.src.rpm /var/www/html/puppet/SRPMS
$ cd /var/www/html/puppet
$ createrepo noarch
$ createrepo SRPMS
Our repository is ready, but we need to export it with the web server to make it available to our nodes. This rpm contains all our Puppet code, so we need to ensure that only the clients we wish get an access to the files. We'll create a simple listener on port 80 for our Puppet repository:
Listen 80
<VirtualHost *:80>
  DocumentRoot /var/www/html/puppet
</VirtualHost>
Now, the nodes need to have the repository defined on them so that they can download the updates when they are made available via the repository. The idea here is that we push the rpm to the nodes and have them install the rpm. Once the rpm is installed, the yum repository pointing to updates is defined and the nodes continue updating themselves:
yumrepo { 'example.com-puppet':
  baseurl  => 'http://puppet.example.com/noarch',
  descr    => 'example.com Puppet Code Repository',
  enabled  => '1',
  gpgcheck => '0',
}
So, to ensure that our nodes operate properly, we have to make sure of the following things:
Install code.
Define repository.
Define cron job to run Puppet apply routinely.
Define package with latest tag to ensure it is updated.
A default node in our masterless configuration requires that the cron task and the repository be defined. If you wish to segregate your nodes into different production zones (such as development, production, and sandbox), I would use a repository management system, such as Pulp. Pulp allows you to define repositories based on other repositories and keeps all your repositories consistent.
Note
You should also set up a gpg key on the builder account that can sign the packages it creates. You will then distribute the gpg public key to all your nodes and enable gpgcheck on the repository definition.
Tip
Downloading the example code
You can download the example code files from your account at http://www.packtpub.com for all the Packt Publishing books you have purchased. If you purchased this book elsewhere, you can visit http://www.packtpub.com/support and register to have the files e-mailed directly to you.
You can download the code files by following these steps:
1. Log in or register to our website using your e-mail address and password.
2. Hover the mouse pointer on the SUPPORT tab at the top.
3. Click on Code Downloads & Errata.
4. Enter the name of the book in the Search box.
5. Select the book for which you're looking to download the code files.
6. Choose from the drop-down menu where you purchased this book from.
7. Click on Code Download.
Once the file is downloaded, please make sure that you unzip or extract the folder using the latest version of:
WinRAR / 7-Zip for Windows
Zipeg / iZip / UnRarX for Mac
7-Zip / PeaZip for Linux
Dealing with scale is a very important task in enterprise deployments. In the first section, we configured a Puppet master with puppetserver. We then expanded the configuration with load balancing and proxying techniques realizing that Puppet is simply a web service. Understanding how nodes request files, catalogs, and certificates allows you to modify the configurations and bypass or alleviate bottlenecks.
In the last section, we explored masterless configuration, wherein instead of checking into Puppet to retrieve new code, the nodes check out the code first and then run against it on a schedule.
Now that we have dealt with the load issue, we need to turn our attention to managing the modules to be applied to nodes. We will cover the organization of the nodes in the next chapter.