Virtualization, as we all know today, is a decades-old technology that was first implemented in the mainframes of the 1960s. Virtualization was a way to logically divide the mainframe's resources for different application processing. With the rise in energy costs, running under-utilized server hardware is no longer a luxury. Virtualization enables us to do more with less, thus saving energy and money while creating a virtual green data center without geographical boundaries.
A hypervisor is a piece of software, hardware, or firmware that creates and manages virtual machines. It is the underlying platform or foundation that allows a virtual infrastructure to be built. In a way, it is the very building block of all virtualization. A bare metal hypervisor acts as a bridge between physical hardware and the virtual machines by creating an abstraction layer. Because of this unique feature, an entire virtual machine can be moved over a vast distance over the internet and be made available to function exactly the same. A virtual machine does not see the hardware directly; instead, it sees the layer of the hypervisor, which is the same no matter what hardware the hypervisor has been installed on.
The Proxmox Virtual Environment (VE) is a cluster-based hypervisor and one of the best-kept secrets in the virtualization industry. The reason is simple. It allows you to build an enterprise business-class virtual infrastructure at a small business-class price tag without sacrificing stability, performance, and ease of use. Whether it is a massive data center to serve millions of people, or a small educational institution, or a home serving important family members, Proxmox can handle configuration to suit any situation.
If you have picked up this book, you are no doubt familiar with virtualization, and perhaps well versed with other hypervisors, such as VMware, Xen, Hyper-V, and so on. In this chapter and upcoming chapters, we will see the mighty power of Proxmox from the inside out. We will examine scenarios and create a complex virtual environment. We will tackle some heavy day-to-day issues and show resolutions that might just save the day in a production environment. We will also learn how to deploy a highly redundant storage system using Ceph to store virtual machines. So strap yourself in and let's dive into the virtual world with the mighty hypervisor, Proxmox VE.
Before we dive in, it is necessary to understand why one should choose Proxmox over the other mainstream hypervisors. Proxmox is not perfect, but stands out among other contenders with its hard-to-beat features. The following are some of the features that make Proxmox a real game changer.
Yes, Proxmox is free! To be more accurate, Proxmox has several subscription levels, among which the community edition is completely free. One can simply download the Proxmox ISO at no cost and raise a fully functional cluster without missing a single hypervisor feature and without paying anything. The main difference between the paid and community subscription level is that the paid subscription receives updates, which go through additional testing and refinement. In a production cluster with a real workload, it is highly recommended to purchase a subscription from Proxmox or Proxmox resellers.
Proxmox VE comes with a robust firewall ready to be configured out of the box. This firewall can be configured to protect the entire Proxmox cluster down to a virtual machine. The per-VM firewall option gives you the ability to configure each VM individually by creating individualized firewall rules, a prominent feature in a multi-tenant virtual environment. We will learn about this feature in detail in Chapter 9, The Proxmox VE Firewall.
Licensed under Apache 2.0, Open vSwitch is a virtual switch designed to work in a multi-server virtual environment. All hypervisors need a bridge between VMs and the outside network. Open vSwitch enhances the features of the standard Linux bridge in an ever-changing virtual environment. Proxmox fully supports Open vSwitch which allows you to create an intricate virtual environment, all the while reducing virtual network management overhead. For details on Open vSwitch, refer to http://openvswitch.org/.
We will learn about Open vSwitch management in Proxmox in Chapter 8, Network of Virtual Networks.
Proxmox comes with a fully functional graphical user interface (GUI) out of the box. The GUI allows an administrator to manage and configure almost all the aspects of a Proxmox cluster. The GUI has been designed keeping simplicity in mind, with functions and features separated into menus for easier navigation. The following screenshot shows an example of the Proxmox GUI dashboard:
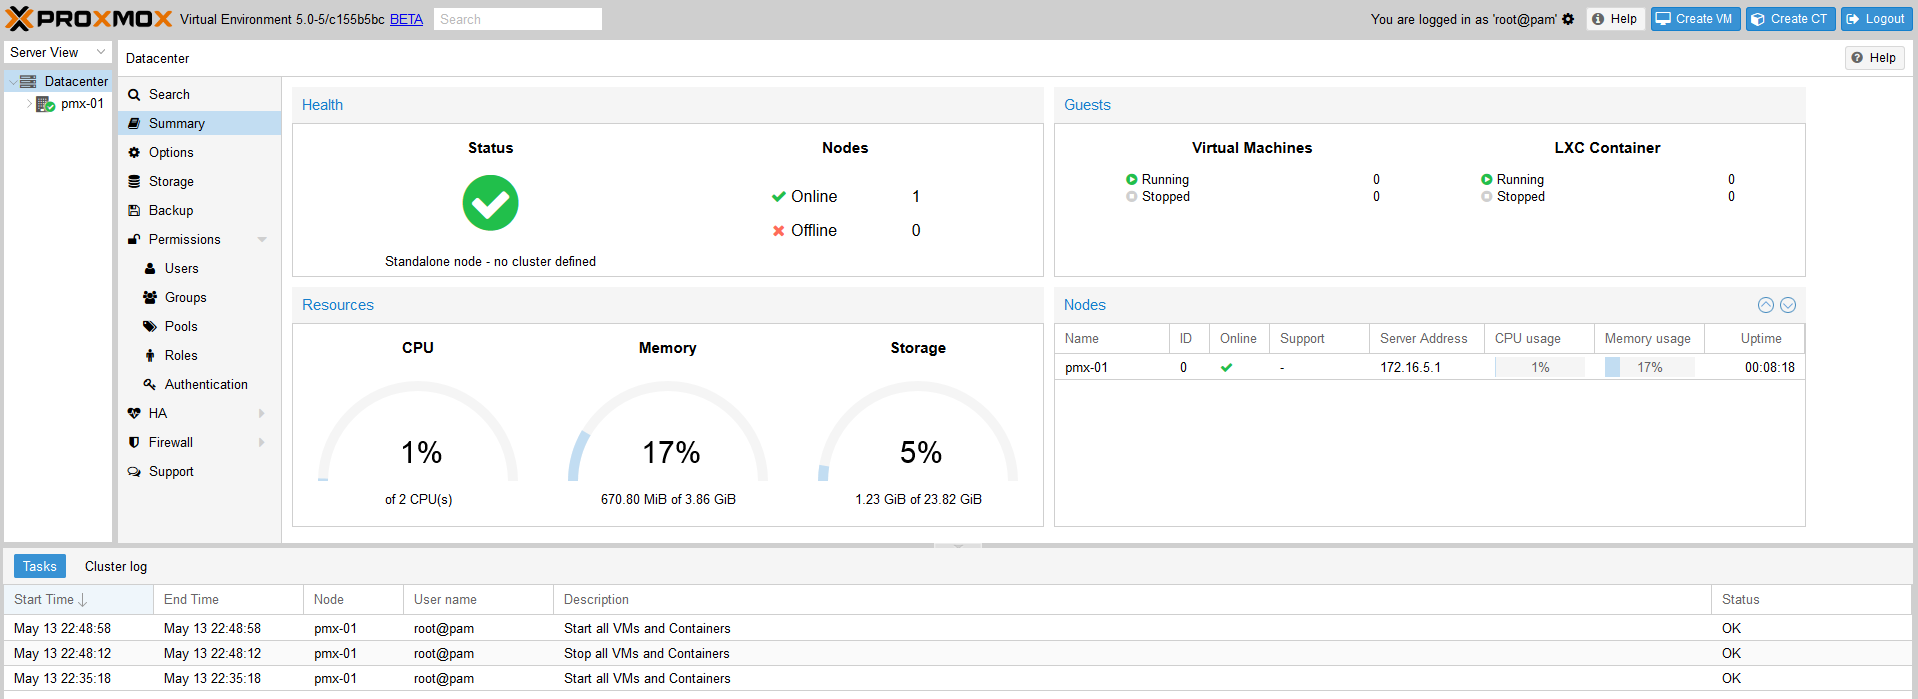
We will dissect the Proxmox GUI dashboard in Chapter 2, Creating a Cluster and Exploring the Proxmox GUI.
A Kernel-based Virtual Machine (KVM) is a kernel module that is added to Linux for full virtualization to create isolated, fully independent virtual machines. KVMs are not dependent on the host operating system in any way, but they do require the virtualization feature in BIOS to be enabled. A KVM allows a wide variety of operating systems for virtual machines, such as Linux and Windows. Proxmox provides a very stable environment for KVM-based VMs. We will learn how to create KVM VMs and also how to manage them in Chapter 6, KVM Virtual Machines.
Introduced in Proxmox VE 4.0, Linux containers, or LXCs, allow multiple Linux instances on the same Linux host. All the containers are dependent on the host Linux operating system and only Linux flavors can be virtualized as containers. There are no containers for the Windows operating system. LXC replaces prior OpenVZ containers, which were the primary containers in the virtualization method in the previous Proxmox versions. If you are not familiar with LXC or want details on it, refer to https://linuxcontainers.org.
We will learn how to create LXC containers and manage them in Chapter 7, LXC Virtual Machines.
Out of the box, Proxmox VE supports a variety of storage systems to store virtual disk images, ISO templates, backups, and so on. All plugins are quite stable and work great with Proxmox. Being able to choose different storage systems gives an administrator the flexibility to leverage the existing storage in the network. As of Proxmox VE 5.0, the following storage plugins are supported:
- The local directory mount points
- LVM
- LVM thin
- NFS
- iSCSI
- GlusterFS
- Ceph RADOS Block Devices (RBD)
- ZFS over iSCSI
- ZFS
We will learn the usage of different storage systems and the types of files they can store in detail in Chapter 4, Storage Systems.
Proxmox has a growing community of users who are always helping others learn Proxmox and troubleshoot various issues. With so many active users around the world, and through active participation of Proxmox developers, the community has now become a culture of its own. Feature requests are continuously being worked on, and the existing features are being strengthened on a regular basis. With so many users supporting Proxmox, it sure is here to stay.
Note
Visit the following link for the official Proxmox forum: https://forum.proxmox.com.
The installation of a Proxmox node is very straightforward. Simply accept the default options, select localization, and enter the network information to install Proxmox VE. We can summarize the installation process in the following steps:
- Download the ISO from the official Proxmox site and prepare a disc with the image (http://proxmox.com/en/downloads).
- Boot the node with the disc and hit Enter to start the installation from the installation GUI, as shown in the following screenshot:
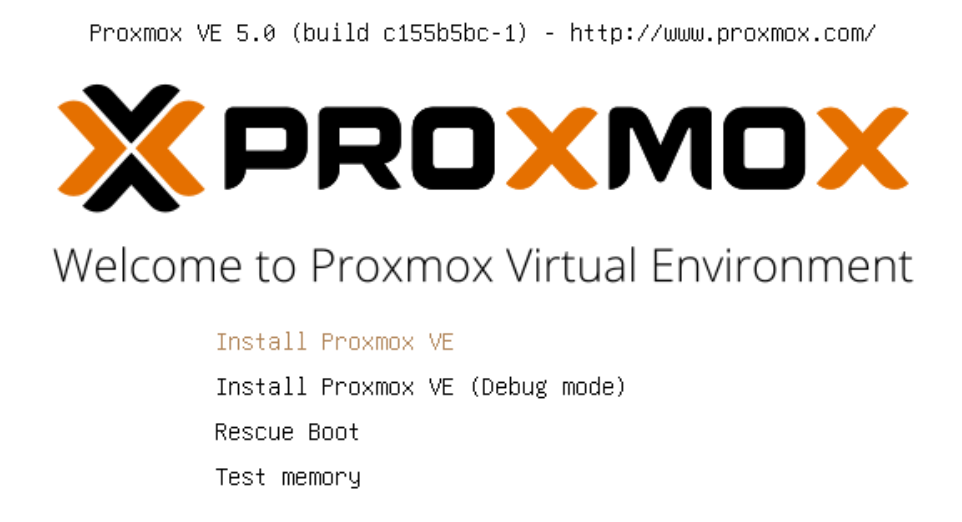
If an optical drive to use the installation disc is unavailable, we can also install Proxmox from a USB drive.
- Progress through the prompts to select options or type in information.
- After the installation is complete, access the Proxmox GUI dashboard using the IP address, as
https://<proxmox_node_ip>:8006.
In some cases, it may be necessary to open the firewall port to allow access to the GUI over port 8006.
Although the basic installation works in all scenarios, there may be times when the advanced installation option is necessary. Only the advanced installation option provides you the ability to customize the main OS drive.
A common practice for the operating system drive is to use a mirror RAID array using a controller interface. This provides drive redundancy if one of the drives fails. This same level of redundancy can also be achieved using a software-based RAID array, such as ZFS. Proxmox now offers options to select ZFS-based arrays for the operating system drive right at the beginning of the installation. For details on ZFS, if you are not familiar, refer to https://en.wikipedia.org/wiki/ZFS.
Note
It is common to ask why one should choose ZFS software RAID over tried-and-tested hardware-based RAID. The simple answer is flexibility. Hardware RAID is locked, or fully dependent, on the hardware RAID controller interface that created the array, whereas ZFS creates software-based RAID which is not dependent on any hardware, and the array can easily be ported to different hardware nodes. Should a RAID controller failure occur, the entire array created from that controller is lost unless there is an identical controller interface available for replacement. The ZFS array is only lost when all the drives or a maximum tolerable number of drives are lost in the array.
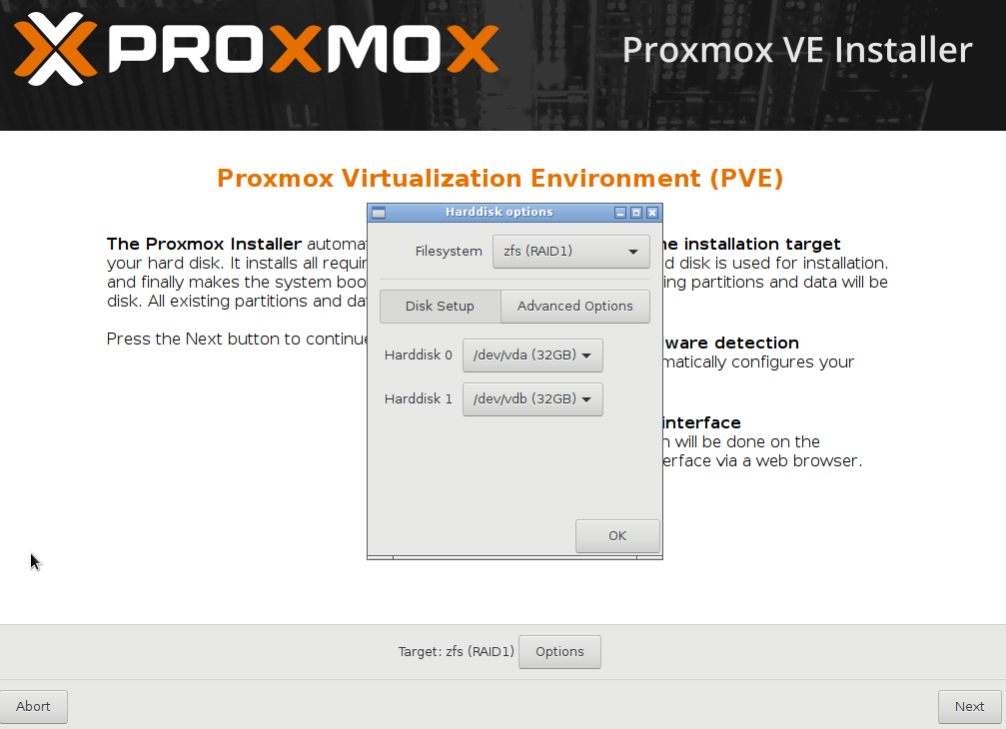
Besides ZFS, we can also select other filesystem types, such as ext3, ext4, or xfs, from the same advanced option. We can also set the custom disk or partition sizes through the advanced option. The following screenshot shows the installation interface with the target hard disk selection page:
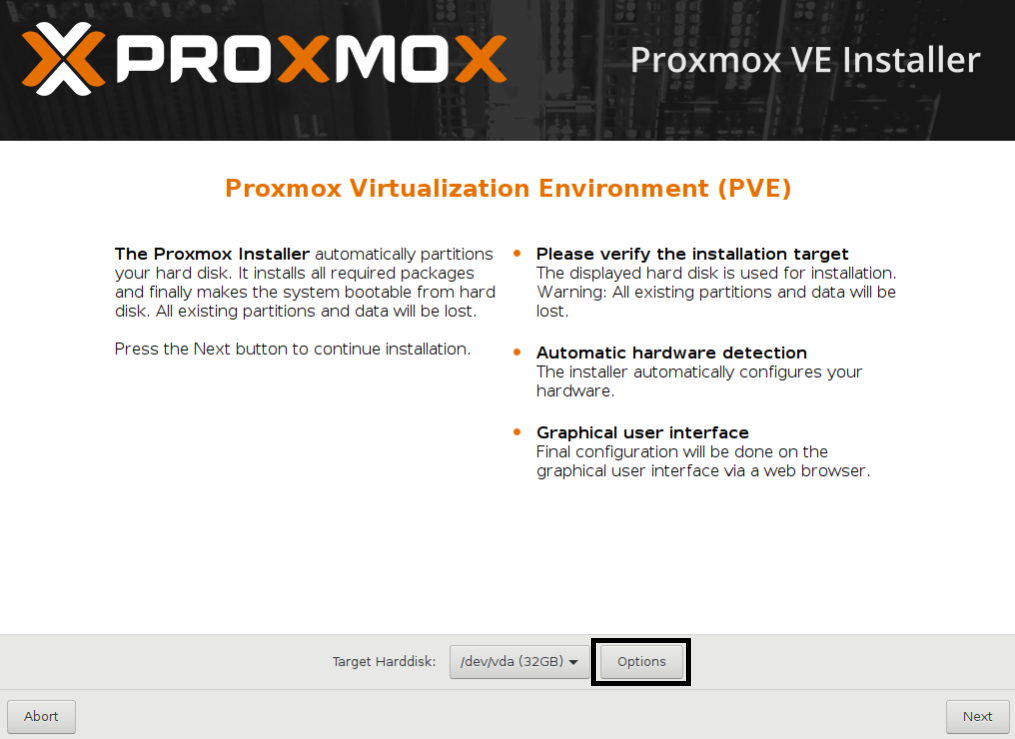
Click on Options, as shown in the preceding screenshot, to open the advanced options for the hard disk. The following screenshot shows the option window with supported filesystem drop-down menu:
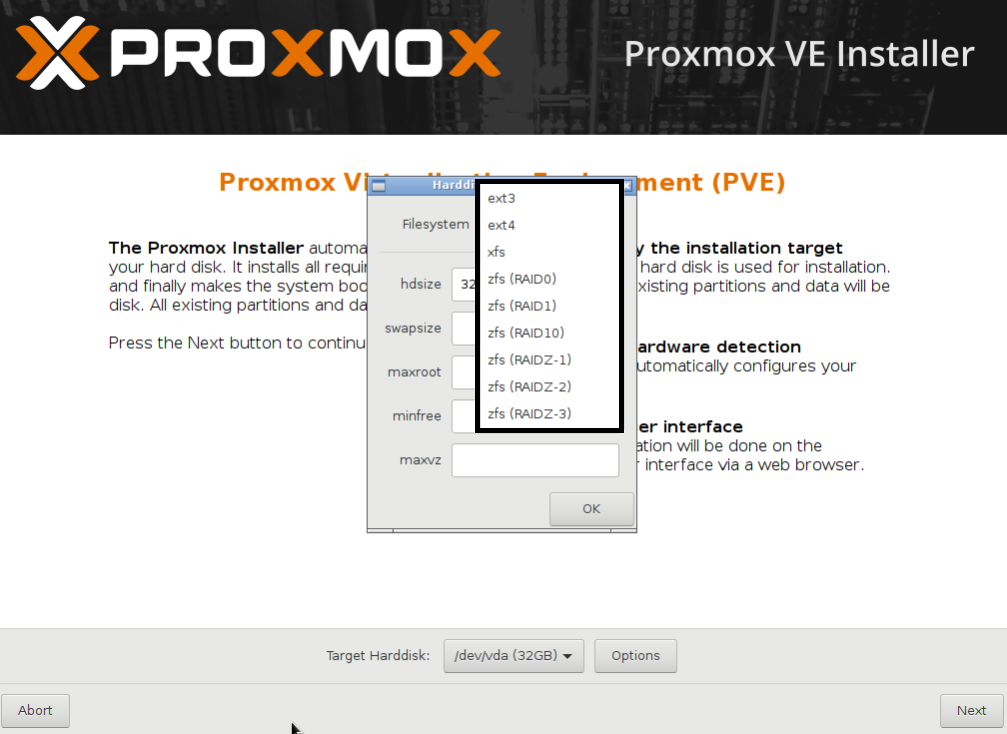
We are going to select the ZFS mirror or RAID1, for the purpose of this book, in order to create a demo cluster from scratch. In the preceding screenshot, we selected zfs (RAID1) for mirroring, and the two drives, Harddisk 0 and Harddisk 1, to install Proxmox. The installer will auto-select the installed disk drive, as shown in the following screenshot:
The Advanced Options include some ZFS performance-related configurations such as compress, checksum, and ashift or alignment shift, as shown in the following screenshot:
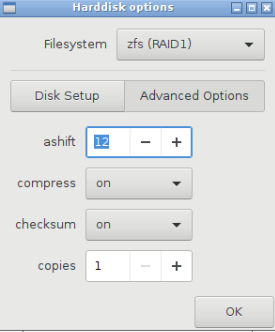
For most environments, this configuration can be left as default.
If you are unfamiliar with ZFS advanced tuning, then the following link may be helpful to get some insight on ZFS performance tuning options:
http://open-zfs.org/wiki/Performance_tuning#Alignment_Shift_.28ashift.29
If we pick a filesystem such as EXT3, EXT4, or XFS instead of ZFS, the Harddisk options dialog box will look like the following screenshot, with a different set of options:
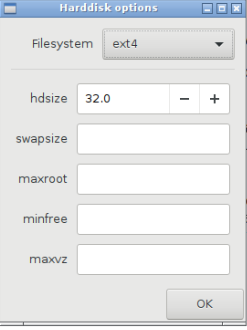
Selecting a filesystem gives us the following advanced options:
hdsize: This is the total drive size to be used by the Proxmox installation.swapsize: This defines the swap partition size.maxroot: This defines the maximum size to be used by the root partition.minfree: This defines the minimum free space that should remain after the Proxmox installation.maxvz: This defines the maximum size for the data partition. This is usually/var/lib/vz.
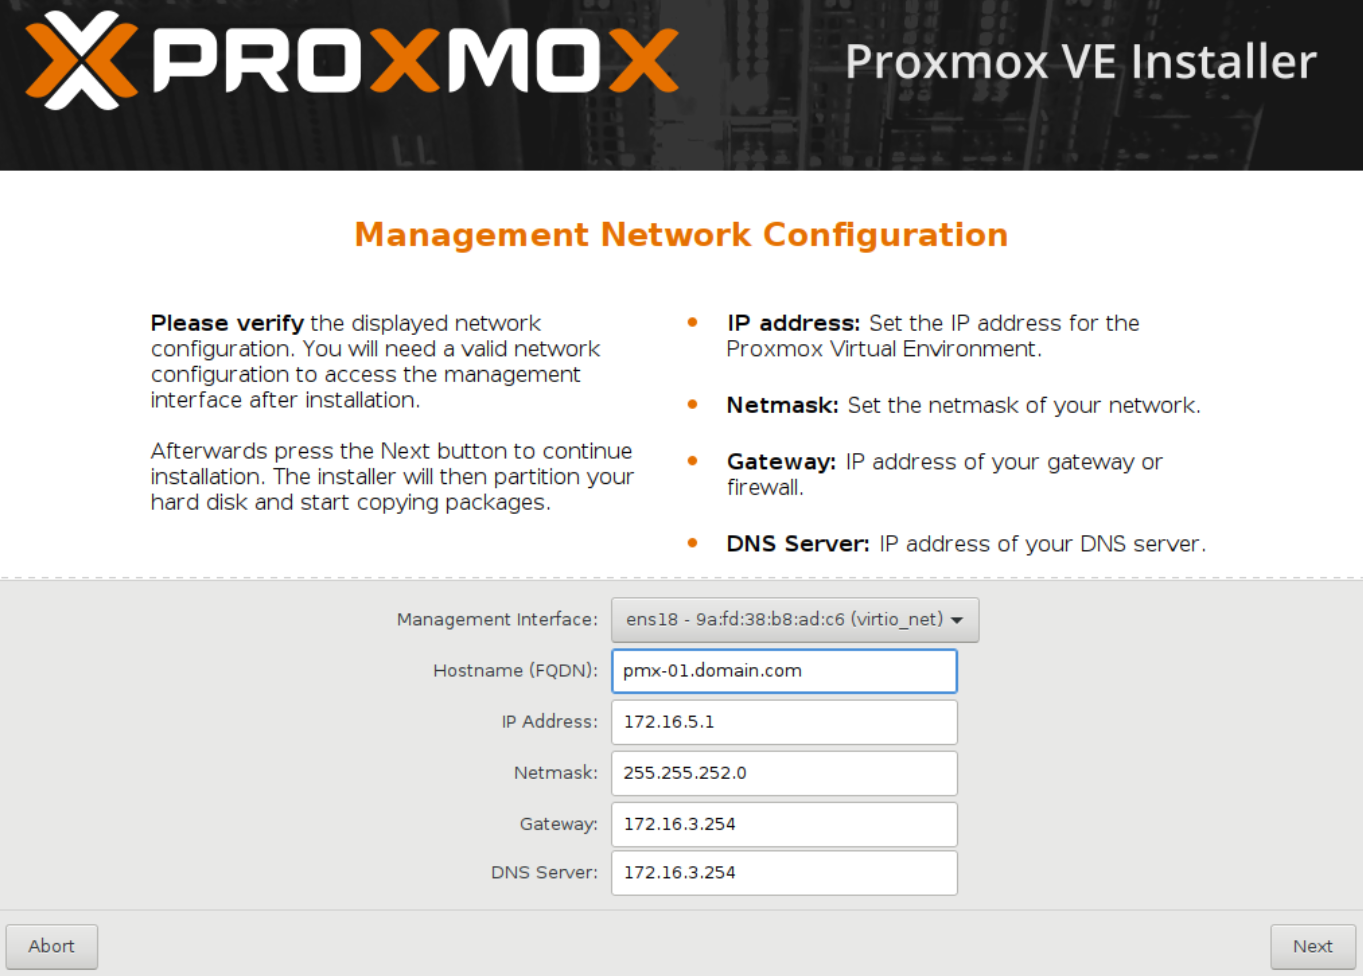
From Proxmox VE version 5, we can select the interface that will be used for management. This is very useful when a node has multiple network interfaces and we want to intentionally use a particular interface for cluster management. The following screenshot shows the management network interface selection screen during Proxmox installation:
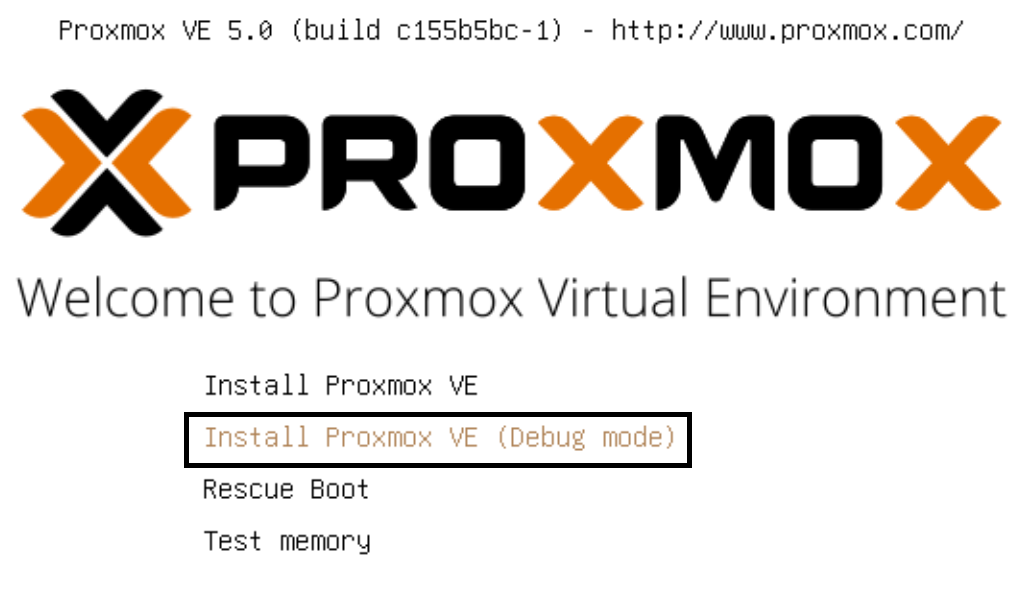
Debugging features are part of any good operating system. Proxmox has debugging features that will help you during a failed installation. Some common reasons are unsupported hardware, conflicts between devices, ISO image errors, and so on. Debugging mode logs and displays installation activities in real time. When the standard installation fails, we can start the Proxmox installation in debug mode from the main installation interface, as shown in the following screenshot:
The debug installation mode will drop us in the prompt, as shown in the following screenshot:

To start the installation, we need to press Ctrl + D. If there is an error during the installation, we can simply press Ctrl + C to get back to this console to continue with our investigation. From the console, we can check the installation log using the following command:
# cat /tmp/install.logAt times, it may be necessary to edit the loader information when normal booting does not function. This is a common case when Proxmox is unable to show the video output due to UEFI or a nonsupported resolution. In such cases, the booting process may hang. From the main installation menu, we can press E to enter edit mode to change the loader information, as shown in the following screenshot:
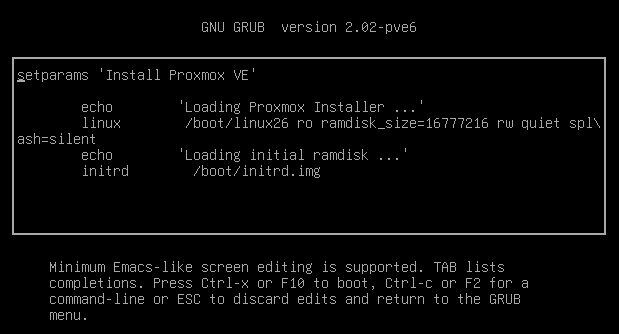
One way to continue with booting is to add the nomodeset argument by editing the loader. The loader should look as follows after the edit:
linux/boot/linux26 ro ramdisk_size=16777216 rw quiet nomodesetProxmox itself is completely free to download and deploy without any cost. But a subscription offers an added level of stability to any node used in a production environment. Both free and subscribed versions have separate repositories and receive updates differently.
Updates or packages released through the subscribed or Enterprise repository go through additional testing and debugging before they are released. This is not to say the updates or packages in the free repository are full of bugs and are released without testing. All Proxmox patches, updates, and packages are taken through the complete development cycle, including testing, before they are released. But Enterprise packages go through much more comprehensive debugging and testing. This level of tests is mandatory for an enterprise-class network environment where a small issue can cost a company a lot of money. A highly stable environment is usually not needed in a home-based platform or small business environment. The subscription menu allows you to activate a purchased subscription on a node. So from a stability point of view, the enterprise version is without a doubt the best choice for any production environment cluster. The price of an enterprise subscription varies depending on the level of Proxmox support provided through tickets, portal, and phone.
Free repository users can only reach out for support through the official Proxmox forum. Proxmox developers quite often lend their expertise to address issues posted on the forum by users. There is no portal or ticket system available for free users. Since this is a free community forum, some issues may not get answered in time.
Note
Even with the free version, Proxmox is still very stable. Do not let the subscription level fool you into thinking that the free version is not even worth considering.
Both free and enterprise versions can be mixed in the same environment. For example, some critical nodes actively serving users can be on the enterprise version, while any non-critical nodes, such as nodes used for testing, backup, and so on, can be on the free version. Upon logging in through the free non-subscription Proxmox node through the GUI, we will be presented with the following notification:

There are three package repositories for Proxmox:
- Proxmox VE Enterprise repository
- Proxmox VE No-Subscription or Free repository
- Proxmox VE Test repository
As the name suggests, this repository is for nodes with paid subscriptions. By default, the Enterprise Repository is enabled in Proxmox. The repository information is in the file /etc/apt/sources.list.d/pve-enterprise.list. We can disable the Enterprise Repository by simply commenting it out with the # symbol in the following line:
deb https://enterprise.proxmox.com/debian jessie pve-enterprise
When disabling the Enterprise Repository, the No-Subscription Repository must be enabled in order to receive updates, patches, and packages. If you're using the Enterprise Repository on a mission-critical node and a subscription has been purchased, the subscription key can be uploaded through the Proxmox GUI by clicking on the Upload Subscription Key button under the Node | Subscription menu, as shown in the following figure:
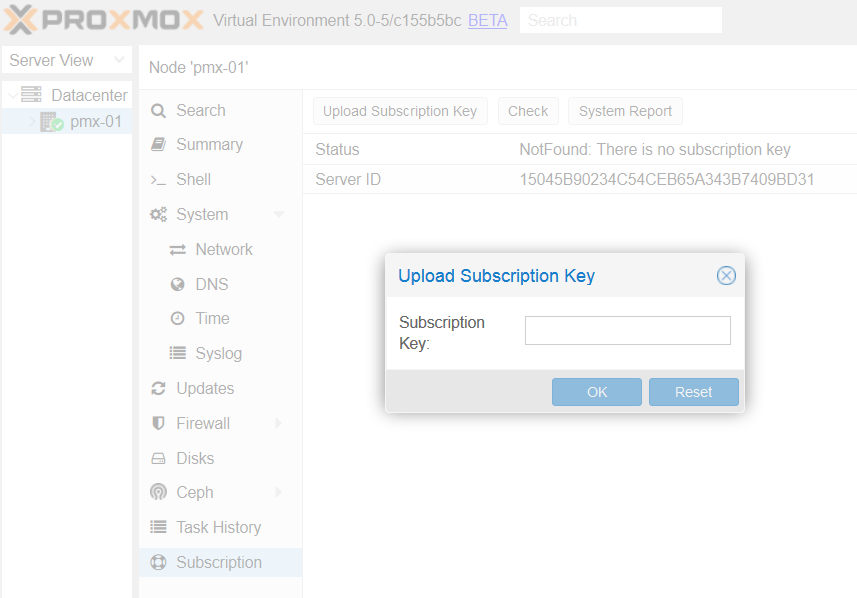
Copy and paste the subscription key and then click on OK. Proxmox will automatically check the validity of the key and activate the subscription for the node. A fully subscribed node appears similarly to the following screenshot, under subscriptions in the GUI:
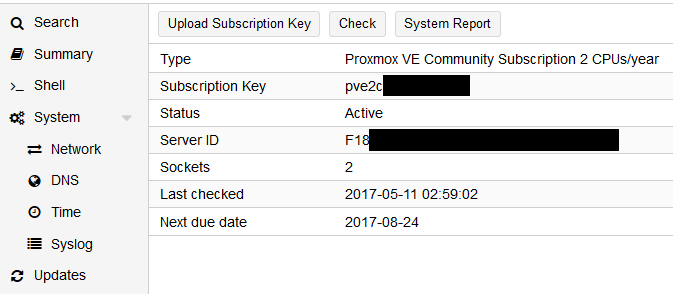
Let's look at the details provided through the Subscription page.
This shows the name of the Proxmox subscription level. There are four levels of subscription available: Community, Basic, Standard, and Premium. The higher the level, the more support add-ons are included.
This is the alphanumeric subscription key the customer receives after purchasing any subscription. The key is formatted in two parts: pveXx-XXXXXXXXXX. The first portion of the key indicates which level of subscription this key belongs to and for how many server sockets. For example, in the previous screenshot, the subscription key is for a Community-level subscription for a server with two sockets. If this were the Premium-level subscription for a server with four sockets, the key would appear as pve4p-XXXXXXXX.
All letters and numbers after the - are unique to each key and should not be shared with unauthorized personnel or made public.
This uniquely generated ID belongs to one node only. When a subscription key is activated on a particular server, the key gets associated with this unique ID. When a node needs to be reinstalled without any hardware changes in it, the key can be reapplied to the server without being reissued or reactivated. But if the key is to be applied to other server hardware or if any major component (such as the CPU, motherboard, or memory) in the server has been changed, then a new unique ID will be generated. In that case, the key will need to be reissued or reactivated. This reissuing can be done by the user on the Proxmox customer site or by the authorized reseller from whom the subscription key has been purchased.
This shows the date and time of the last key validation check performed automatically by the node or manually by the user.
This repository includes updates and packages free of cost. If using this repository, changes must be made to activate it. After disabling the Enterprise Repository, by following the instructions in the previous section, add the following line to the file /etc/apt/sources.list:
deb http://download.proxmox.com/debian jessie pve-no-subscription
This repository largely contains packages for testing purposes only. It is mainly used by Proxmox developers to test new packages and allow interested users to test them as well. Under no circumstances should this repository be used in a production environment. To enable this repository, add the following line to /etc/apt/sources.list:
deb http://download.proxmox.com/debian jessie pvetest
Note
Proxmox has the very best prices per subscription in the virtualization product industry. The operating cost of a Proxmox cluster is minimal as compared to a giant virtual product, such as VMWare. Proxmox provides big-business virtualization at a small-business cost. For details of different subscription levels, refer to http://proxmox.com/proxmox-ve/pricing.
In this chapter, we looked at why Proxmox is a better option as a hypervisor, what advanced installation options are available during an installation, and why we choose software RAID for the operating system drive. We also looked at different subscription levels and their benefits. We learned about the presence of the debugging features to investigate when an installation does not proceed as usual.
In next chapter, we will take a closer look at the Proxmox GUI and see how easy it is to centrally manage a Proxmox cluster from a web browser.


