Although it is certainly possible to use Prezi in a similar way to other presentation tools, such as Microsoft PowerPoint, Prezi opens up new ways of presenting that simply aren't possible with the other tools. While teaching others how to use Prezi, we have discovered that the biggest learning curve is not usually the technical aspect of how to use the tool itself, but rather how to understand and start thinking in what we call the Prezi frame of mind. Many of us have become so accustomed to the slides made prominent by PowerPoint that it's difficult to think outside of the box—literally outside of the box that makes up the slide. Prezi opens up our presentational possibilities in new and exciting ways. Just as important as learning how to use the technical aspect of Prezi is learning how to think Prezi. As we work through the technical elements, we will also reinforce how these elements can help us think differently about how to present.
In this first chapter, we will get an overview of what these different types of presentations look like, covering the following topics:
Thinking about nonlinear presentations
Planning your Prezi
Mind mapping
Deciding the BIG picture
Common Prezi mistakes
As Prezi is so different to other presentation tools both technically and aesthetically, we need to ensure that we approach it in a very different way compared to how we might go about designing a PowerPoint presentation.
It goes without saying that a presentation designed in any media should have a good degree of planning first, but even more so in Prezi. The reason is that Prezi's infinite canvas gives you such a huge expanse of space that it is very easy to lose elements of your design within it.
By simply planning your Prezi in the right way, you can save lots of time in the design stage and really take advantage of this space.
Tip
Forget Slides
It's easy to keep using the term slides when building a Prezi, but slides don't exist in this software, and this kind of thinking will keep you stuck in the old way of presenting. Force yourself and your colleagues to use Prezi terms such as canvas and frames to break the mold and get yourself focused on the right type of approach.
You probably moved over to Prezi because you were getting tired and fed up with the rigid nature of PowerPoint or some other slide-based tool. You felt trapped and confined by the slides that only allowed you to deliver your presentations in one way, that is, in a linear fashion from beginning to end. Then, you saw Prezi and were blown away by the fact that it is a completely open canvas that doesn't have any walls or restrictions like slides do. In other words, it has a three-dimensional canvas as opposed to the traditional two-dimensional slide.
For some though, this fact can be very difficult to embrace and they very quickly return to the comfort of their slide-walled prisons because too much freedom scares them. They simply don't know how to use the space well to deliver their message. If you watch them closely, you will see that they try to build a slideshow in Prezi, and the way they think just doesn't match up with the way Prezi works.
These prisoners can easily be freed if they learn how to think and plan for Prezi, and we believe there are three key steps to master your Prezi designs, which we will explore later in this chapter.
If you ask any Prezi master why they love it so much, you might hear the words "nonlinear presenting" quite a lot. In order to master Prezi, it's important to know what a nonlinear presentation exactly means.
If we want a presentation that teaches someone how to drive, then we will need to start with the absolute basics and build from there. This type of presentation will have to be linear and might have a flow similar to the following:
Unlock the driver's side door.
Get in and put your seat belt on.
Put your foot down on the clutch to check whether you are in gear.
Put the keys into the ignition.
Start the car.
The instructions would follow in a similar manner so that the task is carried out in the right way. This is a linear path, and any presentation built to visually represent it would have to start at step one and then move on to step two, and so on.
Information of this kind always needs to be presented in a linear fashion, so you can use PowerPoint's slide-based design or build a Prezi that uses a series of paths. Both will have clear start and end points.
What if your subject matter had several different areas or modules that didn't have to be presented in a certain order? Who decides where the start and end should be? You? Your manager? The CEO? We'll give you a clue. They're going to be sitting right in front of you during your presentation.
One of the main reasons why presentations don't hit the mark is because they don't consider which elements of the content are most important to their audiences. So why not ask them where they'd like to start? Or at least start your presentation with some friendly introductions; start a conversation and then find out what is the most important part of the topic to them. If enough people agree on the same area, then zoom straight into that area and get going.
This is a nonlinear and more conversational approach to presenting, and it is extremely easy to implement with Prezi.
The beauty of using this approach in Prezi is that it engages your audience more and lets the conversation you have with them unfold very naturally. Following is an example template of how you can structure your nonlinear presentation to cover five separate modules:
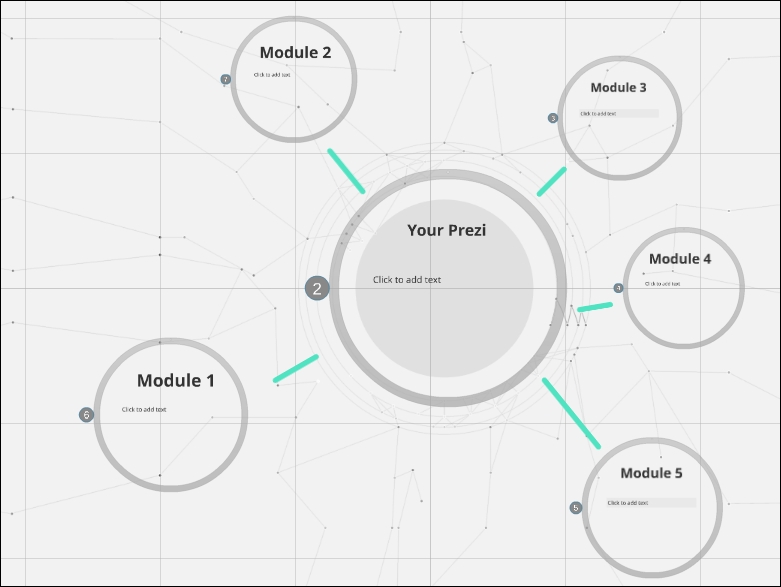
All of the modules are contained inside one giant circular frame, and each module's content is contained inside its own frame within that.
Even though a nonlinear approach is much more creative, there may be elements to your presentation that are best explained in a linear order for your audience to make sense of them.
If this is the case, you can join the different elements of your Prezi together with paths. This gives you the benefit of allowing your audience to decide the direction of your presentation (nonlinear), but also the opportunity to break down key points into a logical order (linear).
Using Prezi's paths tool with this method, your presentation might look similar to the one shown in the following screenshot:
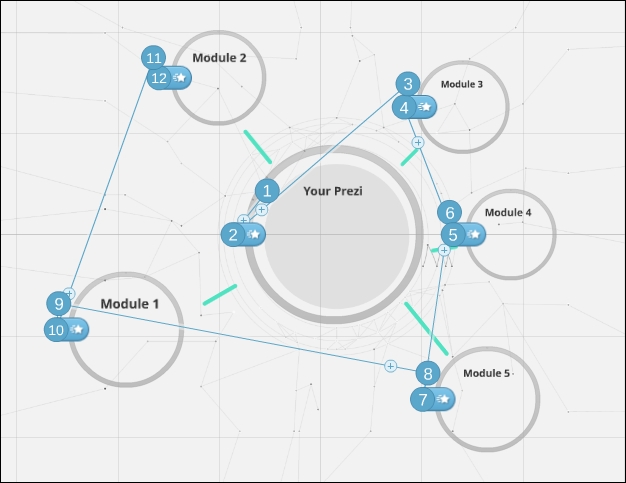
If your audience decides that they would like to start on Module 3, simply zoom in to that frame using your mouse. This can be done quickly by clicking on the desired frame or title. After this, you can let the paths take over so that you flow through the content of Module 3 in a linear manner if needed.
We already mentioned previously that Prezi can (and should) be used in a nonlinear way, but most of us are so used to the linear method of PowerPoint and other slide-based tools that we find it very hard to break out of that mold and use this crazy nonlinear concept.
By thinking in the old linear slide-by-slide way, you can end up with what looks like a PowerPoint presentation, but with some fancy transitions in between slides. If you end up with a presentation like this, then you might as well have continued using PowerPoint because you're not taking full advantage of what Prezi has to offer. Realizing that your presentation's movement doesn't just have to go from left (slide 1) to right (slide 2), but that it can also zoom in to detail and back out to show an overview of everything, will unlock a whole new world of presentation mastery to you.
There's no doubt that to master Prezi you need to learn two things:
The Prezi software
The Prezi mindset
Simply knowing what all the buttons do isn't enough to become a Prezi master. You must ensure that you take the time to train your brain to think differently as well. Failing to do so will kill a Prezi design.
If your boss asks you to build a presentation on that new business idea you mentioned to them at the Christmas party, you are bound to get very excited indeed. Then, if they ask whether you can present the idea to the board in an hour's time, you slowly start to melt in your chair.
Most people would grab a strong coffee, open up their copy of Prezi, insert images, text, video, and anything else they can find to help explain their idea. They would then link the key elements together with paths and be happy that their Prezi will really communicate their idea enough to get a good result.
A Prezi master, on the other hand, would not even dream of touching the Prezi software until they knew exactly how their Prezi was going to deliver their idea, which imagery to use, and what the key messages are. In fact, if they had one hour to build a Prezi, they would probably spend the first 15-20 minutes planning and the rest of the time actually building their Prezi. This is because they've taken the time to learn the three design steps to build a Prezi presentation.
One of these employees will get booted out of the boardroom for giving their senior management team motion sickness, and the other gets commended for delivering a wonderfully clear picture of their business idea. We're pretty sure you know who belongs to which category.
Tip
Ensure that you master the design steps explained in the following section. It is one thing to know the software, but to build really great presentations, you must go about the design in the right way.
The three-step approach explained over the next few pages is aimed at helping you get the most out of Prezi. By ensuring that you follow the three steps, you'll start to think in the right way, understand the key messages in your design, and also build the Prezi in a sensible and time-efficient way.
The three steps are:
Planning your Prezi.
Getting the style right.
Building in layers.
Failure to use this approach can get you frustrated during the design process and will make you lose track of everything on your canvas, waste valuable time, and/or you end up creating something that's sure to deliver motion sickness to your audience.
To master Prezi, you must master these steps.
The first design step is without a doubt the most important of all. Taking the time to plan your Prezi will give you a clear vision of exactly what it is that you need to say or show to your audience in order to deliver your message.
There are some questions you should always ask yourself at the start of any Prezi design:
What's the overall message I'm trying to get across?
What must people know by the end of my Prezi?
Are there any smaller key messages along the way that will help to make my point?
Will my Prezi be led by a presenter such as myself, or will it be accessed by people online?
Answering these questions before you start can give you a really good understanding of what your Prezi needs to say and how it can be said.
Have you ever been in a presentation and spent too much time trying to figure out what the image on screen means rather than what the actual message from the presenter is? Anything visual in your presentation can be extremely powerful for the audience, or it can be extremely distracting and can cloud the importance of your message.
Let's briefly look at some of the unique features of Prezi that can help us start planning from a Prezi perspective.
Prezi's zooming feature can help you deliver your message in a powerful way when it's used correctly. It's simple to create such a zooming effect technically, and we'll look at how to do that. However, first, it's even more important to think about why you're zooming. You don't want to simply zoom in and out just because you can easily do so. What will your zoom communicate? Let's take a look at an intentionally strong use of zoom to understand how this can be done:
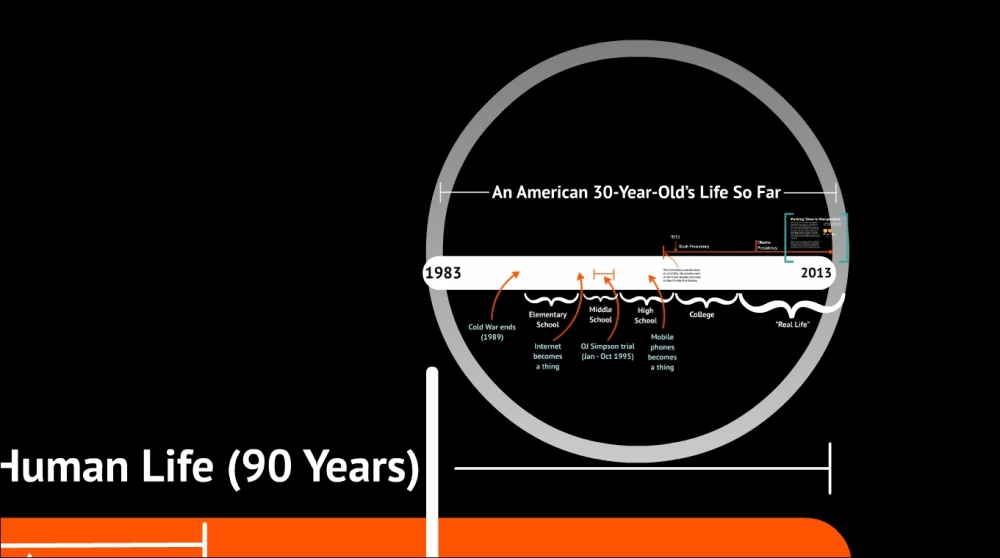
Screenshot from Putting Time into Perspective by Prezi Jedi
In this Prezi, the viewer starts by seeing the events that have shaped the life of a contemporary American who is 30 years old. The Prezi then zooms out further through each step of the presentation, revealing a larger time frame with each step. It finally ends with the time frame of the Behaviorally Modern Humans:
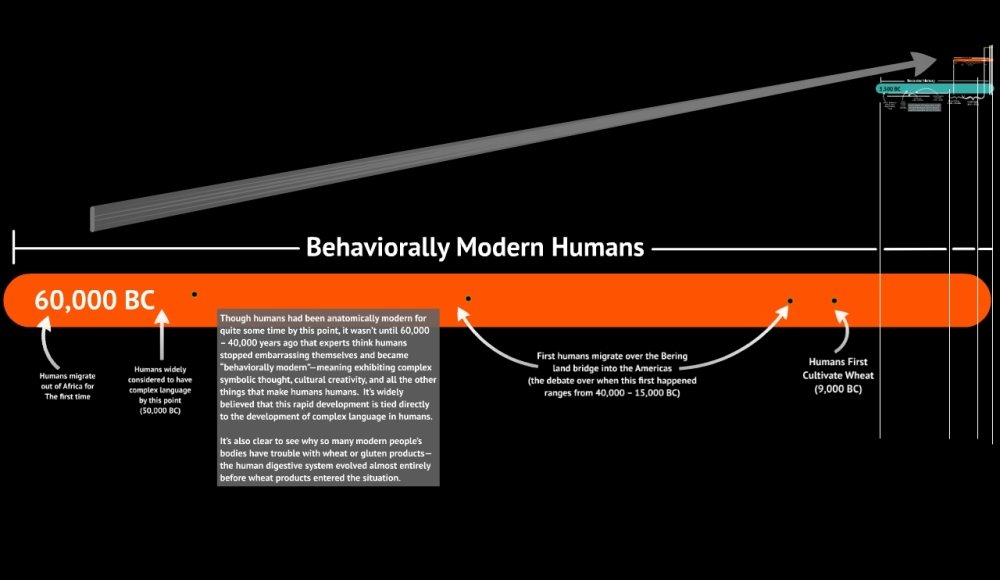
Screenshot from Putting Time into Perspective by Prezi Jedi
The original frame from Prezi is way up at the very top right corner now, way past the tip of the gray arrow—so small that you can't even see it. Here zoom is used intentionally to demonstrate how difficult it is for humans to conceive of time. You can see this effect in action and get the full impact at https://prezi.com/veychlhwrdgz/putting-time-in-perspective/.
Obviously, not every Prezi will be able to use the zoom feature in this way, but this style of zooming reflects the Prezi frame of mind that is so important to the design process. As part of your design process, ensure that you ask, "How will I use zooming in my Prezi?"
In Chapter 3, Consistent Branding for Business, we will look at how we can create templates that will allow us to reuse elements of the design we create for our Prezi. For now, though, the important thing is to start thinking in terms of Frames rather than slides. Although there are a lot of similarities, Prezi has decided to use the name frames to help emphasize the 3D nature of their canvas.
Prezi offers a few different ways to create frames. If you are looking to completely custom design your frame, you can use the frame menu option near the top-left corner of the Prezi window:
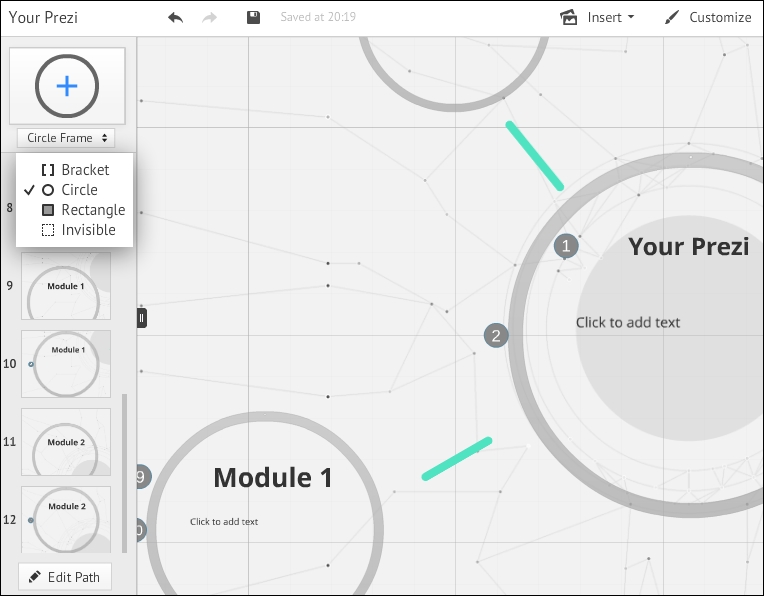
Prezi offers four different default frame styles: Bracket, Circle, Rectangle, and Invisible. The Invisible frames can be used to help determine the path layout of a presentation, but won't be seen by when the Prezi is used in presentation mode. All of the others will be visible at all times. You can see grey circle frames used in the preceding example of Prezi.
If you're looking for a bit more direction, Prezi offers the option to insert a layout, which is a frame with predefined areas to insert elements such as text and images. To access this, go to the top tool bar menu and navigate to Insert | Layouts…. This brings up a tool bar on the right that allows you to insert either single or multi-frame layouts.
Multi-frame layouts offer a wide range of options that have been used in popular Prezi templates. These include layouts that can be used either as part of a larger Prezi, or even as an entire presentation in itself, such as the timeline frame or the tip of the iceberg frame pictured here:
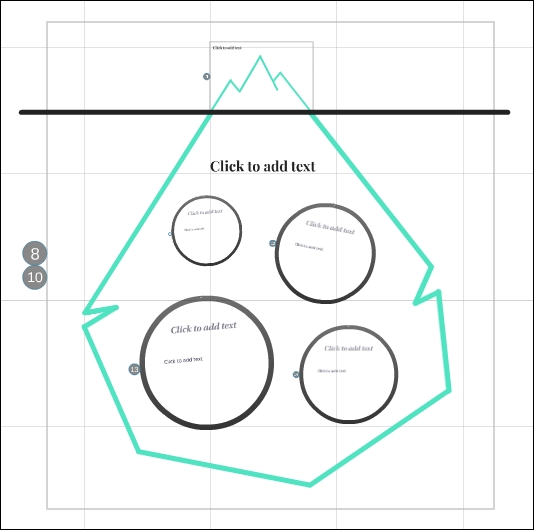
This template actually makes great use of both the frame and zooming features because the presentation can start as zoomed in at the very top, showing a more straightforward understanding of an issue, and then zoom out to the entire iceberg to reveal that there's actually much more complexity to an issue below the surface.
The key to your planning process is to realize that frames are liberated on a 3D canvas in a way that slides in PowerPoint are not.
Note
In a PowerPoint presentation, slides are sequential and always have to be just to the right or left of one another. However, frames can be placed anywhere, and their actual positions relative to one another can help create meaning in your presentation, as with the tip of the iceberg shown earlier. Making use of this new space can be challenging but it's also an opportunity to allow your creativity to flourish.
Now comes the easy part. Taking the Prezi design, you've designed in step 1 – Planning your Prezi, add all of the imagery and styles from step 2 – Getting the style right, and put it all together on the Prezi canvas. It's a piece of cake right?
We're pretty sure that every Prezi user comes unstuck now, and this is again because they rush into the canvas and try to add everything at once. This can lead to certain elements getting lost because you zoomed in too far and then back out again, or you might find that your Prezi doesn't end up looking quite like you'd planned.
In order to help you in this final step, we want you to think of making your Prezi in the same way that you'd make a delicious Victoria sponge cake like the one shown in the following image:
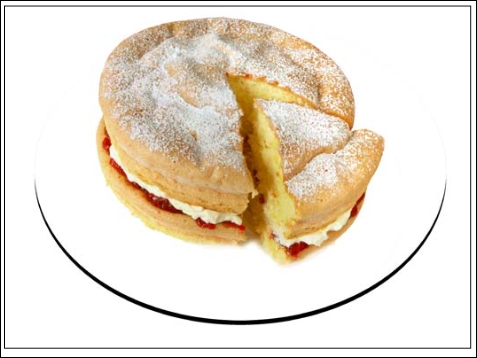
Once you've got all of your ingredients from step 1 – Planning your Prezi, and step 2 – Getting the style right, you should build your Prezi in the layers listed here.
If you're going to have some kind of background image that sits behind everything in your Prezi, then you must insert this onto your canvas before anything else. You may want to start your Prezi by zooming in to a small part of a much larger image that will be revealed at the end. In this case, ensure that it's the first thing you insert.
In the example shown in the following image, the Prezi starts in the top-left corner of the iPad screen at path points 1 and 2. The audience is then taken through the Prezi path, which is all contained inside the screen of the iPad. It is only when the audience reaches path point 12 that the Prezi zooms out to reveal the background image:
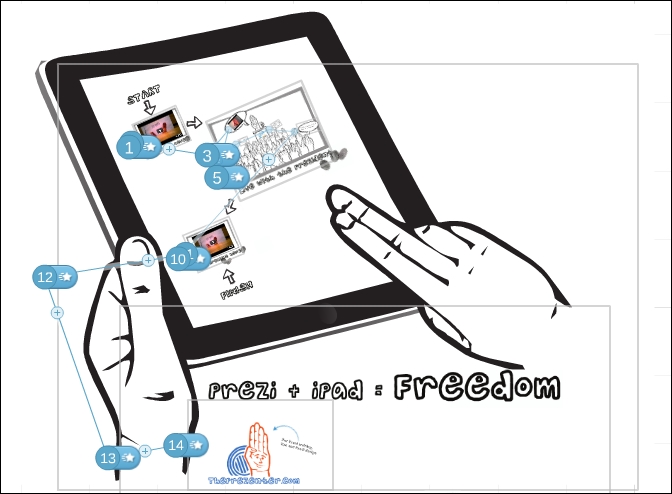
This example can be viewed online at http://prezi.com/yl9_u5si57pp/prezi-ipad-freedom/.
Now that you have your first layer of sponge in place, you can start to add those tasty ingredients and spread them right across your Prezi canvas. Yummy!
The cream and jam of your Prezi might include some or all of the following items:
Text
Images
Graphs
Video files (including sound)
YouTube clips
Flash animations
Frames
If you've planned your Prezi well enough in step 1 – Plan your Prezi, then you should have a good idea of where to place each of these elements on your canvas.
We'd encourage you to place the separate elements at slightly different angles from one another so that the canvas turns a little during transition. Again, try not to overcook this as too much spinning can make people feel ill.
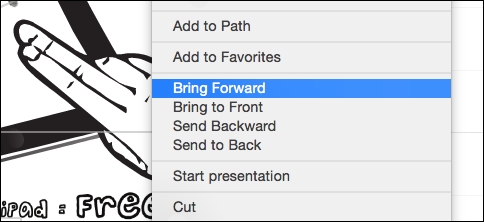
If you do need to adjust the position of any object at this stage, just right-click on it and use the Send Backward or Bring Forward options, as shown in the following screenshot:
Once you have your background imagery (bottom layer) and your different elements (cream and jam) on the same canvas, the only thing left to do is join them all together with paths so that your Prezi flows in the correct order.
Note
As we already mentioned, your Prezi design might not need a path if you're using a conversational presentation method. So, for some, this step might be optional.
It can be extremely difficult and frustrating to try to adjust paths when things need to be moved around on your canvas, so ensure that you are totally happy with the position of your cream and jam before adding this top layer of sponge.
Once you've added your paths, we strongly recommend that you take your Prezi into show mode and test that everything looks and tastes great.
We highly recommend that you master these three design steps as they will really help you to achieve great results and visualize the design before you even touch the Prezi software.
Knowing what you want to achieve from your Prezi at the start is crucial. It's extremely easy to get lost in the Prezi canvas and waste time looking for missing objects, so adding this very structured and logical approach will really help.
As a reminder, the three Prezi design steps are as follows:
Planning your Prezi.
Getting the style right.
Building in layers.
Once you master these steps, building any Prezi will be a piece of cake.
Tip
Don't get caught out
When building a Prezi for your business, you'll no doubt be under serious time constraints, have other work that needs your attention, and probably have a number of distractions around you. Don't allow yourself to skip over these steps because you think there isn't time. They'll actually save you time in the long run if used correctly.
You may be familiar with the term Mind Mapping, and if not, we'd definitely recommend that you look it up to get help with designing your Prezi. We'll explain it in the following screenshot in more detail, but it's definitely a subject that Prezi masters will want to explore more in their own time.
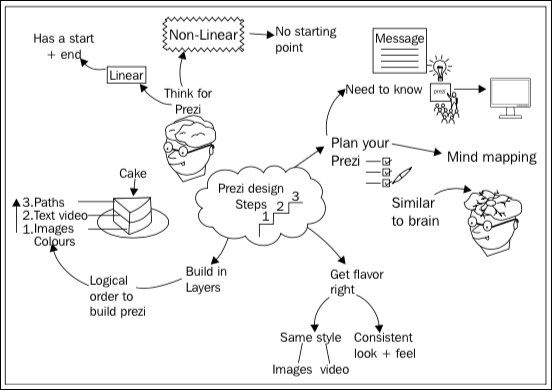
In essence, Mind Mapping is a way of spreading your ideas onto a piece of paper or any canvas available instead of just writing a very dull (and linear) list of what's needed in your Prezi presentation. You can see a very simple example of Mind Mapping in the following diagram, which we created to help us understand how to best communicate the three Prezi design steps in this chapter:
Note
You can see that this Mind Map uses words and pictures to make associations. This is extremely important when planning a Prezi because the more visual, the better it is for your audience.
If you aren't used to using the Mind Mapping technique, it can be a little hard to understand why you should start now and not just write a list of what needs to go into your Prezi.
We already mentioned that Prezi is a nonlinear presentation tool, so it makes perfect sense to plan your Prezi in a nonlinear way. Forcing yourself to plan in this way and spread your ideas out onto one page will start to give you a great idea of how your Prezi will look because Prezi itself is one giant canvas.
Mind Mapping is an amazing tool for generating and planning ideas, but it does take practice. If you haven't done it before, then start now by following the instructions given here:
Grab a pen and paper, and start by writing the subject of your Prezi, that is, My business, in the center of your page.
Circle the title and link any subheadings or important subjects that spring to your mind around it with arrows. These could be your company departments or products.

Then, focus on one sub heading at a time and write any key information you can think of around that. Again, link each point back to its heading with arrows or lines.

Keep repeating these steps until you either run out of things to write, or you find the key points to explain in your Prezi.
Once you identify the key points that need to be presented in your Prezi, underline them or highlight them in some way so that they stand out from everything else.
For each of the key points, try to think of an image that will help visualize it and do a quick sketch of the image. It doesn't have to be a work of art!

If you aren't familiar with the Mind Mapping technique, then try to go through the preceding steps as many times as you can, and for as many subjects as you can think of.
This form of mental exercise will help you think in the right way for Prezi, and will also help your brain make connections between the text and imagery on your map.
We already mentioned that Mind Mapping is great for planning Prezi because they both use a canvas in the same way. However, there is another more scientific explanation as to why this technique and Prezi work so well in communicating ideas.
This connection is related to the way that our brains retain information. While the inner workings of the human brain aren't yet fully understood, we do know that ideas form when the brain creates neural networks between the vast amounts of information that goes into our heads every day.
When presenting to an audience, the best way to get them to remember something is to zoom in on individual details one at a time, then try to show them some kind of link between these details, or at least show them all of the details in one single view and frame them for our audience.
This simple trick is called the BIG picture technique and is explained in the next section. In short, it is simply a way of allowing your audiences' brains to connect the dots and retain the information you want them to.
Ensure that you spend enough time as is needed to fully plan out your Prezi in a Mind Map. Some people will find this very easy and natural to do, while others may struggle to think in this way. Whichever end of the spectrum you fall into, ensure that you keep doing it and never approach the Prezi software until you have your map in front of you. This will help to ensure that you approach your design from a Prezi frame of mind.
By doing this, you'll know:
What are your key points?
What are the images you need to tell the story?
How big your Prezi might be?
Where you will need to zoom in to explain details?
What could visually link everything together (your BIG picture)?
By taking all of the skills you learned so far and combining them with a great way of delivering your Prezi, you're bound to be viewed as a Prezi master by colleagues and bosses alike.
The BIG picture technique is a way of presenting your information to an audience so that they can understand how different elements link together. It enables you to structure your message in a way that will be more memorable to your audience, giving your business Prezi a much higher impact than the traditional presentation tools.
The brain is made up of tiny nerve cells called neurons, these neurons have tiny branch-like structures that reach out and connect with other neurons. Each place where a neuron connects with another neuron is called a synapse or synaptic connection. The pattern and ways our neurons connect to each other form our neural network. These networks form our ideas, thoughts, and memories.
Think of these neural networks in the same way as the mind maps we looked at earlier. Our brains take in thousands of tiny stimuli every second. In a presentation, the stimuli would normally be images, words, and sounds from the presenter and the group we might be sitting with. Our brains take everything in and connect the dots with neural networks between each piece of stimuli. Where a connection is made, an idea is formed.
In the traditional slide-by-slide approach to presenting, it is more difficult for the brain to make connections. This is generally a downside to the way presentations are put together, that is, it's hard to connect a concept on slide 2 to something on slide 50 an hour later.
As Prezi gives us such freedom to move around the canvas and zoom in and out of different elements, it's very easy for us to present in a way that aids the brain in creating neural networks. This, in turn, leads to our Prezi's messages being remembered for longer and in more detail than by using slides.
In order to explain how Prezi can help build neural networks, what better tool to use than Prezi itself? If you have an Internet connection while you're reading this, you can go to http://prezi.com/vuf5fbirwjke/big-picture-thinking/ and refer to a Prezi explaining this concept. If you don't have an Internet connection, refer to the screenshots we added of the same Prezi.
If you follow the steps explained here when constructing your Prezi, you are bound to deliver a much more powerful message:
Show your audience the first piece of information.

Move to the next piece of information; don't rush things.

Move along again until you've covered all the key elements.

Zoom out to show all of the key elements and their relationships in one view.

You can zoom out again to display even more relationships between the information.

Your audience will remember the relationships and understand the BIG picture.
Tip
You can create a copy of the preceding Prezi online at http://prezi.com/vuf5fbirwjke/big-picture-thinking/ to store it in your own Prezi account.
This Prezi explains how to help create the neural networks discussed using the BIG picture technique itself.
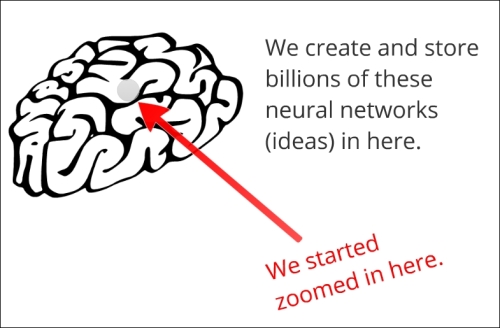
You can see how at the start we are already zoomed in to one neuron of the brain, and then we slowly move outwards. The previous two images clearly show the connections between everything that we previously saw in the Prezi.
In the final frame of the Prezi, we zoomed out completely to see an image of the brain. This is the BIG picture view for this particular Prezi, as it clearly demonstrates that everything we've been seeing happens inside the human brain.
If done correctly, you should start to see your BIG picture form in the planning stage of your Prezi (step 1 – Planning your Prezi). By using the Mind Mapping techniques explained earlier, you will start to see connections between the different elements of your Prezi. At this stage, you should ask yourself the question "What single image could sum up the links between everything?"
It might be difficult to find the right image, and in some cases, it might need a combination of images together. However, the key messages along the way should all be delivered inside of the BIG picture.
Tip
The BIG picture in reverse
You can also try using the BIG picture technique in reverse order. Show the BIG picture at the very start of your Prezi, then zoom in to the details and explain the relationships.
To help you practice finding images that sum up a series of different elements and link them together, have a go at completing the following table. Hopefully, you'll start to get much better at this with time—if you master the three Prezi design steps, of course!
|
What image would you use to connect everything? | ||||
|---|---|---|---|---|
|
Book |
Cream |
Glasses |
Towel | |
|
Mushrooms |
Dough |
Tomatoes |
Cheese | |
|
Revenue |
Client base |
Contract |
Projects | |
|
Employees |
Salaries |
Sick Leave |
Grievances | |
|
Club |
Tee |
Ball |
Sand |
Now that you're starting to think in the Prezi frame of mind, you'll be able to pull together some of these strategies to start creating your own BIG picture Prezis. Before you do so, we have one last note of caution. It's incredibly easy to get carried away by excitement with some of the awesome Prezi tools at your disposal. We inevitably see some of these things popping up during every Prezi training session. If you can avoid these common mistakes, you'll be one step closer to becoming a Prezi master.
One of the biggest attractions to Prezi is the zooming and spinning that happens when transitioning from one element to another. This movement is so smooth and fluent that it's normally the first thing to make people sit up straight and say Wow this is great, how do you do that?
The danger with this is that people then go off and create their own Prezi with as many spins and zooms as they can because they think it looks so great that their presentation is bound to be talked about for ages by their colleagues.
Their Prezi will only be talked about for one reason, and that's because after 20 minutes of all the spinning and zooming, people had to leave the room because they fell ill. Especially when viewed on large screens, this extreme use of zooming and spinning has been known to literally cause actual motion sickness.
The spins and zooms you can create in Prezi can be very useful in helping you to tell your story, especially if used cleverly by slowly revealing words or zooming in to find hidden details, as we discussed earlier. On their own, they have no impact at all and do not help the audience retain any information.
Staring at a blank canvas can be much more intimidating than a blank slide. Precisely because there is more freedom, there is also much more to consider. When you're sitting there with the blank canvas staring back at you, it can be easy to resort to a style with which you're more comfortable. We've seen too many new Prezi users to count who have performed either of the following actions:
Resorted back to laying out their presentation exactly as if it were a PowerPoint.
Just started placing text and images randomly across the canvas, with no plan.
In the first scenario, you're falling back into a linear way of thinking, and not taking advantage of the additional opportunities afforded by the Prezi platform. In the second, it's easy to think you're designing a great nonlinear presentation, but without a solid plan, you end up zooming, panning, and rotating around the screen for no good reason. Many people who claim they don't like Prezi have only seen it used in these ways.
It's easy to get so excited about the new presenting opportunities afforded by Prezi that you want to make use of every single one of them and create the single best presentation in all of history. Slow down, though.
That may happen in time, but if you're creating your first business presentations, it's much better to keep things simple in the beginning. Use some of the features you're most comfortable with first. Your Prezi will look much better if it uses one Prezi design strategy well, rather than many of them poorly. Keep it simple and expand to try new things as and when you're comfortable with them.
This chapter introduced us to Prezi, and gave us a chance to master some of the nontechnical elements. This is an element of the software that is either forgotten or just not given any thought at all by most Prezi users. However, it is just as important as learning what each button does inside the software itself and some people would even argue that it's more important than knowing the software.
As you start working on your Prezi, remember that you'll need to think ahead about the purpose of your Prezi, make sure that you achieve the appropriate style, and utilize the 3D features of the Prezi canvas as you build your own Prezi.
Using the Mind Mapping technique to help you plan your nonlinear Prezi will get you on the right track for the BIG picture thinking that we've practiced in this chapter. Ensure that you master the techniques in this chapter and align the way you think and plan a presentation to the way that Prezi works. Once you've created a Prezi using these steps, you'll be able to serve up a delicious, multilayered Prezi that makes you look like a total superstar to everyone in your business.
In the next chapter, we will transition to the technical side of Prezi with a hands-on look at the technical mechanics of Prezi.