


This chapter will show you how to write some image-processing filters for Android smartphones and tablets, written first for desktop (in C/C++) and then ported to Android (with the same C/C++ code but with a Java GUI), since this is the recommended scenario when developing for mobile devices. This chapter will cover:
How to convert a real-life image to a sketch drawing
How to convert to a painting and overlay the sketch to produce a cartoon
A scary "evil" mode to create bad characters instead of good characters
A basic skin detector and skin color changer, to give someone green "alien" skin
How to convert the project from a desktop app to a mobile app
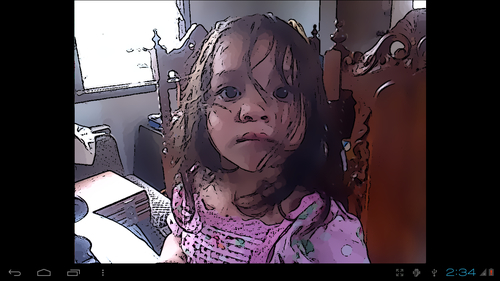
The following screenshot shows the final Cartoonifier app running on an Android tablet:
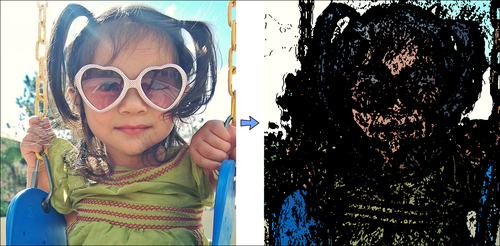
We want to make the real-world camera frames look like they are genuinely from a cartoon. The basic idea is to fill the flat parts with some color and then draw thick lines on the strong edges. In other words, the flat areas should become much more flat and the edges should become much more distinct. We will detect edges and smooth the flat areas, then draw enhanced edges back on top to produce a cartoon or comic book effect.
When developing mobile computer vision apps, it is a good idea to build a fully working desktop version first before porting it to mobile, since it is much easier to develop and debug a desktop program than a mobile app! This chapter will therefore begin with a complete Cartoonifier desktop program that you can create using your favorite IDE (for example, Visual Studio, XCode, Eclipse, QtCreator, and so on). After it is working properly on the desktop, the last section shows how to port it to Android (or potentially iOS) with Eclipse. Since we will create two different projects that mostly share the same source code with different graphical user interfaces, you could create a library that is linked by both projects, but for simplicity we will put the desktop and Android projects next to each other, and set up the Android project to access some files (cartoon.cpp and cartoon.h
, containing all the image processing code) from the Desktop folder. For example:
C:\Cartoonifier_Desktop\cartoon.cppC:\Cartoonifier_Desktop\cartoon.hC:\Cartoonifier_Desktop\main_desktop.cppC:\Cartoonifier_Android\...
The desktop app uses an OpenCV GUI window, initializes the camera, and with each camera frame calls the cartoonifyImage() function containing most of the code in this chapter. It then displays the processed image on the GUI window. Similarly, the Android app uses an Android GUI window, initializes the camera using Java, and with each camera frame calls the exact same C++ cartoonifyImage() function as previously mentioned, but with Android menus and finger-touch input. This chapter will
explain how to create the desktop app from scratch, and the Android app from one of the OpenCV Android sample projects. So first you should create a desktop program in your favorite IDE, with a main_desktop.cpp file to hold the GUI code given in the following sections, such as the main loop, webcam functionality, and keyboard input, and you should create a cartoon.cpp file that will be shared between projects. You should put most of the code of this chapter into cartoon.cpp as a function called cartoonifyImage().
To access a computer's
webcam or camera device, you can simply call open() on a cv::VideoCapture object (OpenCV's method of accessing your camera device), and pass 0 as the default camera ID number. Some computers have multiple cameras attached or they do not work as default camera 0; so it is common practice to allow the user to pass the desired camera number as a command-line argument, in case they want to try camera 1, 2, or -1, for example. We will also try to set the camera resolution to 640 x 480 using cv::VideoCapture::set()
, in order to run faster on high-resolution cameras.
Note
Depending on your camera model, driver, or system, OpenCV might not change the properties of your camera. It is not important for this project, so don't worry if it does not work with your camera.
You can put this code in the main() function of your main_desktop.cpp:
int cameraNumber = 0;
if (argc > 1)
  cameraNumber = atoi(argv[1]);

// Get access to the camera.
cv::VideoCapture camera;
camera.open(cameraNumber);
if (!camera.isOpened()) {
  std::cerr << "ERROR: Could not access the camera or video!" <<
  std::endl;
  exit(1);
}

// Try to set the camera resolution.
camera.set(cv::CV_CAP_PROP_FRAME_WIDTH, 640);
camera.set(cv::CV_CAP_PROP_FRAME_HEIGHT, 480);
After the webcam has been initialized, you can grab the current camera image as a cv::Mat object (OpenCV's image container). You can grab each camera frame by using the C++ streaming operator from your cv::VideoCapture object into a cv::Mat object, just like if you were getting input from a console.
Note
OpenCV makes it very easy to load a video file (such as an AVI or MPG file) and use it instead of a webcam. The only difference to your code would be that you should create the cv::VideoCapture object with the video filename, such as camera.open("my_video.avi"), rather than the camera number, such as camera.open(0). Both methods create a cv::VideoCapture object that can be used in the same way.
If you
want to display a GUI window on the screen using OpenCV, you call cv::imshow() for each image, but you must also call cv::waitKey() once per frame, otherwise your windows will not update at all! Calling cv::waitKey(0) waits indefinitely until the user hits a key in the window, but a positive number such as waitKey(20) or higher will wait for at least that many milliseconds.
Put this main loop in main_desktop.cpp, as the basis for your real-time camera app:
while (true) {
  // Grab the next camera frame.
  cv::Mat cameraFrame;
  camera >> cameraFrame;
  if (cameraFrame.empty()) {
    std::cerr << "ERROR: Couldn't grab a camera frame." <<
    std::endl;
    exit(1);
  }
  // Create a blank output image, that we will draw onto.
  cv::Mat displayedFrame(cameraFrame.size(), cv::CV_8UC3);

  // Run the cartoonifier filter on the camera frame.
  cartoonifyImage(cameraFrame, displayedFrame);

  // Display the processed image onto the screen.
  imshow("Cartoonifier", displayedFrame);

  // IMPORTANT: Wait for at least 20 milliseconds,
  // so that the image can be displayed on the screen!
  // Also checks if a key was pressed in the GUI window.
  // Note that it should be a "char" to support Linux.
  char keypress = cv::waitKey(20);  // Need this to see anything!
  if (keypress == 27) {   // Escape Key
  // Quit the program!
  break;
  }
}//end whileTo obtain a sketch (black-and-white drawing) of the camera frame, we will use an edge-detection filter; whereas to obtain a color painting, we will use an edge-preserving filter (bilateral filter) to further smooth the flat regions while keeping the edges intact. By overlaying the sketch drawing on top of the color painting, we obtain a cartoon effect as shown earlier in the screenshot of the final app.
There are many different edge detection filters, such as Sobel, Scharr, Laplacian filters, or Canny-edge detector. We will use a Laplacian edge filter since it produces edges that look most similar to hand sketches compared to Sobel or Scharr, and that are quite consistent compared to a Canny-edge detector, which produces very clean line drawings but is affected more by random noise in the camera frames and the line drawings therefore often change drastically between frames.
Nevertheless, we still need to reduce the noise in the image before we use a Laplacian edge filter. We will use a Median filter because it is good at removing noise while keeping edges sharp; also, it is not as slow as a bilateral filter. Since Laplacian filters use grayscale images, we must convert from OpenCV's default BGR format to Grayscale. In your empty file cartoon.cpp, put this code at the top so you can access OpenCV and Standard C++
templates without typing cv:: and std:: everywhere:
// Include OpenCV's C++ Interface
#include "opencv2/opencv.hpp"

using namespace cv;
using namespace std;
Put this and all the remaining code in a cartoonifyImage() function in the cartoon.cpp file:
Mat gray;
cvtColor(srcColor, gray, CV_BGR2GRAY);
const int MEDIAN_BLUR_FILTER_SIZE = 7;
medianBlur(gray, gray, MEDIAN_BLUR_FILTER_SIZE);
Mat edges;
const int LAPLACIAN_FILTER_SIZE = 5;
Laplacian(gray, edges, CV_8U, LAPLACIAN_FILTER_SIZE);
The Laplacian filter produces edges with varying brightness, so to make the edges look more like a sketch we apply a binary threshold to make the edges either white or black:
Mat mask;
const int EDGES_THRESHOLD = 80;
threshold(edges, mask, EDGES_THRESHOLD, 255, THRESH_BINARY_INV);
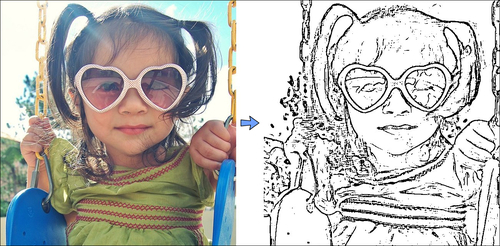
In the following figure, you can see the original image (left side) and the generated edge mask (right side) that looks similar to a sketch drawing. After we generate a color painting (explained later), we can put this edge mask on top for black line drawings:
A strong bilateral filter smoothes flat regions while keeping edges sharp, and is therefore great as an automatic cartoonifier or painting filter, except that it is extremely slow (that is, measured in seconds or even minutes rather than milliseconds!). We will therefore use some tricks to obtain a nice cartoonifier that still runs at an acceptable speed. The most important trick we can use is to perform bilateral filtering at a lower resolution. It will have a similar effect as at full resolution, but will run much faster. Let's reduce the total number of pixels by a factor of four (for example, half width and half height):
Size size = srcColor.size();
Size smallSize;
smallSize.width = size.width/2;
smallSize.height = size.height/2;
Mat smallImg = Mat(smallSize, CV_8UC3);
resize(srcColor, smallImg, smallSize, 0,0, INTER_LINEAR);
Rather than applying a large bilateral filter, we will apply many small bilateral filters to produce a strong cartoon effect in less time. We will truncate the filter (see the following figure) so that instead of performing a whole filter (for example, a filter size of 21 x 21 when the bell curve is 21 pixels wide), it just uses the minimum filter size needed for a convincing result (for example, with a filter size of just 9 x 9 even if the bell curve is 21 pixels wide). This truncated filter will apply the major part of the filter (the gray area) without wasting time on the minor part of the filter (the white area under the curve), so it will run several times faster:

We have four parameters that control the bilateral filter: color strength, positional strength, size, and repetition count. We need a temp Mat since bilateralFilter() can't overwrite its input (referred to as "in-place processing"), but we can apply one filter storing a temp Mat and another filter storing back to the input:
Mat tmp = Mat(smallSize, CV_8UC3);
int repetitions = 7; // Repetitions for strong cartoon effect.
for (int i=0; i<repetitions; i++) {
int ksize = 9; // Filter size. Has a large effect on speed.
double sigmaColor = 9; // Filter color strength.
double sigmaSpace = 7; // Spatial strength. Affects speed.
bilateralFilter(smallImg, tmp, ksize, sigmaColor, sigmaSpace);
bilateralFilter(tmp, smallImg, ksize, sigmaColor, sigmaSpace);
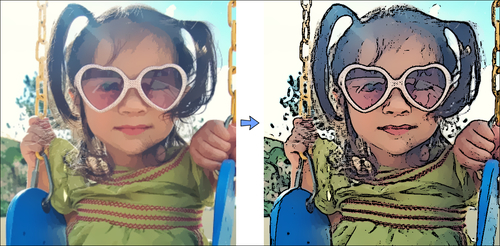
}Remember that this was applied to the shrunken image, so we need to expand the image back to the original size. Then we can overlay the edge mask that we found earlier. To overlay the edge mask "sketch" onto the bilateral filter "painting" (left-hand side of the following figure), we can start with a black background and copy the "painting" pixels that aren't edges in the "sketch" mask:
Mat bigImg;
resize(smallImg, bigImg, size, 0,0, INTER_LINEAR);
dst.setTo(0);
bigImg.copyTo(dst, mask);
The result is a cartoon version of the original photo, as shown on the right side of the figure, where the "sketch" mask is overlaid on the "painting":
Cartoons and comics always have both good and bad characters. With the right combination of edge filters, a scary image can be generated from the most innocent-looking people! The trick is to use a small-edge filter that will find many edges all over the image, then merge the edges using a small Median filter.
We will perform this on a grayscale image with some noise reduction, so the previous code for converting the original image to grayscale and applying a 7 x 7 Median filter should be used again (the first image in the following figure shows the output of the grayscale Median blur). Instead of following it with a Laplacian filter and Binary threshold, we can get a scarier look if we apply a 3 x 3 Scharr gradient filter along x and y (the second image in the figure), and then apply a binary threshold with a very low cutoff (the third image in the figure) and a 3 x 3 Median blur, producing the final "evil" mask (the fourth image in the figure):
Mat gray;
cvtColor(srcColor, gray, CV_BGR2GRAY);
const int MEDIAN_BLUR_FILTER_SIZE = 7;
medianBlur(gray, gray, MEDIAN_BLUR_FILTER_SIZE);
Mat edges, edges2;
Scharr(srcGray, edges, CV_8U, 1, 0);
Scharr(srcGray, edges2, CV_8U, 1, 0, -1);
edges += edges2;     // Combine the x & y edges together.
const int EVIL_EDGE_THRESHOLD = 12;
threshold(edges, mask, EVIL_EDGE_THRESHOLD, 255, THRESH_BINARY_INV);
medianBlur(mask, mask, 3);
Now that we have an "evil" mask, we can overlay this mask onto the cartoonified "painting" image like we did with the regular "sketch" edge mask. The final result is shown on the right side of the following figure:
Now that we have a sketch mode, a cartoon mode (painting + sketch mask), and an evil mode (painting + evil mask), for fun let's try something more complex: an "alien" mode, by detecting the skin regions of the face and then changing the skin color to be green.
There are many different techniques used for detecting skin regions, from simple color thresholds using RGB (Red-Green-Blue) or HSV (Hue-Saturation-Brightness) values or color histogram calculation and reprojection, to complex machine-learning algorithms of mixture models that need camera calibration in the CIELab color space and offline training with many sample faces, and so on. But even the complex methods don't necessarily work robustly across various camera and lighting conditions and skin types. Since we want our skin detection to run on a mobile device without any calibration or training, and we are just using skin detection for a "fun" image filter, it is sufficient for us to use a simple skin-detection method. However, the color response from the tiny camera sensors in mobile devices tend to vary significantly, and we want to support skin detection for people of any skin color but without any calibration, so we need something more robust than simple color thresholds.
For example, a simple HSV skin detector can treat any pixel as skin if its hue is fairly red, saturation is fairly high but not extremely high, and its brightness is not too dark or too bright. But mobile cameras often have bad white balancing, and so a person's skin might look slightly blue instead of red, and so on, and this would be a major problem for simple HSV thresholding.
A more robust solution is to perform face detection with a Haar or LBP cascade classifier (shown in Chapter 8, Face Recognition using Eigenfaces), and then look at the range of colors for the pixels in the middle of the detected face since you know that those pixels should be skin pixels of the actual person. You could then scan the whole image or the nearby region for pixels of a similar color as the center of the face. This has the advantage that it is very likely to find at least some of the true skin region of any detected person no matter what their skin color is or even if their skin appears somewhat blue or red in the camera image.
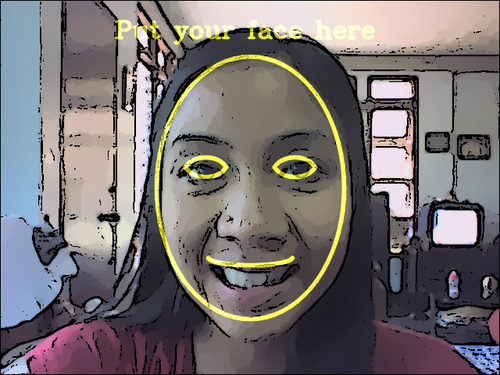
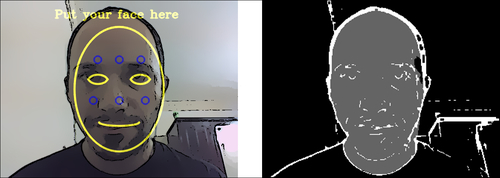
Unfortunately, face detection using cascade classifiers is quite slow on current mobile devices, so this method might be less ideal for some real-time mobile applications. On the other hand, we can take advantage of the fact that for mobile apps it can be assumed that the user will be holding the camera directly towards a person's face from close up, and since the user is holding the camera in their hand, which they can easily move, it is quite reasonable to ask the user to place their face at a specific location and distance, rather than try to detect the location and size of their face. This is the basis of many mobile phone apps where the app asks the user to place their face at a certain position or perhaps to manually drag points on the screen to show where the corners of their face are in a photo. So let's simply draw the outline of a face in the center of the screen and ask the user to move their face to the shown position and size.
When the alien mode is first started, we will draw the face outline on top of the camera frame so the user knows where to put their face. We will draw a big ellipse covering 70 percent of the image height, with a fixed aspect ratio of 0.72 so that the face will not become too skinny or fat depending on the aspect ratio of the camera:
// Draw the color face onto a black background.
Mat faceOutline = Mat::zeros(size, CV_8UC3);
Scalar color = CV_RGB(255,255,0);    // Yellow.
int thickness = 4;
// Use 70% of the screen height as the face height.
int sw = size.width;
int sh = size.height;
int faceH = sh/2 * 70/100;  // "faceH" is the radius of the ellipse.
// Scale the width to be the same shape for any screen width. int faceW = faceH * 72/100;
// Draw the face outline.
ellipse(faceOutline, Point(sw/2, sh/2), Size(faceW, faceH),
        0, 0, 360, color, thickness, CV_AA);
To make it more obvious that it is a face, let's also draw two eye outlines. Rather than drawing an eye as an ellipse, we can make it a bit more realistic (see the following figure) by drawing a truncated
ellipse for the top of the eye and a truncated ellipse for the bottom of the eye, since we can specify the start and end angles when drawing with ellipse():
// Draw the eye outlines, as 2 arcs per eye.
int eyeW = faceW * 23/100;
int eyeH = faceH * 11/100;
int eyeX = faceW * 48/100;
int eyeY = faceH * 13/100;
Size eyeSize = Size(eyeW, eyeH);
// Set the angle and shift for the eye half ellipses.
int eyeA = 15; // angle in degrees.
int eyeYshift = 11;
// Draw the top of the right eye.
ellipse(faceOutline, Point(sw/2 - eyeX, sh/2 – eyeY),
        eyeSize, 0, 180+eyeA, 360-eyeA, color, thickness, CV_AA);
// Draw the bottom of the right eye.
ellipse(faceOutline, Point(sw/2 - eyeX, sh/2 - eyeY – eyeYshift),
       eyeSize, 0, 0+eyeA, 180-eyeA, color, thickness, CV_AA);
// Draw the top of the left eye.
ellipse(faceOutline, Point(sw/2 + eyeX, sh/2 - eyeY),
       eyeSize, 0, 180+eyeA, 360-eyeA, color, thickness, CV_AA);
// Draw the bottom of the left eye.
ellipse(faceOutline, Point(sw/2 + eyeX, sh/2 - eyeY – eyeYshift),
       eyeSize, 0, 0+eyeA, 180-eyeA, color, thickness, CV_AA);
We can use the same method to draw the bottom lip of the mouth:
// Draw the bottom lip of the mouth.
int mouthY = faceH * 48/100;
int mouthW = faceW * 45/100;
int mouthH = faceH * 6/100;
ellipse(faceOutline, Point(sw/2, sh/2 + mouthY), Size(mouthW,
        mouthH), 0, 0, 180, color, thickness, CV_AA);
To make it even more obvious that the user should put their face where shown, let's write a message on the screen!
// Draw anti-aliased text.
int fontFace = FONT_HERSHEY_COMPLEX;
float fontScale = 1.0f;
int fontThickness = 2;
char *szMsg = "Put your face here";
putText(faceOutline, szMsg, Point(sw * 23/100, sh * 10/100),
       fontFace, fontScale, color, fontThickness, CV_AA);
Now that we have the face outline drawn, we can overlay it onto the displayed image by using alpha blending to combine the cartoonified image with this drawn outline:
addWeighted(dst, 1.0, faceOutline, 0.7, 0, dst, CV_8UC3);
This results in the outline on the following figure, showing the user where to put their face so we don't have to detect the face location:
Rather than detecting the skin color and then the region with that skin color, we can use OpenCV's floodFill(), which is similar to the bucket fill tool in many image editing programs. We know that the regions in the middle of the screen should be skin pixels (since we asked the user to put their face in the middle), so to change the whole face to have green skin, we can just apply a green flood fill on the center pixel, which will always color at least some parts of the face as green. In reality, the color, saturation, and brightness is likely to be different in different parts of the face, so a flood fill will rarely cover all the skin pixels of a face unless the threshold is so low that it also covers unwanted pixels outside the face. So, instead of applying a single flood fill in the center of the image, let's apply a flood fill on six different points around the face that should be skin pixels.
A nice feature of OpenCV's floodFill() function is that it can draw the flood fill into an external image rather than modifying the input image. So this feature can give us a mask image for adjusting the color of the skin pixels without necessarily changing the brightness or saturation, producing a more realistic image than if all skin pixels became an identical green pixel (losing significant face detail as a result).
Skin-color changing does not work so well in the RGB color-space. This is because you want to allow brightness to vary in the face but not allow skin color to vary much, and RGB does not separate brightness from color. One solution is to use the Hue-Saturation-Brightness (HSV) color-space, since it separates brightness from the color (hue) as well as the colorfulness (saturation). Unfortunately, HSV wraps the hue value around red, and since skin is mostly red it means that you need to work both with a hue of less than 10 percent and a hue greater than 90 percent, since these are both red. Accordingly, we will instead use the Y'CrCb color-space (the variant of YUV, which is in OpenCV), since it separates brightness from color, and only has a single range of values for typical skin color rather than two. Note that most cameras, images, and videos actually use some type of YUV as their color-space before conversion to RGB, so in many cases you can get a YUV image without having to convert it yourself.
Since we want our alien mode to look like a cartoon, we will apply the alien filter after the image has already been cartoonified; in other words, we have access to the shrunken color image produced by the bilateral filter, and to the full-sized edge mask. Skin detection often works better at low resolutions, since it is the equivalent of analyzing the average value of each high-resolution pixel's neighbors (or the low-frequency signal instead of the high-frequency noisy signal). So let's work at the same shrunken scale as the bilateral filter (half width and half height). Let's convert the painting image to YUV:
Mat yuv = Mat(smallSize, CV_8UC3);
cvtColor(smallImg, yuv, CV_BGR2YCrCb);
We also need to shrink the edge mask so it is at the same scale as the painting image. There is a complication with OpenCV's floodFill() function when storing to a separate mask image, in that the mask should have a 1-pixel border around the whole image, so if the input image is W x H pixels in size, the separate mask image should be (W+2) x (H+2) pixels in size. But floodFill() also allows us to initialize the mask with edges that the flood-fill algorithm will ensure it does not cross. Let's use this feature in the hope that it helps prevent the flood fill from extending outside the face. So we need to provide two mask images: the edge mask that measures W x H in size, and the same edge mask but measuring (W+2) x (H+2) in size because it should include a border around the image. It is possible to have multiple cv::Mat objects (or headers) referencing the same data, or even to have a cv::Mat object that references a sub-region of another cv::Mat image. So instead of allocating two separate images and copying the edge mask pixels across, let's allocate a single mask image including the border, and create an extra cv::Mat header of W x H (that just references the region of interest in the flood-fill mask without the border). In other words, there is just one array of pixels of size (W+2) x (H+2) but two cv::Mat objects, where one is referencing the whole (W+2) x (H+2) image and the other is referencing the W x H region in the middle of that image:
int sw = smallSize.width;
int sh = smallSize.height;
Mat mask, maskPlusBorder;
maskPlusBorder = Mat::zeros(sh+2, sw+2, CV_8UC1);
mask = maskPlusBorder(Rect(1,1,sw,sh)); // mask is in maskPlusBorder.
resize(edge, mask, smallSize);         // Put edges in both of them.
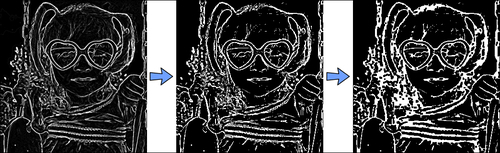
The edge mask
(shown on the left-hand side of the following figure) is full of both strong and weak edges; but we only want strong edges, so we will apply a binary threshold (resulting in the middle image in the following figure). To join some gaps between edges we will then combine the morphological operators dilate() and erode() to remove some gaps (also referred to as the "close" operator), resulting in the right side of the figure:
const int EDGES_THRESHOLD = 80;
threshold(mask, mask, EDGES_THRESHOLD, 255, THRESH_BINARY);
dilate(mask, mask, Mat());
erode(mask, mask, Mat());
As mentioned earlier, we want to apply flood fills in numerous points around the face to make sure we include the various colors and shades of the whole face. Let's choose six points around the nose, cheeks, and forehead, as shown on the left side of the next figure. Note that these values are dependent on the face outline drawn earlier:
int const NUM_SKIN_POINTS = 6;
Point skinPts[NUM_SKIN_POINTS];
skinPts[0] = Point(sw/2,          sh/2 - sh/6);
skinPts[1] = Point(sw/2 - sw/11,  sh/2 - sh/6);
skinPts[2] = Point(sw/2 + sw/11,  sh/2 - sh/6);
skinPts[3] = Point(sw/2,          sh/2 + sh/16);
skinPts[4] = Point(sw/2 - sw/9,   sh/2 + sh/16);
skinPts[5] = Point(sw/2 + sw/9,   sh/2 + sh/16);
Now we just need to find some good lower and upper bounds for the flood fill. Remember that this is being performed in the Y'CrCb color space, so we basically decide how much the brightness, red component, and blue component can vary. We want to allow the brightness to vary a lot, to include shadows as well as highlights and reflections, but we don't want the colors to vary much at all:
const int LOWER_Y = 60;
const int UPPER_Y = 80;
const int LOWER_Cr = 25;
const int UPPER_Cr = 15;
const int LOWER_Cb = 20;
const int UPPER_Cb = 15;
Scalar lowerDiff = Scalar(LOWER_Y, LOWER_Cr, LOWER_Cb);
Scalar upperDiff = Scalar(UPPER_Y, UPPER_Cr, UPPER_Cb);
We will use floodFill() with its default flags, except that we want to store to an external mask, so we must specify FLOODFILL_MASK_ONLY:
const int CONNECTED_COMPONENTS = 4;  // To fill diagonally, use 8. const int flags = CONNECTED_COMPONENTS | FLOODFILL_FIXED_RANGE \
     | FLOODFILL_MASK_ONLY;
Mat edgeMask = mask.clone();    // Keep a copy of the edge mask.
// "maskPlusBorder" is initialized with edges to block floodFill().
for (int i=0; i< NUM_SKIN_POINTS; i++) {
  floodFill(yuv, maskPlusBorder, skinPts[i], Scalar(), NULL,
          lowerDiff, upperDiff, flags);
}
In the following figure, the left side shows the six flood-fill locations (shown as blue circles), and the right side of the figure shows the external mask that is generated, where skin is shown as gray and edges are shown as white. Note that the right-side image was modified for this book so that skin pixels (of value 1) are clearly visible:
The mask image (shown on the right side of the previous figure) now contains:
pixels of value 255 for the edge pixels
pixels of value 1 for the skin regions
pixels of value 0 for the rest
Meanwhile, edgeMask just
contains edge pixels (as value 255). So to get just the skin pixels, we can remove the edges from it:
mask -= edgeMask;
The mask image now just contains 1s for skin pixels and 0s for non-skin pixels. To change the skin color and brightness of the original image, we can use cv::add() with the skin mask to increase the green component in the original BGR image:
int Red = 0;
int Green = 70;
int Blue = 0;
add(smallImgBGR, CV_RGB(Red, Green, Blue), smallImgBGR, mask);
The following figure shows the original image on the left, and the final alien cartoon image on the right, where at least six parts of the face will now be green!
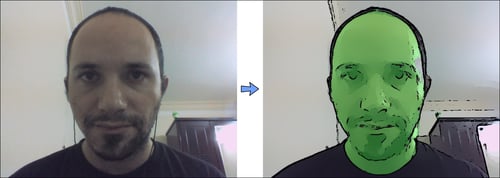
Notice that we
have not only made the skin look green but also brighter (to look like an alien that glows in the dark). If you want to just change the skin color without making it brighter, you can use other color-changing methods, such as adding 70 to green while subtracting 70 from red and blue, or convert to HSV color space using cvtColor(src, dst, "CV_BGR2HSV_FULL"), and adjust the hue and saturation.
That's all! Run the app in the different modes until you are ready to port it to your mobile.
Now that the program works on the desktop, we can make an Android or iOS app from it. The details given here are specific to Android, but also apply when porting to iOS for Apple iPhone and iPad or similar devices. When developing Android apps, OpenCV can be used directly from Java, but the result is unlikely to be as efficient as native C/C++ code and doesn't allow the running of the same code on the desktop as it does for your mobile. So it is recommended to use C/C++ for most OpenCV+Android app development (readers who want to write OpenCV apps purely in Java can use the JavaCV library by Samuel Audet, available at http://code.google.com/p/javacv/, to run the same code on the desktop that we run on Android).
Note
This Android project uses a camera for live input, so it won't work on the Android Emulator. It needs a real Android 2.2 (Froyo) or later device with a camera.
The user
interface of an Android app should be written using Java, but for the image processing we will use the same cartoon.cpp C++ file that we used for the desktop. To use C/C++ code in an Android app, we must use the NDK (Native Development Kit) that is based on
JNI (Java Native Interface). We will create a JNI wrapper for our cartoonifyImage() function so it can be used from Android with Java.
The Android port of OpenCV changes significantly each year, as does Android's method for camera access, so a book is not the best place to describe how it should be set up. Therefore the reader can follow the latest instructions at http://opencv.org/platforms/android.html to set up and build a native (NDK) Android app with OpenCV. OpenCV comes with an Android sample project called Sample3Native that accesses the camera using OpenCV and displays the modified image on the screen. This sample project is useful as a base for the Android app developed in this chapter, so readers should familiarize themselves with this sample app (currently available at http://docs.opencv.org/doc/tutorials/introduction/android_binary_package/android_binary_package_using_with_NDK.html). We will then modify an Android OpenCV base project so that it can cartoonify the camera's video frames and display the resulting frames on the screen.
If you are stuck with OpenCV development for Android, for example if you are receiving a compile error or the camera always gives blank frames, try searching these websites for solutions:
The Android Binary Package NDK tutorial for OpenCV, mentioned previously.
The official Android-OpenCV Google group (https://groups.google.com/forum/?fromgroups#!forum/android-opencv).
OpenCV's Q & A site (http://answers.opencv.org).
StackOverflow Q & A site (http://stackoverflow.com/questions/tagged/opencv+android).
The Web (for example http://www.google.com).
If you still can't fix your problem after trying all of these, you should post a question on the Android-OpenCV Google group with details of the error message, and so on.
When developing for the desktop, we only have to deal with BGR pixel format because the input (from camera, image, or video file) is in BGR format and so is the output (HighGUI window, image, or video file). But when developing for mobiles, you typically have to convert native color formats yourself.
Looking at the
sample code in jni\jni_part.cpp, the myuv variable is the color image in Android's default camera format: "NV21" YUV420sp. The first part of the array is the grayscale pixel array, followed by a half-sized pixel array that alternates between the U and V color channels. So if we just want to access a grayscale image, we can get it directly from the first part of a YUV420sp semi-planar image without any conversions. But if we want a color image (for example, BGR or BGRA color format), we must convert the color format using cvtColor().
Looking at the
Sample3Native code from OpenCV, the mbgra variable is the color image to be displayed on the Android device, in BGRA format. OpenCV's default format is BGR (the opposite byte order of RGB), and BGRA just adds an unused byte on the end of each pixel, so that each pixel is stored as Blue-Green-Red-Unused. You can either do all your processing in OpenCV's default BGR format and then convert your final output from BGR to BGRA before display on the screen, or you can ensure your image processing code can handle the BGRA format instead of or in addition to BGR format. This can often be simple to allow in OpenCV because many OpenCV functions accept the BGRA, but you must ensure that you create images with the same number of channels as the input, by seeing if the Mat::channels() value in your images are 3 or 4. Also, if you directly access pixels in your code, you would need separate code to handle 3-channel BGR and 4-channel BGRA images.
Note
Some CV operations run faster with BGRA pixels (since it is aligned to 32-bit) while some run faster with BGR (since it requires less memory to read and write), so for maximum efficiency you should support both BGR and BGRA and then find which color format runs fastest overall in your app.
Let's
begin with something simple: getting access to the camera frame in OpenCV but not processing it, and instead just displaying it on the screen. This can be done easily with Java code, but it is important to know how to do it using OpenCV too. As mentioned previously, the camera image arrives at our C++ code in YUV420sp format and should leave in BGRA format. So if we prepare our cv::Mat for input and output, we just need to convert from YUV420sp to BGRA using cvtColor. To write C/C++ code for an Android Java app, we need to use special JNI function names that match the Java class and package name that will use that JNI function, in the format:
JNIEXPORT <Return> JNICALL Java_<Package>_<Class>_<Function>(JNIEnv* env, jobject, <Args>)
So let's create a ShowPreview() C/C++ function that is used from a CartoonifierView Java class in a Cartoonifier Java package. Add this ShowPreview() C/C++ function to jni\jni_part.cpp:
// Just show the plain camera image without modifying it.
JNIEXPORT void JNICALL Java_com_Cartoonifier_CartoonifierView_ShowPreview(
  JNIEnv* env, jobject,
  jint width, jint height, jbyteArray yuv, jintArray bgra)
{
  jbyte* _yuv  = env->GetByteArrayElements(yuv, 0);
  jint*  _bgra = env->GetIntArrayElements(bgra, 0);

  Mat myuv = Mat(height + height/2, width, CV_8UC1, (uchar *)_yuv);
  Mat mbgra = Mat(height, width, CV_8UC4, (uchar *)_bgra);


  // Convert the color format from the camera's
  // NV21 "YUV420sp" format to an Android BGRA color image.
  cvtColor(myuv, mbgra, CV_YUV420sp2BGRA);

  // OpenCV can now access/modify the BGRA image "mbgra" ...


  env->ReleaseIntArrayElements(bgra, _bgra, 0);
  env->ReleaseByteArrayElements(yuv, _yuv, 0);
}
While this code looks complex at first, the first two lines of the function just give us native access to the given Java arrays, the next two lines construct cv::Mat objects around the given pixel buffers (that is, they don't allocate new images, they make myuv access the pixels in the _yuv array, and so on), and the last two lines of the function release the native lock we placed on the Java arrays. The only real work we did in the function is to convert from YUV to BGRA format, so this function is the base that we can use for new functions. Now let's extend this to analyze and modify the BGRA cv::Mat before display.
Note
The jni\jni_part.cpp sample code in OpenCV v2.4.2 uses this code:
cvtColor(myuv, mbgra, CV_YUV420sp2BGR, 4);
This looks like it converts to 3-channel BGR format (OpenCV's default format), but due to the "4" parameter it actually converts to 4-channel BGRA (Android's default output format) instead! So it's identical to this code, which is less confusing:
cvtColor(myuv, mbgra, CV_YUV420sp2BGRA);
Since we now have a BGRA image as input and output instead of OpenCV's default BGR, it leaves us with two options for how to process it:
Convert from BGRA to BGR before we perform our image processing, do our processing in BGR, and then convert the output to BGRA so it can be displayed by Android
Modify all our code to handle BGRA format in addition to (or instead of) BGR format, so we don't need to perform slow conversions between BGRA and BGR
For simplicity, we will just apply the color conversions from BGRA to BGR and back, rather than supporting both BGR and BGRA formats. If you are writing a real-time app, you should consider adding 4-channel BGRA support in your code to potentially improve performance. We will do one simple change to make things slightly faster: we are converting the input from YUV420sp to BGRA and then from BGRA to BGR, so we might as well just convert straight from YUV420sp to BGR!
It is a good idea to build and run with the ShowPreview() function (shown previously) on your device so you have something to go back to if you have problems with your C/C++ code later. To call it from Java, we add the Java declaration just next to the Java declaration of CartoonifyImage() near the bottom of CartoonifyView.java:
public native void ShowPreview(int width, int height,
byte[] yuv, int[] rgba);
We can then call it just like the OpenCV sample code called FindFeatures(). Put this in the middle of the processFrame() function of CartoonifierView.java:
ShowPreview(getFrameWidth(), getFrameHeight(), data, rgba);
You should build and run it now on your device, just to see the real-time camera preview.
We
want to add the cartoon.cpp file that we used for the desktop app. The file jni\Android.mk sets the C/C++/Assembly source files, header search paths, native libraries, and GCC compiler settings for your project:
Add
cartoon.cpp(andImageUtils_0.7.cppif you want easier debugging) toLOCAL_SRC_FILES, but remember that they are in the desktop folder instead of the defaultjnifolder. So add this after:LOCAL_SRC_FILES := jni_part.cpp:LOCAL_SRC_FILES += ../../Cartoonifier_Desktop/cartoon.cpp LOCAL_SRC_FILES += ../../Cartoonifier_Desktop/ImageUtils_0.7.cpp
Add the header file search path so it can find
cartoon.hin the common parent folder:LOCAL_C_INCLUDES += $(LOCAL_PATH)/../../Cartoonifier_Desktop
In the file
jni\jni_part.cpp, insert this near the top instead of#include <vector>:#include "cartoon.h" // Cartoonifier. #include "ImageUtils.h" // (Optional) OpenCV debugging // functions.
Add a JNI function
CartoonifyImage()to this file; this will cartoonify the image. We can start by duplicating the functionShowPreview()we created previously, which just shows the camera preview without modifying it. Notice that we convert directly fromYUV420spto BGR since we don't want to process BGRA images:// Modify the camera image using the Cartoonifier filter. JNIEXPORT void JNICALL Java_com_Cartoonifier_CartoonifierView_CartoonifyImage( JNIEnv* env, jobject, jint width, jint height, jbyteArray yuv, jintArray bgra) { // Get native access to the given Java arrays. jbyte* _yuv = env->GetByteArrayElements(yuv, 0); jint* _bgra = env->GetIntArrayElements(bgra, 0); // Create OpenCV wrappers around the input & output data. Mat myuv(height + height/2, width, CV_8UC1, (uchar *)_yuv); Mat mbgra(height, width, CV_8UC4, (uchar *)_bgra); // Convert the color format from the camera's YUV420sp // semi-planar // format to OpenCV's default BGR color image. Mat mbgr(height, width, CV_8UC3); // Allocate a new image buffer. cvtColor(myuv, mbgr, CV_YUV420sp2BGR); // OpenCV can now access/modify the BGR image "mbgr", and should // store the output as the BGR image "displayedFrame". Mat displayedFrame(mbgr.size(), CV_8UC3); // TEMPORARY: Just show the camera image without modifying it. displayedFrame = mbgr; // Convert the output from OpenCV's BGR to Android's BGRA //format. cvtColor(displayedFrame, mbgra, CV_BGR2BGRA); // Release the native lock we placed on the Java arrays. env->ReleaseIntArrayElements(bgra, _bgra, 0); env->ReleaseByteArrayElements(yuv, _yuv, 0); }The previous code does not modify the image, but we want to process the image using the cartoonifier we developed earlier in this chapter. So now let's insert a call to our existing
cartoonifyImage()function that we created incartoon.cppfor the desktop app. Replace the temporary line of codedisplayedFrame = mbgrwith this:cartoonifyImage(mbgr, displayedFrame);That's it! Build the code (Eclipse should compile the C/C++ code for you using
ndk-build) and run it on your device. You should have a working Cartoonifier Android app (right at the beginning of this chapter there is a sample screenshot showing what you should expect)! If it does not build or run, go back over the steps and fix the problems (look at the code provided with this book if you wish). Continue with the next steps once it is working.
You will quickly notice four issues with the app that is now running on your device:
It is extremely slow; many seconds per frame! So we should just display the camera preview and only cartoonify a camera frame when the user has touched the screen to say it is a good photo.
It needs to handle user input, such as to change modes between sketch, paint, evil, or alien modes. We will add these to the Android menu bar.
It would be great if we could save the cartoonified result to image files, to share with others. Whenever the user touches the screen for a cartoonified image, we will save the result as an image file on the user's SD card and display it in the Android Gallery.
There is a lot of random noise in the sketch edge detector. We will create a special "pepper" noise reduction filter to deal with this later.
To show the camera preview (until the user wants to cartoonify the selected camera frame), we can just call the ShowPreview() JNI function we wrote earlier. We will also wait for touch events from the user before cartoonifying the camera image. We only want to cartoonify one image when the user touches the screen; therefore we set a flag to say the next camera frame should be cartoonified and then that flag is reset, so it continues with the camera preview again. But this would mean the cartoonified image is only displayed for a fraction of a second and then the next camera preview will be displayed again. So we will use a second flag to say that the current image should be frozen on the screen for a few seconds before the camera frames overwrite it, to give the user some time to see it:
Add the following header imports near the top of the
CartoonifierApp.javafile in thesrc\com\Cartoonifierfolder:import android.view.View; import android.view.View.OnTouchListener; import android.view.MotionEvent;
Modify the class definition near the top of
CartoonifierApp.java:public class CartoonifierApp extends Activity implements OnTouchListener {Insert this code on the bottom of the
onCreate()function:// Call our "onTouch()" callback function whenever the user // touches the screen. mView.setOnTouchListener(this);
Add the function
onTouch()to process the touch event:public boolean onTouch(View v, MotionEvent m) { // Ignore finger movement event, we just care about when the // finger first touches the screen. if (m.getAction() != MotionEvent.ACTION_DOWN) { return false; // We didn't use this touch movement event. } Log.i(TAG, "onTouch down event"); // Signal that we should cartoonify the next camera frame and save // it, instead of just showing the preview. mView.nextFrameShouldBeSaved(getBaseContext()); return true; }Now we need to add the
nextFrameShouldBeSaved()function toCartoonifierView.java:// Cartoonify the next camera frame & save it instead of preview. protected void nextFrameShouldBeSaved(Context context) { bSaveThisFrame = true; }Add these variables near the top of the
CartoonifierViewclass:private boolean bSaveThisFrame = false; private boolean bFreezeOutput = false; private static final int FREEZE_OUTPUT_MSECS = 3000;
The
processFrame()function ofCartoonifierViewcan now switch between cartoon and preview, but should also make sure to only display something if it is not trying to show a frozen cartoon image for a few seconds. So replaceprocessFrame()with this:@Override protected Bitmap processFrame(byte[] data) { // Store the output image to the RGBA member variable. int[] rgba = mRGBA; // Only process the camera or update the screen if we aren't // supposed to just show the cartoon image. if (bFreezeOutputbFreezeOutput) { // Only needs to be triggered here once. bFreezeOutput = false; // Wait for several seconds, doing nothing! try { wait(FREEZE_OUTPUT_MSECS); } catch (InterruptedException e) { e.printStackTrace(); } return null; } if (!bSaveThisFrame) { ShowPreview(getFrameWidth(), getFrameHeight(), data, rgba); } else { // Just do it once, then go back to preview mode. bSaveThisFrame = false; // Don't update the screen for a while, so the user can // see the cartoonifier output. bFreezeOutput = true; CartoonifyImage(getFrameWidth(), getFrameHeight(), data, rgba, m_sketchMode, m_alienMode, m_evilMode, m_debugMode); } // Put the processed image into the Bitmap object that will be // returned for display on the screen. Bitmap bmp = mBitmap; bmp.setPixels(rgba, 0, getFrameWidth(), 0, 0, getFrameWidth(), getFrameHeight()); return bmp; }You should be able to build and run it to verify that the app works nicely now.
We will save the output both as a PNG file and display in the Android picture gallery. The Android Gallery is designed for JPEG files, but JPEG is bad for cartoon
images with solid colors and edges, so we'll use a tedious method to add PNG images to the gallery. We will create a Java function savePNGImageToGallery() to perform this for us. At the bottom of the processFrame() function just seen previously, we see that an Android Bitmap object is created with the output data; so we need a way to save the Bitmap object to a PNG file. OpenCV's imwrite() Java function can be used to save to a PNG file, but this would require linking to both OpenCV's Java API and OpenCV's C/C++ API (just like the OpenCV4Android sample project "tutorial-4-mixed" does). Since we don't need the OpenCV Java API for anything else, the following code will just show how to save PNG files using the Android API instead of the OpenCV Java API:
Android's
Bitmapclass can save files to PNG format, so let's use it. Also, we need to choose a filename for the image. Let's use the current date and time, to allow saving many files and making it possible for the user to remember when it was taken. Insert this just before thereturn bmpstatement ofprocessFrame():if (bFreezeOutput) { // Get the current date & time SimpleDateFormat s = new SimpleDateFormat("yyyy-MM-dd,HH-mm-ss"); String timestamp = s.format(new Date()); String baseFilename = "Cartoon" + timestamp + ".png"; // Save the processed image as a PNG file on the SD card and show // it in the Android Gallery. savePNGImageToGallery(bmp, mContext, baseFilename); }Add this to the top section of
CartoonifierView.java:// For saving Bitmaps to file and the Android picture gallery. import android.graphics.Bitmap.CompressFormat; import android.net.Uri; import android.os.Environment; import android.provider.MediaStore; import android.provider.MediaStore.Images; import android.text.format.DateFormat; import android.util.Log; import java.io.BufferedOutputStream; import java.io.File; import java.io.FileOutputStream; import java.io.IOException; import java.io.OutputStream; import java.text.SimpleDateFormat; import java.util.Date;
Insert this inside the
CartoonifierViewclass, on the top:private static final String TAG = "CartoonifierView"; private Context mContext; // So we can access the Android // Gallery.
Add this to your
nextFrameShouldBeSaved()function inCartoonifierView:mContext = context; // Save the Android context, for GUI // access.
Add the
savePNGImageToGallery()function toCartoonifierView:// Save the processed image as a PNG file on the SD card // and shown in the Android Gallery. protected void savePNGImageToGallery(Bitmap bmp, Context context, String baseFilename) { try { // Get the file path to the SD card. String baseFolder = \ Environment.getExternalStoragePublicDirectory( \ Environment.DIRECTORY_PICTURES).getAbsolutePath() \ + "/"; File file = new File(baseFolder + baseFilename); Log.i(TAG, "Saving the processed image to file [" + \ file.getAbsolutePath() + "]"); // Open the file. OutputStream out = new BufferedOutputStream( new FileOutputStream(file)); // Save the image file as PNG. bmp.compress(CompressFormat.PNG, 100, out); // Make sure it is saved to file soon, because we are about // to add it to the Gallery. out.flush(); out.close(); // Add the PNG file to the Android Gallery. ContentValues image = new ContentValues(); image.put(Images.Media.TITLE, baseFilename); image.put(Images.Media.DISPLAY_NAME, baseFilename); image.put(Images.Media.DESCRIPTION, "Processed by the Cartoonifier App"); image.put(Images.Media.DATE_TAKEN, System.currentTimeMillis()); // msecs since 1970 UTC. image.put(Images.Media.MIME_TYPE, "image/png"); image.put(Images.Media.ORIENTATION, 0); image.put(Images.Media.DATA, file.getAbsolutePath()); Uri result = context.getContentResolver().insert( MediaStore.Images.Media.EXTERNAL_CONTENT_URI,image); } catch (Exception e) { e.printStackTrace(); } }Android apps need permission from the user during installation if they need to store files on the device. So insert this line in
AndroidManifest.xmljust next to the similar line requesting permission for camera access:<uses-permission android:name="android.permission.WRITE_EXTERNAL_STORAGE"/>
Build and run the app! When you touch the screen to save a photo, you should eventually see the cartoonified image shown on the screen (perhaps after 5 or 10 seconds of processing). Once it is shown on the screen, it means it should be saved to your SD card and to your photo gallery. Exit the Cartoonifier app, open the Android Gallery app, and view the Pictures album. You should see the cartoon image as a PNG image in your screen's full resolution.
If you want to show a notification message whenever a new image is saved to the SD card and Android Gallery, follow these steps; otherwise feel free to skip this section:
Add the following to the top section of
CartoonifierView.java:// For showing a Notification message when saving a file. import android.app.Notification; import android.app.NotificationManager; import android.app.PendingIntent; import android.content.ContentValues; import android.content.Intent;
Add this near the top section of
CartoonifierView:private int mNotificationID = 0; // To show just 1 notification.
Insert this inside the
ifstatement below the call tosavePNGImageToGallery()inprocessFrame():showNotificationMessage(mContext, baseFilename);
Add the
showNotificationMessage()function toCartoonifierView:// Show a notification message, saying we've saved another image. protected void showNotificationMessage(Context context, String filename) { // Popup a notification message in the Android status // bar. To make sure a notification is shown for each // image but only 1 is kept in the status bar at a time, // use a different ID each time // but delete previous messages before creating it. final NotificationManager mgr = (NotificationManager) \ context.getSystemService(Context.NOTIFICATION_SERVICE); // Close the previous popup message, so we only have 1 //at a time, but it still shows a popup message for each //one. if (mNotificationID > 0) mgr.cancel(mNotificationID); mNotificationID++; Notification notification = new Notification(R.drawable.icon, "Saving to gallery (image " + mNotificationID + ") ...", System.currentTimeMillis()); Intent intent = new Intent(context, CartoonifierView.class); // Close it if the user clicks on it. notification.flags |= Notification.FLAG_AUTO_CANCEL; PendingIntent pendingIntent = PendingIntent.getActivity(context, 0, intent, 0); notification.setLatestEventInfo(context, "Cartoonifier saved " + mNotificationID + " images to Gallery", "Saved as '" + filename + "'", pendingIntent); mgr.notify(mNotificationID, notification); }Once again, build and run the app! You should see a notification message pop up whenever you touch the screen for another saved image. If you want the notification message to pop up before the long delay of image processing rather than after, move the call to
showNotificationMessage()before the call tocartoonifyImage(), and move the code for generating the date and time string so that the same string is given to the notification message and the actual file is saved.
Let's allow the user to change modes through the menu:
Add the following headers near the top of the file
src\com\Cartoonifier\CartoonifierApp.java:import android.view.Menu; import android.view.MenuItem;
Insert the following member variables inside the
CartoonifierAppclass:// Items for the Android menu bar. private MenuItem mMenuAlien; private MenuItem mMenuEvil; private MenuItem mMenuSketch; private MenuItem mMenuDebug;
Add the following functions to
CartoonifierApp:/** Called when the menu bar is being created by Android. */ public boolean onCreateOptionsMenu(Menu menu) { Log.i(TAG, "onCreateOptionsMenu"); mMenuSketch = menu.add("Sketch or Painting"); mMenuAlien = menu.add("Alien or Human"); mMenuEvil = menu.add("Evil or Good"); mMenuDebug = menu.add("[Debug mode]"); return true; } /** Called whenever the user pressed a menu item in the menu bar. */ public boolean onOptionsItemSelected(MenuItem item) { Log.i(TAG, "Menu Item selected: " + item); if (item == mMenuSketch) mView.toggleSketchMode(); else if (item == mMenuAlien) mView.toggleAlienMode(); else if (item == mMenuEvil) mView.toggleEvilMode(); else if (item == mMenuDebug) mView.toggleDebugMode(); return true; }Insert the following member variables inside the
CartoonifierViewclass:private boolean m_sketchMode = false; private boolean m_alienMode = false; private boolean m_evilMode = false; private boolean m_debugMode = false;
Add the following functions to
CartoonifierView:protected void toggleSketchMode() { m_sketchMode = !m_sketchMode; } protected void toggleAlienMode() { m_alienMode = !m_alienMode; } protected void toggleEvilMode() { m_evilMode = !m_evilMode; } protected void toggleDebugMode() { m_debugMode = !m_debugMode; }We need to pass the mode values to the
cartoonifyImage()JNI code, so let's send them as arguments. Modify the Java declaration ofCartoonifyImage()inCartoonifierView:public native void CartoonifyImage(int width, int height,byte[] yuv, int[] rgba, boolean sketchMode, boolean alienMode, boolean evilMode, boolean debugMode);
Now modify the Java code so we pass the current mode values in
processFrame():CartoonifyImage(getFrameWidth(), getFrameHeight(), data,rgba, m_sketchMode, m_alienMode, m_evilMode, m_debugMode);
The JNI declaration of
CartoonifyImage()injni\jni_part.cppshould now be:JNIEXPORT void JNICALL Java_com_Cartoonifier_CartoonifierView_CartoonifyImage( JNIEnv* env, jobject, jint width, jint height, jbyteArray yuv, jintArray bgra, jboolean sketchMode, jboolean alienMode, jboolean evilMode, jboolean debugMode)
We then need to pass the modes to the C/C++ code in
cartoon.cppfrom the JNI function injni\jni_part.cpp. When developing for Android we can only show one GUI window at a time, but on a desktop it is handy to show extra windows while debugging. So instead of taking a Boolean flag fordebugMode, let's pass a number that would be0for non-debug, 1 for debug on mobile (where creating a GUI window in OpenCV would cause a crash!), and 2 for debug on desktop (where we can create as many extra windows as we want):int debugType = 0; if (debugMode) debugType = 1; cartoonifyImage(mbgr, displayedFrame, sketchMode, alienMode, evilMode, debugType);
Update the actual C/C++ implementation in
cartoon.cpp:void cartoonifyImage(Mat srcColor, Mat dst, bool sketchMode, bool alienMode, bool evilMode, int debugType) {And update the C/C++ declaration in
cartoon.h:void cartoonifyImage(Mat srcColor, Mat dst, bool sketchMode, bool alienMode, bool evilMode, int debugType);
Build and run it; then try pressing the small options-menu button on the bottom of the window. You should find that the sketch mode is real-time, whereas the paint mode has a large delay due to the bilateral filter.
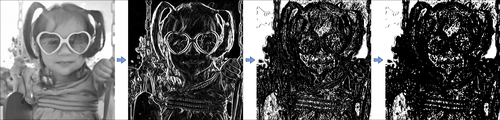
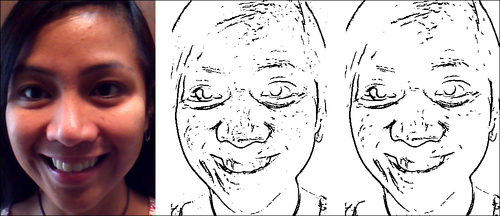
Most of the cameras in current smartphones and tablets have significant image noise. This is normally acceptable, but it has a large effect on our 5 x 5 Laplacian-edge filter. The edge mask (shown as the sketch mode) will often have thousands of small blobs of black pixels called "pepper" noise, made of several black pixels next to each other in a white background. We are already using a Median filter, which is usually strong enough to remove pepper noise, but in our case it may not be strong enough. Our edge mask is mostly a pure white background (value of 255) with some black edges (value of 0) and the dots of noise (also values of 0). We could use a standard closing morphological operator, but it will remove a lot of edges. So, instead, we will apply a custom filter that removes small black regions that are surrounded completely by white pixels. This will remove a lot of noise while having little effect on actual edges.
We will scan the image for black pixels, and at each black pixel we'll check the border of the 5 x 5 square around it to see if all the 5 x 5 border pixels are white. If they are all white we know we have a small island of black noise, so we fill the whole block with white pixels to remove the black island. For simplicity in our 5 x 5 filter, we will ignore the two border pixels around the image and leave them as they are.
The following figure shows the original image from an Android tablet on the left side, with a sketch mode in the center (showing small black dots of pepper noise), and the result of our pepper-noise removal shown on the right side, where the skin looks cleaner:
The following code
can be named as the function removePepperNoise(). This function will edit the image in place for simplicity:
void removePepperNoise(Mat &mask)
{
for (int y=2; y<mask.rows-2; y++) {
  // Get access to each of the 5 rows near this pixel.
  uchar *pUp2 = mask.ptr(y-2);
  uchar *pUp1 = mask.ptr(y-1);
  uchar *pThis = mask.ptr(y);
  uchar *pDown1 = mask.ptr(y+1);
  uchar *pDown2 = mask.ptr(y+2);

  // Skip the first (and last) 2 pixels on each row.
  pThis += 2;
  pUp1 += 2;
  pUp2 += 2;
  pDown1 += 2;
  pDown2 += 2;
  for (int x=2; x<mask.cols-2; x++) {
    uchar value = *pThis;  // Get this pixel value (0 or 255).
    // Check if this is a black pixel that is surrounded by
    // white pixels (ie: whether it is an "island" of black).
    if (value == 0) {
    bool above, left, below, right, surroundings;
    above = *(pUp2 - 2) && *(pUp2 - 1) && *(pUp2) &&
    *(pUp2 + 1) && *(pUp2 + 2);
    left = *(pUp1 - 2) && *(pThis - 2) && *(pDown1 - 2);
    below = *(pDown2 - 2) && *(pDown2 - 1) && *(pDown2) &&
    *(pDown2 + 1) && *(pDown2 + 2);
    right = *(pUp1 + 2) && *(pThis + 2) && *(pDown1 + 2);
    surroundings = above && left && below && right;
    if (surroundings == true) {
      // Fill the whole 5x5 block as white. Since we know
      // the 5x5 borders are already white, we just need to
      // fill the 3x3 inner region.
      *(pUp1 - 1) = 255;
      *(pUp1 + 0) = 255;
      *(pUp1 + 1) = 255;
      *(pThis - 1) = 255;
      *(pThis + 0) = 255;
      *(pThis + 1) = 255;
      *(pDown1 - 1) = 255;
      *(pDown1 + 0) = 255;
      *(pDown1 + 1) = 255;
      // Since we just covered the whole 5x5 block with
      // white, we know the next 2 pixels won't be black,
     // so skip the next 2 pixels on the right.
      pThis += 2;
      pUp1 += 2;
      pUp2 += 2;
      pDown1 += 2;
      pDown2 += 2;
      }
    }
    // Move to the next pixel on the right.
    pThis++;
    pUp1++;
    pUp2++;
    pDown1++;
    pDown2++;
    }
  }
}If you want to show the frames per second (FPS) speed—which is less important for a slow app such as this, but still useful—on the screen, perform the following steps:
Copy the file
src\org\opencv\samples\imagemanipulations\FpsMeter.javafrom the ImageManipulations sample folder in OpenCV (for example,C:\OpenCV-2.4.1\samples\android\image-manipulations) to yoursrc\com\Cartoonifierfolder.Replace the package name at the top of
FpsMeter.javato becom.Cartoonifier.In the file
CartoonifierViewBase.java, declare yourFpsMetermember variable afterprivate byte[] mBuffer;:private FpsMeter mFps;
Initialize the
FpsMeterobject in theCartoonifierViewBase()constructor, aftermHolder.addCallback(this);:mFps = new FpsMeter(); mFps.init();
Measure the FPS of each frame in
run()after thetry/catchblock:mFps.measure();
Draw the FPS onto the screen for each frame, in
run()after thecanvas.drawBitmap()function:mFps.draw(canvas, (canvas.getWidth() - bmp.getWidth()) /2, 0);
If you want your app to run faster, knowing that the quality will suffer, you should definitely consider either asking for a smaller camera image from the hardware or shrinking the image once you have it. The sample code that the Cartoonifier is based on uses the closest camera preview resolution to the screen height. So if your device has a 5 megapixel camera and the screen is just 640 x 480, it might use a camera resolution of 720 x 480, and so on. If you want to control which camera resolution is chosen, you can modify the parameters to setupCamera() in the surfaceChanged() function in CartoonifierViewBase.java. For example:
public void surfaceChanged(SurfaceHolder _holder, int format,
  int width, int height) {
  Log.i(TAG, "Screen size: " + width + "x" + height);
  // Use a camera resolution of roughly half the screen height.
  setupCamera(width/2, height/2);
}
An easy method to obtain the highest preview resolution from a camera is to pass a large size such as 10,000 x 10,000 and it will choose the maximum resolution available (note that it will only give the maximum preview resolution, which is the camera's video resolution and therefore is often much less than the camera's still-image resolution). Or if you want it to run really fast, pass 1 x 1 and it will find the lowest camera preview resolution (for example 160 x 120) for you.
Now that you have created a whole Android Cartoonifier app, you should know the basics of how it works and which parts do what; you should customize it! Change the GUI, the app behavior and workflow, the cartoonifier filter constants, the skin detector algorithm, or replace the cartoonifier code with your own ideas.
You can improve the skin-detection algorithm in many ways, such as by using a more complex skin-detection algorithm (for example, using trained Gaussian models from many recent CVPR or ICCV conference papers at http://www.cvpapers.com) or by adding face detection (see the Face Detection section of Chapter 8, Face Recognition using Eigenfaces) to the skin detector, so that it detects where the user's face is rather than asking the user to put their face in the center of the screen. Beware that face detection may take many seconds on some devices or high-resolution cameras, so this approach may be limited by the comparatively slow processing speed, but smartphones and tablets are getting significantly faster every year, so this will become less of a problem.
The most significant way to speed up mobile computer vision apps is to reduce the camera resolution as much as possible (for example, 0.5 megapixel instead of 5 megapixel), allocate and free up images as rarely as possible, and do image conversions as rarely as possible (for instance, by supporting BGRA images throughout your code). You can also look for optimized image processing or math libraries from the CPU vendor of your device (for example, NVIDIA Tegra, Texas Instruments OMAP, Samsung Exynos, Apple Ax, or QualComm Snapdragon) or for your CPU family (for example, the ARM Cortex-A9). Remember, there may be an optimized version of OpenCV for your device.
To make customizing NDK and desktop image-processing code easier, this book comes with files ImageUtils.cpp and ImageUtils.h to help you experiment. It includes functions such as printMatInfo(), which prints a lot of information about a cv::Mat object, making debugging OpenCV much easier. There are also timing macros to easily add detailed timing statistics to your C/C++ code. For example:
DECLARE_TIMING(myFilter);

void myImageFunction(Mat img) {
  printMatInfo(img, "input");

  START_TIMING(myFilter);
  bilateralFilter(img, …);
  STOP_TIMING(myFilter);
  SHOW_TIMING(myFilter, "My Filter");
}
You would then see something like the following printed to your console:
input: 800w600h 3ch 8bpp, range[19,255][17,243][47,251]
My Filter: time:  213ms   (ave=215ms min=197ms max=312ms, across 57 runs).
This is useful when your OpenCV code is not working as expected; particularly for mobile development where it is often quite difficult to use an IDE debugger, and printf() statements generally won't work in Android NDK. However, the functions in ImageUtils work on both Android and desktop.
This chapter has shown several different types of image-processing filters that can be used to generate various cartoon effects: a plain sketch mode that looks like a pencil drawing, a paint mode that looks like a color painting, and a cartoon mode that overlays the sketch mode on top of the paint mode to make the image appear like a cartoon. It also shows that other fun effects can be obtained, such as the evil mode that greatly enhances noisy edges, and the alien mode that changes the skin of the face to appear bright green.
There are many commercial smartphone apps that perform similar fun effects on the user's face, such as cartoon filters and skin-color changers. There are also professional tools using similar concepts, such as skin-smoothing video post-processing tools that attempt to beautify women's faces by smoothing their skin while keeping the edges and non-skin regions sharp, in order to make their faces appear younger.
This chapter shows how to port the app from a desktop application to an Android mobile app, by following the recommended guidelines of developing a working desktop version first, porting it to a mobile app, and creating a user interface that is suitable for the mobile app. The image-processing code is shared between the two projects so that the reader can modify the cartoon filters for the desktop application, and by rebuilding the Android app it should automatically show their modifications in the Android app as well.
The steps required to use OpenCV4Android change regularly, and Android development itself is not static; so this chapter shows how to build the Android app by adding functionality to one of the OpenCV sample projects. It is expected that the reader can add the same functionality to an equivalent project in future versions of OpenCV4Android.
This book includes source code for both the desktop project and the Android project.


