


 Download code from GitHub
Goal-Based Penetration Testing
The COVID-19 pandemic has changed the way the world operates. Organizations of all sizes have transformed themselves from having none or partial remote working to all of their employees adopting this style. With the new normal, accessible and remote technology has become very important for work and in peoples’ personal lives. We can certainly call this a virtual world, where confidential activities that used to happen in closed rooms now happen over the internet. This has significantly increased the number of cyber threats at least five-fold. Threat actors utilize this digital transformation to exploit the mistakes made by users and companies as their entry point for financial gain, generating reputational damage, or whatever else their goal may be. This occurs in the form of ransomware, phishing, and data breaches.
To understand the current and future ways of working, let us start by exploring the different objectives or goals of threat actors. In this chapter, we will discuss the different types of threat actors and the importance of goal-based penetration testing with a set of objectives; we investigate misconceptions and how a typical vulnerability scan, penetration testing, and red team exercise can fail without the importance of a goal. This chapter also provides an overview of security testing and setting up a verification lab, focusing on the customization of Kali to support some advanced aspects of penetration testing. By the end of this chapter, you will have covered the following:
- The different types of threat actors
- An overview of security testing
- Misconceptions of vulnerability scanning, penetration testing, and red team exercises
- The history and purpose of Kali Linux
- Updating and organizing Kali
- Installing Kali on various services (Amazon Web Services/Google Cloud Platform/Android)
- Setting up defined targets
- Building a verification lab
Let us begin with the types of threat actors that exploit technological infrastructure.
Different types of threat actors
A threat actor is nothing but an entity or individual who is responsible for an event or incident that impacts another entity. It is important that we understand the different types of threat actors and their common motivations, which will help us throughout this book to understand different perspectives. Table 1.1 provides the common threat actors, their motives, and typical goals.
|
Threat Actor |
Common Motivation |
Goal(s) |
|---|---|---|
|
State- or government-sponsored actors |
Military, political, and technological agendas |
Cyber espionage, data theft, or any other activity that interests a nation for its economic benefits |
|
Organized crime or cybercriminals |
Financial gain and profit |
Money and valuable data |
|
Hacktivists/cyber extremists |
Motivational overlaps |
Focus on exposing secrets and disrupting services/organizations that they think are not good for society (hacktivists); focus on causing harm and destruction to further their cause (extremists) |
|
Insiders |
Revenge |
Money or data ransom or creating revenue loss |
Table 1.1: Various threat actors and their motivations
We have now summarized the four major threat actors and their motivations that we can use during goal-based penetration testing and red team exercises to simulate real threat scenarios.
Conceptual overview of security testing
Now that we understand the different threat actors; let’s go ahead and understand what the organizations are trying to protect and from whom? If you asked 100 security consultants the question, what is security testing?, it is very likely that you would receive 100 different responses.
In its simplest form, security testing is a process to determine that any information asset or system is protected and its functionality is maintained as intended.
Common pitfalls of vulnerability assessments, penetration testing, and red team exercises
In this section, we will discuss some misconceptions and limitations regarding traditional/classical vulnerability scanning, penetration testing, and red team exercises. Let us now understand the actual meaning of these three topics in simple terms and their limitations:
- Vulnerability Assessment (VA): The process of identifying vulnerabilities or security loopholes in a system or network through a vulnerability scanner. One of the misconceptions about VA is that it will let you find all of the known vulnerabilities; well, that’s not true. Limitations with VA include that only potential vulnerabilities are found, and it depends purely on the type of scanner that you utilize. It might also include a number of false positives and, to the business owner, there is no clear indication as to which ones do not pose a relevant risk and which one will be initially utilized by the attackers to gain access. The biggest pitfall of VA is false negatives, meaning the scanner did not find an issue that the system or application has.
- Penetration testing (pentesting): The process of safely simulating the hacking scenarios by exploiting vulnerabilities without much impact on the existing network or business. There is also a lower number of false positives since testers will try to validate the vulnerabilities and also attempt to exploit them. A limitation with pentesting is that it uses only currently known, publicly available exploits; mostly, these are a focus for project testing. We often hear from pentesters during an assessment, Yay! Got Root—but we never hear the question, what can you do with it? This could be due to various reasons such as project limitations, including the reporting of high-risk issues immediately to the client, or the client only being interested in one segment of the network and only wanting that part tested.
One of the misconceptions about the pentest is that it provides the attacker with a full view of the network, and you are safe once penetration testing has been performed. This is not the case when attackers have found a vulnerability in the business process of your secure application.
- Red Team Exercise (RTE): A focused process of evaluating the effectiveness of an organization to defend against cyber threats and improve its security by any possible means; during an RTE, we can discover multiple ways of achieving project objectives/scenarios and goals, such as complete coverage of activities with the defined project goal, including phishing (enticing a victim to enter sensitive information or download malicious content through emails), vishing (enticing a victim to provide or do some actions with malicious intent through phone calls), “WhatsApping” (engaging a victim through WhatsApp messenger with malicious intent), wireless, disk drops (USB and SSD), and physical penetration testing. The limitations with RTEs are time-bound, pre-defined scenarios and an assumed rather than real environment. Often, the RTE is run with a fully monitored mode for every technique, and tactics are executed according to the procedure, but this isn’t the case when a real attacker wants to achieve an objective.
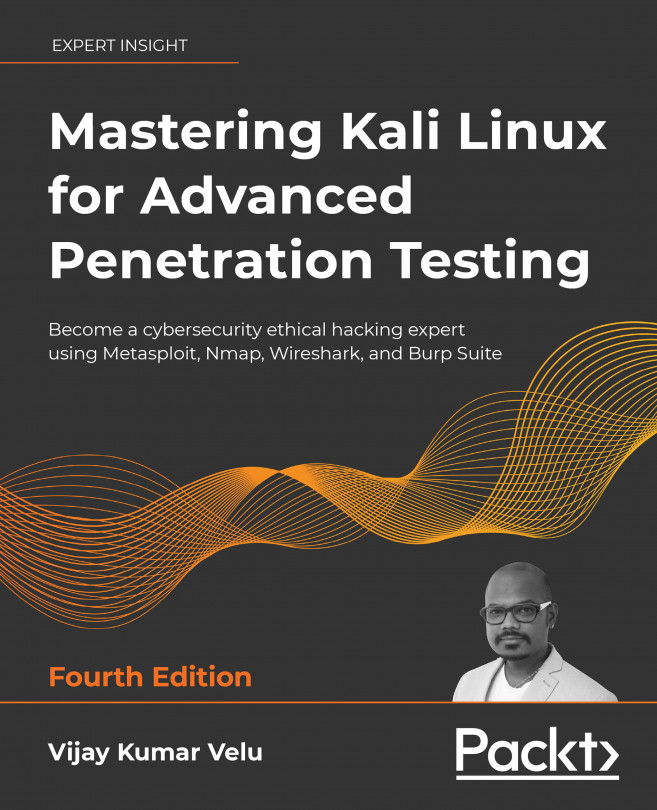
Figure 1.1 showcases the difference between all three activities in terms of the length and breadth of their focus:
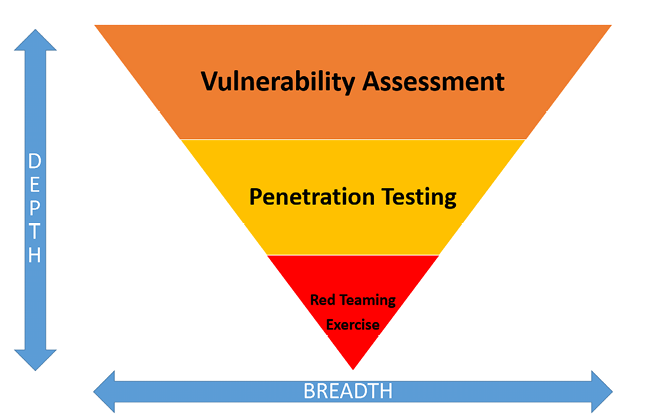
Figure 1.1: The three methods of assessing the vulnerability of systems and the breadth and depth to which they are successful
Often, all three different testing methodologies refer to the term hack or compromise. We will hack your network and show you where your weaknesses are; but wait, does the client or business owner understand the difference between these terms? How do we measure it? What are the criteria? And when do we know that the hack or compromise is complete? All the questions point to only one thing: what the purpose of the testing is, and what the primary goal in mind is.
Objective-based penetration testing
The primary goal of a pentest/RTE is to determine the real risk, differentiating the risk rating from the scanner and giving a business a risk value for each asset, along with the risk to the brand image of the organization. It’s not about how much risk they have; rather, how much they are exposed and how easy it is to exploit this exposure.
A threat that has been found does not really constitute a risk and need not be demonstrated; for example, Cross-Site Scripting (XSS) is a script injection vulnerability that can steal users’ credentials. If a client running a trading company had a brochure website that provides static content to their customers was vulnerable to XSS, it may not have a significant impact on the business. In this case, a client might accept the risk and put in a mitigation plan using a Web Application Firewall (WAF) to prevent the XSS attacks. If the same vulnerability was identified on their main trading website, however, then it would be a significant issue in need of rectification as soon as possible since the company will be at risk of losing the trust of customers through attackers stealing their credentials.
Objective-based penetration testing is time-based, depending on the specific problem that an organization faces. An example of an objective is: We are most worried about our data being stolen and the regulatory fines incurred as a consequence of these breaches. So, the objective now is to compromise the data either by exploiting a system flaw or by manipulating the employees through phishing; sometimes it will be a surprise to see some of their data is already available on the dark web. Every objective comes with its own Tactics, Techniques, and Procedures (TTP) that will support the primary goal of the penetration test activity. We will be exploring all of these different methodologies throughout this book using Kali Linux 2021.4.
The testing methodology
Methodologies rarely consider why a penetration test is being undertaken or which data is critical to the business and needs to be protected. In the absence of this vital first step, penetration tests lose their focus.
Many penetration testers are reluctant to follow a defined methodology, fearing that it will hinder their creativity in exploiting a security weakness on the network or application. Penetration testing fails to reflect the actual activities of a malicious attacker. Frequently, the client wants to see whether you can gain administrative access to a particular system (that is, Can you root the box?). However, the attacker may be focused on copying critical data in a manner that does not require root access or cause a denial of service.
To address the limitations inherent in formal testing methodologies, they must be integrated in a framework that views the network from the perspective of an attacker, known as the cyber kill chain.
In 2009, Mike Cloppert of Lockheed Martin CERT introduced the concept that is now known as the cyber kill chain. This includes the steps taken by an adversary when they are attacking a network. It does not always proceed in a linear flow, as some steps may occur in parallel. Multiple attacks may be launched over time at the same target, and overlapping stages may occur.
In this book, we have modified Cloppert’s cyber kill chain to more accurately reflect how attackers apply these steps when exploiting networks, applications, and data services. Figure 1.2 shows a typical cyber kill chain of an attacker:
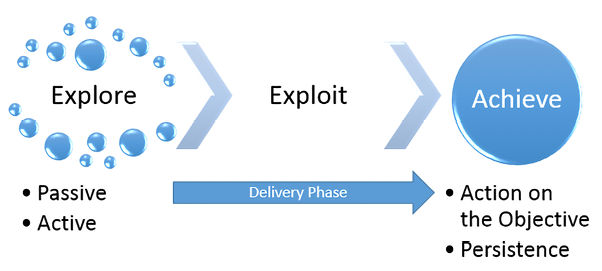
Figure 1.2: The typical cyber kill chain an attacker may follow
A typical cyber kill chain of an attacker can be described as follows:
- Explore or reconnaissance phase: The adage, reconnaissance time is never wasted time, adopted by most military organizations, acknowledges that it is better to learn as much as possible about an enemy before engaging them. For the same reason, attackers will conduct extensive reconnaissance of a target before attacking. In fact, it is estimated that at least 70 percent of the effort of a penetration test or an attack is spent conducting reconnaissance! Generally, they will employ two types of reconnaissance:
- Passive: There is no direct interaction with the target in a hostile manner. For example, the attacker will review publicly available website(s), assess online media (especially social media sites), and attempt to determine the attack surface of the target. One particular task will be to generate a list of past and current employee names, or even an investigation into the breached databases that are publicly available.
These names will form the basis of attempts to use brute force in guessing passwords. They will also be used in social engineering attacks. This type of reconnaissance is difficult, if not impossible, to distinguish from the behavior of regular users.
- Active: This can be detected by the target, but it can be difficult to distinguish it from the rest of the activity that most online organizations encounter from regular traffic. Activities occurring during active reconnaissance include physical visits to target premises, port scanning, and remote vulnerability scanning.
- Passive: There is no direct interaction with the target in a hostile manner. For example, the attacker will review publicly available website(s), assess online media (especially social media sites), and attempt to determine the attack surface of the target. One particular task will be to generate a list of past and current employee names, or even an investigation into the breached databases that are publicly available.
- Delivery phase: Delivery is the selection and development of the weapon that will be used to complete the exploit during the attack. The exact weapon chosen will depend on the attacker’s intent as well as the route of delivery (for example, across the network, via a wireless connection, or through a web-based service). The impact of the delivery phase will be examined in detail in the second half of this book.
- Exploit or compromise phase: This is the point when a particular exploit is successfully applied, allowing attackers to gain a foothold in the objective system. The compromise may have occurred in a single phase (for example, a known operating system vulnerability was exploited using a buffer overflow), or it may have been a multiphase compromise (for example, if an attacker could search and download the data from the internet from sources such as https://haveibeenpwned.com or similar; these sites typically include breached data, including usernames, passwords, phone numbers, and email addresses, that will allow them to easily create a dictionary of passwords to attempt to access the Software as a Service (SaaS) applications, such as Microsoft Office 365 or Outlook Web, attempt to log in to a corporate VPN directly, or use email addresses to perform targeted email phishing techniques. The attacker could even send an SMS with malicious links to deliver a payload). Multiphase attacks are the norm when a malicious attacker targets a specific enterprise.
- Achieve phase – Action on the Objective: This is frequently, and incorrectly, referred to as the exfiltration phase because there is a focus on perceiving attacks solely as a route to steal sensitive data (such as login information, personal information, and financial information). It is in fact common for an attacker to have a different objective; for example, an attacker may wish to drop a ransomware package on their competitors to drive customers to their own business. Therefore, this phase must focus on the many possible actions of an attacker. One of the most common exploitation activities occurs when the attackers attempt to improve their access privileges to the highest possible level (vertical escalation) and to compromise as many accounts as possible (horizontal escalation).
- Achieve phase – Persistence: If there is value in compromising a network or system, then that value can likely be increased if there is persistent access. This allows attackers to maintain communications with a compromised system. From a defender’s point of view, this is the part of the cyber kill chain that is usually the easiest to detect.
Cyber kill chains are merely metamodels of an attacker’s behavior when they attempt to compromise a network or a particular data system. As a metamodel, it can incorporate any proprietary or commercial penetration testing methodology. Unlike the methodologies, however, it ensures a strategic-level focus on how an attacker approaches the network. This focus on the attacker’s activities will guide the layout and content of this book.
Introduction to Kali Linux features
Kali Linux (Kali) is the successor to the BackTrack penetration testing platform that is generally regarded as the de facto standard package of tools used to facilitate penetration testing to secure data and voice networks. It was developed by Mati Aharoni and Devon Kearns of Offensive Security. This distribution is mainly meant for penetration testing and digital forensics.
In 2021, Kali had four updates. The latest rolling version was released on December 9, 2021 with kernel 5.14.0 and the Xfce 4.16.3 desktop environment. Additionally, there was a minor update on December 23, 2021 with version Kali 2021.4a.
Some features of this latest version of Kali include the following:
Over 500 advanced penetration testing, data forensics, and defensive tools. The majority of the older pre-installed tools are eliminated and replaced by similar tools. They provide extensive wireless support with multiple hardware and kernel patches to permit the packet injection required by some wireless attacks. Table 1.2 provides a breakdown of the tools with respect to their specific task as of December 2021:
|
Tool Sections |
No. of Tools |
|---|---|
|
Information Gathering |
67 |
|
Vulnerability Analysis |
27 |
|
Wireless Attacks |
54 |
|
Web Applications |
43 |
|
Exploitation Tools |
21 |
|
Forensics Tools |
23 |
|
Sniffing & Spoofing |
33 |
|
Password Attacks |
39 |
|
Maintaining Access |
17 |
|
Reverse Engineering |
11 |
|
Hardware Hacking |
6 |
|
Reporting Tools |
10 |
Table 1.2: The number of tools available, listed with respect to the specific tasks for which they are used
Some of the key features of Kali Linux 2021.4 include:
- Support for multiple desktop environments such as KDE, GNOME3, Xfce, MATE, e17, lxde, and i3wm.021.
- By default, Kali Linux has Debian-compliant tools that are synchronized with the Debian repositories at least four times daily, making it easier to update packages and apply security fixes.
- There are secure development environments and GPG-signed packages and repositories.
- There is support for ISO customization, allowing users to build their own versions of customized Kali with a limited set of tools to make it lightweight. The bootstrap function also performs enterprise-wide network installs that can be automated using pre-seed files.
- Since ARM-based systems have become more prevalent and less expensive, support for ARMEL and ARMHF in Kali Linux can be installed on devices such as rk3306 mk/ss808, Raspberry Pi, ODROID U2/X2, Samsung Chromebook, EfikaMX, Beaglebone Black, CuBox, and Galaxy Note 10.1.
- Kali remains a free open-source project. Most importantly, it is well supported by an active online community.
The role of Kali in red team tactics
While pentesters might prefer any type of operating system to perform their desired activity, usage of Kali Linux saves significant time and prevents the need to search for packages that aren’t typically available in other operating systems. Some of the advantages that are not noticed with Kali Linux during a red team exercise include the following:
- One single source to attack various platforms.
- It’s quick to add sources and install packages and supporting libraries (especially those that are not available for Windows).
- It’s even possible to install RPM packages with the usage of alien.
The purpose of Kali Linux is to secure network, cloud, and application infrastructure and bundle all of the tools to provide a single platform for penetration testers and forensic analysts.
Installing and updating Kali Linux
In the previous editions of this book, we focused on the installation of Kali Linux to VMware Player, VirtualBox, AWS, and the Raspberry Pi using the Docker appliance. In this section, we will touch base on installing Kali Linux on these same platforms, along with Google Cloud Platform, and a non-rooted Android phone.
Using as a portable device
It is fairly simple to install Kali Linux onto a portable device. In some situations, clients do not permit the use of an external laptop inside a secure facility. In those cases, typically, a testing laptop is provided by the client to the pentesters to perform the scan. Running Kali Linux from a portable device has more advantages during a pentest or RTE:
- It can fit inside a pocket, in the case of a USB drive or mobile device.
- It can be run live without making any changes to the host operating system.
- You can customize the build of Kali Linux and even make the storage persistent.
There are three simple steps to make a USB drive into a portable form of Kali from a Windows PC:
- Download the official Kali Linux image from:http://docs.kali.org/introduction/download-official-kali-linux-images
- We will be using the Rufus open-source utility to create a bootable disk. Rufus helps to create and format bootable drives. Download the latest Rufus from https://github.com/pbatard/rufus/releases/
- Open the Rufus executable as an administrator. Plug the USB drive into an available USB port. Browse to the location where you have downloaded your image. You should see what is shown in Figure 1.3. Select the right drive name and then click Start:

Figure 1.3: Running Rufus to write Kali Linux to an external disk
Once complete, close the Rufus application and safely remove the USB drive. Kali Linux is now ready as a portable device to be plugged into any laptop and be booted up. If you plan to store information while booted on a live disk, ensure you select Persistence partition size to have a minimum of 4 GB; then select Live USB persistence while booting Kali Linux on the portable device. If your host operating system is Linux, this can be achieved by two standard commands:
sudo fdisk -l
This will display all of the disks mounted on the drive. The dd command-line utility does the convert and copy:
dd if=kali linux.iso of=/dev/nameofthedrive bs=512k
if is used for the input file, of is for the output file, and bs is for the block size.
Installing Kali on a Raspberry Pi 4
A Raspberry Pi is a single-board device that is compact in nature and can run just like a fully loaded computer with minimal functionalities. These devices are extremely useful during RTE and penetration testing activities while on site. The base of the operating system is loaded from an SD card, just like a hard drive for normal computers.
You can perform the same steps as those outlined in the previous section on a high-speed SD card that can be plugged into a Raspberry Pi. We are then ready to use the system without any issues. If the installation is successful, the following screen must be present when Kali Linux is booted from a Raspberry Pi. A Raspberry Pi 4 has been used in this demonstration and accessed the Pi’s operating system using a monitor:

Figure 1.4: Successful installation of Kali Linux on a Raspberry Pi 4
Installing Kali on a VM
In the previous editions, we discussed how to install Kali to different hypervisors. We will do the same here, and take a very quick detour on how to install Kali on such devices.
VMware Workstation Player
VMware Workstation Player, formerly known as VMware Player, is free for personal use and is also a commercial product for business use from VMware as a desktop application that allows a VM to be run inside your host operating system. This application can be downloaded from https://www.vmware.com/uk/products/workstation-player/workstation-player-evaluation.html
We will be using version 16.1. Once the installer is downloaded, go ahead and install the VMware Player accordingly, based on your host operating system. If the installation is complete, you should see a screen similar to that displayed in Figure 1.5:
Figure 1.5: Successful installation of VMware Workstation Player
The next step in order to install Kali Linux on VMware is to click on Create a New Virtual Machine and select Installer disc image file (iso). Browse to your ISO file that was downloaded and then click Next. You can now enter a name of your choice (for example, HackBox) and select the Custom Location where you would like to store your VMware image. Click Next and specify the disk capacity. It is recommended that a minimum of 2 GB RAM is used, and 15 GB of disk space is needed to run Kali. Click Next until you finish.
Another method is to directly download the VMware image:
https://www.offensive-security.com/kali-linux-vm-vmware-virtualbox-image-download/
Open the .vmx file and select I copied it. That should boot up the fully loaded Kali Linux in VMware. You can either choose to install Kali Linux as the host operating system or run it as a live image. Once all of the installation steps are complete, you are ready to launch Kali Linux from VMware without any problems. Figure 1.6 shows the screen that should be seen:
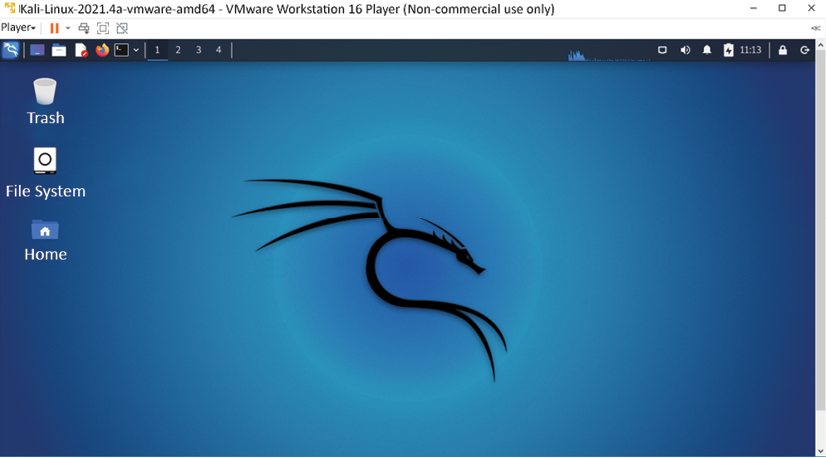
Figure 1.6: Once Kali Linux has been successfully installed on VMware, this display is shown
VirtualBox
Similar to VMware workstation player, VirtualBox is a hypervisor that is completely open-source and a free desktop application from which you can run any VM from the host operating system. This application can be downloaded from https://www.virtualbox.org/wiki/Downloads.
We will now go ahead and install Kali on VirtualBox. Similar to VMware, we will just execute the downloaded executable until we have a successful installation of Oracle VirtualBox, as shown in Figure 1.7:
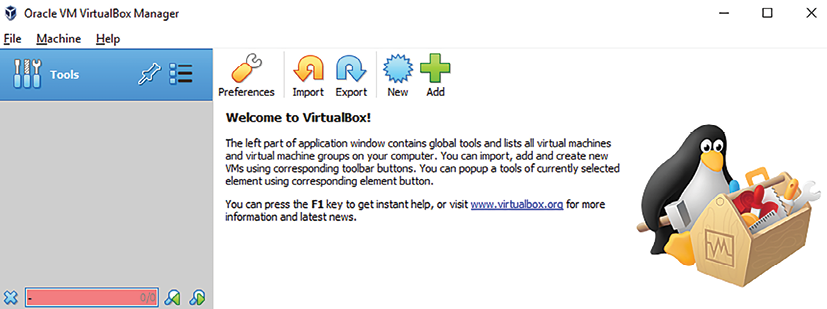
Figure 1.7: Screen displayed upon the successful installation of VM VirtualBox
During installation, it is recommended that you set the RAM to at least 1 or 2 GB, and that you create the virtual hard drive with a minimum of 15 GB so that no performance issues are encountered. After the final step, you should be able to load Kali Linux in VirtualBox, as shown in Figure 1.8:
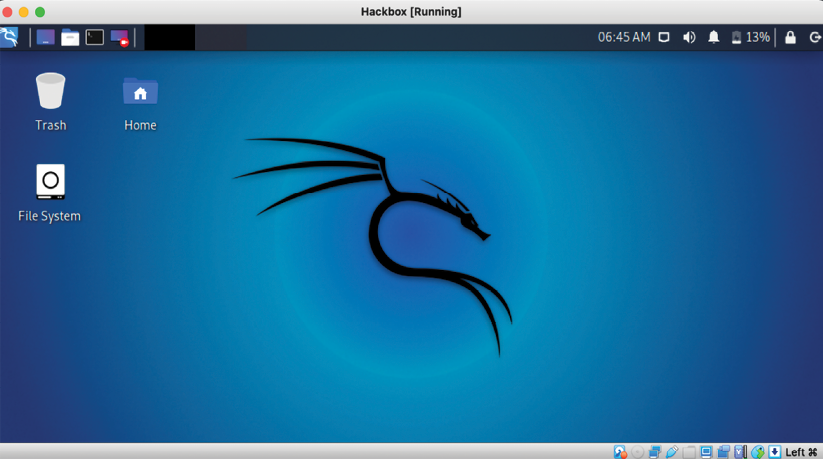
Figure 1.8: Kali Linux, as it displays in VM VirtualBox
After this has been completed, we are now ready to use Kali Linux through VirtualBox. However, we will be exploring the different network options in a further section, LAB network.
Installing to a Docker appliance
Docker is an open-source project that is designed to automate the deployment of software containers and applications instantly. Docker also provides the additional abstraction and automation layer of operating system-level virtualization on Linux or Windows.
Docker is available for Windows, Mac, Linux, and AWS. For Windows, Docker can be downloaded from https://www.docker.com/get-started.
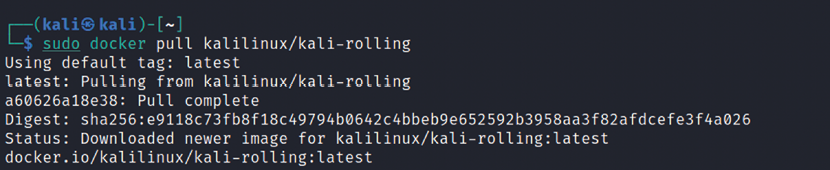
After the Docker installation, it should be fairly simple to run Kali Linux using the following commands:
sudo docker pull kalilinux/kali-rolling
sudo docker run -t -i kalilinux/kali-linux-docker /bin/bash
These can be executed in the Command Prompt (Windows) or Terminal (Linux or Mac) to confirm that the installation has been successful.
We should be able to run Kali Linux directly from Docker, as shown in Figure 1.9. Also note that Docker utilizes container-based technology, which runs its own processes that are isolated from the rest of the operating system, and it shares the host OS kernel. While the VirtualBox environment is not container-based technology, it virtualizes the hardware and shares the hardware resource from the physical host:
Once the Kali Linux Docker image download is complete, you can run the Docker image by running docker run --tty --interactive kalilinux/kali-rolling /bin/bash in Command Prompt or Terminal. You should be able to see the same as what is shown in Figure 1.10:

Figure 1.10: Successful running of Kali Linux from Docker
If Windows 10 is your base operating system, ensure that VT-X is enabled on your system BIOS, along with Hyper-V. Note that enabling Hyper-V will disable VirtualBox, as shown in Figure 1.11:
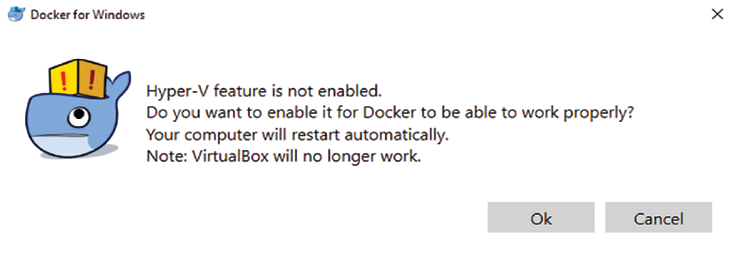
Figure 1.11: An alert that will be shown when installing Docker
Readers should be aware that the following sections involve the usage of commercial services, such as AWS and Google Cloud Platform, that might incur charges while utilizing the services. It is always recommended that readers completely delete or terminate the instances having finished their testing.
Kali on AWS Cloud
Amazon Web Services (AWS) provides Kali Linux as part of Amazon Machine Interface (AMI) and SaaS. Nowadays, the majority of the security testing companies utilize AWS to conduct penetration testing and more efficient phishing attacks. In this section, we will go through the steps to bring up Kali Linux on AWS.
First, you will need to have a valid AWS account. You can sign up by visiting the following URL: https://console.aws.amazon.com/console/home
When logging in to the AWS account, we should be able to see all of the AWS services. Search for Kali Linux, and the following should be displayed, as shown in Figure 1.12.
The page can also be accessed using the following link: https://aws.amazon.com/marketplace/pp/prodview-fznsw3f7mq7to:
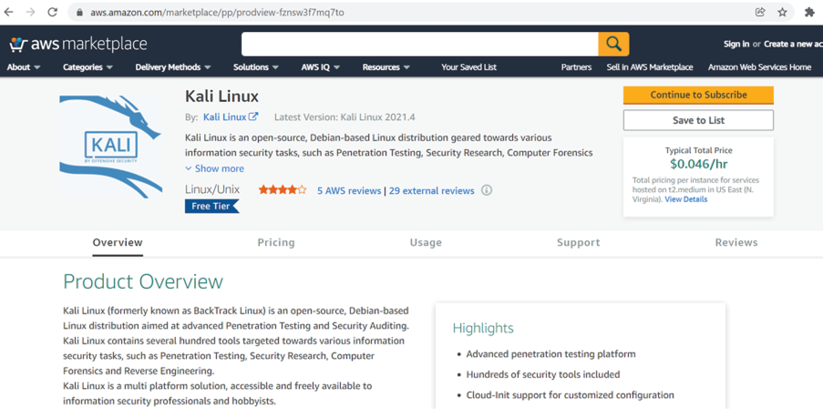
Figure 1.12: Pre-configured Kali Linux in the AWS Marketplace
The open-source community has made it very simple to directly launch a pre-configured Kali Linux 2021.4 instance from the AWS Marketplace. The following will take us to a direct launch of Kali Linux within a few minutes: https://aws.amazon.com/marketplace/pp/prodview-fznsw3f7mq7to.
Follow the instructions; you should then be able to launch the Kali instance by selecting Continue to Subscribe. This should take you to the login page of AWS if not logged in. Click on Continue to Configuration, continue to click on Continue to Launch, and you should arrive at the screen shown in Figure 1.13. From Choose Action, select the option Launch through EC2, also shown in Figure 1.13; finally, click Launch:
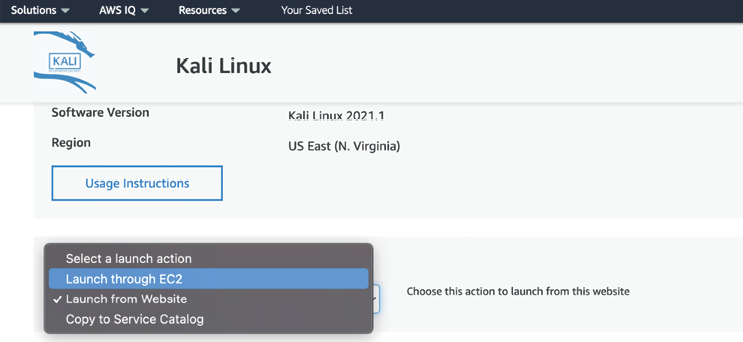
Figure 1.13: Selecting a method to launch Kali Linux through EC2
The next screen will allow you to choose the Instance type; select t2.micro (Free tier eligible) and click on Review and Launch . Finally, you should arrive at Review Instance Launch; click on Launch. This should take us to a screen where a new key pair can be created, as shown in Figure 1.14:
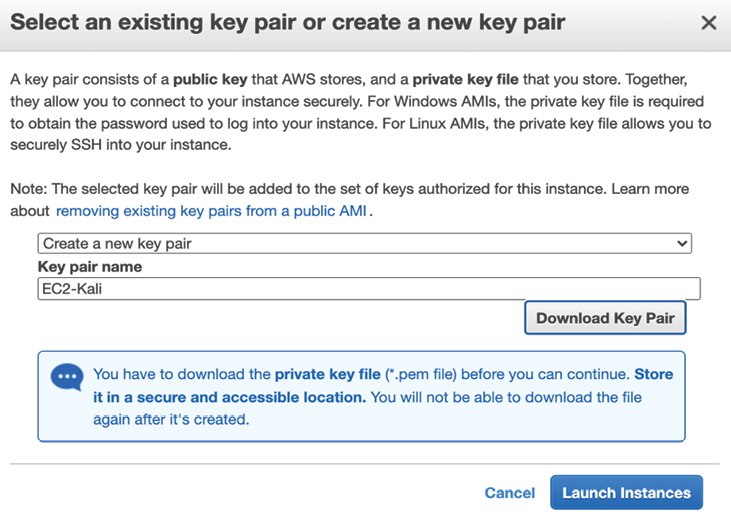
Figure 1.14: Creating a new key pair to connect to AWS instances
As usual, to use any AWS VM, you must create your own key pair in order to ensure the security of the environment. You should then be able to log in by entering the following command from your command shell. In order to use the private key to log in without the password, Amazon enforces the file permission to be tunneled. We will use the following commands to connect to the Kali Linux instance from Terminal:
chmod 400 privatekey.pem
ssh -i privatekey.pem kali@PublicIPofAWS
All Windows users can utilize Windows PowerShell to connect to the instance by running:
ssh -i privatekey.pem kali@PublicIPofAWS
Figure 1.15 depicts the successful usage of Kali on AWS:
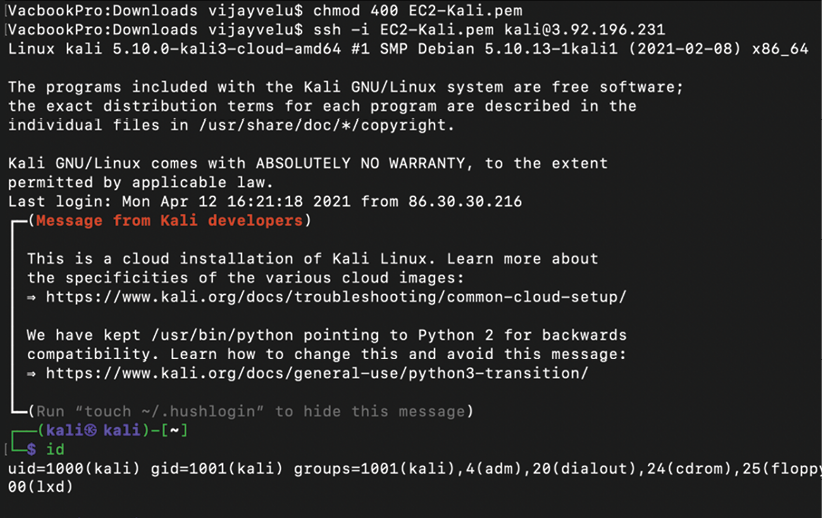
Figure 1.15: Successful connection to a Kali Linux instance in AWS
All of the terms and conditions must be met in order to utilize AWS to perform penetration testing. Legal terms and conditions must be met before launching any attacks from the cloud host.
Kali on Google Cloud Platform (GCP)
There is no version of Kali Linux already available within the Google Cloud Marketplace, unlike AWS. Hence, we will take a different approach to launching Kali Linux on the GCP. Following the same instructions that we used to install Kali in VirtualBox, also use in this instance 12 GB of hard disk space along with 2 GB of RAM. We will utilize our local image to upload to a Google bucket and Compute Engine to run this instance. Before that, we must ensure that once our installation is complete and we log into Kali Linux and start the SSH service to make it persistent, the following commands are run in the Kali Linux VM terminal:
sudo systemctl start ssh
sudo update-rc.d -f ssh enable 2 3 4 5
sudo reboot
For some reason, GCP does not deploy VirtualBox images with the floppy disk enabled, hence we are going to remove the floppy disk by selecting Kali and navigating to Settings, then System, and unselecting Floppy from Boot Order, as shown in Figure 1.16:
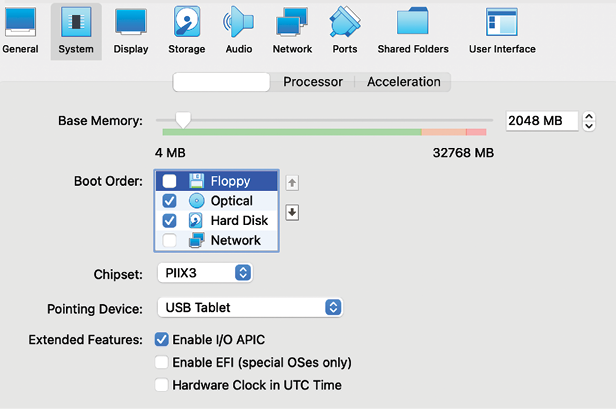
Figure 1.16: With the floppy disk enabled under the Boot Order option, GCP does not deploy VirtualBox images
The next important step involves ensuring that our image is picking up GCP’s network in gathering the DHCP, and getting a public IP address; it is important that we change the network settings by selecting Kali and navigating to Settings, then Network, and clicking on Advanced to change the Adapter Type to Paravirtualized Network, as shown in Figure 1.17:

Figure 1.17: Selecting the Paravirtualized Network in VirtualBox
It is also recommended to remove the audio feature to avoid any compatibility issues; select Kali and navigate to Settings, Audio, and uncheck Enable Audio, as shown in Figure 1.18:
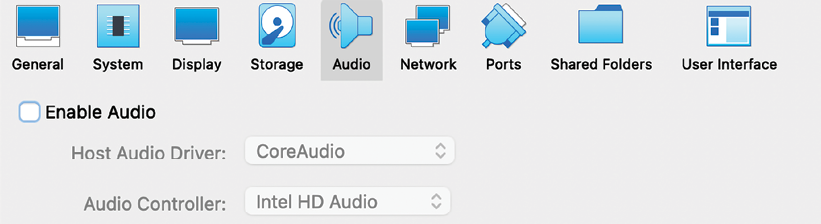
Figure 1.18: With the Enable Audio option selected under the Audio section, GCP may not work properly
Now we must convert the Virtual Disk Image (VDI) into RAW format and apply the naming convention of disk.raw that can then be utilized by Google’s imaging automation software.
We will utilize the generic and open-source machine emulator and virtualizer (QEMU) as the tool to convert either VDI or VMDK files to RAW. In the following steps, we covert the VDI format (similar steps apply for VMDK files):
- Navigate to the VirtualBox location where you have saved the disk images.
- Ensure qemu-img is installed on the native system:
- This can be installed in Windows by downloading the application from https://www.qemu.org/download/#windows
- This can be installed in Linux or macOS systems by running the commands
sudo apt install qemu-imgorbrew install qemu-img
- To convert the image, the following command can be run from the respective Terminal or Command Prompt:
qemu-img convert –f vdi –O raw nameofthevm.vdi disk.raw - Once the
disk.rawfile is created, to reduce the upload size, we will compress the raw disk into thetar.gzformat. However, it is better to usegtarsince Google relies heavily on this utility. For Windows users, these are not natively installed, but the utility can be directly downloaded from http://gnuwin32.sourceforge.net/packages/gtar.htm.You can create the final GCP-compliant image by running the command
gtar –cSzf kali.tar.gz disk.rawon Linux and macOS systems ortar –zcvf kali.tar.gz disk.rawon Windows.
We now have our own image ready to be uploaded to GCP. Create a GCP account or use an existing one to log in to the service. Similar to Microsoft, GCP also provides a free credit option for the user to experience their cloud computing services. The following steps are involved in launching Kali Linux on GCP:
- Log in to https://console.cloud.google.com/.
- Navigate to Cloud Storage and select Brower, and click Create a Bucket.
- Choose a name for the bucket in compliance with GCP’s policy (no capital letters allowed); in our case, we created the bucket name
mastering-kali-linux-edition4. - Click on Upload Files and select our compressed
kali.tar.gzimage that we just created. Once the upload is complete, you should be able to see the same screen displayed in Figure 1.19:
Figure 1.19: After uploading the compressed image to GCP, this screen will be displayed
- Go back to the Home page and select Compute Engine; select Images under the storage and then click on Create Image and enter a name for the image, in this case, we entered
gcp-kali. - Once the name has been entered, for the source, select cloud storage file, click on Bucket, and then select our compressed gz image (
kali.tar.gz). - You can select any region that you want to run in; we selected the default for demonstration purposes. Click Create, which should bring you to the screen displayed in Figure 1.20; if you do not see this, then click on REFRESH on the same screen:

Figure 1.20: The newly created gcp-kali image displaying in the GCP images
- Once the image is created, click on Actions and Create instance, as shown in Figure 1.21:

Figure 1.21: Successful creation of our gcp-kali image that is ready to run as an instance
- This should take us to the VM instance screen to feed the Kali Linux instance information, as shown in Figure 1.22:

Figure 1.22: Entering our gcp-kali instance details and selecting the required resources to run it
- We can now select the CPU (Core Processing Unit) platform and GPU (Graphics Processing Unit); we will select
E2 medium, which will provide two virtual cores of vCPU and 4 GB RAM. Our image includes the storage that we selected during the VM creation (12 GB). - Finally, ensure that the boot disk remains as it is—no changes are required—and finally click Create. This should bring us to the final screen with both the internal and public IP addresses, as shown in Figure 1.23:

Figure 1.23: Successful installation of Kali Linux as an instance in GCP, with an internal and external IP
- We now have successfully created and run an instance of Kali Linux on the GCP, and we can now log in to the public IP with the username and password that we created during the initial creation, as shown in Figure 1.24:

Figure 1.24: Successfully connecting to the Kali Linux instance in GCP externally
Kali on Android (non-rooted phones)
With the support of ARM images, it is possible to directly download the Nethunter images from the Kali website; however, in this section we will try a different approach, running Kali on any Android device that is configured to a high enough standard.
We will utilize two applications from the trusted Google Play Store:
- UserLAnd: This is an open-source app that allows you to run several Linux operating systems on Android devices. This can be downloaded to the device through the Play Store by visiting https://play.google.com/store/apps/details?id=tech.ula&hl=en_GB&gl=US.
- ConnectBot: A powerful open-source SSH client, it can manage simultaneous SSH sessions, create secure tunnels, and copy/paste between other applications. This application can also be downloaded directly through the Play Store or by visiting https://play.google.com/store/apps/details?id=org.connectbot&hl=en_GB&gl=US.
Once you have downloaded UserLAnd, you should see the same as that shown in Figure 1.25; select Kali:

Figure 1.25: Selecting Kali Linux in the UserLAnd mobile application
The application should ask for your username, password, and VNC password for Kali to log in. Once the action is completed, there should be a pop-up asking you to select a connection bot, as shown in Figure 1.26:
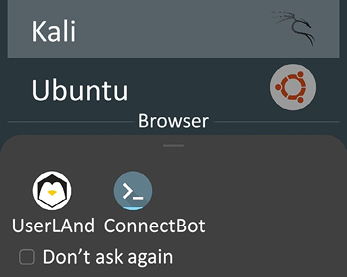
Figure 1.26: After the Kali Linux image is downloaded, you will be provided with the two options; select ConnectBot
We now have a lightweight version of Kali Linux (you may have to install the tools as and when required; as an example, you may install routersploit by running sudo apt-get update && apt install routersploit to gather information about the router that the mobile device is connected to) on our handheld Android device; part of the interface is shown in Figure 1.27:

Figure 1.27: Successful installation of Kali Linux on an Android device
We have now seen how Kali Linux is installed and run on an Android device without having to root the device. The version of Kali Linux on the device operates in its own sandbox; therefore, there will be no restrictions on us performing penetration testing from the device.
Organizing Kali Linux
Installation is just the beginning; organizing Kali Linux is a very important next step. In this section, we will explore the different ways in which our Kali Linux can be organized through customization.
Configuring and customizing Kali Linux
Kali is a framework that is used to perform penetration testing. The tester, however, should never feel tied to the tools that have been installed by default, or by the look and feel of the Kali desktop. By customizing Kali, a tester can increase the security of client data that is being collected and make it easier to perform a penetration test. Common customization options that can be made in Kali include the following:
- Resetting the Kali password
- Adding a non-root user
- Configuring network services and secure communications
- Adjusting network proxy settings
- Accessing the secure shell
- Speeding up Kali operations
- Sharing folders with Microsoft Windows
- Creating encrypted folders
Let us now take a further look at these options.
Resetting the default password
If you downloaded the preconfigured VMware or VirtualBox image, the default username and password to access Kali Linux is kali. It is recommended to change the default password; to do so, run the following command in the Kali Linux terminal:
sudo passwd kali
You will then be prompted to enter a new password, and then to confirm it.
Configuring network services and secure communications
The first step to ensure that we are able to access the internal network is to make sure that it has connectivity to either a wired or wireless network to support updates and communications. You may need to obtain an IP address through Dynamic Host Configuration Protocol (DHCP) by appending a network configuration file and adding an Ethernet adapter to it, in the form of the following commands from the Kali Linux terminal:
# sudo nano /etc/network/interfaces
iface eth0 inet dhcp
Once the network configuration file is appended, you should be able to bring up the ifup script to automatically assign the IP address, as displayed in Figure 1.28:
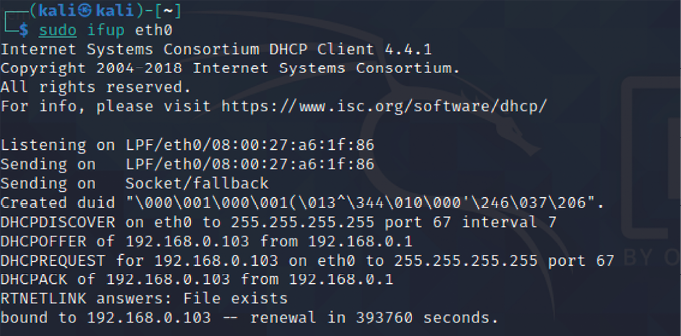
Figure 1.28: Successful assignment of an IP address through DHCP using the ifup script
In the case of a static IP, you can append the same network configuration file with the following lines and quickly set up a static IP to your version of Kali Linux:
# nano /etc/network/interfaces
iface eth0 inet static
address <your address>
netmask <subnet mask>
broadcast <broadcast mask>
gateway <default gateway>
# nano /etc/resolv.conf
nameserver <your DNS ip> or <Google DNS (8.8.8.8)>
By default, Kali starts with the DHCP service enabled. Doing so announces the new IP address to the network, which may alert administrators to the presence of the tester. For some test cases, this may not be an issue, and it may be advantageous to have certain services start automatically during boot-up. This can be achieved by entering the following commands:
update-rc.d networking defaults
/etc/init.d/networking restart
Kali installs with network services that can be started or stopped as required, including DHCP, HTTP, SSH, TFTP, and the VNC server. These services are usually invoked from the command line; however, some are accessible from the Kali menu.
Adjusting network proxy settings
Users located behind an authenticated or unauthenticated proxy connection must modify the bash.bashrc and apt.conf files. Both files are located in the /etc/ directory. Edit the bash.bashrc file, as the following shows, using a text editor to add the following lines to the bottom of the bash.bashrc file:
export ftp_proxy=ftp://username:password@proxyIP:port
export http_proxy=http://username:password@proxyIP:port
export https_proxy=https://username:password@proxyIP:port
export socks_proxy="https://username:password@proxyIP:port"
Replace proxyIP and port with your proxy IP address and port number, respectively, and replace the username and password with your authentication username and password. If there’s no need to authenticate, write only the part following the @ symbol. Save and close the file.
Accessing the secure shell remotely
To minimize detection by a target network during testing, Kali does not enable any external listening network services. Some services, such as SSH, are already installed. However, they must be enabled prior to use. Kali comes preconfigured with default SSH keys. Before starting the SSH service, it is a good idea to disable the default keys and generate a unique keyset for use, as the following code shows. Move the default SSH keys to a backup folder, and then generate a new SSH keyset using the following command:
sudo dpkg-reconfigure openssh-server
To confirm the SSH service is running, you can verify this by using the command sudo service ssh status.
Note that with the default configuration of SSH, root login will be disabled. If you require access with the root account, you may have to edit /etc/ssh/sshd_config and set PermitRootLogin to yes, save, and then exit. Finally, from any system on the same network, you should be able to access the SSH service and utilize Kali Linux. In this example, we use PuTTY, which is a free and portable SSH client for Windows. Now you should be able to access Kali Linux from another machine, accept the SSH certificate, and enter your credentials.
Speeding up Kali operations
Several tools can be used to optimize and speed up Kali operations:
- When using a VM, install its software drive package, either Guest Additions (VirtualBox) or VMware Tools (VMware).
We have to ensure that we run
apt-get updatebefore the installation.
- When creating a VM, select a fixed disk size instead of one that is dynamically allocated. It is faster to add files to a fixed disk, and there is less file fragmentation.
- By default, Kali does not show all applications that are present in the startup menu. Each application that is installed during the boot-up process slows the system data and may impact memory usage and system performance. This can be performed by the following commands in the terminal:
- To list all the startup services at bootup, type
sudo systemctl list-unit-files --type=servicein the terminal and you can choose to disable the unwanted services by runningsudo systemctl disable --now <nameoftheservice> - Finally, you can list the enabled services by running
sudo systemctl list-unit-files --type=service --state=enabled --allin the terminal
- To list all the startup services at bootup, type
Sharing folders with the host operating system
The Kali toolset has the flexibility to share results with applications residing on different operating systems, especially Microsoft Windows. The most effective way to share data is to create a folder that is accessible from the host operating system as well as the Kali Linux VM guest. When data is placed in a shared folder from either the host or the VM, it is immediately available via the shared folder to all systems that access that shared folder. To create a shared folder, perform the following steps:
- Create a folder on the host operating system. In this example, it will be called
kali_Share. - Right-click on the folder and select the Sharing tab. From this menu, select Share.
- Ensure that the file is shared with Everyone and that Permission Level for this share is set to Read/Write.
- If you haven’t already done so, install the VMware tools/Virtual Box Guest additions onto Kali Linux, respectively.
- When the installation is complete, go to the VMware player menu and select Manage and click on Virtual Machine Settings. Find the menu that enables Shared Folders and select Always Enabled.
- In the case of Oracle VirtualBox, select the VM and go to Settings and select Shared Folders, as shown in Figure 1.29:

Figure 1.29: Mounting a shared drive from the original operating system to the guest operating system
Please note that older versions of VMware Player use a different menu.
- Now the folder should be automatically mounted to the
/media/folder, as shown in Figure 1.30:
Figure 1.30: Successful mounting of the shared drive to the Kali Linux VM
- Everything placed in the folder will be accessible in the folder of the same name on the host operating system, and vice versa.
The shared folder, which will contain sensitive data from a penetration test, must be encrypted to protect the client’s network and reduce the tester’s liability should the data ever be lost or stolen.
Using Bash scripts to customize Kali
Typically, to maintain system and software development, command-line interfaces were developed as multiple shells in Linux, namely, sh, bash, csh, tcsh, and ksh.
We can utilize the following Bash scripts to customize Kali Linux depending upon the goal of our penetration testing: https://github.com/PacktPublishing/Mastering-Kali-Linux-for-Advanced-Penetration-Testing-4E.
Building a verification lab
As a penetration tester, it is recommended to set up your own verification lab to test any kind of vulnerabilities and have the right proof of concept before emulating the same conditions on a live environment.
Installing defined targets
In order to practice the art of exploitation, it is always recommended to make use of well-known vulnerable software. In this section, we will be installing Metasploitable3, which has both Windows and Linux versions; Mutillidae, which is a PHP framework web application; and we will also utilize CloudGoat, an AWS deployment tool designed to deploy vulnerable AWS instances.
Lab Network
We need to ensure that we create a separate network that can be accessed only by testers—hence, we are going to create a NAT network within VirtualBox by running the following command from the Command Prompt or Terminal, respective of the directory; for Windows, it is C:\Program Files\Oracle\VirtualBox\:
VBoxManage natnetwork add --netname InsideNetwork --network "10.10.10.0/24" –-enable --dhcp on
Note that this is a single line of code.
Active Directory and Domain Controller
In the previous edition, we discussed how to set up the Active Directory on Windows 2008 R2; in this section, we will upgrade our test lab and install Active Directory on Windows Server 2016 Datacenter. Once the ISO from Microsoft (https://www.microsoft.com/en-us/evalcenter/evaluate-windows-server-2016-essentials) is downloaded and the operating system on VMware Workstation Player or VirtualBox is installed, you should be able to perform the following steps:
- Ensure the Network adapter is connected to the right network. Select the virtual machine and click Settings. Then, from the menu, click on Network, ensure that Enable network adapter is checked and that Attached to is selected as NAT network, and that the name is InsideNetwork (or the name you used to create the lab network). Additionally, click on Advanced and select Allow All under Promiscuous mode (this mode will allow all traffic between the VMs).
- Upon successfully logging into the Windows server, set a static IP to this server by running the following in the command line:
netsh interface ip set address "ethernet" static 10.10.10.100 255.255.255.0 10.10.10.1 - From Server Manager, click on Add roles and features.
- Select Role-based or Features-based installation from the Installation Type
screenand click Next. - By default, the same server will be selected from Select a server from the server pool; click Next.
- From the Server Roles page, place a checkmark in the checkbox next to Active Directory Domain Services. Additional roles, services, or features are also required to install Domain Services: click Add Features and click Next.
- Select optional features to install during the AD DS installation by placing a check in the box next to any desired features, and then click on Next.
- That should take us to the confirmation screen with all the selected features and services; click on Install and, when the installation is complete, click on Close.
- Select AD DS; it should come up with a warning stating:
Configuration required for active directory domain service. Now click on More for post-deployment configuration, which should bring us to Figure 1.31:
Figure 1.31: Promoting the server to a domain controller
- Click on Promote this server to a domain controller.
- Select Add a new Forest and enter the Fully Qualified Domain Name (FQDN). In this example, we will create a new FQDN called
mastering.kali.fourthedition. Then click Next. - On the next screen, for both Forest functional level and Domain functional level, select Windows Server 2016 and type the password for Directory Services Restore Mode (DSRM); click Next.
- Do not select the DNS delegation—directly click on Next, where it should pick up the NetBIOS domain name as MASTERING. Click Next.
- Select the locations for the database, log files, and SYSVOL for Active Directory, and finally, you should be presented with a review screen, as shown in Figure 1.32; click Next:

Figure 1.32: Final stage of installation of Active Directory server on Windows Server 2016
- All the prerequisites must be met. Ignore the warnings; after this, click on Install.
- On the Confirm installation selections screen, review the installation and then click Install. Doing so should reboot the system and a new Active Directory server with a domain controller should have been established.
To create a normal user on the domain, run the following command in the command line on the domain controller:
net user normaluser Passw0rd12 /add /domain
To create a domain administrator account, the following commands will create such a user and add it to the domain admins group:
net user admin Passw0rd123 /add /domain
net group "domain admins" admin /add /domain
To validate whether these users have been created, you can use the domain controller by simply running net user from the command line; you should be able to see all the local users on the server.
We will also be creating an additional user for the new exchange server by running the following commands on our domain controller:
net user exchangeadmin Passw0rd123 /add /domain
net group "domain admins" exchangeadmin /add /domain
net group "Schema admins" exchangeadmin /add /domain
net group "Enterprise admins" exchangeadmin /add /domain
Installing Microsoft Exchange Server 2016
In this section, we will set up a completely new Windows Server 2016 and install the Microsoft Exchange service on it. This is to explore some of the Exchange Server 2021 vulnerabilities that we will explore in later chapters.
We will utilize the same Windows 2016 ISO that we downloaded for the Active Directory installation and create a brand new server. Once the Windows Server is installed and booted up, the first step is to make sure that this server can now be communicated to the DNS service of the Domain Controller; hence, set up a static IP and DNS by running the following commands or manually by editing the Ethernet adapter settings (https://www.server-world.info/en/note?os=Windows_Server_2016&p=initial_conf&f=4):
netsh interface ip set address "ethernet" static 10.10.10.5 255.255.255.0 10.10.10.1
netsh interface ip add dns "Ethernet" 10.10.10.100
The next step is to set up Exchange Server to the domain. This can be achieved by doing the following:
- Go to System Properties. Press Windows Key + R and type
sysdm.cpl; click on Change, which should bring up the new screen of Computer Name/Domain Changes. - Change the computer name from the default to ExchangeServer and click on Domain; type
Mastering.kali.fourthedition, and if there is no problem with the network, then you should get a prompt asking you to enter your username and password. - Enter the username as previously created, called
exchangeadmin, with the password; you should now see the screen shown in Figure 1.33, showing that it was successfully attached to the domain. - The final step is to restart the computer for the change in computer name that the domain should now reflect to take place:

Figure 1.33: Successfully adding the exchange server to the Active Directory domain
The following steps will promote our normal Windows Server 2016 to an Exchange Server:
- Download the Microsoft Exchange Server 2016 image from https://www.microsoft.com/en-us/download/details.aspx?id=57827.
- Mount the ISO file to VirtualBox as a drive by navigating to Settings, Storage, and Select the Optical Drive, and add the exchange server ISO file.
- Before beginning the installation, we will install some prerequisites, which can be directly installed from PowerShell (run as administrator), as the following shows:
PS > Install-WindowsFeature NET-Framework-45-Features, RPC-over-HTTP-proxy, RSAT-Clustering, RSAT-Clustering-CmdInterface, RSAT-Clustering-Mgmt, RSAT-Clustering-PowerShell, Web-Mgmt-Console, WAS-Process-Model, Web-Asp-Net45, Web-Basic-Auth, Web-Client-Auth, Web-Digest-Auth, Web-Dir-Browsing, Web-Dyn-Compression, Web-Http-Errors, Web-Http-Logging, Web-Http-Redirect, Web-Http-Tracing, Web-ISAPI-Ext, Web-ISAPI-Filter, Web-Lgcy-Mgmt-Console, Web-Metabase, Web-Mgmt-Console, Web-Mgmt-Service, Web-Net-Ext45, Web-Request-Monitor, Web-Server, Web-Stat-Compression, Web-Static-Content, Web-Windows-Auth, Web-WMI, Windows-Identity-Foundation, RSAT-ADDS - Besides these packages, you will also need to download Unified Communications Managed API 4.0 Runtime from http://www.microsoft.com/en-us/download/details.aspx?id=34992 and install it.
- Once all the prerequisites are completed, locate the drive by typing
d:in the command line; then typesetup /PrepareSchema /IAcceptExchangeServerLicenseTerms. If no error occurs, then you should see the same screen as displayed in Figure 1.34:
Figure 1.34: Prerequisite checks to install Exchange Server
- Once all the prerequisite analysis has been completed, we can now move on to the next step by preparing our Active Directory by running the following command:
setup /Preparedomain /IAcceptExchangeServerLicenseTerms - As a final step, we will now install the
Mailboxrole on our exchange server by running the following command:setup /Mode:Install /Role:Mailbox /IAcceptExchangeServerLicenseTerms - This will lead to the successful installation of the required Exchange Server components and packages as shown in Figure 1.35:

Figure 1.35: Installation of Exchange Server tools and their configuration
- It may take some time, depending on the system performance. Once everything is complete, we should now have Outlook web access enabled on the Exchange Server on port
443, as shown in Figure 1.36:
Figure 1.36: Successful installation of Exchange Server, accessed at https://localhost/owa/
Metasploitable3
Metasploitable3 is an indubitably vulnerable Virtual Machine (VM) that is intended to be tested for multiple exploits using Metasploit. It is released under a BSD-style license. We will be utilizing two VMs, one VM running an obsolete Windows 2008 server and another running a Linux server Ubuntu 14.04, to practice within our lab network. You can achieve this setup by first installing the Vagrant application.
Vagrant is an open-source tool that is predominantly used for building and managing virtual machine environments. You can download this tool from https://www.vagrantup.com/downloads for your hosting operating system. Once the application is successfully installed, install the required plugins, vagrant-reload and vagrant-vbguest, by running the following commands in the Terminal or Command Prompt:
Vagrant plugin install vagrant-reload
Vagrant plugin install vagrant-vbguest
We are now ready to download the Metasploitable3 virtual machines to our local system. We will use the vagrant box add command along with the repository to download the virtual machines; these are hosted on vagrantcloud.com:
vagrant box add rapid7/metasploitable3-win2k8
vagrant box add rapid7/metasploitable3-ub1404
Running the preceding commands should provide you with the options to download using different providers, as shown in the following Figure 1.37:
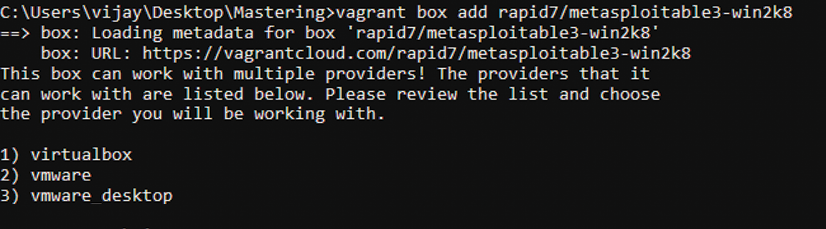
Figure 1.37: Downloading Metasploitable3 via vagrant
These virtual machines are downloaded to the /home/username/.vagrant.d/boxes/ or c:\users\username\.vagrant.d\boxes\ folder. Check these folders to verify the download:
- Change your folder to the respective location by running cd
C:\Users\user\.vagrant.d\boxes or cd /home/username/.vagrant.d/boxes/ - We can list the downloaded boxes that are installed on our device by running
vagrant box list. - To run these machines, we need to initialize them by running
vagrant init metasploitable3-win2k8. This command creates the required Vagrant configuration file namedVagrantfile, which includes all the virtual machine settings. Runvagrant init metasploitable3-ub1404from a different folder to avoid theVagrantfile already existserror message. - Finally, we will bring the virtual machine up by running
vagrant up. You should see the virtual machine up. Pentesters will receive the warningdefault: Warning: Authentication failure. Retrying, which is due to the insecure private key used for the SSH access between the VM and Vagrant. You should see the screen shown in Figure 1.38 upon successfully starting the Metasploitable3 windows server:
Figure 1.38: VirtualBox running metasploitable 3
- Validate the systems that are currently initialized by running vagrant
global-status. - The next important steps are to change the network settings of these VMs to connect them to our lab network. Select the virtual machine and click Settings. Within the General tab, change the Name of the VM to your desired name and, from the menu, click on Network. Ensure Enable network adapter is checked and Attached to is selected as NAT network and the name is InsideNetwork.
We have successfully deployed the vulnerable Metasploitable3 VMs in our VirtualBox environment, which we will be utilizing to conduct more advanced exploitations in the coming sections.
Mutillidae
Mutillidae is an open-source insecure web application designed for penetration testers to practice all of the web app-specific vulnerability exploitation. XAMPP is another such free and open-source cross-platform web server solution stack package that can be used, developed by Apache Friends.
We will now install Mutillidae on our newly installed Microsoft Windows Server 2016 (domain controller) server to host it:
- You can either download XAMPP directly from https://www.apachefriends.org/download.html or run the following command in PowerShell:
wget https://downloadsapachefriends.global.ssl.fastly.net/7.3.28/xampp-windows-x64-7.3.28-1-VC15-installer.exe?from_af=true -OutFile XAMPP-Installer.exeIn case of any SSL/TLS errors while running
wgetin PowerShell, ensure you run the following command within PowerShell:[Net.ServicePointManager]::SecurityProtocol=[Net.SecurityProtocolType]::Tls12to ensure that TLS1.2 is supported by the Windows Server. - We will utilize XAMPP for Windows version 7.1.30. Once the application installation is complete, ensure you enable Apache and MySQLas services by clicking on the tick box under Service within the XAMPP control panel, as shown in Figure 1.39:

Figure 1.39: XAMMP Control Panel showing Apache and MySQL running
- You can download the latest version of Mutillidae directly from https://github.com/webpwnized/mutillidae or by running the following command in PowerShell:
wget https://github.com/webpwnized/mutillidae/archive/refs/heads/master.zip -OutFile mutillidae.zip - Unzip the file and copy the folder to
C:\yourxampplocation\htdocs\<mutillidae>. - Open the
.htacessfile inside theMutillidaefolder and addAllow from 10.10.10.0/24under and the IP range are allowed. - Start the Apache and MySQL services by clicking on the Start button under Actions within XAMPP Control Panel. You should see the web application successfully deployed on your Windows Server, and it can be accessed by visiting
http://10.10.10.100/mutillidae/. - You will receive the database error messages relating to root access denial on MySQL. Open the XAMPP control panel, ensure that the MySQL service is up and running, and click on Shell and run the following steps to reset the root password, as depicted in Figure 1.40:
mysql –u root
use mysql
SET PASSWORD FOR root@localhost = PASSWORD('mutillidae')
Flush privileges
Figure 1.40: Running the Shell from XAMPP and setting the MySQL password for the root user
- The final successful deployment of the vulnerable web application will lead to the screen shown in Figure 1.41:

Figure 1.41: Successfully accessing Mutillidae on Kali Linux within the same lab network
In case of error messages saying that the database is offline or something similar, you have to select Try to setup/reset the DB for Mutillidae. If you encounter any other error messages of missing files – ensure you disable Defender by running Set-MpPreference -DisableRealtimeMonitoring $true in PowerShell as administrator.
CloudGoat
CloudGoat is an AWS deployment tool that is designed by Rhino Security Labs. This tool is written in Python, which deploys a purposefully vulnerable AWS resource in the account. We will set up the CloudGoat Docker image within Kali Linux and explore the different vulnerabilities that attackers can take advantage of in a misconfigured cloud environment.
To make sure that CloudGoat can deploy the AWS resources, the first step is to possess a valid AWS account. Assuming that we have one from the Kali on AWS Cloud section, we will perform the following steps:
- Access https://console.aws.amazon.com/iam/home?region=us-east-2#/home.
- Click on the users, then on Add user; enter
cloudgoatand select Programmatic access; click Next, which should bring us to the screen shown in Figure 1.42:
Figure 1.42: Creating an IAM user account in the AWS console
- Select Attach existing policies directly and check AdministratorAccess, as shown in Figure 1.43; click on Next:

Figure 1.43: Adding the IAM user to the AdministratorAccess group
- Click on Next until you reach the final stage. If no error is displayed, then you should see the following screen with the Success message, where you can download the user Access key ID and Secret access key:

Figure 1.44: Creation of an Access key ID for the IAM user
Now that we have created the IAM user with administrative privileges within the AWS account, let us go ahead and install CloudGoat on the Docker image within Kali Linux by running the following commands in the terminal:
sudo apt install docker.io
sudo docker pull rhinosecuritylabs/cloudgoat
sudo docker run -it rhinosecuritylabs/cloudgoat:latest
Finally, configure the AWS client to connect to our AWS infrastructure using aws configure --profile masteringkali with the latest access key and secret that we downloaded from AWS, as shown in Figure 1.45. We will be exploring this tool in more detail in Chapter 8, Cloud Security Exploitation:
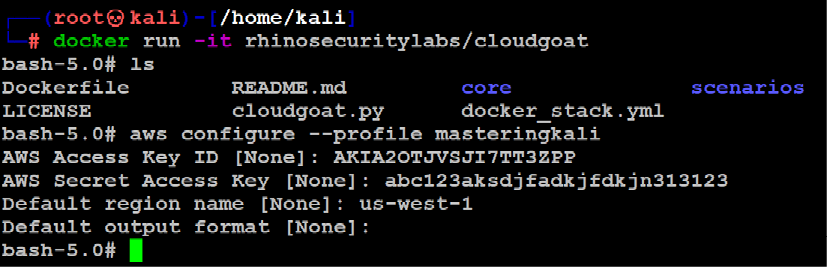
Figure 1.45: Configuration of AWS client for our newly created access key
Figure 1.46 depicts the LAB architecture of our setup for practicing penetration testing on our defined targets:

Figure 1.46: Our Mastering Kali Linux practice lab architecture
We have successfully built our own virtualized internal lab, and this should provide us with a wide range of exposure to identify and exploit multiple vulnerabilities within the infrastructure, application, and cloud. We should have the following set up:
- A Domain Controller running on Windows Server 2016 running Mutillidae through XAMPP
- A vulnerable on-premises Microsoft Exchange server running on Windows Server 2016 with missing patches.
- An obsolete Microsoft Windows 2008 R2 (Metasploitable3 server) running multiple vulnerable services.
- One domain administrator, one exchange administrator, and a normal domain user – which we will utilize in the latter part of this book to perform privilege escalation based on the roles.
- The AWS cloud deployment tool on a Docker image to set up vulnerable AWS infrastructure resources.
Testers have to ensure that all the VMs that are created as part of this lab network should always have the settings of the network set to NAT network and the network name as InsideNetwork, so that the VMs can communicate with each other.
Managing collaborative penetration testing using Faraday
One of the most difficult aspects of penetration testing is remembering to test all of the relevant parts of the network or system target, or trying to remember whether the target was actually tested after the testing has been completed. In some cases, a single client may have multiple penetration testers performing scanning activities from multiple locations, and management would like to have a single view. Faraday can provide this, assuming all of the penetration testers are able to ping each other on the same network or on the internet for external assessment.
Faraday is a multiuser penetration test Integrated Development Environment (IDE). It is designed for testers to distribute, index, and analyze all of the data that is generated during the process of a penetration test or technical security audit to provide different views, such as Management, Executive Summary, and Overall Issues lists.
This IDE platform was developed in Python by InfoByte, and version 3.14.3 is installed by default in the latest version of Kali Linux. You can navigate, from the menu, to Applications, click on 12-Reporting tools, and then click on Faraday start. It should open up a new screen for you to enter your password to perform service changes. You should now be presented with the following screen to set up a username and password for the Faraday web portal.
Once the username and password are both set, the application should open the web browser, pointing to http://localhost:5985/
You will now be able to create workspaces for each project. The next step is to make sure all the testers that are to utilize the Faraday client perform all the tasks by running faraday-client in the terminal; it should prompt you to enter the credentials for the application. Use the same credentials that you just created, and you should now be able to see the same screen as that displayed in Figure 1.47:
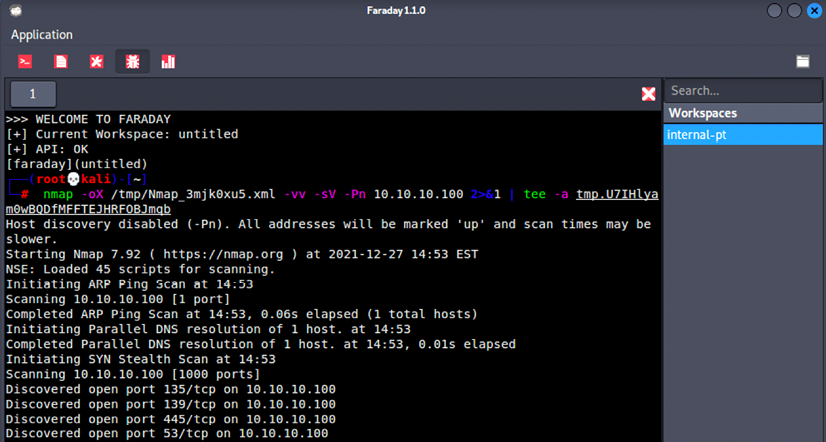
Figure 1.47: Running Nmap scan through the Faraday client
Following this screen, any scanning command-line activities that you or any other penetration testers in your team carry out can be visualized by clicking on the Faraday web application; this will display something similar to that shown in Figure 1.48:
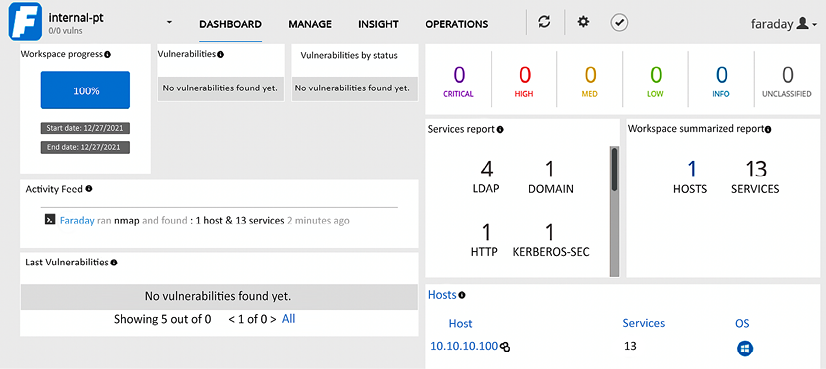
Figure 1.48: The real-time dashboard of Faraday
Summary
In this chapter, we looked at the different threat actors and their motivations, along with certain methodologies and goal-based penetration testing that help organizations to test themselves against real-time attacks. We learned how penetration testers can use Kali Linux on different platforms to assess the security of data systems and networks. We have taken a quick look at how to install Kali on different virtualized and cloud platforms and ran a Kali Linux operating system Docker image, along with one on a non-rooted Android phone.
We built our own verification lab, set up Active Directory Domain Services, along with an Exchange Server instance, and two VMs on the same network, one of which is hosting a vulnerable web application. Most importantly, we learned how to customize Kali to increase the security of our tools and the data that they collect. We’re working to achieve the goal of making tools support our process instead of the other way around!
In the next chapter, we will learn how we can effectively master Open-Source Intelligence (OSINT) in this era to identify the weak attack surfaces of our target and create customized username and password lists to facilitate more focused attacks, extracting these details from the dark web, along with other methods.
