Red Hat JBoss Enterprise Application Platform 7.0 ( JBoss EAP 7) is a middleware platform built on open standards and compliant with the Java EE 7 specification.
It is derived from the upstream project Wildfly 10 and provides ready-to-use features such as high-availability clustering, messaging, and distributed caching.
JBoss EAP 7 is designed with a modular structure that allows on-demand services, thus greatly improving startup speed. Thanks to its web based management console and its powerful Command Line Interface (CLI), editing XML configuration files is unnecessary (and is even discouraged!). The CLI also adds the ability to script and automate management tasks. Internally, JBoss EAP includes APIs and development frameworks for quickly developing fast, secure, and scalable Java EE applications compliant with the Java EE 7 specification.
The first part of this book will let you conquer the management instruments and the EAP 7 domain configuration. When you have completed all green bars, we will concentrate on advanced topics, showing the improvements from the earlier release of the server.
As far as this chapter is concerned, we will now have a quick tour of its technology covering these topics:
What the installation options are and how to choose the one that works better for your context
How to perform the basic administration steps
The essentials of the server configuration
If you are arriving from a JBoss EAP 6 environment you will be eager to know about the highlights of the new platform. Broadly speaking, the changes encompass both the server administration area and the Java Enterprise APIs that can help to provide applications on it. We will start by introducing the new administrative features and then we will briefly mention the API highlights.
The administrative features are described as follows:
Undertow web server: JBoss Web has for quite a long time been the face of the web application server. Although compatible with Servlet/JSP Specifications it has kept the long-term legacy with Tomcat. The new Undertow web server has been built from scratch using the best-of-breed Java IO API. Some of its core features include non-blocking NIO based APIs, a lightweight and fully embeddable architecture based on pluggable handlers, and support for WebSockets, including JSR-356 and the HTTP Upgrade mechanism. Besides this, Undertow is capable of working as a reverse proxy or load balancer for a clustered application server, opening the door to the full JBoss clustering platform.
Simpler server management: Thanks to the HTTP upgrade mechanism available in Undertow, now you can reduce the number of ports in the default installation to just two:
* 8080 for applications with JNDI and EJB multiplexed
* 9990 for management, for both HTTP/JSON and native API
Support for HTTP/2: The new web server architecture supports the new version of the HTTP protocol, named HTTP/2. HTTP/2 aims to reduce latency and make efficient use of the TCP connection by means of binary framing, request/response multiplexing, header compression (HPACK) and more.
New life cycle modes: It is now possible to suspend and resume the execution of the application server. This allows active
sessions/requests/in-flight-txsto complete and can be used for a graceful server shutdown scenario.Enhanced server management: The administration web console has been revamped with a new graphical layout and new availabilities such as the Datasource wizard that will let you quickly create database connections with a few touches.
ArtemisMQ Messaging Broker: In the new server version, the messaging broker has changed to ArtemisMQ which is directly derived from the former HornetQ. Former HornetQ clients will be supported out of the box, while offering compatibility to Apache's ActiveMQ 5.0 clients as well.
ORB Switch: The new version of the application server has switched to OpenJDK ORB which provides better interoperability with other vendors compared with the earlier JacORB implementation.
The Java EE 7 API highlights are related to the the Java EE 7 (JSR 342) specification is an umbrella specification which encompasses 33 single specifications. There have been brand new technologies and improvements of existing ones.
Here is a short list of Java EE 7 drivers:
JSR-352 batch applications for the Java platform, featuring a new API for an XML-based job specification language and a runtime API.
JSR-236 concurrency utilities for JavaEE, providing a simple and standard API for using multiple threads from Java Enterprise components.
JSR-353 Java API for JSON Processing (JSON-P). This API can be used to parse, transform, and query JSON data.
JSR-356 WebSockets support, featuring a full-duplex communication channel between the client and the server by means of simple annotations and life cycle callbacks.
Besides the new additions, some updates have been released to existing services. The most notable ones are as follows:
JSR-345, which includes EJB 3.2, plus Interceptors 1.2 and Annotations 1.2
JSR-340, featuring Servlet 3.1: non-blocking I/O, HTTP upgrade, and so on
JSR-342, including the JMS 2.0 API that delivers a JMSContext resource as a wrapper for JMS resources
JSR-344 JSF 2.2: HTML 5, FaceFlows, Stateless views, Resource lib contracts
Installing the application server can be done in several ways. For the purpose of learning we will start with the basic unzipping installation which will produce a vanilla installation ready to be used. In real-world scenarios with dozens of customized installations to be completed, you will probably want to learn some advanced installation tactics. Don't worry, we have been trained for it and you will be too in a while.
The first one we will detail is also the simplest, which merely requires unzipping a file. The JBoss EAP 7 ZIP file is available from the Red Hat Customer Portal. This method of installation is platform-independent and requires the following steps:
Open a browser and log into the Customer Portal at https://access.redhat.com.
Click Downloads.
Select Red Hat JBoss Enterprise Application Platform in the Product list and click on it.
In the next window, select the correct JBoss EAP version from the Version combobox and click Download .
JBoss EAP 7 is now downloaded to your target machine, ready for installation. Execute the following command in order to unzip the archive:
unzip jboss-eap-7.0.0.zip
Now you can test that the installation was successful by executing the standalone.sh shell script (Windows users will launch the standalone.cmd equivalent).
cd jboss-eap-7.0
cd bin
$ ./standalone.sh
Tip
When to use ZIP installation:
The ZIP installation can be used for developers or simple environments where it's just fine to provide a basic default installation of the server, with all the configuration and libraries in the standard folders. Therefore, it's not the best choice for large enterprise systems where you want to automate and customize installations.
This method of installation is peculiar of JBoss EAP and can be a practical solution if you want to manage your application ecosystem through Red Hat Packet Manager (RPM) archives.
Installing JBoss EAP 7 via RPM requires a subscription to the official Red Hat's repositories. You can either subscribe to the current JBoss EAP channel or a minor channel that provides a specific minor release and all applicable patches. This allows you to maintain the same minor version of JBoss EAP 7, while still staying current with high severity and security patches.
Let's see in practice how the installation can be done on a RHEL 7 operating system. First of all, we have to register our brand new server to the Red Hat Network (RHN), using our credentials (username/password) for accessing to all needed subscriptions.
The command will ask for username or password, or in case we've planned to use an internal RH Satellite 6 system, we can use a preconfigured Activation Key as an option:
# subscription-manager register
After a successful registration we need to figure out to which Pool we need to attach for downloading the EAP 7 packages. We can use the subscription-manager list command followed by the less one for searching through multiple subscriptions:
# subscription-manager list --available|less
Subscription Name:   Client SKU
Provides:            Oracle Java (for RHEL Server) - AUS
                     Oracle Java (for RHEL Client)
                     Red Hat Enterprise Linux 7 High
                         Availability
                     Red Hat Enterprise Linux High Availability
                     Red Hat EUCJP Support (for RHEL Server)
                     Red Hat Enterprise Linux for Power
                     Red Hat Enterprise Linux EUS Compute Node
                     Red Hat Enterprise Linux for Power, big
                         endian -
                     Red Hat OpenShift Enterprise JBoss EAP
                         add-on
                     Oracle Java (for RHEL Server) - Extended
                         Update
                     dotNET on RHEL Beta (for RHEL Server)
                     Red Hat Enterprise Linux Load Balancer
                     JBoss Enterprise Web Server
                     JBoss Enterprise Application Platform -
                         ELS
                     . . . . . . . . . . . . . . . . . . .
As soon as we find the right subscription (you should choose something like: JBoss Enterprise Application Platform) we have to take note of the pool ID and run the following:
# subscription-manager attach --pool
    844aff014485be8a85f8d058bf198144
After that we can explore the available repositories:
# subscription-manager repos --list
We won't list here all the available repositories which is quite large; however, you have to enable only EAP, RHEL7 base rpms, extras, and optional repository, and disable all the others with the following command:
# subscription-manager repos --disable="*" --enable jb-eap-7.0-
    for-rhel-7-server-rpms --enable rhel-7-server-rpms --enable
    rhel-7-server-extras-rpms --enable rhel-7-server-optional-rpms
You can verify that the process worked as expected by simply running the following:
# yum repolist
The list should look like this:
Loaded plugins: search-disabled-repos
repo id
    name
!jb-eap-7.0-for-rhel-7-server-rpms/7Server/x86_64 (RPMs)
!rhel-7-server-extras-rpms/x86_64                 (RPMs)
!rhel-7-server-optional-rpms/7Server/x86_64       (RPMs)
!rhel-7-server-rpms/7Server/x86_64                (RPMs)
repolist: 19,727
Complete the installation by executing the following:
# yum groupinstall jboss-eap7
Tip
When to use RPM installation:
The RPM installation makes things a lot easier in terms of installation because you can use all the tools that know how to deal with RPMs, and upgrading is simpler because you can use yum to do it, especially for security errata. The JBoss RPMs put things where many RHEL system administrators would expect them: config files under /etc, content and libraries under /var, and so on.
Most of the downsides come from being forced to do things the way RHN/RPMs want to do them. You cannot install multiple version of JBoss in parallel, which may not be an issue if you spin up a new VM per instance, but can be for some people. It is also difficult to install non-current versions, since you either need to manually specify the versions of several hundred packages or use satellite with a date cutoff on a custom cloned channel to hide any packages from newer releases.
The JBoss EAP 7 installer archive is also available from the Red Hat Customer Portal (https://access.redhat.com). The .jar archive can be used to run either the graphical or text-based installers.
In order to complete the JAR installation, follow these steps:
Open a terminal and navigate to the directory containing the downloaded installation program JAR.
Type the following command:
java -jar jboss-eap-7.0.0-installer.jarAs an alternative, if you have just a terminal available, use the text only mode by launching the following command:
java -jar jboss-eap-7.0.0-installer.jar -console
We will not detail the single steps of the installation which are quite intuitive and covered by the EAP installation guide. Rather we would like to stress that the installer produces an XML script; you can reuse it for multiple installations, as you can see from the following picture:

If you open the generated XML file, then you can pinpoint some custom elements in the installation:
<?xml version="1.0" encoding="UTF-8" standalone="no"?>
<AutomatedInstallation langpack="eng">
<productName>EAP</productName>
<productVersion>7.0.0</productVersion>
<com.izforge.izpack.panels.HTMLLicencePanel id="HTMLLicencePanel"/>
<com.izforge.izpack.panels.TargetPanel id="DirectoryPanel">
<installpath>/home/francesco/EAP-7.0.0</installpath>
. . . . .
</AutomatedInstallation>
Then you can repeat the installation with the following command:
java -jar jboss-eap-7.0.0-installer.jar -xml yourxml
Tip
When to use the JAR installer:We would recommend using the JAR installer for medium to large sized environments where you have some common defaults for networks, database connectivity, or security settings. Another advantage of this approach is that it can be used for any operating system as it's completely Java based.
Downloading the source code can be used if you need low-level details about the single modules of the application server. Once you have downloaded the jboss-eap-7.0.0-src.zip file, unzip it to your disk at first. Next you can build the server in two ways:
Executing the batch script (
build.shorbuild.batfor Windows)If you have Maven 3.2.5 (or newer) installed you can use it directly as follows:
$ mvn install
Change to the bin directory after a successful build:
$ cd build/target/jboss-eap/bin
Verify that the application server boots successfully:
$ ./standalone.sh
The amount of installation options for EAP could well deserve one or more chapters; however, that would take us away from the scope of this book. We will just mention Ansible, which is an excellent configuration management and provisioning tool that uses SSH to perform administrative tasks on your machines. This has the evident advantage that nothing needs to be installed on the machines you are targeting as Ansible only runs on your main control machine, which could even be your laptop!
The steps used by Ansible to provision and configure machines are described in a kind of template called Playbooks, which are Ansible's configuration, deployment, and orchestration language.
You can find a large list of example Playbooks in the Ansible documentation, available at http://docs.ansible.com/ansible . Besides this, for testing purposes we have provided a sample EAP 7 playbook which is attached to the sources of this book. (Read the instructions contained in the README.txt file packaged in ansible.zip.)
Besides this, if you want a user interface for your provisioning activities, Ansible Tower is a web-based solution that makes Ansible even more easy to use for IT teams of all kinds. It's designed to be the hub for all of your automation tasks.
The scripts for starting the server are contained in the JBOSS_HOME/bin folder:
standalone.shstarts the server in standalone modedomain.shstarts the server in domain mode
An equivalent BAT file is also included for Windows users.
In order to check that your installation was successful, execute one of the startup scripts:
$ ./standalone.sh
Next surf to localhost:8080 and check the welcome page of the application server:

Stopping the application server can be done in several ways. Sending an interrupt signal (Ctrl + C) will interrupt the server abruptly, so it's not a recommended option.
So it is sending a kill -9 signal from the terminal against the application server process which is an extreme option to be used when the application server is not responsive through management channels.
The recommended approach is to connect through the Command Line Interface and execute the shutdown command:
Execute
jboss-cli.shfromJBOSS_HOME/bin.Once in the command line prompt, execute the connect command:
[disconnected /] connect 127.0.0.1:9990
Connected to 127.0.0.1:9990
Now issue the shutdown command that will stop the application server:
[127.0.0.1:9990 /] shutdownThe shutdown command can be also executed with the
restart=trueparameter which will cause the application server to restart:[127.0.0.1@localhost:9990 /] shutdown --restart=trueTip
Two things to know!
The first one is that if you don't provide any parameter to the connect command, it will use the defaults contained in the
jboss-cli.xmlthat will attempt to connect to localhost on port9990.Next, if you are connecting to a remote host controller, a username/password challenge will be prompted. See the next section (Basic server administration) to learn how to create a management user.
Once the installation has been completed, it's about time to complete some basic administration tasks. The most obvious one involves creating one or more users for managing your platform. Out of the box, a script called add-user.sh is provided along with your installation. The purpose of this script is to manage two different types of user:
Management users: users in charge of administrating your application server
Application users: users in charge of accessing your applications
Note
Important notice!
The add-user script uses a very simple file-based mechanism to store the users' information. This can be acceptable for basic security requirements. Real-world scenarios, however, would need to use more appropriate security polices as detailed in Chapter 11, Securing the Application Server, of this book.
You can execute the add-user script both in an interactive way and in an automatic way.
In order to execute the add-user script in an interactive way, just execute it as follows and provide the requested information:
$ ./add.user.sh
What type of user do you wish to add?
 a) Management User (mgmt-users.properties)
 b) Application User (application-users.properties)
(a): a
Enter the details of the new user to add.
Using realm 'ManagementRealm' as discovered from the existing
    property files.
Username : administrator1
. . . . .
Password :
Re-enter Password :
What groups do you want this user to belong to? (Please enter a
    comma separated list, or leave blank for none)[  ]:
About to add user 'administrator1' for realm 'ManagementRealm'
Is this correct yes/no? yes
To represent the user add the following to the server-
    identities definition <secret value="UGFzc3dvcmQxIQ==" />
We have removed some negligible information from the output so that you can focus on the required arguments of the script. The previous information can be filled in also in a non- interactive way by providing the username with the -u parameter, the password with the -p, and the group (if needed) with -g. You can discriminate between management users and application users with the -m and -a parameters.
Here is how to create a management user:
$ ./add-user.sh -m -u administrator1 -p Securepassword1!
Note
Once you have created the management user, you can verify that the login correctly lets you through the management console, which is available at http://localhost:9990.
On the other hand, here is the shell script to create an application user belonging to the guest group:
$ ./add-user.sh -a -u demouser -p Securepassword1! -g guest
Note
Beware that creating users in a non-interactive way exposes your user/password information across the shell history system process table if you are a Linux user.
Once you have created your users the following files (contained in the configuration folder of your server base directory) will be updated:
-rw-rw-r--. 1 francesco francesco   711 Oct 26 06:13
    application-roles.properties
-rw-------. 1 francesco francesco   935 Oct 26 06:13
    application-users.properties
-rw-rw-r--. 1 francesco francesco   646 Nov 24 16:11 mgmt-
    groups.properties
-rw-------. 1 francesco francesco  1111 Nov 24 16:11 mgmt-
    users.properties
The application-roles.properties holds the list of roles granted to application users. The file application-users.properties contains the list of application users and their hashed passwords. Conversely, mgmt-groups.properties contains the list of roles granted to management users and mgmt-users.properties holds the management users and their hash passwords. As a final note, the password contained in *-users.properties files is in hash using this format:
username=HEX( MD5( username ':' realm ':' password))
JBoss EAP provides two operating modes for the servers: the standalone mode and the domain mode. A standalone server is a Java process which is governed by a single management point using a configuration file. A domain server, on the other hand, is a group of Java processes which are managed through a single point called the Domain Controller and its configuration file.
The difference between the two operating modes is related to management capabilities rather than functionalities: a clear example of this is the high availability (HA) functionality that is available both in the standalone mode and in the domain mode; you will just use different configuration files to manage your cluster. Let's see more in detail the specific server configuration.
A standalone server is an independent server process which uses a single configuration file. The configuration, by default, is stored in the JBOSS_HOME/standalone/configuration folder. Within this directory, some built-in configurations are available. Here is a short description of them:
standalone.xml: This is the default standalone configuration file used by the application server. It does not include the messaging subsystem and is not able to run in a cluster.standalone-full.xml: This configuration adds to the default configuration the messaging provider andiiop-openjdklibraries.standalone-ha.xml: This configuration enhances the default configuration with clustering support (JGroups/mod_cluster).standalone-full-ha.xml: This configuration adds both clustering capabilities and the messaging / iiop openjdk libraries.
If you want to start a non-default configuration, then you can use the -c parameter. Here's, for example, how to start the server using the ha server configuration:
$ ./standalone.sh -c standalone-ha.xml
When running in domain mode the configuration is maintained in a single file named domain.xml that resides on the domain controller. This file contains a set of profiles, each one corresponding to the configuration seen earlier in the standalone mode, so you will be able to find the following XML structure within it:
<profiles>
        <profile name="default">. . .</profile>
        <profile name="ha"> . . . </profile>
        <profile name="full"> . . .</profile>
        <profile name="full-ha">. . .</profile>
</profiles>
Each domain is logically divided into server groups that contain the single server instances. The server groups are bound to the profiles described so far:
<server-groups>
        <server-group name="main-server-group" profile="full">
            <socket-binding-group ref="full-sockets"/>
        </server-group>
        <server-group name="other-server-group" profile="full-ha">
            <socket-binding-group ref="full-ha-sockets"/>
        </server-group>
</server-groups>
The single server instances are defined in the host.xml file that is included in every host controller. Within this file you will find the list of servers that will be available on that host:
<servers>
      <server name="server-one" group="main-server-group">
      </server>
      <server name="server-two" group="main-server-group"
      auto-start="true">
            <socket-bindings port-offset="150"/>
      </server>
      <server name="server-three" group="other-server-group"
      auto-start="false">
            <socket-bindings port-offset="250"/>
      </server>
</servers>
We will discuss more in detail about the domain core components in Chapter 3, Managing EAP in Domain Mode, of this book. Whatever your server mode, a number of common configuration concepts apply; in the next sections of this chapter we will describe them.
The whole server configuration is XML based and it is strictly ruled by a set of XML schemas. The configuration schemas are located in the JBOSS_HOME/docs/schema/ directory of your installation. Each configuration file has a set of mandatory elements which include the following.
Every Java library that is installed into the application server is called a module. An extension is a special kind of module that is strictly bound to the application server life cycle and is managed through the core server configuration. The configuration of the extension, if any, is declared in a subsystem section. Here is an excerpt of the server configuration which declares a set of extensions (such as the logging extension), that is later configured through the logging subsystem:
<server xmlns="urn:jboss:domain:4.1">
    <extensions>
        <extension module="org.jboss.as.clustering.infinispan"/>
        <extension module="org.jboss.as.connector"/>
        <extension module="org.jboss.as.deployment-scanner"/>
        <extension module="org.jboss.as.ee"/>
        <extension module="org.jboss.as.ejb3"/>
        <extension module="org.jboss.as.jsf"/>
        <extension module="org.jboss.as.logging"/>
        . . . . .
    </extensions>
    . . . . .
    <profile>
        <subsystem xmlns="urn:jboss:domain:logging:3.0">
    . . . . .
    </profile>
</server>
The path is a logical name for a filesystem path. You can declare a path element in your configuration so that you can reference them using a logical unit, instead of the physical one which may vary on different machines. Out of the box, for example, the logging subsystem includes a reference to the jboss.server.log.dir path.
This in turn points to the server's log directory:
<file relative-to="jboss.server.log.dir" path="server.log"/>
Although you will not find them in the default configuration, some standard paths are available with the application server. Here is a list of them:
|
Path |
Description |
|
|
Root directory of the JBoss AS distribution |
|
|
User's home directory |
|
|
User's current working directory |
|
|
Java installation directory |
|
|
Root directory for an individual server instance |
|
|
Directory the server will use for persistent data file storage |
|
|
Directory the server will use for log file storage |
|
|
Directory the server will use for temporary file storage |
|
|
Directory under which a host controller will create the working area for individual server instances (managed domain mode only) |
Here is an example of a custom path definition:
[standalone@localhost:9990 /] /path=secure:add(path=securedata,relative-to=jboss.server.data.dir)
This will generate the following output in the server's configuration:
<path name="secure" path="securedata" relative-to="jboss.server.data.dir"/>
The attributes of the path element are as follows:
name: this is the name of the path.
path: this is the actual filesystem path. It is meant to be an absolute path, unless the relative-to attribute is specified.
relative-to: this can optionally include the name of another path expression.
An interface is a logical name for a network interface / hostname / IP address to which the application server sockets can be bound. The server configuration includes a section where the interfaces are declared. Other parts of the configuration will reference the network interfaces so that you can specify the bindings for the single services.
The most relevant entries in the interfaces section are the management and public interfaces:
<interface name="management">
   <inet-address   value="${jboss.bind.address.management:127.0.0.1}"/>
</interface>
<interface name="public">
  <inet-address value="${jboss.bind.address:127.0.0.1}"/>
</interface>
As you can guess, the management interface defines the bindings for the administration instruments like the CLI and the web interface. The public interface relates to application-related services like HTTP, HTTPS, AJP, and so on.
The value of an interface is typically exposed using a BeanShell expression which contains in the left section the binding (also as a system property) and optionally in the right side a default value for it, separated by a colon ( :).
/interface=public/:write-attribute(name=inet-address,
value=${jboss.bind.address:192.168.10.1})
{
    "outcome" => "success",
    "response-headers" => {
       "operation-requires-reload" => true,
       "process-state" => "reload-required"
    }
}
The preceding command needs a reload of the server configuration to propagate changes, hence the need to issue the reload command afterwards:
[standalone@localhost:9990 /] reload
That being said, the best practice for setting interface attributes is by means of system properties; this way you will not introduce any dependency against your environment.
Here is, for example, how you can start the standalone server binding the management interfaces and public interfaces to the loopback address:
./standalone.sh -Djboss.bind.address.management=192.168.10.1 -
Djboss.bind.address=127.0.0.1
A socket binding is a named configuration for a socket. Both the domain.xml and standalone.xml configurations include a section where socket configurations can be declared. Other parts of the configuration can then reference those sockets by their logical name, rather than having to include details of the actual socket configuration.
This is an excerpt from the default socket bindings in standalone mode:
<socket-binding-group name="standard-sockets" default-interface="public" port-offset="${jboss.socket.binding.port-offset:0}">
        <socket-binding name="management-http" interface="management" port="${jboss.management.http.port:9990}"/>
        <socket-binding name="management-https" interface="management" port="${jboss.management.https.port:9443}"/>
        <socket-binding name="ajp" port="8009"/>
        <socket-binding name="http" port="8080"/>
        <socket-binding name="https" port="8443"/>
        <outbound-socket-binding name="mail-smtp">
            <remote-destination host="localhost" port="25"/>
        </outbound-socket-binding>
</socket-binding-group>
Just like the network interfaces, it is a good practice to vary them using shell parameters. This is how you can set a port offset of 100 at startup:
./standalone.sh -Djboss.socket.binding.port-offset=100
System property values can be used to customize some aspects of the server configuration. When running in the standalone mode, the properties set in standalone.xml will be part of the server boot process.
For example, the following property named org.apache.cxf.logging.enabled can be used to set the enable logging of web services deployed on the application server:
<system-properties>
  <property name="org.apache.cxf.logging.enabled" value="true"/>
</system-properties>
You can achieve this result through the CLI with the following command:
[standalone@localhost:9990 /] /system-property=
org.apache.cxf.logging.enabled:add(value=true)
{"outcome" => "success"}
You can conversely read the property using the read-resource command:
[standalone@localhost:9999 /] /system-property=
org.apache.cxf.logging.enabled:read-resource {     "outcome" =>
"success",     "result" => {"value" => "true"} }
When running in the domain mode, properties can be set at different levels. We will discuss this in more detail in Chapter 3, Managing EAP in Domain Mode, of this book, which is about the domain mode.
The most significant part of the server configuration is about defining one (in standalone.xml) or more (in domain.xml) profiles. A profile is nothing but a named set of subsystem configurations. A subsystem in turn is a set of services added to the core server by means of extensions.
For example, the following fragment is an example of a subsystem which controls the capabilities of the JPA server implementation:
  <subsystem xmlns="urn:jboss:domain:jpa:1.1">
      <jpa default-datasource="" default-extended-
       persistence-inheritance="DEEP"/>
  </subsystem>
The content of an individual profile configuration looks largely the same in the domain mode and in the standalone mode. The main difference is that in the standalone mode the standalone.xml file is only allowed to have a single profile element (the profile the server will run), whereas in the domain mode the domain.xml file can have many profiles, each of which can be mapped to one or more groups of servers.
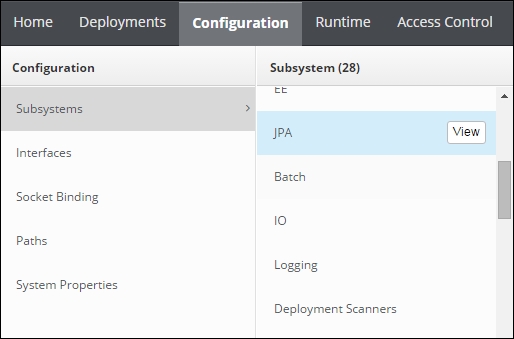
There are two main instruments for managing the subsystems of the application server. The basic approach is to use the web console that is available by default on the port 9990 of the management interface (hence, the default is http://localhost:9990).
Once logged in with the management user, you can navigate through the Configuration upper tab and choose the subsystem you want to edit by clicking on its View button, as depicted by the following picture:
Although pretty simple and powerful, across this book we will use the CLI as the main configuration tool. The CLI is apparently more complex but it offers many advantages such as batch execution of commands in scripts, parameterization of the attributes to be used in scripts, and consistency between different server releases, to mention just a few.
In this chapter we have covered the required steps to install the application server on your machine, with special focus on provisioning the application server in large enterprise contexts. Then we learnt some basic aspects of the server configuration, going through your first administration tasks. In the next chapter we will dig deeply into the CLI that will be your Swiss Army Knife for managing the application server like a ninja!