


Welcome to the Mastering Docker book! The first chapter will cover the Docker basics that you should already have a pretty good handle on. But if you don't already have the required knowledge at this point, this chapter will help give you the basics, so the future chapters don't feel as heavy. By the end of the book, you should be a Docker master able to implement Docker in your own environments, building and supporting applications on top of these environments.
In this chapter, we're going to review the following higher level topics with subtopics in each section:
Understanding Docker
Docker versus typical VMs
The Dockerfile and its function
Docker networking/linking
Docker installers/installation
Types of installers and how they operate
Controlling your Docker daemon
The Kitematic GUI
Docker commands
Useful commands for Docker, Docker images, and Docker containers
In this section, we will be covering the structure of Docker and the flow of what happens behind the scenes in this world. We will also take a look at Dockerfile and all the magic it can do. Lastly, in this section, we will look at the Docker networking/linking.
First, we must know what exactly Docker is and does. Docker is a container management system that helps easily manage Linux Containers (LXC) in an easier and universal fashion. This lets you create images in virtual environments on your laptop and run commands or operations against them. The actions you do to the containers that you run in these environments locally on your own machine will be the same commands or operations you run against them when they are running in your production environment. This helps in not having to do things differently when you go from a development environment like that on your local machine to a production environment on your server. Now, let's take a look at the differences between Docker containers and the typical virtual machine environments.
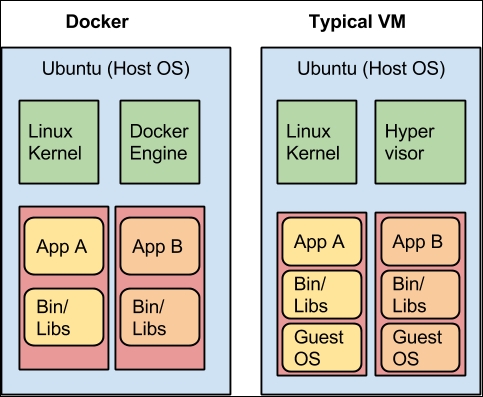
In the following illustration, we can see the typical Docker setup on the right-hand side versus the typical VM setup on the left-hand side:
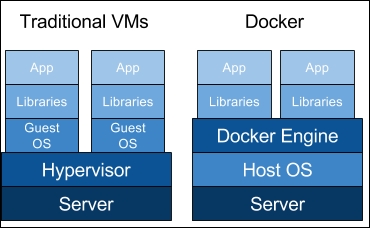
This illustration gives us a lot of insight into the biggest key benefit of Docker, that is, there is no need for a complete operating system every time we need to bring up a new container, which cuts down on the overall size of containers. Docker relies on using the host OS's Linux kernel (since almost all the versions of Linux use the standard kernel models) for the OS it was built upon, such as Red Hat, CentOS, Ubuntu, and so on. For this reason, you can have almost any Linux OS as your host operating system (Ubuntu in the previous illustration) and be able to layer other OSes on top of the host. For example, in the earlier illustration, we could have Red Hat running for one app (the one on the left) and Debian running for the other app (the one on the right), but there would never be a need to actually install Red Hat or Debian on the host. Thus, another benefit of Docker is the size of images when they are born. They are not built with the largest piece: the kernel or the operating system. This makes them incredibly small, compact, and easy to ship.
Next, let's take a look at the most important file pertaining to Docker: Dockerfile. Dockerfile is the core file that contains instructions to be performed when an image is built. For example, in an Ubuntu-based system, if you want to install the Apache package, you would first do an apt-get update followed by an apt-get install -y apache2. These would be the type of instructions you would find inside a typical Dockerfile. Items such as commands, calls to other scripts, setting environmental variables, adding files, and setting permissions can all be done via Dockerfile. Dockerfile is also where you specify what image is to be used as your base image for the build. Let's take a look at a very basic Dockerfile and then go over the individual pieces that make one up and what they all do:
FROM ubuntu:latest
MAINTAINER Scott P. Gallagher <email@somewhere.com>

RUN apt-get update && apt-get install -y apache2

ADD 000-default.conf /etc/apache2/sites-available/
RUN chown root:root /etc/apache2/sites-available/000-default.conf

EXPOSE 80
CMD ["/usr/sbin/apache2ctl", "-D", "FOREGROUND"]
These are the typical items you would find in a basic Dockerfile. The first line states the image we want to start off with when we build the container. In this example, we will be using Ubuntu; the item after the colon can be called if you want a specific version of it. In this case, I am just going to say use the latest version of Ubuntu; but you will also specify trusty, precise, raring, and so on. The second line is the line that is relevant to the maintainer of Dockerfile. In this case, I just have my information in there; well, at least, my name is there. This is for people to contact you if they have any questions or find any errors in your file. Typically, most people just include their name and e-mail address. The next line is a typical line you will see while pulling updates and packages in an Ubuntu environment. You might think they should be separate and wonder why they should be put on the same line separated by &&. Well, in the Dockerfile, it helps by only having to run one process to encompass the entire line. If you were to split it into separate lines, it would have to run one process, finish the process, then start the next process, and finish it. With this, it helps speed up the process by pairing the processes together. They still run one after another, but with more efficiency. The next two lines complement each other. The first adds your custom configurations to the path you specified and changes the owner and group owner to the root user. The EXPOSE line will expose the ports to anything external to the container and to the host it is running on. (This will, by default, expose the container externally beyond the host, unless the firewall is enabled and protecting it.) The last line is the command that is run when the container is launched. This particular command in a Dockerfile should only be used once. If it is used more than once, the last CMD in the Dockerfile will be launched upon the container that is running. This also helps emphasize the one process per container rule. The idea is to spread out the processes so that each process runs in its own container, thus the value of the containers will become more understandable. Essentially, something that runs in the foreground, such as the earlier command to keep the Apache running in the foreground. If we were to use CMD ["service apache2 start"], the container would start and then immediately stop. There is nothing to keep the container running. You can also have other instructions, such as ENV to specify the environmental variables that users can pass upon runtime. These are typically used and are useful while using shell scripts to perform actions such as specifying a database to be created in MySQL or setting permission databases. We will be covering these types of items in a later chapter, so don't worry about looking them up right now.
Another important aspect that needs to be understood is how Docker containers are networked or linked together. The way they are networked or linked together highlights another important and large benefit of Docker. When a container is created, it creates a bridge network adapter for which it is assigns an address; it is through these network adapters that the communication flows when you link containers together. Docker doesn't have the need to expose ports to link containers. Let's take a look at it with the help of the following illustration:
In the preceding illustration, we can see that the typical VM has to expose ports for others to be able to communicate with each other. This can be dangerous if you don't set up your firewalls or, in this case with MySQL, your MySQL permissions correctly. This can also cause unwanted traffic to the open ports. In the case of Docker, you can link your containers together, so there is no need to expose the ports. This adds security to your setup, as there is now a secure connection between your containers.
We've looked at the differences between Docker and typical VMs, as well as the Dockerfile structure and the components that make up the file. We also looked at how Docker containers are linked together for security purposes as opposed to typical VMs. Now, let's review the installers for Docker and the structure behind the installation once they are installed, manipulating them to ensure they are operating correctly.
Installers are one of the first pieces you need to get up and running with Docker on both your local machine as well as your server environments. Let's first take a look at what environments you can install Docker in:
Apple OS X (Mac)
Windows
Linux (various Linux flavors)
Cloud (AWS, DigitalOcean, Microsoft Azure, and so on)
With the various types of installers listed earlier, there are different ways Docker actually operates on the operating system. Docker natively runs on Linux; so if you are using Linux, then it's pretty straightforward how Docker runs right on your system. However, if you are using Windows or Mac OS X, then it operates a little differently, since it relies on using Linux. With these operating systems, they need Linux in some sort of way, thus enters the virtual machine needed to run the Linux part that Docker operates on, which is called boot2docker. The installers for both Windows and Mac OS X are bundled with the boot2docker package alongside the virtual machine software that, by default, is the Oracle VirtualBox.
Now, it is worthwhile to note that Docker recently moved away from offering boot2docker. But, I feel, it is important to understand the boot2docker terms and commands in case you run across anyone running the previous version of the Docker installer. This will help you understand what is going on and move forward to the new installer(s). Currently, they are offering up Docker Toolbox that, like the name implies, includes a lot of items that the installer will install for you. The installers for each OS contain different applications with regards to Docker such as:
|
Docker Toolbox piece |
Mac OS X |
Windows |
|---|---|---|
|
Docker Client |
X |
X |
|
Docker Machine |
X |
X |
|
Docker Compose |
X | |
|
Docker Kitematic |
X |
X |
|
VirtualBox |
X |
X |
First, let's take a look at the older style commands of boot2docker. Then, we will take a look at the new commands or application that you can use to achieve these outcomes.
Now, there are ways to run boot2docker on different VM software. But to start off, VirtualBox is the best and easiest way to operate boot2docker:
$ boot2docker
Usage: boot2docker [<options>] {help|init|up|ssh|save|down|poweroff|reset|restart|config|status|info|ip|shellinit|delete|download|upgrade|version} [<args>]
Now, after we have installed Docker on Linux, OS X, or Windows, how do we go about controlling this virtual machine in the events when we need to start it up, restart it, or even shut it down? This is where the boot2docker command-line parameters come into play.
As you can see in the earlier illustration, there are a lot of options you can use for your boot2docker instance. The options you will use mostly are up, down, poweroff, restart, status, ip, upgrade, and version. Some of these commands you will use mostly to troubleshoot items when you are trying to see why the Docker commands might hang, or when you run into any other issues with your boot2docker virtual machine. You can see what each command does by executing the following command:
$ boot2docker help
The most useful command that I have found while troubleshooting is the boot2docker status command:
$ boot2docker status
Another useful boot2docker command is:
$ boot2docker version
This command will help see what version of boot2docker you are currently running. This is helpful in knowing when to use the boot2docker upgrade command. The last command we will look at with respect to boot2docker is the boot2docker ip command. This command is very useful when you need to know what IP address is to be used to access the machines you have been running on a particular host:
$ boot2docker ip
192.168.59.103
As you can see, the earlier command gives us the IP address of the boot2docker client running on my OS X machine inside VirtualBox. By using this IP, I can now access the containers I might have been running using the IP address alongside any of the open ports I have exposed.
So, with boot2docker on its way out, there needs to be a new way to do what boot2docker does. This being said, enter Docker Machine. With Docker Machine, you can do the same things you did with boot2docker, but now in Machine. The following table shows the commands you used in boot2docker and what they are now in Machine:
|
Command |
boot2docker |
Docker Machine |
|---|---|---|
|
|
|
|
|
|
|
|
|
|
|
|
|
|
|
|
|
|
|
|
Now that we have covered all the basics of controlling your boot2docker VM, let's take a look at another way you can run Docker containers on your local machine. Let's take a look at Kitematic. Kitematic is a recent addition to the Docker portfolio. Up until now, everything we have done has been command line-based. With Kitematic, you can manage your Docker containers through a GUI. Kitematic can be used either on Windows or OS X, just not on Linux; besides who needs a GUI on Linux anyways! Kitematic, just like boot2docker, operates on a VM defaulting to VirtualBox. Pictures are worth a thousand words, so let's take a look at some screenshots of Kitematic:
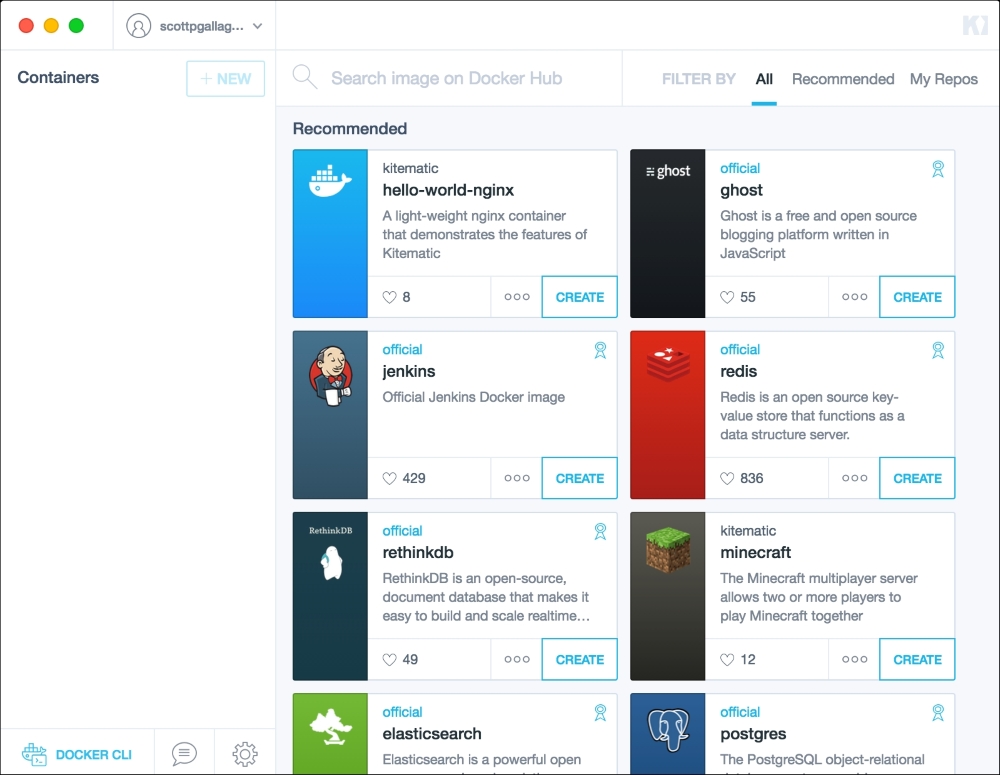
The previous screenshot depicts what you will see when you launch Kitematic for the first time.
After you start running the containers, they will show up on the left-hand side column. You can manipulate and get information about them through the GUI. You can search for prebuilt images on the Docker Hub and click on the CREATE button once you have found the one you want to use or test.
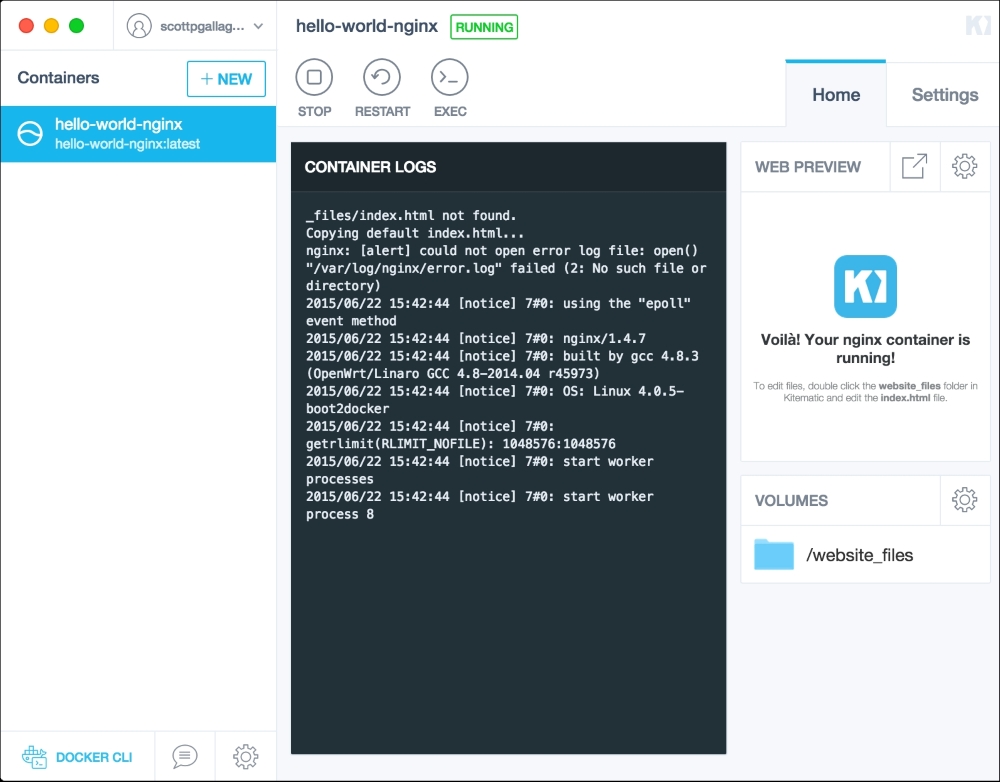
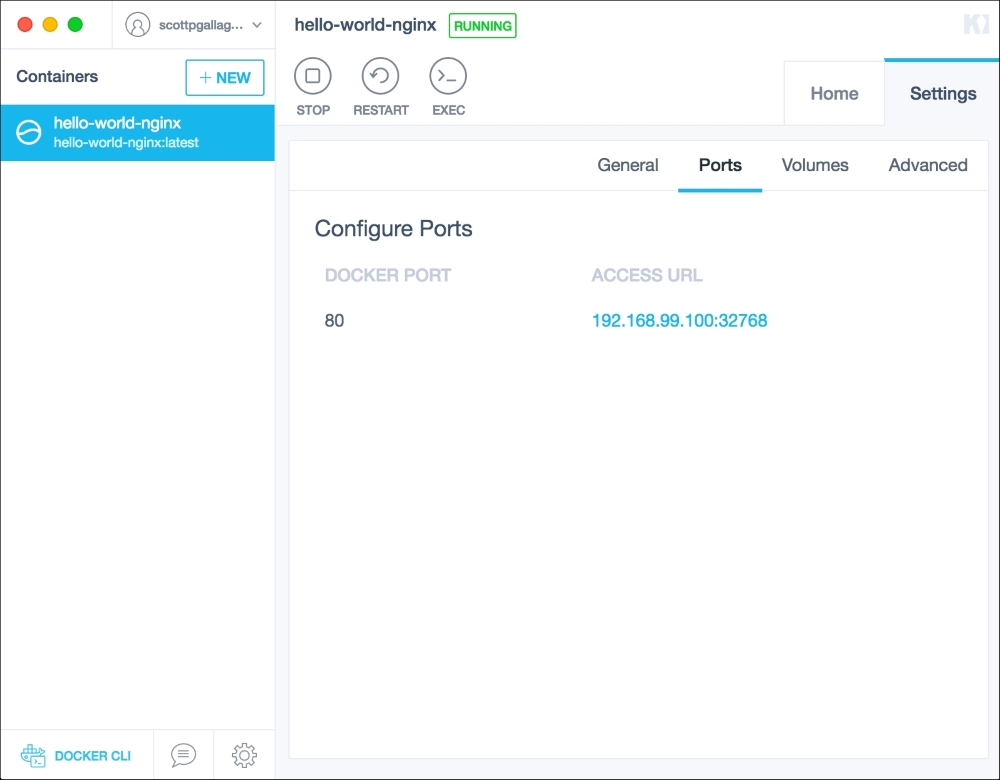
In the preceding screenshot, we have created and are running the hello-world-nginx image inside Kitematic. We can now use the STOP, RESTART, and EXEC commands against the container as well as view the settings of the running container.
In the following screenshot, we can go to settings and view what ports are exposed from the container to the outside:
In the following screenshot, you can see that you can use your login credentials to log in to the Docker Hub and view the repositories you have created and pushed there:

We have covered the types of installers and what they can be run on. We have also seen how to control the Docker VM that gets created for you and how to use Kitematic. Let's look at some Docker commands that you should be familiar with already. We will start with some common commands and then take a peek at the commands that are used for the Docker images. We will then take a dive into the commands that are used for the containers.
The first command we will be taking a look at will be one of the most useful commands not only in Docker but in any command-line utility you use—the help command. It is run simply by executing the command as follows:
$ docker help
The earlier command will give you a full list of all the Docker commands at your disposal and a brief description of what each command does. For further help with a particular command, you can run the following:
$ docker <COMMAND> --help
You will then receive additional information on using the command, such as the switches, arguments, and descriptions of the arguments. Similar to the boot2docker version command we ran earlier, there is also a version command for the Docker daemon:
$ docker version
Now, this command will give us a little bit more information than the boot2docker command output, as follows:
Client version: 1.7.0
Client API version: 1.19
Go version (client): go1.4.2
Git commit (client): 0baf609
OS/Arch (client): darwin/amd64
Server version: 1.7.0
Server API version: 1.19
Go version (server): go1.4.2
Git commit (server): 0baf609
OS/Arch (server): linux/amd64
This is helpful when you want to see the version of the Docker daemon you may be running to see if you need/want to upgrade.
Next, let's take a dive into the Docker images. You will learn how to view the images you currently have that you can run, search for images on the Docker Hub, and pull them down to your environment, so you can run them. Let's first take a look at the docker images command. Upon running the command, we will get an output similar to the following output:
REPOSITORY          TAG                 IMAGE ID            CREATED             VIRTUAL SIZE
ubuntu                   14.10               ab57dbafeeea        11 days ago         194.5 MB
ubuntu                   trusty               6d4946999d4f        11 days ago         188.3 MB
ubuntu                   latest               6d4946999d4f        11 days ago         188.3 MB
Your output will differ based on whether you have any images at all in your Docker environment or upon what images you do have. There are a few important pieces you need to understand from the output you see. Let's go over the columns and what is contained in each. The first column you see is the REPOSITORY column; this column contains the name of the repository as it exists in the Docker Hub. If you were to have a repository that was from someone's user account, it may show up as follows:
REPOSITORY              TAG                 IMAGE ID            CREATED             VIRTUAL SIZE
scottpgallagher/mysql   latest              57df9c7989a1        9 weeks ago         321.7 MB
The next column, the TAG column, will show you different versions of a repository. As you can see in the preceding example with the Ubuntu repository, there are tag names for the different versions. So, if you want to specify a particular version of a repository in your Dockerfile (as we saw earlier), you are able to. This is useful, so you're not always reliant on having to use the latest version of an operating system and can use the one your application supports the best. It can also help you do backward compatibility testing for your application.
The next column is labeled IMAGE ID and it is based on a unique 64 hexadecimal digit string of characters. The image ID simplifies this down to the first 12 digits for easier viewing. Imagine if you had to view all 64 bits on one line! You will learn when to use this unique image ID for later tasks.
The last two columns are pretty straightforward; the first being the creation date for the repository, followed by the virtual size of the image. The size is very important as you want to keep or use images that are very small in size if you plan to be moving them around a lot. The smaller the image, the faster is the load time; and who doesn't like it faster?
Okay, so let's look at how we can search for the images that are in the Docker Hub using the Docker commands. The command we will be looking at is docker search. With the docker search command, you can search based on the different criteria you are looking for. For example, we can search for all the images with the term ubuntu in them and see what all is available. Here is what we would get back in our results; it would go as follows:
$ docker search ubuntu
We would get back our results:
NAME                           DESCRIPTION                                                   STARS     OFFICIAL   AUTOMATED
ubuntu                         Ubuntu is a Debian-based Linux operating s...        1835         [OK]
ubuntu-upstart                 Upstart is an event-based replacement for ...            26           [OK]
tutum/ubuntu                        Ubuntu image with SSH access. For the root...          25                             [OK]
torusware/speedus-ubuntu  Always updated official Ubuntu docker imag...          25                             [OK]
ubuntu-debootstrap             debootstrap --variant=minbase --components...        10            [OK]
rastasheep/ubuntu-sshd      Dockerized SSH service, built on top of of...                4                      [OK]
maxexcloo/ubuntu                Docker base image built on Ubuntu with Sup...           2                              [OK]
nuagebec/ubuntu                 Simple always updated Ubuntu docker images...        2                             [OK]
nimmis/ubuntu                      This is a docker images different LTS vers...       1                             [OK]
alsanium/ubuntu                Ubuntu Core image for Docker                          1                              [OK]
Based on these results, we can now decipher some information. We can see the name of the repository, a reduced description, how many people have starred and think it is a good repository, whether it's an official repository; which means it's been approved by the Docker team, as well as if it's an automated build. An automated build is typically a Docker image that is built automatically when a Git repository it is linked to is updated. The code gets updated, the web hook is called, and a new Docker image is built in the Docker Hub. If we find an image we want to use, we can simply pull it using its repository name with the docker pull command, as follows:
$ docker pull tutum/ubuntu
The image will be downloaded and show up in our list when we perform the docker images command we ran earlier.
We now know how to search for Docker images and pull them down to our machine. What if we want to get rid of them? That's where the docker rmi command comes into play. With the docker rmi command, you can remove unwanted images from your machine(s). So, let's take look at the images we currently have on our machine with the docker images command. We will get the following:
REPOSITORY          TAG                 IMAGE ID            CREATED             VIRTUAL SIZE
ubuntu                   14.10               ab57dbafeeea        11 days ago         194.5 MB
ubuntu                   trusty               6d4946999d4f        11 days ago         188.3 MB
ubuntu                   latest               6d4946999d4f        11 days ago         188.3 MB
We can see that we have duplicate images here taking up space. We can see this by looking at the image ID and seeing the exact image ID for both ubuntu:trusty and ubuntu:latest. We now know that ubuntu:trusty is the latest Ubuntu image, so there is no need to keep them both around. Let's free up some space by removing ubuntu:trusty and just keeping ubuntu:latest. We do this by using the docker rmi command, as follows:
$ docker rmi ubuntu:trusty
If you issue the docker images command now, you will see that ubuntu:trusty no longer shows up in your images list and has been removed. Now, you can remove machines based on their image ID as well. But be careful while you do so; in this scenario, not only will you remove ubuntu:trusty, but you will also remove ubuntu:latest as they have the same image ID.
We have gone over the images and know how to obtain and manipulate them in some ways. Next, we are going to take a look at what it takes to fire them up and manipulate them. This is the part where the images become containers! Let's first go over the basics of the docker run command and how to run containers. We will cover some basic docker run items in this section and more advanced docker run items in the later chapters. So, let's just look at how to get images up, running, and turned into containers. The most basic way to run a container is as follows:
$ docker run -i -t <image_name>:<tag> /bin/bash
Upon closer inspection of the earlier command, we start off with the docker run command, followed by two switches: -i and -t. The -i gives us an interactive shell into the running container, the -t will allocate a pseudo-tty that, while using interactive processes, must be used together with the -i switch. You can also use switches together; for example, -it is commonly used for these two switches. This will help you test the container to see how it operates before running it as a daemon. Once you are comfortable with your container, you can test how it operates in the daemon mode:
$ docker run -d <image_name>:<tag>
If the container is set up correctly and has an entry point setup, you should be able to see the running container by issuing the docker ps command. You will see something similar to the following:
$ docker ps

CONTAINER ID        IMAGE               COMMAND             CREATED             STATUS              PORTS               NAMES
cc1fefcfa098        ubuntu:14.10        "/bin/bash"         3 seconds ago       Up 3 seconds                            boring_mccarthy
Based on the earlier command, we get a lot of other important information indicating that the container is running. We can see the container ID, the image name that is running, the command that is running to keep the image alive, when the container started, its current status, if any ports were exposed they would be listed here, as well as the name given to the container. Now, these names are random, unless it is specified otherwise by the --name= switch. You can also the expose the ports on your containers by using the -p switch as follows:
$ docker run -d -p  <host_port>:<container_port> <image>:<tag>
$ docker run -d -p 8080:80 ubuntu:14.10
This will run the ubuntu 14.10 container in the demonized mode, exposing port 8080 on the Docker host to port 80 on the running container:
CONTAINER ID        IMAGE               COMMAND             CREATED             STATUS              PORTS                          NAMES
55cfdcb6beb6        ubuntu:14.10        "/bin/bash"         2 seconds ago       Up 2 seconds        0.0.0.0:8080->80/tcp   babbage
Now, there will come a time when containers don't want to behave. For this, you can see the issues you have by using the docker logs command. The command is very straightforward. You specify the container you want to see the logs off. For this command, you need to use the container ID or the name of the container from the docker ps output:
$ docker logs 55cfdcb6beb6
Or:
$ docker logs babbage
You can also get this ID when you first initiate the docker run command:
$ docker run -d ubuntu:14.10 /bin/bash
da92261485db98c7463fffadb43e3f684ea9f47949f287f92408fd0f3e4f2bad
Now, let's take a look at how we can stop these containers. For various reasons, we would want to do this. There are a few commands we could use; they are docker kill, docker stop, docker pause, and docker unpause. Let's cover them briefly as they are fairly straightforward. First, let's look at the difference between docker kill and docker stop. The docker kill command will do just that—kill the container immediately. For a graceful shutdown of the container, you would want to use the docker stop command. Mostly, when you are testing, you will be using docker kill. When you're in your production environments, you will want to use docker stop to ensure you don't corrupt any data you might have in the Docker volumes. The commands are used exactly like the docker logs command, where you can use the container ID, the random name given to the container, or the one you might specify with the --name= switch.
Now, let's take a dive into how we can execute some commands, view information on our running containers, and manipulate them in a small sense. We will cover more about container manipulation in the later chapters as well. The first thing we want to take a look at, which will make things a little easier with the upcoming commands, is the docker rename command. With the docker rename command, we can change the name that has been randomly generated for the container. When we performed the docker run command, a random name was assigned to our container; most times, these names are fine. But if you are looking for an easy way to manage the containers, a name can be sometimes easier to remember. For this, you can use the docker rename command as follows:
$ docker rename <current_container_name> <new_container_name>
Now that we have an easily recognizable and rememberable name, let's take a peek inside our containers with the docker stats and docker top commands, taking them in order:
$ docker stats <container_name>

CONTAINER           CPU %               MEM USAGE/LIMIT     MEM %               NET I/O
web1                        0.00%               1.016 MB/2.099 GB   0.05%                  0 B/0 B
The other command docker top provides a list of all running processes inside the container. Again, we can use the name of the container to pull the information:
$ docker top <container_name>
We will receive an output similar to the following one based on what processes are running inside the container:
UID                 PID                 PPID                C                   STIME               TTY                 TIME                CMD
root                8057                1380                0                   13:02               pts/0               00:00:00            /bin/bash
We can see who is running the process (in this case, the root user), the command being run (in this case, /bin/bash), as well as the other information that might be useful.
Lastly, let's cover how we can remove the containers. The same way we looked at removing images earlier with the docker rmi command, we can use the docker rm command to remove unwanted containers. This is useful if you want to reuse a name you provided to a container:
$ docker rm <container_name>
In this chapter, we have covered what basic information you should already know or now know for the chapters ahead. We have gone over the basics of what Docker is and how it is compared to typical virtual machines. We looked at the Dockerfile structure and the networking and linking of containers. We went over the installers, how they operate on different operating systems, and how to control them through the command line. We briefly looked at the latest Docker addition Kitematic for those interested in a GUI version for Windows or OS X. Then, we took a small but deep dive into the basic Docker commands to get you started.
In the next chapter, we will be taking a look at how to build base containers. We will also look in depth at Dockerfile and places to store your images, as well as using environmental variables and Docker volumes.

