


 Download code from GitHub
Making Photoshop Work Harder and Smarter
We all discover Photoshop differently, often learning about tools and features that are relevant to our needs. However, this can lead to knowledge gaps that may hold your skills back. Part 1 of this book, Raising Your Photoshop Game, will focus on essential skills and building upon them, starting with Chapter 1, which establishes a streamlined interface and tools setup.
First, we’ll look at significant updates and new features to arrive in recent versions of Photoshop. Easy to miss, updates can pass you by, often installed automatically without being discovered. You could be missing out on valuable time-saving enhancements to your workflow. From sharing files on the cloud to edit along with others and receiving feedback on live projects to the web browser version of Photoshop (beta) and restoration filters, you can get a feel for the latest changes.
Then, we’ll customize the interface, modifying panels and tools so that they’re easier to locate, putting the most effective features front and center in your interface while keeping less frequently used features just a mouse click away. We’ll reorder the Tools panel, stripping away redundant tools in place for your favored go-to, high-impact tools, and set up keyboard shortcuts that make little-known features easy to activate or modify a tool with ease.
Then, we’ll finish with a little digital imaging 101 to ensure you’ve got a clear understanding of key industry terminology. Having an appreciation of how images are composed will make the process of deconstructing them and enhancing them easier to comprehend while avoiding common mistakes.
As with many concepts in this book, the first chapter focuses on attaining the best possible quality from the outset while leveraging time-saving techniques whenever possible, essential for today’s busy digital image editors. In this chapter, we’ll cover the following topics:
- Updates and new features
- Creating a bespoke workspace
- Modifying preferences
- Quality-first approach
Technical requirements
The project files for this chapter can be found at: https://github.com/PacktPublishing/Mastering-Adobe-Photoshop-2024/tree/main/Chapter01
Updates and new features
2023 marks a decade since Adobe released Creative Cloud, replacing the older Creative Suite in June 2013. Much has changed in that time. Arguably, Adobe’s most significant advances have been digital connectivity between its flagship desktop apps such as Photoshop, and online technology that allows for greater collaboration.
Thanks to a constantly connected workplace, today’s Creative Cloud updates are more of a trickle than a deluge. Outside of Adobe’s annual creativity festival, Adobe MAX, new updates can be installed automatically with little to no fanfare. With this in mind, I’ve summarized the most significant changes to Adobe Photoshop in recent months, just in case they passed you by!
Contextual Task Bar
To reduce the amount of time you spend navigating the interface for tools and features, Photoshop now includes the contextual task bar. Its aim is to predict your next logical step and put those options close to your cursor. The default position of the contextual task bar is often at the bottom of the image window. If, however, you have a text layer active, the contextual task bar will move to the underside of the text frame in the active layer. You can hide, reset, or pin (lock) the position of the contextual task bar by clicking on the More Options icon (shown as A in Figure 1.1) to reveal the options:

Figure 1.1: The Contextual Task Bar
Depending on the kind of layer you have active or the tool you have selected, the options in the contextual task bar will vary. For example, when you create a new document, the contextual task bar displays a button for importing an image, or under the More Options icon, you can reveal the Properties panel.
When you open an existing document containing only a background layer, the contextual task bar will display the Select subject, Remove background, Transform image (shown as B in Figure 1.2), and Create new adjustment layer (C) icons. Clicking on Select subject results in a selection of a prominent region in your image, providing one can be detected, while Remove background goes one step further and conceals the region of the image around your subject with a layer mask.
If an unlocked layer is active, the contextual task bar and the Transform image icon will become available. When you left-click on the Transform image icon, the contextual task bar changes to display Flip Horizontal (D) and Flip Vertical (E) icons. You can subsequently apply or abort your transform edits by clicking on Done or Cancel respectively:

Figure 1.2: Transform and adjustment layer options in the Contextual Task Bar
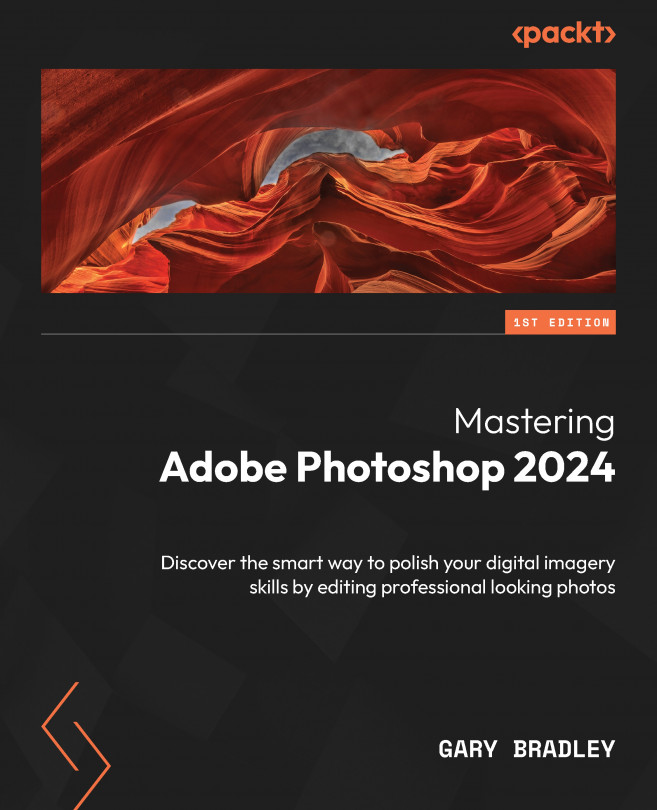
With a selection active, the contextual task bar displays options to modify your selection (shown as F in Figure 1.3), invert a selection (H), create a layer mask from the selection (G), or fill the selection (I). In addition, you can deselect an existing selection and fill a region with pixels using Generative Fill:
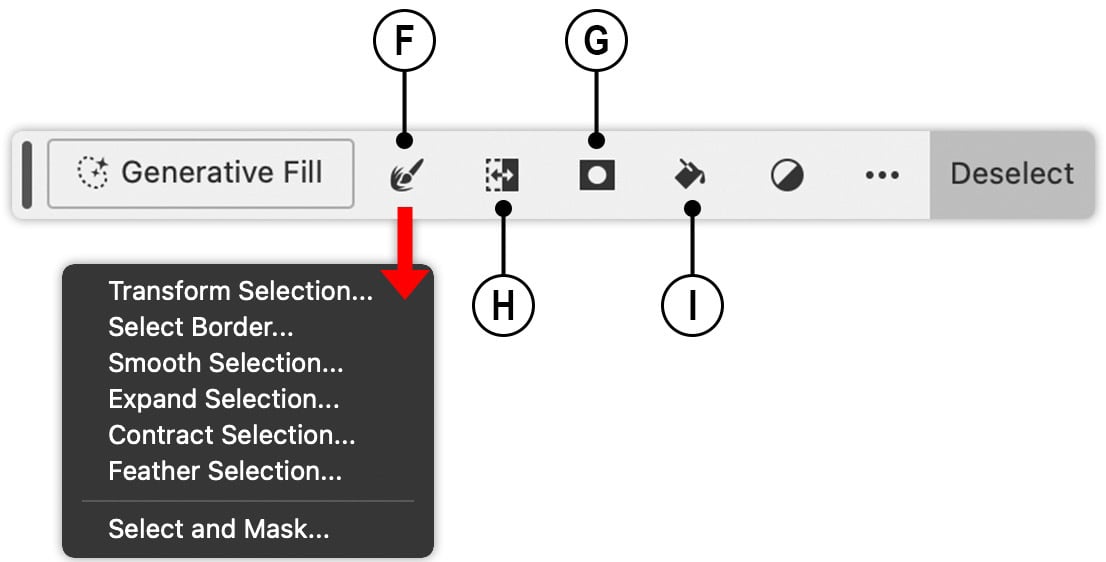
Figure 1.3: Selection options in the Contextual Task Bar
Some of the best time-saving features to be found in the contextual task bar relate to the task of editing layer masks, a process that will be covered in greater depth in Chapter 3 of this book. With a layer active and containing a layer mask, you can now press the Subtract from mask button, which switches you to the Brush tool and sets the foreground color in the Tools panel to black. Then, simply click and drag across parts of your layer to reveal pixel content. You can also achieve the opposite result by clicking on the Add to mask button, which sets the foreground color to white. You can click on the Modify mask feather and density icon (shown as J in Figure 1.4) to reveal a popup. You can also launch the Select and mask workspace to access the full suite of mask refinement features from the same popup. The final two icons are for Hide mask (Figure 1.4, K) and Change mask view (Figure 1.4, L):
Figure 1.4: Masking options in the Contextual Task Bar
Adobe Firefly
In recent years, there has been growing interest in the practical use of artificial intelligence (AI) in creative industries. AI-driven technology has featured in Photoshop for many years since the arrival of Content-Aware Fill. However, the emergence of imagery that is generated from a text prompt represents a seismic shift in digital image creation.
Adobe Photoshop 2024 includes its own text-to-image AI in the form of Adobe Firefly, allowing you to add content to an existing image using two methods: Generative Fill and Generative Expand. Generative Fill uses an active selection to remove unwanted content or add new pixels via a text prompt, while Generative Expand extends your existing canvas, creating new pixels in the expanded region.
In the example shown in Figure 1.5, the image contained a rickety old chair, which I felt could benefit from a subject to enhance visual interest. I created a basic selection with the Rectangular Marquee tool around the region where I wanted the subject. With the selection in place, the contextual task bar then displayed the Generative text prompt field, into which I typed Seagull and pressed the Generate button:
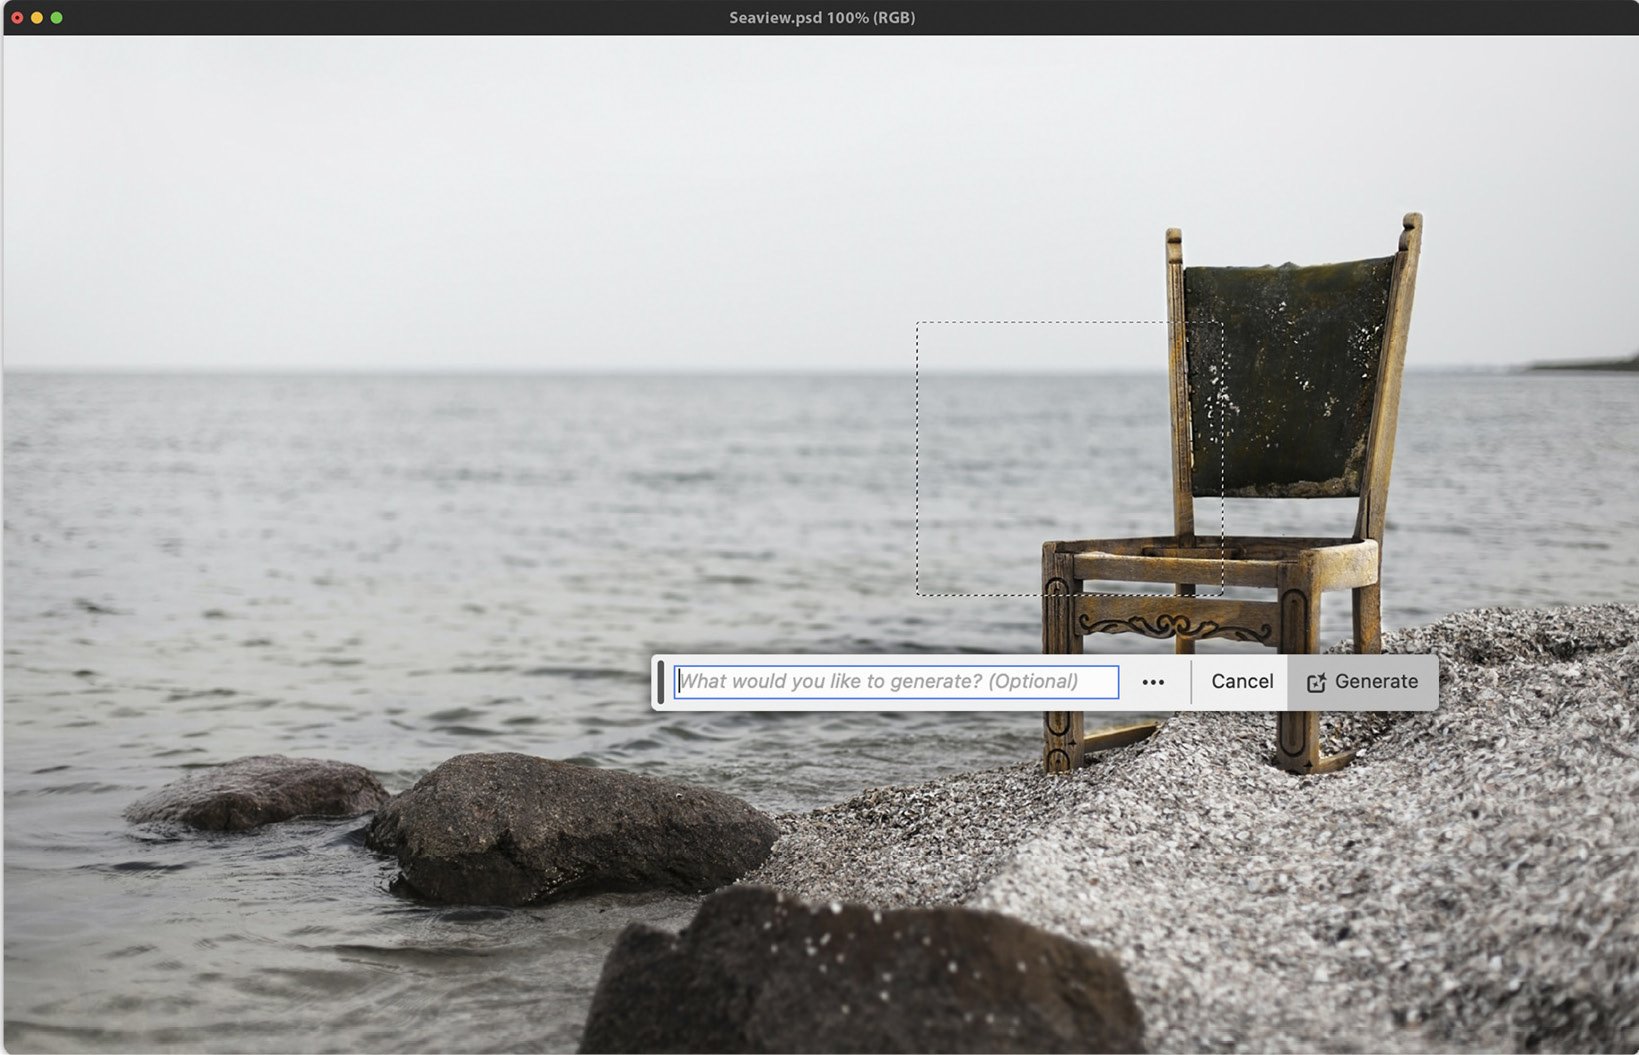
Figure 1.5: Generative Fill options in the Contextual Task Bar
After a few seconds, Photoshop displayed a seagull in a new generative layer. The contextual task bar then changed to display one of three possible results from my text prompt. You can use the Previous and Next buttons to cycle through each version. The Properties panel also displays your text prompt and thumbnails of the three results.
In this scenario, the results Photoshop delivered were impressive, even down to minor details such as the position of the birds’ feet on top of the chair frame. In addition, Photoshop has also matched the light and shade of the original image as well as the angle with a high degree of accuracy. For the best results, try using descriptive nouns and adjectives in your Generative Fill prompts instead of instructive prompts such as “create a landscape.”
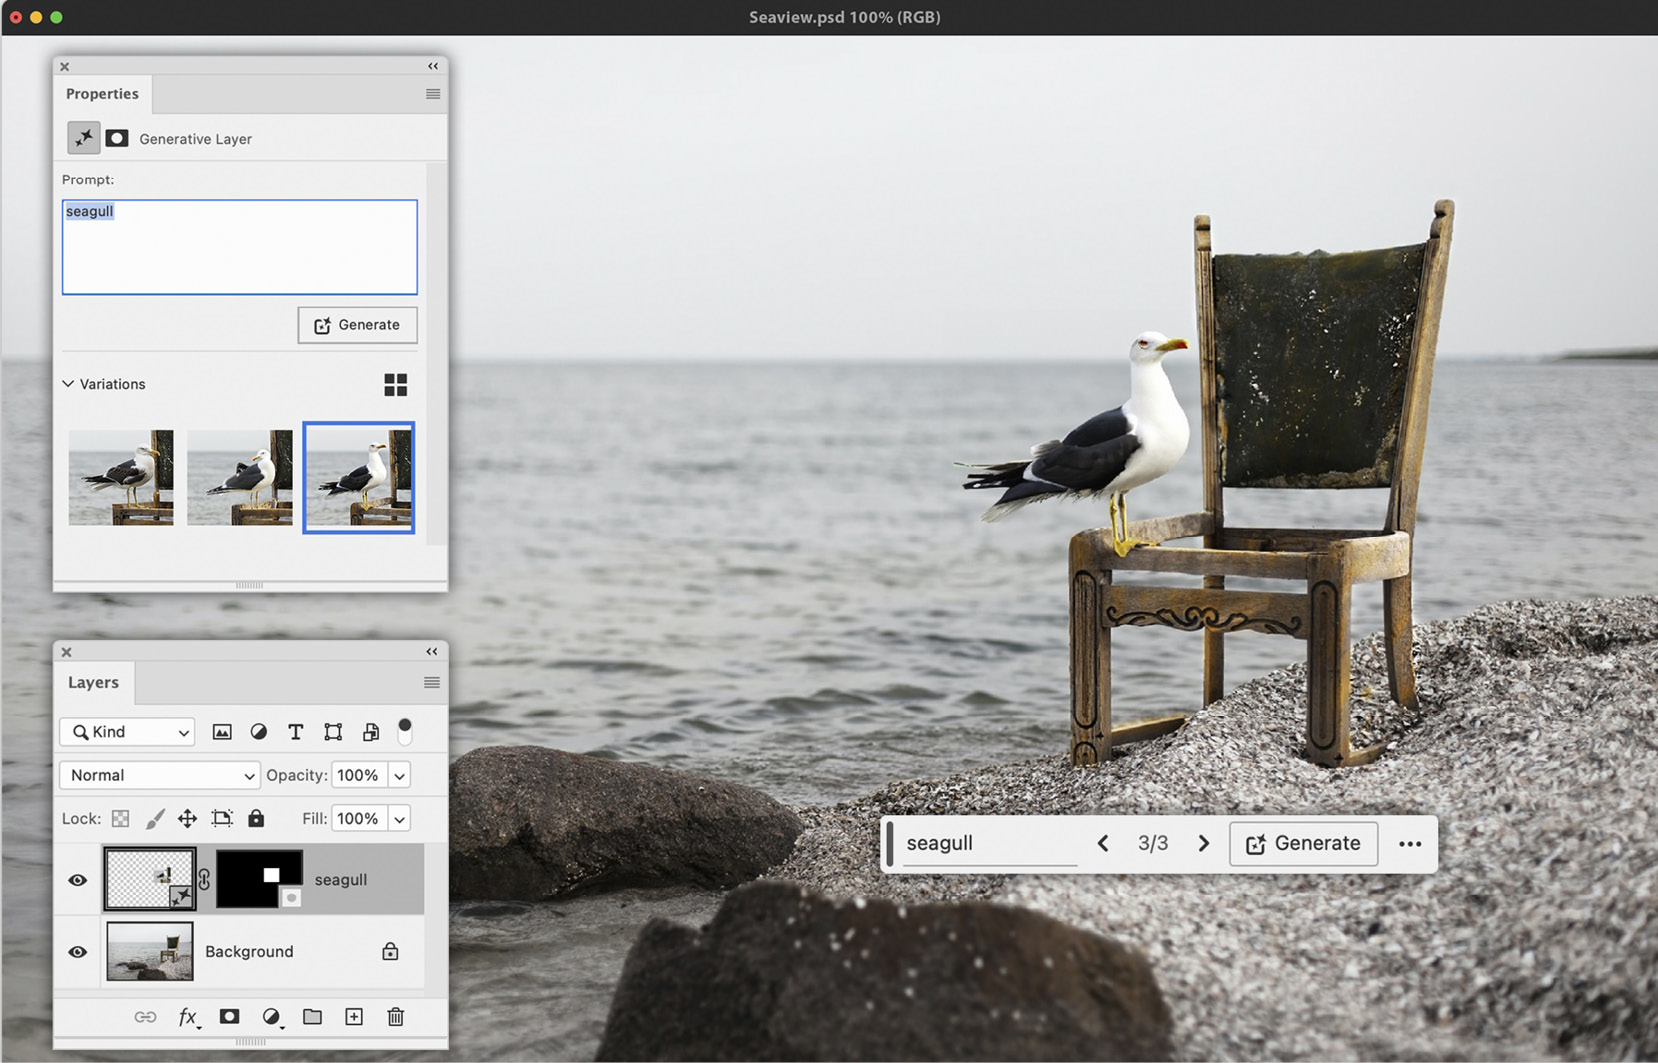
Figure 1.6: Generative Fill used to add a seagull to the image
As with most features, there are limitations. You’ll need an internet connection to use Generative Fill. At the time of writing, shortly after Adobe MAX in October 2023, the maximum resolution Generative Fill can render is 1024 pixels. If you’re trying to fill a large region in a high-quality image, larger than 1024, the results might appear a little blurred.
Creative Cloud users on an All Apps package have 1,000 generative credits included with their monthly subscription. Each text prompt you generate in Photoshop uses one credit. You can monitor your credit usage by logging in to your Creative Cloud account. Adobe’s reason for rationing the use of Generative Fill is that it requires significant computational resources. At the time of writing, you can purchase additional credits for $4.99 (USD) per month for an additional 100 credits.
The Remove tool
For many years, I’ve resorted to using the Spot Healing Brush tool to remove unwanted content from an image. In general, the Spot Healing Brush tool has provided good results, albeit occasionally, it would add back unwanted pixels and require a little finessing. With the addition of the Remove tool in May 2023, the process has become simpler thanks to a simplified workflow when compared to other healing and retouching tools.
Firstly, you don’t have to concern yourself with a full set of brush tip settings, just the brush tip size. This can also be changed by pressing the open ([) and closed (]) bracket keys respectively to make the brush size smaller or larger. Then, click and drag the cursor across the region you wish to remove. Once you release the left mouse button, leave Photoshop to repurpose the surrounding pixels and replace unwanted pixels.
The affected region will be highlighted by a translucent color as you drag across it. You can change this from the Options bar to improve legibility depending on the content within your image. To do so, click on the cog icon in the Options bar to define one of thirteen different highlight colors and the opacity of the color.
Another advantage of the Remove tool is that you can choose to make several brush stroke marks before applying an edit. To do this, turn off the Remove after each stroke checkbox in the Options bar. Then, when you’re ready to apply the edits, click on the Commit button in the Options bar.
You can also use a nifty, hidden feature that is built into the Remove tool, allowing you to paint around the perimeter (shown as B in Figure 1.7) of the region you wish to remove instead of having to paint the entire area (Figure 1.7, A). This technique can be used with or without the Remove after each stroke feature being active. The inset image (Figure 1.7, C) demonstrates the completed edits:
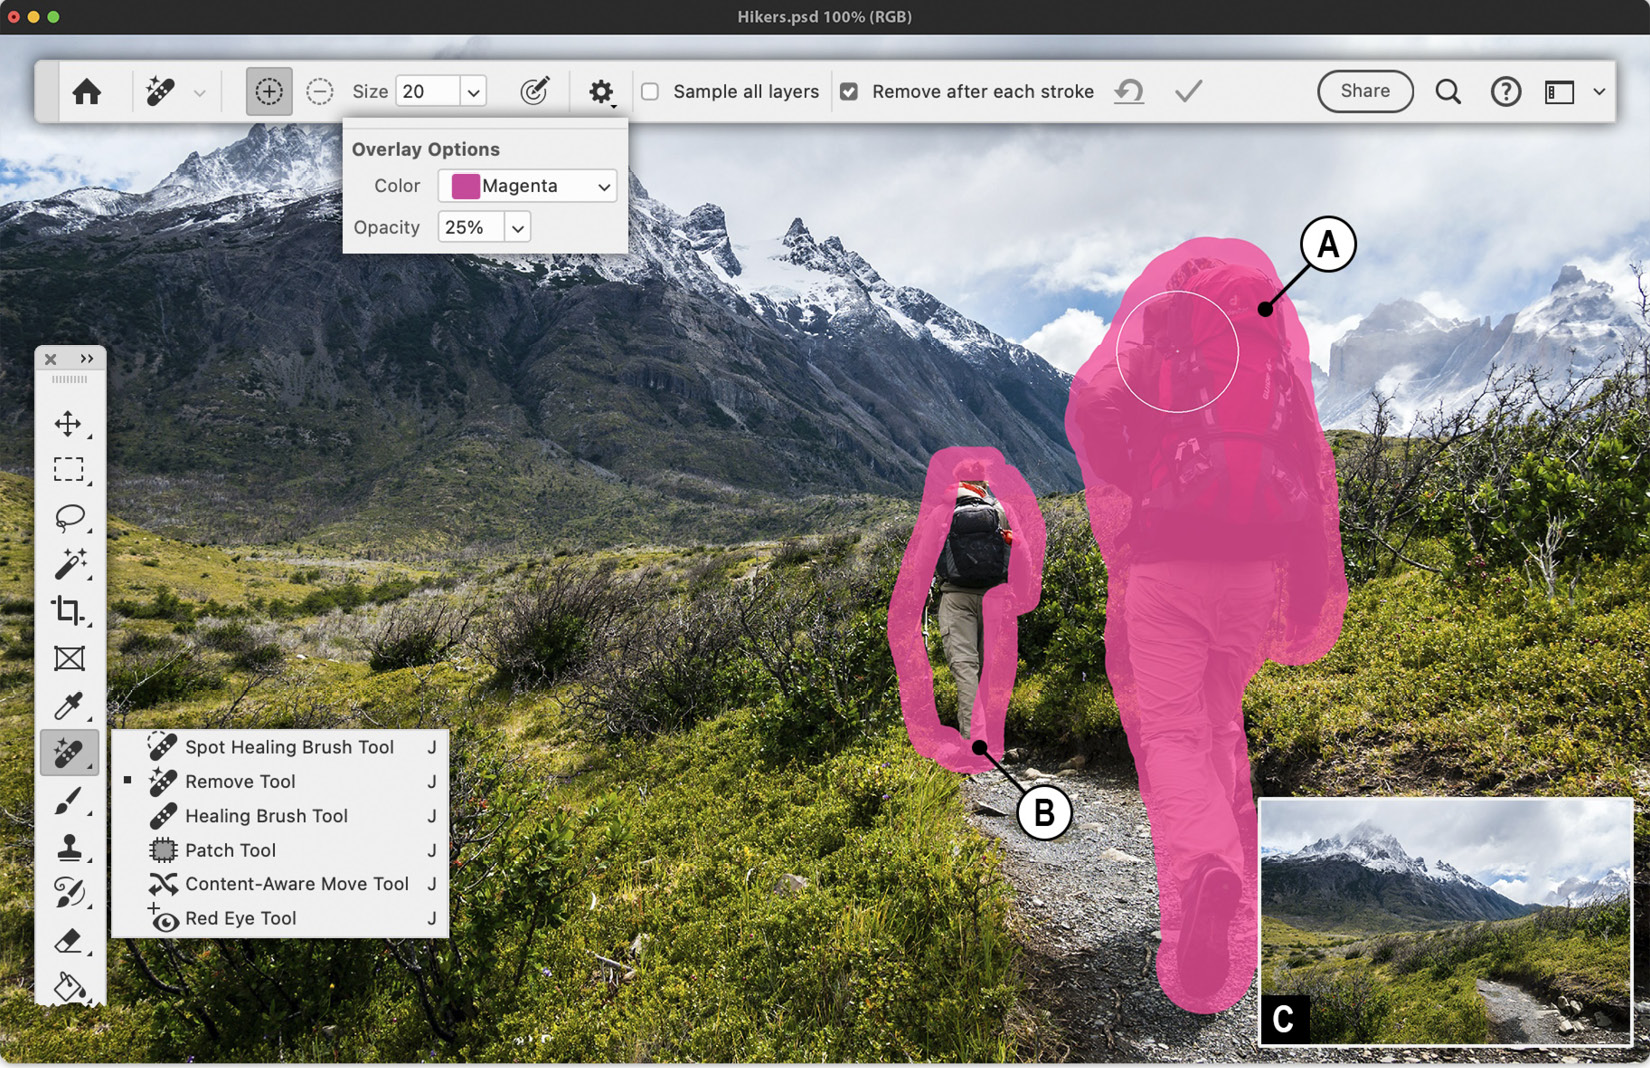
Figure 1.7: The Remove tool and related settings
Adjustment presets
The Adjustments panel now includes a library of presets that allow you to quickly preview how they will appear on your image before adding them to your document. These range from classic black and white for portraiture to split-tone effects:
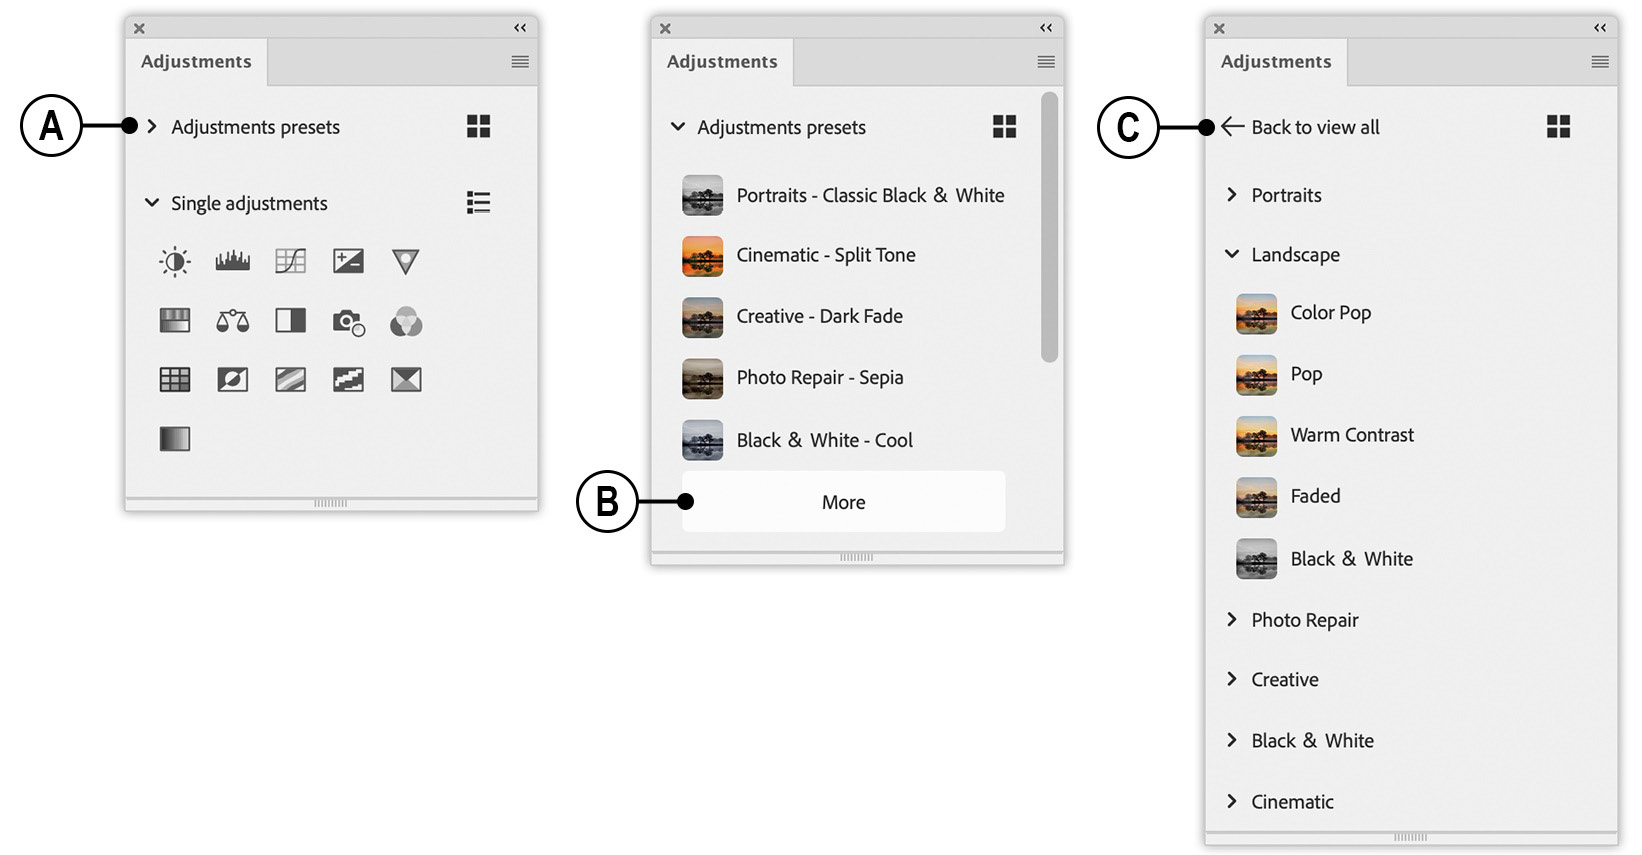
Figure 1.8: The Adjustments panel now includes presets
Go to Window → Adjustments and click on the toggle adjacent to Adjustment presets (shown as A in Figure 1.8) to open a short list of sample presets. To explore additional presets, click on the More button (Figure 1.8, B), where you will be presented with a list of categories that include Portraits, Photo Repair, and Cinematic.
Hover your cursor over one of the presets to preview how it will affect your active document. To apply a preset, simply left-click on the preset name. To exit the library of presets, click on the Back to view all toggle (Figure 1.8, C). Each preset typically consists of two adjustment layers with accompanying layer masks that are neatly organized into layer groups.
You can toggle between list mode, which shows a small thumbnail of each preset in addition to the preset name, or thumbnail-only mode by clicking on the icon located at the top right-hand side of the Adjustments panel (shown as D in Figure 1.9):
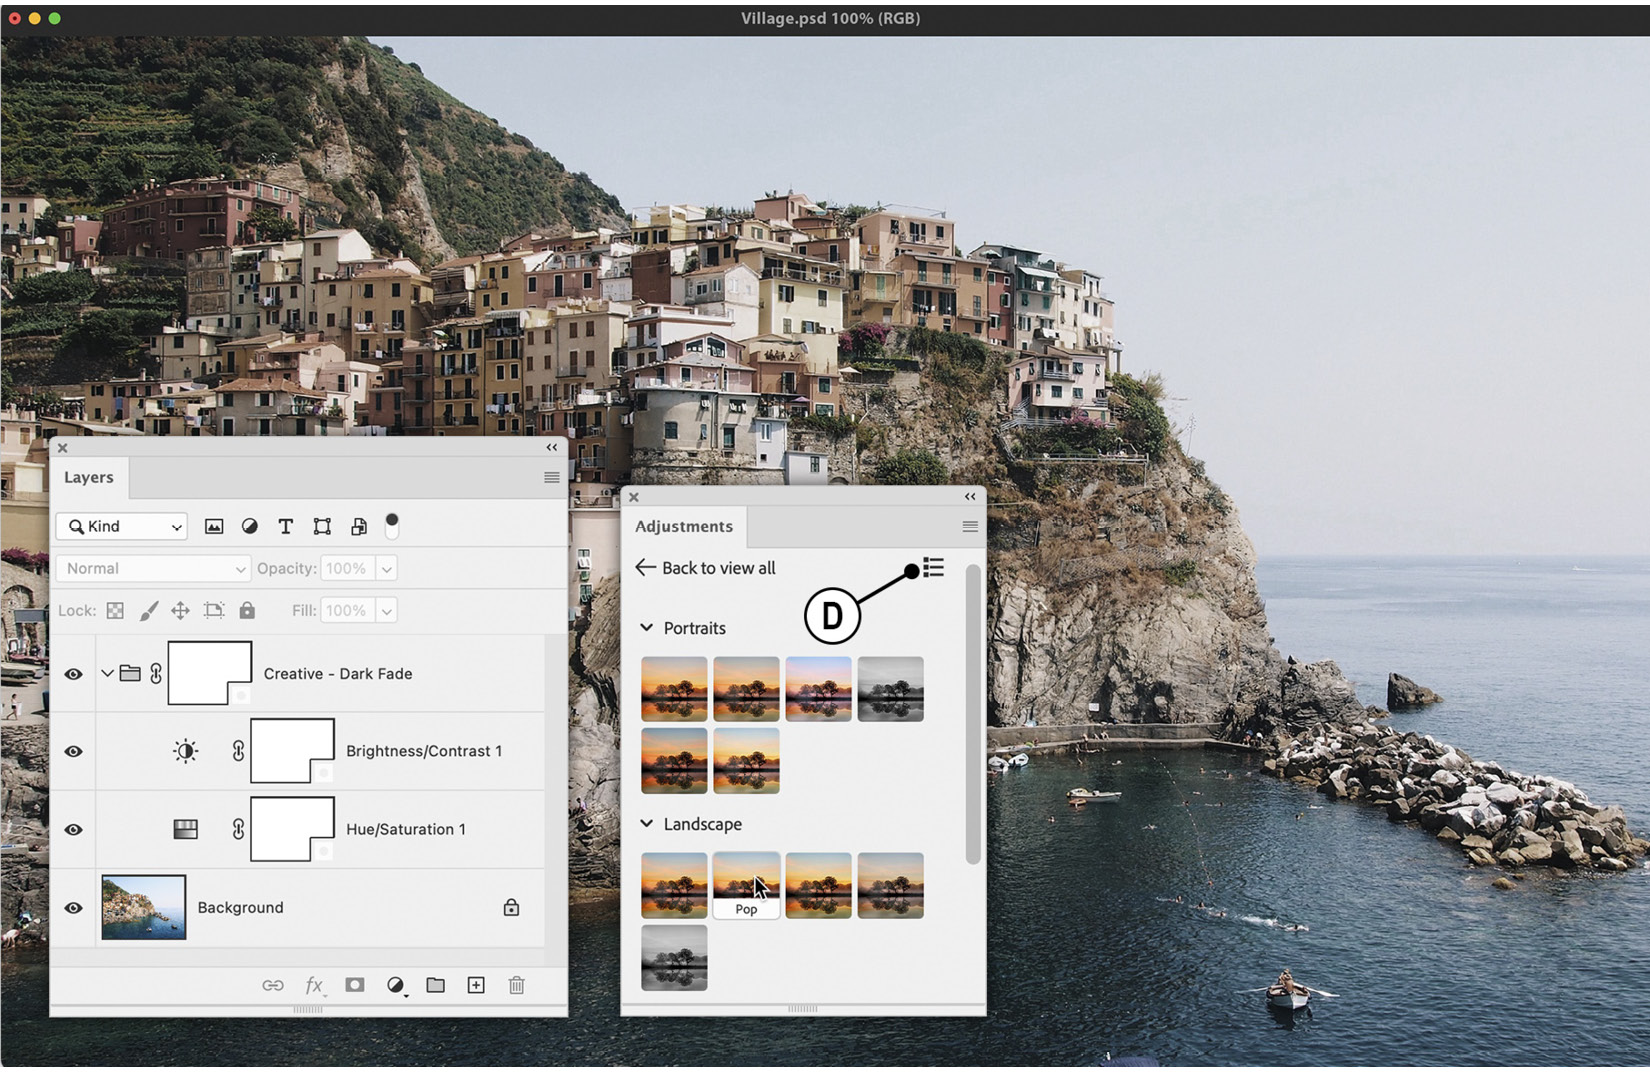
Figure 1.9: Each adjustment preset is organized and added via a layer group
Creating a bespoke workspace
It’s one thing to know your Photoshop tools and features, but quite another to make them more accessible. Delving into a rabbit hole of sub-menus to find a time-saving tool burns valuable time, diminishing its effectiveness. At first, the extra mouse clicks might seem inconsequential, but over the course of a year, that could amount to dozens of hours wasted when you could have been meeting deadlines faster. I would suggest thinking about which tools and panels you use most frequently and prioritizing your screen real estate.
In the following exercises, we’ll look at customizing panels, tools, and shortcuts. You can adjust these techniques to suit your individual workflow.
Modifying panels
Photoshop panels are arranged into “workspaces,” with the default, called Essentials, active when you open it for the first time, an option that Adobe believes is important to all Photoshop users. Arranged into two columns on the right-hand side of the interface, the right-hand column is expanded for high-use options, while the left-hand column is collapsed into a thin set of icons for less frequently used features. The Layers panel is core to almost everything we do in Photoshop, therefore it’s omnipresent and requires space. We will arrange other panels around it. Here’s how to do this:
- Click on the Workspace Switcher menu located at the top-right-hand side of the interface (A in Figure 1.10) and choose Essentials from the list of options. Then, return to the same menu and choose Reset Essentials:
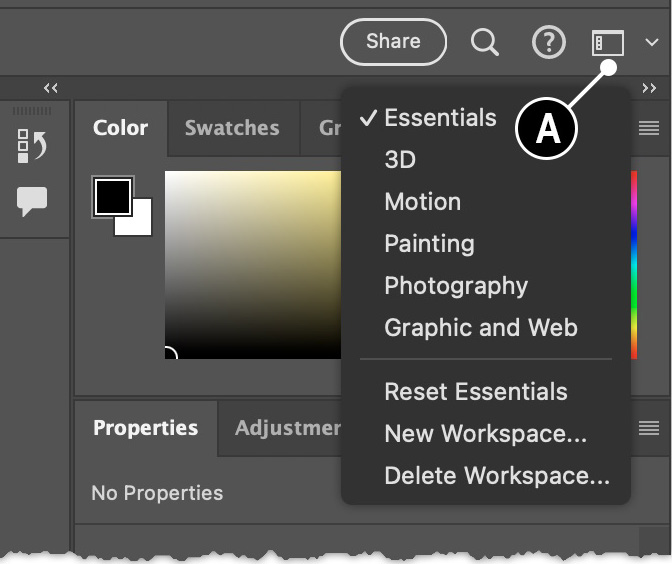
Figure 1.10: The Workspace Switcher menu
- Click on the Color Panel tab to make it active, then click on its Panel fly-out menu in the top-right corner. From the list of options, choose Color wheel. This can make the process of visualizing new colors easier. If you need to create a specific color value, you can simply left-click on the foreground icon located at the top of the Color panel.
- Next, hover your cursor over the Libraries Panel tab and drag it over to the image window to undock it. This panel often requires lots of height to browse through assets, and the best place I’ve found for it is in the left-hand column, collapsed into icons with the History and Comments panels. To add the Libraries panel to this column, drag the Libraries Panel tab above the icon for the History panel, at which point you will see a pale blue line appear. Release the mouse to dock it at the top of the column (B in Figure 1.11).
- The Libraries panel now appears in icon mode, left-click on it to expand it. Hover your cursor over its bottom edge to reveal the scaling symbol, a double-headed arrow, and drag the panel edge downward to extend its height so that more content will be visible when needed. Then, left-click on the Libraries Panel icon to minimize. Use the same technique to expand the height of the other panels in the column to reduce the amount of scrolling that is required with small panels:
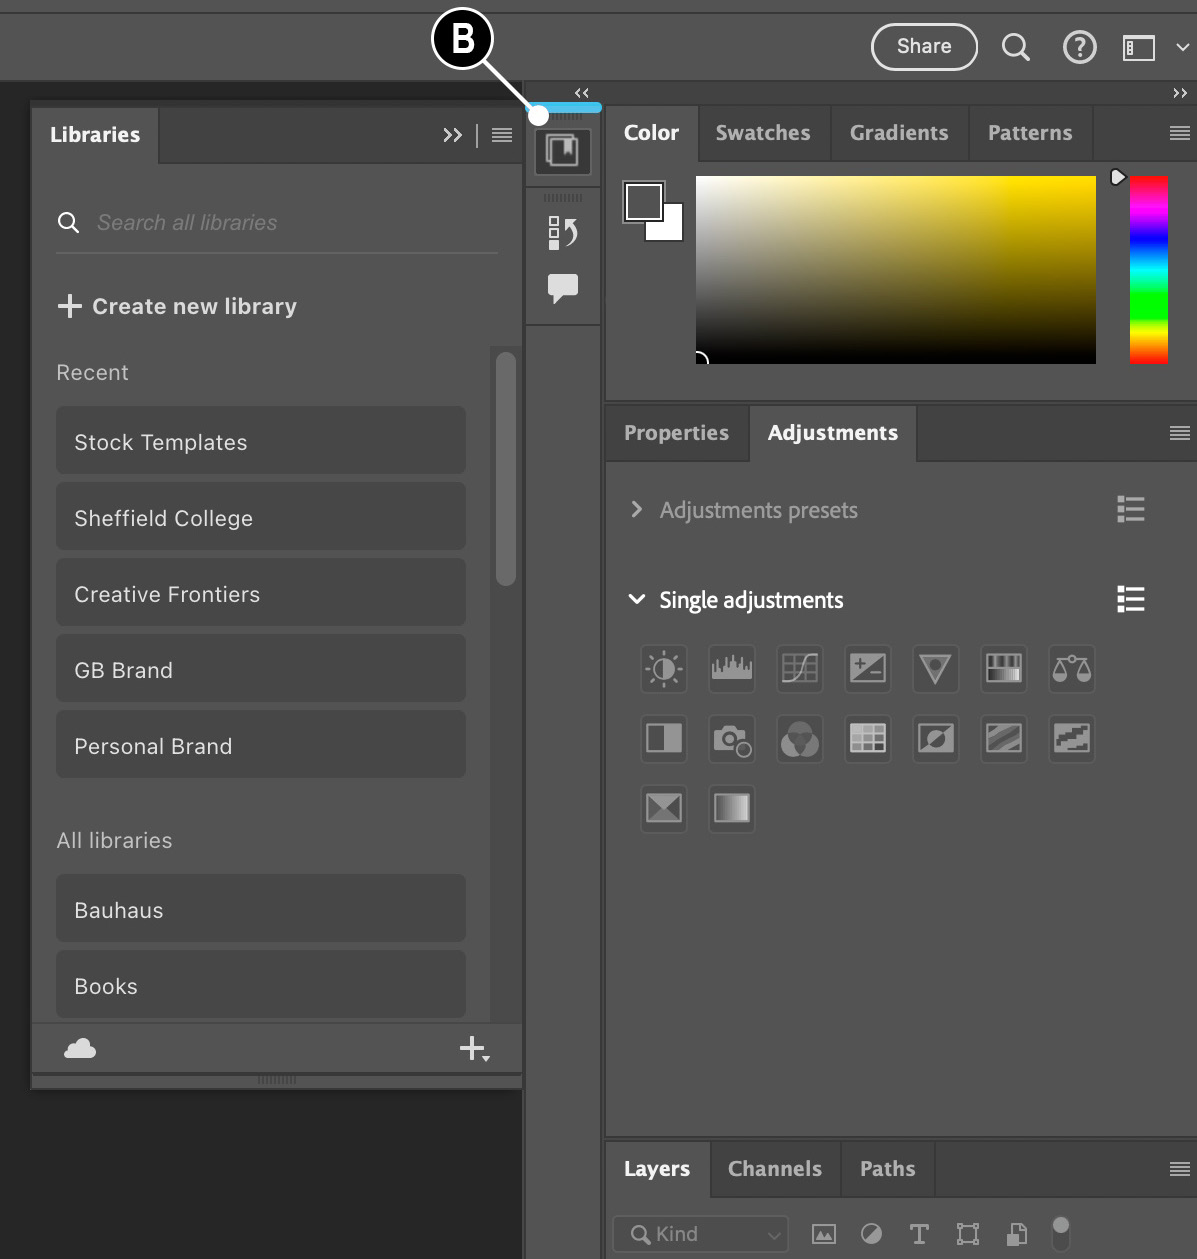
Figure 1.11: Repositioning the Libraries panel above the History panel
- Within the collapsed column, I also added the Brushes panel, which also appears with the Brush Settings panel (Window → Brushes). Both are handy. Using the same technique, you can add any other infrequently used panels to the collapsed column. In the example shown, and my personal preference, I also dragged the Patterns and Gradient panels, originally adjacent to the Color panel into the collapsed column, along with the Shapes panel and Styles panel, found under the Window menu:
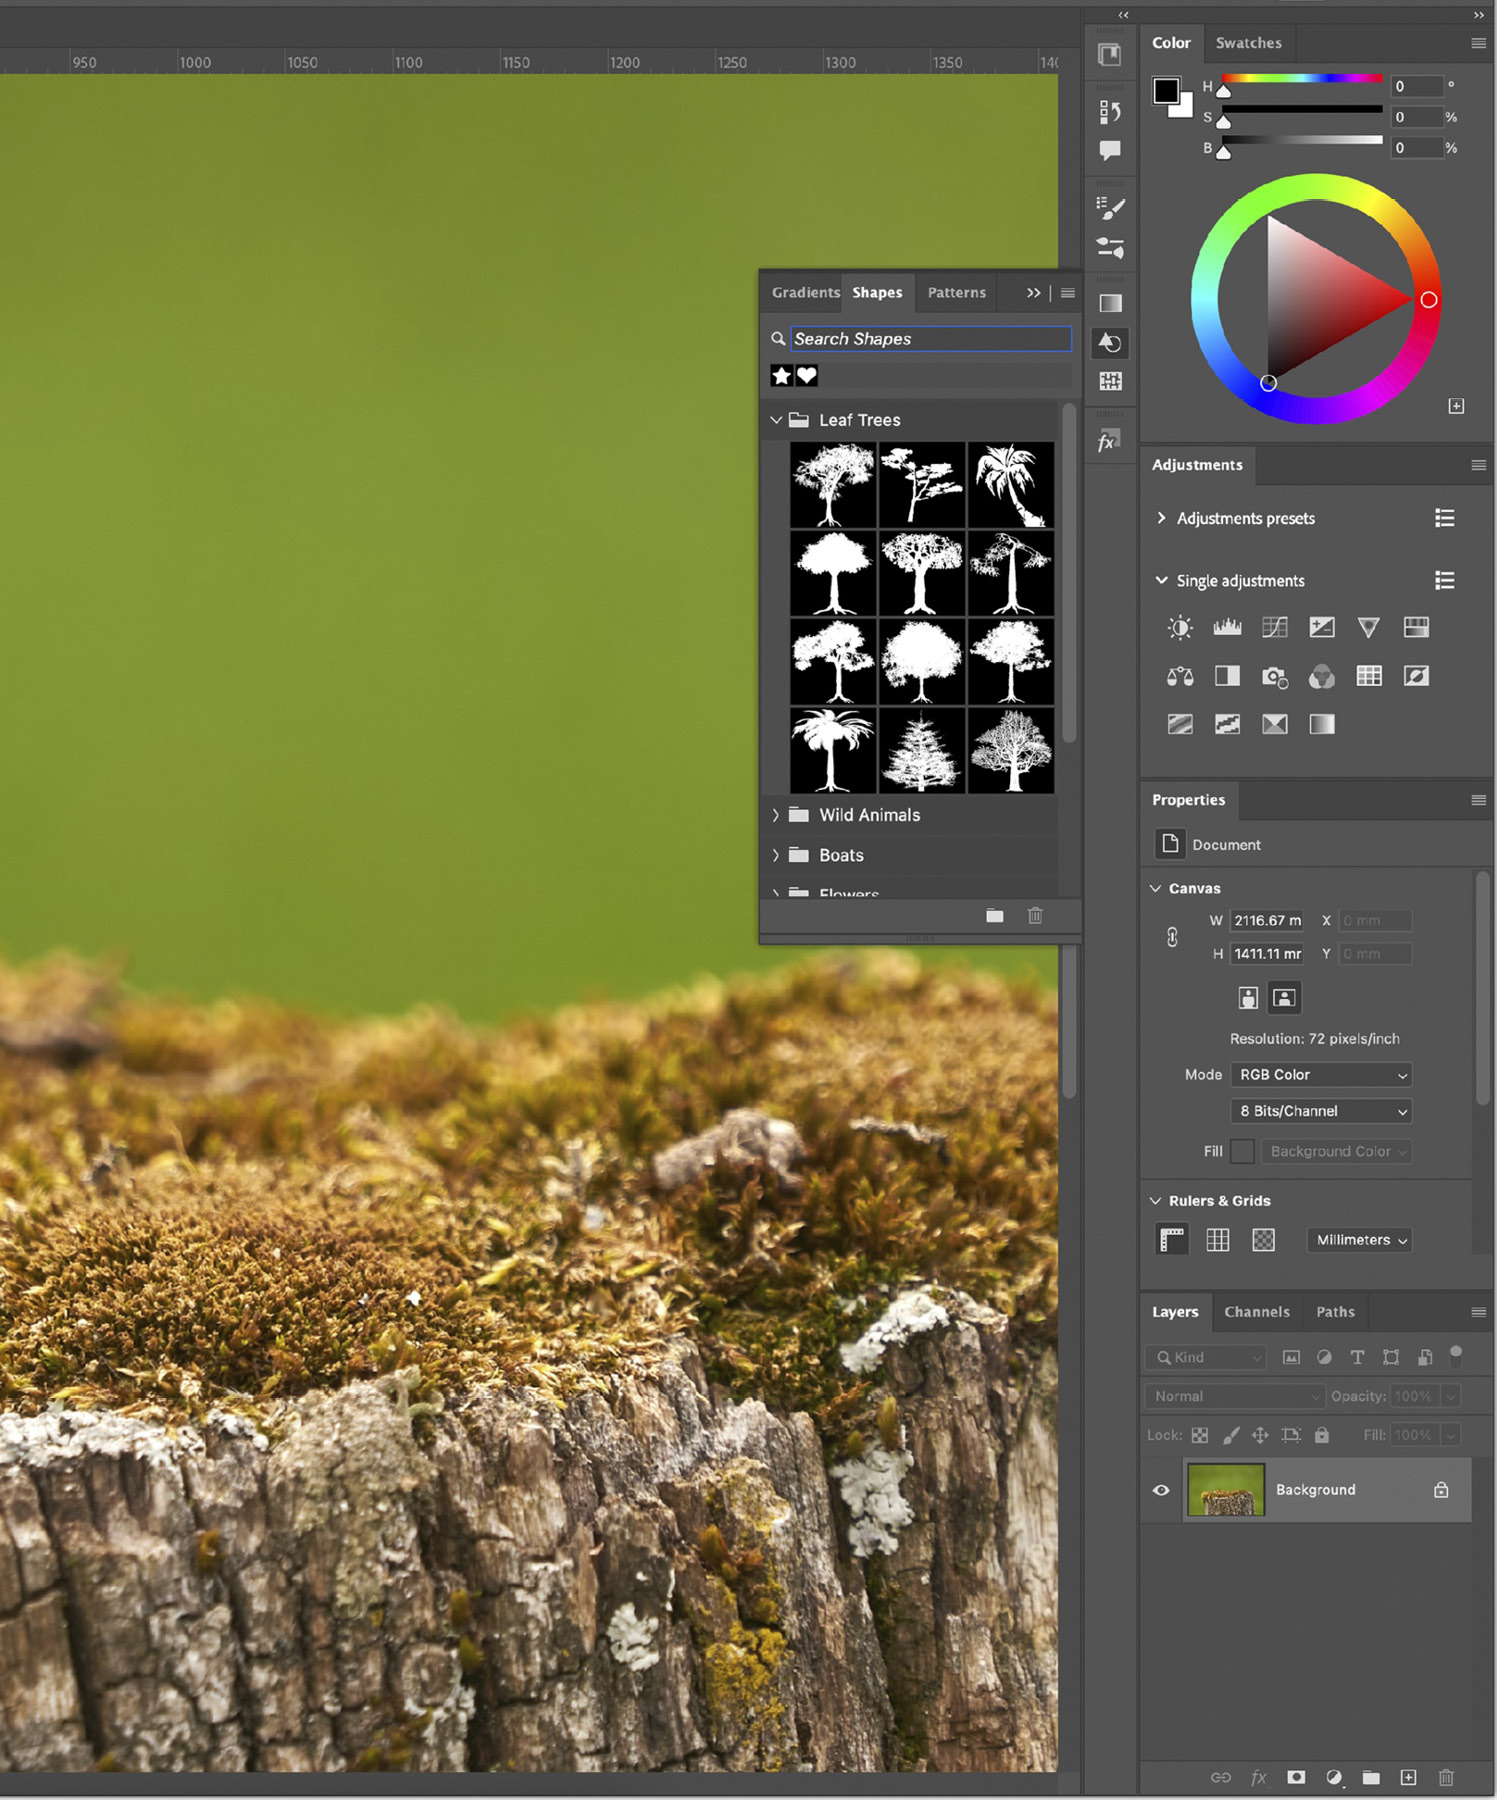
Figure 1.12: The workspace after reconfiguration
Customizing the Tools panel
The Photoshop Tools panel contains in excess of 70 tools; only 21 are visible at any one time, and the majority are hidden. This is another of those scenarios where Adobe can make a best guess as to the tools appropriate to your workflow, but never exactly. This leaves room for improvement and a little simplification. You can start by modifying the default set of tools or you can create a fresh tool panel with just a handful of specialist tools; the choice is yours. We’ll start with the former:
- Click and hold down on the Edit Toolbar button in the lower section of the Tools panel, (shown as three dots). From the pop-out menu that appears, click on the only option, also called Edit Toolbar.
This opens the Customize Toolbar dialog, where you’ll be presented with two columns. The left-hand column, named Tools Panel, lists tools included in the Tools panel, and there is an Extra Tools column on the right-hand side for tools you wish to hide. It’s likely there will be no tools listed on the right at this point.
The list of tools on the left is grouped; each group represents a “slot” on the Tools panel. Take the second group down in the list, starting with the Rectangular Marquee tool, currently visible in the Tools panel in the second slot down, under the first slot of tools that include the Move tool. The remaining three selection tools in the group, Elliptical Marquee, Single Row, and Single Column, are hidden under it.
- Start by dragging the Single Row and Single Column selection tools to the right-hand column. I can honestly say I’ve used them twice in the last 20 years. Repeat the same step for the Slice tool and the Slice Selection tool.
- As the Frame tool behaves like a clipping mask within which you can place images, it can be associated with the crop tools. Drag the icon for the Frame tool under the Perspective Crop tool to add it to the same group of tools.
- Focusing on the next group down, drag the 3D Material Eyedropper, Ruler, Notes, and Count tools to the right-hand column.
- Hover your cursor over the edge of the tool group containing the eraser tools. This will allow you to drag the entire group across to the right-hand column.
- Drag the Red Eye, Color Replacement, 3D Material Drop, Vertical Type Mask, and Horizontal Type Mask tools to the right-hand column.
- Although not entirely necessary, you can combine all of the brush tools by dragging the History Brush and Art History Brush tools into the same group as the Brush tool.
- Having removed what I would call redundant tools, you may wish to click on the Save Preset button, give your new Tools panel a name, and save it in the folder presented to you by Photoshop. Then, click Done.
Naturally, this is how I alter the Tools panel, but you may need to adjust this layout to better suit your own needs by using the same techniques covered in the exercise:

Figure 1.13: The customized Toolbar dialog alongside the edited Tools panel
Saving a custom workspace
Now that we’ve created a streamlined version of the interface, it’s time to save it. This will achieve two things: firstly, the layout of panels will be captured for future use, and secondly, you can reset a saved workspace back to its original state if you find panels have been moved around on screen. Let’s get started:
- Head up to the top right-hand side of the Photoshop interface and click on the Workspace Switcher menu. From the list of options provided, click on New Workspace. Despite its misleading name, the command won’t undo any of your hard work arranging panels; it simply saves the current state of the interface.
- From the New Workspace dialog that will now appear, enter a name for your workspace. I entered
Proin this example, but you can choose your own name. Just make sure it’s short and snappy so that it fits neatly into the Workspace Switcher drop-down menu.By default, panel locations are saved with every new workspace, but you can also capture alterations to the Tools panel, keyboard shortcuts, and menu items. The latter two will be explored in the next exercise. I prefer to keep the Tools panel consistent no matter the task I’m performing. You can update an existing workspace anytime and choose to include changes to the Tools panel, keyboard shortcuts, and menu items. Just enter the same name as the existing workspace to update it.
- In this example, we’ll capture just the panel locations. As such, leave the checkboxes unchecked and click Save to complete the process. You will now find that your new workspace is located at the top of the Workspace Switcher drop-down menu, while Adobe’s supplied workspaces are listed lower down in the dropdown:
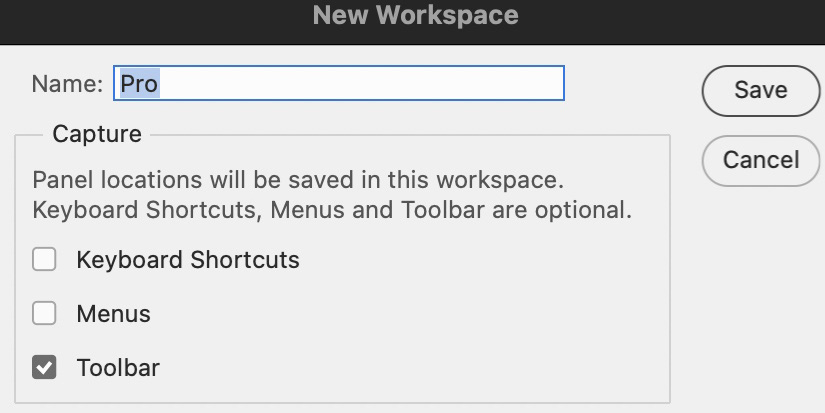
Figure 1.14: The New Workspace dialog captures panel locations, shortcuts, and menus
Modifying keyboard shortcuts and menus
Keyboard shortcuts can save you invaluable time and help avoid navigating through convoluted sub-menus, from more rudimentary tasks such as copying to applying warps. You can also hide redundant menu commands, found from the application dropdowns at the top of the screen. In this exercise, you will explore techniques for assigning a custom shortcut and hiding a menu option:
- Go to Edit → Keyboard Shortcuts and Menus. Ensure the Shortcuts For drop-down menu is set to Application Menus (Figure 1.15, A). Scroll down the list to Window and expand the toggle to reveal the sub-categories.
- Under the right-hand column, labeled Shortcut, click in the empty space adjacent to 2-up Vertical (Figure 1.15, B) to open the type entry field. Type into the field
Ctrl+Alt+1(Windows) orCmd+Option+1(macOS). If the shortcut is already assigned elsewhere, click on the Accept button in the upper right-hand side of the dialog. - Once you have all other remaining shortcuts, click on the Create New Set button (Figure 1.15, C). Enter a name for the set of shortcuts and click Save.
- Then, click on the Menus tab (Figure 1.15, D), scroll down the list until you reach Image, and click on the toggle to expand and open a list of sub-categories. Turn off the visibility icons for Auto Tone, Auto Contrast, and Auto Color (Figure 1.15, E). This will hide those destructive editing options in the Image menu.
Once you have altered the visibility settings of all other menus of your choosing, click on the Create New Set button (Figure 1.15, F). Enter a name for the set of menus and click Save. Then, click on OK to close the Keyboard Shortcut and Menus dialog. Click on the Image menu, and you’ll notice the items have been hidden. To temporarily reveal them, you can click on the Show Menu items at the bottom of the list:
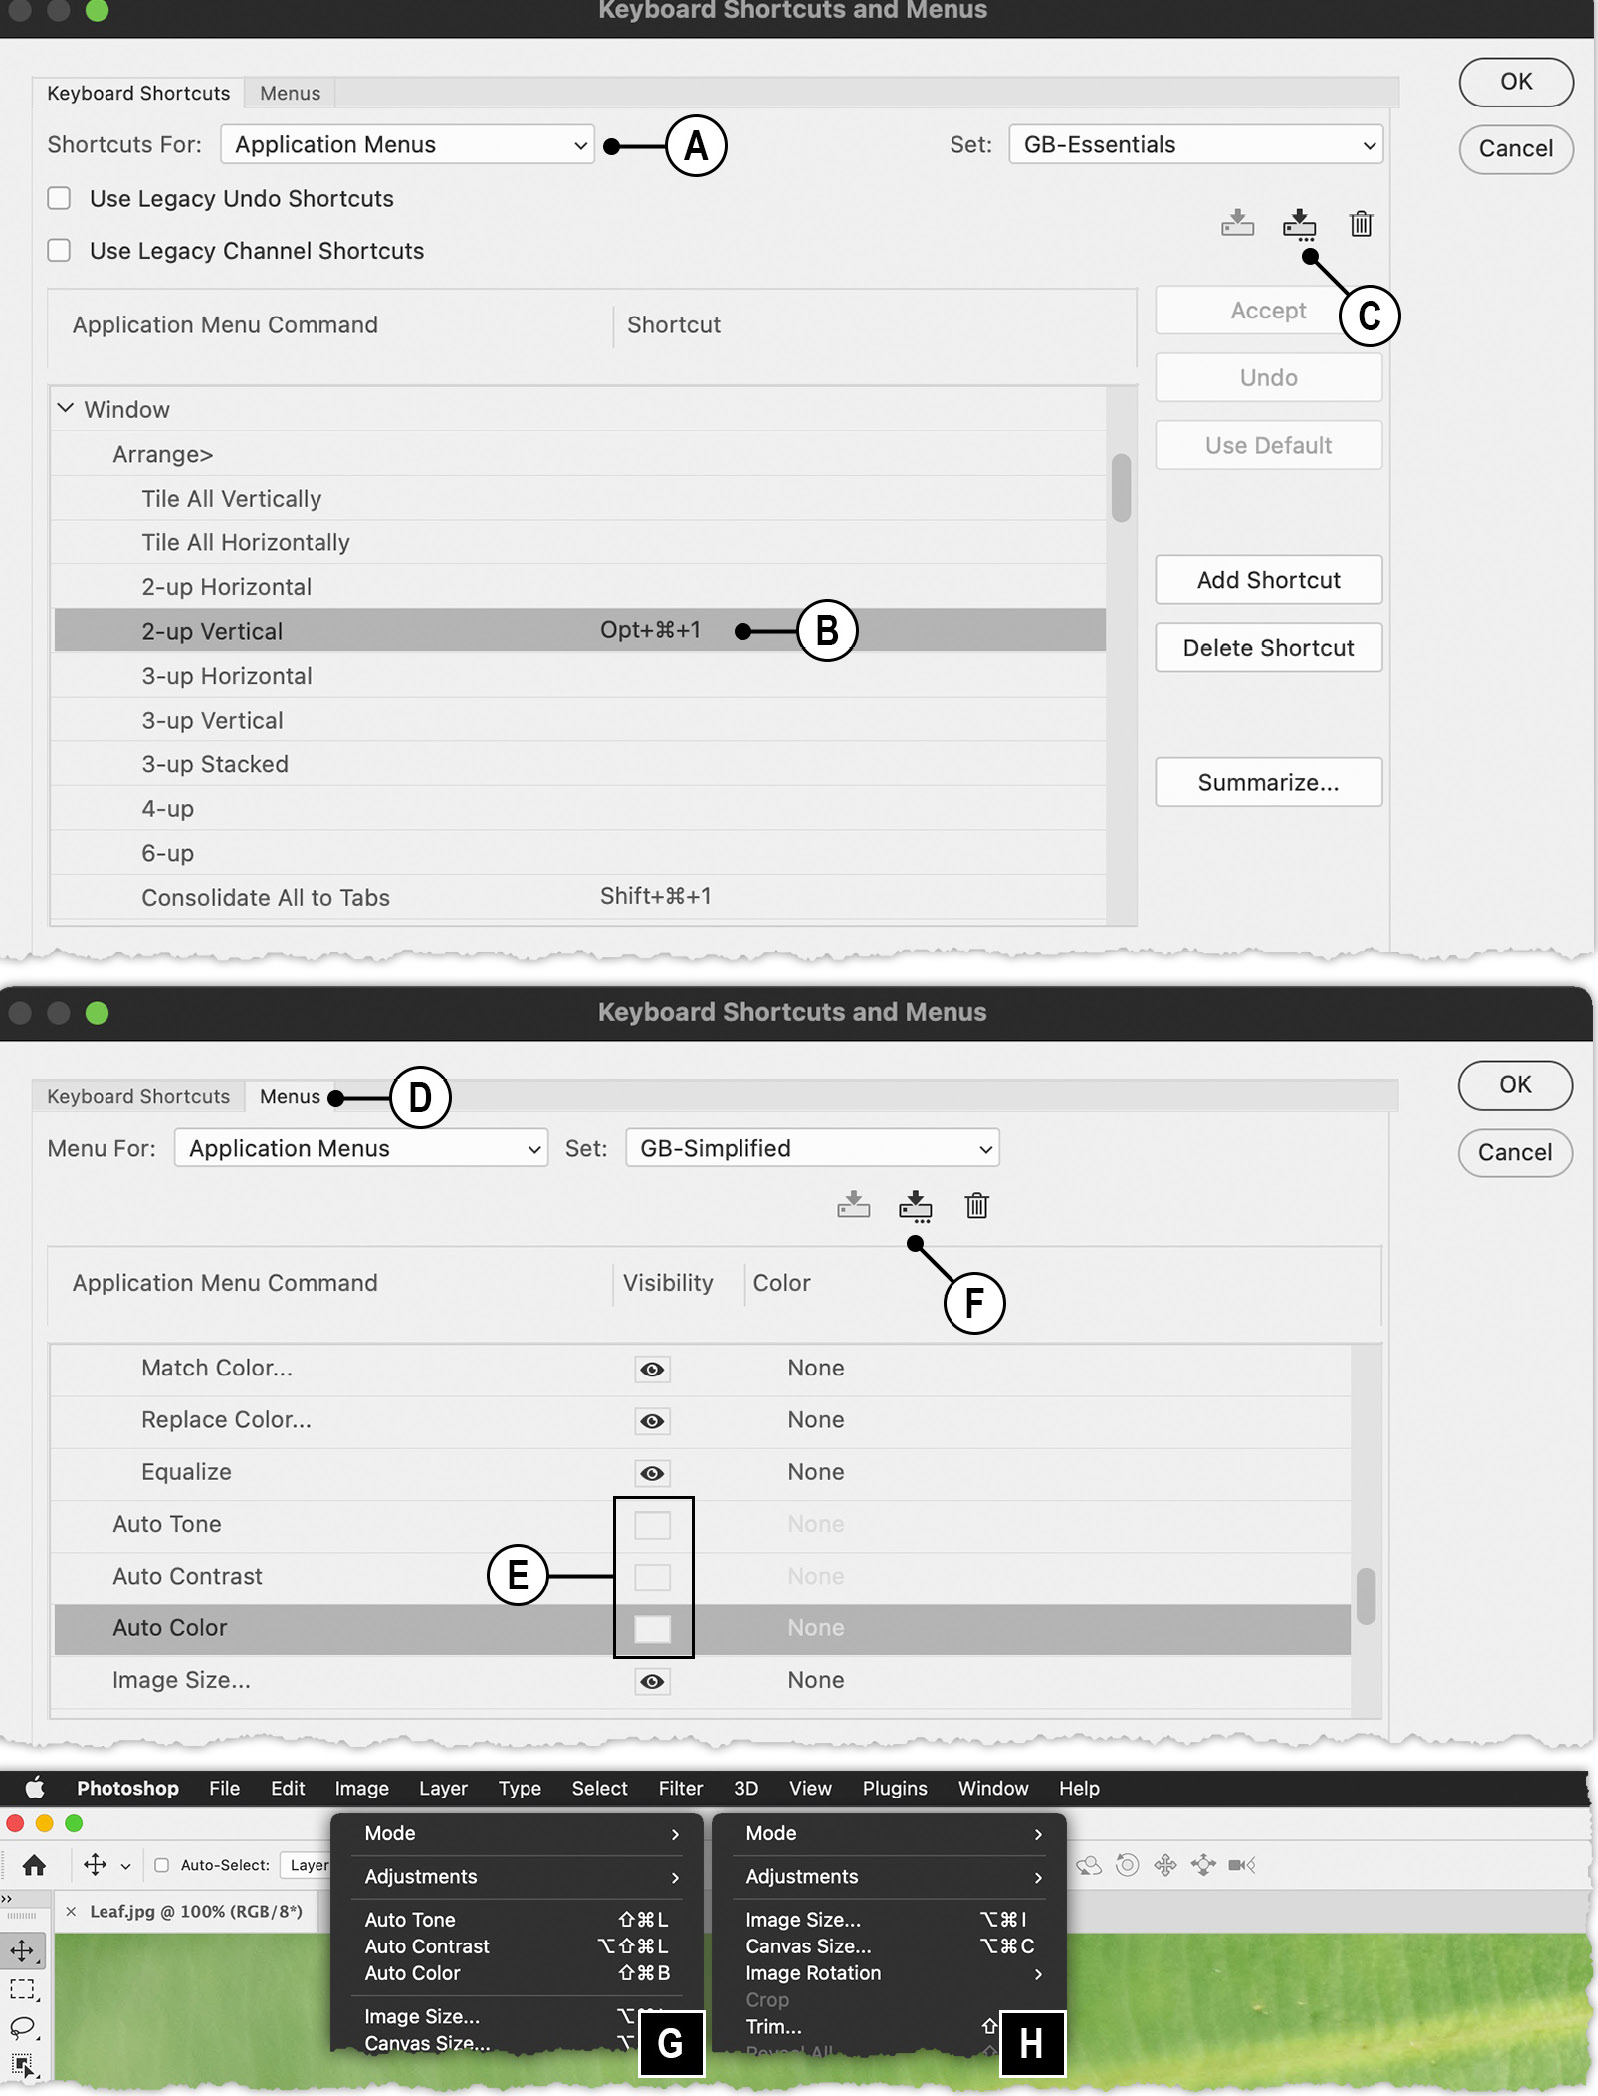
Figure 1.15: You can edit keyboard shortcuts and hide menu items; default (G) and with the three Auto Tone, Auto Contrast, and Auto Color commands hidden (H)
As we’ve seen, Adobe can only make educated guesses as to which tools and features are appropriate to our needs. As such, refining the interface is an essential first step to making day-to-day editing faster by making the tools we need easy to find. In the next section, we’ll modify preference settings, changing a multitude of options, from the interface brightness to the appearance of painting cursors.
Modifying preferences
It is possible to modify the behavior and appearance of some Photoshop features and tools through the Preferences settings, from the brightness of the user interface (UI) to painting cursors and auto-save. In the following steps, I’ll highlight settings that could offer high value to your editing workflow:
- Preferences can be found on macOS via Photoshop → Settings → General, or on Windows, via Edit → Preferences → General. Alternatively, you can press Ctrl + K (Windows) or Cmd + K (macOS) to launch the Preferences settings and reveal General settings.
- Turn on the checkboxes for Auto-Update Open File-based Documents and Preset Syncing.
Contrary to the option’s name, Auto-Update won’t automatically update your active document, but it will inform you that someone else has edited and saved changes to the file you are working on. Photoshop will then give you the option to keep editing your active version or dispense with your edits and update to reflect the other user’s latest saved changes. This is handy when editing project files on a server that are accessible to several users simultaneously:
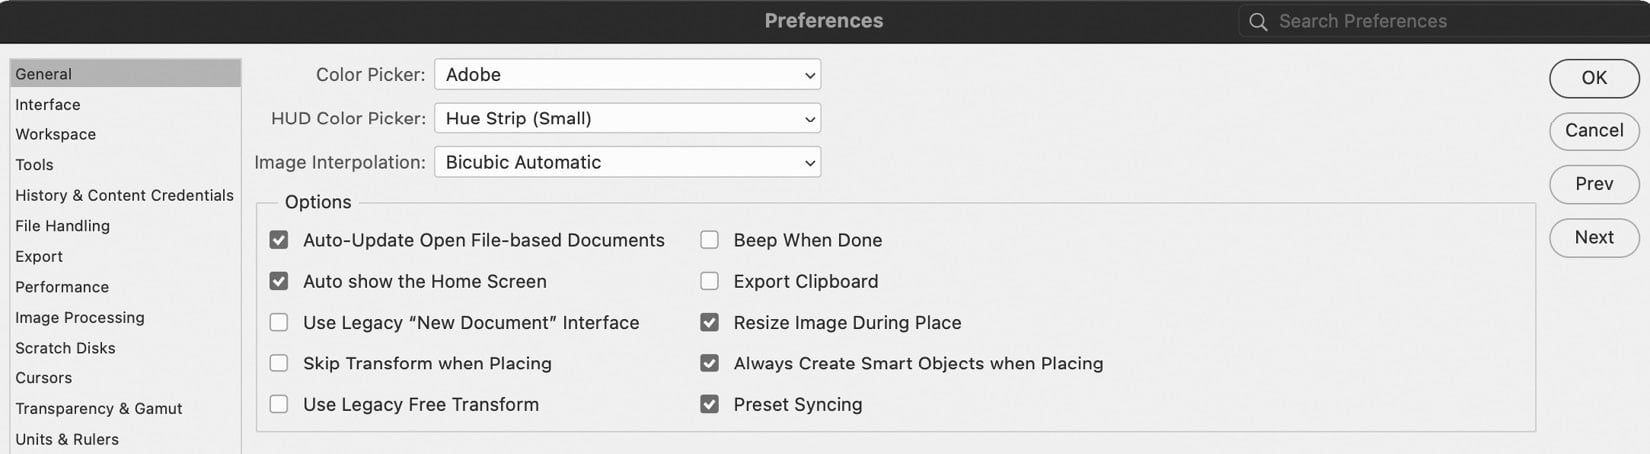
Figure 1.16: General preferences
Syncing presets
Preset Syncing was introduced in February 2021 and uploads your brush, pattern, gradient, shape, and swatch libraries to Creative Cloud. So, wherever you log in with your Adobe ID and use Photoshop in the future, your library assets download from the cloud and become available to use.
- Next, click on Interface from the list on the left-hand side. You can change the UI Color Theme option from the default of Medium Dark to three other variations. You can also alter the style of the image border shown in the image window as well as the background color that surrounds your images.
I find that if the UI brightness is high, this often contributes to eye strain. As such, I tend to set the UI theme to Dark or leave it set to Medium Dark to compensate. Turning on the Neutral Color Mode checkbox removes distracting color from interface buttons and icons. I don’t find lines or shadows around images’ edges helpful; these I set to None. You may wish to alter the brightness of the image window background to Black, Dark, Medium, Light Gray, or a Custom color of your choice. I prefer the less distracting Default of mid-tone gray:
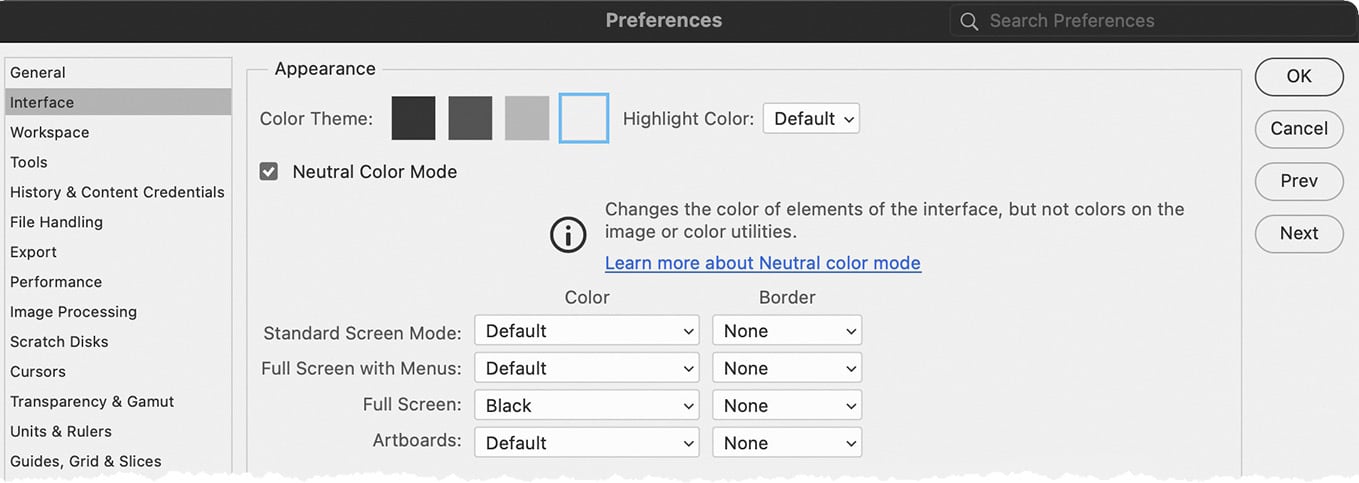
Figure 1.17: Interface preferences
- Click on Tools from the list on the left-hand side. With the exception of Show Rich Tooltips, you can turn on all checkboxes in this section:
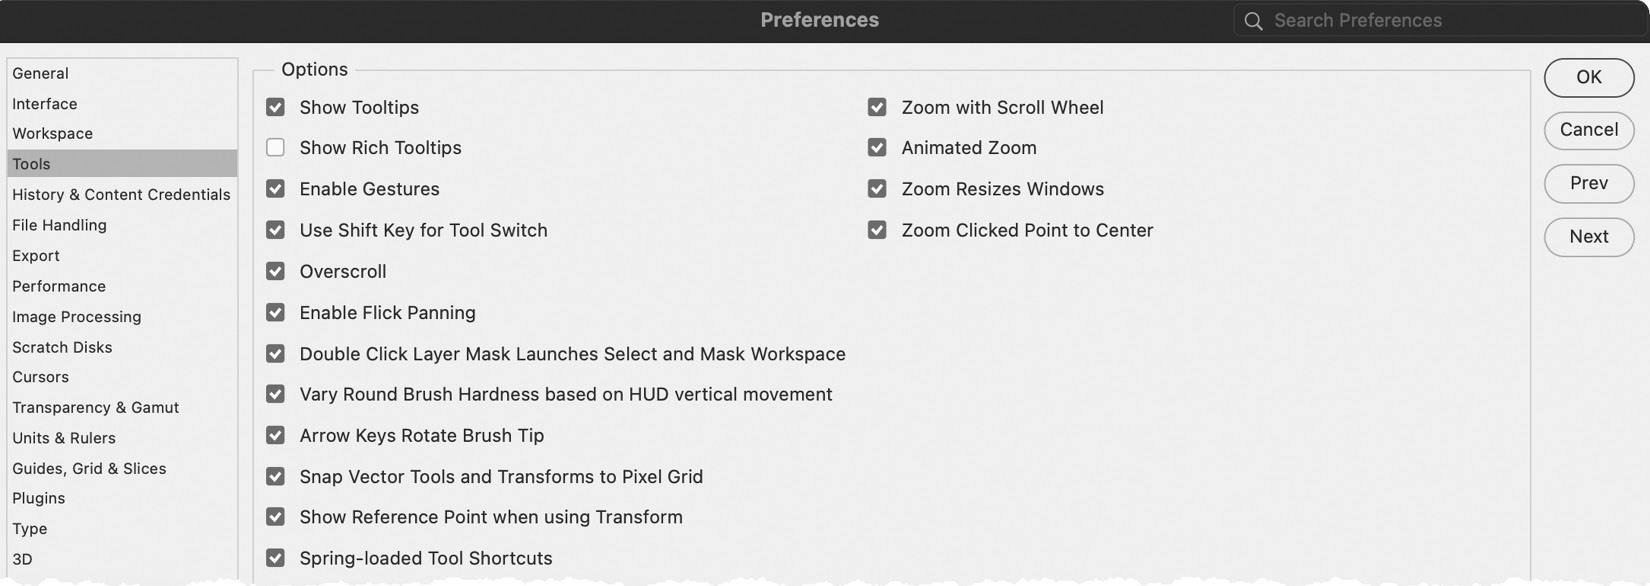
Figure 1.18: Tools preferences
Tool preferences
Rich Tooltips is the animated video explainer that appears every time you hover your cursor over a tool in the Tools panel, which can become tedious very quickly. Other features in this section generally enhance the usability of a tool or the ease with which you accomplish tasks. Zoom with Scroll Wheel allows you to avoid activating the Zoom tool altogether, while Animated Zoom and Flicked Panning make the motion of panning and zooming less jarring on the eye. Overscroll allows you to position the edges of an image anywhere in the image window, making edge editing easier to accomplish.
- Click on File Handling from the list on the left-hand side. Under File Saving Options, I would recommend that Image Previews is set to Always Save, and turn on all checkboxes with the exception of Enable legacy “Save As” and Do not append “copy” to filename when saving a copy. Finally, decide how much work you want to risk losing by defining the Automatic Save Recovery interval dropdown to either
5, 10, 15, 30, or60minutes.Saving an image preview and a thumbnail will allow you to quickly check the contents of an image before opening through Finder on macOS or Explorer on Windows. The ability to save as a background task means you can edit a different Photoshop document while another is saving.
I prefer to set the save recovery increment to every 5 minutes so that when I do experience a crash, I lose a maximum of 5 minutes’ work. Photoshop will reboot and ask if you want to open each document from your previous session at its last saved point. If you experience a lag in performance each time Photoshop saves a recovery file, you might have to balance the pros and cons of setting the interval to 10 minutes.
I still prefer to save my Photoshop documents in a dedicated network folder along with related project assets. However, you can set the default save location to Creative Cloud. There are many benefits to saving on Creative Cloud, which include a file history and, not least, a backup of your file. The option to save to Creative Cloud is also available each time you save a document.
- Turn on the Prefer Adobe Camera Raw for Supported Raw Files checkbox and Use Adobe Camera Raw to Convert Documents from 32 bit to 16/8 bit. Turn on the Ask Before Saving Layered TIFF Files checkbox and set Maximize PSD and PSB File Compatibility to Always:
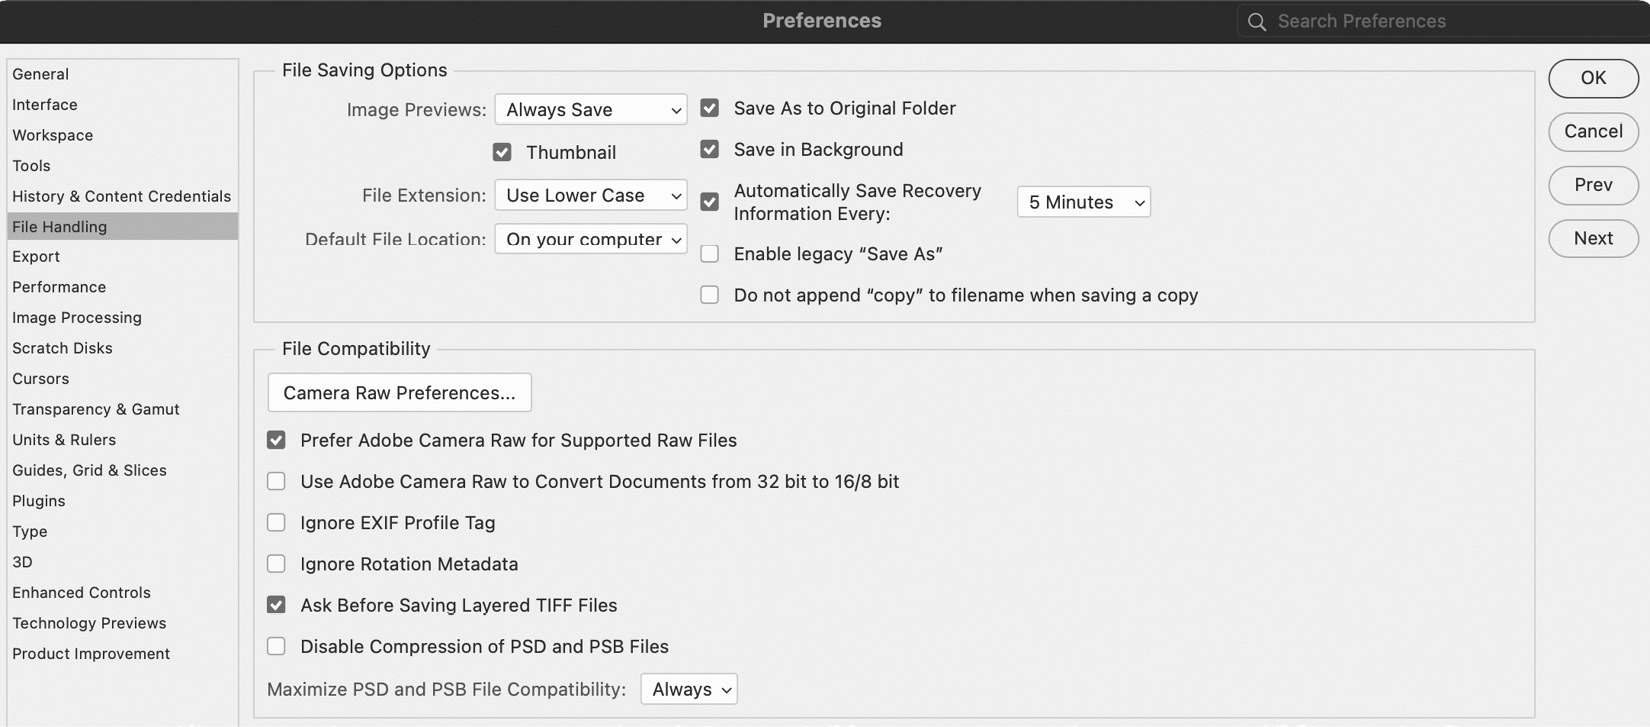
Figure 1.19: File Handling preferences
Camera Raw
Adobe Camera Raw offers fantastic tools and features for editing digital negatives; as such, I would recommend utilizing it for such tasks rather than Photoshop. Maximizing the compatibility of your Photoshop Document (PSD) files means that when you share files with colleagues who have older versions of Photoshop, they will be able to open and edit them.
- Click on Cursors from the list on the left-hand side. Set Painting Cursors to Normal Brush Tip and turn on the Show Crosshair in Brush Tip checkbox. Set the Other Cursors option to Precise. Preview images in the dialog update accordingly to visualize changes to brush tips and icons:
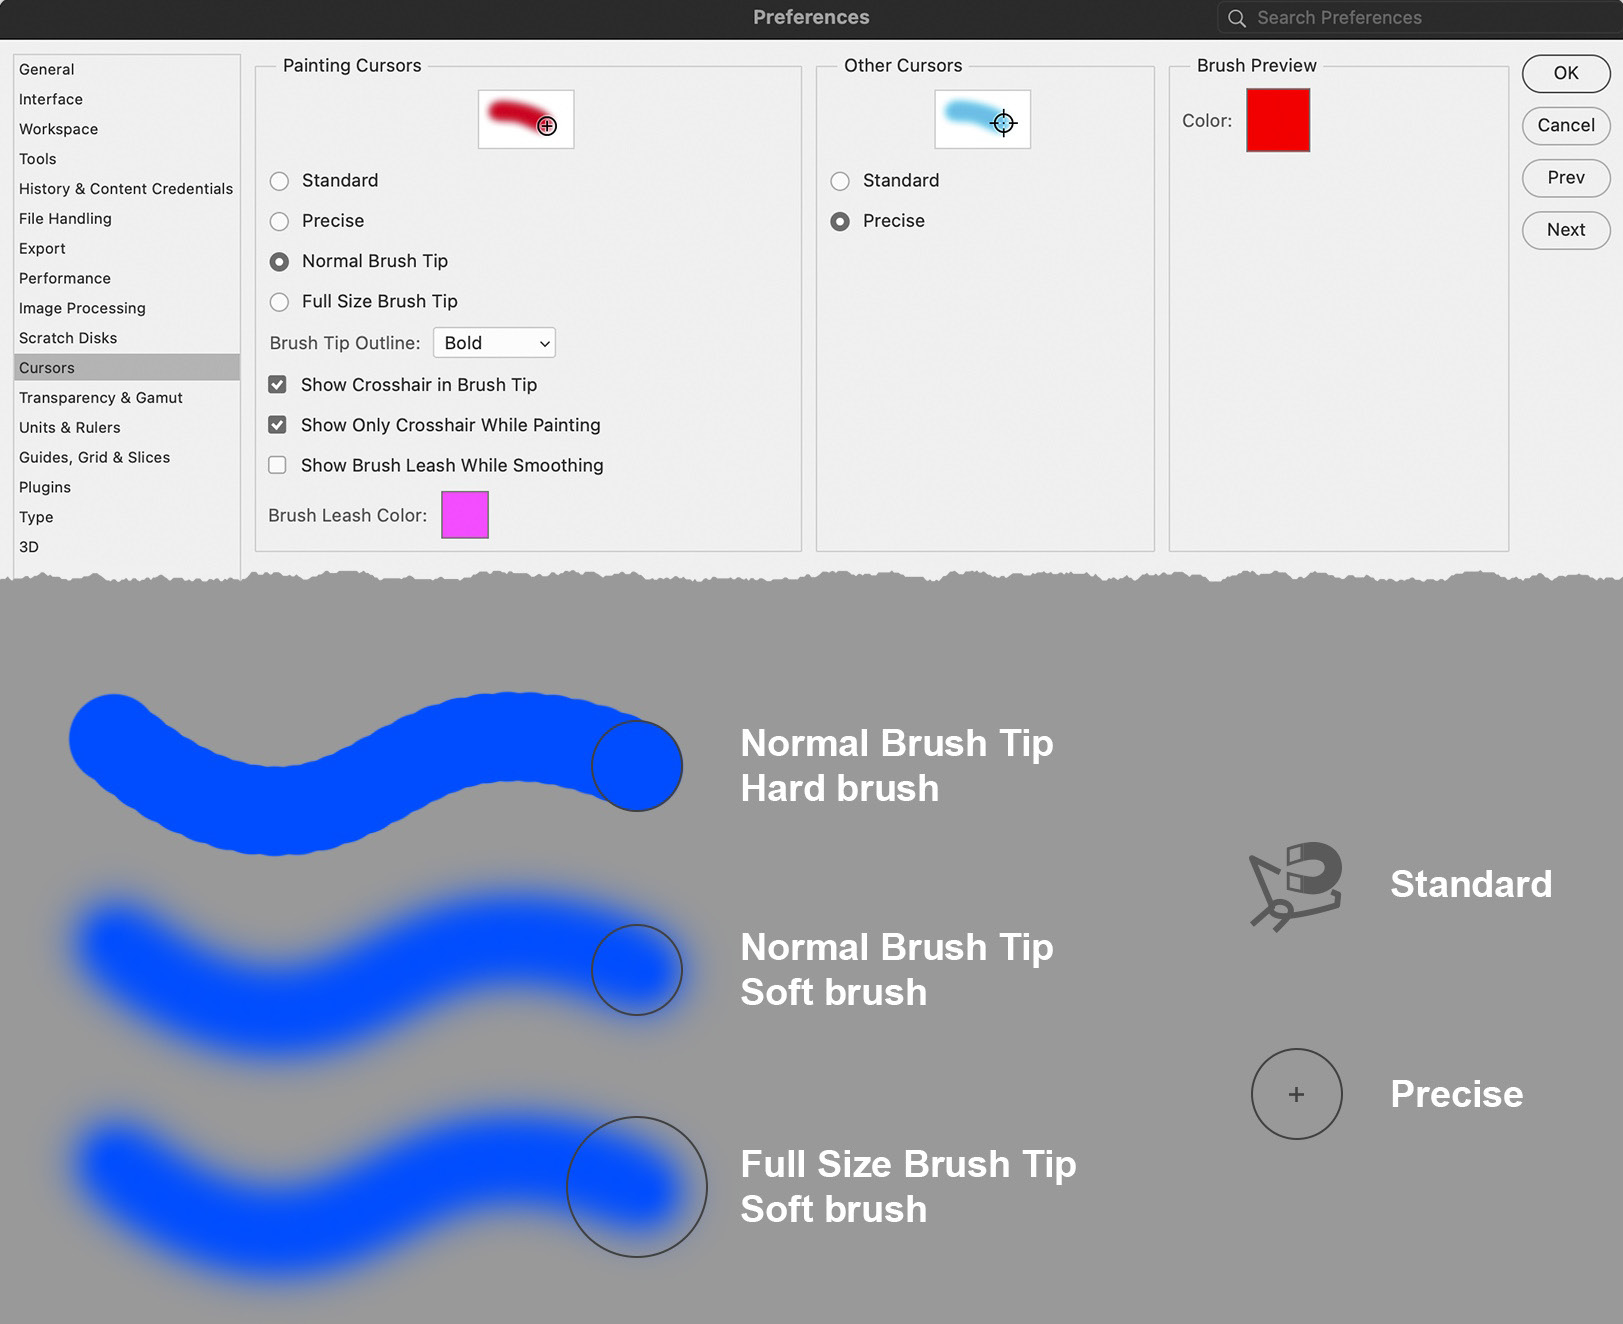
Figure 1.20: Cursors preferences
Painting tools
Painting cursors are integral to editing in Photoshop, so it’s important to understand how each of the cursor appearances might affect the way you use them. The size of a brush tip is indicated by an outline, shown in the preferences as a circle for simplicity, with a red paint stroke. A normal brush tip indicates only the area that receives a full coverage of red, while a full-size brush tip indicates full coverage of red and soft brush marks. I find the normal brush tip size more intuitive to work with. The crosshair inside a brush tip is mainly used for alignment. The section labeled Other Cursors includes selection tools. Standard will make the cursor appear as the icon of the tool itself, while the far more intuitive precise version includes features that make the Magic Wand selection tool far easier to use.
- Click on Type from the list on the left-hand side. Turn off all checkboxes apart from Show Font Names in English and Use ESC key to commit text.
Smart Quotes look terrible and resemble inch marks. I would highly recommend that you deactivate Smart Quotes.
Photoshop now automatically replaces missing fonts or glyph characters with the most suitable match available on your computer. The trouble is that you might not notice this. By turning off Glyph Protection, this issue should highlight missing characters, allowing you to manually correct the issue with a font of your choice:

Figure 1.21: Type preferences
You can now exit type editing mode in Photoshop by pressing the Esc key, matching the behavior of Illustrator and InDesign.
Photoshop will now highlight alternative characters when editing text; however, the pop-out tooltip to use this feature appears on the text frame and can make editing smaller text frames frustrating. For this reason, I deactivate it and go to the Glyphs panel instead (Window → Glyphs).
When you create new text frames in Photoshop, it fills it with copy using the last known type settings. I find this a hindrance and deactivate it.
- Finally, click on Technology Previews from the list on the left-hand side. I would suggest that you turn on all checkboxes.
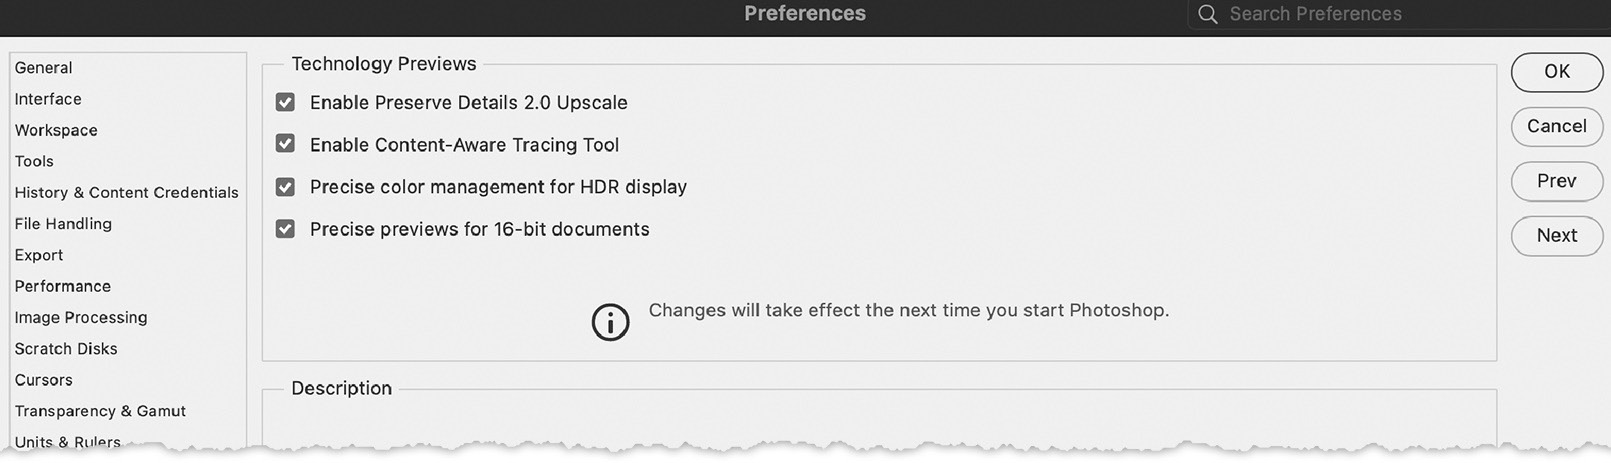
Figure 1.22: Technology preferences
I have found all of the features in this section enhance my experience of Photoshop. Preserve Details 2.0 Upscale allows for better-quality enlargements of images. The Content-Aware Tracing tool detects edges when creating a path; this can save valuable time rather than creating a vector path manually with the Pen tool.
Preference settings are only saved when you close Photoshop, so as soon as you complete your preference changes, close Photoshop and launch it once more.
If you experience persistent Photoshop crashes, it could be related to a corrupt preference file. To resolve this, delete preferences and redo them by going to General from the list on the left-hand side of the Preferences dialog and choosing Reset Preferences on Quit.
Defining color settings
For us humans, color is processed by the wonders of biology as we observe the world around us, almost without being conscious of it. Sadly, the same cannot be said for digital technology, where data is captured on digital single-lens reflex cameras (DSLRs) and smartphones and then passed from one application to another before ultimately being viewed in print and on screen.
To ensure that each device and application recreates color consistently, we need a method by which our technology talks the same language of color. Rather like traveling to a country where language differs, we communicate in the same tongue to understand one another. And so, we use color management to achieve this. It’s relatively simple to set up, can be synchronized across all Adobe Creative Cloud desktops, and only takes a few moments – a small price to pay for relatively consistent color across our projects. Here’s how to do it:
- You define a color management policy for your artwork by going to Edit → Color Settings. Click on the Settings drop-down menu in the upper left-hand corner of the dialog. Depending on which region of the world you’re based, the default setting displayed will differ.
- If you are based in the US, choose North American Prepress 2, which is often recommended for creating artwork intended for onscreen, web, and consumer-level printing (for example, a USB-connected printer) and professional printing at a third-party provider. In Europe, the equivalent is European Prepress 3.
- If you want to avoid warning messages popping up on a regular basis, turn off the three checkboxes under Color Management Policies. Photoshop will still do all of the color synchronizing required; it just won’t tell you about it every time it does!
- Once you have defined the appropriate settings, click on the Save button located at the top right of the dialog. You should be prompted to save the file in the
Settingsfolder presented to you. This is where Adobe looks for the settings file (CSF). Enter a filename ofMyColorand click on the Save button.A message in the middle of the Color Settings dialog reads Not synchronised. This indicates that your other Adobe applications are not using the same settings. We will resolve this in the next step. Click OK to exit. You will need to install Adobe Bridge from the Creative Cloud desktop application to complete the final stage.
- To sync the color settings across Creative Cloud desktop apps, we need to open Adobe Bridge. In Photoshop, go to File → Browse in Bridge. Once Bridge opens, go to Edit → Color Settings. Select MyColor from the list of available color settings and click on Apply. Bridge will apply the same settings across any desktop applications you have already installed:
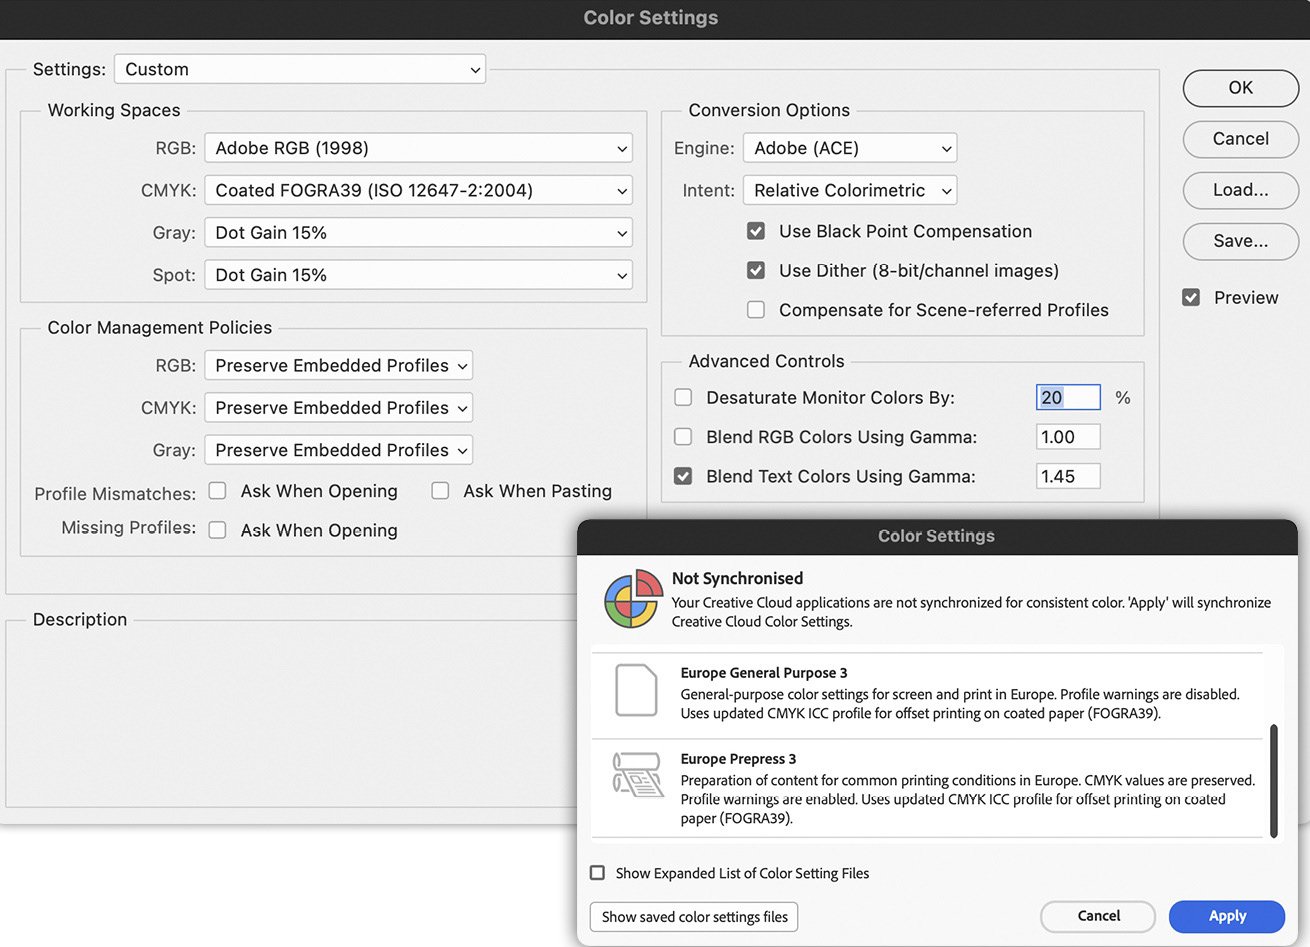
Figure 1.23: Color settings, defined in Photoshop and synchronized in Adobe Bridge
In this section, we’ve modified preference settings and color management. As the heading suggests, some edits are simply down to your personal preference, such as the interface brightness. However, some tools will now become more intuitive to use, simply by modifying the cursor appearance when active. Color management helps ensure color consistency across Creative Cloud applications. The final part of the chapter explores the building blocks of digital images. The better we understand how images are composed, the easier it will be to deconstruct them and attain the best possible quality.
Quality-first approach
You’ve probably heard of the saying, “garbage in, garbage out.” Well, this holds true in Photoshop as well. Just because an image looks fantastic on screen, it doesn’t guarantee it will when printed. Trust me – the last thing you want to experience is the horror of unboxing thousands of prints containing pixelated or blurred images.
PSD is by far the most powerful image format, offering tremendous flexibility within the application. The PSD format supports up to 250,000 layers in a single document, allowing you to scale, rotate, or reposition each component of your design with ease. Or, if you prefer, you can hide or even delete a layer without it affecting the rest of the composition.
Layers are a common facet of nearly all Adobe desktop applications and are especially critical to saving time. Because of the tight integration between other Adobe products, such as Illustrator, InDesign, Premiere, After Effects, Dreamweaver, and Adobe XD, you can directly import layered PSD files and preserve many of the Photoshop features. So, before you save your project artwork in a flattened JPEG format, which can only store a single background layer and no transparent background, consider using PSD instead.
This is a critical step to saving production time as you can edit and reuse the same document, rather than resaving an updated version in a different format each time you edit your artwork. Most applications will auto-update or prompt you to update your imported PSD rather than insist on importing again.
When saving a PSD and setting it to maximize file compatibility, it will include a composite version of a layered image so that it can be read by other applications, including previous versions of Photoshop.
Layered image files mean your text layers stay editable, and if you export from Illustrator, you can choose to create a layered PSD and keep text frames made in Illustrator editable in Photoshop too.
Common edits that you make to the color or brightness of your image, for example, can be stored in adjustment layers. They affect any layer below it in the stack and can be turned off/on and re-edited at any point by double left-clicking on the layer’s adjustment icon thumbnail in the Layers panel.
You can apply layer effects to specific layers to add a drop shadow or glow. Then, re-edit the effect at any time by double left-clicking on the effect name. If you wish to move the effect to a different layer, you can simply drag it from the source layer and onto the destination layer. Or, you could even create a duplicate by holding down the Alt/Option key as you drag and drop a layer effect.
Image quality
All digital photos are mosaics composed of tiles called pixels, an amalgamation of two words: picture and element. These tiny squares each contain just a single color. If you magnify an image in Photoshop beyond a zoom factor of 500%, those pixels become more apparent. But at first glance, at 100% magnification, they are indistinguishable, and our brains resolve those tiny patterns of color into a seamless representation of what the camera captured.
Resolution
Resolution has long been established and leveraged by artists over the centuries. Monet painted with short brush strokes known as daubs to create small clusters of colors. Standing close to the canvas, they have no apparent structure, but walk further back, and our eyes resolve these paint marks to create an image. Therefore, the distance and the size of the color marks are significant. This is as true for pixels as it is for paint.
Pixels per inch (PPI)
In industry, we refer to our formula as pixels per inch (PPI), a method for calculating image size in relation to the number of pixels in a given region, such as an inch. Magazines, read at a distance of 18 inches, require images with 300 pixels vertically and horizontally within every inch. A billboard ad viewed from several meters away requires only 30 PPI, while web graphics require in the region of 72 to 144 PPI to attain the appropriate quality.
Vector graphics
As with photographs, vector graphics are used in abundance in print, online, and on screen. When you see a logo, a road sign, or wayfinding graphics in a supermarket, those are almost certainly made from vector graphics. Unlike digital photographs, vectors typically contain a dozen or so colors and are composed of anchor points and segments that form shapes, not pixels. This means vector graphics are resolution-independent and capable of being used at any size capable of being printed and manufactured without losing quality.
Digital text is a form of vector art, but it could be simple shapes such as circles, rectangles, and lines. Photoshop provides a set of vector-editing tools and several shape libraries that can retain their vector quality. By storing vector art in its own shape layer, Photoshop can preserve the quality of the graphics, allowing them to be modified without losing quality:
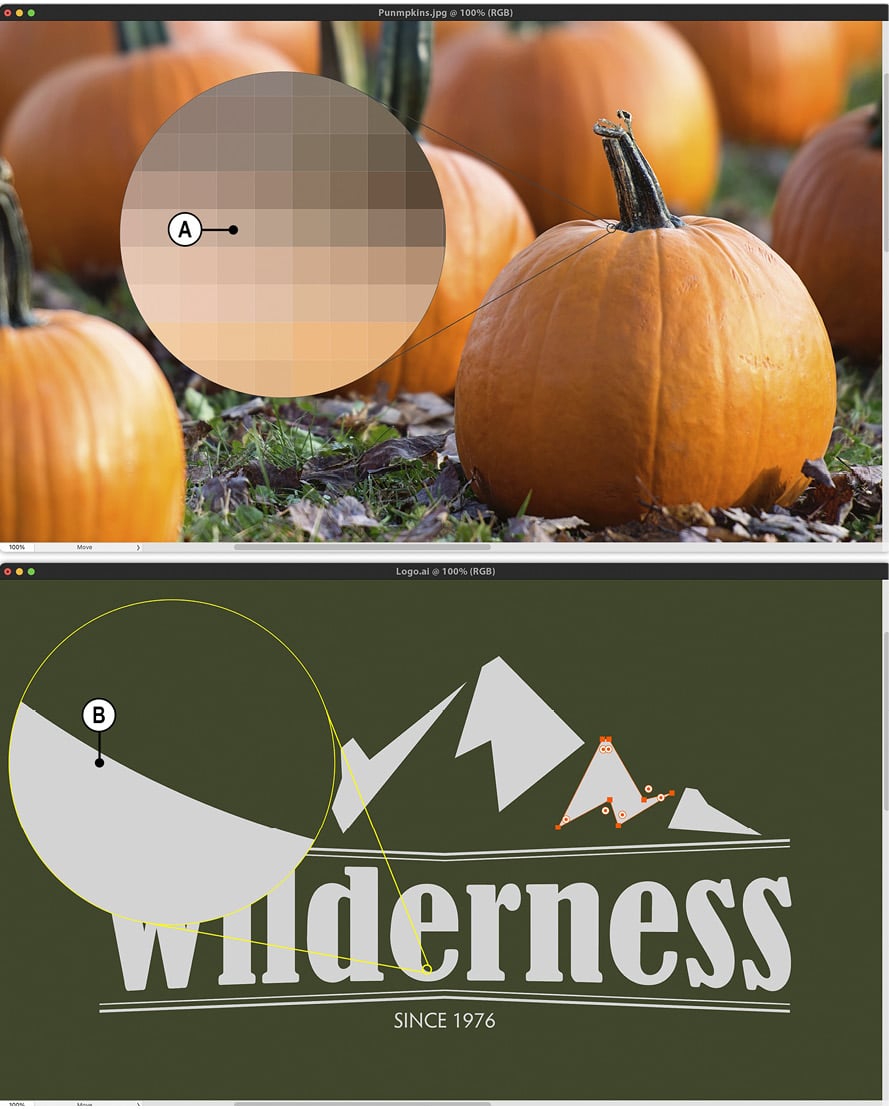
Figure 1.24: A comparison between pixel-based images (A) and vector graphics (B)
Calculating PPI in Photoshop
Image Size isn’t the most exciting Photoshop feature, but essential to determine the maximum size an image can be in print and on screen. Here’s how to use it:
- Go to Image → Image Size. When the dialog appears, set the Width and Height units to Millimeters (or whichever unit of measurement you are accustomed to) by clicking on the drop-down menu.
- Then, turn off the Resample checkbox (A) to create a link between not only the width and height of the image but also the resolution.
- It is normal that when you download an image from a stock site or your digital camera, it will possess a large width and height – for example, 2116 mm x 1411 mm – but a very low resolution of 72 PPI. With a link between the size of the image and the resolution, you can now simply enter the desired PPI into the Resolution setting. For professional print, this is 300 PPI. Click OK when done:
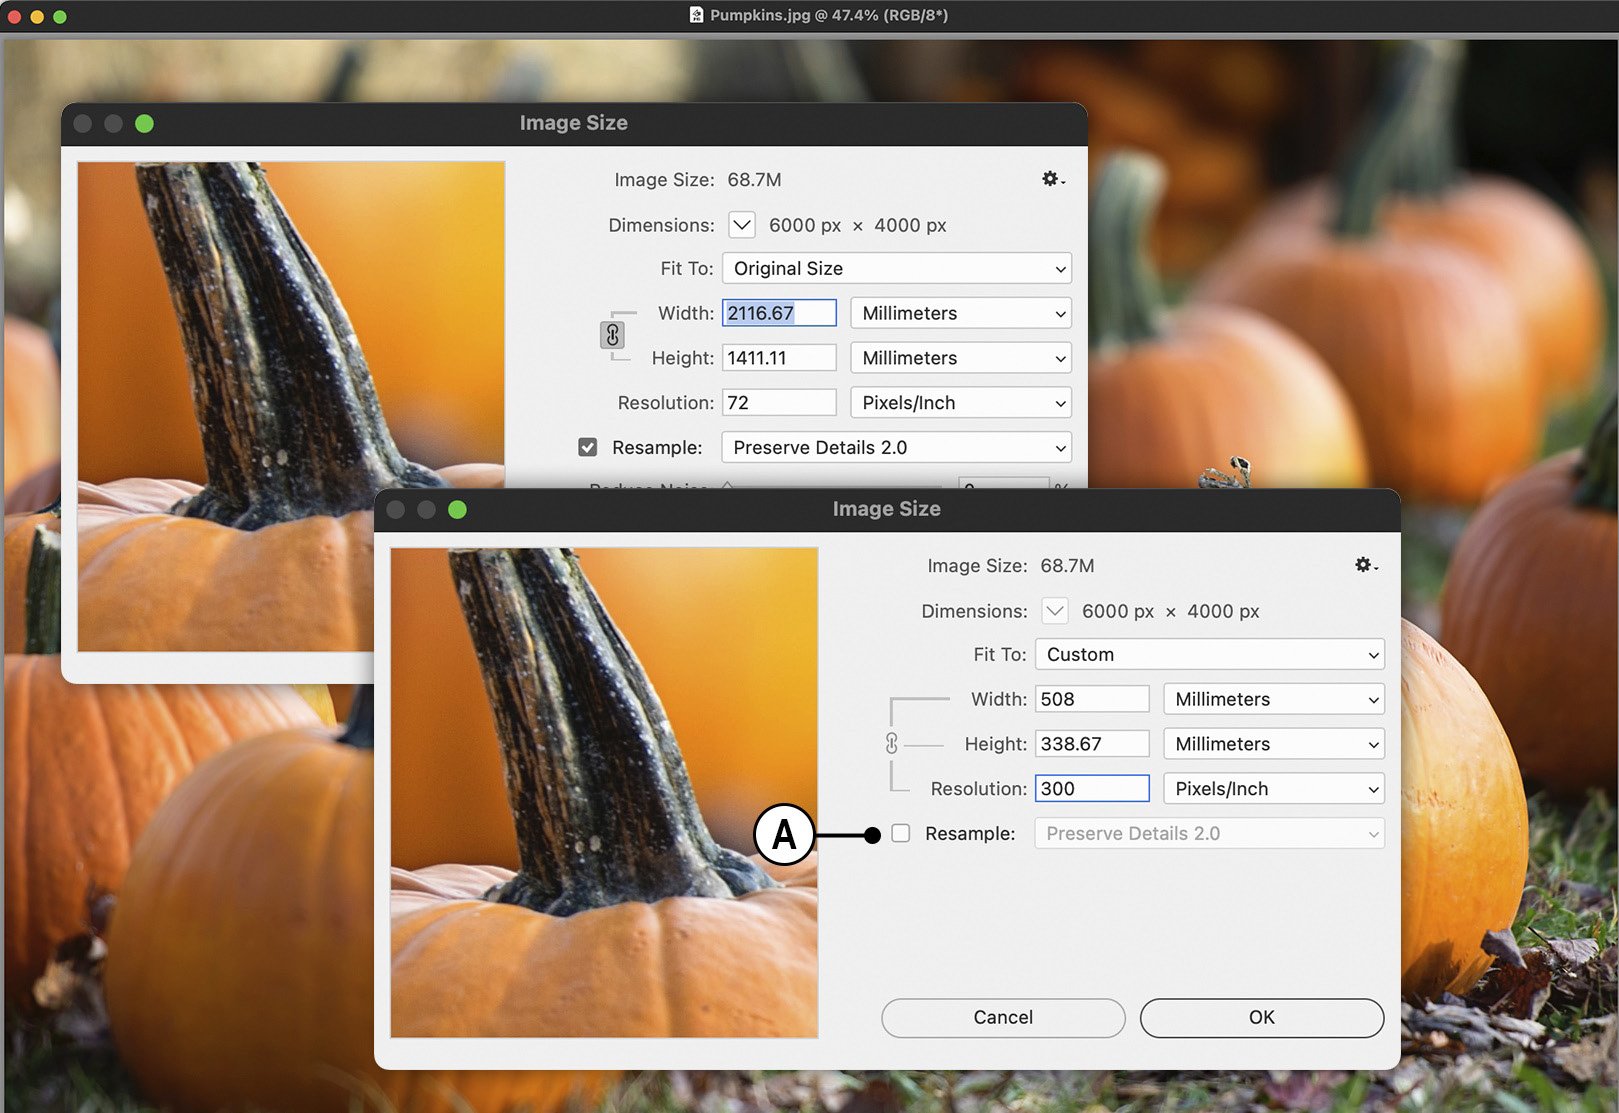
Figure 1.25: The Image Size dialog
In this section, we have learned the importance of defining quality from the outset by measuring the resolution of pixel-based images.
Summary
In this chapter, we have reviewed some of the standout new features and updates to appear in Photoshop, essential client feedback tools, and collaboration features that can make visualizing artwork and concepts easier.
We’ve customized the Photoshop interface to better suit our needs, simplifying how panels are arranged on screen to make finding tools easier to access while providing lots of space for images to take center stage. We’ve customized the Tools panel, hiding redundant tools and making popular tools easier to locate. We’ve seen how keyboard shortcuts can make features more accessible and hide nonessential menu options, all of this captured in a workspace that can be saved for future use.
We’ve seen how preference settings can make a significant impact on the way we interact with cursors and the behavior of tools in general.
Finally, we looked at crucial image-quality concepts such as PPI and resolution that help define the quality of pixel-generated artwork, ensuring that before we edit a file, it has been supplied in the appropriate quality.
In the next chapter, we will learn how to crop images, remove blemishes, and correct colors with nondestructive workflows.
