Download code from GitHub
Setting Up the Local Environment
In this chapter, I will guide you through the process of setting up your local environment, regardless of whether you are working on macOS, Windows, or Linux. We will cover the key steps required to install and configure your system to run the Adobe Commerce (AC) application on Docker-based environments.
Whether you are an experienced developer or a newcomer to the field, this chapter will equip you with the most efficient tools to work with AC.
Note
You can download a complete working environment for VirtualBox. It was created in the same way as it is explained in this chapter.
Now, before we start our adventure with AC frontend development, there are a few things we have to learn about and focus on. Feel free to skip this chapter and the next one if you are familiar with environments, Docker containers, and so on.
In the best scenario, you are given everything on a silver platter and all you need to do is start the environment with a few simple instructions.
This is your first step and is where our AC theme development journey begins, so let’s start.
You’re probably wondering or thinking, “Why do I need to focus on/know these things about environment setup?” and you are absolutely right to ask these questions. If you have worked on enterprise-class projects in larger teams before, you might be used to a situation where a complete fully working environment is given to you with a set of instructions on how to set it up – a silver platter, if you will. I truly wish that all AC projects you will be working on in the future will be like that, but as we all know, the world is not that perfect. Knowing this will also make you a great asset to the team you will be working with.
What if you are a freelancer and someone asks you to take over AC project theme development and you’re all on your own? Wouldn’t it be nice to be able to show some skills, win the contract, and be able to do everything by yourself? It’s the little things that matter the most.
So, heads up – our road (one of many) to set up the local environment starts now and it will be a bumpy one!! Our journey starts with setting up our forge, where we will travel through the command-line interface (CLI), Composer (not a musician) package installation, and AC commands.
In this chapter, we will cover the following topics:
- Hardware and technical requirements
- Preparing the technology stack for AC
- Virtualization with Docker
- Preparing a Docker manager
Technical requirements
The code for this chapter, as well as other chapters, can be found in this book’s GitHub repository: https://github.com/PacktPublishing/Mastering-Adobe-Commerce-Frontend
It is possible to run AC on a Raspberry Pi 4 device and, trust me, it can run smoothly as a platform, but it is not the best choice for the development itself.
While it is possible to run the platform on any computer, in my experience, the following setup is the best:
- A CPU with at least four cores, or at least eight threads.
- 16 GB of RAM (I recommend at least 32 GB of RAM as the virtual machines we will use to run AC will use a lot of memory.
- An SSD drive, though it will be even better if your PC/laptop has an NVMe drive. It just speeds things up when you work with the platform or do any development.
- A good internet connection – you’ll be downloading a lot of data once we start.
Choosing the best operating system
I only work on Linux and macOS since I find using UNIX-based operating systems for development is much, much faster, and, in my humble opinion, Linux and macOS simply have better applications to work with code.
What is your preferred operating system of choice? Is it Windows as it has most applications? Or maybe it’s macOS because of its unique and consistent ecosystem across multiple devices? How about Linux and one of its many, many distributions?
Well, I’m happy to tell you that it does not matter as we will cover all of these systems so that you can set up your local environment and work with AC.
Installing the required applications and services
We’ll start with a few words about the AC technology stack first before we start installing and configuring everything over the next 400 pages! If you don’t have access to AC, you can use the open source version, called Magento 2 Open Source; this is something you might have heard about before somewhere. I’ll explain more about the history behind Adobe and Magento in Chapter 2.
The platform is written in PHP and requires a bunch of services to run locally (or on a server), so let’s focus on the most important ones and explain what they are.
What is a service?
A service is a type of software (application) that runs continuously in the background on a computer or network and provides a specific functionality or set of functionalities to other applications. An email server is an example of a service; can you think of some other examples? I bet you can.
Next, I’ll explain what sort of services are required to run AC; I’ll try to illustrate this with a few comparisons to a restaurant (if you are completely new to frontend development, this might be handy). So, to run AC, you need the following:
- A web (HTTP) server: This is a piece of software that accepts HTTP(S) requests – that is, it is an application that your browser connects to and communicates with when rendering a web page.
You can treat the HTTP/web server as a butler in a restaurant. They take your order (a request) and come back to you with your order (a response) based on what you (or your internet browser) asked for or picked up from the menu.
For AC, it is recommended to go with Apache 2 or Nginx.
The order (a request) is being sent to the kitchen to be processed and in our case, the kitchen is PHP.
- PHP and PHP-FPM: Regarding a simple technical definition of PHP, it is a scripting language that is used to create dynamic web pages. For us, it is the kitchen of our restaurant (along with PHP-FPM) that’s run on the local or remote server and is responsible for generating HTML content that our butler will send back to us (a response).
The technical difference between PHP and PHP-PFM is very simple: you can treat PHP as the main chef of the restaurant and PHP-FPM as the manager who oversees if everything in the kitchen works as it should. If needed, they hire or fire extra staff to process multiple orders at the same time. In a real restaurant, it’s the chef who can fire or hire their subordinates, but I hope that this analogy is pretty clear.
- MySQL/MariaDB database: Now that our kitchen is ready to prepare meals for our customers, we need a place to store ingredients (data). In our case, this is a database. It’s like Excel, but you must use over 400 spreadsheet files with over 100 columns each, and the values of the rows and columns from one file need to match some columns and rows in other files. This is the heart of your entire data in the platform. Have I mentioned that a single piece of product information is stored in over seven database tables? I’m sure I have. Luckily for you, you don’t need to know much about the entire database structure.
Think of MySQL as a giant fridge that contains all the required ingredients (data) to prepare a meal for our restaurant guests.
Due to the large number of database tables, the process of merging data to be presented on the frontend can cause slow performance. As a solution, the Adobe team has incorporated an extra non-relational database known as Elasticsearch (ES).
Note
Elasticsearch has been replaced with OpenSearch by Adobe
- ES: This might be the first time you’ve seen this name or you might be new to it or haven’t worked with it before. Most developers don’t know how it works and that’s fine. Imagine ES as a black box in your project that you feed product data with. Or, if you’ve worked with REST API/GraphQL, ES is the API you connect to to feed and retrieve the data.
In the end, thanks to ES, data is retrieved must faster, making your eCommerce store run swiftly. ES is a required part of the platform and is responsible for the following, among other things:
- Product listing on category pages
- Product listing on search result pages
- Search suggestions
ES can be thought of as the restaurant’s menu or search system that allows customers to search for and find and retrieve already prepared dishes (datasets).
Important
At the time of authoring this book, the new version of Magento 2 will replace ES with OpenSearch.
- Varnish Cache: Varnish is primarily used as a wood finish or a protective coating, but that is not the way we use it in AC. In this instance, we’re talking about Varnish Cache, which, not diving into much detail, is an extra caching layer on top of AC that reduces the load on the database and the application itself by serving HTML-prepared content straight from RAM. This is called a full-page cache.
It is hard to find a way to compare Varnish Cache to our restaurant business, but let’s give it a try! Imagine that you have a 3D instant copier for every completed dish you’ve prepared. Once a dish is ready to be served to the first customer, its exact copy is stored in your 3D copier’s memory. If the next customer orders the same dish/meal, the 3D copier prints the same dish in an instant and the waiter (the HTTP server) can bring it to the customer (browser).
I’m afraid that the preceding list is not complete, so to make sure nobody points out that something is missing, let’s add the remaining ones. Two more services can be used but are not required for frontend development:
- Redis Cache: Redis is just another database that allows you to store information based on the key-value system. It is very fast as the data is stored in memory. You can (and probably should do so on production instances) use Redis cache for the following things:
- Session storage
- Cache storage (I’ll explain the Magento caching system in more detail in Chapter 3)
- RabbitMQ: I’ll use a very huge oversimplification here, so let me apologize to all backend developers in advance: it is simply a messaging system to provide and allow asynchronous tasks to be run by Magento 2 code. Message queues, and why and when they should be used, are much more of a backend thing, but I’ll give you an example so that you know why they have been added to the framework in the first place.
Imagine that a merchant has requested that their store communicate with their internal system via some sort of API. This communication needs to take place every time a customer places an order in their AC store.
There are a lot of ways you could do this in AC:
- Plugins
- Preference
- Observer
I don’t want to describe the differences between these approaches, but each of these places might encounter the same serious problem: “What happens if the merchant’s third-party API is not responding?”
If the customization, as stated earlier, was modified in one of the three ways described previously, the merchant’s API might stop responding, in which case we might be looking into serious checkout issues on our eCommerce platform. We don’t want that.
By utilizing a messaging system, we can push communication to a queue and process it asynchronously, ensuring a seamless and reliable experience for our merchants and their online customers.
As a frontend developer, you don’t need to know much about this, but you should be aware that a lot of AC-based eCommerce systems might have some customizations or additional queues configured, so make sure that you ask for the project’s documentation once you take on a project that is already live.
I hope that you’ve realized that the platform is not just a simple piece of software. It is a very advanced application that requires a lot of services to run. I believe that it does not matter if you are a frontend or a backend developer. When you start dipping your toes into AC waters you must know how those pieces of the puzzle fit together.
If I were to explain the step-by-step configuration for each of the listed services, I might as well write another book. Luckily for us, there are great open source tools available that do all the required configurations for us; I’ll explain them in the next chapter. For now, we just need to prepare our computer before we start using it.
Preparing the technology stack for AC
Now that we know what services we will need locally (or on a remote server) to run AC, let’s proceed with installing each of them manually, step by step. Just kidding! If you are a backend developer, I encourage you to do that by yourself, but frontend developers should not waste time on this. I mean, we are building a restaurant, or a workshop – a frontend development forge that produces pure gold. An alchemist’s laboratory!
You can skip the next few sections of this chapter in the following cases:
- You have enabled virtualization on your Windows 11 (Windows 10) PC and installed Windows Subsystem for Linux 2.0 (WSL 2) on your Windows machine
- You have Docker Engine installed and working on other projects
- You’ve worked with Docker-based environments before
If not, please follow along.
Developing AC on Windows
In my opinion, I believe that Linux and macOS systems are much better for any development. Well, maybe except for ASP/C#, but Magento/AC is based on PHP, so it is much better to run or use a UNIX-based operating system.
Lately, by working with large enterprise class projects, I’ve seen a lot of developers, who work on Windows systems, switch from WSL/WSL 2 to a VirtualBox-based environment with Linux (Ubuntu, as it’s the easiest to run) installed as its virtualized and main system.
You can use the same approach (VirtualBox-based) on macOS as well. The purpose of this is to avoid time-consuming file sync between your local drive and a virtual machine drive, which runs very, very slow and AC has a lot of files… like, A LOT!
However, for this book, we will cover the Windows WSL 2-based environment setup step by step.
Installing WSL 2 on Windows
Before we proceed with WSL, we need to enable (or check if it’s already enabled) virtualization in our Windows operating system. To do this, follow these steps:
- Click on the Windows icon.
- Search for Turn Windows features on or off.
- Enable Hyper-V:
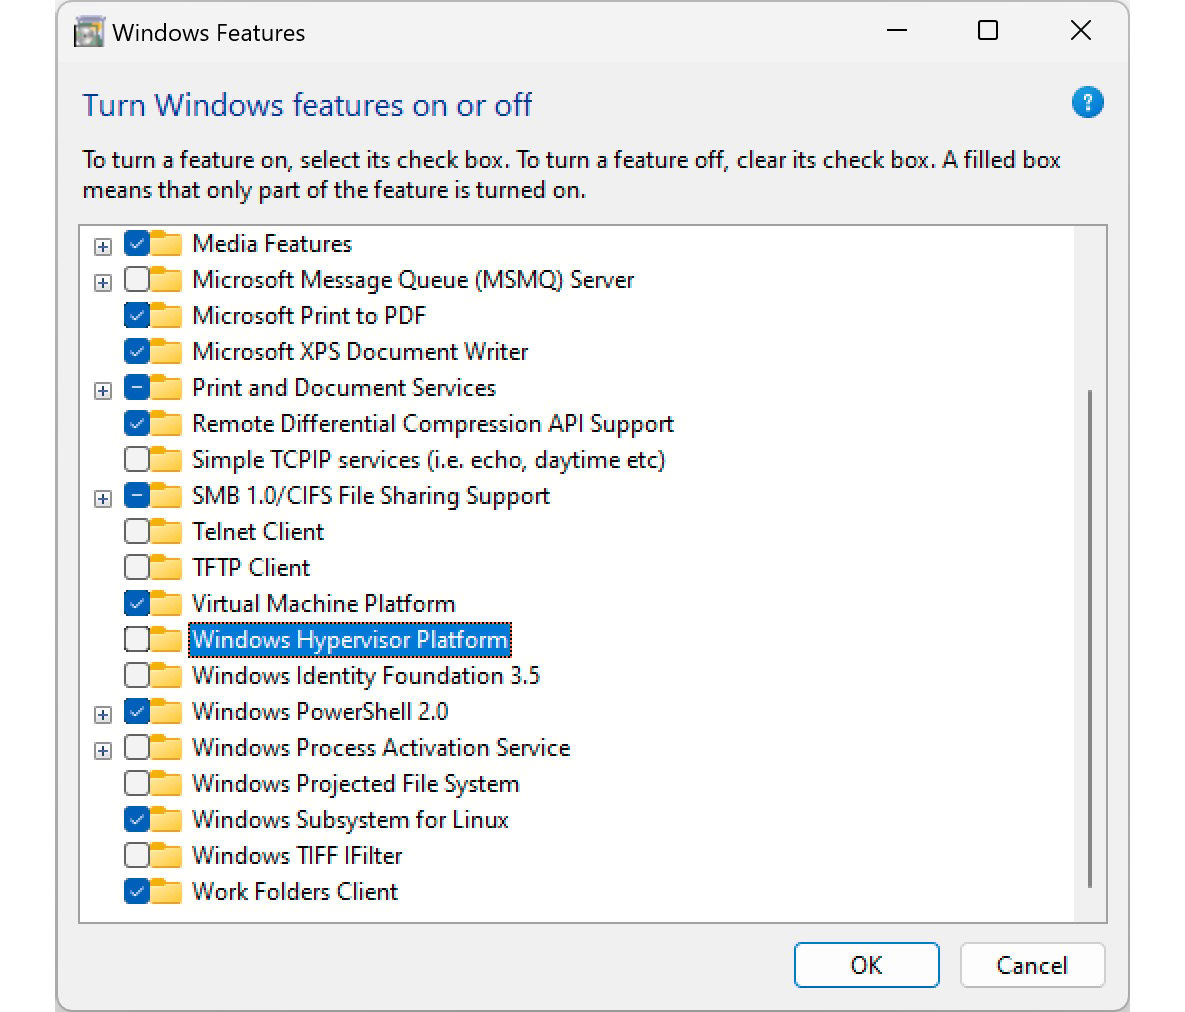
Figure 1.1 – Enabling Windows Hyper-V
Once you’ve done this, restart your PC.
Installing WSL 2 has been simplified and only requires you to do two things:
- Open Command Prompt as an administrator.
- Type the following command in Command Prompt:
wsl --install
- Restart your computer.
If you have an older version of the Windows operating system, or you have not installed the required packages, you can proceed with this simple guide:
- Click on the Windows icon.
- Search for Turn Windows features on or off:

Figure 1.2 – Searching for Turn Windows features on or off
- Click/enable Windows Subsystem For Linux:
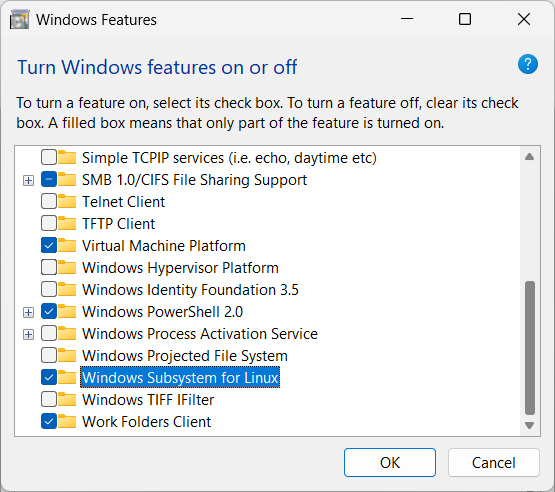
Figure 1.3 – Installing Windows Subsystem for Linux
This section covered all the steps you need to complete on Windows before you can proceed. Once you’ve done this, you can start with the Linux installation. Yes, we will be running Linux on Windows! As crazy as it seems, we are getting close to our goal: a great local environment for AC projects.
Installing Linux
Now that Windows has been configured and WSL 2 has been installed, let’s install one of the Linux distributions; I’m using Ubuntu and I recommend that you use it as well. Proceed with the following steps:
- Open the Microsoft Store app.
- Search for
Ubuntu. - Select Ubuntu 22.04.
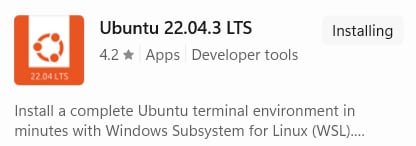
Figure 1.4 – Ubuntu 22.04
We are not done yet. Now that Linux has been downloaded, we need to run it and configure it.
Configuring Linux
We need to launch it for the first time and create a user account.
Make sure you remember the password you configure in the next few steps. We are almost done with the system setup, so this is a final to-do list for you:
- Click the Windows button and type
Ubuntuto find your installed Linux operating system. - This will launch the initial configuration for Ubuntu 22.04; it might take a moment to install:

Figure 1.5 – Starting the installation

Figure 1.6 – Finishing up the Ubuntu installation
- Set your password. Note that you won’t see the characters you type:
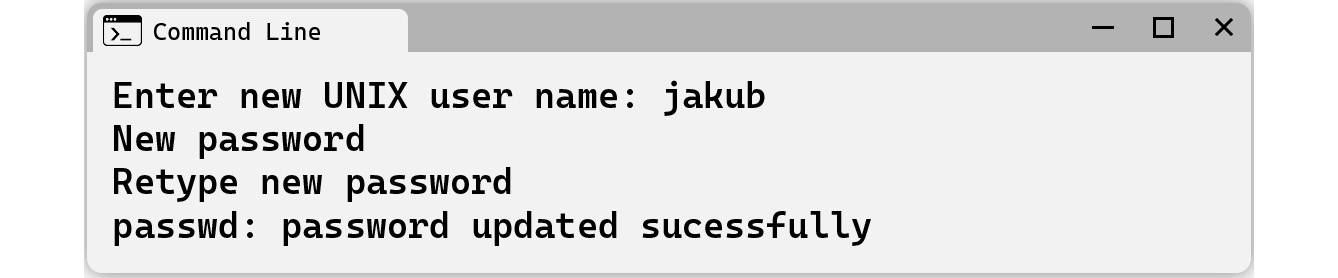
Figure 1.7 – Setting up a user password
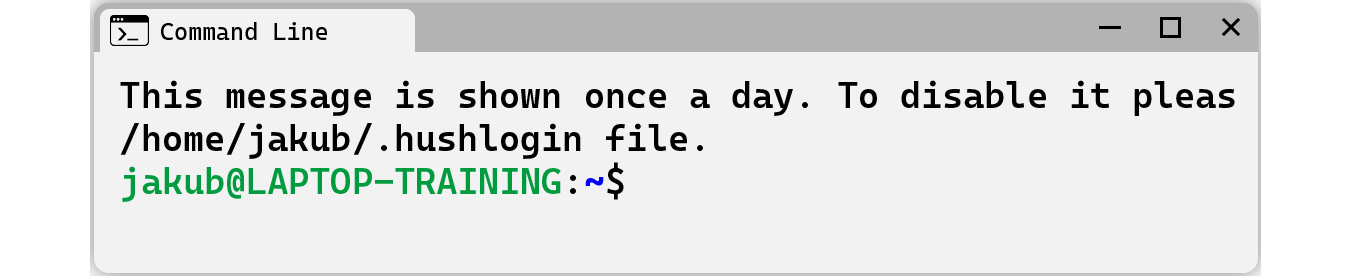
Figure 1.8 – Linux is ready
So far, you’ve made the required configuration changes on your Windows machine, after which you downloaded, installed, and configured Linux. With that, your Windows operating system is fully ready, which means you can proceed with the next steps and set up your local development environment.
If you are curious, check out the next few pages to learn how to work with VirtualBox. I don’t follow this approach, but I know developers who work this way, hence why I’ve described it.
If not, please jump to the Time for virtualization – Docker section of this chapter.
Installing Ubuntu on VirtualBox
As I mentioned earlier, this solution has become much more popular across multiple developers and is becoming widely used by people who like to use Windows (or macOS in some cases) as their main system. This is a very simple guide, so just follow the next few steps:
- Download and install the latest version of Oracle VirtualBox.
- Download the latest Ubuntu 22.04 image from the official Ubuntu site: https://ubuntu.com/download/desktop.
- Open VirtualBox.
- Create a new machine in VirtualBox.
- Select the downloaded Ubuntu file under ISO Image:
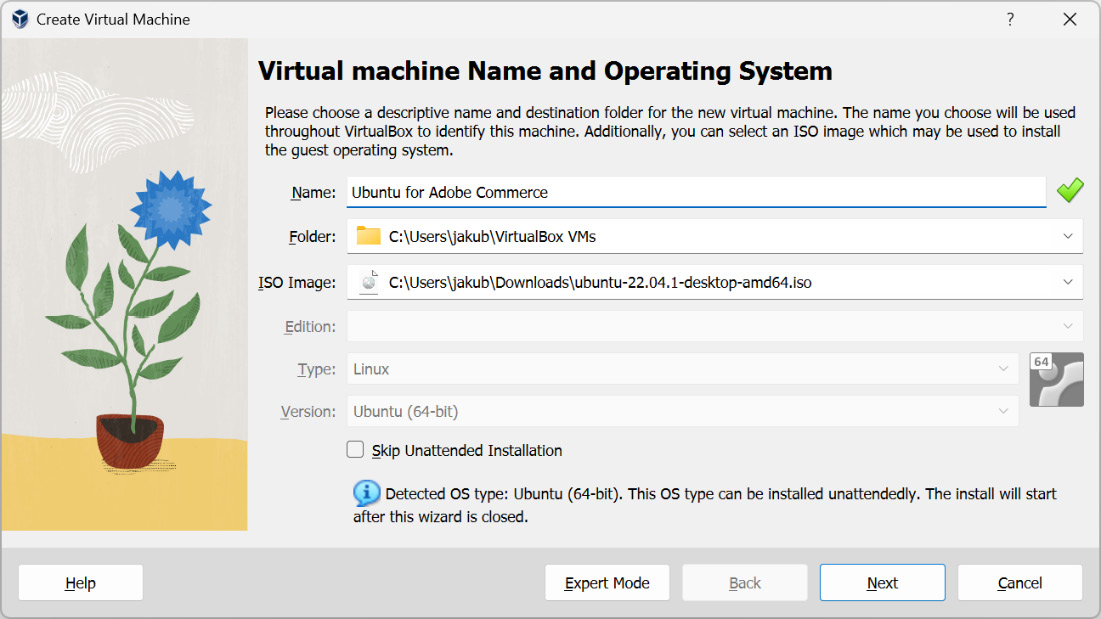
Figure 1.9 – Creating a virtual machine
- Assign RAM/CPUs for Ubuntu – the more the better. However, to safely run Adobe eCommerce without any issues, I recommend the following:
- 8 GB of RAM (you can use 4 GB of RAM, but at least 8 is recommended). You need to make sure you won’t use your entire available memory.
- At least four CPU cores:
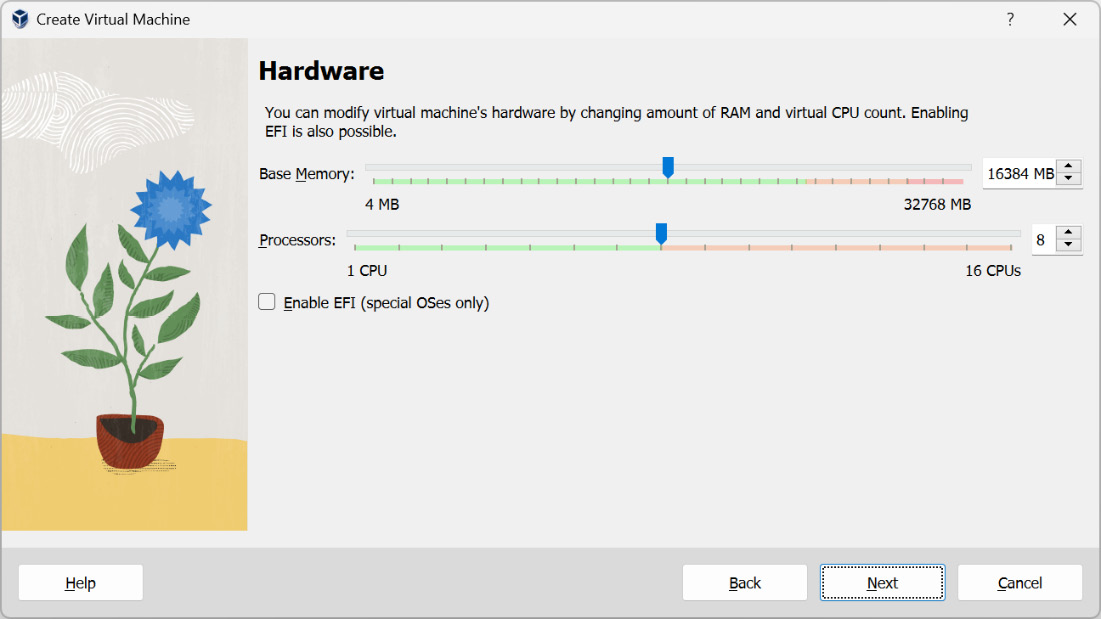
Figure 1.10 – Assigning hardware
- Select your disk size. This depends on the project you will be working on.
- Run your virtual machine by clicking the Start button.
To install Ubuntu on your virtual machine. follow these steps:
- Once you’ve restarted the virtual machine, you need to install Guest Additions for VirtualBox.
Guest Additions for VirtualBox is a set of drivers and utilities that can be installed on a virtual machine running on VirtualBox. It includes improved video support, better mouse and keyboard integration, seamless window integration, and many other useful features. For us, it simply means that Linux will run faster and we will be able to integrate with our Windows operating system with our shared folder.
To install this, turn on your virtual machine and start a terminal (we will be using it a lot from now on).
- Mount the Guest Additions ISO image:
Figure 1.11 – Mounting the Guest Additions ISO image
- Open a CD drive folder on your virtual machine, find a file named
XXX, right-click it, and select Run as Program. This will install Guest Additions. - Reboot Ubuntu Virtual Machine.
If you decide to go with the VirtualBox solution for your local development environment, that is perfectly fine. It is not the best solution but it works and is an acceptable way of doing development.
From now on, all the operations we will be doing will require a Linux subsystem, Virtualized Linux (via VirtualBox), or macOS system, or Linux as your system of choice.
Virtualization with Docker
The most simple explanation of Docker is that it is an application that allows you to create small virtual computers (the proper name for Docker is container, we can also call it a virtual machine) on which an operating system is installed that allows it to run a dedicated application or a set of applications.
There are multiple explanations and resources online about the advantages and disadvantages of Docker-based development. For us, the most important benefit of a Docker-based environment is that it allows us to create a set of containers to run AC without any issues. You can skip the next section if you already have Docker Engine or Docker Desktop installed on your machine.
Installing Docker and the Docker Compose plugin
Docker Engine is available for Linux, macOS, and Windows. There are multiple online instructions on how to install Docker, so I assume that you can install Docker by yourself by following an online tutorial.
Docker Compose is a tool for defining and running multi-container Docker containers. A configuration for all containers and their services is based on a YAML file, which allows you to start all required services to run AC using just one file.
Installing Docker on Windows
For now, let’s just proceed with installing Docker Desktop for Windows. You can find the installation binary files on the Docker website: https://docs.docker.com/desktop/install/windows-install/.
Once you have installed Docker Desktop on Windows, please make sure you have enabled WSL 2 support:
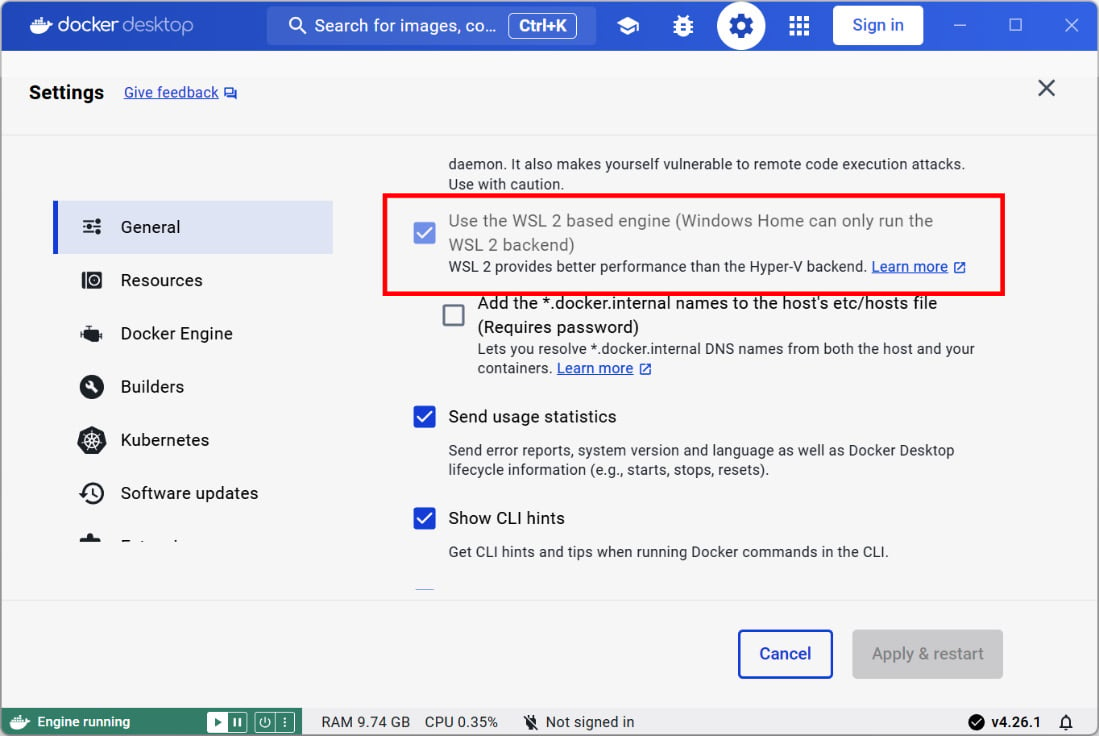
Figure 1.12 – Enabling WSL 2 support
This will allow you to work with Docker containers on your WSL 2 machine. After installing WSL 2 and Docker on your Windows machine, open your Ubuntu console and see if you can use Docker commands inside it. To do this, type the following command:
docker ps
If the message you get is similar to what’s shown in Figure 1.13, you have to enable support for your WSL 2 instance in the Docker Desktop application.
We have to do this for Linux to see and be able to connect to the Docker containers as each Docker container will run a required service to run AC locally:
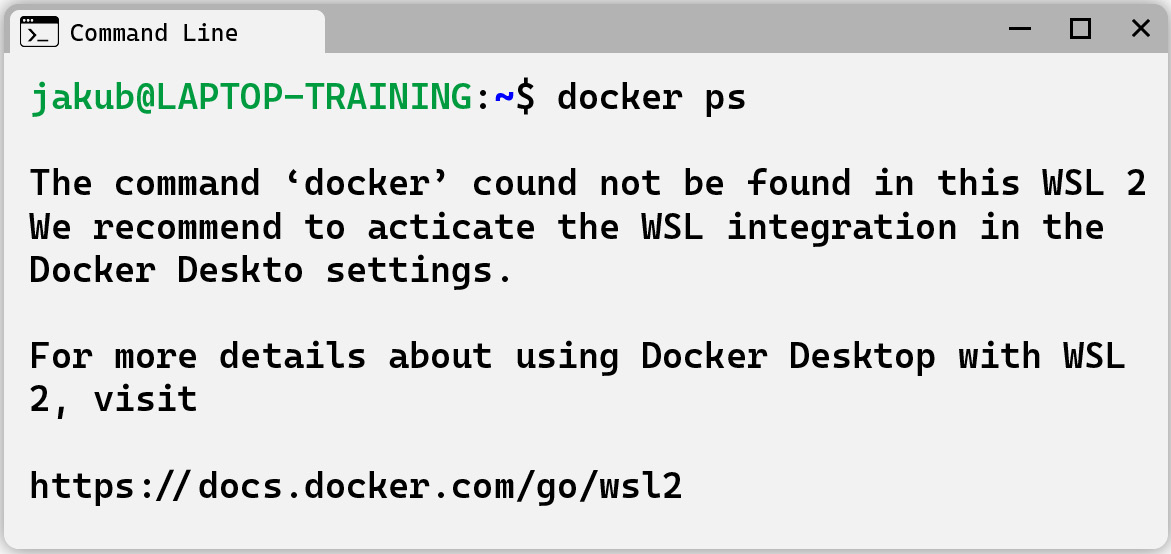
Figure 1.13 – Docker not being recognized by Ubuntu
You can do this in Docker’s application configuration by navigating to Resources | WSL integration | Enable integration with my default WSL distro:
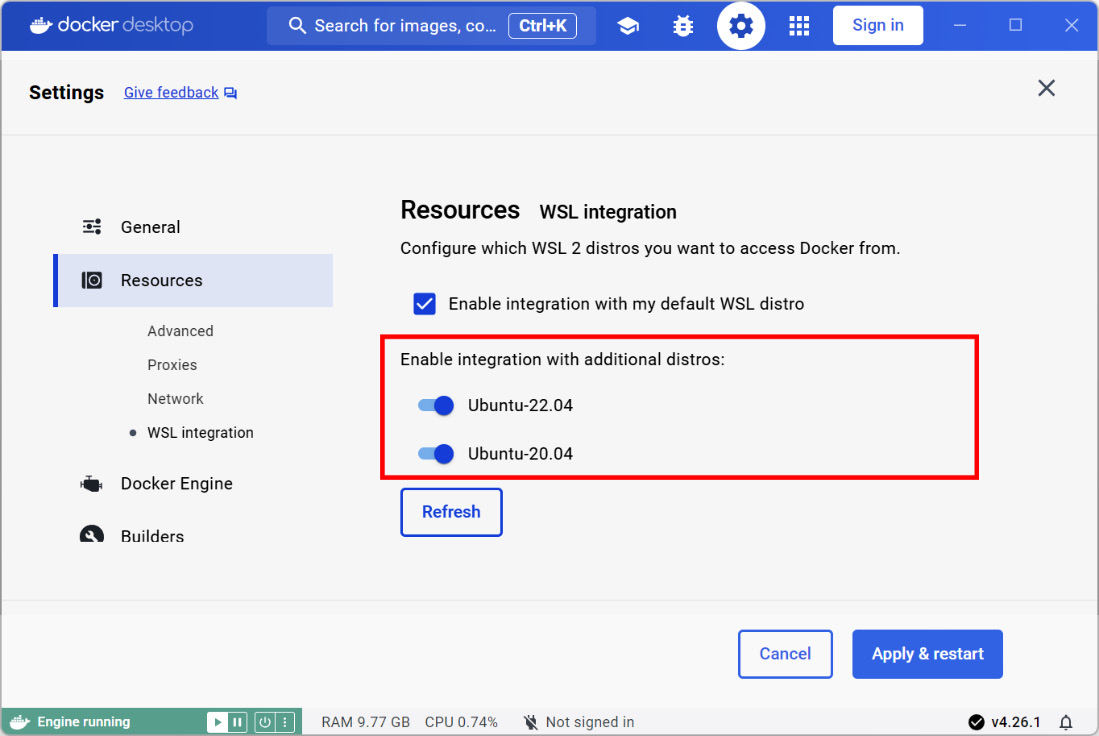
Figure 1.14 – Enabling Docker support for WSL
Enable WSL for installed Linux distributions. Click on Apply and Restart. Now, go back to your WSL machine; you should see Docker Engine being connected to it:

Figure 1.15 – Docker Engine connected
With that, your Windows PC is fully ready for the final step of preparing our working environment.
Installing Docker on macOS
Similar to how we did this for Windows, just proceed with the Docker Desktop installation for macOS. You can find the installation binary files on the Docker website: https://docs.docker.com/desktop/install/mac-install/. Just make sure you download the proper file for the CPU you have in your Apple device. Follow these steps:
- Download the proper version based on the CPU located in your Mac:
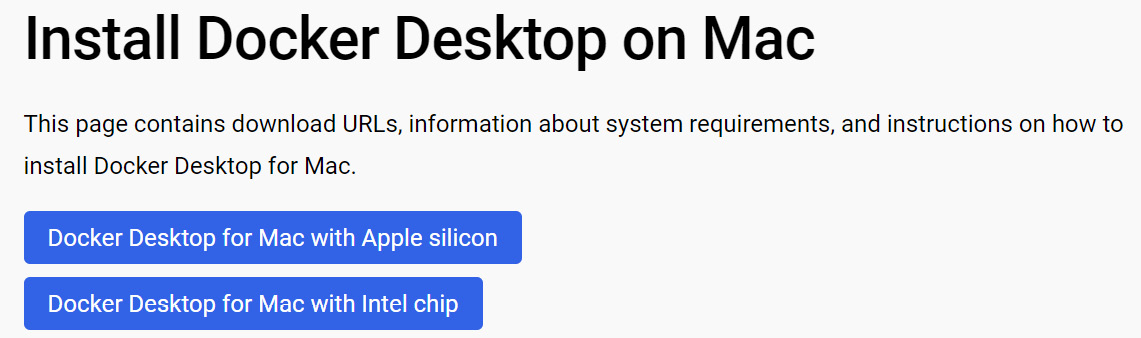
Figure 1.16 – Picking up the proper Docker version for macOS
- Proceed with the installation.
- Start the Docker application and verify the installation:

Figure 1.17 – Verifying the installation
Installing Docker on macOS does not require any extra steps. You can now go ahead and start reading the Preparing a Docker manager section.
Installing Docker on Linux
The Linux installation can be a little more complex, but it depends on the Linux version you are running. Running Linux does not require you to run Docker Desktop applications –everything can be managed through the CLI via Shell. However, if you haven’t started the Docker installation on Linux, I encourage you to go with the desktop application first.
I think it is safe to assume that if you are working on Linux, you are also familiar with how to install any software packages using the CLI and you probably have Docker running already.
Similar to macOS and Windows, we will also use Docker Desktop, so proceed with the installation.
Wrapping things up
Once you have Docker installed and, for Windows users, installed WSL 2 with the latest version of Ubuntu, you need to check the following commands and make sure you can run them locally (or on a remote server):
- Open a terminal application.
- Check the list of running Docker containers by running the following command (you don’t need to use it; we are just checking if we can use and manage a Docker container as a logged-in user):
docker ps
This command lists all the active Docker containers you have installed. If this is your first time running this command, the list will be empty and will look like this:

Figure 1.18 – Active Docker containers list
- Check whether you can run the
docker-composecommand by typing the following:docker-compose -v
You should see the following output:

Figure 1.19 – Running the docker-compose command
Docker Compose is a tool that simplifies the process of running multiple applications or services together in a containerized environment.
As I’ve explained before, Magento/AC requires a lot of services to run and we will use Docker to run each service in its own container. Without the docker-compose command, we would have to start and configure each Docker container separately and we would have to tell all containers how to communicate with each other.
You can read more about the docker-compose command on Docker’s website. For our local development setup, we just need to be sure that this application (docker-compose) is installed since the next section will describe a tool that uses docker-compose under the hood.
At this point, we are ready for the final step of this chapter – installing a piece of open source software to manage our Docker containers so that we won’t have to do it manually.
Preparing a Docker manager
You already know that we’ll be using Docker from now on to manage our virtual machines and install the required services to run AC. There are multiple examples of docker-compose.yml files available on the web. However, working with docker-compose and its configuration files might be a challenge for some. That is why I’ll show you, in my opinion, the best tool there is to manage everything for us with a few simple commands. In Chapter 2, we will put this tool to use and configure a fully working open source version of Magento.
To get our local development environment ready, we have to do three things:
- Install a Docker manager: First, we’ll focus on getting a Docker manager running. We can do this via the CLI. We will be using it a lot from now on, especially once we have AC/Magento Open Source running locally.
At the time of writing, my Docker manager of choice is Warden.
- Configure DNS resolution: The mechanism to translate a domain name into its associated IP address is called DNS resolution. From now on, all our projects will use
*.testas the domain extension. For example, our first project will be available at the following URL, which we will set up in Chapter 2: https://app.packt1.test.It is important to note that there is no domain extension for
*.test. This is something we will use for local development. That’s why we have to teach our operating system how to resolve (match) all domains available at*.testwith our local machine. While the initial configuration is being done with Warden during the installation, certain operating systems might require additional customization to enable successful DNS resolution. I’ll describe this process for all three operating systems. - Install SSL certificates: I don’t like to be asked the question, “This certificate is not secure. Are you sure you want to proceed?” each time I open my project. We need to configure our web browsers (or operating systems) to trust our local SSL certificates. The main one will be installed alongside Warden.
The next section marks the concluding stage in preparing our local workshop. It’s advisable to move forward only if your operating system is equipped with fully operational installations of Docker Desktop, Docker, and Docker Compose.
What is Warden?
Warden is a CLI utility for orchestrating Docker-based developer environments. It enables multiple local environments to run simultaneously without port conflicts via the use of a few centrally run services for proxying requests into the correct environment’s containers: https://github.com/wardenenv/warden.
Warden was created by David Alger and we are all thankful for his work as it has improved our workflows and the way we manage projects. The official documentation is located at https://docs.warden.dev/.
There is also a second option that is very similar to this one: Reward. It is written in Go, and it supports Linux, macOS, and Windows (via WSL 2). You can read more about Reward on the official website: https://rewardenv.readthedocs.io/en/latest/.
My pick is Warden, at least for now. I’m saying for now because, at the time of writing, a lot of improvements have been made.
Time for CLI
Whichever tool you decide to use, be it Warden or Reward, can only be installed in CLI.
This is the moment when we’ll start working with the CLI, so if you have not worked with it before, it might be a little weird, but trust me, it is very simple and quite handy.
Before we proceed with installing Warden, let’s discuss some CLI applications that will improve your workflow and work better than natively installed applications.
The following table shows terminals for working in each system’s CLI:
|
Windows |
Linux |
macOS |
|
Default: Command-line prompt |
Default: Any terminal that comes with the Linux distribution |
Default: Default terminal on macOS |
|
Recommended: Hyper Terminal |
Recommended: Terminator |
Recommended: iTerm2 |
Table 1.1 – List of terminal applications
I’ve worked on all the operating systems listed in this table. Each default terminal application to work with the CLI had some limitations that I did not like. Let me give you an example – the Windows command-line prompt does not allow you to have multiple terminals in the same window. The same goes for any default Linux and macOS terminal apps.
When working with AC, we will need to run a lot of commands in the CLI. Let’s consider two examples: clearing the cache (more about the cache will be covered in Chapter 3) and watching CSS compilation. I prefer to be able to do this in one application window, not multiple ones.
That’s why I’ve shared the list of recommended terminal applications – they keep everything in one place. As shown in the following figure, two terminals are split vertically in one window:
Figure 1.20 – Terminals split in a window
Now that you know what Warden is and why a good terminal application might help you with your daily work, let’s proceed with its installation.
Installing Warden
Open your system’s terminal and follow these steps for each OS:
- Windows: Hit the Windows key + r, type
cmd, and press Enter. Alternatively, open any terminal application, typewsland press Enter; this will log you into your Linux instance. - OSX: Hit Command + Space to open Spotlight. Type
terminaland start the application. If you have installed iTerm2, I recommend selecting this as your main terminal application. - Linux: Hit Ctrl + Alt+ T. This will start a terminal in a new window.
Once you are in your terminal, type the following commands (they will work on all systems). Note that we are going to use sudo before each command. It stands for Super User DO and will allow the command to be executed with root-level privileges:
sudo mkdir /opt/warden
sudo chown $(whoami) /opt/warden
git clone -b main https://github.com/wardenenv/warden.git /opt/warden
echo 'export PATH="/opt/warden/bin:$PATH"' >> ~/.bashrc
PATH="/opt/warden/bin:$PATH"
warden svc up
This will install Warden and set all proper privileges on your system. The last command will configure everything that is required. You should see a message very similar to this one:
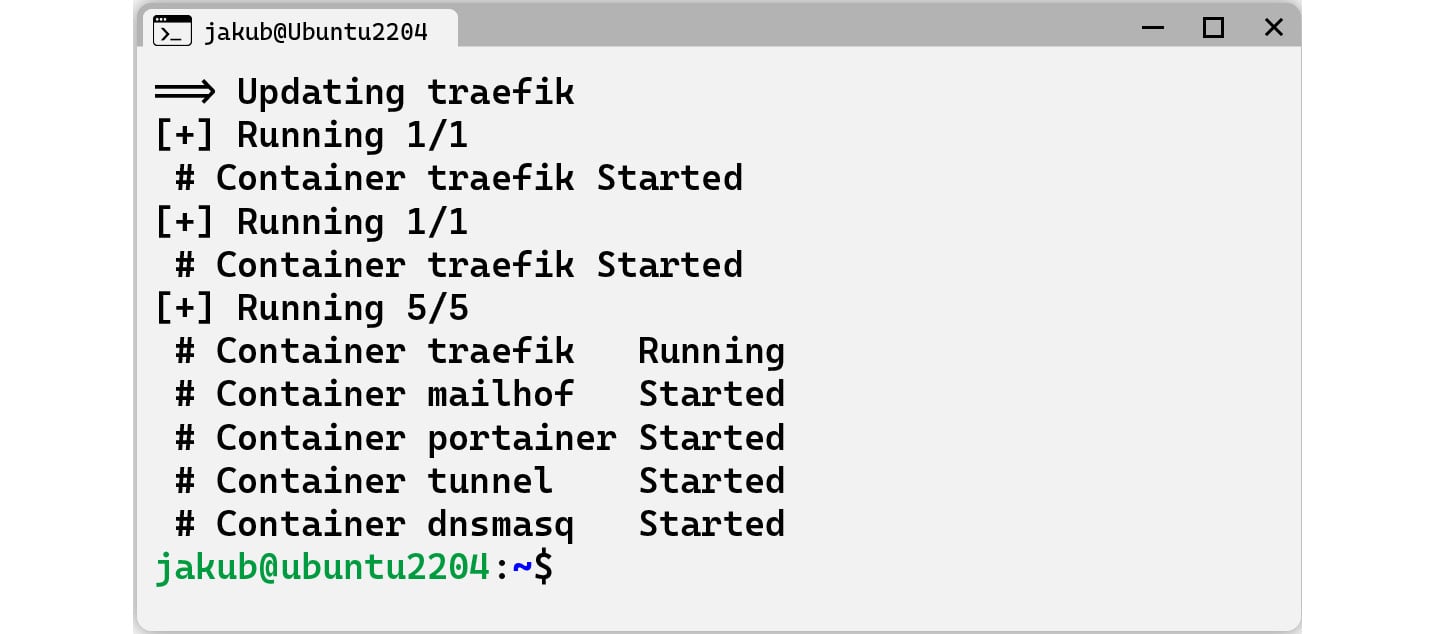
Figure 1.21 – Message upon configuration
I could say that everything is ready for you to start local development, but there are a few steps left and they depend on the operating system that’s installed on your machine.
Warden’s initial installation will configure the following services on your local machine. Type any of these URLs to check whether they work on your end:
- https://traefik.warden.test/
- https://portainer.warden.test/
- https://dnsmasq.warden.test/
- https://mailhog.warden.test/
If you see the message shown in Figure 1.22, then you need to configure DNS resolution on your machine:

Figure 1.22 – Checking DNS resolution
In the next section, I’ll show you how to configure DNS resolution on each operating system. By doing this, we will teach our computers how to resolve any URL that ends with .test regarding the URL address you type in your browser.
You’ve probably realized that we’ll be using *.test as the domain extension for our projects. However, with Warden as our base, we won’t have to configure everything each time we create a new project. Everything will work out of the box, but we need to tell our operating system how to find and resolve the domain names.
Configuring DNS resolution
I hope you won’t mind if I won’t dig into the role of dnsmasq or any other services installed by Warden. I would us to focus on finishing up our local environment setup and tell our operating systems how to resolve the *.test domain extension. As I’ve done previously, I’ll cover this for every operating system. First, we’ll look at Windows.
Configuring DNS resolution on Windows
You need to set 127.0.0.1 as your main DNS. It will not break anything but might cause issues with some VPNs, so make sure you go through this with your system administrator. Follow these steps:
- On Windows 10/11, go to your active network connection settings and edit DNS server assignment, as follows:

Figure 1.23 – DNS settings
- Click Edit.
- Change Automatic to Manual:
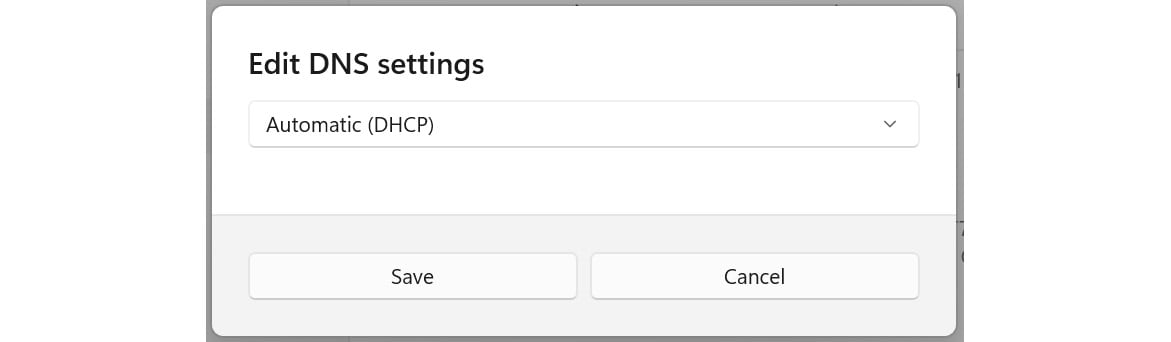
Figure 1.24 – Changing Automatic to Manual
- Change Preferred DNS to
127.0.0.1. - Change Alternate DNS to one of the following:
8.8.8.8or8.8.4.4for Google1.1.1.1or1.0.0.1for CloudFlare9.9.9.9or149.112.112.112for Quad9
- Click Save.
Here, we forced the Windows network connection to use our local machine (127.0.0.1) as the main domain name resolver. This is being done by dnsmasq, one of the services installed with Warden.
If you’re wondering why we’ve added the alternate DNS, it is very simple. If your Docker container with dnsmasq goes down, your network connection won’t be able to match any domain name with its IP. Your computer will stop matching (resolving) the domain names and you might start to think that your internet connection is broken. It’s not – that’s why we’ve added the alternative DNS, to make sure domain names are resolved and you won’t experience any weird issues.
Let’s proceed further. Try typing one of the URLs mentioned earlier. It should work now! At this point, you are almost ready; we just need to resolve a small certificate issue as you’ll probably see something like this:
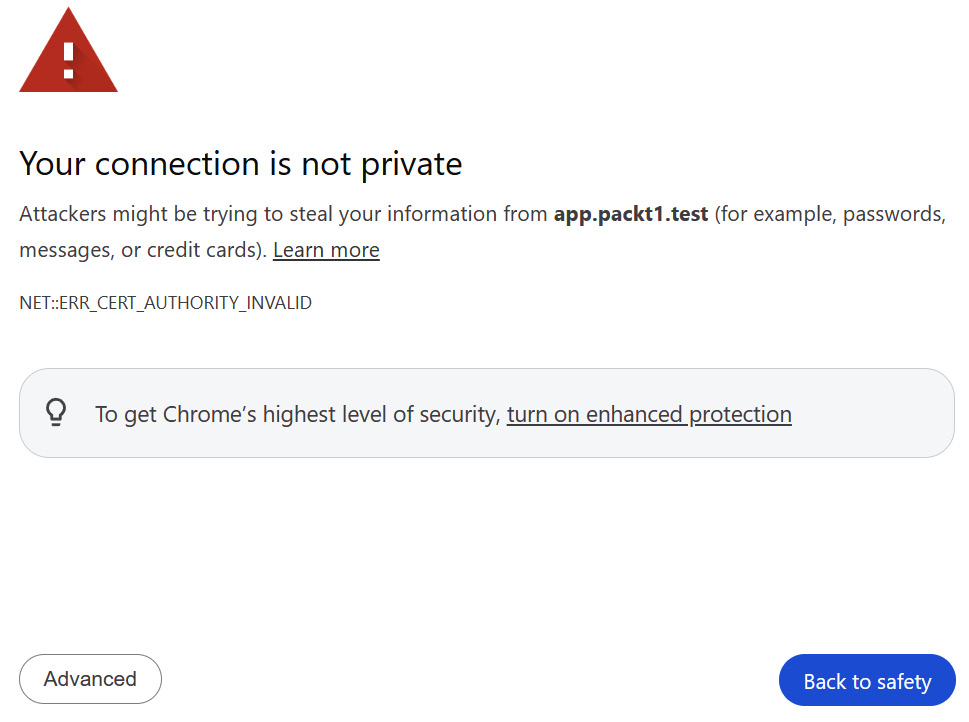
Figure 1.25 – Invalid SSL
Please proceed to the SSL Configuration section of this chapter if you’re working on Windows. Stay put to see the setup for macOS and Linux.
Configuring DNS resolution on macOS
There’s not much to write about here. DNS resolution is done automatically on macOS. This means that all the URLs mentioned earlier will work for you out of the box.
You shouldn’t experience any issues with the SSL either (as people working on Windows might encounter) as the entire process of installing AC is done automatically when Warden is installed.
Configuring DNS resolution on Linux
The Linux installation is quite simple. All we need to do is install something and edit just one file. This service might already be installed on your Linux PC, but I’ve assumed it’s not. Follow these steps:
- Install
resolvconfusing the following command:sudo apt update && sudo apt install resolvconf
- Once installed, edit the
/etc/resolvconf/resolv.conf.d/basefile and place the following content:search home net nameserver 127.0.0.1 nameserver 1.1.1.1 nameserver 1.0.0.1
You can also use Google IPs or the ones from Quad9. They were described in the Configuring DNS resolution on Windows part of this section.
- Restart the network manager:
sudo systemctl restart NetworkManager
With DNS set up, let’s proceed to configuring SSL.
SSL configuration
This section will cover how to make sure our browsers trust our local certificates, which were created by Warden during its installation. We don’t want to click the I trust this certificate option each time we start to work on a project, do we?
I won’t dive into the details of each operating system this time because of the following reasons:
- On macOS, SSL will work automatically. Warden adds the certificate to the user’s trust settings during installation.
- On Linux, the main certificate file is copied to a proper system location and should work automatically.
On Windows, we need to do the following:
- Find the main certificate file on your Linux WSL machine. In my case, the path was as follows:
\\wsl.localhost\Ubuntu-22.04\home\jakub\.warden\ssl\rootca\certs
- Create a copy of the
ca.cert.pemfile and name itca.cert. - Open the Control Panel area and find the Manage user certificates section.
- Expand the Trusted Root Certification Authorities section.
- Right-click on Certificates; under it, select All Tasks | Import.
- Locate the certificate file. You should see something similar to the following:

Figure 1.26 – Certificate file
- Open your Chrome browser. If you are using Firefox as your main browser, jump to the Possible issues with SSLs section.
- Go to one of the URLs listed earlier; I’ll use this one: https://mailhog.warden.test/.
- I am using Chrome, so this is what I can see:
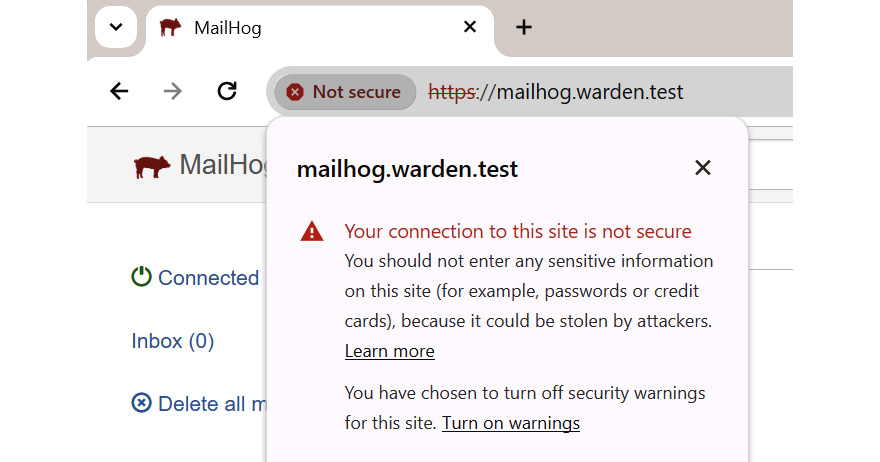
Figure 1.27 – Checking the status on Chrome
Let’s quickly explore some of the common issues that you might face while doing this.
Common issues with SSL certificates
It is possible that even though you have SSL configured on your local operating system, you might have to proceed with some extra steps to make your browser trust SSL certificates created by Warden.
For Firefox on all systems, navigate to Preference | Privacy & Security | View Certificates (bottom of the page) | Authorities | Import and select the same file we added on Windows:
\\wsl.localhost\Ubuntu-22.04\home\jakub\.warden\ssl\rootca\certs\ca.cert.pem
If you are on Linux/macOS, the file’s location will be as follows:
~/.warden/ssl/rootca/certs/ca.cert.pem
For Chrome on Linux, navigate to Chrome Settings | Privacy and Security | Manage Certificates (see more) | Authorities | Import and select the file.
Reload the page; you should no longer see a message stating that the SSL certificate is untrusted.
Alternatives to a functional local environment
In my opinion, environments based on Docker engines are the most efficient way to work. The biggest advantage of this is that, in the end, it does not matter what operating system you use – you can use the same tools.
Of course, there are other ways of setting up a local environment, so let’s try to summarize them in a few words:
- Bare-metal: In this approach, you configure everything on your local machine manually without using any virtual machines and containers. While some backend developers think that this is the best way to work in terms of performance, there are a few issues you might face:
- Errors when upgrading or changing the version of the database or scripting language. With Docker Engine, you simply specify a new machine and specify the version; in a bare-metal setup, you have to install everything manually, and it is not always possible to run multiple instances of ES (for example) on the same machine without some issues.
- Let’s say that you have taken on a project with a very outdated software and technology stack (AC/Magento 2 in version 2.1.x or, even worse, 2.0.x). If you keep your software up to date on your local machine, it might be hard to install the old version of the software required to run the platform. With Docker or a virtualized environment, this is not an issue.
- You might need to install additional services on the computer to match and run multiple domains for one store. Keep in mind that AC can run multiple stores with different domain names at the same time. In the “bare-metal” setup, you can either edit the
/etc/hosts(Linux/macOS) file and map the domains locally, or you can try installing tools such asdnsmasq, but it’s much more advanced than this. - In my opinion, the biggest issue with a bare-metal solution is the fact that multiple developers working on the same project might have different versions of the required services. This might cause conflicts or even break the code once it is pushed to the production environment.
- Vagrant: I’ll use a giant simplification again, but Vagrant is very similar to Docker-based environments. However, in my humble opinion, Vagrant is slower than Docker. Some backend developers might argue that Vagrant is a better solution, and they have very good points about it, but I’ve run into a lot of performance issues in the past and decided not to use Vagrant for my daily work.
If I were to describe the differences between these two options, I would summarize it like this: Vagrant is primarily used to create and manage virtual machines, while Docker is used to create and manage containerized applications. Vagrant is useful when you need a complete virtual machine with a specific operating system and software stack, while Docker is best when you need to deploy lightweight and portable applications or services.
Summary
I hope that you’ve followed my instructions precisely and your local machine is ready. I understand that this installation process might seem complex and unnecessary. However, I strongly believe that if you wish to work with Magento, you need to know a lot about the platform itself, and having a great set of tools to run it with might be a game-changer. Our workshop is now operational. Regardless of your operating system, your local forge is prepared and available. From my perspective, using Warden offers the most effective method to work with AC/Magento Open Source. In the next chapter, we will proceed with installing the platform.